Jump into Samuel’s intricate workflow as he navigates various sources and tools to create his magnificent sci-fi piece of art.
INTRODUCTION
Hi, I’m Samuel Pantze from Germany, and Blender has been my main creative outlet for the past five years. I studied mechatronics engineering, but then decided that I’d rather want to become a scientist, so I started a PhD in computer science in early 2023, where I now write VR software to analyze multidimensional microscopy images. It turns out that knowing how to use Blender proves quite helpful for my PhD project, allowing me to create quick 3D mock-ups, simulate datasets, or prototype shaders and lighting.
I took my first baby steps in Blender back in 2017 when I joined a group of hobby game developers I met online. They needed someone to do the texturing, so that’s what I learned first. Eventually, the irresistible pull of Blender led me to learn about its other features as well. Needless to say, that game we were working on never came to fruition, but since then I’m addicted to this glorious piece of open-source software.
INSPIRATION
I’ve always been a huge fan of everything related to sci-fi and space. My bookshelf is piling over with books from Arthur C. Clarke, Stanislaw Lem, Pierce Brown, John Scalzi, Dan Simmons, Isaac Asimov, and so on. Another source of inspiration is the videos from John D. Boswell, better known as Melodysheep. His ability to weave science, 3D art, and self-composed soundtracks into these masterfully crafted videos is truly unmatched. Lastly, I want to mention the beautiful concept art from Paul Chadeisson; he is incredibly skilled at conveying a sense of scale in his scenes.
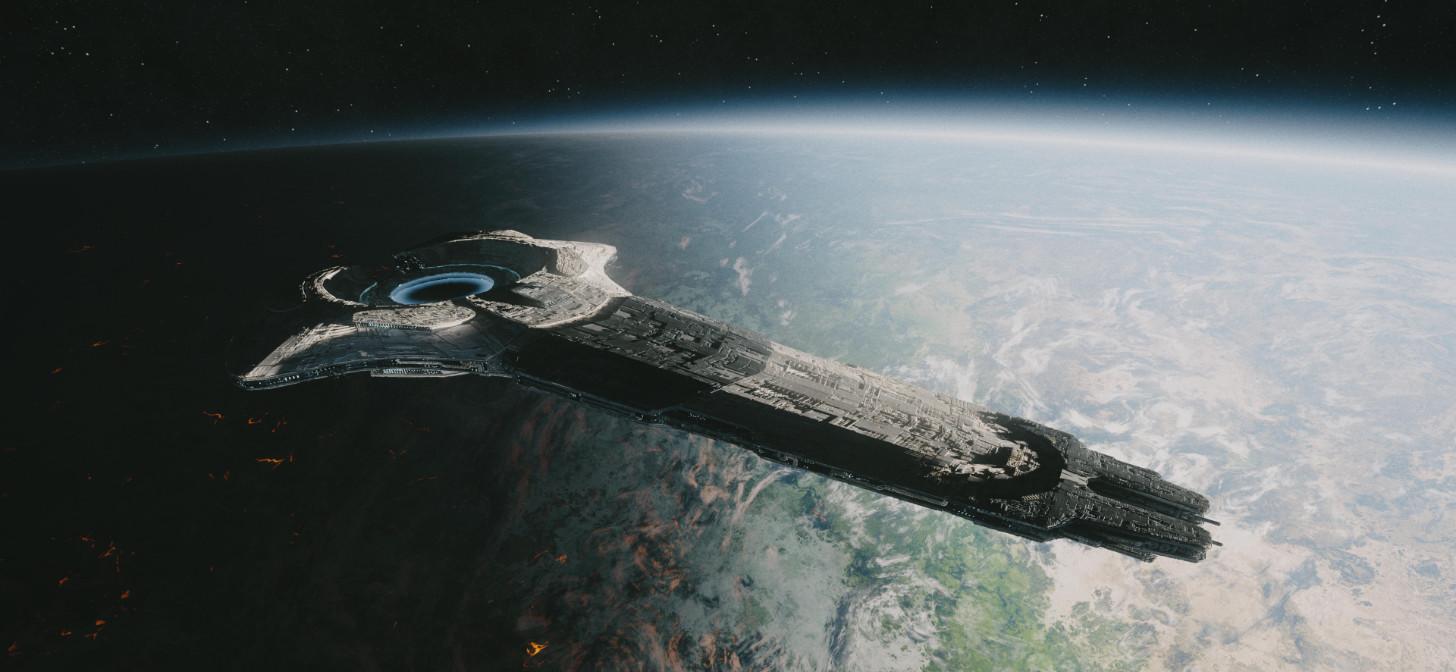
The idea for this particular project was sparked in March 2024 when the theme for the monthly render challenge on the Blender Discord server was announced as “Alien Worlds.” I’d watched both the TV show Foundation and the movie The Creator a few days earlier and knew I’d have to model a spaceship reminiscent of either the Foundation jumpships or the Nomad space station from The Creator.
But what world would be alien enough to satisfy the topic of the challenge? Thanks to one of Melodysheep’s videos, I was made familiar with the concept of tidally locked planets. These types of planets rotate around themselves at the same rate as their orbit around the Sun. As a result, the same side will always be facing the sun, causing it to heat up. The dark side of the planet will be equally hostile to life due to its freezing temperatures. But there may be planets that are habitable just around the twilight zone between searing heat and eternal darkness.
So, the goal was clear: I wanted to model a spaceship with a jump drive over a tidally locked planet. Now I just had to draw the rest of the owl…
PROCESS
My scene is made up of two major components: the spaceship and the planetary background. But before I dive into the intricacies of said background (spoiler: it’s all done with vector math), let’s focus on the boring part first: how to model a spaceship.
Spaceship: Modeling
Looking at other people’s spaceship models and having modeled a few myself before, I learned the following things:
- There is always a hierarchy of shapes: the very basic main shape of the ship comes first. Rough geometric details then break up the simple shape and add detail and functionality. Finer geometric details then help add a sense of scale (think tiny turrets or pipes to indicate a huge ship). And only after you have all these detail layers implemented should you start worrying about texture details.
- Be mindful of the detail density. There needs to be a visual balance between relatively flat surfaces (except for panel creases here and there) and highly structured or cluttered areas. On a spaceship hull, the flat areas can be thought of as shielding panels, and the detailed areas are where those panels reveal the underlying structure, made up of pipes, engines, docking ports, radiators, weapons, etc.
- Right angles or even sharper angles are illegal; instead, break the edges with a bevel or use a subdivision surface modifier.
- Focus on the areas where light and shadow meet. That’s where you want to break up edges that are too clean to create a more interesting shadow terminator. In areas with less visual weight, you can be a bit sloppier.
- Rule of thumb: If your model looks detailed without applying any textures, you’re good.
I love the Random Flow addon for adding fine details, especially for dividing a large area into smaller panels. I also rely on the good old JSplacement textures to use as hull textures and to use as mesh displacement for the ultra-fine details:
Since these textures all have more or less orthogonal details, it’s important to not stretch them too much when mapping them onto your model. That’s why I put special attention on having a good quad flow in my base mesh.
I started out by brainstorming where to put the jump drive. I wanted it to be a huge ring, similar to the jumpships from Foundation, but also not a downright copy of their stand-up design. I decided to put the drive at the rear of the ship and then model the ship around it with a very rough shape using a simple subdivision surface modifier. To speed things up, I only modeled a quarter of the ship and mirrored it both horizontally and vertically. This worked well because the whole ship has a very flat design.
After applying that modifier, I ended up with a pretty good quad flow already. I then added another subdivision surface modifier to add details and refine the flow of the smooth surfaces. I broke the smoothness here and there with sharp edges to create contrasting surface features.
Now that I had the basic shape and rough details fleshed out, I went on to add smaller details. I modeled the rear of the ship with some space for conventional engines in mind; how else would our ship be able to travel within the star system? After playing around with rotational symmetry for a bit, I found the conical shape that I had imagined, and the array modifier took care of the rest:
Once that was done, I moved on to shielding the ship from radiation with my trusty friend, the Random Flow addon. I selected individual islands from the main mesh and played around with the random panel generator. To do this, I had to make a copy of the base mesh first and apply the subdivision modifier so that the generator had sufficient underlying mesh resolution to work with.
Next up: adding detail to the sides. First, I scattered random cubes along the sides with, you guessed it, Random Flow:
To add more interest to the sides, I added pipes, arrayed shapes (radiators?), spherical shapes (docking ports?), guns, structural elements, and other random doodads. The sides were supposed to show the inner workings of the ship, after all.
Spaceship: Textures
With all the geometry in place, it was time to move on to the materials. I mentioned JSplacement textures above; for those unfamiliar with JSplacement, it used to be a freeware for generating tiled textures by randomly splatting rectangles and other shapes over another. Very handy for adding color detail to surfaces or using displacement maps. The software is no longer available for download, but you can achieve similar effects with the free web-based Displacement X tool or by using the SciFi Flex addon.
I mixed some of these textures together, added slight color variations and roughness details with random noise, and then used the ambient occlusion node to add dirt build-up in the nooks and crannies. I duplicated this material and created a darker variant of it to create alterations on the hull. For the sides, I chose a different type of JSplacement texture that consisted mainly of arrayed spots and turned it into tiny emissive window lights.
The glow of the jump drive was created by simply putting a gradient texture on a plane and mixing in a warped noise texture for details.
Since the sunlight hit the top of the hull at a very flat angle, I felt that it could use a bit more geometric detail that casts shadow. So I upped the subdivision levels of the hull and added mesh displacement to the materials. The result is not perfect, but it was sufficient for my use case.
This concludes the boring spaceship part. Let’s move on to the shader magic.
The Planet Background
The problem with planets is that they’re pretty big, at least compared to spaceships. Earth has a diameter of a bit over 12,700 km, and the largest human-built vessel is a cruise ship with around 0.36 km in length (the ISS is only a meager 109 m). Even if we assume our spaceship to be 1 km in length, we’d have to fit an object over ten thousand times that size into the same scene. So what most people do is simply create a sphere that looks big enough, place it somewhere in the distance, apply either a procedural texture or a planet texture they found online, and then add volumetrics to create an atmosphere and clouds.
This approach usually works well, but it has a couple of caveats. First: scale. This is less important when rendering still images, but when animating, parallax from planets that are too small can quickly make the scene look unrealistic. And second: volumetrics. While they do provide accurate light modeling of the atmosphere, they’re quite slow to compute, and especially when you get close to the planet, it really takes forever to render good volumetric clouds (because it requires a small volume step size). Not even talking about rendering animations at this point; and not everyone owns an RTX 4090.
For these reasons I had the idea of an alternative approach: why not use shader math to create a planet in the world shader? This would solve the scaling problem (the HDRI is always infinitely far away), and it wouldn’t require volumetrics at all. We’d also get global illumination from it for free, even in Eevee. The downside: all volumetric effects would have to be modelled manually. But I have always been a fan of challenges, so I gave it a try anyway.
Since my goal was to create a scene close to the atmosphere, I started out by finding a coordinate system transformation that would turn the spherical mapping of the world shader into something resembling a flat surface in perspective.
This is what the coordinate system looks like by default:
And after a simple transform, it looks something like this:
After masking out the top half and moving it a bit downwards, I slowly started to get the effect I wanted:
(Disclaimer: The math here does not correspond to what actually happens when you project a sphere in perspective onto a plane. The goal was simply to make it look plausible. I recently picked up the node graph for this shader again and started implementing a more accurate way of projecting spheres onto planes.)
The falloff didn’t feel right yet, so I played around with different power values until I got something closer to what I had in mind:
Next, I created a shadow gradient (not with gradient textures but by using the texture coordinates themselves by running them through power functions):
This gradient would prove useful in two ways: first, I could use it for the actual shadow, and second, I could use it as a mix factor for the terrain, allowing me to go from a scorching dry terrain over a lush green zone to an icy blue terrain. (Actually, the mask is also useful for modelling other effects like Rayleigh scattering and the sunset glow of clouds).
I mixed a few existing procedural planet textures I’d created for an earlier project and ended up with a terrain like this:
To create the outer atmosphere, I used the Z texture coordinate and ran it through an exponential falloff:
In a similar fashion, I created a falloff mask for the inner atmospheric layer:
For the clouds, I also used existing procedural cloud patterns and mixed them together.
I packaged both the terrain and cloud setup into their own groups so I could reuse them anywhere in the node graph. To create the cloud shadows, I simply had to duplicate the cloud group and move its coordinates a bit to one side. It turned out that the bump node didn’t work in generated coordinate space in the world shader, so I wrote my own (probably highly inefficient) bump mapping, which I then used to give depth to the clouds and to color them with a sunset glow:
After combining all the effects together and sprinkling a few small extras on top (like glowing lava cracks on the shadow side and a procedural starfield), I ended up with this planet:
In the process, I created this monstrosity of a node graph (which is only the topmost hierarchy; it only covers coordinate conversion, mixing the different textures together, and creating the atmospheric effect):
Or in other words
On the flip side, everything has a parameter and it’s quite easy to tweak the look of the final HDRI:
Post-processing
I used the Flared addon to create subtle lens flares for some of the renders. The rest of the post-processing was done in Affinity Photo, which is my editing program of choice nowadays.
The raw TIF render looked like this:
After applying a bit of a bloom effect, a LUT, some curve corrections, and a subtle grade, I ended up with the final images below!
RENDER: Alien Worlds – Jumpship over a tidally locked planet
And that’s how I modelled a jumpship and created a fever dream of a node graph. I hope I gave you a good overview of my workflow and look forward to your thoughts and feedback!
About the Artist
Samuel Pantze is a Blender hobbyist focused on proceduralism, generative art, and sci-fi. He works as a computer scientist in training and sells procedural Blender tools on Blender Market.
