Dive deep into the passionate mind of Stan, a Belarusian 3D artist, exploring the intricacies of this architectural masterpiece.
INTRODUCTION
Hi, I’m Stan (Stanislaw) Kazimiraw, a freelance 3D-artist originating from Zhodino, Belarus, and specializing in CAD and SubDiv modeling.
I started my journey in 3D many years ago when XSI|Softimage and AutoCAD were in their prime, driven by a passion for creating architectural buildings and a fascination with bringing concepts to life.
From a young age, I was captivated by the interplay of light and space in paintings and structures, which inspired me to dive deep into the world of 3D modeling and visualization.
Initially, I began exploring basic modeling techniques and gradually progressed to more complex projects, learning various software tools (ZBrush, Substance Designer, Substance Painter) along the way.
I primarily use Blender and Maya for my projects, ensuring high quality and efficient results.
INSPIRATION
When I was a child, I could spend hours observing and researching paintings of the Old Masters in order to understand how they play with shapes, light, and colors. Thanks to my mother who was a designer and had a lot of books about design, architecture, anatomy, and art at all. It was a period of time when you could get information only from TV, VHS, or books (dark old days with no Internet).
I was especially interested in the paintings of old Dutch and German architecture. Such artists as Salomon Rombouts, Barend and Willem Koekkoek, Andreas Schelfhout, Charles Leickert, Adrianus Eversen, Frederik Roosdorp, and of course, “the Great” Cornelis Springer inspire me the most. Among the books, I want to highlight “The Pillars of the Earth” by Ken Follett. I read it many years ago, and it left a lasting impression on me. And, of course, I have seen many TV shows and anime set in the medieval era.
So, after Blender 2.93 was released and introduced so many new features and improvements, I finally decided to learn it. In addition, the clients I was working with wanted to integrate Blender into their pipeline.
The only thing I did in Blender before was convert (for modding) a 3D character from the “Dynasty Warriors 9” game into “fbx” format for rigging and animation in Maya and Unreal Engine 4.
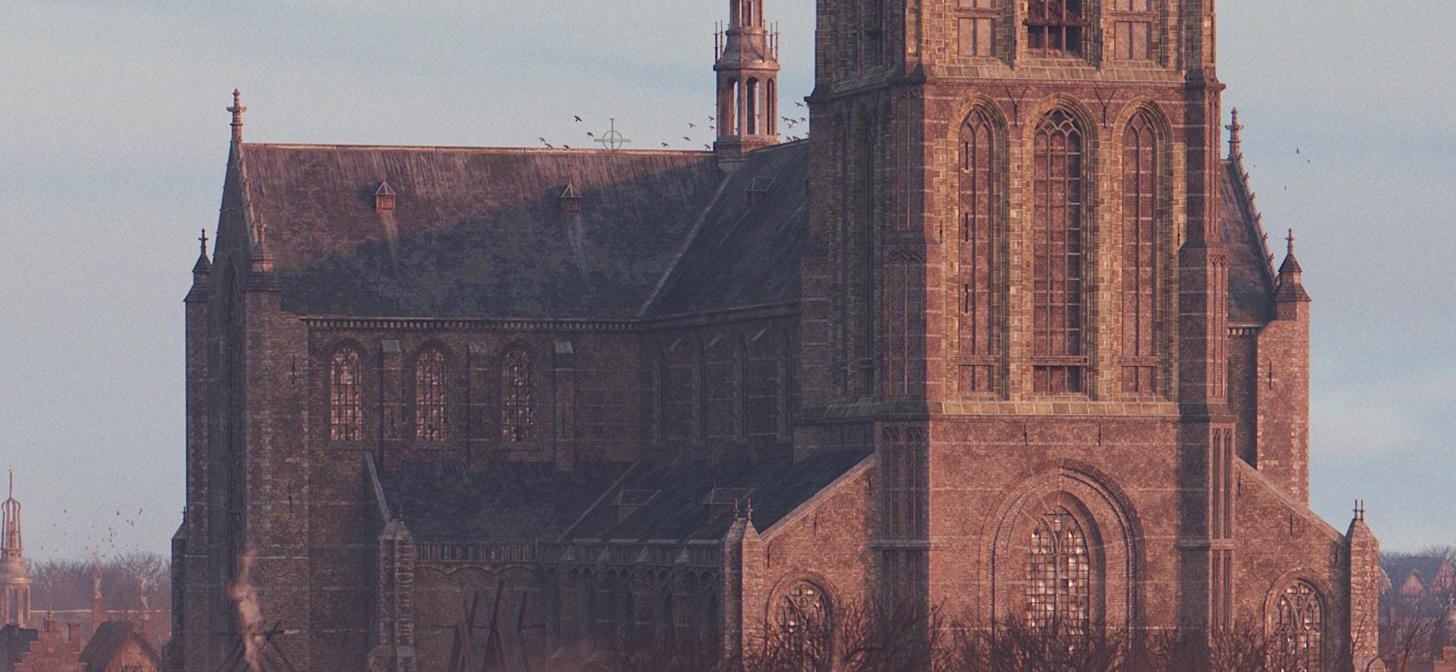
The best way to learn new 3D software for me is to create a couple of scenes from scratch using only this software. As a big fan of Gothic medieval architecture, I decided to create a medieval scene with a huge cathedral as the main hero prop.
PROCESS
Software:
- Blender with no add-ons (modeling, texturing, rendering, compositing)
- Substance Designer (Bitmap2MaterialLight node for converting textures into material; creating masks, dirt, soil, etc.)
- Substance Painter (mixing and recreating some materials from textures)
- Photoshop (masks, diffuse texture creation, tiling)
Pipeline:
- Traditional or Standard (diffuse, normal, specular maps)
Textures:
- 256, 512, 1024 px
References
When the idea was fully formed in my mind, I began searching for references.
The Grote of Sint-Laurenskerk (St. Lawrence Church) in Rotterdam served as the basis for my design, using its original plans and structural elements for guidance—width, length, and height. I made some adjustments to the aisles to simplify them in this version.
For the medieval houses, I drew inspiration from photographs taken by my mother during her visit to the Netherlands and Internet photos of the Archeon Museum Park, where some of the best-preserved medieval houses can be found.
Scene Disassembly Overview
The scene consist of the next elements:
- skydome (sphere 6 km in diameter)
- ground (simple plane, 3 km x 2 km)
- sun (position on the eye on January 15, 1480 year, 16:00 in Rotterdam, with azimuth ~232.5 deg and elevation ~9 deg)
- global atmosphere (simple emission shader)
- smoke and fog (created in Blender physics and rendered into textures)
- medieval houses (kitbash that was created in Blender)
- medieval cathedral (modeled and textured in Blender)
- scaffolds and wooden beams (modeled in Blender, part of the “medieval houses” kitbash)
- trees (modeled and textured in Blender, then rendered into texture)
- birds (simple textures with bump maps)
Modeling Stage
All assets were modeled from scratch in Blender according to real-world scales. Firstly, I modeled a small kitbash of medieval houses and then a medieval cathedral. Trees were modeled using Skin Modifier and baked into transparent textures.
I prefer to keep the number of polygons as small as possible to ensure better performance and faster rendering times. To achieve this, I like to create base meshes with minimal detail and rely on texture maps to add depth and detail. This allows the models to be lightweight while still appearing visually rich.
Also, I like to design “modular assets” that can be reused in different contexts (facades, walls, roofs, doors), which reduces the need to create multiple unique models for similar objects. This also streamlines my workflow.
By focusing on these strategies, I can strike a balance between aesthetics and performance, making my projects more suitable for a range of situations.
Texturing and Shading Stage
At that moment, the Shader Editor was the most interesting and intriguing part of Blender for me. Having previously worked with the Octane node editor in Cinema 4D, I was pleasantly surprised to find that they were quite similar, which made it easy for me to adapt to the Shader Editor.
Substance Designer (Bitmap2MaterialLight node) was utilized to convert some of the textures into standard pipeline maps (Diffuse, Normal, Specular).
Most of the textures I mixed in Substance Painter or Photoshop and then converted simple colored textures into specific textures via Substance Designer.
To simulate standard pipeline behavior, I combined the diffuse BSDF and glossy BSDF shaders, using the specular map as a mask.
I created most of the materials in the shader editor, by blending procedural textures (Musgrave, Noise, etc.) with diffuse or specular maps. For example, the Cathedral Tower features a total of 10 distinct materials.
To reduce repetition in texturing, I blended the Musgrave texture with the diffuse and specular maps, which introduced organic variation and depth to the materials.
Fog from chimneys, ground mist, and haze were initially generated using Blender’s fluid physics (fluid -> domain -> gas). However, I wasn’t satisfied with the results in terms of performance and shape, so I decided to bake the effects into black-and-white textures, which I then modified and combined using RGB channels.
Lighting and Atmosphere Stage
For lighting, I decided to use HDRI in combination with the position of the sun on January 15, 1480, at 16:00 in Rotterdam. Unfortunately, Blender does not support direct input of azimuth and elevation for the sun. I used a solar position calculator to determine the azimuth and elevation, and then I positioned (approximately on the eye) the light source into the angular diameter of the sun according to formulas.
The atmosphere was created using an emission shader instead of principled volume. This approach produces excellent results with minimal noise and improved performance.
I like to use skydomes in my projects because they effectively create immersive environments with a realistic sky and atmosphere. Additionally, skydomes provide flexibility in design, making it easy to simulate different times of day and weather conditions. This not only improves the visual appeal but also helps to set the mood for the scene.
Rendering and Compositing Stage
To render the image, I used Cycles with approximately 650 samples without denoising. Both denoisers, NLM and OptiX, produced washed-out results, so I opted not to use them. As a result, I increased the number of samples to 650 to achieve a cleaner image.
For post-processing, I utilized the Blender Compositor. This “powerful” (ha-ha!) tool allowed me to enhance the final image by adjusting colors, adding effects, and refining details seamlessly within the same software environment.
The words from the Future
This was my very first project in Blender, and at the time, I was unsure whether it was a good idea to learn the software. I found the compositor lacking for post-processing, which left me feeling frustrated. Additionally, I had numerous questions about the performance in large scenes, and render engines…
However, only in a month, when I was working on my third project in Blender, I realized the software had everything I needed. This revelation made Blender my primary tool for 3D work.
RENDER: Cathedral at the end of day
Thank you for reading! I hope this article helps you gain new and valuable insights. If you have any questions or feedback, feel free to share your thoughts. I’m looking forward to hearing from you!
About the Artist
Stan (Stanislaw) Kazimiraw is a freelance 3D artist, specializing in the creation of realistic and detailed models. He is currently working as a hard surface and environment 3D modeler for various clients from China and Japan.


