Introduction
Hi, my name is Flavia, and I’m a 3D Character Artist specializing in games. Most recently, I had the pleasure of contributing to Dead Island 2’s Neighborhood Watch DLC, a project developed at FISHLABS in collaboration with Dambuster Studios.
My journey in the game industry began over a decade ago with an internship that ignited my passion for 3D art. My focus on likeness and realism is inspired by artists I admire, such as Ian Spriggs or Georgian Avasilcutei.
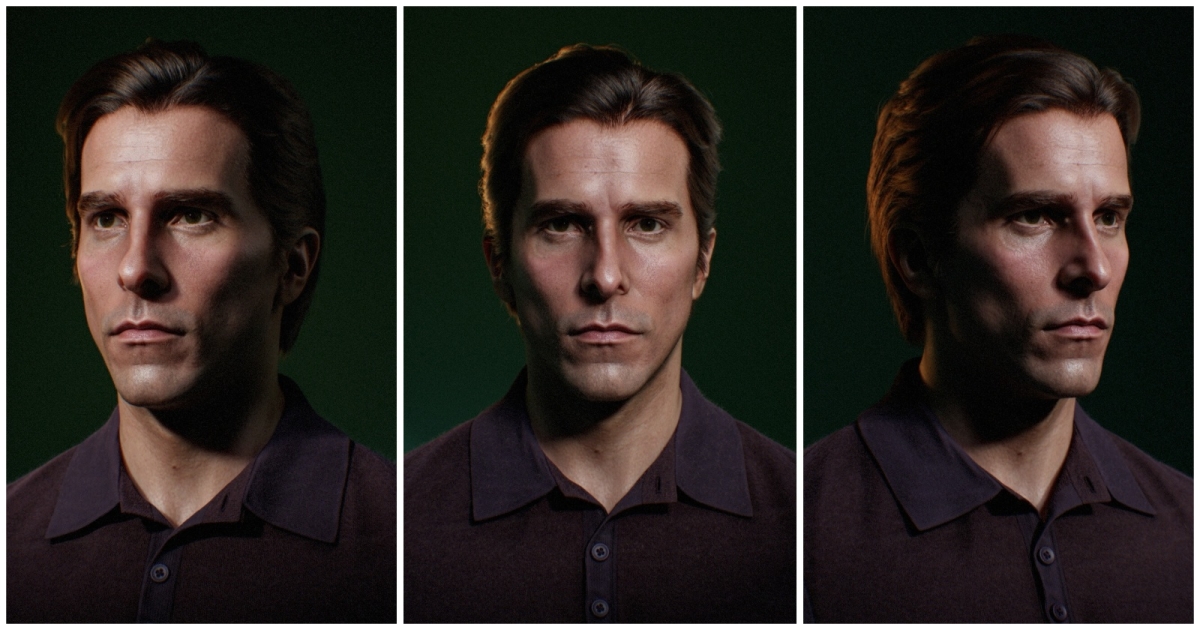
The Christian Bale Project
I was following a video series about traditional portrait sculpture by Amelia Rowcroft. I thought that Christian Bale’s face was an interesting case study to bring that knowledge into the digital space.
The release of the beta for Marmoset Toolbag 5 was another motivation to bring it further as they improved upon texturing and introduced groom hair rendering.
References
As many already know, the distance between the camera and the subject, along with focal length, affects facial distortion. To minimize this, I chose photos taken from a few meters away using a telephoto or zoom lens. Award ceremonies and red carpets provide excellent reference images.
Focal length is also an issue in ZBrush. The camera is not physical and uses a 2.5D method. On top of that, scene size in ZBrush is its own peculiar topic. The best practice is to import an object the size of a head and at the subject’s height to set the scene.
Sometimes, photos reveal information about the camera that was used, but most red carpets are shot with telephoto lenses 70-200 mm. Setting the focal lens to about 105 with a crop angle of 1.5 should approximate the perspective quite well in most cases. I also considered the vertical camera angle as it can create the illusion of varying ear heights due to the camera looking up or down instead of straight. The perfect front-facing photo should capture the face directly facing the camera, ensuring both ears are equally visible. The head should not be tilted up or down, aligning the ears with the eyebrows and the base of the nose.
The ideal profile-facing photo should align closely with the profile outline without the head turned. If an exact profile shot is unavailable, a slightly frontal angle is better for assessing depth.
I selected three key images, a frontal view, a profile view, and a three-quarters view, that were captured during the same occasion. These images served as my foundational references to understanding the main shapes of the face. Additionally, having references that emphasize secondary forms like prominent folds, bulges, and irregularities is beneficial. Detailed references showcasing tertiary forms such as fine wrinkles should be reserved for later stages of sculpting the likeness. Having references of the same type (e.g., front-facing) under various lighting conditions is advantageous as well since it provides us with more information about the shapes of the face, and in ZBrush, you can modify the lighting with a MatCap to match that reference.
Modeling
To build a strong foundation, I analyzed my references and followed a technique outlined in Amelia’s course Building Blocks, or – for people who prefer reading – the book Modeling a Likeness in Clay by Daisy Grubb. This method involves creating a diagram of the face with a grid based on facial landmarks. This approach helped me create a ground truth and align with my main reference.
To create the diagram, I located the center line of the face, measuring the distance between the tear ducts and marking the midpoint as the center line. Additional vertical lines are then drawn on both sides of the center line to determine the eye measurements from the inner eye/tear duct to the outer eye (not the lids but the sclera).
Then, various horizontal lines are added: on the height of the ear holes, the base of the nose, the center of the lips, the top of the eyebrows, and the bottom of the chin. These lines must align accurately with the profile photo, which you can easily do in Photoshop. The rulers and guides enable precise placement, allowing brushes or pens to snap to them effortlessly. To adjust the orientation of the profile photo, simply position the anchor at the center of the ear hole and rotate the face until the diagram’s lines align.
Research on craniofacial superimposition, which essentially explores how the face aligns with the skull, also uses a similar gridding system While not explicitly stated, this connection becomes evident with a solid understanding of facial anatomy.
The above images are extracted from The MEPROCS Project – Handbook on Craniofacial Superimposition (an open-access program funded by the European Union). With the exception of the lower part of the chin, where I traced the visible chin fat and muscles rather than the bone, all other lines are in perfect alignment.
The next step is measuring distances, typically done with a caliper. Since I didn’t have Christian Bale on hand, I used Photoshop’s Ruler Tool, which can be found under Image → Analysis → Ruler Tool. The three main reference photos need to be the same size, as the Ruler Tool measures in pixels. The distance from the ear holes indicates the visible width of the face, which is used to set ZBrush’s Transpose Tool units. Measuring that distance the transpose tool’s units can be configured in ZBrush.
After sculpting a rough blockout, I drew the legacy Transpose Tool on the blockout where the ear holes are meant to be and adjusted the Unit Scale under Preferences → Transpose Units to match the Photoshop measurement.
Referencing other measurements that can be derived from the diagram, I moved my blockout into shape. The Transpose Tool helped verify if I moved enough or too much. I used mostly the move and clay buildup brushes and kept everything low-density and symmetric until I got to a point where I wanted to sculpt more detail.
For this likeness, I started from a sphere as I didn’t want to get distracted by any pre-existing head proportions, but when I reached the moment where I wanted to sculpt the eyes and lips in more detail, I wrapped an existing topology using Wrap3D.
While the grid diagram was helpful during the blockout stage and for occasional checks, I primarily relied on my anatomy knowledge and observation. Sculpting a likeness is an iterative process, going from big to small shapes. Being comfortable with facial anatomy speeds things up. I regularly went back to tutorials to refresh my knowledge and discover new things to learn from.
There are many great resources out there to learn anatomy. If you can spend some money, I recommend Scott Eaton’s course on facial anatomy for some in-depth explanations, and Georgian Avasilcutei’s guide for sculpting faces and his facial anatomy tutorial for a more practical approach.
When I reached this stage, I saved my sculpt with a layer and added various noises on separate layers to build up skin details. Using ZBrush’s Surface Noise, I introduced random noise, then manually sculpted skin imperfections from my references, like veins under the right eye, moles, and fine wrinkles. For pore details, I used a 3D Scan Store texture. I wrapped their head topology to my sculpt, which allowed me to move the details exactly where I wanted them to be, using the color texture as a guide. Then, I rebaked all textures to the UVs of my head.
I blurred the displacement texture for soft noise and refined it further through sculpting. The last step is displacing the head with the small-scale displacement textures. The first layer was important because, going back and forth between renders, I still changed a lot. Every time I noticed that something looked off, I was able to adjust shapes without destroying my skin details.
Clothes
The reference for the shirt is from The Dark Knight movie. I adjusted a body base mesh to fit the body type and used Marvelous Designer to create the pattern and simulation for the shirt. I ZRemeshed the shirt parts and reprojected them on the mesh from Marvelous to preserve folds and irregularities. Then, I sculpted the shirt details in ZBrush, adding folds and details like buttons.
Topology
I used Maya’s Unfold3D UV editor, which has all the tools that I need. For the head, I used a base mesh with a good UV that I made some time ago. The UVs use more texel density on the main parts of the face and are symmetrical, which makes texturing easier.
I retopologized the shirt in Maya with a low density. This makes creating UVs much easier. Then I subdivided the mesh and reprojected it onto my high poly. The UVs of the shirt are laid out like the pattern so that I can use tileable textures without adjusting them to the model.
Texturing
I took the opportunity of this small project to texture in Marmoset Toolbag 5. It gave me instant feedback for values and colors which eliminated a lot of back and forth.
As mentioned before, I chose a scan texture as the base. I selected one that already matched pretty well in age and skin color, and I created simple base textures for the skin shader. For the latter, a detailed outline of the workflow can be watched in this video from the 3D Scan Store:
Once I set up the shader, I created a texture project and started adding filters to my stack, masking the areas that they should influence and adjusting colors according to my reference.
Then, I manually painted skin details like freckles, moles, and redness.
Rendering
In Marmoset Toolbag 5, I selected a studio HDRI and added a matching directional light. I went for something similar to Rembrandt lighting, which creates a signature triangle of light on one cheek where the shadows from the nose and cheekbone meet. I didn’t want it that dark and harsh, so I added a key light to lighten the eye area, a rim light on the left to create some silhouette with the hair, and a fill light on the right.
In the camera settings, I applied a slight film grain and chromatic aberration to give the renders an analog feel that I like. When rendering characters, I recommend starting with a minimal scene setup and making gradual adjustments. The less is more approach works well for lighting, letting a few lights create interesting shadows. Adding too many lights would have washed out the details of my sculpt.
Conclusion
This project took me about a month to complete. The part I enjoyed most was sculpting the likeness and going back to my resources to discover more details I might have missed before. Each project teaches me something new, so I’m constantly learning and improving my skills.
A lesson I learned is the balance between patience and decisiveness. While attention to detail is crucial, it’s also important to make decisions and stick with them. Choosing my main reference in the beginning was a big help in doing so. Recreating real-life people in 3D comes with a lot of complexities, especially if you have to rely on references found on the internet. Another thing is that capturing a likeness doesn’t end with the sculpt, and avoiding the uncanny valley, especially with neutral expressions, is more challenging than it seems.
For aspiring character artists, my advice is to focus on learning anatomy and observing real-world references. Take your time with each step, and don’t rush the process. Having one well-done project in your portfolio will sell your skills much better than three mediocre ones. Growth comes with every day that you open up your project and change something, not with how fast you complete a project.
