


Professional Honorary Organization
191 people like this
19 Posts
0 Photos
0 Videos
Share
Share this page
Visual Effects (VFX)
Recent Updates
-
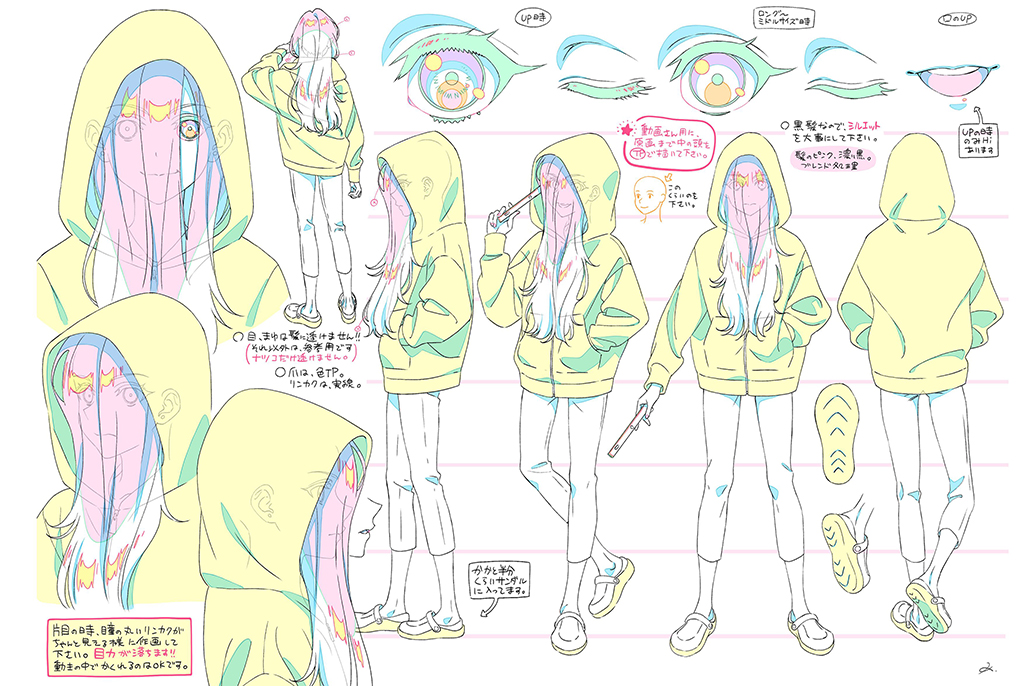 ZENSHU HONORS THE PAST AND FUTURE OF ANIMEvfxvoice.comBy TREVOR HOGGImages courtesy of MAPPA.In most cases, an anime project is based on an original manga, but MAPPA decided to take a different approach from Chainsaw Man and Hells Paradise: Jigokuraku and come up with their own IP called Zenshu. The title translates to redo everything, which is a term often used in the anime industry, and is appropriate given that the story revolves around wunderkind animator and director Natsuko Hirose struggling to meet expectations and deadlines for her latest production, only to find herself becoming a character within her favorite movie A Tale of Perishing. The instrument of magic is not a wand or a sword but a peg bar used to keep animation drawings aligned, which allows the protagonist, Natsuko Hirose, to literally bring her illustrations to life. The Isekai series, streaming on Crunchyroll, consists of 12 episodes and was created by Mitsue Yamazaki and Kimiko Ueno. The original character designs were by Yoshiteru Tsujino and subsequently adapted for animation by Kayoko Ishikawa, who has previously worked on Saraznmai,Aikatsui! and Uchitama?! doing everything from storyboards, prop and costume design, color coordination and direction.Key attributes of Natsuko Hirose are her hoodie, long black hair and big blue eyes.[The animation style] also expresses the trials and struggles, the sincerity and joy experienced by the new generation of creators as they try to shape the future of animation; that spirit itself is reflected in the animation style. At its core, I believe these feelings are something that can resonate across different countries, eras, races and professions.Kayoko Ishikawa, Character Designer & Chief Animation DirectorSince we already had Tsujino-sans original character concept design, I didnt feel there was that much freedom in designing the characters, states Kayoko Ishikawa, Character Designer and Chief Animation Director of Zenshu. Yamazaki-san requested designs that would feel in line with todays anime style, so I aimed for a manga-like look that wouldnt come across as too realistic. Colors were part of the design process for both the costumes and characters. I felt my experience [as a costume and character designer] helped me when I was thinking of the balance between colors and individual design elements. Especially with Natsukos hair, since its very dark, long black hair. If you dont create gaps to it when its flowing in the wind, the silhouette becomes too heavy, and it makes it look like a big, heavy, black mass. Also, the highlights on the hair stand out, so if they are placed in an unnatural way, it immediately feels off to the viewer. I had not worked on a project that required this much care when handling black hair, so it was a great learning experience.The design of Luke Braveheart is based on the classic strait-laced hero found in old-school video games.Being a chief animation director influenced the approach towards the character design. Id say its all about striking a balance between the visual appeal and how easy the characters are for animators to draw, Ishikawa notes. I felt that finding the right mix of relatability and sophistication in a design is quite difficult. I dont want the designs to turn out self-indulgent, but with so many internal conflicts, its something I really struggle with. During weekly script meetings, Mitsue Yamazaki and Kimiko Ueno discussed the story and characters. I gradually started to get a sense of what Yamazaki-san and Ueno-san wanted to do, and what they liked. Each week, I would create image boards and character sketches, and wed keep adjusting and aligning our visions little by little.All of the character designs were created using Adobe Photoshop, Clip Studio Paint and a Wacom pen display tablet. I chose this style because it allows me to easily create and adjust variations in colors and details, Ishikawa remarks. I used the same approach in Zenshu as well; however, since we aimed for an analogue feel for the scenes where characters drawn by Natsuko appear, I drew the characters that appear on these scenes on paper with pencils.Exploring the moment when the peg bar becomes activated enabling Natsuko Hirose to turn her ability to illustrate into a superpower.Certain things need to be kept in mind when designing characters. I focus on capturing each characters unique personality as well as organizing the details for both close-ups and long shots, Ishikawa explains.By capturing characters personality, I mean drawing expressions and poses that convey the characters traits clearly. Organizing details means adjusting the amount of visual information on the screen so the workload of the many different artists doesnt become excessively difficult. And also preventing lines from clustering so much that the characters form becomes unclear. For close-up shots, the character fills the screen, so I add detailed elements to enhance the visual appeal. For long shots, I simplify the designs by omitting fine details.Mitsue Yamazaki wanted modern-looking designs. I explored and adopted a stylized character design that would appeal to people in their 20s and 30s, Ishikawa explains. I researched trending illustrations, films and animations. Since the world that the heroine enters resembles a medieval European fantasy world, I took inspiration from films like The Three Musketeers and The Lord of the Rings. The animation style honors the pioneers of animation. It also expresses the trials and struggles, the sincerity and joy experienced by the new generation of creators as they try to shape the future of animation; that spirit itself is reflected in the animation style. At its core, I believe these feelings are something that can resonate across different countries, eras, races and professions.The peg bar used by animators to ensure that their animation papers stay aligned when drawing takes on the magical qualities of a wand inside the fantasy world of A Tale of Perishing.The child, teen and adult designs of Natsuko Hirose were driven by her character arc. The current Natsuko has a strong sense of self and speaks in a direct manner, so her stance is confident, Ishikawa states. Hands on her hips, feet firmly apart. While shes earnest, she also has a playful side, which is why Ive actively incorporated comical and quirky poses and facial expressions. In her childhood, theres an unrevealed backstory. Natsuko was raised by a single mother who worked long hours as a nurse and didnt have much time to spend with her. Because of this, Natsuko matured faster than other kids and often wore hand-me-down clothes from neighbors. By junior high, with stricter teachers around, she started paying more attention to her appearance by cutting her hair neatly and wearing a headband, but her assertive personality only grew stronger. In high school, she found a clear goal and lived with a laser focus on the shortest path to achieve it. You can clearly see the evolution of her character by lining up her designs and comparing how shes portrayed at each stage of her life.Its all about striking a balance between the visual appeal and how easy the characters are for animators to draw. I felt that finding the right mix of relatability and sophistication in a design is quite difficult. I dont want the designs to turn out self-indulgent, but with so many internal conflicts, its something I really struggle with.Kayoko Ishikawa, Character Designer & Chief Animation DirectorDetermining the directionality and shot design of a stopwatch, animation paper and drawing pencil swirling around in a fanciful manner.Often obscuring the entire face of Natsuko Hirose is her long black hair, which is character in its own right. I was taught that when people look at someone, the first thing they focus on is the eyes, Ishikawa remarks. So, I wondered how we can convey the characters emotions to the audience when the eyes are completely or almost completely hidden. Even if only one eye is visible, if the pupil is even slightly hidden, the emotions become difficult to read. I made guidelines for creating the animation. The pupils must never be completely hidden. Its okay if hair falls over them when the character is moving! Another guideline I had was that emotions should be conveyed through exaggerated reactions. At first, the audience was clearly confused because they couldnt read emotions from her face and therefore didnt understand what kind of a character Natsuko was. But that actually mirrored Natsukos own state; her attempt to hide her true feelings. As she gradually opened up, she transformed her bangs into a palm tree, put her hair up in a bun and hid her face again when she started feeling down. Natsukos hair turned out to be more expressive than I had imagined. Its rare to see a character whose hair carries so much emotional weight.A chair appears that propels Natsuko Hirose towards a desk where all of the required tools to animate are culminating.Audience members have preconceived notions as to what unicorns, dragons and elves should look like despite never ever actually seeing one in real life. Im used to drawing ordinary humans, but when it comes to animals or dragons, I find them harder to draw, Ishikawa admits. Since many animators will be involved in drawing these characters, I aimed to make them easier to animate by giving them human-like proportions and clothing, and by keeping the designs simple while still aiming to create characters with the kind of cuteness that Tsujino-sans characters have. Justice is the former dragon member of the Nine Soldiers who has been grounded by a damaged wing and has become a drunk. Since the character is androgynous, I was careful not to lean too much toward either masculinity or femininity in the design. Justice has an exclusive, slightly melancholic kind of sexiness, but they also have an earnest personality and are loyal to their friends, so I tried to capture that contrast in their gestures and expressions. This was the most challenging character to work on. It took me a long time to grasp the three-dimensional structure of Justice and figure out how best to draw them.Luke Braveheart is the tragic male lead of A Tale of Perishing and the first love of Natsuko Hirose. The design of Luke Braveheart is based on the classic strait-laced hero that Tsujino-san drew, one that youd see in an old-school video game, Ishikawa states. He stands tall and serious with a strong and dignified presence. At the same time, Luke also has age-appropriate cuteness and sexiness that shows in the way he panics and fumbles after suddenly falling in love for the first time. I included little details like loose strands of hair, well-defined muscles and a smile thats both cute and cool. I also gave him expressions that would make Natsukos heart skip a beat. Memmelin is the Elven member of the Nine Soldiers. Although she looks like a child, shes actually the oldest member of the group, Ishikawa observes. Thats why her stance and facial expressions have a calm, mature confidence. For the Harvest Festival, she wears a sexy, grown-up mermaid-line dress. But, in the dance scene with the Ultimate Exister, they wear a floral dress covered in frills, the kind of outfit Memmelin probably dreams of wearing but would be too shy to choose herself.Conceptualizing the moment when Natsuko Hirose sits at her desk and creates illustrations that literally come to life.Key animation sketch of the unicorn character of Unio paired with a final still, which has a stuffed toy aesthetic.A highly-stylized approach was adopted for Memmelins unicorn colleague Unio. Tsujino-sans design was already great, so I pretty much kept it as it was. Yamazaki-san wanted the joints to be soft and floppy like a stuffed animal, so I made them soft and floppy. I also wanted to add unicorns fanciful charm, so when he runs through the sky a rainbow appears and when we zoom in on his eyes, you can see sparkling rainbow reflections. The robot design for QJ remained close to the original one as well. Since I wanted him to have a bit more of a mascot-like feel, I made him look slightly cuter. For the Harvest Festival, his outfit is inspired by Jomon-period clothing decorated with natural stones and ropes for a dressed-up, festive look.Planning out what would become a signature image for the series.Sketching and animating the emotional turmoil that threatens to engulf Luke Braveheart.Memmelin finds herself falling in love with Ultimate Exister, who is one of the living illustrations created by Natsuko Hirose.Treated as character as in its own right is the long black hair of Natsuko Hirose that often obscures her face.Although Memmelin looks like a child, she is actually the oldest member of the group, which is why her stance and facial expressions have a calm, mature confidence.The robot design for QJ remained close to the original, which gave him a mascot look.Often hidden behind the long black hair are the big beautiful blue eyes of Natsuko Hirose.Going through a major physical transformation is Destiny Heartwarming, the daughter of the mayor of The Last Town. I built on Tsujino-sans original concept adding plump curves, pouty lips and big, droopy eyes, Ishikawa describes. I packed her to the brim with both cuteness and sexiness. For the muscular version, I wanted it to also have grace, so I aimed for something between a bodybuilder and a pro wrestler. Even with all the muscles, her pose keeps a distinctly feminine touch. The heroine of Zenshu went through the most iterations. Natsuko originally had short hair, but partway through the project, both the story and her character took a major turn; she turned into a Natsuko straight out of Japanese horror. The design with long hair covering her face added a sense of mystery, not only deepening her character, but also expanding the range of the story. Both her personality and appearance ended up with a much greater variety. A significant aspect in finding the correct character design involves adjusting facial features and trying different color variations. Its sometimes hard to keep working when nothing feels quite right, but when everything finally comes together and I get the feeling of This is it! I feel joy that nothing else can compare to. I also really enjoyed working on the many comical characters.0 Comments ·0 SharesPlease log in to like, share and comment!
 -
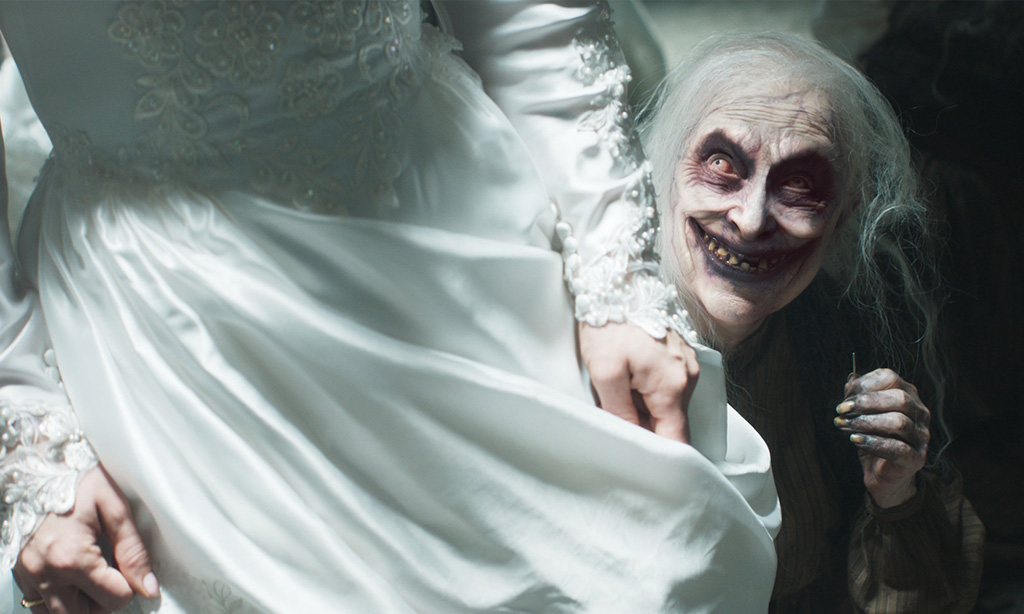 DIGITAL DOMAIN DELIVERS THE DEVIL IN THE DETAILS FOR THE CONJURING: LAST RITESvfxvoice.comBy TREVOR HOGGImages courtesy of Digital Domain and Warner Bros. Pictures.Bringing the paranormal investigative stories of the Ed and Lorraine Warren full circle is the haunting that started everything reemerging in The Conjuring: Last Rites under the direction of Michael Chaves and starring Vera Farmiga, Patrick Wilson, Mia Thomlinson and Ben Hardy. Brought on to heighten the supernatural horror was Scott Edelstein, who served as Production Visual Effects Supervisor and hired his colleagues at Digital Domain to create 425 shots that feature making the 12-foot tall Annabelle doll, crafting a disturbing smile for Abigail Arnold, producing the haunted Conjuring Mirror, destroying a hallway, and recreating the small mill-town setting. I know Scott, so in that sense it made things a lot easier and more comfortable from the get-go because you know who youre talking to and how to interpret the things he says, Alex Millet, Visual Effects Supervisor at Digital Domain. The first step was to try to not get scared watching the previous movies and absorb as much of that look, aesthetic and atmosphere, and to respect that in the new movie. An effort was made to upgrade effects while also honoring what had already been established. Were choosing to do it in 3D for this movie, and theres a lot of things that dont work anymore. But we found that we were able to recreate the 2D look with our 3D approach.Conveying a disturbing smile for Abigail Arnold was a fine line between being creepy or silly.The first step was to try to not get scared watching the previous movies and absorb as much of that look, aesthetic and atmosphere, and to respect that in the new movie.Alex Millet, Visual Effects Supervisor, Digital DomainRaising the level of difficulty for the environment work was a long oner. There was one plate in the street with the character coming out of the car. The camera zooms out and starts to fly above the house, looks around in the street, then comes back down, bursts through the door, and once we get into the house, we get into the next plate photography of the actress in there, Millet explains. The way we decided to work with this was to rebuild the entire street in CG because we found that was easier for us than trying to transition the plate street with our street and having to have every single detail of the street perfectly match one-to-one. We kept the car and character from the plate. As the camera pulls back, we transition toward the CG car and the digital double of the actor. Then were into a full CG version of the shot. We go up to the house, and most of the street is actually 3D because everything needed to work with parallax. Only the far background extension was a matte painting. Then we crash down. Were still full CG. We have rain and atmosphere. All of that is CG. We crash through the door, and once the door opens, we have a few frames of CG inside the house to help us with the transition. After that, were back to the plate.The supernatural aspect of the Annabelle doll becoming 12 feet tall gave Digital Domain the freedom to do whatever looked best without necessarily having to be confined to reality.Going into the realm of the supernatural and hallucinations is the appearance of 12-foot-tall version of the Annabelle doll. Theres a lot of things we started to think about like, what does the dress look like when its 12 feet tall? Is it a much thicker material? Do the wrinkles work differently because the material is that big, or is the material the same thickness but way bigger and looks like a curtain? The supernatural aspect of it gave us the freedom to do whatever we thought looked best without necessarily having to be like, This is what it would be like if you build a dress that was 12 feet tall, and it might not look super great, but thats actually how it would work and react. We didnt have to worry too much about that, and we were able to do what everyone thought was the best look. The transformation went through several iterations. The director wanted the doll to read as if the transformation was a painful process that evolved across the shots. He worked with the postvis department to figure out the timing, and then we took over. Once the animation started, we added that chunkiness you see in the growth.The hallway was modeled with the destruction in mind.Conveying a disturbing smile for Abigail Arnold was a fine line between being creepy or silly. We did a bunch of iterations to find the smile that worked the best, Millet remarks. We had some versions where it was definitely not creepy. It would make you laugh as soon as you see it. It was a combination of not just the mouth, but the look in the eyes and the way all of the little muscles in the face move. Everyone is an expert because we all look at faces every day, so its a much less forgiving thing to do than pretty much any other aspect of what we do in visual effects. Michael Chaves did concept art to illustrate what he wanted. That was incredibly helpful, because we had an exact target to match. The goal for us was to try to match his concept and give it life. The smile was exaggerated then rolled back. We did a bunch of iterations with a different range and smile, but all going much further than what we knew was needed. That helped us not to baby-step the process because the last thing you want is, Oh, a little bit more. And you spend weeks doing that. We went way out in terms of how wide that smile was and showed all of those versions. Once the director was happy with one of them, we actually selected a range to give us an idea of what to work within, and then we made that range as good as we could.[Director Michael Chaves concept art] was incredibly helpful, because we had an exact target to match. The goal for us was to try to match his concept and give it life.Alex Millet, Visual Effects Supervisor, Digital DomainA signature terrifying prop for the franchise is the Conjuring Mirror.A signature terrifying prop for the franchise is the Conjuring Mirror. The work for us was adding the crack in the mirror throughout a lot of different sequences in the movie, Millet explains. First, it was establishing the look of that crack and getting it to read the same across the various shots. The thing with the crack was that in some shots, its going to look awesome and perfect, but in a different lighting condition you dont get the same highlights and, incidentally, the shape feels different even though its the same. The sequence in the hallway was a whole different thing. We had to completely rebuild the mirror in CG so we could animate it. On set, they tried to avoid any reflection problems, but with a big mirror you cant avoid it. There were a bunch of shots where we had to get rid of reflections showing the part of the set that wasnt built or crew members or a giant camera rig. The work for us was to rebuild the entire hallway CG so we could take over any reflection and rebuild any reflection that we needed to do. The hallway gets destroyed. We built the entire hallway then animated the CG mirror. Something we didnt expect was the mirror on set was shorter than the actual mirror we needed to build, so getting the mirror to reach everywhere in the walls was a fun challenge for animation and effects. Once that was figured out, we added some extra geometry behind the walls and under the floor because when we destroy everything, we will see stuff there. Then we moved forward with our effects destruction, so there were different layers of drywall, studs, installation and smoke. That was cool.The factory had to be seen in every shot that takes place in the mill town.A LEGO approach was adopted when constructing the various houses that populate a neighborhood.Set dressing, like wet asphalt and lights in the distance, provided the desired scope and mood for the nighttime shots.Practical houses were constructed, which helped ground the digital extensions.The crack in the Conjuring Mirror had to appear as if there was no point of impact.The Conjuring franchise is based on the exploits of paranormal investigators Ed and Lorraine Warren, portrayed by Patrick Wilson and Vera Farmiga.Construction of the small mill town was tackled as if it was a LEGO set. We wanted to build a house in such a way that floors, colors and roofs could be easily changed, Millet remarks. A lot of our houses were built in three layers: ground floor, first floor and roof. The houses were built in a modular way so we could quickly populate the street, create a layout, and show something that gives you a feel for the street versus iterating on different houses. Geography had to be kept in mind to avoid discontinuity. When the characters drive on the bridge we needed to make sure that it feels like theyre going in the right direction. We had to have the factory looming above the town at all times, so it had to be in such a place that we would always see it when were at street level and in those shots where we go up a little bit. The set dressing can be unlimited. We had birds, cars, every plant has wind in it, and digital people looking around. There are lot of things going on, and as soon as you have to do that, it immediately gets rid of any 2D or matte painting approach. You have to build and animate it. But we also didnt want to take away from the action in the plate. Millet concludes, Overall, this was a small project, but ambitious with the work that had to be done within the given timeline. It was a great project to work on, and the challenges were interesting.0 Comments ·0 Shares
 -
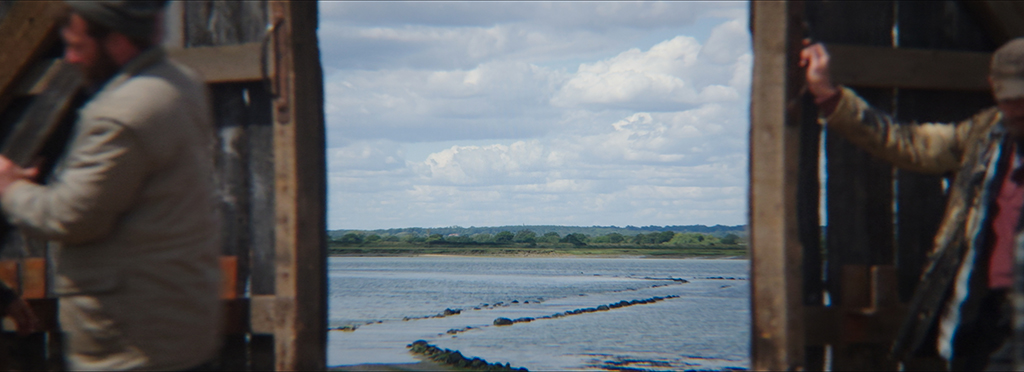 PART 2: UNION VFX CHANNELS CHAOS FOR 28 YEARS LATERvfxvoice.comBy TREVOR HOGGImages courtesy of Union VFX and Sony/Columbia Pictures.Partners in crime for over 23 years, filmmaker Danny Boyle, cinematographer Anthony Dod Mantle and Union VFX Co-Founder Adam Gascoyne have reunited for 28 Years Later, the third instalment of the zombie franchise established by Boyle and Alex Garland, which continues to explore the downward spiral of humanity as civilization gives way to primeval chaos. Danny and Anthony arent making traditional visual effects-driven films, notes Adam Gascoyne, Visual Effects Supervisor. Everything we do has to feel embedded in the photography, very much in the background. That means theres a huge amount of planning to give them the freedom to shoot organically and focus on performance, without visual effects interfering in that process.A significant landmark is the causeway that connects Holy Island to the mainland.The film is intimate, but it has moments of huge cinematic scope. Balancing those, especially across unconventional footage formats, was the real challenge. But its what made the project so creatively satisfying.Adam Gascoyne, Visual Effects SupervisorServing as points of reference were the first two films. We went back to 28 Days Later and 28 Weeks Later to study the aesthetic and mood, particularly how they handled realism and chaos, Gascoyne states. The first film especially had such a gritty, DIY sensibility that we wanted to retain, while expanding the scale. There were early conversations around continuity and where the story might go next, so we tried to lay groundwork visually without limiting future storytelling. Like the onscreen characters, Boyle is instinctual. Danny communicates in terms of emotion and rhythm. Hes very instinctual and might not say, I want a 3D fluid simulation here. But hell say, This needs to feel like a rupture. Or, Like a moment of beautiful violence. Its up to us to interpret that visually, and thats what makes working with him exciting. He gives you the room to be creative, as long as it stays true to the world. Holy Island (Lindisfarne) is a tidal island in Northumberland, England where the protagonists reside.Union VFX constructed the full tidal causeway in CG, including FX-driven water, mist, seaweed and bioluminescent interactions when characters stepped in.Arrows were all digital, including impacts and blood.The Happy Eater and Causeway sequences were heavily planned in the advance. We used previs for layout, timings, and to coordinate the choreography with stunts and practical effects, Gascoyne remarks. For complex effects sequences, like the gas explosion and tidal interaction, postvis helped evolve the final shots while working in parallel with the edit. Visual research was conducted for a variety of things. We referenced astrophotography by Dan Monk at Kielder Forest for the Causeways night sky, imagining what the world might look like without light pollution for 28 years. We also looked at bioluminescent sea creatures, real-world miasma gas, tidal erosion and disaster zone photography. For digital crowds, we studied riot footage and mass movement behavior to get a sense of uncontrolled chaos. The Causeway Chase was the most complex sequence to execute as it features 130 shots that are mostly fully CG.Complicating matters was the choice of camera. The iPhone shoot was one of the biggest technical curveballs, Gascoyne acknowledges. We had 20-camera and 10-camera iPhone rigs, some hand-held and some bar-mounted for bullet-time shots. Matching and syncing these in post meant solving issues around chroma subsampling, stabilisation artifacts, clipped highlights and unrecorded focus shifts. Creatively, we had to make a forgotten, devolved world believable. One where nature has reclaimed infrastructure and humanity has gone feral. But it still had to feel intimate and human. Streamlining the visual effects process was not having to divide the digital augmentation among multiple vendors. Union VFX, being sole vendor, helped maintain consistency and allowed us to work fluidly across teams in London and Montral. We built custom tools to handle iPhone media, matchmove multi-cam rigs, and simulate natural phenomena like water and gas. Our pipeline had to be nimble. We had over 950 shots across the film, many of them subtle, and some incredibly complex, Gascoyne says. Danny [Boyle, director] communicates in terms of emotion and rhythm. Hes very instinctual and might not say, I want a 3D fluid simulation here. But hell say, This needs to feel like a rupture. Or, Like a moment of beautiful violence. Its up to us to interpret that visually, and thats what makes working with him exciting. He gives you the room to be creative, as long as it stays true to the world.Adam Gascoyne, Visual Effects SupervisorThe world had to feel like it had been abandoned for decades, so Union VFX used procedural vegetation and overgrowth simulations to help show how nature had reclaimed space.Different stages of Inflected are encountered throughout 28 Years Later. We worked closely with prosthetics to build a multi-stage progression system, from early infection to full degeneration, Gascoyne states. Our role was to augment with subtle eye shifts, facial damage or infection bloom. We kept everything grounded, our job was never to overwrite their excellent work, but to push it further when needed. Impacting the creation of digital doubles was the prevailing nudity. There was little to no wardrobe or props to hide behind, so digital doubles had to stand up to full scrutiny, Gascoyne states. We developed anatomical shaders with nuanced textures for scars, grime and infection markers that blended cleanly with prosthetics. For crowds, we varied limb damage and posture stages to give a sense of physical deterioration without relying on costume coverage. The skies had to be reimagined for a world that has been without light pollution for 28 years.An important aspect of the environmental work was the overgrown vegetation. The world had to feel like it had been abandoned for decades, so we used procedural vegetation and overgrowth simulations to help show how nature had reclaimed space, Gascoyne describes. Sky replacements were frequent and important, particularly in sequences like the Causeway, where the fully CG aurora sky helped give a sense of time passing and nature expanding. The wildlife was expanded upon. We used digital deer, rats and occasional digital horses where safety or logistics prevented practical shots. The CG animals were integrated to feel completely part of the world. Pivotal to the narrative is the isthmus and the tide going in and out. Only a short water section was available on set, about 100 meters, but the script demanded something that felt 1.5 miles long. We built out the full tidal causeway in CG, including effects-driven water, mist, seaweed and bioluminescent interactions when characters stepped in. The waterline was animated based on real tidal cycle data, and the sky was a full CG aurora nebula with flocks of 10,000 murmuration birds. Visual effects worked closely with prosthetics to build a multi-stage progression system, from early Infection to full degeneration.The limited dynamic range of the iPhone 15 Pro Max meant that Union VFX had to match clipped whites and edge roll-off in their CG, especially in effects like explosions.Visual effects collaborated closely with stunts and special effects. From early prep, we were embedded in conversations with the stunt and special effects teams, Gascoyne explains. Our digital enhancements were always designed around what was captured practically, like blood impacts or interaction with the gas cloud. The bullet-time iPhone rig, used for capturing gore in motion, was developed collaboratively with grips, camera and effects teams to preserve performance while enhancing it digitally. Most of the principal photography was captured on location. Greenscreen was used only where absolutely necessary, like safety work or high-risk interactions. For instance, in gas cloud scenes or crowd extensions, we often worked from roto and grayscreen due to the iPhones limitations with color keying. The blood and gore had to feel real, not exploitative. Danny wanted it to hit emotionally, not gratuitously. For example, the CG arrows and their impacts were grounded in realistic physics, but enhanced to show how brutal and sudden violence can feel in that world. Many impacts were practical, but we helped extend the gore in edit or amplify the timing digitally. Prosthetic arrows were digitally extended.We referenced astrophotography by Dan Monk at Kielder Forest for the Causeways night sky, imagining what the world might look like without light pollution for 28 years. We also looked at bioluminescent sea creatures, real-world miasma gas, tidal erosion and disaster zone photography. For digital crowds, we studied riot footage and mass movement behavior to get a sense of uncontrolled chaos.Adam Gascoyne, Visual Effects SupervisorMixing formats from XL1s to GoPros is a trademark of Anthony Dod Mantle. With iPhones, stabilization artifacts were a concern, Gascoyne notes. We couldnt rely on built-in smoothing, so we disabled it and corrected it manually. The limited dynamic range meant that we had to match clipped whites and edge roll-off in our CG, especially in effects like explosions. Chroma subsampling [4:2:2] meant greenscreen was unreliable, so for larger studio setups we used grayscreen and leaned heavily on roto. Matchmove was complicated by the unrecorded zoom/focus data, but overall, the iPhone footage brought a raw immediacy that worked beautifully with the story.As the sole visual effects vendor, Union VFX was responsible for 950 shots, many of which were subtle and some incredibly complex.The Causeway Chase was the most complex sequence to execute. Its 130 shots long, most of which are fully CG. We had to build the entire environment, tidal water, bioluminescence, a vast CG sky and animate 10,000 birds. Everything had to interact rain, feet in water, light bouncing off surfaces. Its ambitious, but were incredibly proud of how it turned out. Maintaining realism while embracing scale was the biggest challenge. The film is intimate, but it has moments of huge cinematic scope, Gascoyne remarks. Balancing those, especially across unconventional footage formats, was the real challenge. But its what made the project so creatively satisfying. Gascoyne is looking forward to audience reaction to certain scenes. The Happy Eater sequence is a favorite. Its eerie, visually rich and emotionally intense. The CG gas and explosion were tricky, but they pay off. The Causeway Chase, too. Between the sky, the tide and the birds, its epic but grounded in emotion. The production was a unique experience for Gascoyne. Working on something that felt like both a return and a reinvention was incredibly rewarding. We hope the audience feels the grit and scale of this world and never notices most of what we did. Matching and syncing all the iPhones in post meant solving issues around chroma subsampling, stabilisation artifacts, clipped highlights and unrecorded focus shifts.Watch a dramatic VFX breakdown video from Union VFX that showcases the creative design work and depth of detail and that bring out all the horror in 28 Years Later.Click here: https://vimeo.com/1094786468?fl=pl&fe=vl0 Comments ·0 Shares
 -
 NEW TECH AND VFX ADVANCES SPARK COMMERCIALS AND SHORT-FORMvfxvoice.comBy CHRIS McGOWANDaredevil, Colossus and other Marvel characters in the Electric Theatre Coke commercial bridged high-end visual effects and classic comic book art.(Image courtesy of Coca-Cola and Marvel Comics)Its not just advances in traditional VFX software that are transforming advertising, its the rise of emerging technologies like generative AI that is reshaping the approach to short-form content creation, according to Piotr Karwas, VFX Supervisor at Digital Domain. From early stages like storyboarding, concept art and previs, to sometimes even contributing to the final image, this hybrid method of blending generative AI with classic VFX techniques marks an entirely new chapter in effects production, Karwas states. Real-time rendering with game engine technology is becoming an increasingly integral part of our VFX workflow. It plays a particularly significant role in previsualization and motion capture, enhancing both speed and creative flexibility.Karwas notes, Digital Domain has a remarkable history of producing high-impact visual effects for advertising and short-form content, consistently pushing the limits of what is achievable in the medium. Since its founding, the studio has delivered cinematic quality and compelling storytelling in commercials, collaborating with some of the industrys most visionary directors, including David Fincher, Mark Romanek, Michael Bay and Joe Pytka.Rodeo FX crafted 3D billboards in Times Square and Piccadilly Circus to advertise the survival-horror video game The Callisto Protocol. (Image courtesy of Rodeo FX and Striking Distance Studios)Whether its crafting hyper-real environments, photoreal digital humans or seamless compositing for global campaigns, Digital Domain has played a pivotal role in redefining audience expectations for brand storytelling, Karwas says. From Super Bowl commercials to global product launches, he comments, the studios ability to combine cutting-edge visual effects with engaging narratives has made it a preferred partner for major brands aiming to make a bold and immersive statement in a competitive advertising landscape.Visual effects and advanced digital technologies are transforming how brands engage with audiences, adds Karwas. This includes the growth of interactive and immersive advertising. He explains, Digital Domain is at the forefront of this change, utilizing its innovative digital human technology to create experiences that go beyond traditional media. A powerful example is The March 360, a real-time virtual reality experience that not only tells a story but also places viewers inside a pivotal moment in history. By authentically recreating the 1963 March on Washington and digitally resurrecting Dr. Martin Luther King Jr. to deliver his I Have a Dream speech, Digital Domain has shown how VFX can produce emotionally resonant and immersive content that is both historically significant and technologically innovative. This goes beyond mere advertising; it is experiential storytelling that blurs the line between reality and digital creation, engaging audiences on a deeply human level.Electric Theatre Collective demonstrated cutting-edge visual effects in Coca-Cola The Heroes, for which it won the Outstanding VFX in a Commercial prize at the 2025 VES Awards, as well as the best Lighting & Compositing award. Directed by Antoine Bardou-Jacquet, the project merged two iconic brands: Coca-Cola and Marvel. The visual effects and animation were integral to the storytelling. From the outset, the campaign needed three things: carefully designed interpretations of key Marvel characters, CG development and animation of those characters, and vibrant color grading, says Ryan Knowles, Electric Theatre Collective Creative Director.After some early engagement where we created some test animations for Antoine and the agency, GUT [Buenos Aires], we were brought in as a key creative partner for the campaign, comments Greg McKneally, CG VFX Supervisor at Electric Theatre. The brief for this project was to bring illustrated and sculpted Marvel heroes to life, seamlessly embedding them in the real world of a comic shop. We needed to tell a dramatic story while retaining a unique look for each character based on the medium they originated from: comic book, t-shirt or collectible. McKneally notes, With dynamic camera work and physical interactions, we decided the base of each character needed to be CGI. To maintain authenticity, we used traditional 2D animators, illustrators and painters throughout the process, adding hand-made elements into scenes. This approach allowed us to bridge the worlds of comic book art and high-end CGI, allowing for complex scenes in the physical world of the set, with a hand-crafted 2D feel.McKneally continues, Our primary software pipeline involves Maya for modeling, rigging and animation; Houdini for shading, scene assembly, lighting, FX simulation and rendering; and Nuke for compositing. Houdini, and a number of different custom tools built within it for the project, formed the backbone of the creation of the stylized character, including Paintify 2.0, which allowed us to create Daredevil as a moving water-color and pencil illustration.To achieve the look of Black Widow as a 2D illustrated character moving in three dimensions, Electric Theatre worked with a traditional comic book concept artist to develop a set of consistent illustrations. Knowles explains, These were used as a guide for the development of the CG character, and we also trained a bespoke machine learning model on this original concept art. This machine learning model was used to process and filter some of the CG renders of the character. It was a key ingredient in the recipe of the final look of Black Widow, which was crafted in compositing.Simple real-time rendering was used extensively in the previs phase of the project, during which we carefully mapped out each camera move and blocked out the animation for the scenes in Maya, McKneally says. We were able to rough out the placement of the lights and key shadow elements, as well as the characters themselves. To create the unique shading style of Juggernaut, we built a custom shading system which generated the shadows as geometry in the scene, meaning that the artists working in Houdini had a real-time preview that was very close to the final look of the character.For the Malaria Must Die TV spot campaign, Digital Domain utilized Charlatan technology to age David Beckham nearly 30 years to deliver a powerful speech and message. (Image courtesy of Malaria Must Die campaign and Digital Domain)Rodeo FX has delivered visual effects for commercials for many notable clients, including McDonalds. (Images courtesy of Rodeo FX and McDonalds)Electric Theatre brought Juggernaut and other Marvel superheroes to life in the real world of a comic-book shop, and Marvel together with Coca-Cola. (Image courtesy of Coca-Cola and Marvel Comics)The biggest challenge in this project was that each character required a different technical and creative approach, McKneally says. For example, while Colossus is a resin maquette and could use a more conventional CG approach, Juggernaut is inspired by 1980-1990s comics. He is a 3D animated character, but has a limited color palette and uses a bespoke shading system, hatch line geometry, mid-tone shadow mattes which reveal classic printed half-tone shading, and hand-painted 2D animated expressions. All of this was composited together with mis-printing filters, bleed, grain and irregular line work to achieve the final look. McKneally adds, Meanwhile, Captain America and the comic book city features custom toon shaded CG, hand-painted buildings carefully recreated and textured in CGI, hand-painted skies, a custom line-work system, 2D FX animation and crowd simulations.Daredevil was one of the most complex challenges. His entire look is an evolving water-color painting with pencil details, Knowles comments. The paint strokes that define his form had to feel 2D but still react in a realistic way to the lighting of the environment he was moving through. This was achieved in a combination of 3D lighting and an evolution of our bespoke 3D paint system in Houdini originally developed on Coca-Cola Masterpiece and then assembled and finessed in the hands of the compositors. According to McKneally, 3D animation and compositing tools are progressing at a rapid rate. This, combined with the incredible pace of development for machine learning tools, means that the tech landscape for visual effects in advertising is evolving at speed. At Electric, we have created a workflow that allows artists to harness the latest developments in image generation, animation, rendering and compositing, staying nimble and flexible enough to swap new tools into our workflow as the technical or creative demands evolve. Were finding many projects now benefit from a bespoke combination of traditional and emerging tools.Knowles observes, One of the biggest challenges we have seen comes from rapid AI image generation. Polished images generated by all parties agencies, clients, directors which help to sell a concept or idea, but risk shortcutting the creative development. Its a high level of finish in a very short time, but can often lack the nuance, depth and personality that multiple iterations in a traditional concept art development process can achieve. We strive to strike a balance. Knowles adds, To bring this nuance back into the fold, our creative team uses a mix of traditional design and animation workflows to iterate ideas and then engage custom machine learning workflows to add polish and variation. This allows for rounded creative development with the high level of finish now expected by agencies, directors and clients. As machine learning image and video generation becomes more and more available and quality improves having the ability to guide the artistry that underlies the final image becomes even more valuable for creating original, breathtaking work, McKneally explains.As an end-to-end production house, VFX is at the heart of what Alongside does, says Glen Taylor, Founder of Alongside Global. VFX is central to our efforts in the advertising industry, and this trend isnt slowing down. We use it all the time to drive storytelling, realism and creative innovation. From compositing and CG to AI-enhanced workflows, VFX helps shape our final output across our projects. We just created a new website for the healthcare company Calcium, where we built an asset in 3D. VFX spans mediums.The pace of change is intense in VFX software and tech and greatly affects advertising. New tools are released every day face swaps, language transcription and translation, and AI scene building, to name a few, Taylor says. Unreal Engine is already transforming how we work. It allows for live client feedback, instant changes and scalable outputs from AR and VR to social and film. Once we hit photorealism in real-time, it will become the core production tool. He adds, The challenge is knowing what to use and when. Were experimenting constantly, especially with AI-generated content thats licensing-safe and creatively sound. The goal isnt to replace creativity its to move faster and smarter.Deadpool enjoys popcorn and a Coke in the comic-book shop created by Electric Theatre. (Image courtesy of Coca-Cola and Marvel)Rodeo FX Ads & Experiences helped create the immersive event Stranger Things: The Experience, working with Netflix, Fever, Mycotoo and Liminal Space. (Image courtesy of Rodeo FX and Netflix)Rodeo FX worked on visual effects for Tiffany & Co. as part of the global About Love brand campaign. (Image courtesy of Rodeo FX and Tiffany & Co.)Rodeo FX has delivered visual effects for many advertising clients, including McDonalds, Nissan, Red Bull and Tiffany & Co. Ryan Stasyshyn, VFX Supervisor and head of the Toronto office for Rodeo FX, remarks, Content creation has become remarkably accessible, especially with the integration of AI. Simultaneously, our clients are increasingly seeking greater levels of collaboration throughout the creative process. Real-time rendering is coming into play in production and VFX for advertising. That said, I think its worth noting that real-time has a number of hurdles that need to be addressed before it becomes the mainstay of the industry. In regard to real-time rendering to output final frames in a traditional VFX approach, I believe the industry is at that point and, depending on the studio, is either there or going to be there shortly. As real-time rendering pertains to virtual production, I think its use has shown real promise but also a large barrier, with education of the users being the biggest hurdle. The technology is there, and the talent in the industry can certainly support it. I think we may have done ourselves a disservice by overhyping it a little too much out of the gate and sometimes setting unrealistic expectations.The Electric Theatre ad, uniting 2D and 3D animation with live-action in a comic-book shop, won VES awards given in 2025 for Outstanding VFX in a Commercial and Outstanding Lighting and Compositing in a Commercial. (Image courtesy of Coca-Cola and Marvel)The TIME magazine cover image of Dr. Martin Luther King Jr. was created using a historically accurate 3D rendering of King drawn from The March, a virtual reality experience that depicts the 1963 March on Washington. (Image courtesy of Digital Domain, Hank Willis Thomas and the Martin Luther King Jr. Estate)Erik Gagnon, VFX Supervisor and Flame artist for Rodeo FX, says, Rodeo FXs work in advertising is decisively oriented toward the future through the proactive integration of artificial intelligence into our creative process. This approach enables us to provide our clients with a highly personalized and innovative partnership, elevating their original concepts into stunning visuals and unique storytelling experiences. Advancements in VFX tools and technologies are profoundly transforming our approach to advertising. Today, we focus less on isolated software and more on comprehensive ecosystems of specialized tools, allowing us to push creative boundaries. These developments make our production pipelines more adaptive and supports artists in becoming increasingly versatile and agile.Gagnon continues, We are witnessing the rise of interactive and immersive advertising powered by VFX. Rodeo FX has crafted visually compelling experiences, such as 3D billboards in iconic locations like Times Square and Piccadilly Circus for The Callisto Protocol. Additionally, during the Cannes Film Festival, Rodeo FX Ads & Experiences created an ingenious activation for Stranger Things, captivating attendees and sparking their imaginations. The synergy between VFX, advertising, and experiential marketing represents an ideal combination to genuinely bring brands to life. By integrating cutting-edge visual effects into interactive environments, we engage audiences more deeply, stimulating their senses and creating memorable brand connections. This powerful blend not only elevates brand awareness but also ensures impactful and lasting impressions.Franck Lambertz, VFX Supervisor and head of Rodeo FXs Paris office, sees AI-powered image and video generation as an exciting new playground. He notes, While the technology is still developing and can be unstable, we see it as another valuable tool in our creative arsenal. It still requires passion and expertise to avoid clichs and elevate the final result. Our roles may become less technical and more focused on creative leadership. Lambertz continues, Increasingly, clients arrive with well-developed reference decks. Thanks to tools like Midjourney, some directors have already visualized their concepts. This makes the creative process more efficient and enables us to work together more effectively to finalize the vision. Lambertz adds, Sometimes, clients challenge us with real-time projects. Depending on the brief, we assemble the right pipeline and talent to deliver top-tier visuals. Recently, we completed a VR experience for a live event in Paris our first time producing a 7K, 60fps stereoscopic render, fully synchronized with fan and lighting effects. Watching the team immerse themselves in the experience with VR headsets and exchange feedback was a memorable moment. Concludes Karwas, Advertising is rapidly entering a new era. The integration of generative technologies and VFX is unlocking entirely new possibilities for connecting with audiences, enabling brands to engage and interact with customers in ways that were previously unimaginable.0 Comments ·0 Shares
 -
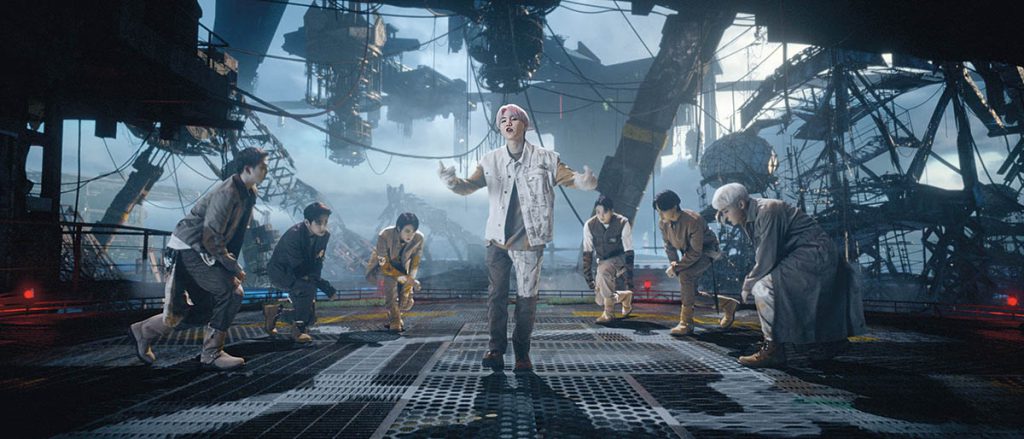 MUSIC VIDEOS AND VFX KEEP IN TUNE WITH EACH OTHER AND THE TIMESvfxvoice.comBy TREVOR HOGGIngenuity Studios provided and coordinated the visual effects work for the music video for My Universe by Coldplay + BTS, with contributions from AMGI, BUF, Rodeo VFX and Territory Studio. (Image courtesy of Ingenuity Studios)Seen as a breeding ground for celebrated filmmakers such as David Fincher, Spike Jonze and the Daniels (Daniel Kwan and Daniel Scheinert), music videos no longer require millions of dollars from a record company to produce or a major television network to reach the masses. The media landscape continues to evolve with the emergence of virtual production, AI and Unreal Engine, as well as what is considered to be acceptable cinematically. Whether an actual renaissance is taking place is open to debate, as Take On Me by a-ha, Sledgehammer by Peter Gabriel and Thriller by Michael Jackson remain hallmarks of innovation despite the ease of access to technology and distribution that exists nowadays for independent-minded content creators and musicians.Constructing a 56-foot-wide by 14-foot-tall virtual production wall in East Providence, Rhode Island for commercials, movies and music videos is Door G, a studio that also does real-world shoots, makes use of AI-enhanced workflows and handles post-production. Independent artists can put their work out on YouTube and social media, and get attention that way, states Jenna Rezendes, Executive Producer at Door G. People may not have heard the song but have seen the video. The visual is important. One has to be agnostic when it comes to methodology and technology. She says, We can work with clients or directors and come up with a plan that suits their creative. Does it make sense to do it virtually or lean into some AI to help create some backgrounds? All of these methods can be combined to create the best product. There are numerous tools accessible to a lot of different people. People are making music videos on their own using iPhones and putting them on TikTok. Its a matter of how the approach fits the end result youre looking for, within your budget.AI will become a standardized tool. It allows you to be more iterative in the creative development phase. You can churn through ideas and not feel like youre wasting a lot of valuable time, remarks Joe Torino, Creative Director at Door G. AI is a quick pressure test of ideas versus spending weeks building things out only to realize its not going to work. Like any other new technological development, AI will become a choice of the creator and the person who is buying the creative. Do they want something that is AI or human-created or a combination of both? It will become clear in the future whats what, and people will have a choice to make what they want to invest in.Unreal Engine is another important tool. Unreal Engine allows you to create worlds from scratch, but, that said, it still requires a lot of processing power not so widely available yet, Torino states. We did a music video that was this post-apocalyptic world entirely created in Unreal Engine. This is something you would struggle to do as video plates. This allowed them, on a reasonable budget, to create this world that otherwise would have been impossible. Content is not being created for the long term. Things are more disposable, Torino believes. If you do a music video that is innovative and creative, you get a chance to have a moment, but I dont know how long that moment will last. You can make a great music video with one filmmaker and artist, and that probably wasnt the case in the 1960s, 1990s and early 2000s, Torino states. The biggest factor for change is through AI. Soon, you will be able to make an entire music video using AI. Were probably six months to a year out from someone who can recreate the aesthetic of the music videos for Take On Me or Sledgehammer with a few clicks and some dollars to spend on AI video rendering platforms. It will be polarizing like everything else, but polarization ultimately gets eyeballs, so people are going to do that.Bluescreen was utilized for the aerial balloon shots in the music video for Contact featuring Wiz Khalifa and Tyga. (Images courtesy of Frender)Door G makes use of a 56-foot-wide by 14-foot-tall virtual production wall in their studio located in East Providence, Rhode Island. (Photo courtesy of Door G)From Normani & 6LACKS Waves music video. Software and technology have become readily available along with tutorials via YouTube, which means that record labels and artists no longer have to hire major visual effects companies for their music videos. (Images courtesy of Frender)Diljit Dosanjhs music video of his song Luna from the album MoonChild Era. Music videos provide the opportunity to experiment with new tools. (Image courtesy of Frender)Leveraging his experience as a visual effects producer, Max Colt established Los Angeles-based Frender, which has worked on award-winning music videos for the likes of Harry Styles, Marc Anthony, Thomas Rhett and Nicki Minaj. For me, its the music, the camera operator, the idea and a bunch of tools to play with, observes Colt. Right now, we work with AI technology because, for the past three years, it has become a trend. Its also easy to jump into the industry because you can shoot a music video on an iPhone like Beyonc its simple to create content, but its not easy to create good content. Ive been in this industry for 15 years and have done 500 or 600 music videos. I am still doing them because I personally like music as well as the freedom, and getting to work with the creatives and musicians. Virtual production cannot be treated in the same way as a greenscreen shoot. Colt notes, You need to approve everything before the shoot, and if you want to change something, its hard but still possible. This is a new tool, and for a big production like a movie, its time and cost-effective. For a music video, virtual production is okay; maybe in the next five years it will become cheaper than shooting regular greenscreen.You can shoot a nice story without any post, Colt observes. It is a trend to create nonexistent things and visual effects help you to do that. You can produce some cool stuff with After Effects. But for simulations you need to use Nuke or Houdini. If you aesthetically understand the difference, you can play with these tools. Music videos are a great platform to play with new tools. Movies are a risky business, and no one spends a lot of money on new stuff. In America, music videos, commercials and films are treated as different industries. Colt remarks, Sometimes its hard to change industries. If you start on music videos, its hard to jump onto big movies. Europe is more flexible. However, music videos are the best platform to start your career, understand the process and see the final result. Projects vary in scope when it comes to enjoyment, he adds. Some projects I love and have a lot of stories. Others are copy-and-paste projects. Just like being a visual effects artist, sometimes its technical work such as clean-ups, while other times its creative, like producing nonexistent things. It really depends.Boston-based independent artist Llynks filmed a music video for her song Dont Deserve in Door Gs East Providence, Rhode Island studio. (Photo courtesy of Door G)Ingenuity Studios was established to create visual effects for music videos, which continue to be part of a corporate portfolio that has expanded into television and feature films. Noteworthy collaborations have been with musicians such as Shawn Mendes, Selena Gomez, Taylor Swift, Billie Eilish and BTS. Music videos have been the leading example on how viewing and creation habits have changed as well as the purpose of these things, observes David Lebensfeld, President & VFX Supervisor for Ghost VFX and Ingenuity Studios. Starting with the MTV era, music videos at their core were promotion to sell albums and took on a larger role in society when they became a place where creative people could go and stretch their legs and do stuff that wasnt possible in other mediums. Record labels were willing to pay for it because it actually coincided with how music gets promoted. Certainly, more recently, TikTok and Instagram, probably more than YouTube, are where music gets promoted. On a production scale, you approach it differently for TikTok than you do for the MTV era because you would have $2 million to $3 million videos, whereas now its about viral trends, which are completely different in how those things get exposed and become popular.Frender produced the music video for Coldplays Up&Up. (Images courtesy of Frender)Frender collaborated with Chris Brown and Nicki Minaj on the music video for Wobble Up. (Images courtesy of Frender)Door G has an agnostic attitude towards methodologies and technologies as there is not one solution for everything. (Photo courtesy of Door G)Music videos are more divorced from cinema than they were in the A Hard Days Night or MTV era where you would have the same people making those things, Lebensfeld remarks. Now its more about capturing the moment and zeitgeist quicker, dirtier and less polished but maybe equally as clever. For that, you dont need a six-week timeline and a $1 million budget to make a music video. The other benefit, particularly around the economics of record labels, is they used to put together a plan where you would come out with a big artists album and say, These are the three singles that were going to put a bunch of money behind and promote. Thats when music video production would begin. It was before the albums came out. Over time, even in the MTV era, the record labels started waiting and seeing what hit in order to better deploy their capital to promote the album. With this current trend, its even more so, where theyll make a music video for something they had no idea was going to be a hit, go with the moment and be able to produce something and put it on TikTok, or let the audience make it user-generated and incentivize that; that is the best use of their capital to promote an album. Some things will continue to stand out. But the way that content is created and consumed is going to be more about reaching niche, localized audiences versus making something big and expensive for everybody.Music videos themselves are not revenue generators. AI, Unreal Engine and cellphone cameras these tools that allow you to make content or user-generated content at a larger scale for a lot less money is where this is heading and arguably is already, Lebensfeld observes. The biggest piece of technology that is changing the way that music videos get made isnt actually production related. Its social media and the technologies behind that, which will continue to evolve with AI or hardware that gets better, easier or more ubiquitous. If you start having people wearing AR glasses all day long, then youre going to need content for that. Its not going to be about how technology is changing what gets produced. Its more about how technology is changing how things get produced [for YouTube, TikTok and Instagram] and the need for content. Arguably, right now, video cameras in your phone are a big piece of the production puzzle, and will become more popular as people consume more content on the go, in a virtual environment or at a Fortnite concert. The AI piece allows for a lazier production process, so you could have somebody generating prompts of something they think is funny and setting it to a Lady Gaga song, and thats what everybody finds hilarious and ends up blowing up a single.0 Comments ·0 Shares
 -
 FRAMESTORE PROVIDES A COMIC BOOK VIBE FOR SUPERMANwww.vfxvoice.comBy TREVOR HOGGImages courtesy of Framestore and Warner Bros. Pictures.After a successful collaboration on Guardians of the Galaxy Vol. 3, Visual Effects Supervisor Stphane Naz and Framestore reunited with filmmaker James Gunn and Production Visual Effects Supervisor Stphane Ceretti for Superman. Among the highlights of the 590 visual effects that had to be created were the entirely digital Krypto the Superdog, the Fortress of Solitude, the nanite-blooded Engineer, CG animatrons, Krypto welcoming Supergirl, and a battle that occurs inside the Fortress of Solitude.The Fortress of Solitude gets extended with crystals while the performers in the mocap suits are turned into the robots helping Superman to recover from his injuries.I was quite excited because Superman was much closer to the comic books and not like a sequel or prequel of something existing. It was more about how we create a new version of Superman, and James [Gunn] was keen to be close to the comic books. Even the designs of Krypto and the Engineer, you feel much closer to the comic books. The comic books are not dark, and Superman is way closer to that spirit.Stphane Naz, Visual Effects Supervisor, FramestoreA Soviet astronaut canine that appeared in Guardians of the Galaxy Vol. 3 proved to Gunn that Framestore could handle Krypto. The brief with Cosmo was to have a real dog, and because James Gunn liked our approach, he said, Okay, next time I have a movie with a dog, it will be you, explains Stphane Naz, VFX Supervisor at Framestore. Even though Krypto is based on James Gunns dog Ozu, the dog itself doesnt exist. On Cosmo, we had a real Golden Retriever and took photogrammetry with the idea being to match the existing dog on set. For Krypto, James came with a lot of references of his dog, but Ozu was not white and is small, so it was not possible to match him pixel to pixel. By the way, Ozu is absolutely crazy and never does what youre expecting. On all the shots that we sent to James, it was always a clip of his dog doing something close to what you have in the shots. However, sometimes you have to deviate, but it was important for us to always check that Krypto was behaving like a real dog.The behavior of Krypto was inspired by the wild antics of Uzo, a dog adopted by director James Gunn.Given that Krypto does not have any lines of dialogue, emotions had to be conveyed through physical actions. We typed on the Internet, pissed dog. Or, happy dog, Naz states. It was incredible. Maybe the dog was not happy, but he was acting like a dog you think is happy. We came up with a lot of clips like that. The opening sequence has a battered and bruised Superman crashing to the ground in the Arctic and whistling for Krypto. When you have the dog jumping on him, there was nothing on David Corenswet; he was acting like something was actually shaking him. We had to replace parts of the body for contact. At the end of the movie, when Krypto is shaking Supergirl and being violent, we had to replace everything except her face; that was because, on set, a stunt performer literally grabbed and shook Milly Alcock on the ground. A dog wont grab someone in the same way that a human would with two hands. It was supposed to be with his mouth. We had to replace a lot. A lot of time was spent on getting the color correct for the white fur, especially in a snowy environment. Naz notes, Pending the color tone, the light would shift it to green or blue. For the human eye, it is easy to detect if white looks real or not. The first time we put the dog in the plate, he looked black. Then we had to boost the amount of bounce. The render time started to be absolutely insane.Time was spent getting the color correct for the white fur of Krypto, especially in a snowy environment of the Arctic.Having the plate as a lighting guide was messing up the ability to integrate Krypto. One of the challenges was that the grade was done on a whitish plate that was burnt out, so you need to change it to be able see the details and contrast, Naz remarks. But doing that altered a lot of the values. We learned quickly to be detached from the plate. The approach was more what you want to see instead of what you would get if he was there for real. The grooming was accomplished through the proprietary software Fibre. It allowed us to have much more control, and the quality of the fur was unique. You always have dead hair stuck in the fur, as well as particles, dirt and humidity on the inside of the hair. We pushed all of the details in those shots. It was smart to have an in-house tool because you can ask for a specific request, and its not like having the limits of commercial software. You can unlock some parameters, then boost or push it. Plowing through the Arctic landscape to get to Superman, Krypto creates a snowstorm. Naz explains, Krypto is running fast but not like a rocket. We cheated more on the simulation by boosting and moving the snow to create a snowstorm. When you have Krypto going towards the camera, you have this cloud that is dying off, then you have another simulation more like real-time. The trick was to exactly blend between the snowstorm and Krypto stopping and jumping on Superman.The sky, lighting, color grading and size of Superman and Krypto were altered to better integrate and convey the massive scale of the Fortress of Solitude.The reason I enjoy working on this type of movie is collaborating with a director like James Gunn, who is visual effects-friendly. We spent a lot of time pushing the quality instead of figuring out what he wants. James knows what he wants, however, you can also come with suggestions; he would be frustrated if you didnt do that [W]hen James goes, This is a good idea, you are proud because you feel a part of something. That to me is key.Stphane Naz, Visual Effects Supervisor, FramestoreA complex asset was the personal sanctuary for Superman. The Fortress of Solitude was insane to render because it consists of 6,000 pieces of crystals refracting, Naz notes. We had seen in the comic books the overall shape of the of the Fortress but had to decide on what it looks like close-up. The idea was to blend the exterior and the interior set, which had an opaque floor, but having the crystals transparent outside and opaque inside made no sense; at one point, it was challenging to find exactly the perfect adjustment between both of them. Also, the quality of the crystals was different between the ground floor versus the top. You have this top-down shot where you have all of those crystals going towards the camera; that was a crazy shot to render for Framestore. There had to be a degree of opaqueness to create a sense of depth inside the crystals. If you have a piece of crystal with no structure inside, like bubbles of fractures, it looks like plastic because you dont feel the thickness. Each piece of crystal had fractures and bubbles, so when you spin around, it feels solid. To render the 140 shots with crystals, they were broken down into different categories. Naz says, We divided the shots into different layers, like far background, mid-ground and foreground. The far background were frames being projected on geometry, the mid-ground was a mix, and the foreground was rendered to limit the number of pieces, bounce and transparency.The Engineer plugs herself into the computer system of the Fortress of Solitude, causing spikes to form on her head.Robots populate the Fortress of Solitude. Those robots are like chrome balls, and the difficulty with them was mostly to create and animate a lot of things you dont see in the frame, Naz notes. If you look at the robots close-up, youll see Superman being reflected, which means we had to animate the digital double for Superman being reflected out of frame and sometimes Krypto and the 12 robots in the scene. If you dont do those out-of-frame reflections, the shot will look poor. The environment had to be created 360 degrees to accommodate for the reflections. Sometimes we had to animate characters that were out of the frame, like the Engineer running around. There was no shortage of capes that had to be animated. Naz remarks, The joke at the beginning was, We have to put capes on the robots as well? It was challenging because Krypto has a cape and now all of the robots. All of the robots in the movie are CG. They built a practical one, but the robot was unable to run and do crazy acting; it was also not reflecting the environment. Even if in some shots there was a big close-up of the practical robot, we had to replace everything.Performing in a motion capture suit and providing the voice for the sardonic Robot No. 4, also known as Gary, was Alan Tudyk. Alan established the vibe, and we got clips of him explaining to us how the robots should move and what was the ideology behind the movement, Naz explains. He was specific about what to do, which was useful to us; that became our bible for the development of the animation. When the robots are moving around Superman, there were people in gray suits on stilts. It is always better to do the maximum in-camera even if in the end you replace a lot. While the automatons tend to Superman, he relaxes by watching holographic home movies. It was one of the first conversations we had when starting to work on the show. I asked Stef, Do we go with digital doubles or shoot them on plates? Stphane Ceretti came up with this approach using Gaussian splats. We had three different companies do the same test, and Infinite Realities in London did the best one. That was challenging because it was one of the first times Framestore was playing with this tech. The idea was to develop some tools to render everything through Houdini. I was impressed with the flexibility that you get with the motion of the character, and the camera can be placed where you want. At one point, you have the character spinning and see their back, which was amazing. That was also challenging because with the Gaussian splats technique you cant splice geometry, but you want to splice them to create a glitch. It was a mix of tech using Houdini projecting on some part of the hologram.Given that Krypto was entirely CG, David Corenswet had to pretend that the canine was lying on his stomach.Nanite particles enable the Engineer to be a shapeshifter, where she can have her forearm transform into a spinning disc that detaches, flies around shredding robots, reattaches and turns back to normal. Stunts did the choreography, Naz states. Even when she transforms and does a back-flip, we always got reference in terms how she moves. We always had this motion as the arms are transforming with the blades. Everything was CG except for the face. The weight was not an issue because it wasnt a massive transformation of volume. The black outfit was so dark sometimes that it was hard to read the volume and all of the small details, so we had to boost the light more than what was on set. Large areas of particles were regrouped or divided to make it look noisy. Naz adds, You can see a progression when she transforms. It starts small and becomes bigger. At one point, we had two versions; what you should get if you go through physicality and gravity versus something more art-directed in animation with no particles. We went with animation because the idea was to be art-directed and for James to be able to choreograph across the framing.At the entrance of the Fortress of Solitude, which consists of 6,000 crystals refracting light, making the asset insane to render. (Image courtesy of Warner Bros. Pictures)Sometimes plates had to be blended for the fight that ensues when Lex Luther and the Engineer enter the Fortress of Solitude. The editor was able to cut something because he used the real action plate, Naz remarks. Then, we had to replace the stunt performers with robots and body track the Engineer, keeping only her face. We also had to replace the Fortress of Solitude because the set consisted of the ground level. Theres a shot where the Engineer is slicing robots and a crystal. Only people going frame by frame will see the cracks inside of the crystal. We replaced the reflection on the sunglasses of Lex Luther so you see the fight across the sequence. In another shot, you have a piece of robot going so close to his face with all the sparks and embers. We had to track his face to have some relighting on the face for integration. For Lex Luther, it was more about integration.Framestore was always checking to make sure that Krypto behaved like a real dog. (Image courtesy of Warner Bros. Pictures)The Engineer utilizes nanite particles to shapeshift her body. (Image courtesy of Warner Bros. Pictures)Driving the storytelling and the visuals was the original source material. I was quite excited because Superman was much closer to the comic books and not like a sequel or prequel of something existing, Naz observes. It was more about how we create a new version of Superman, and James was keen to be close to the comic books. Even with the designs of Krypto and the Engineer, you feel much closer to the comic books. The comic books are not dark, and Superman is way closer to that spirit. The reason I enjoy working on this type of movie is collaborating with a director like James Gunn, who is visual effects-friendly. We spent a lot of time pushing the quality instead of figuring out what he wants. James knows what he wants, however, you can also come with suggestions; he would be frustrated if you didnt do that because there was an expectation that you would have creative input. It was like, You asked for this. but we also think that would be good. Sometimes its no or yes, but when James goes, This is a good idea, you are proud because you feel a part of something. That to me is key. To just do the job is less exciting.Watch a clip from Warner Bros. Pictures and DC Studios of Krypto Saves Superman, which shows Superman in peril, injured and vulnerable in a snowy landscape, when Krypto the CG Superdog arrives to rescue him. Click here: https://www.youtube.com/watch?v=iA8CQ7XOifw. In another short clip, Keep An Eye on Him, Krypto tugs on Supermans cape to capture his attention. Watch here: https://www.youtube.com/watch?v=7jow0XrN-fE.0 Comments ·0 Shares
 -
 RODEO FX BREATHES LIFE INTO THE STONE GUARDIANS FOR SEASON 2 OF THE SANDMANwww.vfxvoice.comBy TREVOR HOGGImages courtesy of Rodeo FX and Netflix.In Season 2 of The Sandman, Dream, after reclaiming his kingdom, goes about restoring his castle, which is guarded by a wyvern, griffin and hippogriff. The responsibility for the reconceived residence and mythical creatures that reside there was given to Rodeo FX, which produced more than 200 shots through a long-standing relationship with Production Visual Effects Supervisor Ian Markiewicz.A sandstorm engulfs the Season 1 palace, which then transitions to a massive, pristine, well-preserved, clean architectural style for Season 2.In Season 2, [the Guardians] become real flesh-and-bone, talking creatures, so the approach was completely different [from Season 1].Martin Pelletier, VFX Supervisor, Rodeo FXIan was a visual effects producer and, at some point, was missing that creative input he wanted so much to give, states Martin Pelletier, VFX Supervisor at Rodeo FX. When the opportunity arose, Ian jumped to the other side. Hes realistic as far as expectations and how things work based on budgets and time. Yet, Ian is never going to pretend that he knows the technical aspect of what were doing. Ian gives pointers to get us headed in the direction he wants and then leaves. He lets the process do its own little magic. Given that visual effects work takes place strictly in the Dreaming, there was more room to be creative and break free from the restrictions imposed by reality. He adds, I like invisible effects, but The Sandman was that opportunity where creativity can go wild.The weather in the Dreaming is determined by the emotional state of Dream.Emotion determines the weather in the Dreaming. The Guardians are exposed to the elements, Pelletier explains. In Season 2, we quickly establish that the mood of Dream determines if its going to be stormy, rainy or the stars or sun are shiny, or a clear blue sky. The Guardians were established as stone creatures in Season 1. In Season 2, they become real flesh-and-bone, talking creatures, so the approach was completely different. The wyvern comes with his fair share of challenges because we never get to see the back of his body or use the tail. The only thing that we ever get to do with the wyvern was for him to lean and stand on the ledge right over the main door entrance. You get to see his wings moving, but its mostly about the neck, torso and head. Posture helped to convey emotion. Pelletier notes, Whenever the wyvern was happy or aggressive, things would be pointing upward in a more rigid and energetic way. The movements would be snappier. Whereas the minute he was in a sad mood, his body sagged and his head leaned lower. The dialogue was synced through keyframe animation. We got the audio track and tried a couple of different ways with the wyvern. The scale and the fact that the mouth opens up made it a little trickier to get the speaking action to look right.Environmental elements such as trees helped to convey the proper scale of Dreams Palace.The Guardians are exposed to the elements in Season 2. We quickly establish that the mood of Dream determines if its going to be stormy, rainy or the stars or sun are shiny, or a clear blue sky.Martin Pelletier, VFX Supervisor, Rodeo FXWings were prominent on both the hippogriff and griffin. We could set the tone, whether they were energetic or sad, by playing with how fast the wings were moving around in animation, Pelletier remarks. The hippogriff was probably the easiest of all three animals because of the fact that we have so many references to look over. White technically creates more issues, especially with feathers. But the good news was that we knew that Season 2 was going to be mostly moody. If you look at the overall chunk of shots where we see the Guardians, 85% of them were either overcast or indirect light. We never had to deal with bright, intense sunlight hitting the hippogriff. The diffused light was a challenge. Pelletier says, All three Guardians are living in some kind of a box. If you look at the entrance and the design of the palace in that area, theres a back wall behind the Guardians as well as sidewalls next to them. Theres not a whole lot of places for light to scatter and bounce off anything that is bright. We had to do lot of cheating, especially on overcast sequences, to get shapes out of them because otherwise they would come out dull and flat.The decision was made to situate Dreams Palace on an isolated island to avoid it looking like Disneyland.Anatomy was a major issue for hybrid creatures like griffins. You start with what was a lion for the reference of the body, Pelletier states. Yet, the body of the griffin is maybe 10 times the size of a lion. The head was mimicking a Golden Eagle, but the Golden Eagle is so much smaller in so many ways. How do we approach the feathers in relation with the scale difference? Are we going with fairly small feathers and make a number required to cover the griffin, which is so much bigger? Or, are we going with much bigger feathers and keep the same relationship size-wise with the Golden Eagle? Which is what we did. Then we had this rig that allowed the feathers to flare upwards and outward as if hes reacting to something. We had to tone it down quite a lot and play subtly with the feather movements to keep in mind the scale of it. You rarely have a human next to it until Episode 210 where hes almost dying and gets rejuvenated with Dream.A number of the shots of Dreams Palace involve top-down perspectives.A puppet head was utilized on set to get the proper interaction between Dream and the griffin. There were a couple of shots where the puppet head wasnt necessarily accounting for the space that the body would take, Pelletier reflects. We had to cheat things because if we would line up our griffins head with the puppet, then the body would be half intersecting with a wall. We had to do a little bit of magic tricks here and there to make things work. But, in the end, it turned out that this sequence looks amazing. Situating the Guardians on a raised platform looking down altered the dynamics of the shots. Its a restriction as far as movements, Pelletier observes. We ended up making the pedestal wider as we quickly understood that it was going to be a struggle to get the wings to open up freely without intersecting with a wall. Feathers added to the complexity of the wings. Regular grooming is a lot easier to deal with, especially with an animal such as a horse because its a short groom. The main thing that we had to deal with was when the wings open up and showcase the full open feathers, because you see a whole lot of little technical details that wouldnt make sense and would create hard shadows, unnecessary gaps and unwanted penetration. There were numerous quality control passes to fix all those issues.A holdover from Season 1 is the bridge being held by a pair of hands, which was inspired by the Golden Bridge in Vietnam.We could set the tone [on the hippogriff and griffin], whether they were energetic or sad, by playing with how fast the wings were moving around in animation.Martin Pelletier, VFX Supervisor, Rodeo FXOpening Season 2 is the reveal of Dreams Palace. Pelletier explains, The shot where the Season 1 palace is being completely engulfed in the sandstorm is much bigger than it should be in relation to the Season 2 palace. Interestingly, enough of the opening of Season 2 was not planned that way. Originally. we were only building the finished version of the Season 2 palace, but then an executive at Netflix said, We need a new opening to get the people in the audience to understand that we have come into the Dreaming, the palace is not the same, and the Dreaming environment has changed as well. Dreams Palace is massive. When we first started presenting the palace to the client in the established initial scale, it was four to six times bigger than what we ended up doing. The minute I showed Ian how small a human being is next to that entrance, he said, Okay, we have a problem because were never going to be able to read a human being in semi-wide shot. We ended up scaling down the palace to something that made more sense. It was still a challenge because on aerial shots where you see the Fates coming in, theyre like tiny dots, so we had to fake longer shadows and a bright spot to cause your eye to look over that area of the garden to make sure you get to see the four figures walking.Vegetation like bushes were important to make sure that the imagery did not look too clean and CG.An iconic castle had to be avoided. They wanted to stay away from that Dracula kind of a mood, Pelletier notes. The palace was to be a pristine, well-preserved and clean architectural piece. They didnt want us to age it or weather it too much. The gardens had to look like theyre being taken care of on a daily basis. There were moments where we had to bring in a bit more brush to our shots because from a certain distance it was looking a little too clean and CG. Another famous image was not to be replicated. How do we present different pieces like a rocky desert landscape on one side and a lush, green jungle environment on the other side without making it look like Disneyland? We decided to place the palace on an isolated piece of land surrounded by a lot of water. The first thing we did was to scatter a bunch of trees next to it to convey the size both of the environment and the palace. And we played quite a lot with the size of the the vegetation next to the palace so it could make sense.Located above the entrance of Dreams Palace are the three Guardians consisting of a griffin, wyvern and hippogriff.The Guardians of the Palace evolve from stone statues in Season 1 to living creatures in Season 2.The size of the Guardians did not always allow for stand-ins or puppets to be utilized in shots.The initial size of Dreams Palace had to be significantly scaled back to enable humans to stand out in semi-wide shots.The pedestal was made wider to enable the wings of the Guardians to open freely without intersecting with a wall.A skinny version of the griffin that would shrink and lose muscle mass over time was developed by Rodeo FX.The fact that the mouth opens made it trickier to get the speaking action to look right for the wyvern.How fast the wings were moving indicated whether the hippogriff was happy or sad.The griffin has the body of a lion and the head of a Golden Eagle.A head of a puppet was utilized to get the proper interaction as Dream attempts to heal the griffin.Rodeo FX created more than 200 shoots for Season 2 of The Sandman.Watch two dramatic VFX breakdowns by Rodeo FX of its work creating the surreal world of The Sandman, Season 2, Volume 1 for the Netflix series. The first video chronicles the initial development of Dreams Castle and the mythical creatures. Click here: https://www.youtube.com/watchv=Kwd5AWGhTE0&t=1s. The second video details the Guardians the wyvern, hippogriff and griffin as they are brought to life from stone statues to soaring, lifelike CG creatures. Also explore the rise of the towering palace they protect. Click here: https://www.youtube.com/watchv=IMoDkVnYwlk&t=2s0 Comments ·0 Shares
 -
 DIGITAL DOMAIN TAKES MAJOR LEAP SHARING THE FANTASTIC FOUR: FIRST STEPSwww.vfxvoice.comBy TREVOR HOGGImages courtesy of Marvel Studios.Getting a reboot is the franchise where an encounter with cosmic radiation causes four astronauts to gain the ability to stretch, be invisible, self-ignite and get transformed into a rock being. Set in a retro-futuristic 1960s, The Fantastic Four: First Steps was directed by Matt Shakman and features the visual effects expertise of Scott Stokdyk, along with a significant contribution of 400 shots by Digital Domain, which managed the character development and animation of the Thing (Ebon Moss-Bachrach), Baby Franklin, Sue Storm/Invisible Woman (Vanessa Kirby), Johnny Storm/Human Torch (Joseph Quinn) and H.E.R.B.I.E. (voiced by Mathew Wood). At the center of the work was the in-house facial capture system known as Masquerade 3, which was upgraded to handle markerless capture, process hours of data overnight and share that data with other vendors.When you see it now, the baby fits in my hand, but on set, the baby had limbs hanging down both sides because of being double the scale of whats in the film. In those cases, we would use a CG blanket and paint out the limbs, replace the head and shrink the whole body down. It was often a per-shot problem.Jan Philip Cramer, Visual Effects Supervisor, Digital DomainThrough eye motion and pantomime, H.E.R.B.I.E. was able to convey whether he was happy or sad.We were brought on early to identify the Thing and how to best tackle that, states Jan Philip Cramer, Visual Effects Supervisor at Digital Domain. We tested a bunch of different options for Scott Stokdyk and ended up talking to all of the vendors. It was important to utilize something that everybody can use. We proposed Masquerade and to use a markerless system, which was the first step for us to see if it was going to work, and are we going to be able to provide data to everybody? This was something we had never done before, and in the industry, its not common to have these facial systems shared.Digital Domain, Framestore, ILM and Sony Pictures Imageworks were the main vendors. All the visual effects supervisors would get together while we were designing the Thing and later to figure out the FACS shapes and base package that everybody can live with, Cramer explains. I was tasked with that, so I met with each vendor separately. Our idea was to solve everything to the same sets of shapes and these shapes would be provided to everybody. This will provide the base level to get the Thing going, and because so many shots had to be worked on in parallel, it would bring some continuity to the character. On top of that, they were hopeful that we could do the same for The Third Floor, where they got the full FACS face with a complete solve on a per-shot level.The Thing (Ebon Moss-Bachrach) was given a stylish wardrobe with the rock body subtly indicated underneath the fabric.[Director] Matt Shakman had an amazing idea. He had Sue, or the stand-in version for her, on multiple days throughout the weeks put the baby on her and do what he called circumstantial acting. We filmed take after take to see whether the baby does something that unintentionally looks like its a choice. This was done until we had enough randomness and good performances that came out of that. That was fun from the get-go.Jan Philip Cramer, Visual Effects Supervisor, Digital DomainContinues Cramer, A great thing about Masquerade is that we could batch-solve overnight everything captured the previous day. We would get a folder delivered to us that would get processed blindly and then the next morning we would spot-check ranges of that. It was so much that you cant even check it in a reasonable way because they would shoot hours every day. My initial concern of sending blindly-solved stuff to other vendors was it might not be good enough or there would be inconsistencies from shot to shot, such as different lighting conditions on the face. We had to boil it down to the essence. It was good that we started with the Thing because its an abstraction of the actor. Its not a one-to-one, like with She-Hulk or Thanos. The rock face is quite different from Ebon Moss-Bachrach. That enabled us to push the system to see if it worked for the various vendors. We then ended up doing the Silver Surfer and Galactus as well, even though Digital Domain didnt have a single shot. We would process face data of these actors and supplied the FACS shapes to ILM, Framestore and Sony Pictures Imageworks.It was important for the digital augmentation to retain the aesthetic of the optical effects utilized during the 1960s.Another factor that had to be taken into consideration was not using facial markers. We shot everything markerless and then the additional photography came about, Cramer recalls. Ebon had a beard because hes on the TV show The Bear. We needed a solution that would work with a random amount of facial hair, and we were able to accommodate this with the system. It worked without having to re-train. A certain rock was chosen by Matt Shakman for the Thing. Normally, they bring the balls and charts, but we always had this rock, so everybody understood what the color of this orange was in that lighting condition. That helped a huge amount. Then, we had this prosthetic guy walking through in the costume; that didnt help so much for the rock. On the facial side, we initially wanted to simulate all the rocks on the skin, but due to the sheer volume, that wasnt the solution. During the shape-crafting period, there was a simulation to ensure that every rock was separated properly and were baked down to FACS shapes that had a lot of correctives in them; that also became the base FACS shape list for the other vendors to integrate into their own system.LED vests were on set to provide interactive lighting on the face of Johnny Storm aka Human Torch (Joseph Quinn).There were was a lot of per-shot tweaking to make sure that cracks between the rocks on the face of the Thing were not distracting. It was hard to maintain something like the nasolabial folds [smile lines], but we would normally try to specifically angle and rotate the rocks so you would still get desired lines coming through, and we would have shadow enhancements in those areas as well, Cramer remarks. We would drive that with masks on the face. Rigidity had to be balanced with bendability to properly convey emotion. Initially, we had two long rocks along the jawline. We would break those to make sure they stayed straight. In our facial rig we would ensure that the rocks didnt bend too much. The rocks had a threshold for how much they could deform. Any rock that you notice that still has a bend to it, we would stiffen that up. The cracks were more of blessing than a curse. Cramer explains, By modulating the cracks, you could redefine it. It forced a lot of per-shot tweaks that are more specific to a lighting condition. The problem was that any shot would generate a random number of issues regarding how the face reads. The first time you put it through lighting versus animation, the difference was quite a bit. In the end, this became part of the Thing language. Right away, when you would go into lighting, you would reduce contrast and focus everything on the main performance, then do little tweaks to the rocks on the in-shot model to get the expression to come through better.A family member was recruited as reference for Baby Franklin. I had a baby two and a half years ago, Cramer reveals. When we were at the beginning stages of planning The Fantastic Four, we realized that they needed a baby to test with, and my baby was exactly in the age range we were looking for. This was a year before the official production started. We went to Digital Domain in Los Angeles and with Matt Shakman shot some test scenes with my wife there and my son. We went to ICT [USC Institute for Creative Technologies], and he was the youngest kid ever to be scanned by them. We did some initial tests with my son to see how to best tackle a baby. They would have a lot of standard babies to swap out, so we needed to a bring consistency to that in some form. Obviously, the main baby does the most of the hero performances, but there would be many others. This was step one. For step two, I went to London to meet with production and became in charge of the baby unit they had. There were 14 different babies, and we whittled it down to two babies who were scanned for two weeks. Then we picked one baby deemed to be the cutest and had the best data. Thats what we went into the shoot with.No facial markers were used when capturing the on-set performance of Ebon Moss-Bachrach as the Thing.Not every Baby Franklin shot belonged to Digital Domain. We did everything once the Fantastic Four arrive on Earth and Sue is carrying the baby, Cramer states. When you see it now, the baby fits in my hand, but on set, the baby had limbs hanging down both sides because of being double the scale of whats in the film. In those cases, we would use a CG blanket and paint out the limbs, replace the head and shrink the whole body down. It was often a per-shot problem. The highest priority to make sure that the baby can only do what its supposed to do. Matt Shakman had an amazing idea. He had Sue, or the stand-in version for her, on multiple days throughout the weeks put the baby on her and do what he called circumstantial acting. We filmed take after take to see whether the baby does something that unintentionally looks like its a choice. This was done until we had enough randomness and good performances come out of that. That was fun from the get-go. The performances did not vary all that much with the stand-in babies. Cramer says, As long as the baby is not looking into the camera and appearing as a baby, youre good! We matched the different babies performances that werent on set, in the right situation, except for a few priority shots where we would pick from a library of performances of the real baby similar to a HMC [Head-Mounted Camera] select, which wed match and animate.A major breakthrough for Digital Domain was being able to process facial data captured by Masquerade 3 overnight, which was then shared with other vendors.Johnny Storm as the Human Torch was originally developed by Digital Domain. We mainly did the bigger flying shots, so luckily, we didnt have to deal so much with his face while performing, Cramer remarks. It was principally body shots. A number of times the face was kept clear, which helped a lot. LED vests were on set to provide interactive lighting on the face. The core idea was that oxygen is leaking out of his skin, so there would be this hint of blue flame that catches and turns into the red flame. The hope was to have that together with these leaking flames so it feels like its emanating from inside of him rather than being just on the surface. We did not do some of these dialogue shots when hes on fire. They used different techniques for that. The initial idea was to have the hands and feet ignite first. Cramer notes, We also played with ideas where it [a flame] came from the chest; having some off-set helped a lot. They trigger initially and have a big flame rippling up fast. I found it wasnt as much of a challenge. The hardest thing with the look was how he appears when fully engaged in flames what does his face turn into? He would have this strong underlying core that had a deep lava quality. We were not the driver of this. There were other vendors who took over the development and finished it.Shadows had a major role to play in getting the face of the Thing to convey the proper emotion.Element shoots were conducted on set. What happened with Scott [Stokdyk, Visual Effects Supervisor] early on was we filmed a bunch of fire tests on set with different flames and chemicals to get various colors and behaviours, Cramer explains. They would have different wind speeds running at it. That became the base of understanding what fire they wanted. Our biggest scene with that was when theyre inside the Baxter Building and [Human Torch] has a dialogue with Mr. Fantastic [Pedro Pascal]. The flames there are realistic. Our goal was to have a gassy fire. Tests were done with the stunt performers for the flying shots. The stunt performers were pulled on wires for the different flying options, which became the initial starting point. We would take those shots, and work with that. We played with ideas such as hovering based on the subtleties of hand thrusters that Johnny can use to balance, but the main thrust comes from his feet.The core idea was that oxygen is leaking out of his [Johnny Storm as Human Torch] skin, so there would be this hint of blue flame that catches and turns into the red flame. The hope was to have that together with these leaking flames so it feels like its emanating from inside of him rather than being just on the surface. He would have this strong underlying core that had a deep lava quality.Jan Philip Cramer, Visual Effects Supervisor, Digital DomainA fascinating shot to achieve was of Baby Franklin in the womb of Sue Storm, which incorporated a lens flare associated with the invisibility effect.Simplicity was key for effects, such as invisibility for the character of Sue Storm. The whole film is meant to feel like older effects that are part of the period, Cramer states. We tried having a glass body and all sorts of refractions through her body. In the end, we went relatively simple. We did some of the refraction, but it was mainly a 2D approach for her going fully invisible in the shots. We did subtle distortion on the inside edges and the client shot with different flares that looked nice; this is where the idea of the splitting camera came from, of showing this RGB effect; she is pulling the different colors apart, and that became part of her energy and force field. Whenever she does anything, you normally see some sort of RGB flare going by her. Its grounded in some form. Because of doing the baby, we did this scanning inside where theres an x-ray of her belly at one point. Those shots were fascinating to do. It was a partial invisibility of the body to do medical things. We tried to use the flares to help integrate it, and we always had the same base ideas that its outlining something that hums a little bit. We would take edges and separate them out to get a RGB look. For us, it started appearing more retro as an effect. It worked quite well. That became a language, and all of the vendors had a similar look running for this character, which was awesome.A stand-in rock nicknamed Jennifer assisted in getting the right lighting for the Thing.Assisting the Fantastic Four is a robotic character known as H.E.R.B.I.E.(Humanoid Experimental Robot-B Type Integrated Electronics), originally conceived for the animated series. Right now, there is this search to ground things in reality, Cramer observes. There was an on-set puppeteered robot that helped a great deal. There is one shot where we used that one-to-one; in all the others, its a CG takeover, but we were always able to use the performance cues from that. We got to design that character together with Marvel Studios from the get-go, and we did the majority of his shots, like when he baby-proofs the whole building. We worked out how he would hover and how his arms could move. We were always thinking how H.E.R.B.I.E. is meant to look not too magical, but that he could actually exist. The eyes consist of a tape machine. Cramer observes, We had different performance bits that were saved for the animators, and those were recycled in different shots. It was mainly with his eye rotation. He was so expressive with his little body motions. It was more like pantomime animation with him. It was obvious when he was happy or sad. There isnt so much nuance with him; its nice to have a character who is direct. It was fun for the animators and me because if the animation works then you know the shot is going to be finished.The facial capture for the Thing established the process for the other characters.Digital Domain focused on the character development for the Thing, Invisible Woman and Human Torch.Blankets came in handy when Sue Storm was holding Baby Franklin in her arms.The overarching breakthrough on this show for Digital Domain was providing other vendors with facial data. To funnel it all through us and then go to everybody helped a lot. It was something different for us to do as a vendor, Cramer states. Thats something Im proud of. The ability to share with other vendors will have ramifications for Masquerade 3. That should be a general move forward, especially with how the industry has changed over the years. Everybody has proprietary stuff, but normally now we share everything. You go on a Marvel Studios show and know youre going to get and give characters to other vendors. In the past, you would have Thanos, and it would be Wt FX and us. But now four or five vendors work on that, so you have five times the inconsistencies getting introduced by having different interpretations of their various systems. It is helpful to funnel it early on and assemble scenes, then hand it out to everybody. It speeds up everybody and gets the same level of look.0 Comments ·0 Shares
 -
 SPECIAL EFFECTS KEEPS PACE WITH THE CHANGING TIDE OF 28 YEARS LATERwww.vfxvoice.comBy TREVOR HOGGImages courtesy of Sony Pictures Entertainment.Taking the zombie genre by storm was 28 Days Later,, which was followed by 28 Weeks Later and now a trilogy of new installments starting with 28 Years Later. As humanity moves further way from the initial days of the infection and resorts to more primeval ways, nature has gradually been reclaiming the world. Contributing to the gritty realism sought by filmmaker Danny Boyle was Sam Conway, who worked for his father, Richard Conway, as a special effects technician on the original movie and its sequel. The first one was close to contemporary times, so we did the explosion at the petrol station, states Special Effects Supervisor Sam Conway. But because this one is set 28 years later, that sort of thing doesnt exist anymore. Its all deteriorated, so this became more back to basics, like bows and arrows. The buzz word to describe Danny Boyle is visceral. What Danny was getting at was violent, in-your-face, fast-paced, aggressive, gory and dirty. When you see him pacing the scene before anyone turns up, you can get into his mind. Hes always one step away from shouting and swearing out loud. Danny has that kind of energy about him. Hes a lovely bloke.Every time we turned up on set, sure enough, it would be, Ignore that storyboard. Were going to be doing it this way. Thats challenging in itself because with storyboards you normally look at and go, Ive got a blind spot there. Excellent. But when youve got 14 iPhones on set 360 degrees, you cant hide anywhere. No one can hide! The storyboards got the movie going. We didnt have any previs. There were lots of tests with stand-ins to make sure that we knew what we were doing on the shoot days.Sam Conway, Special Effects SupervisorAs many as 15 iPhone 15 Pro Max cameras were used at one time, meaning that there was nowhere to hide the special effects rigs. (Photo: Miya Mizuno)What has not changed are the Infected, with the disease being transmitted through the blood. Any gory moment will end up with someone becoming infected, Conway remarks. We still have the telltale signs of the transition, which are the eyes going red and the vomit. A partnership ensued with [Co-founder/Visual Effects Supervisor] Adam Goscoyne and Union VFX, which was responsible for the visual effects work. After 28 years, the Infected have lost all of their clothes but are still running around. When they do get taken out by an arrow, you have to hide the device somewhere, and visual effects was perfect for us. There were lots of blood effects. We had remotes for the squibs, and visual effects stepped up for the removal of bits and pieces. It was complex as well. There are almost 360 degrees shots where you cant hide anything. It has to be there. Clean-up after each take was not crucial. Conway notes, The whole place was a mess anyway! We got away with quite a lot of places. You go into an abandoned house and theres mold and muck everywhere. Then youve got the Infected who are covered with feces and all sorts of stuff. When we do a hit, the blood would go everywhere, which was exactly what Danny wanted. You cant do blood elements because they wont land on the surfaces they need to hit.A 60-foot camera crane swung the full length of the water tank during the causeway chase sequence. (Photo: Miya Mizuno)Blood and gore were the primary contributions of the special effects team. Thats why the visceral thing comes back into it, Conway states. It also centers around the infection being blood-oriented. It has to be gory and violent. You bring out the old tricks that you know will work, like syringes, turkey basters, pipes, pressure vessels or balloons. You have to try to work out whats the best application. There are some interesting setups. Also, when youre on a shoot and only have a couple of minutes to rig something up, we spent our time literally coming up with things you place in someones hand and go, All you have to do is stab that person and there will be blood everywhere. When youre out in the elements, you cant have too much that will potentially break or not work, so the simpler the better. The blood was produced by Maekup, established by David Stoneman. David Stoneman is a wizard. If you give him this complicated thing that has to be blood, but also has to go into a river and meet all these regulations, hes the type of bloke whod turn around and say, I can make something work for you. The blood doesnt stain, you could mix it with water and it still looks nice. More blood was used during testing than on set. We would probably go through eight or nine gallons for some of the blood gags, which is expensive, then only use a couple of gallons on set.If you give [David Stoneman] this complicated thing that has to be blood, but also has to go into a river and meet all these regulations, hes the type of bloke whod turn around and say, I can make something work for you. The blood doesnt stain, you could mix it with water and it still looks nice. We would probably go through eight or nine gallons for some of the blood gags, which is expensive, then only use a couple of gallons on set.Sam Conway, Special Effects SupervisorDirector Danny Boyle talks with Aaron Taylor-Johnson surrounded by the wilderness, which is a character in its own right. (Photo: Miya Mizuno)The color of the blood was determined by the previous films. Its still the same type of blood, Conway notes. The only time we played with the color of the blood on these particular films was 28 Weeks Later where they shot day-for-night and wanted to take out purple and add purple in afterwards to make it darker. The blood was pink when we started playing around with that one. Storyboards provided a rough idea for shots. Every time we turned up on set, sure enough, it would be, Ignore that storyboard. Were going to be doing it this way. Thats challenging in itself because with storyboards you normally look at and go, Ive got a blind spot there. Excellent. But when youve got 14 iPhones on set 360 degrees, you cant hide anywhere. No one can hide! The storyboards got the movie going. We didnt have any previs. There were lots of tests with stand-ins to make sure that we knew what we were doing on the shoot days.Stunts, led by Julian Spencer, and special effects enjoyed a good relationship. Ive worked with Julian Spencer for many years, Conway states. Weve cut our teeth on the same jobs. Its always good to work with somebody you know. Were old friends. Stuntvis was important. A number of the weapons were made from whatever they could find. Anytime a new weapon would appear, we would try to work out how to make that into a blood gag or rig. There are lots of ways to kill the Infected or anybody for that matter. When watching the stunt rehearsals, you get a feel for, Theres going to be a lot of blood coming out of that. The makeshift weapons created by the props department had to be modified. Conway explains, We had to lose some of the parts of those weapons, which visual effects would then add back in post simply because to get a blood effect, sometimes those bits got in the way. Theyre so skinny and difficult to do anything with, youre better off losing them and concentrate on the larger parts of the weapons.Given that the Infected are nude, visual effects needed to paint out the squibs placed on their bodies. (Photo: Miya Mizuno)The weapons are makeshift, created from scraps, with bows and arrows prominent. (Photo: Miya Mizuno)Footage was shot with the iPhone 15 Pro Max, which is great at capturing details, especially the particulates in the air. Anthony Dod Mantle [Cinematographer] loves all of that and picking out all these interesting textures in the air, Conway observes. We did quite a lot of atmospherics and water in the air for 28 Years Later, but not so much for 28 Years Later: The Bone Temple, which was digital as well, but not iPhones. They were concentrating on the shot while we were adding smoke. I rushed out to get an iPhone 15 Pro Max to make sure I had the same apps that Anthony was using, but I could never work it out because its too much for one person to figure out. I have enough on my plate besides worrying about how the phone works and setting the shutter rate. It was definitely hard. The iPhones still have a big lens coming off it and the dolly, but when they started to put 14 or 15 out on set it was tricky because you didnt know where it was safe.Weather was not a major issue, but the tide did impact principal photography. We were on an island that had a causeway, which is something you could drive across, but its tidal, Conway reveals. When the tide comes in, you cant drive across it, so youre trapped on the island. You had to have a lot of forward thinking and timing with the tide. The low-key production did not spend much time on big gimbals. What we did have was a collapsing building moment. It begins in the attic. To try to sell the fact that the building was going to collapse, I made the whole chimney stack vibrate and had breakaway bricks coming off that and a few tip tanks. It looked like the chimney was going to collapse, and I fired a load of air mortars, dust and bricks to chase them out of the house. 28 Years Later wasnt a massive gimbal film but needed some stuff to sell it.Given that the buildings are dilapidated, there were no worries about having to clean up after each take when it came to blood gags. (Photo: Miya Mizuno)It also centers around the infection being blood-oriented. It has to be gory and violent. You bring out the old tricks that you know will work, like syringes, turkey basters, pipes, pressure vessels or balloons. You have to try to work out whats the best application. When youre on a shoot and only have a couple of minutes to rig something up, we spent our time literally coming up with things you place in someones hand and go, All you have to do is stab that person and there will be blood everywhere. When youre out in the elements, you cant have too much that will potentially break or not work, so the simpler the better.Sam Conway, Special Effects SupervisorThe causeway is pivotal to the story. The art department and construction created a 200-foot-long, 40- to 50-foot-wide tank, which was probably nine inches deep, Conway explains. Theyre getting chased across the causeway as the tide is coming in. We had to make that look like a natural sea with the turbulence and waves in a small tank. It was hard to do. That was done at a big warehouse, which was used as an emergency hospital during the COVID-19 pandemic. It had a lovely flat floor, so they could build a perfectly controlled tank. They wanted to do this shot where they run from one end to the other and a 60-foot camera crane is swinging the full length. That was challenging for everybody and difficult to create atmosphere all the way along the 200 feet. A great takeaway were the arrow hits. The arrow hits were good because we came up with an interesting and safe way of doing things that did not involve tanks and pipes, and literally a balloon and small squib.The Infected still transmit their disease through blood, so the primary contributions of the special effects team were the blood and gore. (Photo: Miya Mizuno)A major story point is the causeway that connects the island to the mainland, which was a combination of location and studio work. (Photo: Miya Mizuno)Dr. Kelson, portrayed by Ralph Fiennes, is attempting to survive a world that has become more primitive. (Photo: Miya Mizuno)There were minimal fire effects, as the Infected are drawn to the flames. (Photo: Miya Mizuno)Weapons were digitally altered to allow for the desired blood gags. (Photo: Miya Mizuno)Atmospherics like smoke were important, and the iPhone 15 Pro Max was great at capturing the particulate in the air. (Photo: Miya Mizuno)Given the poor state of the buildings, they could be as perilous as the Infected. (Photo: Miya Mizuno)Nothing had to be significantly altered when it came to the workflow and methodology. Most of the stuff either came to us in a mold or came to us so we mold it ourselves and make rigs to fit inside, Conway states. There was no 3D printing or scanning involved from our side of things. We didnt have the time for that setup. As soon as the reference was okayed, we molded it and did what needed to be done. Or props would give us the software, and wed bastardize that. In special effects, were forever reinventing things because theres always a better way of doing it. You have to explore ways. We spent a lot of time getting squibs on the heads working safely and came up with a nice way of doing it. It involves a couple of plates, a few magnets and a couple of party balloons. Thats as far as Im going to go with that one!Watch a fascinating behind-the-scenes featurette on the making of 28 Years Later with director Danny Boyle and Cinematographer Anthony Dod Mantle. Click here:https://www.youtube.com/watch?v=SXZiTCup1kE0 Comments ·0 Shares
 -
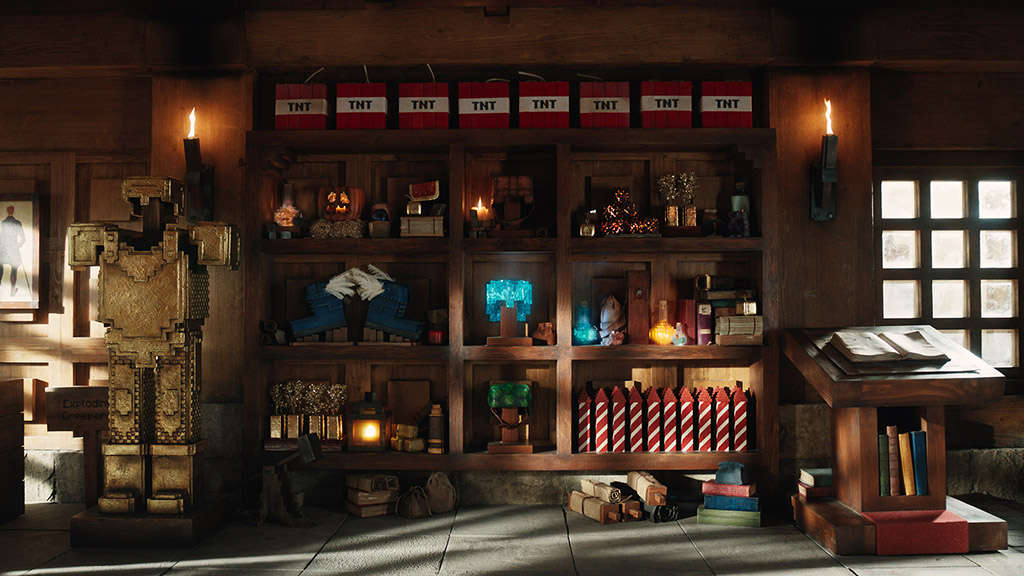 HOW DISGUISE BUILT OUT THE VIRTUAL ENVIRONMENTS FOR A MINECRAFT MOVIEwww.vfxvoice.comBy TREVOR HOGGImages courtesy of Warner Bros. Pictures.Rather than a world constructed around photorealistic pixels, a video game created by Markus Persson has taken the boxier 3D voxel route, which has become its signature aesthetic, and sparked an international phenomenon that finally gets adapted into a feature with the release of A Minecraft Movie. Brought onboard to help filmmaker Jared Hess in creating the environments that the cast of Jason Momoa, Jack Black, Sebastian Hansen, Emma Myers and Danielle Brooks find themselves inhabiting was Disguise under the direction of Production VFX Supervisor Dan Lemmon.[A]s the Senior Unreal Artist within the Virtual Art Department (VAD) on Minecraft, I experienced the full creative workflow. What stood out most was how deeply the VAD was embedded across every stage of production. We werent working in isolation. From the production designer and director to the VFX supervisor and DP, the VAD became a hub for collaboration.Talia Finlayson, Creative Technologist, DisguiseInterior and exterior environments had to be created, such as the shop owned by Steve (Jack Black).Prior to working on A Minecraft Movie, I held more technical roles, like serving as the Virtual Production LED Volume Operator on a project for Apple TV+ and Paramount Pictures, notes Talia Finlayson, Creative Technologist for Disguise. But as the Senior Unreal Artist within the Virtual Art Department (VAD) on Minecraft, I experienced the full creative workflow. What stood out most was how deeply the VAD was embedded across every stage of production. We werent working in isolation. From the production designer and director to the VFX supervisor and DP, the VAD became a hub for collaboration. The project provided new opportunities. Ive always loved the physicality of working with an LED volume, both for the immersion it provides and the way that seeing the environment helps shape an actors performance, notes Laura Bell, Creative Technologist for Disguise. But for A Minecraft Movie, we used Simulcam instead, and it was an incredible experience to live-composite an entire Minecraft world in real-time, especially with nothing on set but blue curtains.Set designs originally created by the art department in Rhinoceros 3D were transformed into fully navigable 3D environments within Unreal Engine. These scenes were far more than visualizations, Finlayson remarks. They were interactive tools used throughout the production pipeline. We would ingest 3D models and concept art, clean and optimize geometry using tools like Blender, Cinema 4D or Maya, then build out the world in Unreal Engine. This included applying materials, lighting and extending environments. These Unreal scenes we created were vital tools across the production and were used for a variety of purposes such as enabling the director to explore shot compositions, block scenes and experiment with camera movement in a virtual space, as well as passing along Unreal Engine scenes to the visual effects vendors so they could align their digital environments and set extensions with the approved production layouts.A virtual exploration of Steves shop in Midport Village.Certain elements have to be kept in mind when constructing virtual environments. When building virtual environments, you need to consider what can actually be built, how actors and cameras will move through the space, and whats safe and practical on set, Bell observes. Outside the areas where strict accuracy is required, you want the environments to blend naturally with the original designs from the art department and support the story, creating a space that feels right for the scene, guides the audiences eye and sets the right tone. Things like composition, lighting and small environmental details can be really fun to work on, but also serve as beautiful additions to help enrich a story.Ive always loved the physicality of working with an LED volume, both for the immersion it provides and the way that seeing the environment helps shape an actors performance. But for A Minecraft Movie, we used Simulcam instead, and it was an incredible experience to live-composite an entire Minecraft world in real-time, especially with nothing on set but blue curtains.Laura Bell, Creative Technologist, DisguiseAmong the buildings that had to be created for Midport Village was Steves (Jack Black) Lava Chicken Shack.Concept art was provided that served as visual touchstones. We received concept art provided by the amazing team of concept artists, Finlayson states. Not only did they send us 2D artwork, but they often shared the 3D models they used to create those visuals. These models were incredibly helpful as starting points when building out the virtual environments in Unreal Engine; they gave us a clear sense of composition and design intent. Storyboards were also a key part of the process and were constantly being updated as the project evolved. Having access to the latest versions allowed us to tailor the virtual environments to match camera angles, story beats and staging. Sometimes we would also help the storyboard artists by sending through images of the Unreal Engine worlds to help them geographically position themselves in the worlds and aid in their storyboarding. At times, the video game assets came in handy. Exteriors often involved large-scale landscapes and stylized architectural elements, which had to feel true to the Minecraft world, Finlayson explains. In some cases, we brought in geometry from the game itself to help quickly block out areas. For example, we did this for the Elytra Flight Chase sequence, which takes place through a large canyon.Flexibility was critical. A key technical challenge we faced was ensuring that the Unreal levels were built in a way that allowed for fast and flexible iteration, Finlayson remarks. Since our environments were constantly being reviewed by the director, production designer, DP and VFX supervisor, we needed to be able to respond quickly to feedback, sometimes live during a review session. To support this, we had to keep our scenes modular and well-organized; that meant breaking environments down into manageable components and maintaining clean naming conventions. By setting up the levels this way, we could make layout changes, swap assets or adjust lighting on the fly without breaking the scene or slowing down the process. Production schedules influence the workflows, pipelines and techniques. No two projects will ever feel exactly the same, Bell notes. For example, Pat Younis [VAD Art Director] adapted his typical VR setup to allow scene reviews using a PS5 controller, which made it much more comfortable and accessible for the director. On a more technical side, because everything was cubes and voxels, my Blender workflow ended up being way heavier on the re-mesh modifier than usual, definitely not something Ill run into again anytime soon!A virtual study and final still of the cast members standing outside of the Lava Chicken Shack.We received concept art provided by the amazing team of concept artists. Not only did they send us 2D artwork, but they often shared the 3D models they used to create those visuals. These models were incredibly helpful as starting points when building out the virtual environments in Unreal Engine; they gave us a clear sense of composition and design intent. Storyboards were also a key part of the process and were constantly being updated as the project evolved. Having access to the latest versions allowed us to tailor the virtual environments to match camera angles, story beats and staging.Talia Finlayson, Creative Technologist, DisguiseThe design and composition of virtual environments tended to remain consistent throughout principal photography. The only major design change I can recall was the removal of a second story from a building in Midport Village to allow the camera crane to get a clear shot of the chicken perched above Steves lava chicken shack, Finlayson remarks. I would agree that Midport Village likely went through the most iterations, Bell responds. The archway, in particular, became a visual anchor across different levels. We often placed it off in the distance to help orient both ourselves and the audience and show how far the characters had traveled. I remember rebuilding the stairs leading up to the rampart five or six times, using different configurations based on the physically constructed stairs. This was because there were storyboarded sequences of the films characters, Henry, Steve and Garrett, being chased by piglins, and the action needed to match what could be achieved practically on set.Virtually conceptualizing the layout of Midport Village.Complex virtual environments were constructed for the final battle and the various forest scenes throughout the movie. What made these particularly challenging was the way physical set pieces were repurposed and repositioned to serve multiple scenes and locations within the story, Finlayson reveals. The same built elements had to appear in different parts of the world, so we had to carefully adjust the virtual environments to accommodate those different positions. Bell is in agreement with her colleague. The forest scenes were some of the more complex environments to manage. It could get tricky, particularly when the filming schedule shifted. There was one day on set where the order of shots changed unexpectedly, and because the physical sets looked so similar, I initially loaded a different perspective than planned. Fortunately, thanks to our workflow, Lindsay George [VP Tech] and I were able to quickly open the recorded sequence in Unreal Engine and swap out the correct virtual environment for the live composite without any disruption to the shoot.An example of the virtual and final version of the Woodland Mansion.Midport Village likely went through the most iterations. The archway, in particular, became a visual anchor across different levels. We often placed it off in the distance to help orient both ourselves and the audience and show how far the characters had traveled.Laura Bell, Creative Technologist, DisguiseExtensive detail was given to the center of the sets where the main action unfolds. For these areas, we received prop layouts from the prop department to ensure accurate placement and alignment with the physical builds, Finlayson explains. These central environments were used heavily for storyboarding, blocking and department reviews, so precision was essential. As we moved further out from the practical set, the environments became more about blocking and spatial context rather than fine detail. We worked closely with Production Designer Grant Major to get approval on these extended environments, making sure they aligned with the overall visual direction. We also used creatures and crowd stand-ins provided by the visual effects team. These gave a great sense of scale and placement during early planning stages and allowed other departments to better understand how these elements would be integrated into the scenes.Cast members Sebastian Hansen, Danielle Brooks and Emma Myers stand in front of the Earth Portal Plateau environment.Doing a virtual scale study of the Mountainside.Practical requirements like camera moves, stunt choreography and crane setups had an impact on the creation of virtual environments. Sometimes we would adjust layouts slightly to open up areas for tracking shots or rework spaces to accommodate key action beats, all while keeping the environment feeling cohesive and true to the Minecraft world, Bell states. Simulcam bridged the physical and virtual worlds on set, overlaying Unreal Engine environments onto live-action scenes in real-time, giving the director, DP and other department heads a fully-realized preview of shots and enabling precise, informed decisions during production. It also recorded critical production data like camera movement paths, which was handed over to the post-production team to give them the exact tracks they needed, streamlining the visual effects pipeline.Piglots cause mayhem during the Wingsuit Chase.Virtual versions of the exterior and interior of the Safe House located in the Enchanted Woods.One of the biggest challenges for me was managing constant iteration while keeping our environments clean, organized and easy to update, Finlayson notes. Because the virtual sets were reviewed regularly by the director and other heads of departments, feedback was often implemented live in the room. This meant the environments had to be flexible. But overall, this was an amazing project to work on, and I am so grateful for the incredible VAD team I was a part of Heide Nichols [VAD Supervisor], Pat Younis, Jake Tuck [Unreal Artist] and Laura. Everyone on this team worked so collaboratively, seamlessly and in such a supportive way that I never felt like I was out of my depth. There was another challenge that is more to do with familiarity. Having a VAD on a film is still a relatively new process in production, Bell states. There were moments where other departments were still learning what we did and how to best work with us. That said, the response was overwhelmingly positive. I remember being on set at the Simulcam station and seeing how excited people were to look at the virtual environments as they walked by, often stopping for a chat and a virtual tour. Instead of seeing just a huge blue curtain, they were stoked to see something Minecraft and could get a better sense of what they were actually shooting.· 0 Comments ·0 Shares


 1K
1K
-
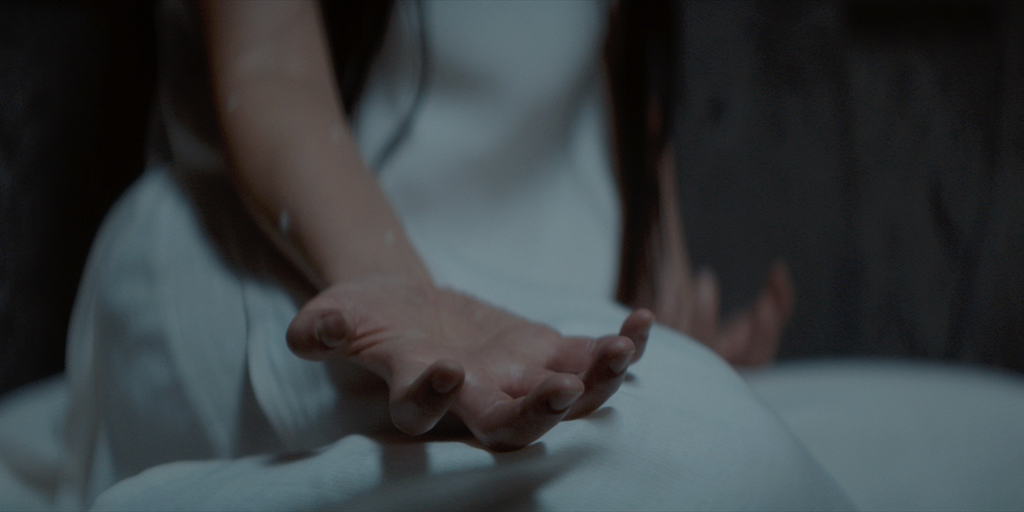 UNVEILING THE BENE GESSENT FOR DUNE: PROPHECYwww.vfxvoice.comBy TREVOR HOGGImages courtesy of HBO.Dune: Prophecy pulls back the veil on the origins of the mysterious organization known as Bene Gessent founded by the two Harkonnen sisters with the goal of breeding a male messianic figure known as the Kwisatz Haderach, who has the ability to access genetic memory and bridge the gap between different eras. The HBO sci-fi series is set 10,000 years before the Dune feature films directed by Denis Villeneuve and consists of six episodes created by Diane Ademu-John and Alison Schapker that required approximately 2,500 visual effects shots by Important Looking Pirates, Accenture Song VFX, Image Engine, Raynault VFX, Rodeo FX, The Resistance, Futureworks and Territory Studio to achieve the desire scope and grandeur. Overseeing the digital augmentation was Michael Enriquez and Terron Pratt, both of whom previously worked on epic projects such as Foundation and Lost in Space, respectively.There was a refinement to what we shot [for the Bene Gesserit ritual], and we ended up lifting Sister Lila and replacing the entire world around her and choreographing the ancestors in a more gruesome way. At moments, the ancestors are almost morphing or splitting, with their hands coming out their arms, and double heads. There is this gruesome, monstrous component to the ancestors appearing before Sister Lila. We couldnt do that monstrous form with what was shot. If you look carefully, every time the light would flash, the number and placement of the ancestors changes. The only way we could handle that was going full CG.Michael Enriquez, VFX SupervisorImperium soldier Desmond Hart (Travis Fimmel) displays a terrifying ability to burn people alive through pyrokinesis.Contributing to the gruesomeness of the characters being burned alive are the flying embers and sparks being emitted by their skin.In Foundation, we did not necessarily have a box to play in, states VFX Supervisor Michael Enriquez. It was like, Were inventing this new world that no one has seen before. It was exciting but difficult to figure out a theme for that show. With Dune, theres already such a rich visual language established by the features. It was interesting to live within that world but still tell a story that is 10,000 years removed from it. In a way, it tied our hands but also forced us to be more creative. The time gap is not as large as one would think. Because of this technical stagnation where computers and tech, for the most part, have been outlawed, everyone is returning to alternative ways of doing things, Enriquez notes. Technology hasnt advanced. While culture and designs may have evolved the way they function in general, its exactly the same. We tried to give a slightly more antique vibe to certain components, but, in the end, they still use Holtzman Shields, spaceships and folding space tech to get around.One of the biggest challenges for spaceports was to make sure there was enough activity taking place in the background to make the environments look believable and alive.I loved being able to work with Shai-Hulud [the sandworms] and put it in an environment that the audience hasnt seen before. The first time we see Shai-Hulud is a combination Arrakis and the Sisterhood environment because it is a dream sequence. Image Engine did a fantastic job to bring Shai-Hulud to life and also creating dynamic effects simulations with Shai-Hulud breaching the sand and coming up through [it] and demolishing that sandcastle-like Sisterhood complex.Terron Pratt, VFX ProducerThe capability of a Face Dancer to shapeshift is demonstrated in-camera. We tried to give it this intermediate stage so its not just Person A is going to Person B, Enriquez remarks. The character goes from the griffin character to this hairless, translucent figure and then to Sister Theodosia [Jade Anouka]. The shot we had to show it in was quite dark, so not a lot was to be seen, but there was a lot of thought process going into how to not make it like Michael Jacksons Black or White video where we were going from one person to another. We wanted to avoid that morph feeling and have it feel like an actual progression between two different stages. Shapeshifting is painful. We had extensive discussions with the director [Richard Lewis] and showrunner [Alison Schapker] in regards to this effect, explains VFX Producer Terron Pratt. We talked about what was needed for the actors to do on set to convey this pain and transformation. Then, in post, we took over areas to emphasize the pain and movement of the bones and the shifting of the structure underneath. It was technically challenging to get to that intermediate stage and for the audience to still understand what was happening without portraying this as a simple morph.Even with the extensive practical sets, digital augmentation was required to get the necessary scope and scale.Imperium soldier Desmond Hart (Travis Fimmel) displays a terrifying ability to burn people alive through pyrokinesis. Desmond Hart burns about six people through the course of the season, Pratt states. There were a few instances where we utilized some prosthetics makeup later on in the series. The first two were all us. Its a slow build as we start to burn the child. As a parent, its a difficult thing to figure out how we do this and present that idea without disturbing the audience in our first episode. We took that over completely in CG. We did a lot of matchmove and started to do that burning, emitting the steam and smoke from that character. That was carried much further as we get into Reverend Mother Kasha Jinjo [Jihae]; she is a bit more exposed. We can see the lava coming through the breaking skin, and particles of ash as well as charring and smoke coming up. Its a visceral moment. We talk extensively about what point is this not believable? Someone is burning from the inside, which is inherently not believable, except for the fact that we set our limit so at the point where she exhales and smoke comes out of her mouth, we said, Shes fully burned from the inside and her lungs are gone. Theoretically, your body can keep on burning; however, we dont show that on the screen anymore.Advance technology takes the form of thinking machines. It was a process because theres no real precedent for the technology in Dune, and so much has been done on sci-fi robotics and tech, Enriquez observes. We had to try to figure out what that feels like. A jumping-off point were the descriptions of the Synx [empire ruled by thinking machines and cyborgs] during the Machine War [Butlerian Jihad]. They were described like crabs. The first thinking machines we see are flashbacks to the Machine War, and got that started while we began building our lizard. We wanted it to feel like a toy because we were trying to say that the Richese family, which has the lizard, is more permissive as far as thinking machine tech. There are parts of the galaxy that dont care too much about the banishment because they feel thinking machines help their lives. There was so much variety in the type of tech that was being shown, we wanted to find a basic throughline that the audience would understand as a thinking machine. We decided that nothing in this world has blue lights except for thinking machines.Dune: Prophecy takes place 10,000 years before Dune and Dune: Part Two.Rodeo FX did quite a big build [for the Imperial Palace], and it was challenging for them because the Imperial Palace has a fantastical look with the water gardens as well as the shape and scale. The spaceport was a challenge in a different way in terms of the number of people and amount of activity that always had to be going on. Accenture Song VFX did a great job on everything from our fly-ins to aerial and ground shots; it was hard to tell where the practical set ended and the CG extension began.Michael Enriquez, VFX SupervisorSandworms make their presence felt in the drama during the breaching of the Shai-Hulud (Fremens reverent term for the sandworms). Shai-Hulud is iconic for the Dune franchise, and being able to launch into that with our first episode meant we could start off strong, hit the audience with something theyre expecting to see, and then we can dig into the other stuff, Pratt notes. I loved being able to work with Shai-Hulud and put it in an environment that the audience hasnt seen before. The first time we see Shai-Hulud is a combination Arrakis and the Sisterhood environment because it is a dream sequence. Image Engine did a fantastic job to bring Shai-Hulud to life and also create dynamic effects simulations with Shai-Hulud breaching the sand, coming up through [it] and demolishing that sandcastle-like Sisterhood complex.Some of the most disturbing imagery has an almost haunting charcoal aesthetic.The Imperial Palace and spaceport on Kaitain were significant asset builds. They were both big environments for us, with the amount of detail that needed to be there, because our cameras were flying all over the place, especially on the Imperial Palace, Enriquez states. We didnt have much of a location for the Imperial Palace except near the entrances where there were a couple of vertical structures. Otherwise, it was a 100% CG. Rodeo FX did quite a big build, and it was challenging for them because the Imperial Palace has a fantastical look with the water gardens as well as the shape and scale. The spaceport was a challenge in a different way in terms of the number of people and amount of activity that always had to be going on. Accenture Song VFX did a great job on everything from our fly-ins to aerial and ground shots; it was hard to tell where the practical set ended and the CG extension began. At times, we needed to have people walking in clusters or there were too many single people. It was a lot of choreographing of action and general background.Prosthetic makeup could not be entirely relied upon and required some digital assistance.Getting planetary introductions are Lankiveil and Wallach IX. It was nice to get into the sandbox that was all our own, Pratt remarks. We started with a tremendous amount of concept design by Tom Meyer [Production Designer] and his team. There was a distinct look between the two planets, which had to feel desolate and almost uninhabitable. Interestingly, Lankiveil was shot a couple of hours away from our stages in Budapest, and it happened to be lightly snowing. It was genuinely cold, and there was snow on the ground, although we enhanced that with special effects snow falling. Small structures were built into a side of a mountain, and we expanded that and carried that look down to the fishing village, which was actually shot in a quarry that had a mound and some structures built out to provide a shoreline. We expanded that with matte paintings and extensive 3D work with effects water and distant ships out on the horizon. Wallach IX was also shot in a quarry outside of Budapest, which served as the environmental foundation. We had these big multi-tiered rock walls, and the spaceport area was built on one of the lower levels, Pratt states. From there, we decided on the orientation of the complex that was going to be on one of the upper levels and built our surrounding environment to match the quarry. Ultimately, we took over a good percentage of that quarry, but it was good to have established the look in-camera.Smoke was added to emphasize the fact that the character is burning from the inside out.Zimia City on Salusa Secundus is a prominent setting. We tried to figure out how much of Zimia City had to be built out because one of the most challenging things to do artificially is ground-level city work, Pratt observes. There is so much detail and so many things that have go in to making it feel believable. Thankfully, for this season, most of time when we are in Zimia City its flyovers, and we only had one scene that took place at ground level when Valya Harkonnen [Emily Watson] goes to visit her family. Tom gave us a ton of concepts for buildings and the general layout of the city. We ran with it and tried to figure out the exact locations of where things are so the connecting shots of cars driving to and from made sense in terms of geography. We fleshed out the city enough that it gave us everything that was needed for this season. We still didnt go crazy as far as building an entire city where you can go and land on the ground level. Zimia City ended up being much more efficient than I feared it would be.Much of the bloodwork was achieved in post-production.A diffused, misty lighting gives an ethereal quality to the shot.A significant asset build was the Imperial Palace.A flashback to the Machine War otherwise known as the Butlerian Jihad.In a dream sequence, the Shai-Hulud breaches the Sisterhood complex, which is made out of sand.Blue lights were a signature visual cue for the thought machines.Sandworms make their presence felt in Episode 101.Wallach IX is a desolate planet shot in a quarry outside Budapest, with the spaceport located at a lower tier.Approximately 2,500 visual effects shots were created for Dune: Prophecy.Given the ban on technology, the visual language of Dune: Prophecy is not radically different to the feature films.Living up to its name is the Bene Gesserit ritual known as the Agony where Sister Lila [Chloe Lea] consumes the Water of Life, which unlocks her genetic memory and, in the process, she becomes a Reverend Mother. We formulated a plan, which was shot to the best of our abilities, and as the cut was being put together, we realized this wasnt what the show needed, Enriquez reveals. There was a refinement to what we shot, and we ended up lifting Sister Lila and replacing the entire world around her and choreographing the ancestors in a more gruesome way. At moments, the ancestors are almost morphing or splitting, with their hands coming out their arms, and double heads. There is this gruesome, monstrous component to the ancestors appearing before Sister Lila. We couldnt do that monstrous form with what was shot. If you look carefully, every time the light would flash, the number and placement of the ancestors changes. The only way we could handle that was going full CG. Im happy with how it turned out.· 0 Comments ·0 Shares
1K
UNVEILING THE BENE GESSENT FOR DUNE: PROPHECYwww.vfxvoice.comBy TREVOR HOGGImages courtesy of HBO.Dune: Prophecy pulls back the veil on the origins of the mysterious organization known as Bene Gessent founded by the two Harkonnen sisters with the goal of breeding a male messianic figure known as the Kwisatz Haderach, who has the ability to access genetic memory and bridge the gap between different eras. The HBO sci-fi series is set 10,000 years before the Dune feature films directed by Denis Villeneuve and consists of six episodes created by Diane Ademu-John and Alison Schapker that required approximately 2,500 visual effects shots by Important Looking Pirates, Accenture Song VFX, Image Engine, Raynault VFX, Rodeo FX, The Resistance, Futureworks and Territory Studio to achieve the desire scope and grandeur. Overseeing the digital augmentation was Michael Enriquez and Terron Pratt, both of whom previously worked on epic projects such as Foundation and Lost in Space, respectively.There was a refinement to what we shot [for the Bene Gesserit ritual], and we ended up lifting Sister Lila and replacing the entire world around her and choreographing the ancestors in a more gruesome way. At moments, the ancestors are almost morphing or splitting, with their hands coming out their arms, and double heads. There is this gruesome, monstrous component to the ancestors appearing before Sister Lila. We couldnt do that monstrous form with what was shot. If you look carefully, every time the light would flash, the number and placement of the ancestors changes. The only way we could handle that was going full CG.Michael Enriquez, VFX SupervisorImperium soldier Desmond Hart (Travis Fimmel) displays a terrifying ability to burn people alive through pyrokinesis.Contributing to the gruesomeness of the characters being burned alive are the flying embers and sparks being emitted by their skin.In Foundation, we did not necessarily have a box to play in, states VFX Supervisor Michael Enriquez. It was like, Were inventing this new world that no one has seen before. It was exciting but difficult to figure out a theme for that show. With Dune, theres already such a rich visual language established by the features. It was interesting to live within that world but still tell a story that is 10,000 years removed from it. In a way, it tied our hands but also forced us to be more creative. The time gap is not as large as one would think. Because of this technical stagnation where computers and tech, for the most part, have been outlawed, everyone is returning to alternative ways of doing things, Enriquez notes. Technology hasnt advanced. While culture and designs may have evolved the way they function in general, its exactly the same. We tried to give a slightly more antique vibe to certain components, but, in the end, they still use Holtzman Shields, spaceships and folding space tech to get around.One of the biggest challenges for spaceports was to make sure there was enough activity taking place in the background to make the environments look believable and alive.I loved being able to work with Shai-Hulud [the sandworms] and put it in an environment that the audience hasnt seen before. The first time we see Shai-Hulud is a combination Arrakis and the Sisterhood environment because it is a dream sequence. Image Engine did a fantastic job to bring Shai-Hulud to life and also creating dynamic effects simulations with Shai-Hulud breaching the sand and coming up through [it] and demolishing that sandcastle-like Sisterhood complex.Terron Pratt, VFX ProducerThe capability of a Face Dancer to shapeshift is demonstrated in-camera. We tried to give it this intermediate stage so its not just Person A is going to Person B, Enriquez remarks. The character goes from the griffin character to this hairless, translucent figure and then to Sister Theodosia [Jade Anouka]. The shot we had to show it in was quite dark, so not a lot was to be seen, but there was a lot of thought process going into how to not make it like Michael Jacksons Black or White video where we were going from one person to another. We wanted to avoid that morph feeling and have it feel like an actual progression between two different stages. Shapeshifting is painful. We had extensive discussions with the director [Richard Lewis] and showrunner [Alison Schapker] in regards to this effect, explains VFX Producer Terron Pratt. We talked about what was needed for the actors to do on set to convey this pain and transformation. Then, in post, we took over areas to emphasize the pain and movement of the bones and the shifting of the structure underneath. It was technically challenging to get to that intermediate stage and for the audience to still understand what was happening without portraying this as a simple morph.Even with the extensive practical sets, digital augmentation was required to get the necessary scope and scale.Imperium soldier Desmond Hart (Travis Fimmel) displays a terrifying ability to burn people alive through pyrokinesis. Desmond Hart burns about six people through the course of the season, Pratt states. There were a few instances where we utilized some prosthetics makeup later on in the series. The first two were all us. Its a slow build as we start to burn the child. As a parent, its a difficult thing to figure out how we do this and present that idea without disturbing the audience in our first episode. We took that over completely in CG. We did a lot of matchmove and started to do that burning, emitting the steam and smoke from that character. That was carried much further as we get into Reverend Mother Kasha Jinjo [Jihae]; she is a bit more exposed. We can see the lava coming through the breaking skin, and particles of ash as well as charring and smoke coming up. Its a visceral moment. We talk extensively about what point is this not believable? Someone is burning from the inside, which is inherently not believable, except for the fact that we set our limit so at the point where she exhales and smoke comes out of her mouth, we said, Shes fully burned from the inside and her lungs are gone. Theoretically, your body can keep on burning; however, we dont show that on the screen anymore.Advance technology takes the form of thinking machines. It was a process because theres no real precedent for the technology in Dune, and so much has been done on sci-fi robotics and tech, Enriquez observes. We had to try to figure out what that feels like. A jumping-off point were the descriptions of the Synx [empire ruled by thinking machines and cyborgs] during the Machine War [Butlerian Jihad]. They were described like crabs. The first thinking machines we see are flashbacks to the Machine War, and got that started while we began building our lizard. We wanted it to feel like a toy because we were trying to say that the Richese family, which has the lizard, is more permissive as far as thinking machine tech. There are parts of the galaxy that dont care too much about the banishment because they feel thinking machines help their lives. There was so much variety in the type of tech that was being shown, we wanted to find a basic throughline that the audience would understand as a thinking machine. We decided that nothing in this world has blue lights except for thinking machines.Dune: Prophecy takes place 10,000 years before Dune and Dune: Part Two.Rodeo FX did quite a big build [for the Imperial Palace], and it was challenging for them because the Imperial Palace has a fantastical look with the water gardens as well as the shape and scale. The spaceport was a challenge in a different way in terms of the number of people and amount of activity that always had to be going on. Accenture Song VFX did a great job on everything from our fly-ins to aerial and ground shots; it was hard to tell where the practical set ended and the CG extension began.Michael Enriquez, VFX SupervisorSandworms make their presence felt in the drama during the breaching of the Shai-Hulud (Fremens reverent term for the sandworms). Shai-Hulud is iconic for the Dune franchise, and being able to launch into that with our first episode meant we could start off strong, hit the audience with something theyre expecting to see, and then we can dig into the other stuff, Pratt notes. I loved being able to work with Shai-Hulud and put it in an environment that the audience hasnt seen before. The first time we see Shai-Hulud is a combination Arrakis and the Sisterhood environment because it is a dream sequence. Image Engine did a fantastic job to bring Shai-Hulud to life and also create dynamic effects simulations with Shai-Hulud breaching the sand, coming up through [it] and demolishing that sandcastle-like Sisterhood complex.Some of the most disturbing imagery has an almost haunting charcoal aesthetic.The Imperial Palace and spaceport on Kaitain were significant asset builds. They were both big environments for us, with the amount of detail that needed to be there, because our cameras were flying all over the place, especially on the Imperial Palace, Enriquez states. We didnt have much of a location for the Imperial Palace except near the entrances where there were a couple of vertical structures. Otherwise, it was a 100% CG. Rodeo FX did quite a big build, and it was challenging for them because the Imperial Palace has a fantastical look with the water gardens as well as the shape and scale. The spaceport was a challenge in a different way in terms of the number of people and amount of activity that always had to be going on. Accenture Song VFX did a great job on everything from our fly-ins to aerial and ground shots; it was hard to tell where the practical set ended and the CG extension began. At times, we needed to have people walking in clusters or there were too many single people. It was a lot of choreographing of action and general background.Prosthetic makeup could not be entirely relied upon and required some digital assistance.Getting planetary introductions are Lankiveil and Wallach IX. It was nice to get into the sandbox that was all our own, Pratt remarks. We started with a tremendous amount of concept design by Tom Meyer [Production Designer] and his team. There was a distinct look between the two planets, which had to feel desolate and almost uninhabitable. Interestingly, Lankiveil was shot a couple of hours away from our stages in Budapest, and it happened to be lightly snowing. It was genuinely cold, and there was snow on the ground, although we enhanced that with special effects snow falling. Small structures were built into a side of a mountain, and we expanded that and carried that look down to the fishing village, which was actually shot in a quarry that had a mound and some structures built out to provide a shoreline. We expanded that with matte paintings and extensive 3D work with effects water and distant ships out on the horizon. Wallach IX was also shot in a quarry outside of Budapest, which served as the environmental foundation. We had these big multi-tiered rock walls, and the spaceport area was built on one of the lower levels, Pratt states. From there, we decided on the orientation of the complex that was going to be on one of the upper levels and built our surrounding environment to match the quarry. Ultimately, we took over a good percentage of that quarry, but it was good to have established the look in-camera.Smoke was added to emphasize the fact that the character is burning from the inside out.Zimia City on Salusa Secundus is a prominent setting. We tried to figure out how much of Zimia City had to be built out because one of the most challenging things to do artificially is ground-level city work, Pratt observes. There is so much detail and so many things that have go in to making it feel believable. Thankfully, for this season, most of time when we are in Zimia City its flyovers, and we only had one scene that took place at ground level when Valya Harkonnen [Emily Watson] goes to visit her family. Tom gave us a ton of concepts for buildings and the general layout of the city. We ran with it and tried to figure out the exact locations of where things are so the connecting shots of cars driving to and from made sense in terms of geography. We fleshed out the city enough that it gave us everything that was needed for this season. We still didnt go crazy as far as building an entire city where you can go and land on the ground level. Zimia City ended up being much more efficient than I feared it would be.Much of the bloodwork was achieved in post-production.A diffused, misty lighting gives an ethereal quality to the shot.A significant asset build was the Imperial Palace.A flashback to the Machine War otherwise known as the Butlerian Jihad.In a dream sequence, the Shai-Hulud breaches the Sisterhood complex, which is made out of sand.Blue lights were a signature visual cue for the thought machines.Sandworms make their presence felt in Episode 101.Wallach IX is a desolate planet shot in a quarry outside Budapest, with the spaceport located at a lower tier.Approximately 2,500 visual effects shots were created for Dune: Prophecy.Given the ban on technology, the visual language of Dune: Prophecy is not radically different to the feature films.Living up to its name is the Bene Gesserit ritual known as the Agony where Sister Lila [Chloe Lea] consumes the Water of Life, which unlocks her genetic memory and, in the process, she becomes a Reverend Mother. We formulated a plan, which was shot to the best of our abilities, and as the cut was being put together, we realized this wasnt what the show needed, Enriquez reveals. There was a refinement to what we shot, and we ended up lifting Sister Lila and replacing the entire world around her and choreographing the ancestors in a more gruesome way. At moments, the ancestors are almost morphing or splitting, with their hands coming out their arms, and double heads. There is this gruesome, monstrous component to the ancestors appearing before Sister Lila. We couldnt do that monstrous form with what was shot. If you look carefully, every time the light would flash, the number and placement of the ancestors changes. The only way we could handle that was going full CG. Im happy with how it turned out.· 0 Comments ·0 Shares
1K
-
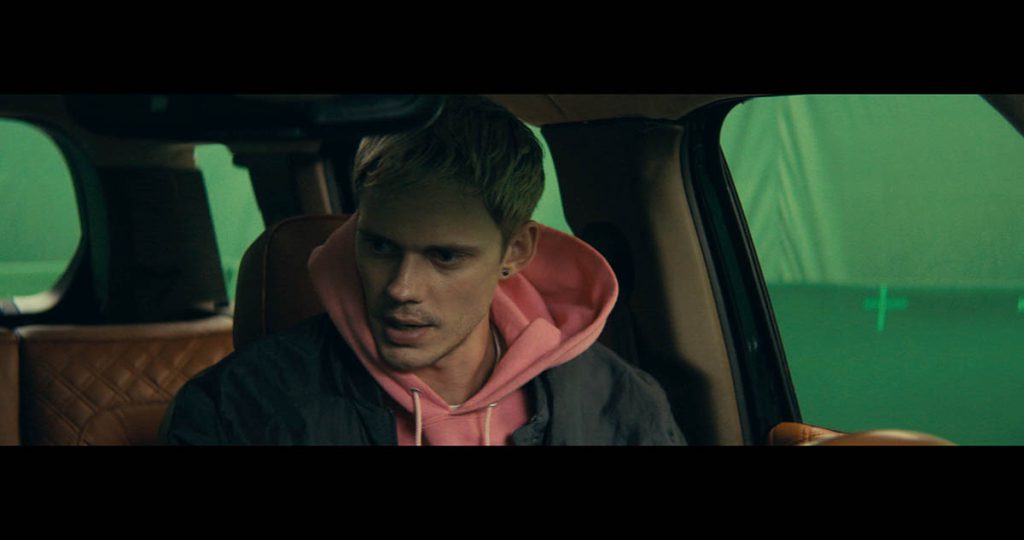 PFX SHIFTS INTO TOP GEAR FOR LOCKEDwww.vfxvoice.comBy TREVOR HOGGImages courtesy of ZQ Entertainment, The Avenue and PFX. Plates were captured by a six-camera array covering 180 and stitched together to achieve the appropriate background width or correct angle.Taking the concept of a single location on the road is Locked, where a carjacker is held captive inside a high-tech SUV that is remotely controlled by a mysterious sociopath. An English language remake of 4X4, the thriller is directed by David Yarovesky, stars Bill Skarsgrd and Anthony Hopkins, and was shot in Vancouver during November and December 2023. Post-production lasted four months with sole vendor PFX creating 750 visual effects shots with the expertise of 75 artists and guidance of VFX Supervisor Jindich ervenka. Every project is specific and unique, ervenka notes. Here, we had a significant challenge due to the sheer number of shots [750], which needed to be completed within four months, all produced in 4K resolution. Additionally, at that time, we didnt have background plates for every car-driving shot. We distributed the workload among our three branches in Prague, Bratislava and Warsaw to ensure timely completion. Director Yarkovesky had a clear vision. That allowed us to move forward quickly. Of course, the more creative and complex sequences involved collaborative exploration, but thats standard and part of the usual process.The greenscreen was set at two distances with one being closer and lower while the other was an entire wall a few meters away, approximately two meters apart.A shot taken from a witness camera on the greenscreen stage.The biggest challenge [of the three-and-a-half-minute take introducing the carjacker] was the length of the shot and the fact that nothing in the shot was static. Tracking such a shot required significant effort and improvisation. The entire background was a video projection onto simple geometry created from LiDAR scans of the parking lot. It greatly helped that we could use real-set footage, timed exactly as needed, and render it directly from Nuke.Jindich ervenka, Visual Effects SupervisorPrevis and storyboards were provided by the client for the more complex shots. We primarily created postvis for the intense sequence with a car crash, fire and other crazy action, ervenka states. We needed to solve this entire sequence in continuity. Continuity was major issue. Throughout the film, we had to maintain continuity in the water drops on all car windows, paying close attention to how they reacted to changes in lighting during the drive. Another area of research involved bokeh effects, which we experimented with extensively. Lastly, we conducted significant research into burning cars, finding many beautiful references that we aimed to replicate as closely as possible. The majority of the visual effects centered around keying, water drops on windows, and cleaning up the interior of the car. ervenka adds, A few shots included digital doubles. There were set extensions, especially towards the end of the film. Additionally, we worked on fire and rain effects, car replacements in crash sequences, bleeding effects, muzzle flashes, bullet hits, and a bullet-time shot featuring numerous CGI elements. PFX adhered to its traditional workflow and pipeline for shot production. We were the sole vendor, which allowed us complete control over the entire process.The studio-filmed interior of the SUV had no glass in the windows which meant that reflections, raindrops and everything visible on the windows had to be added digitally.A signature moment is the three-and-a-half-minute continuous take that introduces the young carjacker portrayed by Bill Skarsgrd. The biggest challenge was the length of the shot and the fact that nothing in the shot was static, ervenka remarks. Tracking such a shot required significant effort and improvisation. The entire background was a video projection onto simple geometry created from LiDAR scans of the parking lot. It greatly helped that we could use real-set footage, timed exactly as needed, and render it directly from Nuke. Window reflections were particularly challenging, and we ultimately used a combination of 3D renders and compositing cheats. When you have moving car parts, the window reflections give it away, so we had to tackle that carefully. Not surprisingly, this was the most complex shot to execute. The three-and-a-half-minute shot involved 12 artists, nine of whom were compositors. Working on extremely long shots is always challenging, so dividing the task into smaller segments was crucial to avoid fatigue. In total, we split it into 96 smaller tasks.[W]e conducted significant research into burning cars, finding many beautiful references that we aimed to replicate as closely as possible. A few shots included digital doubles. There were set extensions, especially towards the end of the film. Additionally, we worked on fire and rain effects, car replacements in crash sequences, bleeding effects, muzzle flashes, bullet hits, and a bullet-time shot featuring numerous CGI elements.Jindich ervenka, Visual Effects Supervisor Over a period of four months, PFX distributed 750 shots among facilities in Prague, Bratislava and Warsaw.Background plates were shot by Onset VFX Supervisor Robert Habros. His crew did excellent work capturing the background plates, ervenka notes. For most car rides, we had footage from six cameras covering 180, allowing us to stitch these together to achieve the appropriate background width or use the correct angle. Additionally, we had footage of an extended drive through the actual city location where the story takes place, so everything was edited by a visual effects editor. We simply synchronized this with the remaining camera recordings and integrated them into the shots. The greenscreen was set at two distances. ervenka explains, There was a closer, lower one and an entire wall a few meters away, approximately two meters apart. Although I wasnt personally on set, this setup helped create parallax since we couldnt rely on the cars interior. For the three-and-a-half-minute shot, we had separate tracking for the background and interior, where all interior walls were tracked as moving objects. Aligning these into a single reliable parallax track was impossible. A shot taken from the three-and-a-half-minute continuous take that introduces the young carjacker portrayed by Bill Skarsgrd.[W]e use an internal application allowing real-time viewing of shots and versions in the context of the films edit or defined workflows, enabling simultaneous comments on any production stage or context. Imagine having daily reviews where everything created up to that point is assessed, with artists continually adding new versions. In these daily sessions, everything was always thoroughly reviewed, and nothing was left for the next day.Jindich ervenka, Visual Effects Supervisor Locked takes place in single location, which is a high-tech SUV.There is an art to painting out unwanted reflections and incorporating desirable ones. The trick was that the studio-filmed interior had no glass in the windows at all, ervenka states. Reflections, raindrops and everything visible on the windows had to be added digitally. Shots from real exteriors and cars provided excellent references. Fire simulations were time-consuming. We simulated them in high resolution, and due to continuity requirements, we simulated from the initial ignition to full combustion, with the longest shot nearly 600 frames long. This was divided into six separate simulations, totaling about 30TB of data. Digital doubles were minimal. Throughout the film, there were only two digital doubles used in violent scenes. We didnt have to create any crowds or face replacements. A CG replica was made of the SUV. We had a LiDAR scan of the actual car, which served as the basis for the detailed CG version, including the interior. Only a few shots ultimately required this, primarily during a scene where another SUV car was initially filmed. We replaced it, and in two cases, we replaced only parts of the car and wheels to maintain real contact with the ground. There was a bit of masking involved, but otherwise, it went smoothly. The interior was mainly used for window reflections in wide shots from inside the car.There was not much need for digital doubles or crowds.We primarily created postvis for the intense sequence with a car crash, fire and other crazy action. We needed to solve this entire sequence in continuity. Throughout the film, we had to maintain continuity in the water drops on all car windows, paying close attention to how they reacted to changes in lighting during the drive.Jindich ervenka, Visual Effects SupervisorThe greatest creative and technical challenge was reviewing shots in continuity within a short production timeline and coordinating across our various offices, ervenka observes. Each shot depended on others, requiring numerous iterations to synchronize everything. For projects like this, we use an internal application allowing real-time viewing of shots and versions in the context of the films edit or defined workflows, enabling simultaneous comments on any production stage or context. Imagine having daily reviews where everything created up to that point is assessed, with artists continually adding new versions. In these daily sessions, everything was always thoroughly reviewed, and nothing was left for the next day. We avoided waiting for exports or caching. Everything needed to run smoothly and in real-time. Complicating matters was that ervenka joined the project only after editing had concluded. I had to quickly coordinate with teams distributed across Central Europe, grasp the intricacies of individual scenes and resolve continuity, which required extensive and precise communication. Thanks to our custom collaboration tools, we managed to streamline this demanding coordination successfully, and we delivered on time. But it definitely wasnt easy! Bill Skarsgrd pretends to try to break a glass window that does not exist.Watch PFXs brief VFX breakdown of the opening scene of Locked. The scene sets the tone for the film with a gripping three-and-a-half-minute single shot brought to life on a greenscreen stage where six crew members moved car parts in perfect sync. Click here: https://www.facebook.com/PFXcompany/videos/locked-vfx-breakdown/4887459704811837/· 0 Comments ·0 Shares
753
PFX SHIFTS INTO TOP GEAR FOR LOCKEDwww.vfxvoice.comBy TREVOR HOGGImages courtesy of ZQ Entertainment, The Avenue and PFX. Plates were captured by a six-camera array covering 180 and stitched together to achieve the appropriate background width or correct angle.Taking the concept of a single location on the road is Locked, where a carjacker is held captive inside a high-tech SUV that is remotely controlled by a mysterious sociopath. An English language remake of 4X4, the thriller is directed by David Yarovesky, stars Bill Skarsgrd and Anthony Hopkins, and was shot in Vancouver during November and December 2023. Post-production lasted four months with sole vendor PFX creating 750 visual effects shots with the expertise of 75 artists and guidance of VFX Supervisor Jindich ervenka. Every project is specific and unique, ervenka notes. Here, we had a significant challenge due to the sheer number of shots [750], which needed to be completed within four months, all produced in 4K resolution. Additionally, at that time, we didnt have background plates for every car-driving shot. We distributed the workload among our three branches in Prague, Bratislava and Warsaw to ensure timely completion. Director Yarkovesky had a clear vision. That allowed us to move forward quickly. Of course, the more creative and complex sequences involved collaborative exploration, but thats standard and part of the usual process.The greenscreen was set at two distances with one being closer and lower while the other was an entire wall a few meters away, approximately two meters apart.A shot taken from a witness camera on the greenscreen stage.The biggest challenge [of the three-and-a-half-minute take introducing the carjacker] was the length of the shot and the fact that nothing in the shot was static. Tracking such a shot required significant effort and improvisation. The entire background was a video projection onto simple geometry created from LiDAR scans of the parking lot. It greatly helped that we could use real-set footage, timed exactly as needed, and render it directly from Nuke.Jindich ervenka, Visual Effects SupervisorPrevis and storyboards were provided by the client for the more complex shots. We primarily created postvis for the intense sequence with a car crash, fire and other crazy action, ervenka states. We needed to solve this entire sequence in continuity. Continuity was major issue. Throughout the film, we had to maintain continuity in the water drops on all car windows, paying close attention to how they reacted to changes in lighting during the drive. Another area of research involved bokeh effects, which we experimented with extensively. Lastly, we conducted significant research into burning cars, finding many beautiful references that we aimed to replicate as closely as possible. The majority of the visual effects centered around keying, water drops on windows, and cleaning up the interior of the car. ervenka adds, A few shots included digital doubles. There were set extensions, especially towards the end of the film. Additionally, we worked on fire and rain effects, car replacements in crash sequences, bleeding effects, muzzle flashes, bullet hits, and a bullet-time shot featuring numerous CGI elements. PFX adhered to its traditional workflow and pipeline for shot production. We were the sole vendor, which allowed us complete control over the entire process.The studio-filmed interior of the SUV had no glass in the windows which meant that reflections, raindrops and everything visible on the windows had to be added digitally.A signature moment is the three-and-a-half-minute continuous take that introduces the young carjacker portrayed by Bill Skarsgrd. The biggest challenge was the length of the shot and the fact that nothing in the shot was static, ervenka remarks. Tracking such a shot required significant effort and improvisation. The entire background was a video projection onto simple geometry created from LiDAR scans of the parking lot. It greatly helped that we could use real-set footage, timed exactly as needed, and render it directly from Nuke. Window reflections were particularly challenging, and we ultimately used a combination of 3D renders and compositing cheats. When you have moving car parts, the window reflections give it away, so we had to tackle that carefully. Not surprisingly, this was the most complex shot to execute. The three-and-a-half-minute shot involved 12 artists, nine of whom were compositors. Working on extremely long shots is always challenging, so dividing the task into smaller segments was crucial to avoid fatigue. In total, we split it into 96 smaller tasks.[W]e conducted significant research into burning cars, finding many beautiful references that we aimed to replicate as closely as possible. A few shots included digital doubles. There were set extensions, especially towards the end of the film. Additionally, we worked on fire and rain effects, car replacements in crash sequences, bleeding effects, muzzle flashes, bullet hits, and a bullet-time shot featuring numerous CGI elements.Jindich ervenka, Visual Effects Supervisor Over a period of four months, PFX distributed 750 shots among facilities in Prague, Bratislava and Warsaw.Background plates were shot by Onset VFX Supervisor Robert Habros. His crew did excellent work capturing the background plates, ervenka notes. For most car rides, we had footage from six cameras covering 180, allowing us to stitch these together to achieve the appropriate background width or use the correct angle. Additionally, we had footage of an extended drive through the actual city location where the story takes place, so everything was edited by a visual effects editor. We simply synchronized this with the remaining camera recordings and integrated them into the shots. The greenscreen was set at two distances. ervenka explains, There was a closer, lower one and an entire wall a few meters away, approximately two meters apart. Although I wasnt personally on set, this setup helped create parallax since we couldnt rely on the cars interior. For the three-and-a-half-minute shot, we had separate tracking for the background and interior, where all interior walls were tracked as moving objects. Aligning these into a single reliable parallax track was impossible. A shot taken from the three-and-a-half-minute continuous take that introduces the young carjacker portrayed by Bill Skarsgrd.[W]e use an internal application allowing real-time viewing of shots and versions in the context of the films edit or defined workflows, enabling simultaneous comments on any production stage or context. Imagine having daily reviews where everything created up to that point is assessed, with artists continually adding new versions. In these daily sessions, everything was always thoroughly reviewed, and nothing was left for the next day.Jindich ervenka, Visual Effects Supervisor Locked takes place in single location, which is a high-tech SUV.There is an art to painting out unwanted reflections and incorporating desirable ones. The trick was that the studio-filmed interior had no glass in the windows at all, ervenka states. Reflections, raindrops and everything visible on the windows had to be added digitally. Shots from real exteriors and cars provided excellent references. Fire simulations were time-consuming. We simulated them in high resolution, and due to continuity requirements, we simulated from the initial ignition to full combustion, with the longest shot nearly 600 frames long. This was divided into six separate simulations, totaling about 30TB of data. Digital doubles were minimal. Throughout the film, there were only two digital doubles used in violent scenes. We didnt have to create any crowds or face replacements. A CG replica was made of the SUV. We had a LiDAR scan of the actual car, which served as the basis for the detailed CG version, including the interior. Only a few shots ultimately required this, primarily during a scene where another SUV car was initially filmed. We replaced it, and in two cases, we replaced only parts of the car and wheels to maintain real contact with the ground. There was a bit of masking involved, but otherwise, it went smoothly. The interior was mainly used for window reflections in wide shots from inside the car.There was not much need for digital doubles or crowds.We primarily created postvis for the intense sequence with a car crash, fire and other crazy action. We needed to solve this entire sequence in continuity. Throughout the film, we had to maintain continuity in the water drops on all car windows, paying close attention to how they reacted to changes in lighting during the drive.Jindich ervenka, Visual Effects SupervisorThe greatest creative and technical challenge was reviewing shots in continuity within a short production timeline and coordinating across our various offices, ervenka observes. Each shot depended on others, requiring numerous iterations to synchronize everything. For projects like this, we use an internal application allowing real-time viewing of shots and versions in the context of the films edit or defined workflows, enabling simultaneous comments on any production stage or context. Imagine having daily reviews where everything created up to that point is assessed, with artists continually adding new versions. In these daily sessions, everything was always thoroughly reviewed, and nothing was left for the next day. We avoided waiting for exports or caching. Everything needed to run smoothly and in real-time. Complicating matters was that ervenka joined the project only after editing had concluded. I had to quickly coordinate with teams distributed across Central Europe, grasp the intricacies of individual scenes and resolve continuity, which required extensive and precise communication. Thanks to our custom collaboration tools, we managed to streamline this demanding coordination successfully, and we delivered on time. But it definitely wasnt easy! Bill Skarsgrd pretends to try to break a glass window that does not exist.Watch PFXs brief VFX breakdown of the opening scene of Locked. The scene sets the tone for the film with a gripping three-and-a-half-minute single shot brought to life on a greenscreen stage where six crew members moved car parts in perfect sync. Click here: https://www.facebook.com/PFXcompany/videos/locked-vfx-breakdown/4887459704811837/· 0 Comments ·0 Shares
753
-
 INGENUITY STUDIOS LAUNCHES THE SHIPS AND TURNS THE PAGES THAT BOOKEND WASHINGTON BLACKwww.vfxvoice.comBy TREVOR HOGGImages courtesy of Ingenuity Studios and HuluWhen a prodigiously-gifted, scientifically-minded 11-year-old boy flees his native Barbados, a global adventure ensues that sees him rise above societal prejudices and chart his future in the Hulu miniseries Washington Black. Created by Selwyn Seyfu Hinds (Executive Producer and Showrunner), the eight episodes adapt the novel by Esi Edugyan, which starts off on a Barbados sugar plantation in the 1830s and subsequently sojourns to Virginia, the Canadian Arctic, Nova Scotia, London and Morocco. Looking after digital recreation of the period along with some fantastical moments were VFX Supervisor Eddie Williams and VFX Producer Tyler Foell, who sought the expertise of Ingenuity Studios to produce 378 shots with 126 of them containing CG elements. Among the environmental work was a harbor and a flyover of London as well as a magical butterfly, and opening and closing sequences featuring the pages of a CG book transitioning to live action.We looked at a lot of those photos [of merchant vessels from that period] and tried to figure out, What can we do to get variety in boats so there are schooners, merchant vessels and others that would have been popular in this era? Then, we had our CG team make multiple parts of the ships, and from there we were able to essentially make our own kit-bashing. It was like, Well use this hull and these masts from that other ship. We started mixing and combining. If I remember correctly, we had roughly 2 fully-built CG model ships.Tyler Shanklin, VFX Producer, Ingenuity StudiosThe CG team at Ingenuity Studios made multiple parts of the ships in order to achieve diversity through kit-bashing.Combining the grim reality of the adult world with the fanciful wonders of a childs imagination is the visual aesthetic of Washington Black. What we got from the production was that the footage had a lot of this style mapped out, which had a Steampunk element to it, states Tyler Shanklin, VFX Producer at Ingenuity Studios. They wanted a world that felt lived in; thats the important thing. They didnt want everything clean, but to be more realistic. Roughly composited shots were favored over storyboards and previs. The good news is, for a lot of the more intricate or big things that needed to change, essentially shots that dont look anywhere near how they were captured, we were given rough comps showing us the direction they wanted to take it. It was on our plate to then make it look cohesive. We also had weekly meetings where we everybody would hop on Zoom and go almost shot by shot to say, Heres where were at. Heres where were taking it. That allowed us to get feedback along the way from Eddie and Tyler, just to make sure that we dont spend days rendering something that went in a completely wrong direction than what they were looking for.Practical lights assisted in enabling the bioluminescence situated beneath the water to interact with the boat.Reference images were provided of the practical set pieces including vehicles. We needed to extend some of those vehicles because only part of them were constructed, Shanklin remarks. Luckily, our Visual Effects Supervisor, Krisztian Csanki, happens to enjoy Steampunk, so he completely understood what this world needed to look like when it came to contraptions and vehicles. The other side was the client was adamant that there were going to be some differences. This is not based in true history. History has taken a turn, so there would be certain anachronistic qualities. We were looking up, What materials were clothing made from back then? What was the style of clothing? The difference between the 1810s versus the 1830s; how did fashion change in that time? What did steamboats look like? This was at the beginning of the steamboat movement in realistic history. From there, we started piecing things together, working closely with Eddie Williams and Tyler Foell, who would show things to the Showrunner and the other producers, and the networking would provide feedback for us. From there, we would continue to evolve until we got what you see and what everybody enjoyed.Whimsy creeps into the creature effects. What was interesting with the butterfly is we started out looking at extremely slow-motion footage of how they flap their wings so we could recreate that and play it back at normal speed, Shanklin explains. We had to find this perfect balance between making it look whimsical and magical because this is the moment in the show where Titch [Tom Ellis] is showing Young Washington Black [Eddie Karanja] that he does have a scientific and artistic mind. It was important for that to have elements of whimsy, fun and magic because it is a pivotal part of the story where this boy is shown that hes more than what the rest of the world sees him. The CG butterfly was meant to enhance, not distract from the emotional and narrative significance of the moment. We want everybody to say, Wow, that looks great. But at the same time, we take a stand of if youre noticing the visual effects because theyre so amazing then you need to dial it back. We shouldnt be distracting from the show or story. What we ended up doing was to capture this magical place in the in-between of ultra realism and whimsy. When you watch footage of butterflies flapping their wings in real time, it looks very quick. You dont notice that theres this waving motion in their wings. We did the animation correctly, played it back normally, and then slowed it down just a hair so that your eye is able to pick up that waving motion of the wings when it goes to fly off; that is where we happen to land in that slightly magical place.Some interior environments were added later in post-production.Desaturation figures into the color palette for the gritty realistic scenes while vibrant and brighter tones are present in the fanciful scenes. That is actually a conversation Krisztian Csanki and I had with the post team, specifically about the Halifax harbor era, Shanklin notes. Because of modern day, the buildings are absolutely beautiful and extremely saturated. But we realized that the paints back then wouldnt have been able to get the same brightness because they were using mostly botanical dyes to create these colors. In addition, they werent out there with the hose every Saturday cleaning the dirt off of the building. We asked ourselves, What would this look like if it were truly created with botanical colors, and what would they look like with dirt and dust caked on them? This is the era of stagecoaches, horses and dirt roads. A lot of experimentation went into where we could get those buildings. In any of the buildings that were updated, changed or created with CG, we would provide maps for the post team so the colorist could go in and dial some of those buildings to match the color grading they were doing over the top of our shots.There were times where the skies had to be replaced to get the desired color for the water.Water simulations and interactions were tricky. We worked with a lot of water and ships, Shanklin explains. Dialing that in was probably the part that took the longest because there was a lot of feedback about physics issues of having the boat interact with the water or having the water interact with the ships correctly, plus dialing it back. Early on, the feedback we received was that the crests of water breaking out from the front of the boats and leaving that V shape were too strong. We needed to slow down the speed of the boats and maybe change the direction the water naturally flows. It was a lot of playing around, seeing what happens, and getting multiple versions over to the show to see which ones they appreciated and liked the most. Plenty of photographs exist of merchant vessels from that period of time. We looked at a lot of those photos and tried to figure out, What can we do to get variety in boats so there are schooners, merchant vessels and others that would have been popular in this era? Then, we had our CG team make multiple parts of the ships, and from there we were able to essentially make our own kit-bashing. It was like, Well use this hull and these masts from that other ship. We started mixing and combining. If I remember correctly, we had roughly 12 fully-built CG model ships.Reference images were provided of the practical set pieces, including vehicles.A theatrical scene takes place underwater. There were some shots where you could see what looked like a ground; either that or a very detailed tank, Shanklin recalls. We actually had to remove that to make it look like Washington Black [Ernest Kingsley Junior] was deeper in the ocean surrounded by nothing. This was one of those things where the client was more talking to us about the emotion they wanted to evoke. The complete loneliness and isolation Wash would have been feeling in this moment. For some of those shots, we did at a reef wall, while others we removed everything around him to make it feel isolated. Those were shot practically. A simple composite was provided by Eddie Williams. Eddie did some great work to show us where he wanted the refracted light breaking through the water, the direction it should be going, and the size Wash should be in the frame. We did multiple versions to dial in the murkiness. However, even though the camera is further away in some of these shots, you still need to be able to see and understand clearly that it is Wash in the water. There was a lot of back and forth trying to find that sweet spot of accuracy plus visuals for the sake of storytelling.Computer graphics illustrate the brilliant scientific mind of Washington Black.There is a theatrical quality to the underwater sequence, which conveys the loneliness and isolation that Washington Black is feeling.The compositing team at Ingenuity Studios added dirt to the buildings and windows to make the environments appear more believable.We asked ourselves, What would this [building] look like if it were truly created with botanical colors, and what would they look like with dirt and dust caked on them? This is the era of stagecoaches, horses and dirt roads. A lot of experimentation went into where we could get those buildings. In any of the buildings that were updated, changed or created with CG, we would provide maps for the post team so the colorist could go in and dial some of those buildings to match the color grading they were doing over the top of our shots.Tyler Shanklin, VFX Producer, Ingenuity StudiosLondon is shown during a flyover. We found a layout of the city of London, so in terms of how the streets wind and where the buildings are located, there has not been a lot of change, Shanklin notes. Our CG team would go in and model the buildings; our texture team would create the bricks and wood; and, generally, the DMP team would go in and dirty things up. It was about splitting up the labor so we could get things done as quickly as possible. Smoke was a prominent atmospheric in London. We started out being extremely realistic, thinking, Okay, this is the era of coal, so thick black smoke was billowing from every chimney, recalls Shanklin. However, thats one area where theyre like, Tone it down. Make it look more like steam. Make less of it so we can see more of the city. Historical accuracy gave way to narrative clarity. We were told specifically to add Big Ben under construction with all the scaffolding even though that did not happen until 1843. That was because there are three possible landmarks that would make London identifiable, with Big Ben being the most recognizable.Washington Black is not based in true history, so there are certain anachronistic qualities to the imagery.The CG book, which serves as bookends for the series, was a last-minute addition. Luckily, in-house we had a number of leather and page textures, Shanklin remarks. For the book opening, how many individual images and pages do you want to see? Once they got the number to us, we did a loose Playblast showing that number of pages with images on them. We sent that to the client who approved it, and went from there. We didnt have time to think about how the pages should move. It was more about rigging them so they had natural paper weight and bends and moved slightly. While we were having the CG team create the book and rig it for animation, our DMP team went in and created versions of what the pages and cover looked like. While these things were being created, we were getting look approvals from the client, so when it got to the actual textures of the book after it was modeled and rigged, we already knew what look the client wanted. That helped us move faster.· 0 Comments ·0 Shares
593
INGENUITY STUDIOS LAUNCHES THE SHIPS AND TURNS THE PAGES THAT BOOKEND WASHINGTON BLACKwww.vfxvoice.comBy TREVOR HOGGImages courtesy of Ingenuity Studios and HuluWhen a prodigiously-gifted, scientifically-minded 11-year-old boy flees his native Barbados, a global adventure ensues that sees him rise above societal prejudices and chart his future in the Hulu miniseries Washington Black. Created by Selwyn Seyfu Hinds (Executive Producer and Showrunner), the eight episodes adapt the novel by Esi Edugyan, which starts off on a Barbados sugar plantation in the 1830s and subsequently sojourns to Virginia, the Canadian Arctic, Nova Scotia, London and Morocco. Looking after digital recreation of the period along with some fantastical moments were VFX Supervisor Eddie Williams and VFX Producer Tyler Foell, who sought the expertise of Ingenuity Studios to produce 378 shots with 126 of them containing CG elements. Among the environmental work was a harbor and a flyover of London as well as a magical butterfly, and opening and closing sequences featuring the pages of a CG book transitioning to live action.We looked at a lot of those photos [of merchant vessels from that period] and tried to figure out, What can we do to get variety in boats so there are schooners, merchant vessels and others that would have been popular in this era? Then, we had our CG team make multiple parts of the ships, and from there we were able to essentially make our own kit-bashing. It was like, Well use this hull and these masts from that other ship. We started mixing and combining. If I remember correctly, we had roughly 2 fully-built CG model ships.Tyler Shanklin, VFX Producer, Ingenuity StudiosThe CG team at Ingenuity Studios made multiple parts of the ships in order to achieve diversity through kit-bashing.Combining the grim reality of the adult world with the fanciful wonders of a childs imagination is the visual aesthetic of Washington Black. What we got from the production was that the footage had a lot of this style mapped out, which had a Steampunk element to it, states Tyler Shanklin, VFX Producer at Ingenuity Studios. They wanted a world that felt lived in; thats the important thing. They didnt want everything clean, but to be more realistic. Roughly composited shots were favored over storyboards and previs. The good news is, for a lot of the more intricate or big things that needed to change, essentially shots that dont look anywhere near how they were captured, we were given rough comps showing us the direction they wanted to take it. It was on our plate to then make it look cohesive. We also had weekly meetings where we everybody would hop on Zoom and go almost shot by shot to say, Heres where were at. Heres where were taking it. That allowed us to get feedback along the way from Eddie and Tyler, just to make sure that we dont spend days rendering something that went in a completely wrong direction than what they were looking for.Practical lights assisted in enabling the bioluminescence situated beneath the water to interact with the boat.Reference images were provided of the practical set pieces including vehicles. We needed to extend some of those vehicles because only part of them were constructed, Shanklin remarks. Luckily, our Visual Effects Supervisor, Krisztian Csanki, happens to enjoy Steampunk, so he completely understood what this world needed to look like when it came to contraptions and vehicles. The other side was the client was adamant that there were going to be some differences. This is not based in true history. History has taken a turn, so there would be certain anachronistic qualities. We were looking up, What materials were clothing made from back then? What was the style of clothing? The difference between the 1810s versus the 1830s; how did fashion change in that time? What did steamboats look like? This was at the beginning of the steamboat movement in realistic history. From there, we started piecing things together, working closely with Eddie Williams and Tyler Foell, who would show things to the Showrunner and the other producers, and the networking would provide feedback for us. From there, we would continue to evolve until we got what you see and what everybody enjoyed.Whimsy creeps into the creature effects. What was interesting with the butterfly is we started out looking at extremely slow-motion footage of how they flap their wings so we could recreate that and play it back at normal speed, Shanklin explains. We had to find this perfect balance between making it look whimsical and magical because this is the moment in the show where Titch [Tom Ellis] is showing Young Washington Black [Eddie Karanja] that he does have a scientific and artistic mind. It was important for that to have elements of whimsy, fun and magic because it is a pivotal part of the story where this boy is shown that hes more than what the rest of the world sees him. The CG butterfly was meant to enhance, not distract from the emotional and narrative significance of the moment. We want everybody to say, Wow, that looks great. But at the same time, we take a stand of if youre noticing the visual effects because theyre so amazing then you need to dial it back. We shouldnt be distracting from the show or story. What we ended up doing was to capture this magical place in the in-between of ultra realism and whimsy. When you watch footage of butterflies flapping their wings in real time, it looks very quick. You dont notice that theres this waving motion in their wings. We did the animation correctly, played it back normally, and then slowed it down just a hair so that your eye is able to pick up that waving motion of the wings when it goes to fly off; that is where we happen to land in that slightly magical place.Some interior environments were added later in post-production.Desaturation figures into the color palette for the gritty realistic scenes while vibrant and brighter tones are present in the fanciful scenes. That is actually a conversation Krisztian Csanki and I had with the post team, specifically about the Halifax harbor era, Shanklin notes. Because of modern day, the buildings are absolutely beautiful and extremely saturated. But we realized that the paints back then wouldnt have been able to get the same brightness because they were using mostly botanical dyes to create these colors. In addition, they werent out there with the hose every Saturday cleaning the dirt off of the building. We asked ourselves, What would this look like if it were truly created with botanical colors, and what would they look like with dirt and dust caked on them? This is the era of stagecoaches, horses and dirt roads. A lot of experimentation went into where we could get those buildings. In any of the buildings that were updated, changed or created with CG, we would provide maps for the post team so the colorist could go in and dial some of those buildings to match the color grading they were doing over the top of our shots.There were times where the skies had to be replaced to get the desired color for the water.Water simulations and interactions were tricky. We worked with a lot of water and ships, Shanklin explains. Dialing that in was probably the part that took the longest because there was a lot of feedback about physics issues of having the boat interact with the water or having the water interact with the ships correctly, plus dialing it back. Early on, the feedback we received was that the crests of water breaking out from the front of the boats and leaving that V shape were too strong. We needed to slow down the speed of the boats and maybe change the direction the water naturally flows. It was a lot of playing around, seeing what happens, and getting multiple versions over to the show to see which ones they appreciated and liked the most. Plenty of photographs exist of merchant vessels from that period of time. We looked at a lot of those photos and tried to figure out, What can we do to get variety in boats so there are schooners, merchant vessels and others that would have been popular in this era? Then, we had our CG team make multiple parts of the ships, and from there we were able to essentially make our own kit-bashing. It was like, Well use this hull and these masts from that other ship. We started mixing and combining. If I remember correctly, we had roughly 12 fully-built CG model ships.Reference images were provided of the practical set pieces, including vehicles.A theatrical scene takes place underwater. There were some shots where you could see what looked like a ground; either that or a very detailed tank, Shanklin recalls. We actually had to remove that to make it look like Washington Black [Ernest Kingsley Junior] was deeper in the ocean surrounded by nothing. This was one of those things where the client was more talking to us about the emotion they wanted to evoke. The complete loneliness and isolation Wash would have been feeling in this moment. For some of those shots, we did at a reef wall, while others we removed everything around him to make it feel isolated. Those were shot practically. A simple composite was provided by Eddie Williams. Eddie did some great work to show us where he wanted the refracted light breaking through the water, the direction it should be going, and the size Wash should be in the frame. We did multiple versions to dial in the murkiness. However, even though the camera is further away in some of these shots, you still need to be able to see and understand clearly that it is Wash in the water. There was a lot of back and forth trying to find that sweet spot of accuracy plus visuals for the sake of storytelling.Computer graphics illustrate the brilliant scientific mind of Washington Black.There is a theatrical quality to the underwater sequence, which conveys the loneliness and isolation that Washington Black is feeling.The compositing team at Ingenuity Studios added dirt to the buildings and windows to make the environments appear more believable.We asked ourselves, What would this [building] look like if it were truly created with botanical colors, and what would they look like with dirt and dust caked on them? This is the era of stagecoaches, horses and dirt roads. A lot of experimentation went into where we could get those buildings. In any of the buildings that were updated, changed or created with CG, we would provide maps for the post team so the colorist could go in and dial some of those buildings to match the color grading they were doing over the top of our shots.Tyler Shanklin, VFX Producer, Ingenuity StudiosLondon is shown during a flyover. We found a layout of the city of London, so in terms of how the streets wind and where the buildings are located, there has not been a lot of change, Shanklin notes. Our CG team would go in and model the buildings; our texture team would create the bricks and wood; and, generally, the DMP team would go in and dirty things up. It was about splitting up the labor so we could get things done as quickly as possible. Smoke was a prominent atmospheric in London. We started out being extremely realistic, thinking, Okay, this is the era of coal, so thick black smoke was billowing from every chimney, recalls Shanklin. However, thats one area where theyre like, Tone it down. Make it look more like steam. Make less of it so we can see more of the city. Historical accuracy gave way to narrative clarity. We were told specifically to add Big Ben under construction with all the scaffolding even though that did not happen until 1843. That was because there are three possible landmarks that would make London identifiable, with Big Ben being the most recognizable.Washington Black is not based in true history, so there are certain anachronistic qualities to the imagery.The CG book, which serves as bookends for the series, was a last-minute addition. Luckily, in-house we had a number of leather and page textures, Shanklin remarks. For the book opening, how many individual images and pages do you want to see? Once they got the number to us, we did a loose Playblast showing that number of pages with images on them. We sent that to the client who approved it, and went from there. We didnt have time to think about how the pages should move. It was more about rigging them so they had natural paper weight and bends and moved slightly. While we were having the CG team create the book and rig it for animation, our DMP team went in and created versions of what the pages and cover looked like. While these things were being created, we were getting look approvals from the client, so when it got to the actual textures of the book after it was modeled and rigged, we already knew what look the client wanted. That helped us move faster.· 0 Comments ·0 Shares
593
-
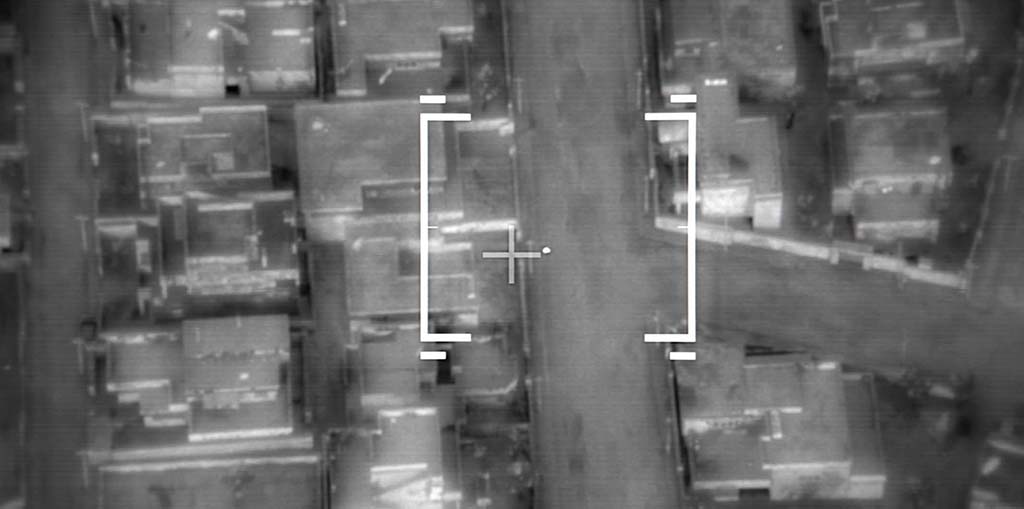 THE RULES OF ENGAGEMENT FOR WARFAREwww.vfxvoice.comBy TREVOR HOGGImages courtesy of DNA Films, A24 and Cinesite.What starts off as a routine military operation goes horribly wrong, and such an experience left a lasting impression on former American Navy SEAL Ray Mendoza, who recounts how his platoon came under fire during the Iraq War in 2006 while monitoring U.S. troop movements through hostile territory. The real-life incident serves as the basis for Warfare, which Mendoza co-directed with Alex Garland and shot over a period of 28 days at Bovingdon Airfield in Hertfordshire, U.K. Assisting with the environmental transformation consisting of approximately 200 shots was the visual effects team led by Simon Stanley-Camp and sole vendor Cinesite.Im delighted and disappointed [that Warfare has been praised for its realistic portrayal of soldiers in action] because no one knows there are visual effects, and there has been nothing said about the visual effects yet. In this climate, Warfare should be seen by a lot of people.Simon Stanley-Camp, Visual Effects SupervisorProviding audience members with a sense of direction is the drone footage, which involved placing large bluescreen carpet down an airport runway.Without the shadow of a doubt, this was the most collaborative movie Ive ever worked on in 25 years, notes Visual Effects Supervisor Stanley-Camp. Every department was so helpful, from production design to special effects, which we worked with hand-in-hand. There were probably three different layers or levels of smoke. Theres smoke, dust and debris when the grenade goes off [in the room]. All of those special effects elements were captured mostly in-camera. Weve occasionally added a little bit of smoke within the masonry. The big IED [Improvised Explosive Device] explosion was smoky, but over the course of the 50 shots where theyre scrambling around in the smoke, we added 30% more smoke. It starts thick and soupy. You could have two guys standing next to each other and they wouldnt know it. There was this idea of layering more smoke to hide the surrounding action. We had lots of rotoscoping and layering in there.Practical explosions were used as the base, then expanded upon digitally.The Show of Force [where U.S. fighter jets fly overhead] occurs quickly. You cut back inside to be with the soldiers in the house. You dont linger outside and see the dust settling, blowing away and clearing. The first Show of Force we sped up to almost double the speed it was filmed. Its the one time we used the crane. On the whole, the action is always with the soldiers. Its handheld. Its Steadicam. You are a soldier.Simon Stanley-Camp, Visual Effects SupervisorPrincipal photography took place outdoors. Its funny because Bovingdon Airfield is a studio with five or six soundstages, but we didnt use any of them other than for some effects elements, Stanley-Camp reveals. We were shooting in the car park next to the airfield. There was one building, which is the old control tower from the Second World War, that we repurposed for a market area. Just before I was involved, there was talk about building one house. Then, it went up to four and finally to eight houses that were flattage and worked from specific angles. If you go slightly off center, you can see the sides of the set or down the gaps between the set. We had two 20-foot by 120-foot bluescreens and another two on Manitous that could be floated around and walked in.Greenscreen assisted with digital set extensions.Ramadi, Iraq is a real place, so maps and Google Docs were referenced for the layout of the streets. We lifted buildings from that reference, and Ray would say, No. That road wasnt there. We put in water towers off in the distance, which Ray remembered being there and where they were then. Palm trees and bushes were dressed into the set, which was LiDAR scanned and photomontaged before and after the battle. There is quite a lot of greens, and I shot ferns as elements blowing around with the smoke, and being blown with air movers as 2D elements to pepper back in along with laundry, Stanley-Camp states. I mention laundry because we were looking for things to add movement that didnt look out of place. There are air conditioning units and fans moving. We had some CG palm trees with three levels of pre-programmed motion to dial in, like high, medium and low, for ambient movement, but nothing too drastic. Then on the flybys of the Show of Force, we ran another simulation on that to create the air resistance of the planes flying through.When the main IED goes off, we shot that with the cast, and it plays out as they come through the gate. Its predominately compressed air, some pyrotechnics, cork, dust and debris, safe stuff that you could fire and light. There are a lot of lighting effects built into that explosion. When the smoke goes off, flashbulbs go off, which provide the necessary brightness and impact. Then, we shot it for real with seven cameras and three buried. We did it twice. The whole crew was there watching it. It was like a big party when they set that off.Simon Stanley-Camp, Visual Effects SupervisorThe fighter jet in the Show of Force sequences was entirely CG.Over a period of 95 minutes, the action unfolds in real-time. One of the first questions I asked Alex was, What is the sky? You imagine that its blue the whole time, Stanley-Camp remarks. [Even though shooting took place during the British summer], were sitting in their winter, so the soldiers are always in full fatigues, and the insurgents are running around with jumpers, coats and sweatshirts. We got a couple of magical days of beautiful skies with lots of texture and clouds. It looked great, and Alex said, This is the look. Anytime there was a spare camera and it was a good sky, we shot it. We didnt have to do so many replacements, probably about five. We had a couple of sunny days where we had to bring in shadow casters for consistency so the sun wasnt going in and out. What did require extensive work were the masonry, bullet hits and explosions. There were a ton of special effects work there. A lot of what we were doing was a heal and reveal painting them out and letting them pop back in, then moving them because with all of the wind, the practical ones are never going to go off in the right place. Maybe because they were too close or too far away. We would reposition and augment them with our own version of CG bullet holes and hits.The dust simulations featured in the Show of Force sequences were created using Houdini.Numerous explosions were captured in-camera. When the main IED goes off, we shot that with the cast, and it plays out as they come through the gate, Stanley-Camp remarks. Its predominately compressed air, some pyrotechnics, cork, dust and debris, safe stuff that you could fire and light. There are a lot of lighting effects built into that explosion. When the smoke goes off, flashbulbs go off, which provide the necessary brightness and impact. Then, we shot it for real with seven cameras and three buried. We did it twice. The whole crew was there watching it. It was like a big party when they set that off. We filled that up with a set extension for the top shot, and as the phosphorous started to die out and fall away, we took over with CG bright phosphorous that lands and rolls around. Then, additional smoke to carry it onto camera. The special effects guys had a spare explosion ready to go, so I shot that as well for an element we didnt use in the end, other than for reference on how combustible it was, how much dust and billowing smoke it let off.Muzzle flashes were specific to the rifles, rather than relying on a generic one.Assisting the platoon are screeching U.S. fighter jets that stir up massive amounts of dust as they fly overhead. The Show of Force happens three times, Stanley-Camp notes. Thats purely effects-generated. Its a Houdini simulation. We had a little bit of help from fans blowing trees and laundry on set. Any ambient real stuff I could get to move, I did. Readability was important. The Show of Force occurs quickly. You cut back inside to be with the soldiers in the house. You dont linger outside and see the dust settling, blowing away and clearing. The first Show of Force we sped up to almost double the speed it was filmed. Its the one time we used the crane. On the whole, the action is always with the soldiers. Its handheld. Its Steadicam. You are a soldier.When theyre being dragged up the drive into the house, the legs are meant to be broken in weird and awkward angles. We did a lot with repositioning angles. If you look at the before and after, you go, Oh, my god, theyre at horrible angles. However, if you look at it straight on and are not comparing it against a normal leg, its less noticeable. We did quite a lot of bending, warping and breaking of legs!Simon Stanley-Camp, Visual Effects SupervisorAn effort was made to always have practical elements in-camera.The fighter jet was entirely CG. You could get in it, Stanley-Camp reveals. Its a full textured build. The canopy is reflecting anything that would be in shot from the HDRI. What was real were the Bradley Fighting Vehicles. We had two Bradleys and two drivers. The Bradleys were redressed with armor plating fitted on the sides to make them bulkier than when they came to us raw. The gun turret was modified and the barrel added. It didnt fire, so thats all us. The major misconception of the Bradleys is that it fires a big pyrotechnic shell. But the shell doesnt explode on contact. It punches holes through things. When it fires, what we see coming out the end is dust, debris, a little puff and a tiny bit of gunk. Ive seen bigger tanks where the whole tank shakes when they fire. There is none of that. The Bradleys are quick and nimble reconnaissance vehicles.Unfolding in real-time, Warfare was shot over a period of 28 days at Bovingdon Airfield in Hertfordshire, U.K.Muzzle flashes are plentiful. We had about six different types of rifles, so we broke those down and shot extensively, Stanley-Camp states. We did a days effects shoot against black that included every rifle shot from every angle. More interesting from a technical perspective, we looked at different frame rates to shoot any of the live-action gun work to capture as much of the muzzle flashes as possible. Alex said he had to replace a lot of them during Civil War because they had all sorts of rolling shutter problems. We experimented with different frame rates and ended up shooting at 30 frames per second to capture the most of the muzzle flash, and that gave us the least rolling shutter effect. Muzzle flashes are a bright light source. Once the grenade has gone off and the rooms are filled with smoke, the muzzle flash illuminates in a different way; it lights the room and smoke. How much atmospherics were in the room depended on how bright the muzzle flash registered.The flattage sets were sturdy enough to allow shooting to take place on the rooftops.Not as much digital augmentation was required for wounds than initially thought. The house is probably three feet off the ground, and we were also able to dig some holes, Stanley-Camp reveals. There were trapdoors in the floor with leg-sized holes that you could slip your knee into, refit the tiles around the leg, and then [use] the prosthetic leg. Usually, from the knee down was replaced. Because of open wounds, arterial veins are exposed, I thought there should be a bit of pumping blood, so we put a little blood movement on the legs and shins. Otherwise, not too much. It stood up. When theyre being dragged up the drive into the house, the legs are meant to be broken in weird and awkward angles. We did a lot with repositioning angles. If you look at the before and after, you go, Oh, my god, theyre at horrible angles. However, if you look at it straight on and are not comparing it against a normal leg, its less noticeable. We did quite a lot of bending, warping and breaking of legs!The Bradley Fighting Vehicles were practical, then digitally enhanced.Drone footage provides audience members with a sense of direction. Initially, the map was barely going to be seen, Stanley-Camp remarks. It was a live play on set, on monitor, and that was it. I did those upfront, played them on the day, and the performance works. Those have stayed in. But the exposition grew, and we did another seven or eight map iterations telling the story where the soldiers and tanks are. One of those shots is four minutes long. I was going to do it as CG or motion capture, and Alex was like, I hate motion capture. Even with these tiny ants moving around, youll know. I looked for studios high enough to get wide enough. 60 feet is about as high as I could get. Then I said, Why dont we shoot it from a drone? This was toward the end of post. We went back to Bovingdon Airfield for two days and had brilliant weather. We shot that on the runway because of the size of the place. It was biggest carpet of bluescreen you can imagine. I had soldiers and insurgents walking the full length of that. Then I took those bluescreen elements and inserted them into the maps.Requiring extensive CG work were the masonry, bullet hits and explosions.The IED device explosion consisted of compressed air, pyrotechnics, cork, dust and debris, which was then heightened digitally to make it feel more lethal.Skies were altered to get the desired mood for shots.Cinesite served as the sole vendor on Warfare and was responsible for approximately 200 visual effects shots.The Show of Force shots were always going to be challenging. There is a lot of reference online, and everybody thinks they know what it should look like, Stanley-Camp remarks. Those shots work in context. Im pleased with them. Warfare has been praised for its realistic portrayal of soldiers in action. Im delighted and disappointed because no one knows there are visual effects, and there has been nothing said about the visual effects yet. In this climate, Warfare should be seen by a lot of people. It takes a snapshot of a moment. Like Ray has been saying, This is one of the thousand of operations that happen on a weekly basis that went wrong.· 0 Comments ·0 Shares
559
THE RULES OF ENGAGEMENT FOR WARFAREwww.vfxvoice.comBy TREVOR HOGGImages courtesy of DNA Films, A24 and Cinesite.What starts off as a routine military operation goes horribly wrong, and such an experience left a lasting impression on former American Navy SEAL Ray Mendoza, who recounts how his platoon came under fire during the Iraq War in 2006 while monitoring U.S. troop movements through hostile territory. The real-life incident serves as the basis for Warfare, which Mendoza co-directed with Alex Garland and shot over a period of 28 days at Bovingdon Airfield in Hertfordshire, U.K. Assisting with the environmental transformation consisting of approximately 200 shots was the visual effects team led by Simon Stanley-Camp and sole vendor Cinesite.Im delighted and disappointed [that Warfare has been praised for its realistic portrayal of soldiers in action] because no one knows there are visual effects, and there has been nothing said about the visual effects yet. In this climate, Warfare should be seen by a lot of people.Simon Stanley-Camp, Visual Effects SupervisorProviding audience members with a sense of direction is the drone footage, which involved placing large bluescreen carpet down an airport runway.Without the shadow of a doubt, this was the most collaborative movie Ive ever worked on in 25 years, notes Visual Effects Supervisor Stanley-Camp. Every department was so helpful, from production design to special effects, which we worked with hand-in-hand. There were probably three different layers or levels of smoke. Theres smoke, dust and debris when the grenade goes off [in the room]. All of those special effects elements were captured mostly in-camera. Weve occasionally added a little bit of smoke within the masonry. The big IED [Improvised Explosive Device] explosion was smoky, but over the course of the 50 shots where theyre scrambling around in the smoke, we added 30% more smoke. It starts thick and soupy. You could have two guys standing next to each other and they wouldnt know it. There was this idea of layering more smoke to hide the surrounding action. We had lots of rotoscoping and layering in there.Practical explosions were used as the base, then expanded upon digitally.The Show of Force [where U.S. fighter jets fly overhead] occurs quickly. You cut back inside to be with the soldiers in the house. You dont linger outside and see the dust settling, blowing away and clearing. The first Show of Force we sped up to almost double the speed it was filmed. Its the one time we used the crane. On the whole, the action is always with the soldiers. Its handheld. Its Steadicam. You are a soldier.Simon Stanley-Camp, Visual Effects SupervisorPrincipal photography took place outdoors. Its funny because Bovingdon Airfield is a studio with five or six soundstages, but we didnt use any of them other than for some effects elements, Stanley-Camp reveals. We were shooting in the car park next to the airfield. There was one building, which is the old control tower from the Second World War, that we repurposed for a market area. Just before I was involved, there was talk about building one house. Then, it went up to four and finally to eight houses that were flattage and worked from specific angles. If you go slightly off center, you can see the sides of the set or down the gaps between the set. We had two 20-foot by 120-foot bluescreens and another two on Manitous that could be floated around and walked in.Greenscreen assisted with digital set extensions.Ramadi, Iraq is a real place, so maps and Google Docs were referenced for the layout of the streets. We lifted buildings from that reference, and Ray would say, No. That road wasnt there. We put in water towers off in the distance, which Ray remembered being there and where they were then. Palm trees and bushes were dressed into the set, which was LiDAR scanned and photomontaged before and after the battle. There is quite a lot of greens, and I shot ferns as elements blowing around with the smoke, and being blown with air movers as 2D elements to pepper back in along with laundry, Stanley-Camp states. I mention laundry because we were looking for things to add movement that didnt look out of place. There are air conditioning units and fans moving. We had some CG palm trees with three levels of pre-programmed motion to dial in, like high, medium and low, for ambient movement, but nothing too drastic. Then on the flybys of the Show of Force, we ran another simulation on that to create the air resistance of the planes flying through.When the main IED goes off, we shot that with the cast, and it plays out as they come through the gate. Its predominately compressed air, some pyrotechnics, cork, dust and debris, safe stuff that you could fire and light. There are a lot of lighting effects built into that explosion. When the smoke goes off, flashbulbs go off, which provide the necessary brightness and impact. Then, we shot it for real with seven cameras and three buried. We did it twice. The whole crew was there watching it. It was like a big party when they set that off.Simon Stanley-Camp, Visual Effects SupervisorThe fighter jet in the Show of Force sequences was entirely CG.Over a period of 95 minutes, the action unfolds in real-time. One of the first questions I asked Alex was, What is the sky? You imagine that its blue the whole time, Stanley-Camp remarks. [Even though shooting took place during the British summer], were sitting in their winter, so the soldiers are always in full fatigues, and the insurgents are running around with jumpers, coats and sweatshirts. We got a couple of magical days of beautiful skies with lots of texture and clouds. It looked great, and Alex said, This is the look. Anytime there was a spare camera and it was a good sky, we shot it. We didnt have to do so many replacements, probably about five. We had a couple of sunny days where we had to bring in shadow casters for consistency so the sun wasnt going in and out. What did require extensive work were the masonry, bullet hits and explosions. There were a ton of special effects work there. A lot of what we were doing was a heal and reveal painting them out and letting them pop back in, then moving them because with all of the wind, the practical ones are never going to go off in the right place. Maybe because they were too close or too far away. We would reposition and augment them with our own version of CG bullet holes and hits.The dust simulations featured in the Show of Force sequences were created using Houdini.Numerous explosions were captured in-camera. When the main IED goes off, we shot that with the cast, and it plays out as they come through the gate, Stanley-Camp remarks. Its predominately compressed air, some pyrotechnics, cork, dust and debris, safe stuff that you could fire and light. There are a lot of lighting effects built into that explosion. When the smoke goes off, flashbulbs go off, which provide the necessary brightness and impact. Then, we shot it for real with seven cameras and three buried. We did it twice. The whole crew was there watching it. It was like a big party when they set that off. We filled that up with a set extension for the top shot, and as the phosphorous started to die out and fall away, we took over with CG bright phosphorous that lands and rolls around. Then, additional smoke to carry it onto camera. The special effects guys had a spare explosion ready to go, so I shot that as well for an element we didnt use in the end, other than for reference on how combustible it was, how much dust and billowing smoke it let off.Muzzle flashes were specific to the rifles, rather than relying on a generic one.Assisting the platoon are screeching U.S. fighter jets that stir up massive amounts of dust as they fly overhead. The Show of Force happens three times, Stanley-Camp notes. Thats purely effects-generated. Its a Houdini simulation. We had a little bit of help from fans blowing trees and laundry on set. Any ambient real stuff I could get to move, I did. Readability was important. The Show of Force occurs quickly. You cut back inside to be with the soldiers in the house. You dont linger outside and see the dust settling, blowing away and clearing. The first Show of Force we sped up to almost double the speed it was filmed. Its the one time we used the crane. On the whole, the action is always with the soldiers. Its handheld. Its Steadicam. You are a soldier.When theyre being dragged up the drive into the house, the legs are meant to be broken in weird and awkward angles. We did a lot with repositioning angles. If you look at the before and after, you go, Oh, my god, theyre at horrible angles. However, if you look at it straight on and are not comparing it against a normal leg, its less noticeable. We did quite a lot of bending, warping and breaking of legs!Simon Stanley-Camp, Visual Effects SupervisorAn effort was made to always have practical elements in-camera.The fighter jet was entirely CG. You could get in it, Stanley-Camp reveals. Its a full textured build. The canopy is reflecting anything that would be in shot from the HDRI. What was real were the Bradley Fighting Vehicles. We had two Bradleys and two drivers. The Bradleys were redressed with armor plating fitted on the sides to make them bulkier than when they came to us raw. The gun turret was modified and the barrel added. It didnt fire, so thats all us. The major misconception of the Bradleys is that it fires a big pyrotechnic shell. But the shell doesnt explode on contact. It punches holes through things. When it fires, what we see coming out the end is dust, debris, a little puff and a tiny bit of gunk. Ive seen bigger tanks where the whole tank shakes when they fire. There is none of that. The Bradleys are quick and nimble reconnaissance vehicles.Unfolding in real-time, Warfare was shot over a period of 28 days at Bovingdon Airfield in Hertfordshire, U.K.Muzzle flashes are plentiful. We had about six different types of rifles, so we broke those down and shot extensively, Stanley-Camp states. We did a days effects shoot against black that included every rifle shot from every angle. More interesting from a technical perspective, we looked at different frame rates to shoot any of the live-action gun work to capture as much of the muzzle flashes as possible. Alex said he had to replace a lot of them during Civil War because they had all sorts of rolling shutter problems. We experimented with different frame rates and ended up shooting at 30 frames per second to capture the most of the muzzle flash, and that gave us the least rolling shutter effect. Muzzle flashes are a bright light source. Once the grenade has gone off and the rooms are filled with smoke, the muzzle flash illuminates in a different way; it lights the room and smoke. How much atmospherics were in the room depended on how bright the muzzle flash registered.The flattage sets were sturdy enough to allow shooting to take place on the rooftops.Not as much digital augmentation was required for wounds than initially thought. The house is probably three feet off the ground, and we were also able to dig some holes, Stanley-Camp reveals. There were trapdoors in the floor with leg-sized holes that you could slip your knee into, refit the tiles around the leg, and then [use] the prosthetic leg. Usually, from the knee down was replaced. Because of open wounds, arterial veins are exposed, I thought there should be a bit of pumping blood, so we put a little blood movement on the legs and shins. Otherwise, not too much. It stood up. When theyre being dragged up the drive into the house, the legs are meant to be broken in weird and awkward angles. We did a lot with repositioning angles. If you look at the before and after, you go, Oh, my god, theyre at horrible angles. However, if you look at it straight on and are not comparing it against a normal leg, its less noticeable. We did quite a lot of bending, warping and breaking of legs!The Bradley Fighting Vehicles were practical, then digitally enhanced.Drone footage provides audience members with a sense of direction. Initially, the map was barely going to be seen, Stanley-Camp remarks. It was a live play on set, on monitor, and that was it. I did those upfront, played them on the day, and the performance works. Those have stayed in. But the exposition grew, and we did another seven or eight map iterations telling the story where the soldiers and tanks are. One of those shots is four minutes long. I was going to do it as CG or motion capture, and Alex was like, I hate motion capture. Even with these tiny ants moving around, youll know. I looked for studios high enough to get wide enough. 60 feet is about as high as I could get. Then I said, Why dont we shoot it from a drone? This was toward the end of post. We went back to Bovingdon Airfield for two days and had brilliant weather. We shot that on the runway because of the size of the place. It was biggest carpet of bluescreen you can imagine. I had soldiers and insurgents walking the full length of that. Then I took those bluescreen elements and inserted them into the maps.Requiring extensive CG work were the masonry, bullet hits and explosions.The IED device explosion consisted of compressed air, pyrotechnics, cork, dust and debris, which was then heightened digitally to make it feel more lethal.Skies were altered to get the desired mood for shots.Cinesite served as the sole vendor on Warfare and was responsible for approximately 200 visual effects shots.The Show of Force shots were always going to be challenging. There is a lot of reference online, and everybody thinks they know what it should look like, Stanley-Camp remarks. Those shots work in context. Im pleased with them. Warfare has been praised for its realistic portrayal of soldiers in action. Im delighted and disappointed because no one knows there are visual effects, and there has been nothing said about the visual effects yet. In this climate, Warfare should be seen by a lot of people. It takes a snapshot of a moment. Like Ray has been saying, This is one of the thousand of operations that happen on a weekly basis that went wrong.· 0 Comments ·0 Shares
559
-
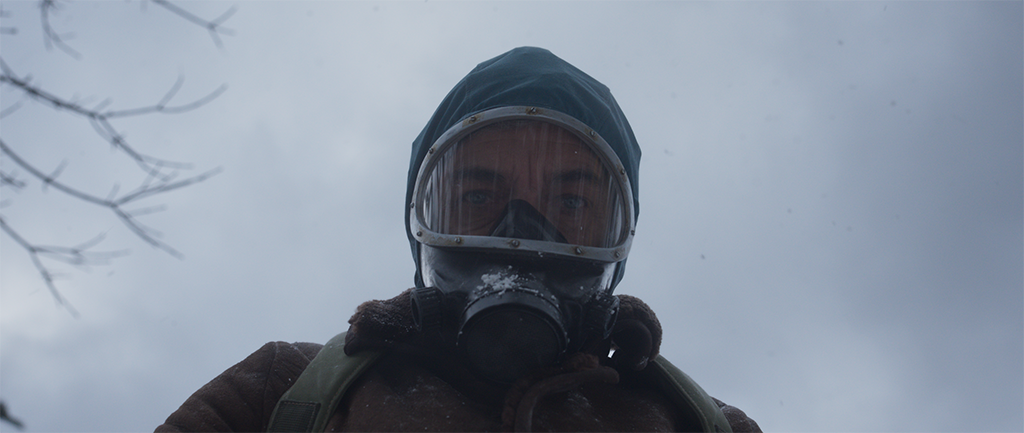 BOAT DELIVERS A FLURRY OF VISUAL EFFECTS FOR THE ETERNAUTwww.vfxvoice.comBy TREVOR HOGGImages courtesy of Netflix, K&S Films & Boat.The K&S Films and Netflix adaption of the iconic Argentinian graphic novel The Eternaut, which consists of six episodes created, directed and written by Bruno Stagnaro, provided a global showcase for Latin America visual effects company Boat. The major tasks for Boat were 120 days of on-set supervision and utilizing 70 artists in Buenos Aires and Montevideo to create 360 shots and 40 assets that turn Buenos Aires into a wintry, apocalyptic environment during an alien invasion. The production company had storyboards and concept art, but the director also worked with the art department to develop an in-house team to make previs and postvis of each sequence, states Guille Lawlor, VFX Supervisor at Boat. That was a good base to start from as we were not working from scratch.Reflections in the masks had to be painted out and reinserted to avoid taking away from the facial performance.One of the things that Boat is known for in Latin America is crowd simulation expertise. For this project, the challenging thing was trying to connect and render our Houdini crowd tool in Unreal Engine. The running characters are digital, but we also added a lot of dead extras on the ground; that was an Easter egg for us because we scanned ourselves!Guille Lawlor, VFX Supervisor, BoatBecause of the scope of the project, significant alterations were made to the pipeline. All of the CG and set extensions were done in Unreal Engine, which made things a lot easier, Lawlor remarks. There were no big issues with the render farm because Unreal Engine specializes in giving you fast renders. We have since adopted the Unreal Engine technology in other shows. The real-time renders have changed everything for us. USD was another significant component. The backbone of the 3D pipeline was USD, which makes it easy to share assets and scenes between different software. All of the set extensions were made in Unreal Engine, but all of the simulations and effects were done in Houdini. We used USD to share and connect every step of our work, Lawlor says.A major logistical and technical challenge was turning Buenos Aires into a wintry city through practical and digital effects, given that it never snows there.A massive effort was made to have a practical foundation, which meant constructing 15 main sets, bringing in 500 tons of artificial snow and having a 2,000-square-meter warehouse covered in greenscreen that allowed for digital extensions. It was good to have the artificial snow because you get real reactions from the actors, Lawlor notes. Principal photography went on for eight or nine months, starting in the winter and ending in the summer. The thing is, in Buenos Aires, it never snows. We had to deal with 360 shots, and in every one we had to do snow simulations. We ended up having four independent visual effects team that had a supervisor, coordinator, Unreal Engine leader and 10 compositors. One specific team worked on matchmoving and another only on visual effects simulations, which were fed to the other compositing teams. I was the overall supervisor, and it was a big challenge coordinating all of the teams together.The wheels of vehicles were digitally replaced to get the proper interaction with the artificial snow.All of the CG and set extensions were done in Unreal Engine, which made things a lot easier. There were no big issues with the render farm because Unreal Engine specializes in giving you fast renders. We have since adopted the Unreal Engine technology in other shows. The real-time renders have changed everything for us.Guille Lawlor, VFX Supervisor, BoatSnow continuity was a major issue. The snow and storm are like characters in the story, Lawlor states. In each episode, we have a different mood for the snow and storm. The snow starts falling quietly, then the storm gets higher and higher. At some point, the storm ends and the residents can go outside and breathe fresh air. Reality, at times, served as an inspiration. We had a couple of artists living in Nordic countries who shot their own reference. Snow had to interact with gunfire. The effects team delivered almost 100 shots of bullet hits in the snow, and we did everything in Houdini.A city block and three houses were constructed at a studio backlot.Much of the footage was captured in the studio backlot. That backlot represented a specific street and corner of the city, Lawlor explains. We scanned the real locations and matched everything together because the director wanted anyone from Buenos Aires watching the show to go, Hey, thats my place! I know this corner. We used a lot of Google Maps and local reference. Theres also a ton of advertising in the city, and the production decided to keep everything like it is in the real world. Iconic shots were recreated from the graphic novel. Lawlor explains, There is a lot of recreation of the graphic novel in the show. When the main character goes outside for the first time and the shot of the two characters going to the harbor looking for a specific yacht only to find that water doesnt exist anymore; that sequence changed our relationship with the production because once the director saw it, he said, I trust them. Afterwards, we started receiving an insane number of shots, and thats why we had to quickly scale up our team.That backlot represented a specific street and corner of the city. We scanned the real locations and matched everything together because the director wanted anyone from Buenos Aires watching the show to go, Hey, thats my place! I know this corner. We used a lot of Google Maps and local reference. Theres also a ton of advertising in the city, and the production decided to keep everything like it is in the real world.Guille Lawlor, VFX Supervisor, BoatAn iconic moment from the graphic novel was recreated by turning a harbor with boats into a frozen wasteland.Vehicles were shot at the studio. We did a matchmove for each car and simulated the wheels and their interaction with the snow because the actual set floor was salt, which doesnt react in the same way, Lawlor reveals. We had to clean up the tire tracks from previous shots and from the production guys on set. At the end, we developed a Houdini tool to do our own wheels and footprints, which was easier than having to work by hand. Reflections were equally important to get right. For all of the shots captured at the studio, we had to replace the reflection of the ceiling and add extra ones in our CG environments to give them more realism. The tough thing was replacing the reflections on the mask; and in three or four shots that took the mask off, as it was a closeup and you want to look into the eyes of the actor. It was a huge thing dealing with reflections, especially in the faces of the actors.One of the tools being utilized was virtual production, which included work by the K&S Inhouse team.Digital doubles were not utilized for the main actors, but crowds were added in the background during the shootout to get the desired scope. One of the things that Boat is known for in Latin America is crowd simulation expertise, Lawlor states. For this project, the challenging thing was trying to connect and render our Houdini crowd tool in Unreal Engine. The running characters are digital, but we also added a lot of dead extras on the ground; that was an Easter egg for us because we scanned ourselves! Having Boat colleague Bruno Fauceglia on set streamlined the process. I dont know how the other vendors did the work, because one of the most important things is all the information that we have from set, notes Onset VFX Supervisor Fauceglia. Most of my on-set relationships were with the art department and DP. You have parts of the scene in virtual production, in the studio with bluescreen and on location. Most of what you see in the final picture is the combination of that.A train is surrounded by a digital environment.Another vendor captured the LiDAR and photogrammetry, which was then processed by the virtual art department. I did photogrammetry myself when we had to improvise the data set for a location, object or character in order to have that information in post, Fauceglia remarks. The most important thing is to have the layouts of the scenes and to communicate that information to post-production. You have a lot of data to collect from the position of the camera in order to be able to create various scenarios. Also, you have to communicate the vision of the director six months later in the post-production. For the production company, my job was to make sure everything was done properly and that we had the resources in the future to make it happen. We were at four studios at the same time, so we could build up a scenario in one, shoot in another, then a few weeks later go back to the previous studio and continue shooting. We had a studio with the virtual production on a small stage, another studio had a bigger stage, a little studio had some set decorations, and studio outside the city where we built one block of a neighborhood and three houses.A combination of bluescreen and greenscreen assisted in getting the required scope for environments.500 tons of artificial snow were shipped in and digitally augmented.A partial train-track set was built on the virtual production stage.There is a lot of recreation of the graphic novel in the show. When the main character goes outside for the first time and the shot of the two characters going to the harbor looking for a specific yacht only to find that water doesnt exist anymore; that sequence changed our relationship with the production because once the director saw it, he said, I trust them.Guille Lawlor, VFX Supervisor, BoatAlong with the harbor scene, the shootout at the shopping mall was complex to execute. We had 60 to 70 shots, and that action sequence had to have perfect continuity, which meant having to fix all of the location issues, Lawlor states. The production company only got permission to shoot in one specific place of the location. Then we had to offset that set and cover the whole parking lot with different angles and have everything make sense. People who know that shopping mall understand the continuity, it was a huge layout problem. We spent a lot time trying to figure out how to build the sequence. Shots were digitally altered to make it appear as if they were captured in different areas of the parking lot. That scene was challenging because you go from this storm, which helped to disguise the background, to this clean, pristine set that is obviously fake because it was a sunny day in the summer. Fauceglia remarks, It had that innate look of something that is not real, which we had to alter. Another difficulty was to have the right look for the snow. We were working on set until the last day, understanding how this snow will look in the future. The first month of the process was spent trying to achieve the right look, which we could then replicate for the rest of the show.Assessing the footage captured at the virtual production stage.Filming could only take place in one particular area of the parking lot, complicating the shopping mall shootout.Aliens were not the only threat; so were other humans, as demonstrated by the shopping mall shootout.Watch Boats dramatic VFX reel for The Eternaut, showcasing the companys amazing environment work and dedication to matching the beat of the action and heightened realism of every scene. Click here: https://vimeo.com/1082343152?p=1tBoat was one of 10 studios working on The Eternaut. Other vendors around the world contributing VFX, collaborating and sharing assets include K&S Inhouse, CONTROL Studio, Redefine, Malditomaus, Bitt, PlanetX, Scanline, Unbound and Important Looking Pirates. Watch four brief VFX breakdown videos from CONTROL that show the impressive work done in different stages and most of the assets vendors received for The Eternaut. Click here: https://controlstudio.tv/portfolio/el-eternauta/· 0 Comments ·0 Shares
1K
BOAT DELIVERS A FLURRY OF VISUAL EFFECTS FOR THE ETERNAUTwww.vfxvoice.comBy TREVOR HOGGImages courtesy of Netflix, K&S Films & Boat.The K&S Films and Netflix adaption of the iconic Argentinian graphic novel The Eternaut, which consists of six episodes created, directed and written by Bruno Stagnaro, provided a global showcase for Latin America visual effects company Boat. The major tasks for Boat were 120 days of on-set supervision and utilizing 70 artists in Buenos Aires and Montevideo to create 360 shots and 40 assets that turn Buenos Aires into a wintry, apocalyptic environment during an alien invasion. The production company had storyboards and concept art, but the director also worked with the art department to develop an in-house team to make previs and postvis of each sequence, states Guille Lawlor, VFX Supervisor at Boat. That was a good base to start from as we were not working from scratch.Reflections in the masks had to be painted out and reinserted to avoid taking away from the facial performance.One of the things that Boat is known for in Latin America is crowd simulation expertise. For this project, the challenging thing was trying to connect and render our Houdini crowd tool in Unreal Engine. The running characters are digital, but we also added a lot of dead extras on the ground; that was an Easter egg for us because we scanned ourselves!Guille Lawlor, VFX Supervisor, BoatBecause of the scope of the project, significant alterations were made to the pipeline. All of the CG and set extensions were done in Unreal Engine, which made things a lot easier, Lawlor remarks. There were no big issues with the render farm because Unreal Engine specializes in giving you fast renders. We have since adopted the Unreal Engine technology in other shows. The real-time renders have changed everything for us. USD was another significant component. The backbone of the 3D pipeline was USD, which makes it easy to share assets and scenes between different software. All of the set extensions were made in Unreal Engine, but all of the simulations and effects were done in Houdini. We used USD to share and connect every step of our work, Lawlor says.A major logistical and technical challenge was turning Buenos Aires into a wintry city through practical and digital effects, given that it never snows there.A massive effort was made to have a practical foundation, which meant constructing 15 main sets, bringing in 500 tons of artificial snow and having a 2,000-square-meter warehouse covered in greenscreen that allowed for digital extensions. It was good to have the artificial snow because you get real reactions from the actors, Lawlor notes. Principal photography went on for eight or nine months, starting in the winter and ending in the summer. The thing is, in Buenos Aires, it never snows. We had to deal with 360 shots, and in every one we had to do snow simulations. We ended up having four independent visual effects team that had a supervisor, coordinator, Unreal Engine leader and 10 compositors. One specific team worked on matchmoving and another only on visual effects simulations, which were fed to the other compositing teams. I was the overall supervisor, and it was a big challenge coordinating all of the teams together.The wheels of vehicles were digitally replaced to get the proper interaction with the artificial snow.All of the CG and set extensions were done in Unreal Engine, which made things a lot easier. There were no big issues with the render farm because Unreal Engine specializes in giving you fast renders. We have since adopted the Unreal Engine technology in other shows. The real-time renders have changed everything for us.Guille Lawlor, VFX Supervisor, BoatSnow continuity was a major issue. The snow and storm are like characters in the story, Lawlor states. In each episode, we have a different mood for the snow and storm. The snow starts falling quietly, then the storm gets higher and higher. At some point, the storm ends and the residents can go outside and breathe fresh air. Reality, at times, served as an inspiration. We had a couple of artists living in Nordic countries who shot their own reference. Snow had to interact with gunfire. The effects team delivered almost 100 shots of bullet hits in the snow, and we did everything in Houdini.A city block and three houses were constructed at a studio backlot.Much of the footage was captured in the studio backlot. That backlot represented a specific street and corner of the city, Lawlor explains. We scanned the real locations and matched everything together because the director wanted anyone from Buenos Aires watching the show to go, Hey, thats my place! I know this corner. We used a lot of Google Maps and local reference. Theres also a ton of advertising in the city, and the production decided to keep everything like it is in the real world. Iconic shots were recreated from the graphic novel. Lawlor explains, There is a lot of recreation of the graphic novel in the show. When the main character goes outside for the first time and the shot of the two characters going to the harbor looking for a specific yacht only to find that water doesnt exist anymore; that sequence changed our relationship with the production because once the director saw it, he said, I trust them. Afterwards, we started receiving an insane number of shots, and thats why we had to quickly scale up our team.That backlot represented a specific street and corner of the city. We scanned the real locations and matched everything together because the director wanted anyone from Buenos Aires watching the show to go, Hey, thats my place! I know this corner. We used a lot of Google Maps and local reference. Theres also a ton of advertising in the city, and the production decided to keep everything like it is in the real world.Guille Lawlor, VFX Supervisor, BoatAn iconic moment from the graphic novel was recreated by turning a harbor with boats into a frozen wasteland.Vehicles were shot at the studio. We did a matchmove for each car and simulated the wheels and their interaction with the snow because the actual set floor was salt, which doesnt react in the same way, Lawlor reveals. We had to clean up the tire tracks from previous shots and from the production guys on set. At the end, we developed a Houdini tool to do our own wheels and footprints, which was easier than having to work by hand. Reflections were equally important to get right. For all of the shots captured at the studio, we had to replace the reflection of the ceiling and add extra ones in our CG environments to give them more realism. The tough thing was replacing the reflections on the mask; and in three or four shots that took the mask off, as it was a closeup and you want to look into the eyes of the actor. It was a huge thing dealing with reflections, especially in the faces of the actors.One of the tools being utilized was virtual production, which included work by the K&S Inhouse team.Digital doubles were not utilized for the main actors, but crowds were added in the background during the shootout to get the desired scope. One of the things that Boat is known for in Latin America is crowd simulation expertise, Lawlor states. For this project, the challenging thing was trying to connect and render our Houdini crowd tool in Unreal Engine. The running characters are digital, but we also added a lot of dead extras on the ground; that was an Easter egg for us because we scanned ourselves! Having Boat colleague Bruno Fauceglia on set streamlined the process. I dont know how the other vendors did the work, because one of the most important things is all the information that we have from set, notes Onset VFX Supervisor Fauceglia. Most of my on-set relationships were with the art department and DP. You have parts of the scene in virtual production, in the studio with bluescreen and on location. Most of what you see in the final picture is the combination of that.A train is surrounded by a digital environment.Another vendor captured the LiDAR and photogrammetry, which was then processed by the virtual art department. I did photogrammetry myself when we had to improvise the data set for a location, object or character in order to have that information in post, Fauceglia remarks. The most important thing is to have the layouts of the scenes and to communicate that information to post-production. You have a lot of data to collect from the position of the camera in order to be able to create various scenarios. Also, you have to communicate the vision of the director six months later in the post-production. For the production company, my job was to make sure everything was done properly and that we had the resources in the future to make it happen. We were at four studios at the same time, so we could build up a scenario in one, shoot in another, then a few weeks later go back to the previous studio and continue shooting. We had a studio with the virtual production on a small stage, another studio had a bigger stage, a little studio had some set decorations, and studio outside the city where we built one block of a neighborhood and three houses.A combination of bluescreen and greenscreen assisted in getting the required scope for environments.500 tons of artificial snow were shipped in and digitally augmented.A partial train-track set was built on the virtual production stage.There is a lot of recreation of the graphic novel in the show. When the main character goes outside for the first time and the shot of the two characters going to the harbor looking for a specific yacht only to find that water doesnt exist anymore; that sequence changed our relationship with the production because once the director saw it, he said, I trust them.Guille Lawlor, VFX Supervisor, BoatAlong with the harbor scene, the shootout at the shopping mall was complex to execute. We had 60 to 70 shots, and that action sequence had to have perfect continuity, which meant having to fix all of the location issues, Lawlor states. The production company only got permission to shoot in one specific place of the location. Then we had to offset that set and cover the whole parking lot with different angles and have everything make sense. People who know that shopping mall understand the continuity, it was a huge layout problem. We spent a lot time trying to figure out how to build the sequence. Shots were digitally altered to make it appear as if they were captured in different areas of the parking lot. That scene was challenging because you go from this storm, which helped to disguise the background, to this clean, pristine set that is obviously fake because it was a sunny day in the summer. Fauceglia remarks, It had that innate look of something that is not real, which we had to alter. Another difficulty was to have the right look for the snow. We were working on set until the last day, understanding how this snow will look in the future. The first month of the process was spent trying to achieve the right look, which we could then replicate for the rest of the show.Assessing the footage captured at the virtual production stage.Filming could only take place in one particular area of the parking lot, complicating the shopping mall shootout.Aliens were not the only threat; so were other humans, as demonstrated by the shopping mall shootout.Watch Boats dramatic VFX reel for The Eternaut, showcasing the companys amazing environment work and dedication to matching the beat of the action and heightened realism of every scene. Click here: https://vimeo.com/1082343152?p=1tBoat was one of 10 studios working on The Eternaut. Other vendors around the world contributing VFX, collaborating and sharing assets include K&S Inhouse, CONTROL Studio, Redefine, Malditomaus, Bitt, PlanetX, Scanline, Unbound and Important Looking Pirates. Watch four brief VFX breakdown videos from CONTROL that show the impressive work done in different stages and most of the assets vendors received for The Eternaut. Click here: https://controlstudio.tv/portfolio/el-eternauta/· 0 Comments ·0 Shares
1K
-
 HOW DNEG BUILT SEATTLE AND DECAYED IT 25 YEARS FOR THE LAST OF US SEASON 2www.vfxvoice.comBy CHRIS McGOWANImages courtesy of DNEG and HBO.The greening of a city usually makes a town a nicer place to live in, but it isnt human-friendly when it happens to a post-apocalyptic Seattle overrun with voracious zombie-like creatures, as is the case in Season 2 of the hit HBO series The Last of Us. Much of that transformation was the task of DNEG, which had to reconstruct contemporary Seattle and then add 25 years of decay. Stephen James, VFX Supervisor at DNEG, comments, Building a city, weathering and destroying it, and adding 20 years of overgrowth, is already a very layered and complex challenge. But this season we had to add another layer of complexity water. We had to tell the story through the environment of how a coastal and very rainy city like Seattle may weather over time. Other VFX studios working on the show included Wt FX, Rise FX, Distillery VFX, Important Looking Pirates, Storm Studios and Clear Angle Studios. Alex Wang was the Production VFX Supervisor, and Fiona Campbell Westgate served as Production VFX Producer.A number of different techniques were utilized to build Seattle, from set extension and augmentation to digital matte painting and full CG environments.In order to get data of the waterside of the buildings where our team couldnt access, we had permission to fly a drone in the early morning before sunrise for both photogrammetry and photography. Our drone pilot had to dodge seagulls defending their nests while capturing each structure, which meant several trips to ensure the safety of the drone and the seagulls!Stephen James, VFX Supervisor, DNEGThe Last of Us is based on the Naughty Dog video game, created by Craig Mazin and Neil Druckmann, in which a global fungal infection turns its hosts into deadly mutants that transform or kill most of humanity. We had more than 20 unique locations and environments over the course of the season, from Ellie and Dinas initial approach to Seattle in Episode 3, to epic views of the city from the theater rooftop in Episode 4, and a number of wide city and waterfront shots in Episode 7, explains Melaina Mace, DFX Supervisor at DNEG. We utilized a number of different techniques to build Seattle, from set extension and augmentation to digital matte painting and full CG environments. Nearly all of these sequences required vegetation and overgrowth, weathering and destruction, and, because a lot of our work was set in a flooded Seattle, many sequences also required rain or FX water simulations.Building on the work done on Boston in Season 1, the filmmakers wanted the vegetation in Seattle to be more lush and green, reflecting the weather patterns and climate, telling the story about how a rainy, coastal city like Seattle might weather over time.Mace continues, For wider street and city views, we built a number of key Seattle buildings and built up a library of generic buildings to fill out our city in our wider rooftop and waterfront shots. Our Environment team worked in tandem with our FX team to build a massive, flooded section of the city along the waterfront for Episode 7, which needed to work from multiple different angles across multiple sequences. Nature reclaimed the city with CG moss, ivy and overgrowth. Building on the work done on Boston in Season 1, the filmmakers wanted the vegetation in Seattle to be a bit more lush and green and reflect the weather patterns and climate of the city. Mace explains, We had a library of Megascans ground plants and SpeedTree trees and plants from Season 1 that we were able to build upon as a starting point. We updated our library to include more ferns and coniferous trees to match the vegetation of the Pacific Northwest. Nearly every shot had some element of vegetation, from extending off ground plants in the set dressing and extending ivy up a full building facade, to building an entire ecosystem for a full CG environment. Mace notes, All vegetation scatters and ivy designs were created by our Environment team, led by Environment Supervisor Romain Simonnet. All ivy generation, ground plant and tree scattering was done in Houdini, where the team could also add wind simulations to match the movement of vegetation in the plate photography for seamless integration.To capture the scope of destruction, a partial set was constructed against bluescreen on a studio backlot, then digitally enhanced and completed in CG.To capture the iconic sites of Seattle, our team spent five days in Seattle, both scouting and reference-gathering across the city, James remarks. A big focus on getting as much photography and data as possible for the Aquarium and Great Wheel, given the level of detail and accuracy that would be required. We had multiple people capturing texture and reference photograph, LiDAR capture from Clear Angle, and a drone team for further coverage. Mace explains, We worked with a local production company, Motion State, to capture drone footage of the Aquarium, Great Wheel and a number of other Seattle buildings, which allowed us to create a full photogrammetry scan of each location. James notes, In order to get data of the waterside of the buildings where our team couldnt access, we had permission to fly a drone in the early morning before sunrise for both photogrammetry and photography. Our drone pilot had to dodge seagulls defending their nests while capturing each structure, which meant several trips to ensure the safety of the drone and the seagulls! We also ran video of the drone traveling along the water, beside the Great Wheel and various angles of the city, which were [an] excellent reference for shot composition for any of our full CG shots.The Pinnacle Theatre was based on the real Paramount Theatre in Seattle. DNEGs Environment team extended the city street in CG and dressed it with vegetation and ivy.Based on the real Paramount Theatre in Seattle, we had to extend the CG building [of the Pinnacle Theatre] off a two-story set built on a backlot in Surrey, B.C. The set was actually a mirror image of the real location, so it took a bit of work to line up but still retain the original building design. We were also fortunate enough to have the original Pinnacle Theatre asset from the game, which Naughty Dog very kindly provided for reference.Melaina Mace, DFX Supervisor, DNEGMace notes, Given the scope of the work in Episode 7, we knew we would need to build hero, full-CG assets for a number of locations, including the Seattle Aquarium and Seattle Great Wheel. Each asset was primarily based on the real-world location, with slight design alterations to match the show concept art and set design.A partial set was built on a backlot for the backside of the Aquarium where Ellie climbs onto the pier in Episode 7. Mace adds, We then lined up the location LiDAR and photogrammetry scans with the set LiDAR and adjusted the design of the building to seamlessly line up with the set. Small design details were changed to tie into the design of the game, including the whale murals on the side of the Aquarium, which were a story point to guide Ellie on her quest to find Abby. Another hero asset build was the Pinnacle Theatre, Ellie and Dinas refuge in Seattle, seen in Episodes 4, 5, 6 and 7. Mace explains, Based on the real Paramount Theatre in Seattle, we had to extend the CG building off a two-story set built on a backlot in Surrey, B.C. The set was actually a mirror image of the real location, so it took a bit of work to line up but still retain the original building design. We were also fortunate enough to have the original Pinnacle Theatre asset from the game, which Naughty Dog very kindly provided for reference. Our Environment team then extended the full city street in CG and dressed it with vegetation and ivy.Nearly all sequences required vegetation and overgrowth, weathering and destruction.Drone photogrammetry, on-site location photography, LiDAR scans and custom FX simulations were used to craft expansive CG environments and dynamic weather systems. We spent a week on location in Seattle with our Shoot team, led by Chris Stern, capturing as much data as possible, Mace states. We captured Roundshot photography at varying times of day from multiple different rooftop locations in downtown Seattle, as well as various different angles on the Seattle skyline, which we used as both reference for our CG environments and as the base photography for digital matte painting.DNEGs asset team created nine unique WLF (Washington Liberation Front) soldier digi-doubles based on 3D scans of the actors, then blended them in seamlessly with the actors.Approximately 70 water shots with crashing waves, animated boats and complex FX simulations were crafted. Due to the complexity of the environments and digi-double work and then needing to run hero FX simulations against each of those, it was really vital that both the environment and animation work for these sequences were prioritized early, James notes. Environments focused on any coastal areas that would have FX interaction such as the collapsed city coast, docks and boats run aground. We were very fortunate to have FX Supervisor Roberto Rodricks, along with an FX team with a lot of water experience, James comments. That allowed us to hit the ground running with our water workflows. Each ocean shot started with a base FX ocean that gave us buy-off on speed, wave height and direction. That was then pushed into hero simulation for any foreground water. The animation team, led by Animation Supervisor Andrew Doucette, had boat rigs that would flow with the ocean surface, but then added further detail and secondary motions to the boats. The soldiers were both mocap and keyframe animations to have the soldiers reacting to the ongoing boat movements. Once animation was finalized, FX would then run additional post simulations for boat interaction, which allowed us to quickly adapt and update ocean simulations as animation changed without redoing the full simulation. However, in a few shots, there were so many boats with their wakes interacting with each other that it had to run as one master simulation.Full CG assets were built for a number of locations, including the Seattle Aquarium and Seattle Great Wheel, based on the real-world locations, with slight design alterations to match concept art and set design.Drone footage of the Aquarium, Great Wheel and a number of other Seattle buildings allowed DNEG to create a full photogrammetry scan of each location.To deliver a realistic storm and match plate photography, DNEG Environments added layers of depth to each shot, including secondary details such as wind gusts, rain curtains, ripples and splashes on the water surface.The introduction of water added another layer of complexity to Season 2. Approximately 70 water shots with crashing waves, animated boats and complex FX simulations were crafted.DNEGs Environment team worked in tandem with the FX team to build a massive, flooded section of the city along the waterfront for Episode 7.James continues, In order to sell a realistic storm and match plate photography, it was vital that we added layers and layers of complexity to each of these shots. FX added secondary details such as gusts, rain curtains, ripples and splashes on the water surface, and drips/water sheeting on any surfaces. Digi-doubles were involved in some water shots. The asset team created nine unique WLF (Washington Liberation Front) soldier digi-doubles based on 3D scans of the actors. Each digi had four unique costume sets: two variations on their tactical gear costume and a set of raincoat costume variants to match the plate photography in Episode 7. Mace remarks, Our Animation team, led by Andrew Doucette, brought the soldiers to life, filling out an armada of military boats with the WLF militia, which needed to blend seamlessly with the actors in the plate photography. For the water sequences, we were able to get layout started early and postvisd the entire sequence in late 2024. We were very thorough at that stage, as we wanted to make sure that we had a very solid foundation to build our complex environment, animation and FX work on. Layout had to consolidate a variety of set locations such as the water tank, dry boat rig and multiple set dock locations into one consistent scene.· 0 Comments ·0 Shares
1K
HOW DNEG BUILT SEATTLE AND DECAYED IT 25 YEARS FOR THE LAST OF US SEASON 2www.vfxvoice.comBy CHRIS McGOWANImages courtesy of DNEG and HBO.The greening of a city usually makes a town a nicer place to live in, but it isnt human-friendly when it happens to a post-apocalyptic Seattle overrun with voracious zombie-like creatures, as is the case in Season 2 of the hit HBO series The Last of Us. Much of that transformation was the task of DNEG, which had to reconstruct contemporary Seattle and then add 25 years of decay. Stephen James, VFX Supervisor at DNEG, comments, Building a city, weathering and destroying it, and adding 20 years of overgrowth, is already a very layered and complex challenge. But this season we had to add another layer of complexity water. We had to tell the story through the environment of how a coastal and very rainy city like Seattle may weather over time. Other VFX studios working on the show included Wt FX, Rise FX, Distillery VFX, Important Looking Pirates, Storm Studios and Clear Angle Studios. Alex Wang was the Production VFX Supervisor, and Fiona Campbell Westgate served as Production VFX Producer.A number of different techniques were utilized to build Seattle, from set extension and augmentation to digital matte painting and full CG environments.In order to get data of the waterside of the buildings where our team couldnt access, we had permission to fly a drone in the early morning before sunrise for both photogrammetry and photography. Our drone pilot had to dodge seagulls defending their nests while capturing each structure, which meant several trips to ensure the safety of the drone and the seagulls!Stephen James, VFX Supervisor, DNEGThe Last of Us is based on the Naughty Dog video game, created by Craig Mazin and Neil Druckmann, in which a global fungal infection turns its hosts into deadly mutants that transform or kill most of humanity. We had more than 20 unique locations and environments over the course of the season, from Ellie and Dinas initial approach to Seattle in Episode 3, to epic views of the city from the theater rooftop in Episode 4, and a number of wide city and waterfront shots in Episode 7, explains Melaina Mace, DFX Supervisor at DNEG. We utilized a number of different techniques to build Seattle, from set extension and augmentation to digital matte painting and full CG environments. Nearly all of these sequences required vegetation and overgrowth, weathering and destruction, and, because a lot of our work was set in a flooded Seattle, many sequences also required rain or FX water simulations.Building on the work done on Boston in Season 1, the filmmakers wanted the vegetation in Seattle to be more lush and green, reflecting the weather patterns and climate, telling the story about how a rainy, coastal city like Seattle might weather over time.Mace continues, For wider street and city views, we built a number of key Seattle buildings and built up a library of generic buildings to fill out our city in our wider rooftop and waterfront shots. Our Environment team worked in tandem with our FX team to build a massive, flooded section of the city along the waterfront for Episode 7, which needed to work from multiple different angles across multiple sequences. Nature reclaimed the city with CG moss, ivy and overgrowth. Building on the work done on Boston in Season 1, the filmmakers wanted the vegetation in Seattle to be a bit more lush and green and reflect the weather patterns and climate of the city. Mace explains, We had a library of Megascans ground plants and SpeedTree trees and plants from Season 1 that we were able to build upon as a starting point. We updated our library to include more ferns and coniferous trees to match the vegetation of the Pacific Northwest. Nearly every shot had some element of vegetation, from extending off ground plants in the set dressing and extending ivy up a full building facade, to building an entire ecosystem for a full CG environment. Mace notes, All vegetation scatters and ivy designs were created by our Environment team, led by Environment Supervisor Romain Simonnet. All ivy generation, ground plant and tree scattering was done in Houdini, where the team could also add wind simulations to match the movement of vegetation in the plate photography for seamless integration.To capture the scope of destruction, a partial set was constructed against bluescreen on a studio backlot, then digitally enhanced and completed in CG.To capture the iconic sites of Seattle, our team spent five days in Seattle, both scouting and reference-gathering across the city, James remarks. A big focus on getting as much photography and data as possible for the Aquarium and Great Wheel, given the level of detail and accuracy that would be required. We had multiple people capturing texture and reference photograph, LiDAR capture from Clear Angle, and a drone team for further coverage. Mace explains, We worked with a local production company, Motion State, to capture drone footage of the Aquarium, Great Wheel and a number of other Seattle buildings, which allowed us to create a full photogrammetry scan of each location. James notes, In order to get data of the waterside of the buildings where our team couldnt access, we had permission to fly a drone in the early morning before sunrise for both photogrammetry and photography. Our drone pilot had to dodge seagulls defending their nests while capturing each structure, which meant several trips to ensure the safety of the drone and the seagulls! We also ran video of the drone traveling along the water, beside the Great Wheel and various angles of the city, which were [an] excellent reference for shot composition for any of our full CG shots.The Pinnacle Theatre was based on the real Paramount Theatre in Seattle. DNEGs Environment team extended the city street in CG and dressed it with vegetation and ivy.Based on the real Paramount Theatre in Seattle, we had to extend the CG building [of the Pinnacle Theatre] off a two-story set built on a backlot in Surrey, B.C. The set was actually a mirror image of the real location, so it took a bit of work to line up but still retain the original building design. We were also fortunate enough to have the original Pinnacle Theatre asset from the game, which Naughty Dog very kindly provided for reference.Melaina Mace, DFX Supervisor, DNEGMace notes, Given the scope of the work in Episode 7, we knew we would need to build hero, full-CG assets for a number of locations, including the Seattle Aquarium and Seattle Great Wheel. Each asset was primarily based on the real-world location, with slight design alterations to match the show concept art and set design.A partial set was built on a backlot for the backside of the Aquarium where Ellie climbs onto the pier in Episode 7. Mace adds, We then lined up the location LiDAR and photogrammetry scans with the set LiDAR and adjusted the design of the building to seamlessly line up with the set. Small design details were changed to tie into the design of the game, including the whale murals on the side of the Aquarium, which were a story point to guide Ellie on her quest to find Abby. Another hero asset build was the Pinnacle Theatre, Ellie and Dinas refuge in Seattle, seen in Episodes 4, 5, 6 and 7. Mace explains, Based on the real Paramount Theatre in Seattle, we had to extend the CG building off a two-story set built on a backlot in Surrey, B.C. The set was actually a mirror image of the real location, so it took a bit of work to line up but still retain the original building design. We were also fortunate enough to have the original Pinnacle Theatre asset from the game, which Naughty Dog very kindly provided for reference. Our Environment team then extended the full city street in CG and dressed it with vegetation and ivy.Nearly all sequences required vegetation and overgrowth, weathering and destruction.Drone photogrammetry, on-site location photography, LiDAR scans and custom FX simulations were used to craft expansive CG environments and dynamic weather systems. We spent a week on location in Seattle with our Shoot team, led by Chris Stern, capturing as much data as possible, Mace states. We captured Roundshot photography at varying times of day from multiple different rooftop locations in downtown Seattle, as well as various different angles on the Seattle skyline, which we used as both reference for our CG environments and as the base photography for digital matte painting.DNEGs asset team created nine unique WLF (Washington Liberation Front) soldier digi-doubles based on 3D scans of the actors, then blended them in seamlessly with the actors.Approximately 70 water shots with crashing waves, animated boats and complex FX simulations were crafted. Due to the complexity of the environments and digi-double work and then needing to run hero FX simulations against each of those, it was really vital that both the environment and animation work for these sequences were prioritized early, James notes. Environments focused on any coastal areas that would have FX interaction such as the collapsed city coast, docks and boats run aground. We were very fortunate to have FX Supervisor Roberto Rodricks, along with an FX team with a lot of water experience, James comments. That allowed us to hit the ground running with our water workflows. Each ocean shot started with a base FX ocean that gave us buy-off on speed, wave height and direction. That was then pushed into hero simulation for any foreground water. The animation team, led by Animation Supervisor Andrew Doucette, had boat rigs that would flow with the ocean surface, but then added further detail and secondary motions to the boats. The soldiers were both mocap and keyframe animations to have the soldiers reacting to the ongoing boat movements. Once animation was finalized, FX would then run additional post simulations for boat interaction, which allowed us to quickly adapt and update ocean simulations as animation changed without redoing the full simulation. However, in a few shots, there were so many boats with their wakes interacting with each other that it had to run as one master simulation.Full CG assets were built for a number of locations, including the Seattle Aquarium and Seattle Great Wheel, based on the real-world locations, with slight design alterations to match concept art and set design.Drone footage of the Aquarium, Great Wheel and a number of other Seattle buildings allowed DNEG to create a full photogrammetry scan of each location.To deliver a realistic storm and match plate photography, DNEG Environments added layers of depth to each shot, including secondary details such as wind gusts, rain curtains, ripples and splashes on the water surface.The introduction of water added another layer of complexity to Season 2. Approximately 70 water shots with crashing waves, animated boats and complex FX simulations were crafted.DNEGs Environment team worked in tandem with the FX team to build a massive, flooded section of the city along the waterfront for Episode 7.James continues, In order to sell a realistic storm and match plate photography, it was vital that we added layers and layers of complexity to each of these shots. FX added secondary details such as gusts, rain curtains, ripples and splashes on the water surface, and drips/water sheeting on any surfaces. Digi-doubles were involved in some water shots. The asset team created nine unique WLF (Washington Liberation Front) soldier digi-doubles based on 3D scans of the actors. Each digi had four unique costume sets: two variations on their tactical gear costume and a set of raincoat costume variants to match the plate photography in Episode 7. Mace remarks, Our Animation team, led by Andrew Doucette, brought the soldiers to life, filling out an armada of military boats with the WLF militia, which needed to blend seamlessly with the actors in the plate photography. For the water sequences, we were able to get layout started early and postvisd the entire sequence in late 2024. We were very thorough at that stage, as we wanted to make sure that we had a very solid foundation to build our complex environment, animation and FX work on. Layout had to consolidate a variety of set locations such as the water tank, dry boat rig and multiple set dock locations into one consistent scene.· 0 Comments ·0 Shares
1K
-
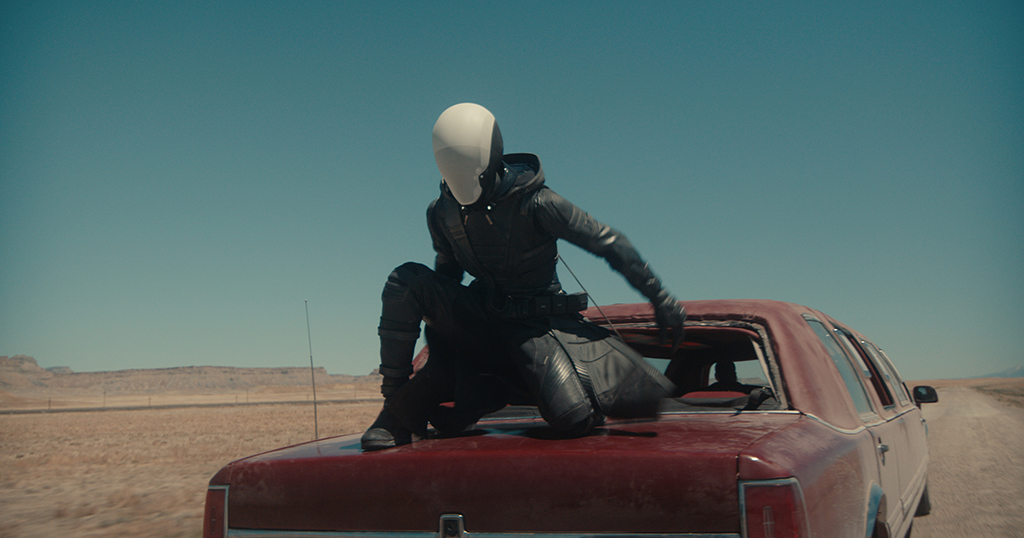 DIGITAL DOMAIN SCALES BACK FOR GREATER EFFECT ON THUNDERBOLTS*www.vfxvoice.comBy TREVOR HOGGImages courtesy of Digital Domain and Marvel Studios.Banding together in Thunderbolts* is a group of criminal misfits, comprised of Yelena Belova, John Walker, Ava Starr, Bucky Barnes, Red Guardian and Taskmaster, who embark on a mission under the direction of filmmaker Jake Schreier, with Jake Morrison providing digital support. Contributing nearly 200 shots was Digital Domain, which was assigned the vault fight, elevator shaft escape, a surreal moment with a Meth Chicken, and creating digital doubles for Yelena Belova, John Walker and Ava Starr that were shared with other participating vendors.Whats great about this movie is that [director] Jake Schreier wanted to ground everything and have things be a lot smaller than we normally would propose. The first version of our explosion with Taskmasters arrow tip was big. Jake was like, I want it a lot smaller. Jake [Morrison] kept dialing it down in size because he felt it shouldnt be overwhelming. That was the philosophy for a lot of the effects in the tasks that we had in hand in visual effects.Nikos Kalaitzidis, VFX Supervisor, Digital DomainMotion blur was a key component of creating the Ghost Effect.One of the variables would be if we looked at the shots assigned to us and had Yelena as a mid to background character, explains Nikos Kalaitzidis, VFX Supervisor at Digital Domain. We might have cut corners and built her differently, but we were the primary vendor that created this character, which had to be shared with other vendors that had to build her more hero-like. We had to make sure that the pores on her skin and face were top quality, and we could create and match the photographic reference provided to us along with the scans. Even though other vendors have their own proprietary software, which is normally a different renderer or rigging system, we provided everything we had once [the character] was completed, such as the model, displacement, textures, reference photography, renders and HDRIs used to create the final turntable.Sparks were treated as 3D assets, which allowed them to be better integrated into shots as interactive light.Serving as the antagonist is the Void, a cruel, dark entity that lives within a superhuman being suffering from amnesia known as Sentry aka Robert Bob Reynolds. In Bobs past life, he was a drug addict, and during a bout of depression he goes back to a dark memory, Kalaitzidis states. As a side job, Bob wore a chicken suit trying to sell something on the side of the road while high on meth. This is one of those sequences that was thought up afterwards as part of the reshoots. The Thunderbolts go into Bobs brain, which has different rooms, and enter a closet that causes them to fall out into a different dimension where its the Meth Chicken universe. A lot of clothes keep falling from the closet until they enter a different door that takes them somewhere else. We only had a few weeks to do it. We had to ensure that everything shot on set had a certain feel and look to it that worked with all of the surrounding sequences. What was interesting about this is they shot it, not with greenscreen, but an old-fashioned matte painting. Our job wasnt to replace the matte painting with a digital one that had more depth, but to seamlessly have the ground meld into that matte painting and make things darker to fit the surrounding environments.As part of the set extension work, the elevator shaft was made to appear as if it was a mile long.There is a point in time where they try to save themselves and go through the threshold at the top of the elevator shaft. Most of them fall and had to be replaced with digital doubles, which meant using the assets we created, having CFX for their cloth and hair, and making sure that the performances and physics were working well from one shot to another.Nikos Kalaitzidis, VFX Supervisor, Digital DomainConstructed as a 100-foot-long, 24-foot-high practical set, the vault still had to be digitally augmented to achieve the necessary size and scope. There were certain parts of it that we needed to do, like set extensions for the ceiling or incinerator vents or hallways that go outside of the vault, Kalaitzidis remarks. There was one hallway with the elevator shaft they built, and we provided three different hallways with variations for each one if the Thunderbolts needed to escape. Contributing to the complexity was the stunt work. We pride ourselves on going from the stunt person to the main actor or actress. There was a lot of choreography that either had to be re-timed and re-performed so it feels like the hits are landing on the other actor and the weapons are hitting the shields. The arm of the Taskmaster had to be re-timed while fighting John Walker. Kalaitzidis notes, They are fighting sword to shield, and the re-time in editorial didnt work out because there was a lot of pauses during the stunt performance. We took out those pauses and made sure there was a certain flow to the fight of the arm hitting shield. We keyframed the arm in 2D to have a different choreography to ensure that both actors were fighting as intended.The new helmet for Ghost makes use of a white mesh.Multiple elements were shot when Walker throws Yelena across the vault. Normally, with a shot like that we would do the hand-off of the stunt person to the main actor during the whip pan, Kalaitzidis explains. But in this particular case, the director wanted us to zoom in on the main actress after the stunt actress hits the ground. The camera was more or less handheld, so we had to realign both cameras to make sure that they were working together. The ground and background had to be redone in CG. The most important part was, how do we see both the stunt actress and Florence Pugh? That was done, in part, by matchmoving both characters and lining them up as close as possible. We even had a digital double as a between, but what helped us was accidentally coming up a new solution with our Charlatan software. When using Charlatan to swap the face, the artist noticed that he could also do the hair down to the shoulders. All of a sudden, he began to blend both plates together, and it became a glorified morphing tool. There is another shot where Walker does a kip-up. One of the stunt guys springs off his hands and lands on his feet. We had to do the same thing but using a digital double of his character and lining it up with the actor who lands at the [desired] place. We matchmoved his performance, did an animation, and used the Charlatan software to blend both bodies. It turned out to be seamless.The live-action blazes from Backdraft were a point a reference when creating the fire flood.The elevator shaft had to be extended digitally so it appears to be a mile long. We had to come up with a look of how it goes into the abyss, which feels like a signature for a lot of different sequences throughout the movie, Kalaitzidis states. They shot the live-action set, which had a certain amount of texture. Jake felt that the textures inside of the set could be more reflective, so we had to enhance the live-action set to blend seamlessly with the set extension of the shaft that goes into darkness. They had safety harnesses to pull them, which had to be removed. There is a point in time where they try to save themselves and go through the threshold at the top of the elevator shaft. Most of them fall and had to be replaced with digital doubles, which meant using the assets we created, having CFX for their cloth and hair, and making sure that the performances and physics were working well from one shot to another.When youre phasing in and out, you might have four heads, and we called each one of those a leaf [a term coined by Visual Effects Supervisor Jake Morrison]. With those leaves we would make sure that they had different opacities, blurs and z-depths, so we had more complexity for each of them. As the leaves separate into different opacities, we also see them coming together. There is a certain choreography that we had in animation to achieve that.Nikos Kalaitzidis, VFX Supervisor, Digital DomainDigital Domain contributed nearly 200 visual effects shots, with lighting being a major component of the plate augmentation.Sparks are always fun to simulate. I always like 3D sparks because theyre more integrated, Kalaitzidis remarks. We also take the sparks and give them to our lighting department to use as interactive light. The same thing with 2D sparks, which have a great dynamic range within the plate and crank up the explosion to create interactive light as well. Explosions tended to be restrained. Whats great about this movie is that Jake Schreier wanted to ground everything and have things be a lot smaller than we normally would propose. The first version of our explosion with Taskmasters arrow tip was big. Jake was like, I want it a lot smaller. Jake kept dialing it down in size because he felt it shouldnt be overwhelming. That was the philosophy for a lot of the effects in the tasks that we had in hand in visual effects. A particular movie directed by Ron Howard was a point of reference. Kalaitzidis explains, Jake Morrison told us, Take a look at the fires in Backdraft because they are all live-action. There was a lot of slow motion. Looking at the texture and fire, and how the fire transmits into smoke, studying the smoke combined with the fire, we used a lot of that to adhere to our incinerator shot.A slower mechanical approach was adopted for the opening and closing of the helmet worn by the Taskmaster.Costumes and effects get upgraded for every movie, with Ghost (Ava Starr) being a significant example this time. Ava can phase out for up to a minute, so she has a bit more control over her phasing power, Kalaitzidis states. This is interesting because it leads to how the phasing is used for choreography when shes fighting and reveals the ultimate sucker punch where she disappears one second, comes back and kicks someone in the face. How we got there was looking at a lot of the footage in Ant-Man. We did it similar but subtler. The plates were matchmoved with the actress; we gave it to our animation team, which offset the performance, left, right, forward, back in time and space. Then in lighting we rendered it out at different shutters, and one long shutter to give it a dreamy look and another that had no shutter so it was sharp when we wanted it that was handed to compositing, which had a template to put it all together because there were a lot of various renders going on at that point. It was a craft between animation, lighting and compositing to dial it in the way Jake Schreier wanted it.A physicality needed to be conveyed for the Ghost Effect. We would recreate the wall in 3D and make sure that as Ava is phasing through in 3D space, she doesnt look like a dissolve but actually appears to be coming out of that wall as her body is transforming through it, Kalaitzidis explains. That was a technique used wherever we could. Another key thing that was tricky was, because we had some long shutters in the beginning in trying to develop this new look, it started to make her feel that she had a super speed. We had to dial back the motion blurs that gave us these long streaks, which looked cool but implied a different sort of power. Multiple layers of effects had to be orchestrated like a dance. When youre phasing in and out, you might have four heads, and we called each one of those a leaf [a term coined by Morrison]. With those leaves we would make sure that they had different opacities, blurs and z-depths, so we had more complexity for each one of them. As the leaves separate into different opacities, we also see them coming together. There is a certain choreography that we had in animation to achieve that.Stunt rehearsals were critical in choreographing the fight between Taskmaster and Ghost inside the vault.Explosions were dialed down to make them more believable.[Ghost (Ava Starr)] can phase out for up to a minute, so she has a bit more control over her phasing power. This is interesting because it leads to how the phasing is used for choreography when shes fighting and reveals the ultimate sucker punch where she disappears one second, comes back and kicks someone in the face. How we got there was looking at a lot of the footage in Ant-Man. We did it similar but subtler.Nikos Kalaitzidis, VFX Supervisor, Digital DomainConstructing the Cryo Case to store Bob was a highlight. It was one of those effects that no one will pay attention to in the movie in regard to how much thought went into it, Kalaitzidis observes. We went through a concept stage with the previs department to come up with almost a dozen different looks for the inside of the Cyro Case. Digital Domain was responsible for how the energy is discharged from Yelenas bracelet for the Widow Bite effect. That was fun because it was established in Black Widow and was a red effect. We went from red to blue, and the Widow Bite was like the explosion when we first did it; it was big arcs of electricity, and Jake Schreier had us dial it down and be more grounded, so we made it smaller and smaller. Not only is it the electricity shooting out as a projectile and hitting someones body, but what does the bracelet look like? We did some look development as if theres an energy source inside of the bracelet.Contributing to the integration of the vault fight was the burning paper found throughout the environment.Allowing the quick opening and closing of the of helmet for Ghost was the conceit that it utilizes nanomite technology.Helmets proved to be challenging. In the MCU, there are these helmets that have nanomite technology, which justifies why they can open and close so fast in a matter of four to six frames, Kalaitzidis states. Ghost had a cool new helmet that had a certain white mesh. We had to break the helmet up into different parts to make it feel mechanical while receding and closing. That happened quickly because there are lot of shots of her where she touches a button on a collar and opens up, and you want to see her performance quickly. It worked well with the cut. For the Taskmaster, we only see it once, and Jake wanted the effect to be more mechanical. It wasnt nanomite technology, and he didnt want to have it magical. Unlike the other helmets, it had to be nice and slow. We had to make sure that it worked with the actors face and skin so it doesnt go through her body and also works with the hoodie. As the helmet goes back, you see the hoodie wrinkle, and it does the same thing when closing.Contributing to the surrealness are the Thunderbolts entering the dark recesses of Bobs mind and encountering his time spent as a chicken mascot high on meth.One of the more complex shots to execute was the fire flood effect in the vault. If the room was exploding, we had a lot of paper on the ground and ran a simulation on that so it would get affected, Kalaitzidis remarks. Then they would run a lighting pass to make sure whatever explosion was happening would light the characters, the crates in the room and ceiling to ensure everything was well integrated. A collaborative mentality prevailed during the production of Thunderbolts*. We were graced with having such a great team and working closely with Jake Morrison. Having him in the same room with Jake Schreier during reviews so we could understand what he was going through and wanted, and the sort of effects he was looking for, was helpful.Watch an informative video breakdown of Digital Domains amazing VFX work on the vault fight and elevator shaft escape for Thunderbolts*. Click here. https://www.youtube.com/watch?v=d0DtdBriMHg· 0 Comments ·0 Shares
2K
DIGITAL DOMAIN SCALES BACK FOR GREATER EFFECT ON THUNDERBOLTS*www.vfxvoice.comBy TREVOR HOGGImages courtesy of Digital Domain and Marvel Studios.Banding together in Thunderbolts* is a group of criminal misfits, comprised of Yelena Belova, John Walker, Ava Starr, Bucky Barnes, Red Guardian and Taskmaster, who embark on a mission under the direction of filmmaker Jake Schreier, with Jake Morrison providing digital support. Contributing nearly 200 shots was Digital Domain, which was assigned the vault fight, elevator shaft escape, a surreal moment with a Meth Chicken, and creating digital doubles for Yelena Belova, John Walker and Ava Starr that were shared with other participating vendors.Whats great about this movie is that [director] Jake Schreier wanted to ground everything and have things be a lot smaller than we normally would propose. The first version of our explosion with Taskmasters arrow tip was big. Jake was like, I want it a lot smaller. Jake [Morrison] kept dialing it down in size because he felt it shouldnt be overwhelming. That was the philosophy for a lot of the effects in the tasks that we had in hand in visual effects.Nikos Kalaitzidis, VFX Supervisor, Digital DomainMotion blur was a key component of creating the Ghost Effect.One of the variables would be if we looked at the shots assigned to us and had Yelena as a mid to background character, explains Nikos Kalaitzidis, VFX Supervisor at Digital Domain. We might have cut corners and built her differently, but we were the primary vendor that created this character, which had to be shared with other vendors that had to build her more hero-like. We had to make sure that the pores on her skin and face were top quality, and we could create and match the photographic reference provided to us along with the scans. Even though other vendors have their own proprietary software, which is normally a different renderer or rigging system, we provided everything we had once [the character] was completed, such as the model, displacement, textures, reference photography, renders and HDRIs used to create the final turntable.Sparks were treated as 3D assets, which allowed them to be better integrated into shots as interactive light.Serving as the antagonist is the Void, a cruel, dark entity that lives within a superhuman being suffering from amnesia known as Sentry aka Robert Bob Reynolds. In Bobs past life, he was a drug addict, and during a bout of depression he goes back to a dark memory, Kalaitzidis states. As a side job, Bob wore a chicken suit trying to sell something on the side of the road while high on meth. This is one of those sequences that was thought up afterwards as part of the reshoots. The Thunderbolts go into Bobs brain, which has different rooms, and enter a closet that causes them to fall out into a different dimension where its the Meth Chicken universe. A lot of clothes keep falling from the closet until they enter a different door that takes them somewhere else. We only had a few weeks to do it. We had to ensure that everything shot on set had a certain feel and look to it that worked with all of the surrounding sequences. What was interesting about this is they shot it, not with greenscreen, but an old-fashioned matte painting. Our job wasnt to replace the matte painting with a digital one that had more depth, but to seamlessly have the ground meld into that matte painting and make things darker to fit the surrounding environments.As part of the set extension work, the elevator shaft was made to appear as if it was a mile long.There is a point in time where they try to save themselves and go through the threshold at the top of the elevator shaft. Most of them fall and had to be replaced with digital doubles, which meant using the assets we created, having CFX for their cloth and hair, and making sure that the performances and physics were working well from one shot to another.Nikos Kalaitzidis, VFX Supervisor, Digital DomainConstructed as a 100-foot-long, 24-foot-high practical set, the vault still had to be digitally augmented to achieve the necessary size and scope. There were certain parts of it that we needed to do, like set extensions for the ceiling or incinerator vents or hallways that go outside of the vault, Kalaitzidis remarks. There was one hallway with the elevator shaft they built, and we provided three different hallways with variations for each one if the Thunderbolts needed to escape. Contributing to the complexity was the stunt work. We pride ourselves on going from the stunt person to the main actor or actress. There was a lot of choreography that either had to be re-timed and re-performed so it feels like the hits are landing on the other actor and the weapons are hitting the shields. The arm of the Taskmaster had to be re-timed while fighting John Walker. Kalaitzidis notes, They are fighting sword to shield, and the re-time in editorial didnt work out because there was a lot of pauses during the stunt performance. We took out those pauses and made sure there was a certain flow to the fight of the arm hitting shield. We keyframed the arm in 2D to have a different choreography to ensure that both actors were fighting as intended.The new helmet for Ghost makes use of a white mesh.Multiple elements were shot when Walker throws Yelena across the vault. Normally, with a shot like that we would do the hand-off of the stunt person to the main actor during the whip pan, Kalaitzidis explains. But in this particular case, the director wanted us to zoom in on the main actress after the stunt actress hits the ground. The camera was more or less handheld, so we had to realign both cameras to make sure that they were working together. The ground and background had to be redone in CG. The most important part was, how do we see both the stunt actress and Florence Pugh? That was done, in part, by matchmoving both characters and lining them up as close as possible. We even had a digital double as a between, but what helped us was accidentally coming up a new solution with our Charlatan software. When using Charlatan to swap the face, the artist noticed that he could also do the hair down to the shoulders. All of a sudden, he began to blend both plates together, and it became a glorified morphing tool. There is another shot where Walker does a kip-up. One of the stunt guys springs off his hands and lands on his feet. We had to do the same thing but using a digital double of his character and lining it up with the actor who lands at the [desired] place. We matchmoved his performance, did an animation, and used the Charlatan software to blend both bodies. It turned out to be seamless.The live-action blazes from Backdraft were a point a reference when creating the fire flood.The elevator shaft had to be extended digitally so it appears to be a mile long. We had to come up with a look of how it goes into the abyss, which feels like a signature for a lot of different sequences throughout the movie, Kalaitzidis states. They shot the live-action set, which had a certain amount of texture. Jake felt that the textures inside of the set could be more reflective, so we had to enhance the live-action set to blend seamlessly with the set extension of the shaft that goes into darkness. They had safety harnesses to pull them, which had to be removed. There is a point in time where they try to save themselves and go through the threshold at the top of the elevator shaft. Most of them fall and had to be replaced with digital doubles, which meant using the assets we created, having CFX for their cloth and hair, and making sure that the performances and physics were working well from one shot to another.When youre phasing in and out, you might have four heads, and we called each one of those a leaf [a term coined by Visual Effects Supervisor Jake Morrison]. With those leaves we would make sure that they had different opacities, blurs and z-depths, so we had more complexity for each of them. As the leaves separate into different opacities, we also see them coming together. There is a certain choreography that we had in animation to achieve that.Nikos Kalaitzidis, VFX Supervisor, Digital DomainDigital Domain contributed nearly 200 visual effects shots, with lighting being a major component of the plate augmentation.Sparks are always fun to simulate. I always like 3D sparks because theyre more integrated, Kalaitzidis remarks. We also take the sparks and give them to our lighting department to use as interactive light. The same thing with 2D sparks, which have a great dynamic range within the plate and crank up the explosion to create interactive light as well. Explosions tended to be restrained. Whats great about this movie is that Jake Schreier wanted to ground everything and have things be a lot smaller than we normally would propose. The first version of our explosion with Taskmasters arrow tip was big. Jake was like, I want it a lot smaller. Jake kept dialing it down in size because he felt it shouldnt be overwhelming. That was the philosophy for a lot of the effects in the tasks that we had in hand in visual effects. A particular movie directed by Ron Howard was a point of reference. Kalaitzidis explains, Jake Morrison told us, Take a look at the fires in Backdraft because they are all live-action. There was a lot of slow motion. Looking at the texture and fire, and how the fire transmits into smoke, studying the smoke combined with the fire, we used a lot of that to adhere to our incinerator shot.A slower mechanical approach was adopted for the opening and closing of the helmet worn by the Taskmaster.Costumes and effects get upgraded for every movie, with Ghost (Ava Starr) being a significant example this time. Ava can phase out for up to a minute, so she has a bit more control over her phasing power, Kalaitzidis states. This is interesting because it leads to how the phasing is used for choreography when shes fighting and reveals the ultimate sucker punch where she disappears one second, comes back and kicks someone in the face. How we got there was looking at a lot of the footage in Ant-Man. We did it similar but subtler. The plates were matchmoved with the actress; we gave it to our animation team, which offset the performance, left, right, forward, back in time and space. Then in lighting we rendered it out at different shutters, and one long shutter to give it a dreamy look and another that had no shutter so it was sharp when we wanted it that was handed to compositing, which had a template to put it all together because there were a lot of various renders going on at that point. It was a craft between animation, lighting and compositing to dial it in the way Jake Schreier wanted it.A physicality needed to be conveyed for the Ghost Effect. We would recreate the wall in 3D and make sure that as Ava is phasing through in 3D space, she doesnt look like a dissolve but actually appears to be coming out of that wall as her body is transforming through it, Kalaitzidis explains. That was a technique used wherever we could. Another key thing that was tricky was, because we had some long shutters in the beginning in trying to develop this new look, it started to make her feel that she had a super speed. We had to dial back the motion blurs that gave us these long streaks, which looked cool but implied a different sort of power. Multiple layers of effects had to be orchestrated like a dance. When youre phasing in and out, you might have four heads, and we called each one of those a leaf [a term coined by Morrison]. With those leaves we would make sure that they had different opacities, blurs and z-depths, so we had more complexity for each one of them. As the leaves separate into different opacities, we also see them coming together. There is a certain choreography that we had in animation to achieve that.Stunt rehearsals were critical in choreographing the fight between Taskmaster and Ghost inside the vault.Explosions were dialed down to make them more believable.[Ghost (Ava Starr)] can phase out for up to a minute, so she has a bit more control over her phasing power. This is interesting because it leads to how the phasing is used for choreography when shes fighting and reveals the ultimate sucker punch where she disappears one second, comes back and kicks someone in the face. How we got there was looking at a lot of the footage in Ant-Man. We did it similar but subtler.Nikos Kalaitzidis, VFX Supervisor, Digital DomainConstructing the Cryo Case to store Bob was a highlight. It was one of those effects that no one will pay attention to in the movie in regard to how much thought went into it, Kalaitzidis observes. We went through a concept stage with the previs department to come up with almost a dozen different looks for the inside of the Cyro Case. Digital Domain was responsible for how the energy is discharged from Yelenas bracelet for the Widow Bite effect. That was fun because it was established in Black Widow and was a red effect. We went from red to blue, and the Widow Bite was like the explosion when we first did it; it was big arcs of electricity, and Jake Schreier had us dial it down and be more grounded, so we made it smaller and smaller. Not only is it the electricity shooting out as a projectile and hitting someones body, but what does the bracelet look like? We did some look development as if theres an energy source inside of the bracelet.Contributing to the integration of the vault fight was the burning paper found throughout the environment.Allowing the quick opening and closing of the of helmet for Ghost was the conceit that it utilizes nanomite technology.Helmets proved to be challenging. In the MCU, there are these helmets that have nanomite technology, which justifies why they can open and close so fast in a matter of four to six frames, Kalaitzidis states. Ghost had a cool new helmet that had a certain white mesh. We had to break the helmet up into different parts to make it feel mechanical while receding and closing. That happened quickly because there are lot of shots of her where she touches a button on a collar and opens up, and you want to see her performance quickly. It worked well with the cut. For the Taskmaster, we only see it once, and Jake wanted the effect to be more mechanical. It wasnt nanomite technology, and he didnt want to have it magical. Unlike the other helmets, it had to be nice and slow. We had to make sure that it worked with the actors face and skin so it doesnt go through her body and also works with the hoodie. As the helmet goes back, you see the hoodie wrinkle, and it does the same thing when closing.Contributing to the surrealness are the Thunderbolts entering the dark recesses of Bobs mind and encountering his time spent as a chicken mascot high on meth.One of the more complex shots to execute was the fire flood effect in the vault. If the room was exploding, we had a lot of paper on the ground and ran a simulation on that so it would get affected, Kalaitzidis remarks. Then they would run a lighting pass to make sure whatever explosion was happening would light the characters, the crates in the room and ceiling to ensure everything was well integrated. A collaborative mentality prevailed during the production of Thunderbolts*. We were graced with having such a great team and working closely with Jake Morrison. Having him in the same room with Jake Schreier during reviews so we could understand what he was going through and wanted, and the sort of effects he was looking for, was helpful.Watch an informative video breakdown of Digital Domains amazing VFX work on the vault fight and elevator shaft escape for Thunderbolts*. Click here. https://www.youtube.com/watch?v=d0DtdBriMHg· 0 Comments ·0 Shares
2K
-
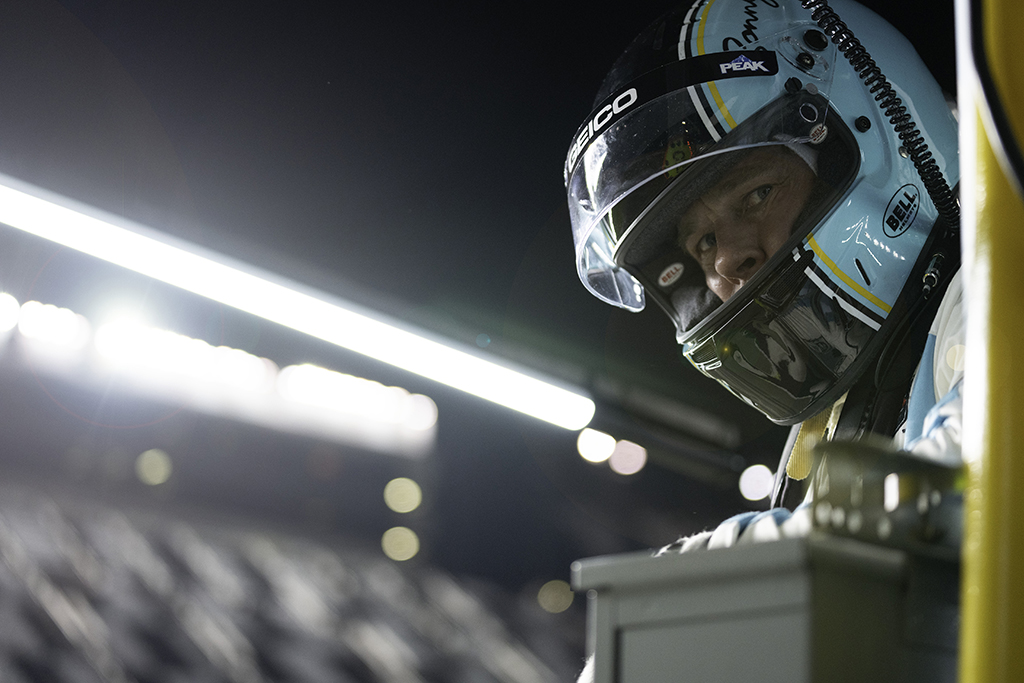 FRAMESTORE CLIMBS BEHIND THE WHEEL FOR F1: THE MOVIEwww.vfxvoice.comBy TREVOR HOGGImages courtesy of Apple Original Films and Warner Bros. Pictures.While the term reskinning is associated with video games where the visual aesthetic is altered within the original framework, it is also an approach utilized extensively by filmmaker Joseph Kosinski, where live-action footage is digitally altered to take advantage of the innate reality while accommodating the needs of the story. This technique was critical in order to bring F1: The Movie to the big screen, as it allowed for broadcast footage to be intercut with principal photography to ensure that the racing scenes envisioned by Kosinski, and starring Brad Pitt and Damson Idris, were dynamic, executable and believable. An extremely high percentage of the 1,200 shots contributed by Framestore involved altering Formula One cars, which made reskinning much more significant than crowd replication and set extensions.The interesting thing about F1: The Movie is that its all got the motion blur of film. On the broadcast footage we added motion blur on top to give the sense of that 180-degrees shutter. In many ways, people are seeing F1 in a way that has not been seen since the 1990s, before F1 became this digital widescreen presentation format, and the blurry shutter went away. It feels quicker because of the way it blurs.Robert Harrington, VFX Supervisor, FramestoreVisors were actually worn by the drivers rather than being digitally added.Its rare to have a shot where you were just adding crowd, notes Robert Harrington, VFX Supervisor at Framestore. You would normally have cars and then there would be some crowd in the background. Reskinning comes down to camera and object tracking. For the Apex cars [driven by Brad Pitt and Damson Idris] we had CAD as a source. Whenever you see the broadcast shots, they get repurposed with a two prong-attack. Broadcast cameras are not like normal cameras. On the other side, youve got to have your objects to track in those shots. We would have a Williams car and turn it into an Apex car. To do that, we had to work out fairly accurately how big those cars were as well as their shapes to solve the camera tracking.Formula Ones massive archive of races was indispensable. For the production shots, you know what those cameras are, Harrington remarks. You can go to the Panavision office and grid all of these lenses. Conversely, broadcast cameras have tiny sensors, and because theyre filming real events, the zooms are humongous. One of them had a Canon UJ86, which goes from 9mm to 800mm. These humongous zooms are quite hard for us to work with. If I took a camera setup with an 800mm zoom and a tiny sensor, but then put the lens on a Sony Venice camera, it would be the equivalent of around 3000mm. We have to work around that and still get the ability to put the cars in those broadcast shots. Beyond that, you have all of the motion blur and the shaking cars, so tracking was a point of focus.Motion blur was digitally inserted into the broadcast footage to better convey the sense of high speed.Terrestrial LiDAR scans were taken of the entire racetracks, and textures were captured by drones. By perhaps Tuesday, everything would have been taken down from the race, so we had to add some props and sponsors back in, Harrington notes. You cant only use the LiDAR. They would be filming in the week following the race and would go around a corner where, during the race, they might have had a bright yellow Pirelli sponsor on the lefthand side, but now theres nothing there, so theres nothing to reflect onto the car theyre filming with the actor. We had a nice car asset. We spent time on the micro scratches and all the little details so that we could render a car that looked like the car on the plate. We could replace panels and areas.The decision was made not to rely on virtual production but to use archival and principal photography footage captured on location.We found some references of hot laps for specific racetracks, for example, Carlos Sainzs best lap in Monza, to have what speed at what corner. We tried to be accurate to that. The shots used the original filmed cars with stickers on them, for example, a Ferrari sticker on an AlphaTauri car, to indicate which car should be replaced in each shot. We were able to use the actual speed of the footage as a reference. We paid close attention to vibration on the car, and how the camera was shaking to give a sensation of having a powerful engine behind you.Nicolas Chevallier, VFX Supervisor, FramestoreCreative license was required for the digital cars. We tried to do the best we could to model the car as closely as possible, states Nicolas Chevallier, VFX Supervisor at Framestore. But its not something where you can go to the Red Bull team and say, May I take pictures of your car in every detail? Its like a secret. Lighting was tricky throughout the movie. Monza and Silverstone are sunny; however, the last race in Abu Dhabi starts in daylight and then goes all the way up until night. The lights around the racetrack in Abu Dhabi were important to match. Yas Marina racetrack has a complex setup of lights, probably engineered for every single one; recreating this was a challenge, mostly at night. We had real-life reference underneath, so we tried to get as close as possible to the car that we were replacing. A strategy was developed for the tires. Chevallier notes, We had a massive database to say, Ferrari needs to have the #55 and has to be on red tires. We had to build a comprehensive shader to be able to handle a lot of settings to change the number on the car, the yellow T-bar or to alter the tire color to make sure they had the right livery for every single track. For example, Mclaren has a different livery for Silverstone. Actually, youre not building 10, but 20 cars in various states. We had different variations of dirt and tire wear.Figuring out how to execute a crash sequence through mathematical calculations, previs and techvis.Shots were tracked through Flow Production Tracking. We developed some bits in Shotgun so we could control car numbers, tire colors and liveries, Harrington states. It was driven entirely at render time essentially with Flow Production Tracking to find out how each car should be set up for liveries, helmets and tire compounds; that gave us a level of flexibility, which was good because there are lots of shots. The Formula One cars needed to look and feel like they were going at a high speed. We found some references of hot laps for specific racetracks, for example, Carlos Sainzs best lap in Monza, to have what speed at what corner, Chevallier explains, We tried to be accurate to that. The editorial team provided us with a rough cut of a sequence. The shots used the original filmed cars with stickers on them, for example, a Ferrari sticker on an AlphaTauri car, to indicate which car should be replaced in each shot. We were able to use the actual speed of the footage as a reference. We paid close attention to vibration on the car, and how the camera was shaking to give a sensation of having a powerful engine behind you.Atmospherics were important in making shots more dynamic and believable.Whenever you see the broadcast shots, they get repurposed with a two prong-attack. Broadcast cameras are not like normal cameras. On the other side, youve got to have your objects to track in those shots. We would have a Williams car and turn it into an Apex car. To do that, we had to work out fairly accurately how big those cars were as well as their shapes to solve the camera tracking.Robert Harrington, VFX Supervisor, FramestoreMotion blur had to be added. We have the footage they shot with the same production cameras, such as the Sony Venice, which was 24 frames per second and 180-degrees shutter, so it had the motion blur look of film, Harrington notes. Broadcast footage always uses a very skinny shutter, which minimizes motion blur. This is done so viewers can clearly see the action, whether its in sports like football, tennis or auto racing. Whenever you press pause, everything is fairly sharp. Things dont look smooth, and it affects how you perceive the speed of the shot. The interesting thing about F1: The Movie is that its all got the motion blur of film. On the broadcast footage we added motion blur on top to give the sense of that 180-degrees shutter. In many ways, people are seeing F1 in a way that has not been seen since the 1990s, before F1 became this digital widescreen presentation format, and the blurry shutter went away. It feels quicker because of the way it blurs.Every shot was based on actual photography.Reflections on the racing visors were not a major issue. I have done my fair share of visors in my career, Harrington notes. But it wasnt a problem on this one. The visors were in all the time because theyre really driving cars. Sparks are plentiful on the racetrack. Most of the time we tried to keep it like the sparks that were actually on the footage. We did some digital sparks for continuity, but always had the next shot in the edit to match to. Chevallier states. Broadcast footage uses a different frame rate. Harrington observes, The only battle would come when you had particularly sharp sparks in a broadcast shot and had to re-time it from 50 frames-per-second skinny shutter to 24.Rain was a significant atmospheric. Monza was shot without rain because it was not raining in 2023, so the Monza rain was a mix of the 2017 race, Chevallier reveals. It was funny how old-fashion the cars looked, so they had to be reskinned for the rain. We also had to add rain, replace the road, insert droplets, mist and rooster tails. There was lots of rain interaction. The challenge was to create all the different ingredients combined at the right level to make a believable shot while keeping efficiency regarding simulation time. We had little droplets on the car body traveling with the speed and reacting to the direction of the car. Spray was coming off the wheels, sometimes from one car onto another one. We had to adjust the levels a couple of times. Lewis Hamilton had some notes as a professional driver, and told us to reduce the rain level by at least 50% or 60% as it was too heavy to race this amount on slick.Around 80% of the visual effects work was centered on reskinning cars.For the production shots, you know what those cameras are. You can go to the Panavision office and grid all of these lenses. Conversely, broadcast cameras have tiny sensors, and because theyre filming real events, the zooms are humongous. We have to work around that and still get the ability to put the cars in those broadcast shots. Beyond that, you have all of the motion blur and the shaking cars, so tracking was a point of focus.Robert Harrington, VFX Supervisor, FramestoreProduction VFX Supervisor Ryan Tudhope organized an array camera car that people saw driving around the races. Panavision went off and built it, Harrington states. It had seven RED Komodos filming backplates plus a RED Monstro filming upwards with a fisheye lens. Komodos are global shutter cameras, so they dont have any rolling-shutter skewing of things that move past. The camera array positions were calibrated with the onboard cameras. This allowed us to always capture the shot of the driver from the same consistent position, even in scenes with rain. We made sure that the array was designed to maximize coverage for these known angles on the car, and thats what Framestore used to then replace the background. They never had to do virtual production.Trees and rain were among the environmental elements digitally added to shots.All of the racetracks are real. Were not doing CG aerial establishing shots, Harrington remarks. We added props, grandstands and buildings to them. The crowds were treated differently for each racetrack. The standard partisans have a specific shirt, but they dont have the same shirt in Monza or Silverstone, Chevallier observes. It was like a recipe with the amount of orange and red, and clusters of like fans all together, to make them seamless with the actual real F1 footage. We were looking at static shots of crowds with people scratching their head or putting their sunglasses on. It was like a social study,Reskinning comes down to camera and object tracking.Sparks were a combination of real and CG elements.Sponsorship signage was part of the environmental work.Personally, Ive watched F1 since I was a kid, Harrington states. What was interesting for me was that we got to forensically rebuild events from the sports history. We actually found out how high that guys car went, or how fast an F1 car actually accelerated. The visual effects work placed everyone in the drivers seat. The thing that impressed me is when we did a few shots and had to matchmove all of the helmets and hands, Chevallier recalls. I gave notes to the team saying, Okay, guys, there are some missing frames because it looks like its shaking like crazy. I had a look frame by frame, and the heads of the guys are jumping from the left side of the cockpit to the right side in less than a frame. I was surprised by all of the forces that apply to this. Some things you would give notes because it looks like a mistake we kept because that was what it was really like for the driver. Im still impressed by all of this.· 0 Comments ·0 Shares
2K
FRAMESTORE CLIMBS BEHIND THE WHEEL FOR F1: THE MOVIEwww.vfxvoice.comBy TREVOR HOGGImages courtesy of Apple Original Films and Warner Bros. Pictures.While the term reskinning is associated with video games where the visual aesthetic is altered within the original framework, it is also an approach utilized extensively by filmmaker Joseph Kosinski, where live-action footage is digitally altered to take advantage of the innate reality while accommodating the needs of the story. This technique was critical in order to bring F1: The Movie to the big screen, as it allowed for broadcast footage to be intercut with principal photography to ensure that the racing scenes envisioned by Kosinski, and starring Brad Pitt and Damson Idris, were dynamic, executable and believable. An extremely high percentage of the 1,200 shots contributed by Framestore involved altering Formula One cars, which made reskinning much more significant than crowd replication and set extensions.The interesting thing about F1: The Movie is that its all got the motion blur of film. On the broadcast footage we added motion blur on top to give the sense of that 180-degrees shutter. In many ways, people are seeing F1 in a way that has not been seen since the 1990s, before F1 became this digital widescreen presentation format, and the blurry shutter went away. It feels quicker because of the way it blurs.Robert Harrington, VFX Supervisor, FramestoreVisors were actually worn by the drivers rather than being digitally added.Its rare to have a shot where you were just adding crowd, notes Robert Harrington, VFX Supervisor at Framestore. You would normally have cars and then there would be some crowd in the background. Reskinning comes down to camera and object tracking. For the Apex cars [driven by Brad Pitt and Damson Idris] we had CAD as a source. Whenever you see the broadcast shots, they get repurposed with a two prong-attack. Broadcast cameras are not like normal cameras. On the other side, youve got to have your objects to track in those shots. We would have a Williams car and turn it into an Apex car. To do that, we had to work out fairly accurately how big those cars were as well as their shapes to solve the camera tracking.Formula Ones massive archive of races was indispensable. For the production shots, you know what those cameras are, Harrington remarks. You can go to the Panavision office and grid all of these lenses. Conversely, broadcast cameras have tiny sensors, and because theyre filming real events, the zooms are humongous. One of them had a Canon UJ86, which goes from 9mm to 800mm. These humongous zooms are quite hard for us to work with. If I took a camera setup with an 800mm zoom and a tiny sensor, but then put the lens on a Sony Venice camera, it would be the equivalent of around 3000mm. We have to work around that and still get the ability to put the cars in those broadcast shots. Beyond that, you have all of the motion blur and the shaking cars, so tracking was a point of focus.Motion blur was digitally inserted into the broadcast footage to better convey the sense of high speed.Terrestrial LiDAR scans were taken of the entire racetracks, and textures were captured by drones. By perhaps Tuesday, everything would have been taken down from the race, so we had to add some props and sponsors back in, Harrington notes. You cant only use the LiDAR. They would be filming in the week following the race and would go around a corner where, during the race, they might have had a bright yellow Pirelli sponsor on the lefthand side, but now theres nothing there, so theres nothing to reflect onto the car theyre filming with the actor. We had a nice car asset. We spent time on the micro scratches and all the little details so that we could render a car that looked like the car on the plate. We could replace panels and areas.The decision was made not to rely on virtual production but to use archival and principal photography footage captured on location.We found some references of hot laps for specific racetracks, for example, Carlos Sainzs best lap in Monza, to have what speed at what corner. We tried to be accurate to that. The shots used the original filmed cars with stickers on them, for example, a Ferrari sticker on an AlphaTauri car, to indicate which car should be replaced in each shot. We were able to use the actual speed of the footage as a reference. We paid close attention to vibration on the car, and how the camera was shaking to give a sensation of having a powerful engine behind you.Nicolas Chevallier, VFX Supervisor, FramestoreCreative license was required for the digital cars. We tried to do the best we could to model the car as closely as possible, states Nicolas Chevallier, VFX Supervisor at Framestore. But its not something where you can go to the Red Bull team and say, May I take pictures of your car in every detail? Its like a secret. Lighting was tricky throughout the movie. Monza and Silverstone are sunny; however, the last race in Abu Dhabi starts in daylight and then goes all the way up until night. The lights around the racetrack in Abu Dhabi were important to match. Yas Marina racetrack has a complex setup of lights, probably engineered for every single one; recreating this was a challenge, mostly at night. We had real-life reference underneath, so we tried to get as close as possible to the car that we were replacing. A strategy was developed for the tires. Chevallier notes, We had a massive database to say, Ferrari needs to have the #55 and has to be on red tires. We had to build a comprehensive shader to be able to handle a lot of settings to change the number on the car, the yellow T-bar or to alter the tire color to make sure they had the right livery for every single track. For example, Mclaren has a different livery for Silverstone. Actually, youre not building 10, but 20 cars in various states. We had different variations of dirt and tire wear.Figuring out how to execute a crash sequence through mathematical calculations, previs and techvis.Shots were tracked through Flow Production Tracking. We developed some bits in Shotgun so we could control car numbers, tire colors and liveries, Harrington states. It was driven entirely at render time essentially with Flow Production Tracking to find out how each car should be set up for liveries, helmets and tire compounds; that gave us a level of flexibility, which was good because there are lots of shots. The Formula One cars needed to look and feel like they were going at a high speed. We found some references of hot laps for specific racetracks, for example, Carlos Sainzs best lap in Monza, to have what speed at what corner, Chevallier explains, We tried to be accurate to that. The editorial team provided us with a rough cut of a sequence. The shots used the original filmed cars with stickers on them, for example, a Ferrari sticker on an AlphaTauri car, to indicate which car should be replaced in each shot. We were able to use the actual speed of the footage as a reference. We paid close attention to vibration on the car, and how the camera was shaking to give a sensation of having a powerful engine behind you.Atmospherics were important in making shots more dynamic and believable.Whenever you see the broadcast shots, they get repurposed with a two prong-attack. Broadcast cameras are not like normal cameras. On the other side, youve got to have your objects to track in those shots. We would have a Williams car and turn it into an Apex car. To do that, we had to work out fairly accurately how big those cars were as well as their shapes to solve the camera tracking.Robert Harrington, VFX Supervisor, FramestoreMotion blur had to be added. We have the footage they shot with the same production cameras, such as the Sony Venice, which was 24 frames per second and 180-degrees shutter, so it had the motion blur look of film, Harrington notes. Broadcast footage always uses a very skinny shutter, which minimizes motion blur. This is done so viewers can clearly see the action, whether its in sports like football, tennis or auto racing. Whenever you press pause, everything is fairly sharp. Things dont look smooth, and it affects how you perceive the speed of the shot. The interesting thing about F1: The Movie is that its all got the motion blur of film. On the broadcast footage we added motion blur on top to give the sense of that 180-degrees shutter. In many ways, people are seeing F1 in a way that has not been seen since the 1990s, before F1 became this digital widescreen presentation format, and the blurry shutter went away. It feels quicker because of the way it blurs.Every shot was based on actual photography.Reflections on the racing visors were not a major issue. I have done my fair share of visors in my career, Harrington notes. But it wasnt a problem on this one. The visors were in all the time because theyre really driving cars. Sparks are plentiful on the racetrack. Most of the time we tried to keep it like the sparks that were actually on the footage. We did some digital sparks for continuity, but always had the next shot in the edit to match to. Chevallier states. Broadcast footage uses a different frame rate. Harrington observes, The only battle would come when you had particularly sharp sparks in a broadcast shot and had to re-time it from 50 frames-per-second skinny shutter to 24.Rain was a significant atmospheric. Monza was shot without rain because it was not raining in 2023, so the Monza rain was a mix of the 2017 race, Chevallier reveals. It was funny how old-fashion the cars looked, so they had to be reskinned for the rain. We also had to add rain, replace the road, insert droplets, mist and rooster tails. There was lots of rain interaction. The challenge was to create all the different ingredients combined at the right level to make a believable shot while keeping efficiency regarding simulation time. We had little droplets on the car body traveling with the speed and reacting to the direction of the car. Spray was coming off the wheels, sometimes from one car onto another one. We had to adjust the levels a couple of times. Lewis Hamilton had some notes as a professional driver, and told us to reduce the rain level by at least 50% or 60% as it was too heavy to race this amount on slick.Around 80% of the visual effects work was centered on reskinning cars.For the production shots, you know what those cameras are. You can go to the Panavision office and grid all of these lenses. Conversely, broadcast cameras have tiny sensors, and because theyre filming real events, the zooms are humongous. We have to work around that and still get the ability to put the cars in those broadcast shots. Beyond that, you have all of the motion blur and the shaking cars, so tracking was a point of focus.Robert Harrington, VFX Supervisor, FramestoreProduction VFX Supervisor Ryan Tudhope organized an array camera car that people saw driving around the races. Panavision went off and built it, Harrington states. It had seven RED Komodos filming backplates plus a RED Monstro filming upwards with a fisheye lens. Komodos are global shutter cameras, so they dont have any rolling-shutter skewing of things that move past. The camera array positions were calibrated with the onboard cameras. This allowed us to always capture the shot of the driver from the same consistent position, even in scenes with rain. We made sure that the array was designed to maximize coverage for these known angles on the car, and thats what Framestore used to then replace the background. They never had to do virtual production.Trees and rain were among the environmental elements digitally added to shots.All of the racetracks are real. Were not doing CG aerial establishing shots, Harrington remarks. We added props, grandstands and buildings to them. The crowds were treated differently for each racetrack. The standard partisans have a specific shirt, but they dont have the same shirt in Monza or Silverstone, Chevallier observes. It was like a recipe with the amount of orange and red, and clusters of like fans all together, to make them seamless with the actual real F1 footage. We were looking at static shots of crowds with people scratching their head or putting their sunglasses on. It was like a social study,Reskinning comes down to camera and object tracking.Sparks were a combination of real and CG elements.Sponsorship signage was part of the environmental work.Personally, Ive watched F1 since I was a kid, Harrington states. What was interesting for me was that we got to forensically rebuild events from the sports history. We actually found out how high that guys car went, or how fast an F1 car actually accelerated. The visual effects work placed everyone in the drivers seat. The thing that impressed me is when we did a few shots and had to matchmove all of the helmets and hands, Chevallier recalls. I gave notes to the team saying, Okay, guys, there are some missing frames because it looks like its shaking like crazy. I had a look frame by frame, and the heads of the guys are jumping from the left side of the cockpit to the right side in less than a frame. I was surprised by all of the forces that apply to this. Some things you would give notes because it looks like a mistake we kept because that was what it was really like for the driver. Im still impressed by all of this.· 0 Comments ·0 Shares
2K
-
 DIGGING DEEPLY INTO VFX FOR THE LIVE-ACTION HOW TO TRAIN YOUR DRAGONwww.vfxvoice.comBy TREVOR HOGGImages courtesy of Universal Studios.While Shrek launched the first franchise for DreamWorks Animation, How to Train Your Dragon has become such a worthy successor that the original director, Dean DeBlois, has returned to do a live-action adaptation of a teenage Viking crossing the social conflict divide between humans and flying beasts by befriending a Night Fury. Given that the fantasy world does not exist, there is no shortage of CG animation provided by Christian Manz and Framestore, in particular with scenes featuring Toothless and the Red Death. Framestore facilities in London, Montreal, Melbourne and Mumbai, as well an in-house team, provided concept art, visual development, previs, techvis, postvis and 1,700 shots to support the cast of Mason Thames, Nico Parker, Gerard Butler, Nick Frost, Gabriel Howell, Bronwyn James and Nick Cornwall.A full-size puppet of Toothless was constructed, minus the wings, that could be broken down into various sections to get the proper interaction with Hiccup.What I hoped is that people would watch it and see real human beings flying dragons. Youre emotionally more connected because youre seeing it for real. The animation is amazing and emotional, but we wanted to try to elevate that in terms of storytelling, emotion and wish fulfillment.Christian Manz, VFX SupervisorEven though the animated features were not treated as glorified previs by the production, the trilogy was the visual starting point for the live-action adaptation. Deans challenge from the beginning was, If you can come up with better shots or work, thats great. If you cant come up with better shots then it will be the one from the animated movie, states VFX Supervisor Manz. When it came to a few key things like flying and reestablishing what that would look like in the real world, we began to deviate. Elevating the complexity of the visual effects work was the sheer amount of interaction between digital creatures and live-action cast. What I hoped is that people would watch it and see real human beings flying dragons, Manz notes. Youre emotionally more connected because youre seeing it for real. The animation is amazing and emotional, but we wanted to try to elevate that in terms of storytelling, emotion and wish fulfillment.Despite having significant set builds, digital extensions were still required to achieve the desired scope for Berk.The nature of live-action filmmaking presented limitations that do not exist in animation. Glen McIntosh, our Animation Supervisor, said from the beginning that, Everything is going to move slower, Manz remarks. You watch Stoick pick up Hiccup at the end of the animated movie, and in about three frames hes grabbed and flung him over his shoulder. In our version, Gerard Butler has to kneel down, shuffle over to where Mason Thames is and lift him up. All of that takes more time. The sizes of the dragons also had to be more consistent. Manz comments, We all had a go at ribbing Dean about continuity because every dragon changed in size throughout the original film. It works and you believe it. However, here we had to obey the size and physics to feel real. An extensive amount of time was spent during pre-production to discover the performances of the dragons. Because we were literally inhabiting a real world, Dominic Watkins was building sets, so we had to find out how big they are, how fast they would move, and their fire. It was important we figured that out ahead of time.One of the hardest scenes to recreate and animate was Hiccup befriending Toothless.We all had a go at ribbing Dean [DeBlois, director] about continuity because every dragon changed in size throughout the original film. It works and you believe it. However, here we had to obey the size and physics to feel real. Because we were literally inhabiting a real world, Dominic Watkins was building sets, so we had to find out how big they are, how fast they would move, and their fire. It was important we figured that out ahead of time.Christian Manz, VFX SupervisorRetaining the cartoon stylization of Toothless was important while also taking advantage of the photorealism associated with live-action. Three months before we officially began working on the film, Peter Cramer, the President of Universal Pictures, wanted to know that Toothless would work, Manz explains. We did visual development but didnt concept him because we already had the animated one. From there we did sculpting in ZBrush, painting in Photoshop and rendering in Blender. We spent three months pushing him around. I went out to woods nearby with a camera, HDRI package, color chart and sliver ball to try to shoot some background photographs that we could then put him into, rather than sticking him in a gray room. I even used my son as a stand-in for Hiccup to see what Toothless looked like against a real human. We looked at lizards to horses to snakes to panthers to bats for the wings. The studio wanted him big, so he is a lot bigger than the animated version; his head compared to his body is a lot smaller, head-to-neck proportion is smaller, his eyes are smaller proportion compared to the animated one, and the wings are much bigger. We ended up with a turntable, ran some animation through Blender, and came up with a close-up of Toothless where hes attached to the rope, which proved to the studio it would work.Other recreations were the sequences that take place in the training arena.Hiccup befriending Toothless was the sequence that took the longest to develop and produce. During the gestation of that, we slowly pulled it back because when you watch animals in the real world, when they want something rather than moving around and doing lots of stuff, theyll just look at you and have simple poses, Manz notes. That simplicity, but with lots of subtlety, was difficult. To get the proper interaction, there was a puppet on set for Toothless. We had a simple puppet from nose to tail for him, apart from the wings, that could be broken up. For that scene, it would only be Tom Wilson [Creature Puppetry Supervisor] and the head at the right height. We did previs animation for the whole sequence. Framestore has an AR iPad tool called Farsight, which you could load up, put the right lens on, and both us, Dean and camera could look to make sure that Toothless was framed correctly. We could show Mason what he was looking at and use it to make sure that Tom was at the right height and angle. Im a firm believer that you need that interaction. Anything where an actor is just pretending never works.The live-action version was able to elevate the flying scenes.Red Death was so massive that separate sets were constructed to represent different parts of her body. We had simple forms, but based off our models, the art department built us a mouth set with some teeth. We had an eye set that provided something for Snotlout [Gabriel Howell] to hang off of and bash the eye, which had the brow attached to it. Then we had like a skate ramp, which was the head and horn, to run up, Manz reveals. When Asterid [Nico Parker] is chopping off teeth, she is not hitting air. We had teeth that could be slotted in and out based on the shots that were needed. The set could tip as well, so you could be teetered around. Scale was conveyed through composition. We made it a thing never to frame Red Death because she was so big and that was part of making her look big. One of the challenges of animating her is, when flying she looks like shes underwater because of having to move so slowly. Her wingtips are probably going 100 miles per hour, but theyre so huge and covering such a large area of space that having Toothless and rocks falling in the shot gave it scale.Fire was a principal cast member. I called up YouTube footage of a solid rocket booster being tested last year, strapped to the ground and lit, Manz states. The sheer power of the force of that fire, and it was done in a desert, kicked up lots of dust. We used that as the reference for her fire. Another unique thing in this world is that each dragon has a different fire. Her fire felt like it should be massive. Toothless has purple fire. Deadly Nadder has magnesium fire. We have lava slugs from Gronckle. For a number of those, we had Tez Palmer and his special effects team creating stuff on set that had those unique looks we could start with and add to. When we saw the first take of the Red Death blasting the boats, we were like, Thats going to look amazing! The jets of fire would always involve us because they had to be connected to the dragon. The practical fire added an extra layer of fun to try to work out.An aerial view of the training arena showcases a maze configuration.Another significant element was flying. I felt the more analogue we could be, the more real it could look, but it still had to be driven by the movement and shapes of our dragons, Manz remarks. We worked with Alistair Williams [Special Effects Supervisor] motion control team and used their six-axis rig, which can carry massive planes and helicopters, and placed an animatronic buck of the head, neck and shoulders of each dragon on top of that. We designed flight cycles for the dragons, and as actors were cast, we digitally worked out the scale and constraints of having a person on them. When the special effects came on, we passed over the models, and they returned files in Blender, overlaying our animation with their rig. The rigs were built and shipped out to Belfast one by one. There were no motion control cameras. I had simple techvis of what the camera would be doing and would say, This bit we need to get. That bit will always be CG. We would find the shot on the day. The six-axis rigs could be driven separately from animation. but also be driven by a Wahlberg remote control. You could blend between the animation and remote control or different flight cycles. The aim was that Mason was not just on a fairground ride but is controlling, or is being controlled, by this beast he is riding; that was a freeing process.A character that required a number of limb replacement shots was Gobber, who is missing an arm and a leg.Not entirely framing the Red Death in the shot was a way to emphasize the enormous size of the dragon.Glen McIntosh, our Animation Supervisor, said from the beginning that, Everything is going to move slower [in live-action than in animation], You watch Stoick pick up Hiccup at the end of the animated movie, and in about three frames hes grabbed and flung him over his shoulder. In our version, Gerard Butler has to kneel down, shuffle over to where Mason Thames is and lift him up. All of that takes more time.Christian Manz, VFX SupervisorA 360-degree set was physically constructed for the training arena, and was built to full height. We didnt have the roof and had a partial rock wall, but the whole thing was there. We were doing previs and designing alongside Dominic Watkins building the training arena. One of the big things was how fast is the Nadder going to run and how big does this arena have to be? We were also working with Roy Taylor [Stunt Coordinator], who did some stuntvis that was cut into the previs, and then started building our sequence. I ended up with a literal plan in which fences had to be real and what the actions were. It was shot sequentially so we could strike fences as we went; some fences would become CG. That was the first thing we shot, and it snowed! We had ice on the ground that froze the fences to the ground. They had a flamethrower out melting snow. We had short shooting days, so some of it had to be shot as the sun went down. Bill Pope would shoot closer and closer, which meant we could replace bits of environment and still make it look like it was day further away. There was a lot in there to do.Each dragon was given a distinct fire that was a combination of practical and digital elements.Live-action actors do not move as quickly as animated characters, adding to the screentime.Environments were important for the flying sequences. Flying was going to be us or plates, and I wanted to capture that material early, so we were recceing within two months of starting, back in the beginning of 2023, Manz states. We went to Faroe Islands, Iceland and Scotland, and Dean was blown away because he had never been on a recce like that before. All of the landscapes were astonishing. We picked the key places that Dean and Dominic liked and went back with Jeremy Braben of Helicopter Film Services and Dominic Ridley of Clear Angle Studios to film plates for three weeks. We caught 30 different locations, full-length canyons and whole chunks of coastline. My gut told me that what we wanted to do was follow Toothless and the other dragons, which meant that the backgrounds would be digital. Creating all of those different environments was one of the biggest challenges of the whole show, even before we shot the strung-out shots of Toothless flying alone around Berk that made everyone go, That could look cool. It was using all of that visual reference in terms of the plates we shot, the actual date and the stuff we learned. There were birds everywhere, the color of the water was aquamarine in Faroe, and you could get the light for real.Using the practical set as base, the entire environment for the training arena was digitally rebuilt.Wind assisted in conveying a sense of speed. No matter how much wind you blow at people for real, you can never get enough, Manz observes. They were using medically filtered compressed air so we could film without goggles. Terry Bambers [1st Assistant Director: Gimbal Unit] team rigged those to the gimbals and had additional ones blowing at bits of costume and boots. For a lot of the takes, we had to go again because we needed to move more; clothes dont move as much as you think theyre going to. Framestore built some incredible digital doubles that, through the sequence, are either used as whole or part. We utilized much of the live-action as the source, but theres whole lot going on to create that illusion and bond it to the dragon and background.Having smaller elements in the frame assisted in conveying the enormous size of the Red Death.Missing an arm and a leg is Gobber (Nick Frost). Dean and I were keen not to have the long and short arm thing. Our prop modeler built the arm so it could be the actual hammer or stone, and Nicks arm would be inside of that with a handle inside. He had a brace on his arm, then we had the middle bit we had to replace. Most of the time, that meant we could use the real thing, but the paint-out was a lot of work. Framestore built a partial CG version of him so we could replace part of his body where his arm crossed. Like with Nick, the main thing with Hiccup was to try to get almost a ski boot on Mason so he couldnt bend his ankle. The main thing was getting his body to move in the correct way. In the end, Nick came up to me one day and asked, Could I just limp? We got Dean to speak to him sometimes when he would forget to limp. You cant fix that stuff. Once all of that body language is in there, thats what makes it believable. The Gobber work is some of the best work. You dont notice it because it feels real, even though its a lot of shots.· 0 Comments ·0 Shares
1K
DIGGING DEEPLY INTO VFX FOR THE LIVE-ACTION HOW TO TRAIN YOUR DRAGONwww.vfxvoice.comBy TREVOR HOGGImages courtesy of Universal Studios.While Shrek launched the first franchise for DreamWorks Animation, How to Train Your Dragon has become such a worthy successor that the original director, Dean DeBlois, has returned to do a live-action adaptation of a teenage Viking crossing the social conflict divide between humans and flying beasts by befriending a Night Fury. Given that the fantasy world does not exist, there is no shortage of CG animation provided by Christian Manz and Framestore, in particular with scenes featuring Toothless and the Red Death. Framestore facilities in London, Montreal, Melbourne and Mumbai, as well an in-house team, provided concept art, visual development, previs, techvis, postvis and 1,700 shots to support the cast of Mason Thames, Nico Parker, Gerard Butler, Nick Frost, Gabriel Howell, Bronwyn James and Nick Cornwall.A full-size puppet of Toothless was constructed, minus the wings, that could be broken down into various sections to get the proper interaction with Hiccup.What I hoped is that people would watch it and see real human beings flying dragons. Youre emotionally more connected because youre seeing it for real. The animation is amazing and emotional, but we wanted to try to elevate that in terms of storytelling, emotion and wish fulfillment.Christian Manz, VFX SupervisorEven though the animated features were not treated as glorified previs by the production, the trilogy was the visual starting point for the live-action adaptation. Deans challenge from the beginning was, If you can come up with better shots or work, thats great. If you cant come up with better shots then it will be the one from the animated movie, states VFX Supervisor Manz. When it came to a few key things like flying and reestablishing what that would look like in the real world, we began to deviate. Elevating the complexity of the visual effects work was the sheer amount of interaction between digital creatures and live-action cast. What I hoped is that people would watch it and see real human beings flying dragons, Manz notes. Youre emotionally more connected because youre seeing it for real. The animation is amazing and emotional, but we wanted to try to elevate that in terms of storytelling, emotion and wish fulfillment.Despite having significant set builds, digital extensions were still required to achieve the desired scope for Berk.The nature of live-action filmmaking presented limitations that do not exist in animation. Glen McIntosh, our Animation Supervisor, said from the beginning that, Everything is going to move slower, Manz remarks. You watch Stoick pick up Hiccup at the end of the animated movie, and in about three frames hes grabbed and flung him over his shoulder. In our version, Gerard Butler has to kneel down, shuffle over to where Mason Thames is and lift him up. All of that takes more time. The sizes of the dragons also had to be more consistent. Manz comments, We all had a go at ribbing Dean about continuity because every dragon changed in size throughout the original film. It works and you believe it. However, here we had to obey the size and physics to feel real. An extensive amount of time was spent during pre-production to discover the performances of the dragons. Because we were literally inhabiting a real world, Dominic Watkins was building sets, so we had to find out how big they are, how fast they would move, and their fire. It was important we figured that out ahead of time.One of the hardest scenes to recreate and animate was Hiccup befriending Toothless.We all had a go at ribbing Dean [DeBlois, director] about continuity because every dragon changed in size throughout the original film. It works and you believe it. However, here we had to obey the size and physics to feel real. Because we were literally inhabiting a real world, Dominic Watkins was building sets, so we had to find out how big they are, how fast they would move, and their fire. It was important we figured that out ahead of time.Christian Manz, VFX SupervisorRetaining the cartoon stylization of Toothless was important while also taking advantage of the photorealism associated with live-action. Three months before we officially began working on the film, Peter Cramer, the President of Universal Pictures, wanted to know that Toothless would work, Manz explains. We did visual development but didnt concept him because we already had the animated one. From there we did sculpting in ZBrush, painting in Photoshop and rendering in Blender. We spent three months pushing him around. I went out to woods nearby with a camera, HDRI package, color chart and sliver ball to try to shoot some background photographs that we could then put him into, rather than sticking him in a gray room. I even used my son as a stand-in for Hiccup to see what Toothless looked like against a real human. We looked at lizards to horses to snakes to panthers to bats for the wings. The studio wanted him big, so he is a lot bigger than the animated version; his head compared to his body is a lot smaller, head-to-neck proportion is smaller, his eyes are smaller proportion compared to the animated one, and the wings are much bigger. We ended up with a turntable, ran some animation through Blender, and came up with a close-up of Toothless where hes attached to the rope, which proved to the studio it would work.Other recreations were the sequences that take place in the training arena.Hiccup befriending Toothless was the sequence that took the longest to develop and produce. During the gestation of that, we slowly pulled it back because when you watch animals in the real world, when they want something rather than moving around and doing lots of stuff, theyll just look at you and have simple poses, Manz notes. That simplicity, but with lots of subtlety, was difficult. To get the proper interaction, there was a puppet on set for Toothless. We had a simple puppet from nose to tail for him, apart from the wings, that could be broken up. For that scene, it would only be Tom Wilson [Creature Puppetry Supervisor] and the head at the right height. We did previs animation for the whole sequence. Framestore has an AR iPad tool called Farsight, which you could load up, put the right lens on, and both us, Dean and camera could look to make sure that Toothless was framed correctly. We could show Mason what he was looking at and use it to make sure that Tom was at the right height and angle. Im a firm believer that you need that interaction. Anything where an actor is just pretending never works.The live-action version was able to elevate the flying scenes.Red Death was so massive that separate sets were constructed to represent different parts of her body. We had simple forms, but based off our models, the art department built us a mouth set with some teeth. We had an eye set that provided something for Snotlout [Gabriel Howell] to hang off of and bash the eye, which had the brow attached to it. Then we had like a skate ramp, which was the head and horn, to run up, Manz reveals. When Asterid [Nico Parker] is chopping off teeth, she is not hitting air. We had teeth that could be slotted in and out based on the shots that were needed. The set could tip as well, so you could be teetered around. Scale was conveyed through composition. We made it a thing never to frame Red Death because she was so big and that was part of making her look big. One of the challenges of animating her is, when flying she looks like shes underwater because of having to move so slowly. Her wingtips are probably going 100 miles per hour, but theyre so huge and covering such a large area of space that having Toothless and rocks falling in the shot gave it scale.Fire was a principal cast member. I called up YouTube footage of a solid rocket booster being tested last year, strapped to the ground and lit, Manz states. The sheer power of the force of that fire, and it was done in a desert, kicked up lots of dust. We used that as the reference for her fire. Another unique thing in this world is that each dragon has a different fire. Her fire felt like it should be massive. Toothless has purple fire. Deadly Nadder has magnesium fire. We have lava slugs from Gronckle. For a number of those, we had Tez Palmer and his special effects team creating stuff on set that had those unique looks we could start with and add to. When we saw the first take of the Red Death blasting the boats, we were like, Thats going to look amazing! The jets of fire would always involve us because they had to be connected to the dragon. The practical fire added an extra layer of fun to try to work out.An aerial view of the training arena showcases a maze configuration.Another significant element was flying. I felt the more analogue we could be, the more real it could look, but it still had to be driven by the movement and shapes of our dragons, Manz remarks. We worked with Alistair Williams [Special Effects Supervisor] motion control team and used their six-axis rig, which can carry massive planes and helicopters, and placed an animatronic buck of the head, neck and shoulders of each dragon on top of that. We designed flight cycles for the dragons, and as actors were cast, we digitally worked out the scale and constraints of having a person on them. When the special effects came on, we passed over the models, and they returned files in Blender, overlaying our animation with their rig. The rigs were built and shipped out to Belfast one by one. There were no motion control cameras. I had simple techvis of what the camera would be doing and would say, This bit we need to get. That bit will always be CG. We would find the shot on the day. The six-axis rigs could be driven separately from animation. but also be driven by a Wahlberg remote control. You could blend between the animation and remote control or different flight cycles. The aim was that Mason was not just on a fairground ride but is controlling, or is being controlled, by this beast he is riding; that was a freeing process.A character that required a number of limb replacement shots was Gobber, who is missing an arm and a leg.Not entirely framing the Red Death in the shot was a way to emphasize the enormous size of the dragon.Glen McIntosh, our Animation Supervisor, said from the beginning that, Everything is going to move slower [in live-action than in animation], You watch Stoick pick up Hiccup at the end of the animated movie, and in about three frames hes grabbed and flung him over his shoulder. In our version, Gerard Butler has to kneel down, shuffle over to where Mason Thames is and lift him up. All of that takes more time.Christian Manz, VFX SupervisorA 360-degree set was physically constructed for the training arena, and was built to full height. We didnt have the roof and had a partial rock wall, but the whole thing was there. We were doing previs and designing alongside Dominic Watkins building the training arena. One of the big things was how fast is the Nadder going to run and how big does this arena have to be? We were also working with Roy Taylor [Stunt Coordinator], who did some stuntvis that was cut into the previs, and then started building our sequence. I ended up with a literal plan in which fences had to be real and what the actions were. It was shot sequentially so we could strike fences as we went; some fences would become CG. That was the first thing we shot, and it snowed! We had ice on the ground that froze the fences to the ground. They had a flamethrower out melting snow. We had short shooting days, so some of it had to be shot as the sun went down. Bill Pope would shoot closer and closer, which meant we could replace bits of environment and still make it look like it was day further away. There was a lot in there to do.Each dragon was given a distinct fire that was a combination of practical and digital elements.Live-action actors do not move as quickly as animated characters, adding to the screentime.Environments were important for the flying sequences. Flying was going to be us or plates, and I wanted to capture that material early, so we were recceing within two months of starting, back in the beginning of 2023, Manz states. We went to Faroe Islands, Iceland and Scotland, and Dean was blown away because he had never been on a recce like that before. All of the landscapes were astonishing. We picked the key places that Dean and Dominic liked and went back with Jeremy Braben of Helicopter Film Services and Dominic Ridley of Clear Angle Studios to film plates for three weeks. We caught 30 different locations, full-length canyons and whole chunks of coastline. My gut told me that what we wanted to do was follow Toothless and the other dragons, which meant that the backgrounds would be digital. Creating all of those different environments was one of the biggest challenges of the whole show, even before we shot the strung-out shots of Toothless flying alone around Berk that made everyone go, That could look cool. It was using all of that visual reference in terms of the plates we shot, the actual date and the stuff we learned. There were birds everywhere, the color of the water was aquamarine in Faroe, and you could get the light for real.Using the practical set as base, the entire environment for the training arena was digitally rebuilt.Wind assisted in conveying a sense of speed. No matter how much wind you blow at people for real, you can never get enough, Manz observes. They were using medically filtered compressed air so we could film without goggles. Terry Bambers [1st Assistant Director: Gimbal Unit] team rigged those to the gimbals and had additional ones blowing at bits of costume and boots. For a lot of the takes, we had to go again because we needed to move more; clothes dont move as much as you think theyre going to. Framestore built some incredible digital doubles that, through the sequence, are either used as whole or part. We utilized much of the live-action as the source, but theres whole lot going on to create that illusion and bond it to the dragon and background.Having smaller elements in the frame assisted in conveying the enormous size of the Red Death.Missing an arm and a leg is Gobber (Nick Frost). Dean and I were keen not to have the long and short arm thing. Our prop modeler built the arm so it could be the actual hammer or stone, and Nicks arm would be inside of that with a handle inside. He had a brace on his arm, then we had the middle bit we had to replace. Most of the time, that meant we could use the real thing, but the paint-out was a lot of work. Framestore built a partial CG version of him so we could replace part of his body where his arm crossed. Like with Nick, the main thing with Hiccup was to try to get almost a ski boot on Mason so he couldnt bend his ankle. The main thing was getting his body to move in the correct way. In the end, Nick came up to me one day and asked, Could I just limp? We got Dean to speak to him sometimes when he would forget to limp. You cant fix that stuff. Once all of that body language is in there, thats what makes it believable. The Gobber work is some of the best work. You dont notice it because it feels real, even though its a lot of shots.· 0 Comments ·0 Shares
1K
More Stories
