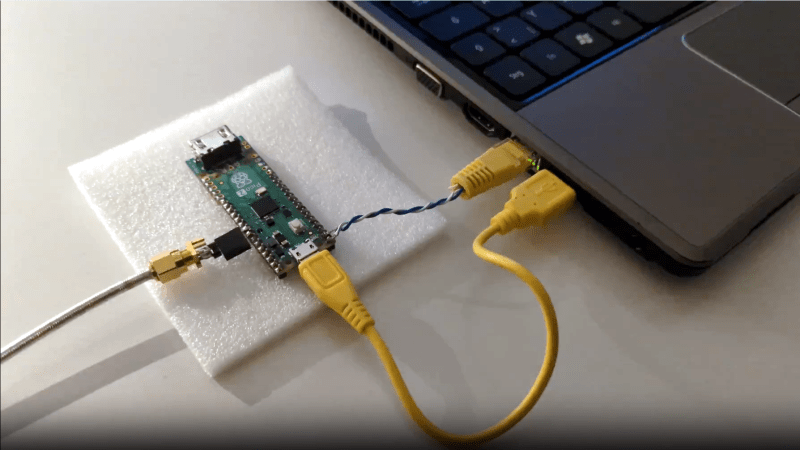
• In a world so connected, I find myself lost in the silence of Ethernet signals, where the hum of data feels like the echo of my own loneliness. Each byte transmitted is a reminder of the connections I wish I had, yet here I am, tangled in wires, yearning for warmth that never comes. The beauty of networking computers fades into a painful solitude, as I realize that even the strongest connections can leave you feeling utterly alone. Listening to Ethernet might be fascinating, but it only amplifies the void around me.

    #loneliness #heartbreak #Ethernet #connections #solitude
    In a world so connected, I find myself lost in the silence of Ethernet signals, where the hum of data feels like the echo of my own loneliness. Each byte transmitted is a reminder of the connections I wish I had, yet here I am, tangled in wires, yearning for warmth that never comes. The beauty of networking computers fades into a painful solitude, as I realize that even the strongest connections can leave you feeling utterly alone. Listening to Ethernet might be fascinating, but it only amplifies the void around me. #loneliness #heartbreak #Ethernet #connections #solitude
    HACKADAY.COM
    Listening To Ethernet Via Eurorack
    Ethernet is how we often network computers together, particularly when they’re too important to leave on a fussy WiFi connection. Have you ever thought about listening to Ethernet signals, though? Well, …read more
    Like
    Love
    Wow
    Sad
    Angry
    123
    1 Comments 0 Shares 0 Reviews
  • You Can Get This Budget Lenovo Chromebook for Just $55 Right Now

    We may earn a commission from links on this page. Deal pricing and availability subject to change after time of publication.At you probably don’t expect much from a laptop, but this refurbished Lenovo 100e Chromebookmight surprise you. It’s not fast, it’s not flashy, and it only has 16GB of eMMC storage, but it’s the kind of machine that can take a beating and still show up to work the next day. Built for classrooms and chaos, it has reinforced edges, spill-resistant keys, and rubber bumpers that make it more forgiving than most laptops you’ll find in this price range. It’s also listed in Grade “A” condition, so you’re getting a laptop that should look close to new.Performance-wise, it’s basic. There’s a MediaTek processor inside with 4GB of RAM—enough for browsing, Google Docs, streaming, or online classes, but not much more. Don’t expect to run 20 tabs or multitask like a maniac. What you do get is a surprisingly solid 11.6-inch display with anti-glare coating, a webcam that’s fine for video calls, and a battery that lasts around 10 hours. Chrome OS is light and easy to use, especially if you’re already living in the Google ecosystem. And the machine itself is lightweight and compact, making it a decent travel companion or a starter laptop for kids.Of course, there are trade-offs. Storage is tight—you’ll need to rely on Google Drive or plug in an SD card if you want to keep anything local. The charger uses USB-C, which is convenient, but there’s only one of those ports alongside a single USB-A and HDMI. No Ethernet, no touchscreen, no premium features. Still, for under with free shipping, it’s hard to argue. Whether you need a backup device, something to toss in a backpack without worry, or a no-frills option for schoolwork and emails, this budget Lenovo Chromebook keeps things simple.
    #you #can #get #this #budget
    You Can Get This Budget Lenovo Chromebook for Just $55 Right Now
    We may earn a commission from links on this page. Deal pricing and availability subject to change after time of publication.At you probably don’t expect much from a laptop, but this refurbished Lenovo 100e Chromebookmight surprise you. It’s not fast, it’s not flashy, and it only has 16GB of eMMC storage, but it’s the kind of machine that can take a beating and still show up to work the next day. Built for classrooms and chaos, it has reinforced edges, spill-resistant keys, and rubber bumpers that make it more forgiving than most laptops you’ll find in this price range. It’s also listed in Grade “A” condition, so you’re getting a laptop that should look close to new.Performance-wise, it’s basic. There’s a MediaTek processor inside with 4GB of RAM—enough for browsing, Google Docs, streaming, or online classes, but not much more. Don’t expect to run 20 tabs or multitask like a maniac. What you do get is a surprisingly solid 11.6-inch display with anti-glare coating, a webcam that’s fine for video calls, and a battery that lasts around 10 hours. Chrome OS is light and easy to use, especially if you’re already living in the Google ecosystem. And the machine itself is lightweight and compact, making it a decent travel companion or a starter laptop for kids.Of course, there are trade-offs. Storage is tight—you’ll need to rely on Google Drive or plug in an SD card if you want to keep anything local. The charger uses USB-C, which is convenient, but there’s only one of those ports alongside a single USB-A and HDMI. No Ethernet, no touchscreen, no premium features. Still, for under with free shipping, it’s hard to argue. Whether you need a backup device, something to toss in a backpack without worry, or a no-frills option for schoolwork and emails, this budget Lenovo Chromebook keeps things simple. #you #can #get #this #budget
    LIFEHACKER.COM
    You Can Get This Budget Lenovo Chromebook for Just $55 Right Now
    We may earn a commission from links on this page. Deal pricing and availability subject to change after time of publication.At $54.99, you probably don’t expect much from a laptop, but this refurbished Lenovo 100e Chromebook (2nd Gen, 2019) might surprise you. It’s not fast, it’s not flashy, and it only has 16GB of eMMC storage, but it’s the kind of machine that can take a beating and still show up to work the next day. Built for classrooms and chaos, it has reinforced edges, spill-resistant keys, and rubber bumpers that make it more forgiving than most laptops you’ll find in this price range. It’s also listed in Grade “A” condition, so you’re getting a laptop that should look close to new.Performance-wise, it’s basic. There’s a MediaTek processor inside with 4GB of RAM—enough for browsing, Google Docs, streaming, or online classes, but not much more. Don’t expect to run 20 tabs or multitask like a maniac. What you do get is a surprisingly solid 11.6-inch display with anti-glare coating, a webcam that’s fine for video calls, and a battery that lasts around 10 hours. Chrome OS is light and easy to use, especially if you’re already living in the Google ecosystem. And the machine itself is lightweight and compact, making it a decent travel companion or a starter laptop for kids.Of course, there are trade-offs. Storage is tight—you’ll need to rely on Google Drive or plug in an SD card if you want to keep anything local. The charger uses USB-C, which is convenient, but there’s only one of those ports alongside a single USB-A and HDMI. No Ethernet, no touchscreen, no premium features. Still, for under $60 with free shipping, it’s hard to argue. Whether you need a backup device, something to toss in a backpack without worry, or a no-frills option for schoolwork and emails, this budget Lenovo Chromebook keeps things simple.
    0 Comments 0 Shares 0 Reviews
  • Hisense U6 Smart Fire TVs are at their lowest prices ever

    Deal

     When you purchase through links on our site, we may earn an affiliate commission. Here’s how it works.

    Hisense U6 Smart Fire TVs are at their lowest prices ever

    Fiza Ali

    Neowin
    @Fiza_Aliii ·

    May 31, 2025 14:48 EDT

    Ahead of Father's Day, Hisense is offering five variants of the U6 Series Smart Fire TVat their all-time low prices. The U6 Series offers a 4K UHDresolution while its backlight system comprises approximately 1,000 mini-LEDs arranged in a Full Array Local Dimming configuration.
    Colour reproduction is achieved through QLED quantum-dot technology, enabling the display to render over one billion colours. Furthermore, the panel supports a wide colour gamut, which results in more accurate renditions of natural hues. A Total HDR Solution ensures compatibility with multiple HDR formats, including Dolby Vision IQ, HDR 10 + Adaptive, HDR 10, HDR 10 + Gaming, and HLG.
    At the core of the U6 Series is the Hi-View AI Engine, a chipset that handles advanced picture processing tasks. These include an AI-powered 4K Upscaler, AI Smooth Motion, and AI Sports Mode. Collectively, these features ensure that fine details are reproduced with greater clarity.

    For gaming, the TV offers Game Mode Pro, which supports a native 144Hz refresh rate and Variable Refresh Rateranging from 48Hz to 144Hz. An on-screen Game Bar allows users to toggle VRR settings, monitor input lag, and access gaming presets directly.

    Connectivity options include four HDMI ports, one of which supports eARC via HDMI 1, two USB ports, an Ethernetport and an optical digital audio output. Moreover, wireless connectivity comprises Wi-Fi 6 and Bluetooth 5.2.
    The U6 Series runs on the Fire TV platform with Alexa built in, granting access to a library of streaming apps and voice control functionality. Audio is enhanced by Dolby Atmos, and the unit features a 2.1-channel surround-sound configuration. Additional capabilities include noise-reduction processing, closed caption support, a sleep timer, and parental control functions.

    55" Hisense U6 Series Mini-LED 4K Smart Fire TV:34% off

    65" Hisense U6 Series Mini-LED 4K Smart Fire TV:30% off

    75" Hisense U6 Series Mini-LED 4K Smart Fire TV:31% off

    85" Hisense U6 Series Mini-LED 4K Smart Fire TV:35% off

    100" Hisense U6 Series Mini-LED 4K Smart Fire TV:This Amazon deal is US-specific and not available in other regions unless specified. If you don't like it or want to look at more options, check out the Amazon US deals page here.

    Get Prime, Prime Video, Audible Plus or Kindle / Music Unlimited. Free for 30 days. As an Amazon Associate, we earn from qualifying purchases.

    Tags

    Report a problem with article

    Follow @NeowinFeed
    #hisense #smart #fire #tvs #are
    Hisense U6 Smart Fire TVs are at their lowest prices ever
    Deal  When you purchase through links on our site, we may earn an affiliate commission. Here’s how it works. Hisense U6 Smart Fire TVs are at their lowest prices ever Fiza Ali Neowin @Fiza_Aliii · May 31, 2025 14:48 EDT Ahead of Father's Day, Hisense is offering five variants of the U6 Series Smart Fire TVat their all-time low prices. The U6 Series offers a 4K UHDresolution while its backlight system comprises approximately 1,000 mini-LEDs arranged in a Full Array Local Dimming configuration. Colour reproduction is achieved through QLED quantum-dot technology, enabling the display to render over one billion colours. Furthermore, the panel supports a wide colour gamut, which results in more accurate renditions of natural hues. A Total HDR Solution ensures compatibility with multiple HDR formats, including Dolby Vision IQ, HDR 10 + Adaptive, HDR 10, HDR 10 + Gaming, and HLG. At the core of the U6 Series is the Hi-View AI Engine, a chipset that handles advanced picture processing tasks. These include an AI-powered 4K Upscaler, AI Smooth Motion, and AI Sports Mode. Collectively, these features ensure that fine details are reproduced with greater clarity. For gaming, the TV offers Game Mode Pro, which supports a native 144Hz refresh rate and Variable Refresh Rateranging from 48Hz to 144Hz. An on-screen Game Bar allows users to toggle VRR settings, monitor input lag, and access gaming presets directly. Connectivity options include four HDMI ports, one of which supports eARC via HDMI 1, two USB ports, an Ethernetport and an optical digital audio output. Moreover, wireless connectivity comprises Wi-Fi 6 and Bluetooth 5.2. The U6 Series runs on the Fire TV platform with Alexa built in, granting access to a library of streaming apps and voice control functionality. Audio is enhanced by Dolby Atmos, and the unit features a 2.1-channel surround-sound configuration. Additional capabilities include noise-reduction processing, closed caption support, a sleep timer, and parental control functions. 55" Hisense U6 Series Mini-LED 4K Smart Fire TV:34% off 65" Hisense U6 Series Mini-LED 4K Smart Fire TV:30% off 75" Hisense U6 Series Mini-LED 4K Smart Fire TV:31% off 85" Hisense U6 Series Mini-LED 4K Smart Fire TV:35% off 100" Hisense U6 Series Mini-LED 4K Smart Fire TV:This Amazon deal is US-specific and not available in other regions unless specified. If you don't like it or want to look at more options, check out the Amazon US deals page here. Get Prime, Prime Video, Audible Plus or Kindle / Music Unlimited. Free for 30 days. As an Amazon Associate, we earn from qualifying purchases. Tags Report a problem with article Follow @NeowinFeed #hisense #smart #fire #tvs #are
    WWW.NEOWIN.NET
    Hisense U6 Smart Fire TVs are at their lowest prices ever
    Deal  When you purchase through links on our site, we may earn an affiliate commission. Here’s how it works. Hisense U6 Smart Fire TVs are at their lowest prices ever Fiza Ali Neowin @Fiza_Aliii · May 31, 2025 14:48 EDT Ahead of Father's Day, Hisense is offering five variants of the U6 Series Smart Fire TV (2025 model) at their all-time low prices. The U6 Series offers a 4K UHD (3,840×2,160) resolution while its backlight system comprises approximately 1,000 mini-LEDs arranged in a Full Array Local Dimming configuration. Colour reproduction is achieved through QLED quantum-dot technology, enabling the display to render over one billion colours. Furthermore, the panel supports a wide colour gamut, which results in more accurate renditions of natural hues. A Total HDR Solution ensures compatibility with multiple HDR formats, including Dolby Vision IQ, HDR 10 + Adaptive, HDR 10, HDR 10 + Gaming, and HLG. At the core of the U6 Series is the Hi-View AI Engine, a chipset that handles advanced picture processing tasks. These include an AI-powered 4K Upscaler, AI Smooth Motion, and AI Sports Mode. Collectively, these features ensure that fine details are reproduced with greater clarity. For gaming, the TV offers Game Mode Pro, which supports a native 144Hz refresh rate and Variable Refresh Rate (VRR) ranging from 48Hz to 144Hz. An on-screen Game Bar allows users to toggle VRR settings, monitor input lag, and access gaming presets directly. Connectivity options include four HDMI ports (two HDMI 2.1 and two HDMI 2.0), one of which supports eARC via HDMI 1, two USB ports (one USB 3.0 and one USB 2.0), an Ethernet (LAN) port and an optical digital audio output. Moreover, wireless connectivity comprises Wi-Fi 6 and Bluetooth 5.2. The U6 Series runs on the Fire TV platform with Alexa built in, granting access to a library of streaming apps and voice control functionality. Audio is enhanced by Dolby Atmos, and the unit features a 2.1-channel surround-sound configuration. Additional capabilities include noise-reduction processing, closed caption support, a sleep timer, and parental control functions. 55" Hisense U6 Series Mini-LED 4K Smart Fire TV: $528.99 (Amazon US) 34% off 65" Hisense U6 Series Mini-LED 4K Smart Fire TV: $698.99 (Amazon US) 30% off 75" Hisense U6 Series Mini-LED 4K Smart Fire TV: $898.99 (Amazon US) 31% off 85" Hisense U6 Series Mini-LED 4K Smart Fire TV: $1,299.99 (Amazon US) 35% off 100" Hisense U6 Series Mini-LED 4K Smart Fire TV: $2,599.99 (Amazon US) This Amazon deal is US-specific and not available in other regions unless specified. If you don't like it or want to look at more options, check out the Amazon US deals page here. Get Prime (SNAP), Prime Video, Audible Plus or Kindle / Music Unlimited. Free for 30 days. As an Amazon Associate, we earn from qualifying purchases. Tags Report a problem with article Follow @NeowinFeed
    14 Comments 0 Shares 0 Reviews
  • Huawei Supernode 384 disrupts Nvidia’s AI market hold

    Huawei’s AI capabilities have made a breakthrough in the form of the company’s Supernode 384 architecture, marking an important moment in the global processor wars amid US-China tech tensions.The Chinese tech giant’s latest innovation emerged from last Friday’s Kunpeng Ascend Developer Conference in Shenzhen, where company executives demonstrated how the computing framework challenges Nvidia’s long-standing market dominance directly, as the company continues to operate under severe US-led trade restrictions.Architectural innovation born from necessityZhang Dixuan, president of Huawei’s Ascend computing business, articulated the fundamental problem driving the innovation during his conference keynote: “As the scale of parallel processing grows, cross-machine bandwidth in traditional server architectures has become a critical bottleneck for training.”The Supernode 384 abandons Von Neumann computing principles in favour of a peer-to-peer architecture engineered specifically for modern AI workloads. The change proves especially powerful for Mixture-of-Experts modelsHuawei’s CloudMatrix 384 implementation showcases impressive technical specifications: 384 Ascend AI processors spanning 12 computing cabinets and four bus cabinets, generating 300 petaflops of raw computational power paired with 48 terabytes of high-bandwidth memory, representing a leap in integrated AI computing infrastructure.Performance metrics challenge industry leadersReal-world benchmark testing reveals the system’s competitive positioning in comparison to established solutions. Dense AI models like Meta’s LLaMA 3 achieved 132 tokens per second per card on the Supernode 384 – delivering 2.5 times superior performance compared to traditional cluster architectures.Communications-intensive applications demonstrate even more dramatic improvements. Models from Alibaba’s Qwen and DeepSeek families reached 600 to 750 tokens per second per card, revealing the architecture’s optimisation for next-generation AI workloads.The performance gains stem from fundamental infrastructure redesigns. Huawei replaced conventional Ethernet interconnects with high-speed bus connections, improving communications bandwidth by 15 times while reducing single-hop latency from 2 microseconds to 200 nanoseconds – a tenfold improvement.Geopolitical strategy drives technical innovationThe Supernode 384’s development cannot be divorced from broader US-China technological competition. American sanctions have systematically restricted Huawei’s access to cutting-edge semiconductor technologies, forcing the company to maximise performance within existing constraints.Industry analysis from SemiAnalysis suggests the CloudMatrix 384 uses Huawei’s latest Ascend 910C AI processor, which acknowledges inherent performance limitations but highlights architectural advantages: “Huawei is a generation behind in chips, but its scale-up solution is arguably a generation ahead of Nvidia and AMD’s current products in the market.”The assessment reveals how Huawei AI computing strategies have evolved beyond traditional hardware specifications toward system-level optimisation and architectural innovation.Market implications and deployment realityBeyond laboratory demonstrations, Huawei has operationalised CloudMatrix 384 systems in multiple Chinese data centres in Anhui Province, Inner Mongolia, and Guizhou Province. Such practical deployments validate the architecture’s viability and establishes an infrastructure framework for broader market adoption.The system’s scalability potential – supporting tens of thousands of linked processors – positions it as a compelling platform for training increasingly sophisticated AI models. The capability addresses growing industry demands for massive-scale AI implementation in diverse sectors.Industry disruption and future considerationsHuawei’s architectural breakthrough introduces both opportunities and complications for the global AI ecosystem. While providing viable alternatives to Nvidia’s market-leading solutions, it simultaneously accelerates the fragmentation of international technology infrastructure along geopolitical lines.The success of Huawei AI computing initiatives will depend on developer ecosystem adoption and sustained performance validation. The company’s aggressive developer conference outreach indicated a recognition that technical innovation alone cannot guarantee market acceptance.For organisations evaluating AI infrastructure investments, the Supernode 384 represents a new option that combines competitive performance with independence from US-controlled supply chains. However, long-term viability remains contingent on continued innovation cycles and improved geopolitical stability.See also: Oracle plans B Nvidia chip deal for AI facility in TexasWant to learn more about AI and big data from industry leaders? Check out AI & Big Data Expo taking place in Amsterdam, California, and London. The comprehensive event is co-located with other leading events including Intelligent Automation Conference, BlockX, Digital Transformation Week, and Cyber Security & Cloud Expo.Explore other upcoming enterprise technology events and webinars powered by TechForge here.
    #huawei #supernode #disrupts #nvidias #market
    Huawei Supernode 384 disrupts Nvidia’s AI market hold
    Huawei’s AI capabilities have made a breakthrough in the form of the company’s Supernode 384 architecture, marking an important moment in the global processor wars amid US-China tech tensions.The Chinese tech giant’s latest innovation emerged from last Friday’s Kunpeng Ascend Developer Conference in Shenzhen, where company executives demonstrated how the computing framework challenges Nvidia’s long-standing market dominance directly, as the company continues to operate under severe US-led trade restrictions.Architectural innovation born from necessityZhang Dixuan, president of Huawei’s Ascend computing business, articulated the fundamental problem driving the innovation during his conference keynote: “As the scale of parallel processing grows, cross-machine bandwidth in traditional server architectures has become a critical bottleneck for training.”The Supernode 384 abandons Von Neumann computing principles in favour of a peer-to-peer architecture engineered specifically for modern AI workloads. The change proves especially powerful for Mixture-of-Experts modelsHuawei’s CloudMatrix 384 implementation showcases impressive technical specifications: 384 Ascend AI processors spanning 12 computing cabinets and four bus cabinets, generating 300 petaflops of raw computational power paired with 48 terabytes of high-bandwidth memory, representing a leap in integrated AI computing infrastructure.Performance metrics challenge industry leadersReal-world benchmark testing reveals the system’s competitive positioning in comparison to established solutions. Dense AI models like Meta’s LLaMA 3 achieved 132 tokens per second per card on the Supernode 384 – delivering 2.5 times superior performance compared to traditional cluster architectures.Communications-intensive applications demonstrate even more dramatic improvements. Models from Alibaba’s Qwen and DeepSeek families reached 600 to 750 tokens per second per card, revealing the architecture’s optimisation for next-generation AI workloads.The performance gains stem from fundamental infrastructure redesigns. Huawei replaced conventional Ethernet interconnects with high-speed bus connections, improving communications bandwidth by 15 times while reducing single-hop latency from 2 microseconds to 200 nanoseconds – a tenfold improvement.Geopolitical strategy drives technical innovationThe Supernode 384’s development cannot be divorced from broader US-China technological competition. American sanctions have systematically restricted Huawei’s access to cutting-edge semiconductor technologies, forcing the company to maximise performance within existing constraints.Industry analysis from SemiAnalysis suggests the CloudMatrix 384 uses Huawei’s latest Ascend 910C AI processor, which acknowledges inherent performance limitations but highlights architectural advantages: “Huawei is a generation behind in chips, but its scale-up solution is arguably a generation ahead of Nvidia and AMD’s current products in the market.”The assessment reveals how Huawei AI computing strategies have evolved beyond traditional hardware specifications toward system-level optimisation and architectural innovation.Market implications and deployment realityBeyond laboratory demonstrations, Huawei has operationalised CloudMatrix 384 systems in multiple Chinese data centres in Anhui Province, Inner Mongolia, and Guizhou Province. Such practical deployments validate the architecture’s viability and establishes an infrastructure framework for broader market adoption.The system’s scalability potential – supporting tens of thousands of linked processors – positions it as a compelling platform for training increasingly sophisticated AI models. The capability addresses growing industry demands for massive-scale AI implementation in diverse sectors.Industry disruption and future considerationsHuawei’s architectural breakthrough introduces both opportunities and complications for the global AI ecosystem. While providing viable alternatives to Nvidia’s market-leading solutions, it simultaneously accelerates the fragmentation of international technology infrastructure along geopolitical lines.The success of Huawei AI computing initiatives will depend on developer ecosystem adoption and sustained performance validation. The company’s aggressive developer conference outreach indicated a recognition that technical innovation alone cannot guarantee market acceptance.For organisations evaluating AI infrastructure investments, the Supernode 384 represents a new option that combines competitive performance with independence from US-controlled supply chains. However, long-term viability remains contingent on continued innovation cycles and improved geopolitical stability.See also: Oracle plans B Nvidia chip deal for AI facility in TexasWant to learn more about AI and big data from industry leaders? Check out AI & Big Data Expo taking place in Amsterdam, California, and London. The comprehensive event is co-located with other leading events including Intelligent Automation Conference, BlockX, Digital Transformation Week, and Cyber Security & Cloud Expo.Explore other upcoming enterprise technology events and webinars powered by TechForge here. #huawei #supernode #disrupts #nvidias #market
    WWW.ARTIFICIALINTELLIGENCE-NEWS.COM
    Huawei Supernode 384 disrupts Nvidia’s AI market hold
    Huawei’s AI capabilities have made a breakthrough in the form of the company’s Supernode 384 architecture, marking an important moment in the global processor wars amid US-China tech tensions.The Chinese tech giant’s latest innovation emerged from last Friday’s Kunpeng Ascend Developer Conference in Shenzhen, where company executives demonstrated how the computing framework challenges Nvidia’s long-standing market dominance directly, as the company continues to operate under severe US-led trade restrictions.Architectural innovation born from necessityZhang Dixuan, president of Huawei’s Ascend computing business, articulated the fundamental problem driving the innovation during his conference keynote: “As the scale of parallel processing grows, cross-machine bandwidth in traditional server architectures has become a critical bottleneck for training.”The Supernode 384 abandons Von Neumann computing principles in favour of a peer-to-peer architecture engineered specifically for modern AI workloads. The change proves especially powerful for Mixture-of-Experts models (machine-learning systems using multiple specialised sub-networks to solve complex computational challenges.)Huawei’s CloudMatrix 384 implementation showcases impressive technical specifications: 384 Ascend AI processors spanning 12 computing cabinets and four bus cabinets, generating 300 petaflops of raw computational power paired with 48 terabytes of high-bandwidth memory, representing a leap in integrated AI computing infrastructure.Performance metrics challenge industry leadersReal-world benchmark testing reveals the system’s competitive positioning in comparison to established solutions. Dense AI models like Meta’s LLaMA 3 achieved 132 tokens per second per card on the Supernode 384 – delivering 2.5 times superior performance compared to traditional cluster architectures.Communications-intensive applications demonstrate even more dramatic improvements. Models from Alibaba’s Qwen and DeepSeek families reached 600 to 750 tokens per second per card, revealing the architecture’s optimisation for next-generation AI workloads.The performance gains stem from fundamental infrastructure redesigns. Huawei replaced conventional Ethernet interconnects with high-speed bus connections, improving communications bandwidth by 15 times while reducing single-hop latency from 2 microseconds to 200 nanoseconds – a tenfold improvement.Geopolitical strategy drives technical innovationThe Supernode 384’s development cannot be divorced from broader US-China technological competition. American sanctions have systematically restricted Huawei’s access to cutting-edge semiconductor technologies, forcing the company to maximise performance within existing constraints.Industry analysis from SemiAnalysis suggests the CloudMatrix 384 uses Huawei’s latest Ascend 910C AI processor, which acknowledges inherent performance limitations but highlights architectural advantages: “Huawei is a generation behind in chips, but its scale-up solution is arguably a generation ahead of Nvidia and AMD’s current products in the market.”The assessment reveals how Huawei AI computing strategies have evolved beyond traditional hardware specifications toward system-level optimisation and architectural innovation.Market implications and deployment realityBeyond laboratory demonstrations, Huawei has operationalised CloudMatrix 384 systems in multiple Chinese data centres in Anhui Province, Inner Mongolia, and Guizhou Province. Such practical deployments validate the architecture’s viability and establishes an infrastructure framework for broader market adoption.The system’s scalability potential – supporting tens of thousands of linked processors – positions it as a compelling platform for training increasingly sophisticated AI models. The capability addresses growing industry demands for massive-scale AI implementation in diverse sectors.Industry disruption and future considerationsHuawei’s architectural breakthrough introduces both opportunities and complications for the global AI ecosystem. While providing viable alternatives to Nvidia’s market-leading solutions, it simultaneously accelerates the fragmentation of international technology infrastructure along geopolitical lines.The success of Huawei AI computing initiatives will depend on developer ecosystem adoption and sustained performance validation. The company’s aggressive developer conference outreach indicated a recognition that technical innovation alone cannot guarantee market acceptance.For organisations evaluating AI infrastructure investments, the Supernode 384 represents a new option that combines competitive performance with independence from US-controlled supply chains. However, long-term viability remains contingent on continued innovation cycles and improved geopolitical stability.(Image from Pixabay)See also: Oracle plans $40B Nvidia chip deal for AI facility in TexasWant to learn more about AI and big data from industry leaders? Check out AI & Big Data Expo taking place in Amsterdam, California, and London. The comprehensive event is co-located with other leading events including Intelligent Automation Conference, BlockX, Digital Transformation Week, and Cyber Security & Cloud Expo.Explore other upcoming enterprise technology events and webinars powered by TechForge here.
    0 Comments 0 Shares 0 Reviews
  • A beginner’s guide for FFXIV’s Occult Crescent

    FFXIV: Dawntrail’s field operation is the Occult Crescent, a huge piece of content that dropped in patch 7.25 and should keep you busy for a while. This content is somewhat tied to the Dawntrail relic weapon, and serves as a great way to kill time while also running some pretty exciting content.

    Below we explain where to unlock the Occult Crescent in FFXIV and cover details about what the Occult Crescent even is.

    How to unlock the Occult Crescent in FFXIV

    To unlock the Occult Crescent, you’ll need to have at least one combat job at level 100 and have completed the main portion of the Dawntrail expansion.Once that’s situated, you’ll just need to start the quest “One Last Hurrah” from the Expedition Messenger in Tuliyollal:

    Follow this quest line to unlock access to the Occult Crescent.

    What is the Occult Crescent?

    The Occult Crescent is the field operation for the Dawntrail expansion. This is separate, instanced content that plunges you onto a huge map with a bunch of mechanics specific to this area.

    In the Occult Crescent maps, you’ll level your “knowledge” rather than your actual job level, and the enemies around the map will deal and take damage based on that knowledge level. If you get attacked by a level 20 monster when you’re only at knowledge level one, be prepared to die.

    The Occult Crescent shares a lot of quirks with its predecessors, like Eureka or Bozja:

    You lose knowledge EXPwhen you die and then choose to revive back at base.

    You cannot fly around the map, but you can ride your mount.

    Special “critical encounters” spawn around the map, locking you into tough and chaotic battles against a big enemy or unique pack of enemies.

    Just like bunnies in Eureka, you can help Magic Pots in specific FATEs to be led to treasure.

    Specific to the Occult Crescent, there are Phantom Jobs, which are like… mini-jobs you can take on to give you extra skills to help out. Some are unlocked right away, like Phantom Bard or Phantom Knight, but some require you to buy them from the local shop or get a specific drop from a critical encounter.

    After finding some survey points, completing some quests, and hitting knowledge rank 20, you’ll be able to participate in “The Forked Tower,” a 48-person dungeon for unique rewards.

    So, yep. Your main goal here is to run around, completing FATEs and critical encounters to gain knowledge EXP and rank up. You’ll also amass currency along the way that you can use for special rewards.

    Starting tips for conquering the Occult Crescent

    If this is your first time stepping foot into a field operation, it can be a lot. Here are some tips to help you out:

    Unlike in previous field operations, you can freely unlock aethernet teleport points, with no need to worry about progression or level. You’ll want to reveal the map and unlock these ASAP so you can quickly jump into critical encounters.

    To participate in critical encounters, you’ll need to head over to the area labeled with the blue FATE icon and wait in the huge circle or square on the ground. If you don’t make it there by the time the encounter starts, you will not be able to participate.

    You can go it alone, but partying up is much better. A simple “lfg” in shout chat should net you an invite. If no invite comes, you may need to start collecting your own straggler players to make a party of your own.

    If you’re low level, stay out of the vision of those high-leveled baddies to avoid death. When in doubt, walk behind them and hug walls to stay out of their way.

    With those two above points being made, if you do die, sending a request for a revive alongside a “<pos>” in shout chat will tell players your location so that they can help you. Choosing to revive back at base will lose you EXP and possibly levels, so try not to do that too much.

    Don’t forget to use your Phantom Job skills. It can be easy to get too locked in to a critical encounter, but don’t forget that you have some useful exclusive tools at your disposal.

    Don’t get discouraged by your rampant deaths in critical encounters. These fights are chaotic and involve a lot of pattern recognition and memorization. It takes a bit to learn and you’ll get there!

    Open those chests! You may see just chillin’ chests on the floor. While a lot of them will give you weird junk, some of them have valuables like mounts, minions, and glamour inside.

    Consider buying the riding map first and the other stuff after. Getting to zoom around the map at a faster speed will help the grind a lot. You can buy the map from the “Expedition Antiquarian” NPC at the base camp for 3,000 silver pieces.

    Once you level up enough Phantom Jobs, you can use their buffing skills and then swap jobs while retaining the buffs. This makes Phantom Bard a pretty nice job to level early, as it can grant you an Phantom Job EXP buff.

    That said, this whole thing is a learning experience — everyone alongside you is also figuring stuff out, us included.
    #beginners #guide #ffxivs #occult #crescent
    A beginner’s guide for FFXIV’s Occult Crescent
    FFXIV: Dawntrail’s field operation is the Occult Crescent, a huge piece of content that dropped in patch 7.25 and should keep you busy for a while. This content is somewhat tied to the Dawntrail relic weapon, and serves as a great way to kill time while also running some pretty exciting content. Below we explain where to unlock the Occult Crescent in FFXIV and cover details about what the Occult Crescent even is. How to unlock the Occult Crescent in FFXIV To unlock the Occult Crescent, you’ll need to have at least one combat job at level 100 and have completed the main portion of the Dawntrail expansion.Once that’s situated, you’ll just need to start the quest “One Last Hurrah” from the Expedition Messenger in Tuliyollal: Follow this quest line to unlock access to the Occult Crescent. What is the Occult Crescent? The Occult Crescent is the field operation for the Dawntrail expansion. This is separate, instanced content that plunges you onto a huge map with a bunch of mechanics specific to this area. In the Occult Crescent maps, you’ll level your “knowledge” rather than your actual job level, and the enemies around the map will deal and take damage based on that knowledge level. If you get attacked by a level 20 monster when you’re only at knowledge level one, be prepared to die. The Occult Crescent shares a lot of quirks with its predecessors, like Eureka or Bozja: You lose knowledge EXPwhen you die and then choose to revive back at base. You cannot fly around the map, but you can ride your mount. Special “critical encounters” spawn around the map, locking you into tough and chaotic battles against a big enemy or unique pack of enemies. Just like bunnies in Eureka, you can help Magic Pots in specific FATEs to be led to treasure. Specific to the Occult Crescent, there are Phantom Jobs, which are like… mini-jobs you can take on to give you extra skills to help out. Some are unlocked right away, like Phantom Bard or Phantom Knight, but some require you to buy them from the local shop or get a specific drop from a critical encounter. After finding some survey points, completing some quests, and hitting knowledge rank 20, you’ll be able to participate in “The Forked Tower,” a 48-person dungeon for unique rewards. So, yep. Your main goal here is to run around, completing FATEs and critical encounters to gain knowledge EXP and rank up. You’ll also amass currency along the way that you can use for special rewards. Starting tips for conquering the Occult Crescent If this is your first time stepping foot into a field operation, it can be a lot. Here are some tips to help you out: Unlike in previous field operations, you can freely unlock aethernet teleport points, with no need to worry about progression or level. You’ll want to reveal the map and unlock these ASAP so you can quickly jump into critical encounters. To participate in critical encounters, you’ll need to head over to the area labeled with the blue FATE icon and wait in the huge circle or square on the ground. If you don’t make it there by the time the encounter starts, you will not be able to participate. You can go it alone, but partying up is much better. A simple “lfg” in shout chat should net you an invite. If no invite comes, you may need to start collecting your own straggler players to make a party of your own. If you’re low level, stay out of the vision of those high-leveled baddies to avoid death. When in doubt, walk behind them and hug walls to stay out of their way. With those two above points being made, if you do die, sending a request for a revive alongside a “<pos>” in shout chat will tell players your location so that they can help you. Choosing to revive back at base will lose you EXP and possibly levels, so try not to do that too much. Don’t forget to use your Phantom Job skills. It can be easy to get too locked in to a critical encounter, but don’t forget that you have some useful exclusive tools at your disposal. Don’t get discouraged by your rampant deaths in critical encounters. These fights are chaotic and involve a lot of pattern recognition and memorization. It takes a bit to learn and you’ll get there! Open those chests! You may see just chillin’ chests on the floor. While a lot of them will give you weird junk, some of them have valuables like mounts, minions, and glamour inside. Consider buying the riding map first and the other stuff after. Getting to zoom around the map at a faster speed will help the grind a lot. You can buy the map from the “Expedition Antiquarian” NPC at the base camp for 3,000 silver pieces. Once you level up enough Phantom Jobs, you can use their buffing skills and then swap jobs while retaining the buffs. This makes Phantom Bard a pretty nice job to level early, as it can grant you an Phantom Job EXP buff. That said, this whole thing is a learning experience — everyone alongside you is also figuring stuff out, us included. #beginners #guide #ffxivs #occult #crescent
    WWW.POLYGON.COM
    A beginner’s guide for FFXIV’s Occult Crescent
    FFXIV: Dawntrail’s field operation is the Occult Crescent, a huge piece of content that dropped in patch 7.25 and should keep you busy for a while. This content is somewhat tied to the Dawntrail relic weapon (though you’ll be able to complete the weapon without necessarily partaking in the field op), and serves as a great way to kill time while also running some pretty exciting content. Below we explain where to unlock the Occult Crescent in FFXIV and cover details about what the Occult Crescent even is. How to unlock the Occult Crescent in FFXIV To unlock the Occult Crescent, you’ll need to have at least one combat job at level 100 and have completed the main portion of the Dawntrail expansion. (Y’know, the main story quest that is literally called “Dawntrail.”) Once that’s situated, you’ll just need to start the quest “One Last Hurrah” from the Expedition Messenger in Tuliyollal: Follow this quest line to unlock access to the Occult Crescent. What is the Occult Crescent? The Occult Crescent is the field operation for the Dawntrail expansion. This is separate, instanced content that plunges you onto a huge map with a bunch of mechanics specific to this area. In the Occult Crescent maps, you’ll level your “knowledge” rather than your actual job level, and the enemies around the map will deal and take damage based on that knowledge level. If you get attacked by a level 20 monster when you’re only at knowledge level one, be prepared to die. The Occult Crescent shares a lot of quirks with its predecessors, like Eureka or Bozja: You lose knowledge EXP (and potentially levels) when you die and then choose to revive back at base (but you don’t lose any when you get raised by another player). You cannot fly around the map, but you can ride your mount. Special “critical encounters” spawn around the map, locking you into tough and chaotic battles against a big enemy or unique pack of enemies. Just like bunnies in Eureka, you can help Magic Pots in specific FATEs to be led to treasure. Specific to the Occult Crescent, there are Phantom Jobs, which are like… mini-jobs you can take on to give you extra skills to help out. Some are unlocked right away, like Phantom Bard or Phantom Knight, but some require you to buy them from the local shop or get a specific drop from a critical encounter. After finding some survey points, completing some quests, and hitting knowledge rank 20, you’ll be able to participate in “The Forked Tower,” a 48-person dungeon for unique rewards. So, yep. Your main goal here is to run around, completing FATEs and critical encounters to gain knowledge EXP and rank up. You’ll also amass currency along the way that you can use for special rewards. Starting tips for conquering the Occult Crescent If this is your first time stepping foot into a field operation, it can be a lot. Here are some tips to help you out: Unlike in previous field operations, you can freely unlock aethernet teleport points, with no need to worry about progression or level. You’ll want to reveal the map and unlock these ASAP so you can quickly jump into critical encounters. To participate in critical encounters, you’ll need to head over to the area labeled with the blue FATE icon and wait in the huge circle or square on the ground. If you don’t make it there by the time the encounter starts, you will not be able to participate. You can go it alone, but partying up is much better. A simple “lfg” in shout chat should net you an invite. If no invite comes, you may need to start collecting your own straggler players to make a party of your own. If you’re low level, stay out of the vision of those high-leveled baddies to avoid death. When in doubt, walk behind them and hug walls to stay out of their way. With those two above points being made, if you do die, sending a request for a revive alongside a “<pos>” in shout chat will tell players your location so that they can help you. Choosing to revive back at base will lose you EXP and possibly levels, so try not to do that too much. Don’t forget to use your Phantom Job skills. It can be easy to get too locked in to a critical encounter, but don’t forget that you have some useful exclusive tools at your disposal. Don’t get discouraged by your rampant deaths in critical encounters. These fights are chaotic and involve a lot of pattern recognition and memorization. It takes a bit to learn and you’ll get there! Open those chests! You may see just chillin’ chests on the floor. While a lot of them will give you weird junk, some of them have valuables like mounts, minions, and glamour inside. Consider buying the riding map first and the other stuff after. Getting to zoom around the map at a faster speed will help the grind a lot. You can buy the map from the “Expedition Antiquarian” NPC at the base camp for 3,000 silver pieces. Once you level up enough Phantom Jobs, you can use their buffing skills and then swap jobs while retaining the buffs. This makes Phantom Bard a pretty nice job to level early, as it can grant you an Phantom Job EXP buff. That said, this whole thing is a learning experience — everyone alongside you is also figuring stuff out, us included.
    0 Comments 0 Shares 0 Reviews
  • How To Differentiate Between Cat6 and Cat8?

    Posted on : May 29, 2025

    By

    Tech World Times

    Technology 

    Rate this post

    Cat6 cables are a common choice for both office and home networks. They provide data transfer speeds of up to 10 Gbps at a distance of nearly 55 meters. Cat6 has a bandwidth of 250 MHz and can manage important data loads. This makes them suitable for online gaming and HD video streaming. These cables are suitable for traditional Cat5e infrastructure. It provides a versatile option for updating networks without repairing current hardware. The main benefits include compatibility with previous standards, good for small and home office use, and cost-effectiveness.
    Cat8 shows the latest ethernet technology, providing important enhancements over their predecessors. They have a bandwidth of up to 2000 MHz and a data transfer speed reaching 25-40 Gbps. Cat8 cables are created for high-performance apps over small distances. These cables are immensely shielded to reduce interference, making them suitable for public settings, server rooms, data centers, and other commercial ecosystems where reliable and high-speed connections are important. The main benefits include that it is best for data centers and commercial apps, superior shielding for lesser interference, and ultra-fast speeds of up to 40 Gbps.
    Selecting the correct Ethernet cable, whether cat6 or cat8, leveraging a variety of factors entailing budget, environment, and performance requirements.
    Keeping this scenario under consideration, we are presenting some factors that will help you select between cat6 and cat8.
    Performance Requirements
    The main factor when selecting between cat6 and cat8 is the performance of network requirements. Cat6 cables can manage routine tasks like file transfers, video streaming, and web browsing, with speeds of about 10 Gbps over a distance of 55 meters. This makes them sufficient for office or home setups. nevertheless, for data-intensive apps like server connections, huge data transfers, and 4k/8k video editing. Cat8 cables are best suited, providing speeds up to 40 Gbps with lesser latency.
    Jacket Materials
    Cat6 cables generally utilize PVC jackets for indoor environments. This is done by providing fundamental protection against wear and abrasion. LLDPE jackets for outdoor installations offer UV resistance and enhanced water resistance, nevertheless, cat8 cables typically feature low smoke zero Halogenor plenum-rated jackets. This provides superior fire resistance and decreased toxic emissions. This makes them ideal for commercial buildings where safety is important.
    Shielding
    Cat6 cables can be featured in basic shielded or unshielded. This makes them suitable for lesser interference environments like offices and homes. On the contrary, cat8 cables are completely shielded with advanced options like individually shielded pairs and foil shielding. This makes cat8 optimal for ecosystems with high EMI, like data centers or industrial settings, where signal integrity is important.
    Environment
    Consider the operating environment of the cable. Cat8 cables excel in high-interference ecosystems because of their superior shielding. This maintains signal integrity by safeguarding EMI. This makes it ideal for ecosystems with heavy electronic noise, like industrial spaces and data centers. On the contrary, Cat6 cables are suitable for traditional indoor environments where there is lesser interface. This offers a more economical solution.
    Budget
    Cat6 cables are very affordable. This makes them a popular choice for small businesses and homes where ultra-high speeds are not important. Cat8 cables, while providing superior performance, come with a higher price tag because of their advanced shielding and capabilities. For the majority of the users, the extra cost of operating in demanding conditions.
    Conclusion
    Cat8 is superior to cat6 in terms of shielding, bandwidth, and speed. Cat8 is best suited for data-heavy ecosystems, like high-performance set-ups and data centers. Nevertheless, cat6 is sufficient for the majority of network uses at a lesser cost. Finally, the choice between cat6 and cat8 must rely on your budget considerations and the network’s demands. 
    Tech World TimesTech World Times, a global collective focusing on the latest tech news and trends in blockchain, Fintech, Development & Testing, AI and Startups. If you are looking for the guest post then contact at techworldtimes@gmail.com
    #how #differentiate #between #cat6 #cat8
    How To Differentiate Between Cat6 and Cat8?
    Posted on : May 29, 2025 By Tech World Times Technology  Rate this post Cat6 cables are a common choice for both office and home networks. They provide data transfer speeds of up to 10 Gbps at a distance of nearly 55 meters. Cat6 has a bandwidth of 250 MHz and can manage important data loads. This makes them suitable for online gaming and HD video streaming. These cables are suitable for traditional Cat5e infrastructure. It provides a versatile option for updating networks without repairing current hardware. The main benefits include compatibility with previous standards, good for small and home office use, and cost-effectiveness. Cat8 shows the latest ethernet technology, providing important enhancements over their predecessors. They have a bandwidth of up to 2000 MHz and a data transfer speed reaching 25-40 Gbps. Cat8 cables are created for high-performance apps over small distances. These cables are immensely shielded to reduce interference, making them suitable for public settings, server rooms, data centers, and other commercial ecosystems where reliable and high-speed connections are important. The main benefits include that it is best for data centers and commercial apps, superior shielding for lesser interference, and ultra-fast speeds of up to 40 Gbps. Selecting the correct Ethernet cable, whether cat6 or cat8, leveraging a variety of factors entailing budget, environment, and performance requirements. Keeping this scenario under consideration, we are presenting some factors that will help you select between cat6 and cat8. Performance Requirements The main factor when selecting between cat6 and cat8 is the performance of network requirements. Cat6 cables can manage routine tasks like file transfers, video streaming, and web browsing, with speeds of about 10 Gbps over a distance of 55 meters. This makes them sufficient for office or home setups. nevertheless, for data-intensive apps like server connections, huge data transfers, and 4k/8k video editing. Cat8 cables are best suited, providing speeds up to 40 Gbps with lesser latency. Jacket Materials Cat6 cables generally utilize PVC jackets for indoor environments. This is done by providing fundamental protection against wear and abrasion. LLDPE jackets for outdoor installations offer UV resistance and enhanced water resistance, nevertheless, cat8 cables typically feature low smoke zero Halogenor plenum-rated jackets. This provides superior fire resistance and decreased toxic emissions. This makes them ideal for commercial buildings where safety is important. Shielding Cat6 cables can be featured in basic shielded or unshielded. This makes them suitable for lesser interference environments like offices and homes. On the contrary, cat8 cables are completely shielded with advanced options like individually shielded pairs and foil shielding. This makes cat8 optimal for ecosystems with high EMI, like data centers or industrial settings, where signal integrity is important. Environment Consider the operating environment of the cable. Cat8 cables excel in high-interference ecosystems because of their superior shielding. This maintains signal integrity by safeguarding EMI. This makes it ideal for ecosystems with heavy electronic noise, like industrial spaces and data centers. On the contrary, Cat6 cables are suitable for traditional indoor environments where there is lesser interface. This offers a more economical solution. Budget Cat6 cables are very affordable. This makes them a popular choice for small businesses and homes where ultra-high speeds are not important. Cat8 cables, while providing superior performance, come with a higher price tag because of their advanced shielding and capabilities. For the majority of the users, the extra cost of operating in demanding conditions. Conclusion Cat8 is superior to cat6 in terms of shielding, bandwidth, and speed. Cat8 is best suited for data-heavy ecosystems, like high-performance set-ups and data centers. Nevertheless, cat6 is sufficient for the majority of network uses at a lesser cost. Finally, the choice between cat6 and cat8 must rely on your budget considerations and the network’s demands.  Tech World TimesTech World Times, a global collective focusing on the latest tech news and trends in blockchain, Fintech, Development & Testing, AI and Startups. If you are looking for the guest post then contact at techworldtimes@gmail.com #how #differentiate #between #cat6 #cat8
    TECHWORLDTIMES.COM
    How To Differentiate Between Cat6 and Cat8?
    Posted on : May 29, 2025 By Tech World Times Technology  Rate this post Cat6 cables are a common choice for both office and home networks. They provide data transfer speeds of up to 10 Gbps at a distance of nearly 55 meters. Cat6 has a bandwidth of 250 MHz and can manage important data loads. This makes them suitable for online gaming and HD video streaming. These cables are suitable for traditional Cat5e infrastructure. It provides a versatile option for updating networks without repairing current hardware. The main benefits include compatibility with previous standards, good for small and home office use, and cost-effectiveness. Cat8 shows the latest ethernet technology, providing important enhancements over their predecessors. They have a bandwidth of up to 2000 MHz and a data transfer speed reaching 25-40 Gbps. Cat8 cables are created for high-performance apps over small distances (up to 30 meters). These cables are immensely shielded to reduce interference, making them suitable for public settings, server rooms, data centers, and other commercial ecosystems where reliable and high-speed connections are important. The main benefits include that it is best for data centers and commercial apps, superior shielding for lesser interference, and ultra-fast speeds of up to 40 Gbps. Selecting the correct Ethernet cable, whether cat6 or cat8, leveraging a variety of factors entailing budget, environment, and performance requirements. Keeping this scenario under consideration, we are presenting some factors that will help you select between cat6 and cat8. Performance Requirements The main factor when selecting between cat6 and cat8 is the performance of network requirements. Cat6 cables can manage routine tasks like file transfers, video streaming, and web browsing, with speeds of about 10 Gbps over a distance of 55 meters. This makes them sufficient for office or home setups. nevertheless, for data-intensive apps like server connections, huge data transfers, and 4k/8k video editing. Cat8 cables are best suited, providing speeds up to 40 Gbps with lesser latency. Jacket Materials Cat6 cables generally utilize PVC jackets for indoor environments. This is done by providing fundamental protection against wear and abrasion. LLDPE jackets for outdoor installations offer UV resistance and enhanced water resistance, nevertheless, cat8 cables typically feature low smoke zero Halogen (LSZH) or plenum-rated jackets. This provides superior fire resistance and decreased toxic emissions. This makes them ideal for commercial buildings where safety is important. Shielding Cat6 cables can be featured in basic shielded or unshielded. This makes them suitable for lesser interference environments like offices and homes. On the contrary, cat8 cables are completely shielded with advanced options like individually shielded pairs and foil shielding. This makes cat8 optimal for ecosystems with high EMI, like data centers or industrial settings, where signal integrity is important. Environment Consider the operating environment of the cable. Cat8 cables excel in high-interference ecosystems because of their superior shielding. This maintains signal integrity by safeguarding EMI. This makes it ideal for ecosystems with heavy electronic noise, like industrial spaces and data centers. On the contrary, Cat6 cables are suitable for traditional indoor environments where there is lesser interface. This offers a more economical solution. Budget Cat6 cables are very affordable. This makes them a popular choice for small businesses and homes where ultra-high speeds are not important. Cat8 cables, while providing superior performance, come with a higher price tag because of their advanced shielding and capabilities. For the majority of the users, the extra cost of operating in demanding conditions. Conclusion Cat8 is superior to cat6 in terms of shielding, bandwidth, and speed. Cat8 is best suited for data-heavy ecosystems, like high-performance set-ups and data centers. Nevertheless, cat6 is sufficient for the majority of network uses at a lesser cost. Finally, the choice between cat6 and cat8 must rely on your budget considerations and the network’s demands.  Tech World TimesTech World Times (TWT), a global collective focusing on the latest tech news and trends in blockchain, Fintech, Development & Testing, AI and Startups. If you are looking for the guest post then contact at techworldtimes@gmail.com
    2 Comments 0 Shares 0 Reviews
  • Razer USB 4 Dock review: plentiful ports and power for your peripherals

    Macworld

    At a glanceExpert's Rating

    Pros

    Impressive connectivity

    100W power for charging laptop

    Competitive price

    Gaming port for wireless keyboard/mouse

    Cons

    Just one USB 4 port

    No Thunderbolt support

    Modest data transfer speeds

    Unclear info relating to dual-display support

    Our Verdict
    The use of USB rather than Thunderbolt means that the USB 4 Dock isn’t aimed at professional users who need high-speed data transfer. However, it does provide dual-display supportalong with an impressive selection of ports and connectors for general use in an office, and a competitive price.

    Price When Reviewed
    This value will show the geolocated pricing text for product undefined

    Best Pricing Today

    Type: USB-C/USB-A dock

    Ports: 14Power: 100W for laptop; 180W max

    External Displays: 1x 4K at 120Hz, or 2x 4K at 60Hz

    Razer is best known for its range of high-end gaming gear, which is mostly designed for Windows PCs, but it also makes a number of more down-to-earth accessories that are suitable for general use at home or in an office. It makes several docks and hubs that can be used with Macs and PCs, including a fairly expensive Thunderbolt 4 dock that weighs in at around /£300.

    Now it has launched the less expensive ‘USB 4 Dock’, which manages to provide dual-monitor support along with an impressive selection of ports and connectors for the considerably lower price of /£229.99.

    Available in black or Mercury White – which is really just silver, and very similar in tone to the M4 Mac mini – the USB 4 Dock is neatly designed and very sturdily built. The body of the dock is made out of anodized aluminium, which feels very solid and also has a smooth, scratch-resistant finish that looks very smart.

    It’s quite compact too, given that Razer has managed to squeeze in no less than 14 separate ports and connectors – although it’s worth noting that the main USB4 port is used to connect the dock to your Mac, leaving 13 ports that are available for connecting a monitor and other accessories.

    The USB 4 Dock measures just 22mm high, 190mm wide and 80mm deep, and is fairly light too, weighing 1.1kg, and Razer’s web site does make a point of referring to its “portable design”.

    However, it neglects to mention the additional mains power supply that is also included in the box. The power supply is almost as large as the dock itself, and slightly heavier, so the USB 4 Dock really isn’t going to stray very far from your desk at home or in the office. It is, however, very versatile, as that chunky power supply provides 100W of power for charging a MacBook or a PC laptop, along with additional power for all the other ports and connectors on the dock.

    On the back of the dock you’ll find the main USB4 port – with USB-C connector – which is used to connect your MacBook or other computer to the dock. Alongside this are both HDMI 2.1 and DisplayPort 1.4 connectors for connecting external monitors – but, again, Razer’s web site proves to be a little unclear here.

    The website refers to the dock’s support for dual displays and seems to imply that the first display can run at 4K resolution with 120Hz refresh rate, with a second 4K display running at 60Hz. However, our discussions with Razer confirmed that the USB 4 Dock can run a single 4K display at 120Hz, or two 4K displays at 60Hz, so that’s something to remember if you’re planning to use the USB 4 Dock as part of a multi-monitor set-up.

    The rest of the dock’s features are more straightforward. Also located on the back panel is a Gigabit Ethernet port for a wired network connection, and three USB-Aports, two of which provide data transfer of 10Gbps while the third runs at 5Gbps. There are even more USB ports on the front as well – two USB-C and one USB-A, with all three running at 10Gbps. And, to keep Razer’s gaming audience happy, there’s one last USB-A port located all on its own on the left-hand edge of the dock, which is specifically designed to hold a 2.4GHz wireless dongle that can provide a low-latency connection for a wireless keyboard and mouse.

    The dock provides good audio support too, as the front panel houses a 3.5mm audio connector, which can work with either a microphone or a set of wired headphones. There are also two slots on the front for SD and MicroSD memory cards, for transferring photos or video from a camera.

    It’s worth noting though, that there’s just that one USB4 port on the back, which is used to connect your MacBook to the dock, with all the other USB ports supporting USB 3.2. If you need higher performance – perhaps for backing up large video or graphics files onto an SSD – then you may need to look at a more expensive Thunderbolt dock instead.

    However, the strength of the USB 4 Dock is its sheer versatility, with 13 ports and connectors available for attaching peripherals and accessories, and the ability to power and charge multiple devices all at the same time.

    Should you buy the Razer USB 4 Dock?

    Professional users who need the full speed of Thunderbolt 4 – or even Thunderbolt 5 on the latest Macs with M4 Pro chips – might prefer a more expensive Thunderbolt dock for working with large video or graphics files. The USB 4 Dock isn’t in that league for sheer performance, but its versatile selection of ports and connectors will be a real boon for people – like me – who have a selection of SSDs, webcam, keyboard and other accessories in their office that they need to use with their Mac every day.

    For more USB Docks to consider for your Mac, read our round up of the Best Thunderbolt and USB-C docking stations.

    Connectivity

    1x USB4for host computer

    1x HDMI 2.1

    1x DisplayPort 1.4

    2x USB-C3x USB-A1x USB-A1x USB-A1x Gigabit Ethernet

    1x 3.5mm audio in/out

    1x SD

    1x MicroSD
    #razer #usb #dock #review #plentiful
    Razer USB 4 Dock review: plentiful ports and power for your peripherals
    Macworld At a glanceExpert's Rating Pros Impressive connectivity 100W power for charging laptop Competitive price Gaming port for wireless keyboard/mouse Cons Just one USB 4 port No Thunderbolt support Modest data transfer speeds Unclear info relating to dual-display support Our Verdict The use of USB rather than Thunderbolt means that the USB 4 Dock isn’t aimed at professional users who need high-speed data transfer. However, it does provide dual-display supportalong with an impressive selection of ports and connectors for general use in an office, and a competitive price. Price When Reviewed This value will show the geolocated pricing text for product undefined Best Pricing Today Type: USB-C/USB-A dock Ports: 14Power: 100W for laptop; 180W max External Displays: 1x 4K at 120Hz, or 2x 4K at 60Hz Razer is best known for its range of high-end gaming gear, which is mostly designed for Windows PCs, but it also makes a number of more down-to-earth accessories that are suitable for general use at home or in an office. It makes several docks and hubs that can be used with Macs and PCs, including a fairly expensive Thunderbolt 4 dock that weighs in at around /£300. Now it has launched the less expensive ‘USB 4 Dock’, which manages to provide dual-monitor support along with an impressive selection of ports and connectors for the considerably lower price of /£229.99. Available in black or Mercury White – which is really just silver, and very similar in tone to the M4 Mac mini – the USB 4 Dock is neatly designed and very sturdily built. The body of the dock is made out of anodized aluminium, which feels very solid and also has a smooth, scratch-resistant finish that looks very smart. It’s quite compact too, given that Razer has managed to squeeze in no less than 14 separate ports and connectors – although it’s worth noting that the main USB4 port is used to connect the dock to your Mac, leaving 13 ports that are available for connecting a monitor and other accessories. The USB 4 Dock measures just 22mm high, 190mm wide and 80mm deep, and is fairly light too, weighing 1.1kg, and Razer’s web site does make a point of referring to its “portable design”. However, it neglects to mention the additional mains power supply that is also included in the box. The power supply is almost as large as the dock itself, and slightly heavier, so the USB 4 Dock really isn’t going to stray very far from your desk at home or in the office. It is, however, very versatile, as that chunky power supply provides 100W of power for charging a MacBook or a PC laptop, along with additional power for all the other ports and connectors on the dock. On the back of the dock you’ll find the main USB4 port – with USB-C connector – which is used to connect your MacBook or other computer to the dock. Alongside this are both HDMI 2.1 and DisplayPort 1.4 connectors for connecting external monitors – but, again, Razer’s web site proves to be a little unclear here. The website refers to the dock’s support for dual displays and seems to imply that the first display can run at 4K resolution with 120Hz refresh rate, with a second 4K display running at 60Hz. However, our discussions with Razer confirmed that the USB 4 Dock can run a single 4K display at 120Hz, or two 4K displays at 60Hz, so that’s something to remember if you’re planning to use the USB 4 Dock as part of a multi-monitor set-up. The rest of the dock’s features are more straightforward. Also located on the back panel is a Gigabit Ethernet port for a wired network connection, and three USB-Aports, two of which provide data transfer of 10Gbps while the third runs at 5Gbps. There are even more USB ports on the front as well – two USB-C and one USB-A, with all three running at 10Gbps. And, to keep Razer’s gaming audience happy, there’s one last USB-A port located all on its own on the left-hand edge of the dock, which is specifically designed to hold a 2.4GHz wireless dongle that can provide a low-latency connection for a wireless keyboard and mouse. The dock provides good audio support too, as the front panel houses a 3.5mm audio connector, which can work with either a microphone or a set of wired headphones. There are also two slots on the front for SD and MicroSD memory cards, for transferring photos or video from a camera. It’s worth noting though, that there’s just that one USB4 port on the back, which is used to connect your MacBook to the dock, with all the other USB ports supporting USB 3.2. If you need higher performance – perhaps for backing up large video or graphics files onto an SSD – then you may need to look at a more expensive Thunderbolt dock instead. However, the strength of the USB 4 Dock is its sheer versatility, with 13 ports and connectors available for attaching peripherals and accessories, and the ability to power and charge multiple devices all at the same time. Should you buy the Razer USB 4 Dock? Professional users who need the full speed of Thunderbolt 4 – or even Thunderbolt 5 on the latest Macs with M4 Pro chips – might prefer a more expensive Thunderbolt dock for working with large video or graphics files. The USB 4 Dock isn’t in that league for sheer performance, but its versatile selection of ports and connectors will be a real boon for people – like me – who have a selection of SSDs, webcam, keyboard and other accessories in their office that they need to use with their Mac every day. For more USB Docks to consider for your Mac, read our round up of the Best Thunderbolt and USB-C docking stations. Connectivity 1x USB4for host computer 1x HDMI 2.1 1x DisplayPort 1.4 2x USB-C3x USB-A1x USB-A1x USB-A1x Gigabit Ethernet 1x 3.5mm audio in/out 1x SD 1x MicroSD #razer #usb #dock #review #plentiful
    WWW.MACWORLD.COM
    Razer USB 4 Dock review: plentiful ports and power for your peripherals
    Macworld At a glanceExpert's Rating Pros Impressive connectivity 100W power for charging laptop Competitive price Gaming port for wireless keyboard/mouse Cons Just one USB 4 port No Thunderbolt support Modest data transfer speeds Unclear info relating to dual-display support Our Verdict The use of USB rather than Thunderbolt means that the USB 4 Dock isn’t aimed at professional users who need high-speed data transfer. However, it does provide dual-display support (60Hz) along with an impressive selection of ports and connectors for general use in an office, and a competitive price. Price When Reviewed This value will show the geolocated pricing text for product undefined Best Pricing Today Type: USB-C/USB-A dock Ports: 14 (13 available for peripherals) Power: 100W for laptop; 180W max External Displays: 1x 4K at 120Hz, or 2x 4K at 60Hz Razer is best known for its range of high-end gaming gear, which is mostly designed for Windows PCs, but it also makes a number of more down-to-earth accessories that are suitable for general use at home or in an office. It makes several docks and hubs that can be used with Macs and PCs, including a fairly expensive Thunderbolt 4 dock that weighs in at around $300/£300. Now it has launched the less expensive ‘USB 4 Dock’, which manages to provide dual-monitor support along with an impressive selection of ports and connectors for the considerably lower price of $229.99/£229.99 (and Razer prefers USB 4 rather than the official USB4). Available in black or Mercury White – which is really just silver, and very similar in tone to the M4 Mac mini – the USB 4 Dock is neatly designed and very sturdily built. The body of the dock is made out of anodized aluminium, which feels very solid and also has a smooth, scratch-resistant finish that looks very smart. It’s quite compact too, given that Razer has managed to squeeze in no less than 14 separate ports and connectors – although it’s worth noting that the main USB4 port is used to connect the dock to your Mac, leaving 13 ports that are available for connecting a monitor and other accessories. The USB 4 Dock measures just 22mm high, 190mm wide and 80mm deep, and is fairly light too, weighing 1.1kg, and Razer’s web site does make a point of referring to its “portable design”. However, it neglects to mention the additional mains power supply that is also included in the box. The power supply is almost as large as the dock itself, and slightly heavier, so the USB 4 Dock really isn’t going to stray very far from your desk at home or in the office. It is, however, very versatile, as that chunky power supply provides 100W of power for charging a MacBook or a PC laptop, along with additional power for all the other ports and connectors on the dock. On the back of the dock you’ll find the main USB4 port – with USB-C connector – which is used to connect your MacBook or other computer to the dock (with USB4 cable included in the box). Alongside this are both HDMI 2.1 and DisplayPort 1.4 connectors for connecting external monitors – but, again, Razer’s web site proves to be a little unclear here. The website refers to the dock’s support for dual displays and seems to imply that the first display can run at 4K resolution with 120Hz refresh rate, with a second 4K display running at 60Hz. However, our discussions with Razer confirmed that the USB 4 Dock can run a single 4K display at 120Hz, or two 4K displays at 60Hz, so that’s something to remember if you’re planning to use the USB 4 Dock as part of a multi-monitor set-up. The rest of the dock’s features are more straightforward. Also located on the back panel is a Gigabit Ethernet port for a wired network connection, and three USB-A (3.2) ports, two of which provide data transfer of 10Gbps while the third runs at 5Gbps. There are even more USB ports on the front as well – two USB-C and one USB-A, with all three running at 10Gbps. And, to keep Razer’s gaming audience happy, there’s one last USB-A port located all on its own on the left-hand edge of the dock, which is specifically designed to hold a 2.4GHz wireless dongle that can provide a low-latency connection for a wireless keyboard and mouse. The dock provides good audio support too, as the front panel houses a 3.5mm audio connector, which can work with either a microphone or a set of wired headphones. There are also two slots on the front for SD and MicroSD memory cards, for transferring photos or video from a camera. It’s worth noting though, that there’s just that one USB4 port on the back, which is used to connect your MacBook to the dock, with all the other USB ports supporting USB 3.2. If you need higher performance – perhaps for backing up large video or graphics files onto an SSD – then you may need to look at a more expensive Thunderbolt dock instead. However, the strength of the USB 4 Dock is its sheer versatility, with 13 ports and connectors available for attaching peripherals and accessories, and the ability to power and charge multiple devices all at the same time. Should you buy the Razer USB 4 Dock? Professional users who need the full speed of Thunderbolt 4 – or even Thunderbolt 5 on the latest Macs with M4 Pro chips – might prefer a more expensive Thunderbolt dock for working with large video or graphics files. The USB 4 Dock isn’t in that league for sheer performance, but its versatile selection of ports and connectors will be a real boon for people – like me – who have a selection of SSDs, webcam, keyboard and other accessories in their office that they need to use with their Mac every day. For more USB Docks to consider for your Mac, read our round up of the Best Thunderbolt and USB-C docking stations. Connectivity 1x USB4 (USB-C) for host computer 1x HDMI 2.1 1x DisplayPort 1.4 2x USB-C (10Gbps) 3x USB-A (10Gbps) 1x USB-A (5Gbps) 1x USB-A (for wireless adaptor) 1x Gigabit Ethernet 1x 3.5mm audio in/out 1x SD 1x MicroSD
    0 Comments 0 Shares 0 Reviews
  • Aqara Camera Hub G5 Pro review: security camera that works with Apple Home

    Macworld

    At a glance

    Pros

    High quality QHD camera

    Good night vision

    Adjustable spotlight

    Supports HomeKit and Matter

    Cons

    Aqara app is over-complicated

    You have to provide your own power adaptor

    Cloud storage requires a subscription

    Our Verdict
    The sturdy design of the G5 Pro is well-suited for outdoor use, and provides a good, clear image with Quad-HD resolution by day or by night. Its support for HomeKit and Matter also makes it a good option for Apple users, with low-cost cloud storage available via an iCloud+ subscription.

    Price When Reviewed
    This value will show the geolocated pricing text for product undefined

    Best Pricing Today

    Price When Reviewed179,99 Euro

    Best Prices Today: Aqara Kamera Hub G5 Pro WLAN

    Retailer

    Price

    159,68 €

    View Deal

    167,99 €

    View Deal

    167,99 €

    View Deal

    Aqara

    179,99 €

    View Deal

    €197.18

    View Deal

    Price comparison from over 24,000 stores worldwide

    View more prices

    Product

    Price

    Price comparison from Backmarket

    In recent years, Aqara has been one of the few manufacturers of security cameras that still supports HomeKit for Apple devices – even when Apple itself seems to have dropped the term ‘HomeKit’ and now tends to just say that a camera ‘works with Apple Home’.

    The G3 and E1 cameras that we’ve reviewed from Aqaraare very competitively priced, but they’re both designed for indoor use, so the company has extended its range with the new Camera Hub G5 Pro, which boasts a sturdy design that is very much intended for life outdoors.

    There are actually two versions of the G5 Pro available, and they also give you a choice of colours, with either plain white or a dark-grey that looks very similar to Apple’s Space Grey. We tested the standard Wi-Fi version of the camera, which uses a USB-C cable for its power supply and costs /£179.99.

    The USB-C cable included is 2m long, so that should allow you to place it on a window sill or on a wall without too much trouble. The camera stand is adjustable, allowing you to tilt and swivel the camera as required, and there’s a wall-mounting kit included in the box as well. However, Aqara only provides the USB-C cable for charging, with no mains power adaptor included, so you’ll have to provide that for yourself.

    If you want to move the camera further away – or perhaps higher up on a wall so that it overlooks a car parking space – then you might want to opt for the more expensive PoE version. This costs /£199.99 and uses an Ethernet connection to provide both power supply and a wired network connection.

    Both models are identical though, and are larger than previous Aqara cameras, as the G5 Pro houses the main camera sensor, along with a PIR sensorthat provides night vision, and an adjustable spotlight that you can activate to scare off intruders.

    There’s also a built-in speaker and microphone that provide two-way audio as well. And, as it’s designed for outdoor use, the G5 Pro has a sturdy IP65 rating for resistance to water and dust, and Aqara states that it can cope with temperatures as low as -50f/-30C.

    Getting started is very easy, thanks to the Aqara Home app for iOS/Android – although things do get a little more complicated later on. As soon as you connect the G5 Pro to a power supply, the camera’s speaker announces that it is ready to go into pairing mode, and the app uses Bluetooth to connect to the camera and set everything up.

    The camera supports dual-band Wi-Fi using the 2.4GHz and 5.0GHz frequency bands, and the app prompts you to select your preferred network and enter the Wi-Fi password. If you hold your mobile device upright, the Aqara app displays a small preview of the live video from the camera at the top of the screen, with a rather daunting selection of additional controls and settings below. If you turn your device into landscapemode then the video image expands to full-screen size to give you a better view.

    The camera has Quad-HDresolution, which provides a clear, sharp image with a viewing angle of 133-degrees. There’s a little fish-eye distortion around the edges of the image, but that doesn’t affect visibility very much at all, and it’s good to have such a wide field of view to keep an eye on things. The camera’s infra-red sensor works well too, providing good visibility even in darker conditions.

    To be honest, we found the Aqara app rather complicated after the initial set-up process, as it spreads a wide range of camera controls and settings across a long series of menus and sub-menus. But, thankfully, Aqara’s HomeKit support provides a more straightforward way of controlling the camera, and it only took a few quick taps to connect the G5 Pro to the Apple Home app on my iPhone and other Apple devices.

    The Apple Home app offers a simplified set of controls that let you record or stream live video whenever you leave or arrive home. It even offers to download firmware updates for the camera via Apple home too, so full marks to Aqara for making the HomeKit integration so smooth.

    HomeKit integration comes in useful elsewhere too. Our review camera had 8GB of memory that allows it to store video directly on the camera, and the Aqara app also allows you to connect the G5 Pro to a NAS drive for storing your recordings on your home or office network.

    Aqara also offers a subscription service called HomeGuardian that provides online storage and other features, costing per month or per year for a single camera, or per month or per year for an unlimited number of cameras.

    But, of course, Apple’s own iCloud+ subscription service includes a feature called HomeKit Secure Video that allows you to store video from HomeKit-compatible security cameras, starting at just /£0.99 per month for a single camera.

    Should you buy Aqara’s Camera Hub G5 Pro?

    If you need a sturdy outdoor camera that works well with Apple devices then the Camera Hub G5 Pro is hard to beat. Its camera provides good image quality even in low light conditions, and the built-in memory allows you to record and store video straight out of the box.

    Aqara’s app isn’t the most elegant piece of software we’ve ever seen, but the camera’s support for HomeKit and Matter allows you to easily control the camera using the Apple Home app, as well as providing a low-cost option for cloud storage too.
    #aqara #camera #hub #pro #review
    Aqara Camera Hub G5 Pro review: security camera that works with Apple Home
    Macworld At a glance Pros High quality QHD camera Good night vision Adjustable spotlight Supports HomeKit and Matter Cons Aqara app is over-complicated You have to provide your own power adaptor Cloud storage requires a subscription Our Verdict The sturdy design of the G5 Pro is well-suited for outdoor use, and provides a good, clear image with Quad-HD resolution by day or by night. Its support for HomeKit and Matter also makes it a good option for Apple users, with low-cost cloud storage available via an iCloud+ subscription. Price When Reviewed This value will show the geolocated pricing text for product undefined Best Pricing Today Price When Reviewed179,99 Euro Best Prices Today: Aqara Kamera Hub G5 Pro WLAN Retailer Price 159,68 € View Deal 167,99 € View Deal 167,99 € View Deal Aqara 179,99 € View Deal €197.18 View Deal Price comparison from over 24,000 stores worldwide View more prices Product Price Price comparison from Backmarket In recent years, Aqara has been one of the few manufacturers of security cameras that still supports HomeKit for Apple devices – even when Apple itself seems to have dropped the term ‘HomeKit’ and now tends to just say that a camera ‘works with Apple Home’. The G3 and E1 cameras that we’ve reviewed from Aqaraare very competitively priced, but they’re both designed for indoor use, so the company has extended its range with the new Camera Hub G5 Pro, which boasts a sturdy design that is very much intended for life outdoors. There are actually two versions of the G5 Pro available, and they also give you a choice of colours, with either plain white or a dark-grey that looks very similar to Apple’s Space Grey. We tested the standard Wi-Fi version of the camera, which uses a USB-C cable for its power supply and costs /£179.99. The USB-C cable included is 2m long, so that should allow you to place it on a window sill or on a wall without too much trouble. The camera stand is adjustable, allowing you to tilt and swivel the camera as required, and there’s a wall-mounting kit included in the box as well. However, Aqara only provides the USB-C cable for charging, with no mains power adaptor included, so you’ll have to provide that for yourself. If you want to move the camera further away – or perhaps higher up on a wall so that it overlooks a car parking space – then you might want to opt for the more expensive PoE version. This costs /£199.99 and uses an Ethernet connection to provide both power supply and a wired network connection. Both models are identical though, and are larger than previous Aqara cameras, as the G5 Pro houses the main camera sensor, along with a PIR sensorthat provides night vision, and an adjustable spotlight that you can activate to scare off intruders. There’s also a built-in speaker and microphone that provide two-way audio as well. And, as it’s designed for outdoor use, the G5 Pro has a sturdy IP65 rating for resistance to water and dust, and Aqara states that it can cope with temperatures as low as -50f/-30C. Getting started is very easy, thanks to the Aqara Home app for iOS/Android – although things do get a little more complicated later on. As soon as you connect the G5 Pro to a power supply, the camera’s speaker announces that it is ready to go into pairing mode, and the app uses Bluetooth to connect to the camera and set everything up. The camera supports dual-band Wi-Fi using the 2.4GHz and 5.0GHz frequency bands, and the app prompts you to select your preferred network and enter the Wi-Fi password. If you hold your mobile device upright, the Aqara app displays a small preview of the live video from the camera at the top of the screen, with a rather daunting selection of additional controls and settings below. If you turn your device into landscapemode then the video image expands to full-screen size to give you a better view. The camera has Quad-HDresolution, which provides a clear, sharp image with a viewing angle of 133-degrees. There’s a little fish-eye distortion around the edges of the image, but that doesn’t affect visibility very much at all, and it’s good to have such a wide field of view to keep an eye on things. The camera’s infra-red sensor works well too, providing good visibility even in darker conditions. To be honest, we found the Aqara app rather complicated after the initial set-up process, as it spreads a wide range of camera controls and settings across a long series of menus and sub-menus. But, thankfully, Aqara’s HomeKit support provides a more straightforward way of controlling the camera, and it only took a few quick taps to connect the G5 Pro to the Apple Home app on my iPhone and other Apple devices. The Apple Home app offers a simplified set of controls that let you record or stream live video whenever you leave or arrive home. It even offers to download firmware updates for the camera via Apple home too, so full marks to Aqara for making the HomeKit integration so smooth. HomeKit integration comes in useful elsewhere too. Our review camera had 8GB of memory that allows it to store video directly on the camera, and the Aqara app also allows you to connect the G5 Pro to a NAS drive for storing your recordings on your home or office network. Aqara also offers a subscription service called HomeGuardian that provides online storage and other features, costing per month or per year for a single camera, or per month or per year for an unlimited number of cameras. But, of course, Apple’s own iCloud+ subscription service includes a feature called HomeKit Secure Video that allows you to store video from HomeKit-compatible security cameras, starting at just /£0.99 per month for a single camera. Should you buy Aqara’s Camera Hub G5 Pro? If you need a sturdy outdoor camera that works well with Apple devices then the Camera Hub G5 Pro is hard to beat. Its camera provides good image quality even in low light conditions, and the built-in memory allows you to record and store video straight out of the box. Aqara’s app isn’t the most elegant piece of software we’ve ever seen, but the camera’s support for HomeKit and Matter allows you to easily control the camera using the Apple Home app, as well as providing a low-cost option for cloud storage too. #aqara #camera #hub #pro #review
    WWW.MACWORLD.COM
    Aqara Camera Hub G5 Pro review: security camera that works with Apple Home
    Macworld At a glance Pros High quality QHD camera Good night vision Adjustable spotlight Supports HomeKit and Matter Cons Aqara app is over-complicated You have to provide your own power adaptor Cloud storage requires a subscription Our Verdict The sturdy design of the G5 Pro is well-suited for outdoor use, and provides a good, clear image with Quad-HD resolution by day or by night. Its support for HomeKit and Matter also makes it a good option for Apple users, with low-cost cloud storage available via an iCloud+ subscription. Price When Reviewed This value will show the geolocated pricing text for product undefined Best Pricing Today Price When Reviewed179,99 Euro Best Prices Today: Aqara Kamera Hub G5 Pro WLAN Retailer Price 159,68 € View Deal 167,99 € View Deal 167,99 € View Deal Aqara 179,99 € View Deal €197.18 View Deal Price comparison from over 24,000 stores worldwide View more prices Product Price Price comparison from Backmarket In recent years, Aqara has been one of the few manufacturers of security cameras that still supports HomeKit for Apple devices – even when Apple itself seems to have dropped the term ‘HomeKit’ and now tends to just say that a camera ‘works with Apple Home’ (referring to the Home app on your Apple devices). The G3 and E1 cameras that we’ve reviewed from Aqara (in our round up of the Best Security Cameras) are very competitively priced, but they’re both designed for indoor use, so the company has extended its range with the new Camera Hub G5 Pro, which boasts a sturdy design that is very much intended for life outdoors. There are actually two versions of the G5 Pro available, and they also give you a choice of colours, with either plain white or a dark-grey that looks very similar to Apple’s Space Grey. We tested the standard Wi-Fi version of the camera, which uses a USB-C cable for its power supply and costs $179.99/£179.99. The USB-C cable included is 2m long, so that should allow you to place it on a window sill or on a wall without too much trouble. The camera stand is adjustable, allowing you to tilt and swivel the camera as required, and there’s a wall-mounting kit included in the box as well. However, Aqara only provides the USB-C cable for charging, with no mains power adaptor included, so you’ll have to provide that for yourself. If you want to move the camera further away – or perhaps higher up on a wall so that it overlooks a car parking space – then you might want to opt for the more expensive PoE version (power over Ethernet). This costs $199.99/£199.99 and uses an Ethernet connection to provide both power supply and a wired network connection. Both models are identical though, and are larger than previous Aqara cameras, as the G5 Pro houses the main camera sensor, along with a PIR sensor (passive infra-red) that provides night vision, and an adjustable spotlight that you can activate to scare off intruders. There’s also a built-in speaker and microphone that provide two-way audio as well. And, as it’s designed for outdoor use, the G5 Pro has a sturdy IP65 rating for resistance to water and dust, and Aqara states that it can cope with temperatures as low as -50f/-30C. Getting started is very easy, thanks to the Aqara Home app for iOS/Android – although things do get a little more complicated later on. As soon as you connect the G5 Pro to a power supply, the camera’s speaker announces that it is ready to go into pairing mode, and the app uses Bluetooth to connect to the camera and set everything up. The camera supports dual-band Wi-Fi using the 2.4GHz and 5.0GHz frequency bands, and the app prompts you to select your preferred network and enter the Wi-Fi password. If you hold your mobile device upright, the Aqara app displays a small preview of the live video from the camera at the top of the screen, with a rather daunting selection of additional controls and settings below. If you turn your device into landscape (wide) mode then the video image expands to full-screen size to give you a better view. The camera has Quad-HD (2688×1520) resolution, which provides a clear, sharp image with a viewing angle of 133-degrees. There’s a little fish-eye distortion around the edges of the image, but that doesn’t affect visibility very much at all, and it’s good to have such a wide field of view to keep an eye on things. The camera’s infra-red sensor works well too, providing good visibility even in darker conditions. To be honest, we found the Aqara app rather complicated after the initial set-up process, as it spreads a wide range of camera controls and settings across a long series of menus and sub-menus (and Aqara told us that they don’t provide a manual for the app either). But, thankfully, Aqara’s HomeKit support provides a more straightforward way of controlling the camera, and it only took a few quick taps to connect the G5 Pro to the Apple Home app on my iPhone and other Apple devices. The Apple Home app offers a simplified set of controls that let you record or stream live video whenever you leave or arrive home. It even offers to download firmware updates for the camera via Apple home too, so full marks to Aqara for making the HomeKit integration so smooth. HomeKit integration comes in useful elsewhere too. Our review camera had 8GB of memory that allows it to store video directly on the camera, and the Aqara app also allows you to connect the G5 Pro to a NAS drive for storing your recordings on your home or office network. Aqara also offers a subscription service called HomeGuardian that provides online storage and other features, costing $4.99 per month or $49.99 per year for a single camera, or $9.99 per month or $99.99 per year for an unlimited number of cameras. But, of course, Apple’s own iCloud+ subscription service includes a feature called HomeKit Secure Video that allows you to store video from HomeKit-compatible security cameras, starting at just $0.99/£0.99 per month for a single camera (see: iCloud+ pricing). Should you buy Aqara’s Camera Hub G5 Pro? If you need a sturdy outdoor camera that works well with Apple devices then the Camera Hub G5 Pro is hard to beat. Its camera provides good image quality even in low light conditions, and the built-in memory allows you to record and store video straight out of the box. Aqara’s app isn’t the most elegant piece of software we’ve ever seen, but the camera’s support for HomeKit and Matter allows you to easily control the camera using the Apple Home app, as well as providing a low-cost option for cloud storage too.
    0 Comments 0 Shares 0 Reviews
  • TCL QM7K review: stunning image quality for an affordable price

    TCL QM7K

    MSRP Score Details

    “The TCL QM7K offers a stunning image for its price point, bringing premium-level picture quality to your living room without costing a small fortune.”

    Pros

    Fantastic color accuracy

    Impressive contrast

    Excellent brightness

    Decently wide viewing angle

    Cons

    Reflective screen

    Unimpressive sound

    “Why you can trust Digital Trends – We have a 20-year history of testing, reviewing, and rating products, services and apps to help you make a sound buying decision. Find out more about how we test and score products.“

    Recommended Videos

    We finally got our hands on the TCL QM7K Mini-LED QLED, winner of our Top Tech of CES 2025 award. Earlier this year we reviewed the QM6K and were impressed with its value and performance, so we’re excited to put the QM7K through its paces.
    TCL continues to impress in the midrange and I’m happy to say, the QM7K did not disappoint. Mini-LED screen technology is making for gorgeous displays with incredible contrast more affordable for the average consumer, and TCL is really showing what the technology can do with this new entry.
    There’s a good chance that this isn’t the last model we’ll hear about from TCL this year as the company has switched to a staggered release approach for its 2025 models, but for now let’s soak in the QM7K and all it has to offer.
    TCL QM7K specs

    Sizes
    55, 65, 75, 85, 98, and 115 inches

    Pricing
    and Display type
    QD-Mini LED

    Operating system
    Google TV

    Screen resolution
    4K Ultra HDHDR support
    Dolby Vision, Dolby Vision Gaming, Dolby Vision IQ, HDR 10+, HDR10, HLG

    Native refresh rate
    144Hz

    Gaming features
    Auto Game Mode, AMD FreeSync Premium Pro, Game Accelerator 288, VRRAudio support
    Dolby Atmos, Dolby Digital +, DTS: Virtual XConnectivity
    4 HDMI, USB 3.0, USB 2.0, Ethernet, S/PDIF, ATSC 1.0 Tuner

    Affordable price means a less premium build
    Andre Revilla / Digital Trends
    The QM7K targets that affordable middle ground between a true budget TV and the premium flagship models of today. It aims to be within reach of most consumers, particularly in the smaller 55- or 65-inch models.
    So I can’t say I was too shocked when I started unboxing and assembling the QM7K that I found its construction to be a little flimsy.
    Andre Revilla / Digital Trends
    The stand that holds the TV is designed as one central piece, as opposed to the individual legs of the QM6K, which makes attaching it to the QM7K a straightforward process. It’s brushed to look like metal, but metal it is not.
    The plastic T-shaped stand weighs about 5 pounds and does its job in holding the 85-inch model we tested for this review.
    Andre Revilla / Digital Trends
    The TV itself weighs only 75 pounds, aided by a frame made almost entirely of plastic. Savings have to come from somewhere to hit these price points, right? The good news is that this makes assembly a lot easier than on far heavierhigh-end models.
    The QM7K sways a bit anytime you move it or the furniture it sits on, but it’s held securely enough that it’s not going anywhere.
    Decent audio, nothing mind-blowing
    The audio on the TCL QM7K is billed as having better audio than the QM6K, thanks to a Bang & Olufsen audio upgrade, which TCL says will offer “more accurate sound quality for an enhanced home theater audio experience.” All in all, the 2.2-speaker system performs about as expected for a mostly affordable model. Which is to say, it didn’t sound terrible, but it didn’t sound great.
    Andre Revilla / Digital Trends
    The bass response left a lot to be desired, but it’s not like I was expecting a 6-inch subwoofer built into the TV. The dialogue could at times sound muddled, blending in a bit too much with a soundtrack or background noise.
    This really only happened in intense scenes where loud music, dialogue, and sound effects all combined in a cacophony of sound. The QM7K natively supports Dolby Digital and Dolby Digital+ audio, but the built-in speakers aren’t doing it justice.
    Seeing as this model supports Dolby Atmos passthrough, you’d be better off with a Dolby Atmos soundbar, or another dedicated audio system to get the most out of the Dolby audio available on most streaming platforms.
    Color accurate right out of the box
    The QM7K features a number of display profiles that users can select from, but for our purposes we’re going to focus on Filmmaker Mode, which was first added on the QM6K. This mode is designed for color accuracy, and it was spot-on right out of the box.
    Andre Revilla / Digital Trends
    We tested the QM7K first in SDR while in Filmmaker Mode, and it delivered an impressive color delta E of 0.8. While this fell to near zero post-calibration, that’s honestly not even necessary, as the human eye struggles to distinguish a delta E of less than 1.0, making Filmmaker Mode more than sufficient.
    More than bright enough
    If you’re looking to sear your eyeballs out of your sockets during nighttime viewing, then the QM7K is the right TV for you. TCL advertises a peak brightness of 3,000 nits in HDR for the QM7K, though this varies by size and will vary slightly by panel.
    Andre Revilla / Digital Trends
    In my own testing, I was able to get one 2,400-nit burst in HDR testing in a 10% window with brightness, peak luminance, and dynamic backlighting all turned up to the max. More stable readings in HDR came in around 2,000 nits in peak brightness. Peak brightness measurements in SDR came in at a still very respectable 1,600 nits.
    If you’re wanting to get the best color accuracy and contrast out of your QM7K with minimal clipping and as much uniformity as possible, then you’ll likely be watching Filmmaker Mode in its default configuration, which still offers 800 nits with the brightness turned to 100 while keeping those other backlight and luminance settings turned off.
    My gripe with reflections
    While the brightness of the QM7K more than delivers, nothing could get away from the fact that the screen itself was pretty reflective. Don’t get me wrong, I’ve seen worse, but if your living room is like mine and has windows opposite the TV, you’ll find yourself getting up to close them every time you turn on the TV during the daytime.
    Windows reflected in the TCL QM7K Andre Revilla / Digital Trends
    I’m not even picking on reflections when sunlight is pouring in the windows midday, as this issue persists into the evening when the sun is already starting to set. With brightness settings maxed, the QM7K can handle as bright a room as you can throw at it, but any sort of light source directly in front of the screen from your viewing position will be thrown back at you and remains quite visible even in bright scenes.
    A superb image overall
    All in all, the TCL QM7K offers a stunning image for its price point. Without getting too far into the weeds, I’ll say that a lot of cool tech—like the condensed micro lens in the backlight system, helping focus and direct the light from each mini LED, and the decreased optical distance, which is the space between the backlight and the LCD—helps create an image with excellent contrast.
    These technologies also help reduce haloing in HDR, as they lead to less light scatter. The QM7K really goes to show that Mini LED QLED panels are taking the fight to OLED, bringing premium-level picture quality to your living room without costing you a small fortune.

    Value remains the focus
    TCL has continued to impress with panel technology and image quality while maintaining approachable pricing. The 85-inch model we tested launched just over two months ago and is already being sold by all major retailers and TCL at about a 30% markdown from its original MSRP of Right now, that means you can pick up an 85-inch QM7K for and the 55-inch is currently marked down to under Look for these prices to continue dropping as the year goes on, especially as we get into the holiday season.
    The TCL QM7K is an impressive entry that blurs the line between flagship and mid-range in performance while staying solidly in the realm of mid-range pricing. I’ll be eagerly awaiting any TCL launches hopefully still to come this year.
    #tcl #qm7k #review #stunning #image
    TCL QM7K review: stunning image quality for an affordable price
    TCL QM7K MSRP Score Details “The TCL QM7K offers a stunning image for its price point, bringing premium-level picture quality to your living room without costing a small fortune.” Pros Fantastic color accuracy Impressive contrast Excellent brightness Decently wide viewing angle Cons Reflective screen Unimpressive sound “Why you can trust Digital Trends – We have a 20-year history of testing, reviewing, and rating products, services and apps to help you make a sound buying decision. Find out more about how we test and score products.“ Recommended Videos We finally got our hands on the TCL QM7K Mini-LED QLED, winner of our Top Tech of CES 2025 award. Earlier this year we reviewed the QM6K and were impressed with its value and performance, so we’re excited to put the QM7K through its paces. TCL continues to impress in the midrange and I’m happy to say, the QM7K did not disappoint. Mini-LED screen technology is making for gorgeous displays with incredible contrast more affordable for the average consumer, and TCL is really showing what the technology can do with this new entry. There’s a good chance that this isn’t the last model we’ll hear about from TCL this year as the company has switched to a staggered release approach for its 2025 models, but for now let’s soak in the QM7K and all it has to offer. TCL QM7K specs Sizes 55, 65, 75, 85, 98, and 115 inches Pricing and Display type QD-Mini LED Operating system Google TV Screen resolution 4K Ultra HDHDR support Dolby Vision, Dolby Vision Gaming, Dolby Vision IQ, HDR 10+, HDR10, HLG Native refresh rate 144Hz Gaming features Auto Game Mode, AMD FreeSync Premium Pro, Game Accelerator 288, VRRAudio support Dolby Atmos, Dolby Digital +, DTS: Virtual XConnectivity 4 HDMI, USB 3.0, USB 2.0, Ethernet, S/PDIF, ATSC 1.0 Tuner Affordable price means a less premium build Andre Revilla / Digital Trends The QM7K targets that affordable middle ground between a true budget TV and the premium flagship models of today. It aims to be within reach of most consumers, particularly in the smaller 55- or 65-inch models. So I can’t say I was too shocked when I started unboxing and assembling the QM7K that I found its construction to be a little flimsy. Andre Revilla / Digital Trends The stand that holds the TV is designed as one central piece, as opposed to the individual legs of the QM6K, which makes attaching it to the QM7K a straightforward process. It’s brushed to look like metal, but metal it is not. The plastic T-shaped stand weighs about 5 pounds and does its job in holding the 85-inch model we tested for this review. Andre Revilla / Digital Trends The TV itself weighs only 75 pounds, aided by a frame made almost entirely of plastic. Savings have to come from somewhere to hit these price points, right? The good news is that this makes assembly a lot easier than on far heavierhigh-end models. The QM7K sways a bit anytime you move it or the furniture it sits on, but it’s held securely enough that it’s not going anywhere. Decent audio, nothing mind-blowing The audio on the TCL QM7K is billed as having better audio than the QM6K, thanks to a Bang & Olufsen audio upgrade, which TCL says will offer “more accurate sound quality for an enhanced home theater audio experience.” All in all, the 2.2-speaker system performs about as expected for a mostly affordable model. Which is to say, it didn’t sound terrible, but it didn’t sound great. Andre Revilla / Digital Trends The bass response left a lot to be desired, but it’s not like I was expecting a 6-inch subwoofer built into the TV. The dialogue could at times sound muddled, blending in a bit too much with a soundtrack or background noise. This really only happened in intense scenes where loud music, dialogue, and sound effects all combined in a cacophony of sound. The QM7K natively supports Dolby Digital and Dolby Digital+ audio, but the built-in speakers aren’t doing it justice. Seeing as this model supports Dolby Atmos passthrough, you’d be better off with a Dolby Atmos soundbar, or another dedicated audio system to get the most out of the Dolby audio available on most streaming platforms. Color accurate right out of the box The QM7K features a number of display profiles that users can select from, but for our purposes we’re going to focus on Filmmaker Mode, which was first added on the QM6K. This mode is designed for color accuracy, and it was spot-on right out of the box. Andre Revilla / Digital Trends We tested the QM7K first in SDR while in Filmmaker Mode, and it delivered an impressive color delta E of 0.8. While this fell to near zero post-calibration, that’s honestly not even necessary, as the human eye struggles to distinguish a delta E of less than 1.0, making Filmmaker Mode more than sufficient. More than bright enough If you’re looking to sear your eyeballs out of your sockets during nighttime viewing, then the QM7K is the right TV for you. TCL advertises a peak brightness of 3,000 nits in HDR for the QM7K, though this varies by size and will vary slightly by panel. Andre Revilla / Digital Trends In my own testing, I was able to get one 2,400-nit burst in HDR testing in a 10% window with brightness, peak luminance, and dynamic backlighting all turned up to the max. More stable readings in HDR came in around 2,000 nits in peak brightness. Peak brightness measurements in SDR came in at a still very respectable 1,600 nits. If you’re wanting to get the best color accuracy and contrast out of your QM7K with minimal clipping and as much uniformity as possible, then you’ll likely be watching Filmmaker Mode in its default configuration, which still offers 800 nits with the brightness turned to 100 while keeping those other backlight and luminance settings turned off. My gripe with reflections While the brightness of the QM7K more than delivers, nothing could get away from the fact that the screen itself was pretty reflective. Don’t get me wrong, I’ve seen worse, but if your living room is like mine and has windows opposite the TV, you’ll find yourself getting up to close them every time you turn on the TV during the daytime. Windows reflected in the TCL QM7K Andre Revilla / Digital Trends I’m not even picking on reflections when sunlight is pouring in the windows midday, as this issue persists into the evening when the sun is already starting to set. With brightness settings maxed, the QM7K can handle as bright a room as you can throw at it, but any sort of light source directly in front of the screen from your viewing position will be thrown back at you and remains quite visible even in bright scenes. A superb image overall All in all, the TCL QM7K offers a stunning image for its price point. Without getting too far into the weeds, I’ll say that a lot of cool tech—like the condensed micro lens in the backlight system, helping focus and direct the light from each mini LED, and the decreased optical distance, which is the space between the backlight and the LCD—helps create an image with excellent contrast. These technologies also help reduce haloing in HDR, as they lead to less light scatter. The QM7K really goes to show that Mini LED QLED panels are taking the fight to OLED, bringing premium-level picture quality to your living room without costing you a small fortune. Value remains the focus TCL has continued to impress with panel technology and image quality while maintaining approachable pricing. The 85-inch model we tested launched just over two months ago and is already being sold by all major retailers and TCL at about a 30% markdown from its original MSRP of Right now, that means you can pick up an 85-inch QM7K for and the 55-inch is currently marked down to under Look for these prices to continue dropping as the year goes on, especially as we get into the holiday season. The TCL QM7K is an impressive entry that blurs the line between flagship and mid-range in performance while staying solidly in the realm of mid-range pricing. I’ll be eagerly awaiting any TCL launches hopefully still to come this year. #tcl #qm7k #review #stunning #image
    WWW.DIGITALTRENDS.COM
    TCL QM7K review: stunning image quality for an affordable price
    TCL QM7K MSRP $1,300.00 Score Details “The TCL QM7K offers a stunning image for its price point, bringing premium-level picture quality to your living room without costing a small fortune.” Pros Fantastic color accuracy Impressive contrast Excellent brightness Decently wide viewing angle Cons Reflective screen Unimpressive sound “Why you can trust Digital Trends – We have a 20-year history of testing, reviewing, and rating products, services and apps to help you make a sound buying decision. Find out more about how we test and score products.“ Recommended Videos We finally got our hands on the TCL QM7K Mini-LED QLED, winner of our Top Tech of CES 2025 award. Earlier this year we reviewed the QM6K and were impressed with its value and performance, so we’re excited to put the QM7K through its paces. TCL continues to impress in the midrange and I’m happy to say, the QM7K did not disappoint. Mini-LED screen technology is making for gorgeous displays with incredible contrast more affordable for the average consumer, and TCL is really showing what the technology can do with this new entry. There’s a good chance that this isn’t the last model we’ll hear about from TCL this year as the company has switched to a staggered release approach for its 2025 models, but for now let’s soak in the QM7K and all it has to offer. TCL QM7K specs Sizes 55, 65, 75, 85, 98, and 115 inches Pricing $1,299.99, $1,499.99, $1,999.99, $2,499.99, $4,999.99, and $19,999.99 Display type QD-Mini LED Operating system Google TV Screen resolution 4K Ultra HD (3,840 x 2,160) HDR support Dolby Vision, Dolby Vision Gaming, Dolby Vision IQ, HDR 10+, HDR10, HLG Native refresh rate 144Hz Gaming features Auto Game Mode (ALLM), AMD FreeSync Premium Pro, Game Accelerator 288, VRR (up to 144Hz) Audio support Dolby Atmos, Dolby Digital +, DTS: Virtual X (Passthrough Dolby Atmos, Dolby Digital +, Dolby Digital, PCM) Connectivity 4 HDMI (1x eARC), USB 3.0, USB 2.0, Ethernet (LAN), S/PDIF, ATSC 1.0 Tuner Affordable price means a less premium build Andre Revilla / Digital Trends The QM7K targets that affordable middle ground between a true budget TV and the premium flagship models of today. It aims to be within reach of most consumers, particularly in the smaller 55- or 65-inch models. So I can’t say I was too shocked when I started unboxing and assembling the QM7K that I found its construction to be a little flimsy. Andre Revilla / Digital Trends The stand that holds the TV is designed as one central piece, as opposed to the individual legs of the QM6K, which makes attaching it to the QM7K a straightforward process. It’s brushed to look like metal, but metal it is not. The plastic T-shaped stand weighs about 5 pounds and does its job in holding the 85-inch model we tested for this review. Andre Revilla / Digital Trends The TV itself weighs only 75 pounds, aided by a frame made almost entirely of plastic. Savings have to come from somewhere to hit these price points, right? The good news is that this makes assembly a lot easier than on far heavier (albeit sturdier) high-end models. The QM7K sways a bit anytime you move it or the furniture it sits on, but it’s held securely enough that it’s not going anywhere. Decent audio, nothing mind-blowing The audio on the TCL QM7K is billed as having better audio than the QM6K, thanks to a Bang & Olufsen audio upgrade, which TCL says will offer “more accurate sound quality for an enhanced home theater audio experience.” All in all, the 2.2-speaker system performs about as expected for a mostly affordable model. Which is to say, it didn’t sound terrible, but it didn’t sound great. Andre Revilla / Digital Trends The bass response left a lot to be desired, but it’s not like I was expecting a 6-inch subwoofer built into the TV. The dialogue could at times sound muddled, blending in a bit too much with a soundtrack or background noise. This really only happened in intense scenes where loud music, dialogue, and sound effects all combined in a cacophony of sound. The QM7K natively supports Dolby Digital and Dolby Digital+ audio, but the built-in speakers aren’t doing it justice. Seeing as this model supports Dolby Atmos passthrough, you’d be better off with a Dolby Atmos soundbar, or another dedicated audio system to get the most out of the Dolby audio available on most streaming platforms. Color accurate right out of the box The QM7K features a number of display profiles that users can select from, but for our purposes we’re going to focus on Filmmaker Mode, which was first added on the QM6K. This mode is designed for color accuracy, and it was spot-on right out of the box. Andre Revilla / Digital Trends We tested the QM7K first in SDR while in Filmmaker Mode, and it delivered an impressive color delta E of 0.8. While this fell to near zero post-calibration, that’s honestly not even necessary, as the human eye struggles to distinguish a delta E of less than 1.0, making Filmmaker Mode more than sufficient. More than bright enough If you’re looking to sear your eyeballs out of your sockets during nighttime viewing, then the QM7K is the right TV for you. TCL advertises a peak brightness of 3,000 nits in HDR for the QM7K, though this varies by size and will vary slightly by panel. Andre Revilla / Digital Trends In my own testing, I was able to get one 2,400-nit burst in HDR testing in a 10% window with brightness, peak luminance, and dynamic backlighting all turned up to the max. More stable readings in HDR came in around 2,000 nits in peak brightness. Peak brightness measurements in SDR came in at a still very respectable 1,600 nits. If you’re wanting to get the best color accuracy and contrast out of your QM7K with minimal clipping and as much uniformity as possible, then you’ll likely be watching Filmmaker Mode in its default configuration, which still offers 800 nits with the brightness turned to 100 while keeping those other backlight and luminance settings turned off. My gripe with reflections While the brightness of the QM7K more than delivers, nothing could get away from the fact that the screen itself was pretty reflective. Don’t get me wrong, I’ve seen worse, but if your living room is like mine and has windows opposite the TV, you’ll find yourself getting up to close them every time you turn on the TV during the daytime. Windows reflected in the TCL QM7K Andre Revilla / Digital Trends I’m not even picking on reflections when sunlight is pouring in the windows midday, as this issue persists into the evening when the sun is already starting to set. With brightness settings maxed, the QM7K can handle as bright a room as you can throw at it, but any sort of light source directly in front of the screen from your viewing position will be thrown back at you and remains quite visible even in bright scenes. A superb image overall All in all, the TCL QM7K offers a stunning image for its price point. Without getting too far into the weeds, I’ll say that a lot of cool tech—like the condensed micro lens in the backlight system, helping focus and direct the light from each mini LED, and the decreased optical distance, which is the space between the backlight and the LCD—helps create an image with excellent contrast. These technologies also help reduce haloing in HDR, as they lead to less light scatter. The QM7K really goes to show that Mini LED QLED panels are taking the fight to OLED, bringing premium-level picture quality to your living room without costing you a small fortune. Value remains the focus TCL has continued to impress with panel technology and image quality while maintaining approachable pricing. The 85-inch model we tested launched just over two months ago and is already being sold by all major retailers and TCL at about a 30% markdown from its original MSRP of $2,500. Right now, that means you can pick up an 85-inch QM7K for $1,800, and the 55-inch is currently marked down to under $900. Look for these prices to continue dropping as the year goes on, especially as we get into the holiday season. The TCL QM7K is an impressive entry that blurs the line between flagship and mid-range in performance while staying solidly in the realm of mid-range pricing. I’ll be eagerly awaiting any TCL launches hopefully still to come this year.
    0 Comments 0 Shares 0 Reviews
CGShares https://cgshares.com