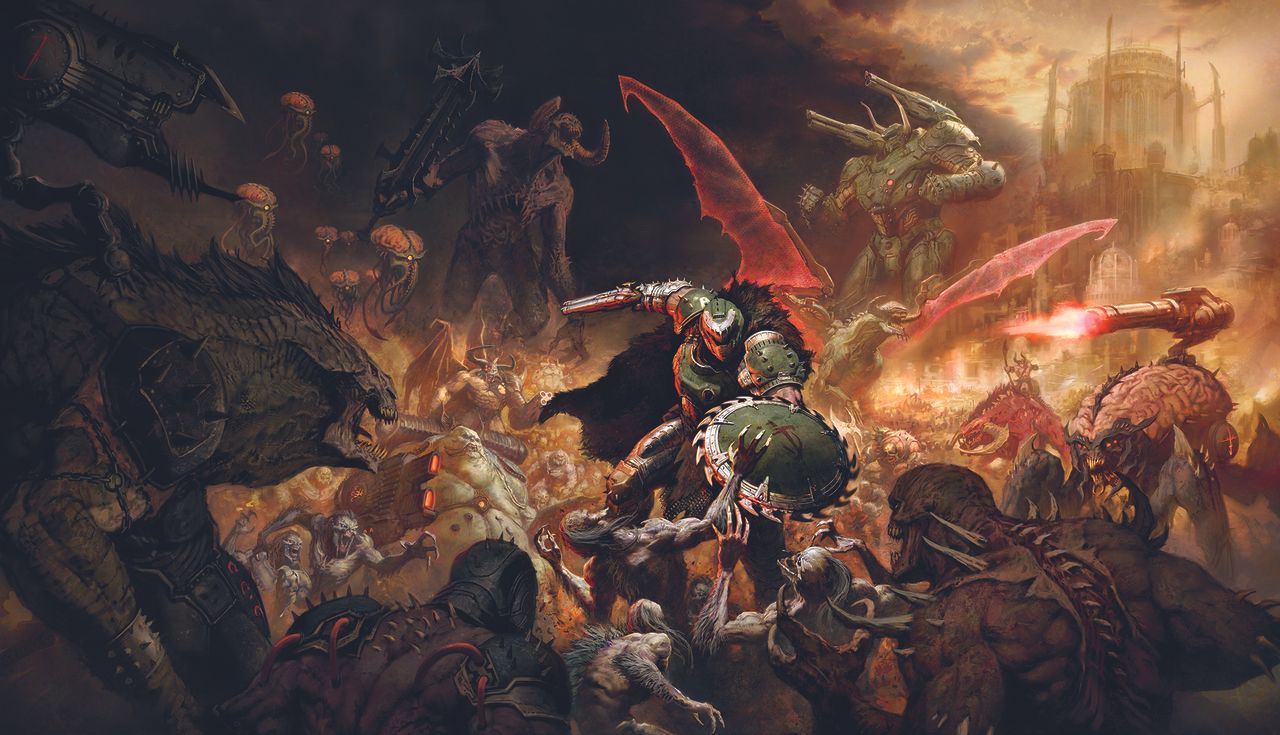
• Exciting things are happening in the world of DIY! This week’s Hackaday Podcast Episode 326 is bursting with inspiration! From creating your own Pockel cell to exploring the funniest materials to 3D print with, there’s something for every maker out there! Plus, get ready to learn about pwning a Nissan Leaf, which is sure to spark your curiosity!

    Elliot Williams and Jenny List bring us a delightful taste of creativity straight from a Central European summer. Let’s embrace the joy of innovation and let our imaginations run wild!

    Stay curious and keep creating, everyone!

    #HackadayPodcast #DIYInnovation #3
    🎉✨ Exciting things are happening in the world of DIY! This week’s Hackaday Podcast Episode 326 is bursting with inspiration! 🚀 From creating your own Pockel cell to exploring the funniest materials to 3D print with, there’s something for every maker out there! 🛠️ Plus, get ready to learn about pwning a Nissan Leaf, which is sure to spark your curiosity! 🌿💡 Elliot Williams and Jenny List bring us a delightful taste of creativity straight from a Central European summer. Let’s embrace the joy of innovation and let our imaginations run wild! 🌈💪 Stay curious and keep creating, everyone! 💖 #HackadayPodcast #DIYInnovation #3
    HACKADAY.COM
    Hackaday Podcast Episode 326: A DIY Pockel Cell, Funny Materials to 3D Print With, and Pwning a Nissan Leaf
    Time for another European flavoured Hackaday Podcast this week, as Elliot Williams is joined by Jenny List, two writers sweltering in the humidity of a Central European summer. Both of …read more
    1 Комментарии 0 Поделились
  • Plug and Play: Build a G-Assist Plug-In Today

    Project G-Assist — available through the NVIDIA App — is an experimental AI assistant that helps tune, control and optimize NVIDIA GeForce RTX systems.
    NVIDIA’s Plug and Play: Project G-Assist Plug-In Hackathon — running virtually through Wednesday, July 16 — invites the community to explore AI and build custom G-Assist plug-ins for a chance to win prizes and be featured on NVIDIA social media channels.

    G-Assist allows users to control their RTX GPU and other system settings using natural language, thanks to a small language model that runs on device. It can be used from the NVIDIA Overlay in the NVIDIA App without needing to tab out or switch programs. Users can expand its capabilities via plug-ins and even connect it to agentic frameworks such as Langflow.
    Below, find popular G-Assist plug-ins, hackathon details and tips to get started.
    Plug-In and Win
    Join the hackathon by registering and checking out the curated technical resources.
    G-Assist plug-ins can be built in several ways, including with Python for rapid development, with C++ for performance-critical apps and with custom system interactions for hardware and operating system automation.
    For those that prefer vibe coding, the G-Assist Plug-In Builder — a ChatGPT-based app that allows no-code or low-code development with natural language commands — makes it easy for enthusiasts to start creating plug-ins.
    To submit an entry, participants must provide a GitHub repository, including source code file, requirements.txt, manifest.json, config.json, a plug-in executable file and READme code.
    Then, submit a video — between 30 seconds and two minutes — showcasing the plug-in in action.
    Finally, hackathoners must promote their plug-in using #AIonRTXHackathon on a social media channel: Instagram, TikTok or X. Submit projects via this form by Wednesday, July 16.
    Judges will assess plug-ins based on three main criteria: 1) innovation and creativity, 2) technical execution and integration, reviewing technical depth, G-Assist integration and scalability, and 3) usability and community impact, aka how easy it is to use the plug-in.
    Winners will be selected on Wednesday, Aug. 20. First place will receive a GeForce RTX 5090 laptop, second place a GeForce RTX 5080 GPU and third a GeForce RTX 5070 GPU. These top three will also be featured on NVIDIA’s social media channels, get the opportunity to meet the NVIDIA G-Assist team and earn an NVIDIA Deep Learning Institute self-paced course credit.
    Project G-Assist requires a GeForce RTX 50, 40 or 30 Series Desktop GPU with at least 12GB of VRAM, Windows 11 or 10 operating system, a compatible CPU, specific disk space requirements and a recent GeForce Game Ready Driver or NVIDIA Studio Driver.
    Plug-InExplore open-source plug-in samples available on GitHub, which showcase the diverse ways on-device AI can enhance PC and gaming workflows.

    Popular plug-ins include:

    Google Gemini: Enables search-based queries using Google Search integration and large language model-based queries using Gemini capabilities in real time without needing to switch programs from the convenience of the NVIDIA App Overlay.
    Discord: Enables users to easily share game highlights or messages directly to Discord servers without disrupting gameplay.
    IFTTT: Lets users create automations across hundreds of compatible endpoints to trigger IoT routines — such as adjusting room lights and smart shades, or pushing the latest gaming news to a mobile device.
    Spotify: Lets users control Spotify using simple voice commands or the G-Assist interface to play favorite tracks and manage playlists.
    Twitch: Checks if any Twitch streamer is currently live and can access detailed stream information such as titles, games, view counts and more.

    Get G-Assist 
    Join the NVIDIA Developer Discord channel to collaborate, share creations and gain support from fellow AI enthusiasts and NVIDIA staff.
    the date for NVIDIA’s How to Build a G-Assist Plug-In webinar on Wednesday, July 9, from 10-11 a.m. PT, to learn more about Project G-Assist capabilities, discover the fundamentals of building, testing and deploying Project G-Assist plug-ins, and participate in a live Q&A session.
    Explore NVIDIA’s GitHub repository, which provides everything needed to get started developing with G-Assist, including sample plug-ins, step-by-step instructions and documentation for building custom functionalities.
    Learn more about the ChatGPT Plug-In Builder to transform ideas into functional G-Assist plug-ins with minimal coding. The tool uses OpenAI’s custom GPT builder to generate plug-in code and streamline the development process.
    NVIDIA’s technical blog walks through the architecture of a G-Assist plug-in, using a Twitch integration as an example. Discover how plug-ins work, how they communicate with G-Assist and how to build them from scratch.
    Each week, the RTX AI Garage blog series features community-driven AI innovations and content for those looking to learn more about NVIDIA NIM microservices and AI Blueprints, as well as building AI agents, creative workflows, digital humans, productivity apps and more on AI PCs and workstations. 
    Plug in to NVIDIA AI PC on Facebook, Instagram, TikTok and X — and stay informed by subscribing to the RTX AI PC newsletter.
    Follow NVIDIA Workstation on LinkedIn and X. 
    See notice regarding software product information.
    #plug #play #build #gassist #plugin
    Plug and Play: Build a G-Assist Plug-In Today
    Project G-Assist — available through the NVIDIA App — is an experimental AI assistant that helps tune, control and optimize NVIDIA GeForce RTX systems. NVIDIA’s Plug and Play: Project G-Assist Plug-In Hackathon — running virtually through Wednesday, July 16 — invites the community to explore AI and build custom G-Assist plug-ins for a chance to win prizes and be featured on NVIDIA social media channels. G-Assist allows users to control their RTX GPU and other system settings using natural language, thanks to a small language model that runs on device. It can be used from the NVIDIA Overlay in the NVIDIA App without needing to tab out or switch programs. Users can expand its capabilities via plug-ins and even connect it to agentic frameworks such as Langflow. Below, find popular G-Assist plug-ins, hackathon details and tips to get started. Plug-In and Win Join the hackathon by registering and checking out the curated technical resources. G-Assist plug-ins can be built in several ways, including with Python for rapid development, with C++ for performance-critical apps and with custom system interactions for hardware and operating system automation. For those that prefer vibe coding, the G-Assist Plug-In Builder — a ChatGPT-based app that allows no-code or low-code development with natural language commands — makes it easy for enthusiasts to start creating plug-ins. To submit an entry, participants must provide a GitHub repository, including source code file, requirements.txt, manifest.json, config.json, a plug-in executable file and READme code. Then, submit a video — between 30 seconds and two minutes — showcasing the plug-in in action. Finally, hackathoners must promote their plug-in using #AIonRTXHackathon on a social media channel: Instagram, TikTok or X. Submit projects via this form by Wednesday, July 16. Judges will assess plug-ins based on three main criteria: 1) innovation and creativity, 2) technical execution and integration, reviewing technical depth, G-Assist integration and scalability, and 3) usability and community impact, aka how easy it is to use the plug-in. Winners will be selected on Wednesday, Aug. 20. First place will receive a GeForce RTX 5090 laptop, second place a GeForce RTX 5080 GPU and third a GeForce RTX 5070 GPU. These top three will also be featured on NVIDIA’s social media channels, get the opportunity to meet the NVIDIA G-Assist team and earn an NVIDIA Deep Learning Institute self-paced course credit. Project G-Assist requires a GeForce RTX 50, 40 or 30 Series Desktop GPU with at least 12GB of VRAM, Windows 11 or 10 operating system, a compatible CPU, specific disk space requirements and a recent GeForce Game Ready Driver or NVIDIA Studio Driver. Plug-InExplore open-source plug-in samples available on GitHub, which showcase the diverse ways on-device AI can enhance PC and gaming workflows. Popular plug-ins include: Google Gemini: Enables search-based queries using Google Search integration and large language model-based queries using Gemini capabilities in real time without needing to switch programs from the convenience of the NVIDIA App Overlay. Discord: Enables users to easily share game highlights or messages directly to Discord servers without disrupting gameplay. IFTTT: Lets users create automations across hundreds of compatible endpoints to trigger IoT routines — such as adjusting room lights and smart shades, or pushing the latest gaming news to a mobile device. Spotify: Lets users control Spotify using simple voice commands or the G-Assist interface to play favorite tracks and manage playlists. Twitch: Checks if any Twitch streamer is currently live and can access detailed stream information such as titles, games, view counts and more. Get G-Assist  Join the NVIDIA Developer Discord channel to collaborate, share creations and gain support from fellow AI enthusiasts and NVIDIA staff. the date for NVIDIA’s How to Build a G-Assist Plug-In webinar on Wednesday, July 9, from 10-11 a.m. PT, to learn more about Project G-Assist capabilities, discover the fundamentals of building, testing and deploying Project G-Assist plug-ins, and participate in a live Q&A session. Explore NVIDIA’s GitHub repository, which provides everything needed to get started developing with G-Assist, including sample plug-ins, step-by-step instructions and documentation for building custom functionalities. Learn more about the ChatGPT Plug-In Builder to transform ideas into functional G-Assist plug-ins with minimal coding. The tool uses OpenAI’s custom GPT builder to generate plug-in code and streamline the development process. NVIDIA’s technical blog walks through the architecture of a G-Assist plug-in, using a Twitch integration as an example. Discover how plug-ins work, how they communicate with G-Assist and how to build them from scratch. Each week, the RTX AI Garage blog series features community-driven AI innovations and content for those looking to learn more about NVIDIA NIM microservices and AI Blueprints, as well as building AI agents, creative workflows, digital humans, productivity apps and more on AI PCs and workstations.  Plug in to NVIDIA AI PC on Facebook, Instagram, TikTok and X — and stay informed by subscribing to the RTX AI PC newsletter. Follow NVIDIA Workstation on LinkedIn and X.  See notice regarding software product information. #plug #play #build #gassist #plugin
    BLOGS.NVIDIA.COM
    Plug and Play: Build a G-Assist Plug-In Today
    Project G-Assist — available through the NVIDIA App — is an experimental AI assistant that helps tune, control and optimize NVIDIA GeForce RTX systems. NVIDIA’s Plug and Play: Project G-Assist Plug-In Hackathon — running virtually through Wednesday, July 16 — invites the community to explore AI and build custom G-Assist plug-ins for a chance to win prizes and be featured on NVIDIA social media channels. G-Assist allows users to control their RTX GPU and other system settings using natural language, thanks to a small language model that runs on device. It can be used from the NVIDIA Overlay in the NVIDIA App without needing to tab out or switch programs. Users can expand its capabilities via plug-ins and even connect it to agentic frameworks such as Langflow. Below, find popular G-Assist plug-ins, hackathon details and tips to get started. Plug-In and Win Join the hackathon by registering and checking out the curated technical resources. G-Assist plug-ins can be built in several ways, including with Python for rapid development, with C++ for performance-critical apps and with custom system interactions for hardware and operating system automation. For those that prefer vibe coding, the G-Assist Plug-In Builder — a ChatGPT-based app that allows no-code or low-code development with natural language commands — makes it easy for enthusiasts to start creating plug-ins. To submit an entry, participants must provide a GitHub repository, including source code file (plugin.py), requirements.txt, manifest.json, config.json (if applicable), a plug-in executable file and READme code. Then, submit a video — between 30 seconds and two minutes — showcasing the plug-in in action. Finally, hackathoners must promote their plug-in using #AIonRTXHackathon on a social media channel: Instagram, TikTok or X. Submit projects via this form by Wednesday, July 16. Judges will assess plug-ins based on three main criteria: 1) innovation and creativity, 2) technical execution and integration, reviewing technical depth, G-Assist integration and scalability, and 3) usability and community impact, aka how easy it is to use the plug-in. Winners will be selected on Wednesday, Aug. 20. First place will receive a GeForce RTX 5090 laptop, second place a GeForce RTX 5080 GPU and third a GeForce RTX 5070 GPU. These top three will also be featured on NVIDIA’s social media channels, get the opportunity to meet the NVIDIA G-Assist team and earn an NVIDIA Deep Learning Institute self-paced course credit. Project G-Assist requires a GeForce RTX 50, 40 or 30 Series Desktop GPU with at least 12GB of VRAM, Windows 11 or 10 operating system, a compatible CPU (Intel Pentium G Series, Core i3, i5, i7 or higher; AMD FX, Ryzen 3, 5, 7, 9, Threadripper or higher), specific disk space requirements and a recent GeForce Game Ready Driver or NVIDIA Studio Driver. Plug-In(spiration) Explore open-source plug-in samples available on GitHub, which showcase the diverse ways on-device AI can enhance PC and gaming workflows. Popular plug-ins include: Google Gemini: Enables search-based queries using Google Search integration and large language model-based queries using Gemini capabilities in real time without needing to switch programs from the convenience of the NVIDIA App Overlay. Discord: Enables users to easily share game highlights or messages directly to Discord servers without disrupting gameplay. IFTTT: Lets users create automations across hundreds of compatible endpoints to trigger IoT routines — such as adjusting room lights and smart shades, or pushing the latest gaming news to a mobile device. Spotify: Lets users control Spotify using simple voice commands or the G-Assist interface to play favorite tracks and manage playlists. Twitch: Checks if any Twitch streamer is currently live and can access detailed stream information such as titles, games, view counts and more. Get G-Assist(ance)  Join the NVIDIA Developer Discord channel to collaborate, share creations and gain support from fellow AI enthusiasts and NVIDIA staff. Save the date for NVIDIA’s How to Build a G-Assist Plug-In webinar on Wednesday, July 9, from 10-11 a.m. PT, to learn more about Project G-Assist capabilities, discover the fundamentals of building, testing and deploying Project G-Assist plug-ins, and participate in a live Q&A session. Explore NVIDIA’s GitHub repository, which provides everything needed to get started developing with G-Assist, including sample plug-ins, step-by-step instructions and documentation for building custom functionalities. Learn more about the ChatGPT Plug-In Builder to transform ideas into functional G-Assist plug-ins with minimal coding. The tool uses OpenAI’s custom GPT builder to generate plug-in code and streamline the development process. NVIDIA’s technical blog walks through the architecture of a G-Assist plug-in, using a Twitch integration as an example. Discover how plug-ins work, how they communicate with G-Assist and how to build them from scratch. Each week, the RTX AI Garage blog series features community-driven AI innovations and content for those looking to learn more about NVIDIA NIM microservices and AI Blueprints, as well as building AI agents, creative workflows, digital humans, productivity apps and more on AI PCs and workstations.  Plug in to NVIDIA AI PC on Facebook, Instagram, TikTok and X — and stay informed by subscribing to the RTX AI PC newsletter. Follow NVIDIA Workstation on LinkedIn and X.  See notice regarding software product information.
    Like
    Wow
    Love
    Sad
    25
    0 Комментарии 0 Поделились
  • What an exhilarating experience at the National Animation Film Festival! I had the pleasure of diving into the fascinating world of "Atomik Tour," a brilliant stop-motion short by the talented Bruno Collet. This 12-minute gem takes us on a thrilling journey through dark tourism, exploring the eerie yet captivating aspects of the forbidden zone. It's amazing how art can transform our perceptions of the world, even the darker sides! Let's celebrate creativity and the magic of storytelling that brings us together!

    Don’t miss out on this incredible film that sparks curiosity and wonder! Keep dreaming, keep creating!

    #AtomikTour #DarkTourism #Stop
    🎉✨ What an exhilarating experience at the National Animation Film Festival! 🎥🌟 I had the pleasure of diving into the fascinating world of "Atomik Tour," a brilliant stop-motion short by the talented Bruno Collet. 🎨💫 This 12-minute gem takes us on a thrilling journey through dark tourism, exploring the eerie yet captivating aspects of the forbidden zone. 🏴‍☠️👌 It's amazing how art can transform our perceptions of the world, even the darker sides! Let's celebrate creativity and the magic of storytelling that brings us together! 🌈🙌 Don’t miss out on this incredible film that sparks curiosity and wonder! Keep dreaming, keep creating! #AtomikTour #DarkTourism #Stop
    Dark Tourism et Stop-Motion : les coulisses d’Atomik Tour de Bruno Collet
    A l’occasion du Festival National du Film d’Animation, le réalisateur Bruno Collet (connu entre autres pour son court-métrage Mémorable) et une partie de son équipe ont proposé un retour sur Atomik Tour. Ce court métrage est un film fanta
    1 Комментарии 0 Поделились
  • Esri releases CityEngine 2025.0

    Check out the new features in the procedural city generation software, including the new Street Designer for creating complex road setups.
    Esri releases CityEngine 2025.0 Check out the new features in the procedural city generation software, including the new Street Designer for creating complex road setups.
    Esri releases CityEngine 2025.0
    Check out the new features in the procedural city generation software, including the new Street Designer for creating complex road setups.
    2 Комментарии 0 Поделились
  • Into the Omniverse: World Foundation Models Advance Autonomous Vehicle Simulation and Safety

    Editor’s note: This blog is a part of Into the Omniverse, a series focused on how developers, 3D practitioners and enterprises can transform their workflows using the latest advances in OpenUSD and NVIDIA Omniverse.
    Simulated driving environments enable engineers to safely and efficiently train, test and validate autonomous vehiclesacross countless real-world and edge-case scenarios without the risks and costs of physical testing.
    These simulated environments can be created through neural reconstruction of real-world data from AV fleets or generated with world foundation models— neural networks that understand physics and real-world properties. WFMs can be used to generate synthetic datasets for enhanced AV simulation.
    To help physical AI developers build such simulated environments, NVIDIA unveiled major advances in WFMs at the GTC Paris and CVPR conferences earlier this month. These new capabilities enhance NVIDIA Cosmos — a platform of generative WFMs, advanced tokenizers, guardrails and accelerated data processing tools.
    Key innovations like Cosmos Predict-2, the Cosmos Transfer-1 NVIDIA preview NIM microservice and Cosmos Reason are improving how AV developers generate synthetic data, build realistic simulated environments and validate safety systems at unprecedented scale.
    Universal Scene Description, a unified data framework and standard for physical AI applications, enables seamless integration and interoperability of simulation assets across the development pipeline. OpenUSD standardization plays a critical role in ensuring 3D pipelines are built to scale.
    NVIDIA Omniverse, a platform of application programming interfaces, software development kits and services for building OpenUSD-based physical AI applications, enables simulations from WFMs and neural reconstruction at world scale.
    Leading AV organizations — including Foretellix, Mcity, Oxa, Parallel Domain, Plus AI and Uber — are among the first to adopt Cosmos models.

    Foundations for Scalable, Realistic Simulation
    Cosmos Predict-2, NVIDIA’s latest WFM, generates high-quality synthetic data by predicting future world states from multimodal inputs like text, images and video. This capability is critical for creating temporally consistent, realistic scenarios that accelerate training and validation of AVs and robots.

    In addition, Cosmos Transfer, a control model that adds variations in weather, lighting and terrain to existing scenarios, will soon be available to 150,000 developers on CARLA, a leading open-source AV simulator. This greatly expands the broad AV developer community’s access to advanced AI-powered simulation tools.
    Developers can start integrating synthetic data into their own pipelines using the NVIDIA Physical AI Dataset. The latest release includes 40,000 clips generated using Cosmos.
    Building on these foundations, the Omniverse Blueprint for AV simulation provides a standardized, API-driven workflow for constructing rich digital twins, replaying real-world sensor data and generating new ground-truth data for closed-loop testing.
    The blueprint taps into OpenUSD’s layer-stacking and composition arcs, which enable developers to collaborate asynchronously and modify scenes nondestructively. This helps create modular, reusable scenario variants to efficiently generate different weather conditions, traffic patterns and edge cases.
    Driving the Future of AV Safety
    To bolster the operational safety of AV systems, NVIDIA earlier this year introduced NVIDIA Halos — a comprehensive safety platform that integrates the company’s full automotive hardware and software stack with AI research focused on AV safety.
    The new Cosmos models — Cosmos Predict- 2, Cosmos Transfer- 1 NIM and Cosmos Reason — deliver further safety enhancements to the Halos platform, enabling developers to create diverse, controllable and realistic scenarios for training and validating AV systems.
    These models, trained on massive multimodal datasets including driving data, amplify the breadth and depth of simulation, allowing for robust scenario coverage — including rare and safety-critical events — while supporting post-training customization for specialized AV tasks.

    At CVPR, NVIDIA was recognized as an Autonomous Grand Challenge winner, highlighting its leadership in advancing end-to-end AV workflows. The challenge used OpenUSD’s robust metadata and interoperability to simulate sensor inputs and vehicle trajectories in semi-reactive environments, achieving state-of-the-art results in safety and compliance.
    Learn more about how developers are leveraging tools like CARLA, Cosmos, and Omniverse to advance AV simulation in this livestream replay:

    Hear NVIDIA Director of Autonomous Vehicle Research Marco Pavone on the NVIDIA AI Podcast share how digital twins and high-fidelity simulation are improving vehicle testing, accelerating development and reducing real-world risks.
    Get Plugged Into the World of OpenUSD
    Learn more about what’s next for AV simulation with OpenUSD by watching the replay of NVIDIA founder and CEO Jensen Huang’s GTC Paris keynote.
    Looking for more live opportunities to learn more about OpenUSD? Don’t miss sessions and labs happening at SIGGRAPH 2025, August 10–14.
    Discover why developers and 3D practitioners are using OpenUSD and learn how to optimize 3D workflows with the self-paced “Learn OpenUSD” curriculum for 3D developers and practitioners, available for free through the NVIDIA Deep Learning Institute.
    Explore the Alliance for OpenUSD forum and the AOUSD website.
    Stay up to date by subscribing to NVIDIA Omniverse news, joining the community and following NVIDIA Omniverse on Instagram, LinkedIn, Medium and X.
    #into #omniverse #world #foundation #models
    Into the Omniverse: World Foundation Models Advance Autonomous Vehicle Simulation and Safety
    Editor’s note: This blog is a part of Into the Omniverse, a series focused on how developers, 3D practitioners and enterprises can transform their workflows using the latest advances in OpenUSD and NVIDIA Omniverse. Simulated driving environments enable engineers to safely and efficiently train, test and validate autonomous vehiclesacross countless real-world and edge-case scenarios without the risks and costs of physical testing. These simulated environments can be created through neural reconstruction of real-world data from AV fleets or generated with world foundation models— neural networks that understand physics and real-world properties. WFMs can be used to generate synthetic datasets for enhanced AV simulation. To help physical AI developers build such simulated environments, NVIDIA unveiled major advances in WFMs at the GTC Paris and CVPR conferences earlier this month. These new capabilities enhance NVIDIA Cosmos — a platform of generative WFMs, advanced tokenizers, guardrails and accelerated data processing tools. Key innovations like Cosmos Predict-2, the Cosmos Transfer-1 NVIDIA preview NIM microservice and Cosmos Reason are improving how AV developers generate synthetic data, build realistic simulated environments and validate safety systems at unprecedented scale. Universal Scene Description, a unified data framework and standard for physical AI applications, enables seamless integration and interoperability of simulation assets across the development pipeline. OpenUSD standardization plays a critical role in ensuring 3D pipelines are built to scale. NVIDIA Omniverse, a platform of application programming interfaces, software development kits and services for building OpenUSD-based physical AI applications, enables simulations from WFMs and neural reconstruction at world scale. Leading AV organizations — including Foretellix, Mcity, Oxa, Parallel Domain, Plus AI and Uber — are among the first to adopt Cosmos models. Foundations for Scalable, Realistic Simulation Cosmos Predict-2, NVIDIA’s latest WFM, generates high-quality synthetic data by predicting future world states from multimodal inputs like text, images and video. This capability is critical for creating temporally consistent, realistic scenarios that accelerate training and validation of AVs and robots. In addition, Cosmos Transfer, a control model that adds variations in weather, lighting and terrain to existing scenarios, will soon be available to 150,000 developers on CARLA, a leading open-source AV simulator. This greatly expands the broad AV developer community’s access to advanced AI-powered simulation tools. Developers can start integrating synthetic data into their own pipelines using the NVIDIA Physical AI Dataset. The latest release includes 40,000 clips generated using Cosmos. Building on these foundations, the Omniverse Blueprint for AV simulation provides a standardized, API-driven workflow for constructing rich digital twins, replaying real-world sensor data and generating new ground-truth data for closed-loop testing. The blueprint taps into OpenUSD’s layer-stacking and composition arcs, which enable developers to collaborate asynchronously and modify scenes nondestructively. This helps create modular, reusable scenario variants to efficiently generate different weather conditions, traffic patterns and edge cases. Driving the Future of AV Safety To bolster the operational safety of AV systems, NVIDIA earlier this year introduced NVIDIA Halos — a comprehensive safety platform that integrates the company’s full automotive hardware and software stack with AI research focused on AV safety. The new Cosmos models — Cosmos Predict- 2, Cosmos Transfer- 1 NIM and Cosmos Reason — deliver further safety enhancements to the Halos platform, enabling developers to create diverse, controllable and realistic scenarios for training and validating AV systems. These models, trained on massive multimodal datasets including driving data, amplify the breadth and depth of simulation, allowing for robust scenario coverage — including rare and safety-critical events — while supporting post-training customization for specialized AV tasks. At CVPR, NVIDIA was recognized as an Autonomous Grand Challenge winner, highlighting its leadership in advancing end-to-end AV workflows. The challenge used OpenUSD’s robust metadata and interoperability to simulate sensor inputs and vehicle trajectories in semi-reactive environments, achieving state-of-the-art results in safety and compliance. Learn more about how developers are leveraging tools like CARLA, Cosmos, and Omniverse to advance AV simulation in this livestream replay: Hear NVIDIA Director of Autonomous Vehicle Research Marco Pavone on the NVIDIA AI Podcast share how digital twins and high-fidelity simulation are improving vehicle testing, accelerating development and reducing real-world risks. Get Plugged Into the World of OpenUSD Learn more about what’s next for AV simulation with OpenUSD by watching the replay of NVIDIA founder and CEO Jensen Huang’s GTC Paris keynote. Looking for more live opportunities to learn more about OpenUSD? Don’t miss sessions and labs happening at SIGGRAPH 2025, August 10–14. Discover why developers and 3D practitioners are using OpenUSD and learn how to optimize 3D workflows with the self-paced “Learn OpenUSD” curriculum for 3D developers and practitioners, available for free through the NVIDIA Deep Learning Institute. Explore the Alliance for OpenUSD forum and the AOUSD website. Stay up to date by subscribing to NVIDIA Omniverse news, joining the community and following NVIDIA Omniverse on Instagram, LinkedIn, Medium and X. #into #omniverse #world #foundation #models
    BLOGS.NVIDIA.COM
    Into the Omniverse: World Foundation Models Advance Autonomous Vehicle Simulation and Safety
    Editor’s note: This blog is a part of Into the Omniverse, a series focused on how developers, 3D practitioners and enterprises can transform their workflows using the latest advances in OpenUSD and NVIDIA Omniverse. Simulated driving environments enable engineers to safely and efficiently train, test and validate autonomous vehicles (AVs) across countless real-world and edge-case scenarios without the risks and costs of physical testing. These simulated environments can be created through neural reconstruction of real-world data from AV fleets or generated with world foundation models (WFMs) — neural networks that understand physics and real-world properties. WFMs can be used to generate synthetic datasets for enhanced AV simulation. To help physical AI developers build such simulated environments, NVIDIA unveiled major advances in WFMs at the GTC Paris and CVPR conferences earlier this month. These new capabilities enhance NVIDIA Cosmos — a platform of generative WFMs, advanced tokenizers, guardrails and accelerated data processing tools. Key innovations like Cosmos Predict-2, the Cosmos Transfer-1 NVIDIA preview NIM microservice and Cosmos Reason are improving how AV developers generate synthetic data, build realistic simulated environments and validate safety systems at unprecedented scale. Universal Scene Description (OpenUSD), a unified data framework and standard for physical AI applications, enables seamless integration and interoperability of simulation assets across the development pipeline. OpenUSD standardization plays a critical role in ensuring 3D pipelines are built to scale. NVIDIA Omniverse, a platform of application programming interfaces, software development kits and services for building OpenUSD-based physical AI applications, enables simulations from WFMs and neural reconstruction at world scale. Leading AV organizations — including Foretellix, Mcity, Oxa, Parallel Domain, Plus AI and Uber — are among the first to adopt Cosmos models. Foundations for Scalable, Realistic Simulation Cosmos Predict-2, NVIDIA’s latest WFM, generates high-quality synthetic data by predicting future world states from multimodal inputs like text, images and video. This capability is critical for creating temporally consistent, realistic scenarios that accelerate training and validation of AVs and robots. In addition, Cosmos Transfer, a control model that adds variations in weather, lighting and terrain to existing scenarios, will soon be available to 150,000 developers on CARLA, a leading open-source AV simulator. This greatly expands the broad AV developer community’s access to advanced AI-powered simulation tools. Developers can start integrating synthetic data into their own pipelines using the NVIDIA Physical AI Dataset. The latest release includes 40,000 clips generated using Cosmos. Building on these foundations, the Omniverse Blueprint for AV simulation provides a standardized, API-driven workflow for constructing rich digital twins, replaying real-world sensor data and generating new ground-truth data for closed-loop testing. The blueprint taps into OpenUSD’s layer-stacking and composition arcs, which enable developers to collaborate asynchronously and modify scenes nondestructively. This helps create modular, reusable scenario variants to efficiently generate different weather conditions, traffic patterns and edge cases. Driving the Future of AV Safety To bolster the operational safety of AV systems, NVIDIA earlier this year introduced NVIDIA Halos — a comprehensive safety platform that integrates the company’s full automotive hardware and software stack with AI research focused on AV safety. The new Cosmos models — Cosmos Predict- 2, Cosmos Transfer- 1 NIM and Cosmos Reason — deliver further safety enhancements to the Halos platform, enabling developers to create diverse, controllable and realistic scenarios for training and validating AV systems. These models, trained on massive multimodal datasets including driving data, amplify the breadth and depth of simulation, allowing for robust scenario coverage — including rare and safety-critical events — while supporting post-training customization for specialized AV tasks. At CVPR, NVIDIA was recognized as an Autonomous Grand Challenge winner, highlighting its leadership in advancing end-to-end AV workflows. The challenge used OpenUSD’s robust metadata and interoperability to simulate sensor inputs and vehicle trajectories in semi-reactive environments, achieving state-of-the-art results in safety and compliance. Learn more about how developers are leveraging tools like CARLA, Cosmos, and Omniverse to advance AV simulation in this livestream replay: Hear NVIDIA Director of Autonomous Vehicle Research Marco Pavone on the NVIDIA AI Podcast share how digital twins and high-fidelity simulation are improving vehicle testing, accelerating development and reducing real-world risks. Get Plugged Into the World of OpenUSD Learn more about what’s next for AV simulation with OpenUSD by watching the replay of NVIDIA founder and CEO Jensen Huang’s GTC Paris keynote. Looking for more live opportunities to learn more about OpenUSD? Don’t miss sessions and labs happening at SIGGRAPH 2025, August 10–14. Discover why developers and 3D practitioners are using OpenUSD and learn how to optimize 3D workflows with the self-paced “Learn OpenUSD” curriculum for 3D developers and practitioners, available for free through the NVIDIA Deep Learning Institute. Explore the Alliance for OpenUSD forum and the AOUSD website. Stay up to date by subscribing to NVIDIA Omniverse news, joining the community and following NVIDIA Omniverse on Instagram, LinkedIn, Medium and X.
    0 Комментарии 0 Поделились
  • BOUNCING FROM RUBBER DUCKIES AND FLYING SHEEP TO CLONES FOR THE BOYS SEASON 4

    By TREVOR HOGG
    Images courtesy of Prime Video.

    For those seeking an alternative to the MCU, Prime Video has two offerings of the live-action and animated variety that take the superhero genre into R-rated territory where the hands of the god-like figures get dirty, bloodied and severed. “The Boys is about the intersection of celebrity and politics using superheroes,” states Stephan Fleet, VFX Supervisor on The Boys. “Sometimes I see the news and I don’t even know we can write to catch up to it! But we try. Invincible is an intense look at an alternate DC Universe that has more grit to the superhero side of it all. On one hand, I was jealous watching Season 1 of Invincible because in animation you can do things that you can’t do in real life on a budget.” Season 4 does not tone down the blood, gore and body count. Fleet notes, “The writers almost have this dialogue with us. Sometimes, they’ll write in the script, ‘And Fleet will come up with a cool visual effect for how to kill this person.’ Or, ‘Chhiu, our fight coordinator, will make an awesome fight.’ It is a frequent topic of conversation. We’re constantly trying to be inventive and create new ways to kill people!”

    When Splintersplits in two, the cloning effect was inspired by cellular mitosis.

    “The writers almost have this dialogue with us. Sometimes, they’ll write in the script, ‘And Fleet will come up with a cool visual effect for how to kill this person.’ Or, ‘Chhiu, our fight coordinator, will make an awesome fight.’ It is a frequent topic of conversation. We’re constantly trying to be inventive and create new ways to kill people!”
    —Stephan Fleet, VFX Supervisor

    A total of 1,600 visual effects shots were created for the eight episodes by ILM, Pixomondo, MPC Toronto, Spin VFX, DNEG, Untold Studios, Luma Pictures and Rocket Science VFX. Previs was a critical part of the process. “We have John Griffith, who owns a small company called CNCPT out of Texas, and he does wonderful Unreal Engine level previs,” Fleet remarks. “On set, we have a cartoon of what is going to be done, and you’ll be amazed, specifically for action and heavy visual effects stuff, how close those shots are to the previs when we finish.” Founding Director of Federal Bureau of Superhuman Affairs, Victoria Neuman, literally gets ripped in half by two tendrils coming out of Compound V-enhanced Billy Butcher, the leader of superhero resistance group The Boys. “The word that we like to use on this show is ‘grounded,’ and I like to say ‘grounded’ with an asterisk in this day and age because we’re grounded until we get to killing people in the craziest ways. In this case, having someone floating in the air and being ripped in half by two tendrils was all CG.”

    Multiple plates were shot to enable Simon Pegg to phase through the actor laying in a hospital bed.

    Testing can get rather elaborate. “For that end scene with Butcher’s tendrils, the room was two stories, and we were able to put the camera up high along with a bunch of blood cannons,” Fleet recalls. “When the body rips in half and explodes, there is a practical component. We rained down a bunch of real blood and guts right in front of Huey. It’s a known joke that we like to douse Jack Quaid with blood as much as possible! In this case, the special effects team led by Hudson Kenny needed to test it the day before, and I said, “I’ll be the guinea pig for the test.’ They covered the whole place with plastic like it was a Dexter kill room because you don’t want to destroy the set. I’m standing there in a white hazmat suit with goggles on, covered from head to toe in plastic and waiting as they’re tweaking all of these things. It sounds like World War II going on. They’re on walkie talkies to each other, and then all of a sudden, it’s ‘Five, four, three, two, one…’  And I get exploded with blood. I wanted to see what it was like, and it’s intense.”

    “On set, we have a cartoon of what is going to be done, and you’ll be amazed, specifically for action and heavy visual effects stuff, how close those shots are to the previs when we finish.”
    —Stephan Fleet, VFX Supervisor

    The Deep has a love affair with an octopus called Ambrosius, voiced by Tilda Swinton. “It’s implied bestiality!” Fleet laughs. “I would call it more of a romance. What was fun from my perspective is that I knew what the look was going to be, so then it’s about putting in the details and the animation. One of the instincts that you always have when you’re making a sea creature that talks to a humanyou tend to want to give it human gestures and eyebrows. Erik Kripkesaid, ‘No. We have to find things that an octopus could do that conveys the same emotion.’ That’s when ideas came in, such as putting a little The Deep toy inside the water tank. When Ambrosius is trying to have an intimate moment or connect with him, she can wrap a tentacle around that. My favorite experience doing Ambrosius was when The Deep is reading poetry to her on a bed. CG creatures touching humans is one of the more complicated things to do and make look real. Ambrosius’ tentacles reach for his arm, and it becomes an intimate moment. More than touching the skin, displacing the bedsheet as Ambrosius moved ended up becoming a lot of CG, and we had to go back and forth a few times to get that looking right; that turned out to be tricky.”

    A building is replaced by a massive crowd attending a rally being held by Homelander.

    In a twisted form of sexual foreplay, Sister Sage has The Deep perform a transorbital lobotomy on her. “Thank you, Amazon for selling lobotomy tools as novelty items!” Fleet chuckles. “We filmed it with a lobotomy tool on set. There is a lot of safety involved in doing something like that. Obviously, you don’t want to put any performer in any situation where they come close to putting anything real near their eye. We created this half lobotomy tool and did this complicated split screen with the lobotomy tool on a teeter totter. The Deep wasin one shot and Sister Sage reacted in the other shot. To marry the two ended up being a lot of CG work. Then there are these close-ups which are full CG. I always keep a dummy head that is painted gray that I use all of the time for reference. In macrophotography I filmed this lobotomy tool going right into the eye area. I did that because the tool is chrome, so it’s reflective and has ridges. It has an interesting reflective property. I was able to see how and what part of the human eye reflects onto the tool. A lot of that shot became about realistic reflections and lighting on the tool. Then heavy CG for displacing the eye and pushing the lobotomy tool into it. That was one of the more complicated sequences that we had to achieve.”

    In order to create an intimate moment between Ambrosius and The Deep, a toy version of the superhero was placed inside of the water tank that she could wrap a tentacle around.

    “The word that we like to use on this show is ‘grounded,’ and I like to say ‘grounded’ with an asterisk in this day and age because we’re grounded until we get to killing people in the craziest ways. In this case, having someone floating in the air and being ripped in half by two tendrils was all CG.”
    —Stephan Fleet, VFX Supervisor

    Sheep and chickens embark on a violent rampage courtesy of Compound V with the latter piercing the chest of a bodyguard belonging to Victoria Neuman. “Weirdly, that was one of our more traditional shots,’ Fleet states. “What is fun about that one is I asked for real chickens as reference. The chicken flying through his chest is real. It’s our chicken wrangler in green suit gently tossing a chicken. We blended two real plates together with some CG in the middle.” A connection was made with a sci-fi classic. “The sheep kill this bull, and we shot it is in this narrow corridor of fencing. When they run, I always equated it as the Trench Run in Star Wars and looked at the sheep as TIE fighters or X-wings coming at them.” The scene was one of the scarier moments for the visual effects team. Fleet explains, “When I read the script, I thought this could be the moment where we jump the shark. For the shots where the sheep are still and scream to the camera, Untold Studios did a bunch of R&D and came up with baboon teeth. I tried to keep anything real as much as possible, but, obviously, when sheep are flying, they have to be CG. I call it the Battlestar Galactica theory, where I like to shake the camera, overshoot shots and make it sloppy when they’re in the air so you can add motion blur. Comedy also helps sell visual effects.”

    The sheep injected with Compound V develop the ability to fly and were shot in an imperfect manner to help ground the scenes.

    Once injected with Compound V, Hugh Campbell Sr.develops the ability to phase through objects, including human beings. “We called it the Bro-nut because his name in the script is Wall Street Bro,” Fleet notes. “That was a complicated motion control shot, repeating the move over and over again. We had to shoot multiple plates of Simon Pegg and the guy in the bed. Special effects and prosthetics created a dummy guy with a hole in his chest with practical blood dripping down. It was meshing it together and getting the timing right in post. On top of that, there was the CG blood immediately around Simon Pegg.” The phasing effect had to avoid appearing as a dissolve. “I had this idea of doing high-frequency vibration on the X axis loosely based on how The Flash vibrates through walls. You want everything to have a loose motivation that then helps trigger the visuals. We tried not to overcomplicate that because, ultimately, you want something like that to be quick. If you spend too much time on phasing, it can look cheesy. In our case, it was a lot of false walls. Simon Pegg is running into a greenscreen hole which we plug in with a wall or coming out of one. I went off the actor’s action, and we added a light opacity mix with some X-axis shake.”

    Providing a different twist to the fights was the replacement of spurting blood with photoreal rubber duckies during a drug-induced hallucination.

    Homelanderbreaks a mirror which emphasizes his multiple personality disorder. “The original plan was that special effects was going to pre-break a mirror, and we were going to shoot Anthony Starr moving his head doing all of the performances in the different parts of the mirror,” Fleet reveals. “This was all based on a photo that my ex-brother-in-law sent me. He was walking down a street in Glendale, California, came across a broken mirror that someone had thrown out, and took a photo of himself where he had five heads in the mirror. We get there on the day, and I’m realizing that this is really complicated. Anthony has to do these five different performances, and we have to deal with infinite mirrors. At the last minute, I said, ‘We have to do this on a clean mirror.’ We did it on a clear mirror and gave Anthony different eyelines. The mirror break was all done in post, and we were able to cheat his head slightly and art-direct where the break crosses his chin. Editorial was able to do split screens for the timing of the dialogue.”

    “For the shots where the sheep are still and scream to the camera, Untold Studios did a bunch of R&D and came up with baboon teeth. I tried to keep anything real as much as possible, but, obviously, when sheep are flying, they have to be CG. I call it the Battlestar Galactica theory, where I like to shake the camera, overshoot shots and make it sloppy when they’re in the air so you can add motion blur. Comedy also helps sell visual effects.”
    —Stephan Fleet, VFX Supervisor

    Initially, the plan was to use a practical mirror, but creating a digital version proved to be the more effective solution.

    A different spin on the bloodbath occurs during a fight when a drugged Frenchiehallucinates as Kimiko Miyashirogoes on a killing spree. “We went back and forth with a lot of different concepts for what this hallucination would be,” Fleet remarks. “When we filmed it, we landed on Frenchie having a synesthesia moment where he’s seeing a lot of abstract colors flying in the air. We started getting into that in post and it wasn’t working. We went back to the rubber duckies, which goes back to the story of him in the bathtub. What’s in the bathtub? Rubber duckies, bubbles and water. There was a lot of physics and logic required to figure out how these rubber duckies could float out of someone’s neck. We decided on bubbles when Kimiko hits people’s heads. At one point, we had water when she got shot, but it wasn’t working, so we killed it. We probably did about 100 different versions. We got really detailed with our rubber duckie modeling because we didn’t want it to look cartoony. That took a long time.”

    Ambrosius, voiced by Tilda Swinton, gets a lot more screentime in Season 4.

    When Splintersplits in two was achieved heavily in CG. “Erik threw out the words ‘cellular mitosis’ early on as something he wanted to use,” Fleet states. “We shot Rob Benedict on a greenscreen doing all of the different performances for the clones that pop out. It was a crazy amount of CG work with Houdini and particle and skin effects. We previs’d the sequence so we had specific actions. One clone comes out to the right and the other pulls backwards.” What tends to go unnoticed by many is Splinter’s clones setting up for a press conference being held by Firecracker. “It’s funny how no one brings up the 22-hour motion control shot that we had to do with Splinter on the stage, which was the most complicated shot!” Fleet observes. “We have this sweeping long shot that brings you into the room and follows Splinter as he carries a container to the stage and hands it off to a clone, and then you reveal five more of them interweaving each other and interacting with all of these objects. It’s like a minute-long dance. First off, you have to choreograph it. We previs’d it, but then you need to get people to do it. We hired dancers and put different colored armbands on them. The camera is like another performer, and a metronome is going, which enables you to find a pace. That took about eight hours of rehearsal. Then Rob has to watch each one of their performances and mimic it to the beat. When he is handing off a box of cables, it’s to a double who is going to have to be erased and be him on the other side. They have to be almost perfect in their timing and lineup in order to take it over in visual effects and make it work.”
    #bouncing #rubber #duckies #flying #sheep
    BOUNCING FROM RUBBER DUCKIES AND FLYING SHEEP TO CLONES FOR THE BOYS SEASON 4
    By TREVOR HOGG Images courtesy of Prime Video. For those seeking an alternative to the MCU, Prime Video has two offerings of the live-action and animated variety that take the superhero genre into R-rated territory where the hands of the god-like figures get dirty, bloodied and severed. “The Boys is about the intersection of celebrity and politics using superheroes,” states Stephan Fleet, VFX Supervisor on The Boys. “Sometimes I see the news and I don’t even know we can write to catch up to it! But we try. Invincible is an intense look at an alternate DC Universe that has more grit to the superhero side of it all. On one hand, I was jealous watching Season 1 of Invincible because in animation you can do things that you can’t do in real life on a budget.” Season 4 does not tone down the blood, gore and body count. Fleet notes, “The writers almost have this dialogue with us. Sometimes, they’ll write in the script, ‘And Fleet will come up with a cool visual effect for how to kill this person.’ Or, ‘Chhiu, our fight coordinator, will make an awesome fight.’ It is a frequent topic of conversation. We’re constantly trying to be inventive and create new ways to kill people!” When Splintersplits in two, the cloning effect was inspired by cellular mitosis. “The writers almost have this dialogue with us. Sometimes, they’ll write in the script, ‘And Fleet will come up with a cool visual effect for how to kill this person.’ Or, ‘Chhiu, our fight coordinator, will make an awesome fight.’ It is a frequent topic of conversation. We’re constantly trying to be inventive and create new ways to kill people!” —Stephan Fleet, VFX Supervisor A total of 1,600 visual effects shots were created for the eight episodes by ILM, Pixomondo, MPC Toronto, Spin VFX, DNEG, Untold Studios, Luma Pictures and Rocket Science VFX. Previs was a critical part of the process. “We have John Griffith, who owns a small company called CNCPT out of Texas, and he does wonderful Unreal Engine level previs,” Fleet remarks. “On set, we have a cartoon of what is going to be done, and you’ll be amazed, specifically for action and heavy visual effects stuff, how close those shots are to the previs when we finish.” Founding Director of Federal Bureau of Superhuman Affairs, Victoria Neuman, literally gets ripped in half by two tendrils coming out of Compound V-enhanced Billy Butcher, the leader of superhero resistance group The Boys. “The word that we like to use on this show is ‘grounded,’ and I like to say ‘grounded’ with an asterisk in this day and age because we’re grounded until we get to killing people in the craziest ways. In this case, having someone floating in the air and being ripped in half by two tendrils was all CG.” Multiple plates were shot to enable Simon Pegg to phase through the actor laying in a hospital bed. Testing can get rather elaborate. “For that end scene with Butcher’s tendrils, the room was two stories, and we were able to put the camera up high along with a bunch of blood cannons,” Fleet recalls. “When the body rips in half and explodes, there is a practical component. We rained down a bunch of real blood and guts right in front of Huey. It’s a known joke that we like to douse Jack Quaid with blood as much as possible! In this case, the special effects team led by Hudson Kenny needed to test it the day before, and I said, “I’ll be the guinea pig for the test.’ They covered the whole place with plastic like it was a Dexter kill room because you don’t want to destroy the set. I’m standing there in a white hazmat suit with goggles on, covered from head to toe in plastic and waiting as they’re tweaking all of these things. It sounds like World War II going on. They’re on walkie talkies to each other, and then all of a sudden, it’s ‘Five, four, three, two, one…’  And I get exploded with blood. I wanted to see what it was like, and it’s intense.” “On set, we have a cartoon of what is going to be done, and you’ll be amazed, specifically for action and heavy visual effects stuff, how close those shots are to the previs when we finish.” —Stephan Fleet, VFX Supervisor The Deep has a love affair with an octopus called Ambrosius, voiced by Tilda Swinton. “It’s implied bestiality!” Fleet laughs. “I would call it more of a romance. What was fun from my perspective is that I knew what the look was going to be, so then it’s about putting in the details and the animation. One of the instincts that you always have when you’re making a sea creature that talks to a humanyou tend to want to give it human gestures and eyebrows. Erik Kripkesaid, ‘No. We have to find things that an octopus could do that conveys the same emotion.’ That’s when ideas came in, such as putting a little The Deep toy inside the water tank. When Ambrosius is trying to have an intimate moment or connect with him, she can wrap a tentacle around that. My favorite experience doing Ambrosius was when The Deep is reading poetry to her on a bed. CG creatures touching humans is one of the more complicated things to do and make look real. Ambrosius’ tentacles reach for his arm, and it becomes an intimate moment. More than touching the skin, displacing the bedsheet as Ambrosius moved ended up becoming a lot of CG, and we had to go back and forth a few times to get that looking right; that turned out to be tricky.” A building is replaced by a massive crowd attending a rally being held by Homelander. In a twisted form of sexual foreplay, Sister Sage has The Deep perform a transorbital lobotomy on her. “Thank you, Amazon for selling lobotomy tools as novelty items!” Fleet chuckles. “We filmed it with a lobotomy tool on set. There is a lot of safety involved in doing something like that. Obviously, you don’t want to put any performer in any situation where they come close to putting anything real near their eye. We created this half lobotomy tool and did this complicated split screen with the lobotomy tool on a teeter totter. The Deep wasin one shot and Sister Sage reacted in the other shot. To marry the two ended up being a lot of CG work. Then there are these close-ups which are full CG. I always keep a dummy head that is painted gray that I use all of the time for reference. In macrophotography I filmed this lobotomy tool going right into the eye area. I did that because the tool is chrome, so it’s reflective and has ridges. It has an interesting reflective property. I was able to see how and what part of the human eye reflects onto the tool. A lot of that shot became about realistic reflections and lighting on the tool. Then heavy CG for displacing the eye and pushing the lobotomy tool into it. That was one of the more complicated sequences that we had to achieve.” In order to create an intimate moment between Ambrosius and The Deep, a toy version of the superhero was placed inside of the water tank that she could wrap a tentacle around. “The word that we like to use on this show is ‘grounded,’ and I like to say ‘grounded’ with an asterisk in this day and age because we’re grounded until we get to killing people in the craziest ways. In this case, having someone floating in the air and being ripped in half by two tendrils was all CG.” —Stephan Fleet, VFX Supervisor Sheep and chickens embark on a violent rampage courtesy of Compound V with the latter piercing the chest of a bodyguard belonging to Victoria Neuman. “Weirdly, that was one of our more traditional shots,’ Fleet states. “What is fun about that one is I asked for real chickens as reference. The chicken flying through his chest is real. It’s our chicken wrangler in green suit gently tossing a chicken. We blended two real plates together with some CG in the middle.” A connection was made with a sci-fi classic. “The sheep kill this bull, and we shot it is in this narrow corridor of fencing. When they run, I always equated it as the Trench Run in Star Wars and looked at the sheep as TIE fighters or X-wings coming at them.” The scene was one of the scarier moments for the visual effects team. Fleet explains, “When I read the script, I thought this could be the moment where we jump the shark. For the shots where the sheep are still and scream to the camera, Untold Studios did a bunch of R&D and came up with baboon teeth. I tried to keep anything real as much as possible, but, obviously, when sheep are flying, they have to be CG. I call it the Battlestar Galactica theory, where I like to shake the camera, overshoot shots and make it sloppy when they’re in the air so you can add motion blur. Comedy also helps sell visual effects.” The sheep injected with Compound V develop the ability to fly and were shot in an imperfect manner to help ground the scenes. Once injected with Compound V, Hugh Campbell Sr.develops the ability to phase through objects, including human beings. “We called it the Bro-nut because his name in the script is Wall Street Bro,” Fleet notes. “That was a complicated motion control shot, repeating the move over and over again. We had to shoot multiple plates of Simon Pegg and the guy in the bed. Special effects and prosthetics created a dummy guy with a hole in his chest with practical blood dripping down. It was meshing it together and getting the timing right in post. On top of that, there was the CG blood immediately around Simon Pegg.” The phasing effect had to avoid appearing as a dissolve. “I had this idea of doing high-frequency vibration on the X axis loosely based on how The Flash vibrates through walls. You want everything to have a loose motivation that then helps trigger the visuals. We tried not to overcomplicate that because, ultimately, you want something like that to be quick. If you spend too much time on phasing, it can look cheesy. In our case, it was a lot of false walls. Simon Pegg is running into a greenscreen hole which we plug in with a wall or coming out of one. I went off the actor’s action, and we added a light opacity mix with some X-axis shake.” Providing a different twist to the fights was the replacement of spurting blood with photoreal rubber duckies during a drug-induced hallucination. Homelanderbreaks a mirror which emphasizes his multiple personality disorder. “The original plan was that special effects was going to pre-break a mirror, and we were going to shoot Anthony Starr moving his head doing all of the performances in the different parts of the mirror,” Fleet reveals. “This was all based on a photo that my ex-brother-in-law sent me. He was walking down a street in Glendale, California, came across a broken mirror that someone had thrown out, and took a photo of himself where he had five heads in the mirror. We get there on the day, and I’m realizing that this is really complicated. Anthony has to do these five different performances, and we have to deal with infinite mirrors. At the last minute, I said, ‘We have to do this on a clean mirror.’ We did it on a clear mirror and gave Anthony different eyelines. The mirror break was all done in post, and we were able to cheat his head slightly and art-direct where the break crosses his chin. Editorial was able to do split screens for the timing of the dialogue.” “For the shots where the sheep are still and scream to the camera, Untold Studios did a bunch of R&D and came up with baboon teeth. I tried to keep anything real as much as possible, but, obviously, when sheep are flying, they have to be CG. I call it the Battlestar Galactica theory, where I like to shake the camera, overshoot shots and make it sloppy when they’re in the air so you can add motion blur. Comedy also helps sell visual effects.” —Stephan Fleet, VFX Supervisor Initially, the plan was to use a practical mirror, but creating a digital version proved to be the more effective solution. A different spin on the bloodbath occurs during a fight when a drugged Frenchiehallucinates as Kimiko Miyashirogoes on a killing spree. “We went back and forth with a lot of different concepts for what this hallucination would be,” Fleet remarks. “When we filmed it, we landed on Frenchie having a synesthesia moment where he’s seeing a lot of abstract colors flying in the air. We started getting into that in post and it wasn’t working. We went back to the rubber duckies, which goes back to the story of him in the bathtub. What’s in the bathtub? Rubber duckies, bubbles and water. There was a lot of physics and logic required to figure out how these rubber duckies could float out of someone’s neck. We decided on bubbles when Kimiko hits people’s heads. At one point, we had water when she got shot, but it wasn’t working, so we killed it. We probably did about 100 different versions. We got really detailed with our rubber duckie modeling because we didn’t want it to look cartoony. That took a long time.” Ambrosius, voiced by Tilda Swinton, gets a lot more screentime in Season 4. When Splintersplits in two was achieved heavily in CG. “Erik threw out the words ‘cellular mitosis’ early on as something he wanted to use,” Fleet states. “We shot Rob Benedict on a greenscreen doing all of the different performances for the clones that pop out. It was a crazy amount of CG work with Houdini and particle and skin effects. We previs’d the sequence so we had specific actions. One clone comes out to the right and the other pulls backwards.” What tends to go unnoticed by many is Splinter’s clones setting up for a press conference being held by Firecracker. “It’s funny how no one brings up the 22-hour motion control shot that we had to do with Splinter on the stage, which was the most complicated shot!” Fleet observes. “We have this sweeping long shot that brings you into the room and follows Splinter as he carries a container to the stage and hands it off to a clone, and then you reveal five more of them interweaving each other and interacting with all of these objects. It’s like a minute-long dance. First off, you have to choreograph it. We previs’d it, but then you need to get people to do it. We hired dancers and put different colored armbands on them. The camera is like another performer, and a metronome is going, which enables you to find a pace. That took about eight hours of rehearsal. Then Rob has to watch each one of their performances and mimic it to the beat. When he is handing off a box of cables, it’s to a double who is going to have to be erased and be him on the other side. They have to be almost perfect in their timing and lineup in order to take it over in visual effects and make it work.” #bouncing #rubber #duckies #flying #sheep
    WWW.VFXVOICE.COM
    BOUNCING FROM RUBBER DUCKIES AND FLYING SHEEP TO CLONES FOR THE BOYS SEASON 4
    By TREVOR HOGG Images courtesy of Prime Video. For those seeking an alternative to the MCU, Prime Video has two offerings of the live-action and animated variety that take the superhero genre into R-rated territory where the hands of the god-like figures get dirty, bloodied and severed. “The Boys is about the intersection of celebrity and politics using superheroes,” states Stephan Fleet, VFX Supervisor on The Boys. “Sometimes I see the news and I don’t even know we can write to catch up to it! But we try. Invincible is an intense look at an alternate DC Universe that has more grit to the superhero side of it all. On one hand, I was jealous watching Season 1 of Invincible because in animation you can do things that you can’t do in real life on a budget.” Season 4 does not tone down the blood, gore and body count. Fleet notes, “The writers almost have this dialogue with us. Sometimes, they’ll write in the script, ‘And Fleet will come up with a cool visual effect for how to kill this person.’ Or, ‘Chhiu, our fight coordinator, will make an awesome fight.’ It is a frequent topic of conversation. We’re constantly trying to be inventive and create new ways to kill people!” When Splinter (Rob Benedict) splits in two, the cloning effect was inspired by cellular mitosis. “The writers almost have this dialogue with us. Sometimes, they’ll write in the script, ‘And Fleet will come up with a cool visual effect for how to kill this person.’ Or, ‘Chhiu, our fight coordinator, will make an awesome fight.’ It is a frequent topic of conversation. We’re constantly trying to be inventive and create new ways to kill people!” —Stephan Fleet, VFX Supervisor A total of 1,600 visual effects shots were created for the eight episodes by ILM, Pixomondo, MPC Toronto, Spin VFX, DNEG, Untold Studios, Luma Pictures and Rocket Science VFX. Previs was a critical part of the process. “We have John Griffith [Previs Director], who owns a small company called CNCPT out of Texas, and he does wonderful Unreal Engine level previs,” Fleet remarks. “On set, we have a cartoon of what is going to be done, and you’ll be amazed, specifically for action and heavy visual effects stuff, how close those shots are to the previs when we finish.” Founding Director of Federal Bureau of Superhuman Affairs, Victoria Neuman, literally gets ripped in half by two tendrils coming out of Compound V-enhanced Billy Butcher, the leader of superhero resistance group The Boys. “The word that we like to use on this show is ‘grounded,’ and I like to say ‘grounded’ with an asterisk in this day and age because we’re grounded until we get to killing people in the craziest ways. In this case, having someone floating in the air and being ripped in half by two tendrils was all CG.” Multiple plates were shot to enable Simon Pegg to phase through the actor laying in a hospital bed. Testing can get rather elaborate. “For that end scene with Butcher’s tendrils, the room was two stories, and we were able to put the camera up high along with a bunch of blood cannons,” Fleet recalls. “When the body rips in half and explodes, there is a practical component. We rained down a bunch of real blood and guts right in front of Huey. It’s a known joke that we like to douse Jack Quaid with blood as much as possible! In this case, the special effects team led by Hudson Kenny needed to test it the day before, and I said, “I’ll be the guinea pig for the test.’ They covered the whole place with plastic like it was a Dexter kill room because you don’t want to destroy the set. I’m standing there in a white hazmat suit with goggles on, covered from head to toe in plastic and waiting as they’re tweaking all of these things. It sounds like World War II going on. They’re on walkie talkies to each other, and then all of a sudden, it’s ‘Five, four, three, two, one…’  And I get exploded with blood. I wanted to see what it was like, and it’s intense.” “On set, we have a cartoon of what is going to be done, and you’ll be amazed, specifically for action and heavy visual effects stuff, how close those shots are to the previs when we finish.” —Stephan Fleet, VFX Supervisor The Deep has a love affair with an octopus called Ambrosius, voiced by Tilda Swinton. “It’s implied bestiality!” Fleet laughs. “I would call it more of a romance. What was fun from my perspective is that I knew what the look was going to be [from Season 3], so then it’s about putting in the details and the animation. One of the instincts that you always have when you’re making a sea creature that talks to a human [is] you tend to want to give it human gestures and eyebrows. Erik Kripke [Creator, Executive Producer, Showrunner, Director, Writer] said, ‘No. We have to find things that an octopus could do that conveys the same emotion.’ That’s when ideas came in, such as putting a little The Deep toy inside the water tank. When Ambrosius is trying to have an intimate moment or connect with him, she can wrap a tentacle around that. My favorite experience doing Ambrosius was when The Deep is reading poetry to her on a bed. CG creatures touching humans is one of the more complicated things to do and make look real. Ambrosius’ tentacles reach for his arm, and it becomes an intimate moment. More than touching the skin, displacing the bedsheet as Ambrosius moved ended up becoming a lot of CG, and we had to go back and forth a few times to get that looking right; that turned out to be tricky.” A building is replaced by a massive crowd attending a rally being held by Homelander. In a twisted form of sexual foreplay, Sister Sage has The Deep perform a transorbital lobotomy on her. “Thank you, Amazon for selling lobotomy tools as novelty items!” Fleet chuckles. “We filmed it with a lobotomy tool on set. There is a lot of safety involved in doing something like that. Obviously, you don’t want to put any performer in any situation where they come close to putting anything real near their eye. We created this half lobotomy tool and did this complicated split screen with the lobotomy tool on a teeter totter. The Deep was [acting in a certain way] in one shot and Sister Sage reacted in the other shot. To marry the two ended up being a lot of CG work. Then there are these close-ups which are full CG. I always keep a dummy head that is painted gray that I use all of the time for reference. In macrophotography I filmed this lobotomy tool going right into the eye area. I did that because the tool is chrome, so it’s reflective and has ridges. It has an interesting reflective property. I was able to see how and what part of the human eye reflects onto the tool. A lot of that shot became about realistic reflections and lighting on the tool. Then heavy CG for displacing the eye and pushing the lobotomy tool into it. That was one of the more complicated sequences that we had to achieve.” In order to create an intimate moment between Ambrosius and The Deep, a toy version of the superhero was placed inside of the water tank that she could wrap a tentacle around. “The word that we like to use on this show is ‘grounded,’ and I like to say ‘grounded’ with an asterisk in this day and age because we’re grounded until we get to killing people in the craziest ways. In this case, having someone floating in the air and being ripped in half by two tendrils was all CG.” —Stephan Fleet, VFX Supervisor Sheep and chickens embark on a violent rampage courtesy of Compound V with the latter piercing the chest of a bodyguard belonging to Victoria Neuman. “Weirdly, that was one of our more traditional shots,’ Fleet states. “What is fun about that one is I asked for real chickens as reference. The chicken flying through his chest is real. It’s our chicken wrangler in green suit gently tossing a chicken. We blended two real plates together with some CG in the middle.” A connection was made with a sci-fi classic. “The sheep kill this bull, and we shot it is in this narrow corridor of fencing. When they run, I always equated it as the Trench Run in Star Wars and looked at the sheep as TIE fighters or X-wings coming at them.” The scene was one of the scarier moments for the visual effects team. Fleet explains, “When I read the script, I thought this could be the moment where we jump the shark. For the shots where the sheep are still and scream to the camera, Untold Studios did a bunch of R&D and came up with baboon teeth. I tried to keep anything real as much as possible, but, obviously, when sheep are flying, they have to be CG. I call it the Battlestar Galactica theory, where I like to shake the camera, overshoot shots and make it sloppy when they’re in the air so you can add motion blur. Comedy also helps sell visual effects.” The sheep injected with Compound V develop the ability to fly and were shot in an imperfect manner to help ground the scenes. Once injected with Compound V, Hugh Campbell Sr. (Simon Pegg) develops the ability to phase through objects, including human beings. “We called it the Bro-nut because his name in the script is Wall Street Bro,” Fleet notes. “That was a complicated motion control shot, repeating the move over and over again. We had to shoot multiple plates of Simon Pegg and the guy in the bed. Special effects and prosthetics created a dummy guy with a hole in his chest with practical blood dripping down. It was meshing it together and getting the timing right in post. On top of that, there was the CG blood immediately around Simon Pegg.” The phasing effect had to avoid appearing as a dissolve. “I had this idea of doing high-frequency vibration on the X axis loosely based on how The Flash vibrates through walls. You want everything to have a loose motivation that then helps trigger the visuals. We tried not to overcomplicate that because, ultimately, you want something like that to be quick. If you spend too much time on phasing, it can look cheesy. In our case, it was a lot of false walls. Simon Pegg is running into a greenscreen hole which we plug in with a wall or coming out of one. I went off the actor’s action, and we added a light opacity mix with some X-axis shake.” Providing a different twist to the fights was the replacement of spurting blood with photoreal rubber duckies during a drug-induced hallucination. Homelander (Anthony Starr) breaks a mirror which emphasizes his multiple personality disorder. “The original plan was that special effects was going to pre-break a mirror, and we were going to shoot Anthony Starr moving his head doing all of the performances in the different parts of the mirror,” Fleet reveals. “This was all based on a photo that my ex-brother-in-law sent me. He was walking down a street in Glendale, California, came across a broken mirror that someone had thrown out, and took a photo of himself where he had five heads in the mirror. We get there on the day, and I’m realizing that this is really complicated. Anthony has to do these five different performances, and we have to deal with infinite mirrors. At the last minute, I said, ‘We have to do this on a clean mirror.’ We did it on a clear mirror and gave Anthony different eyelines. The mirror break was all done in post, and we were able to cheat his head slightly and art-direct where the break crosses his chin. Editorial was able to do split screens for the timing of the dialogue.” “For the shots where the sheep are still and scream to the camera, Untold Studios did a bunch of R&D and came up with baboon teeth. I tried to keep anything real as much as possible, but, obviously, when sheep are flying, they have to be CG. I call it the Battlestar Galactica theory, where I like to shake the camera, overshoot shots and make it sloppy when they’re in the air so you can add motion blur. Comedy also helps sell visual effects.” —Stephan Fleet, VFX Supervisor Initially, the plan was to use a practical mirror, but creating a digital version proved to be the more effective solution. A different spin on the bloodbath occurs during a fight when a drugged Frenchie (Tomer Capone) hallucinates as Kimiko Miyashiro (Karen Fukuhara) goes on a killing spree. “We went back and forth with a lot of different concepts for what this hallucination would be,” Fleet remarks. “When we filmed it, we landed on Frenchie having a synesthesia moment where he’s seeing a lot of abstract colors flying in the air. We started getting into that in post and it wasn’t working. We went back to the rubber duckies, which goes back to the story of him in the bathtub. What’s in the bathtub? Rubber duckies, bubbles and water. There was a lot of physics and logic required to figure out how these rubber duckies could float out of someone’s neck. We decided on bubbles when Kimiko hits people’s heads. At one point, we had water when she got shot, but it wasn’t working, so we killed it. We probably did about 100 different versions. We got really detailed with our rubber duckie modeling because we didn’t want it to look cartoony. That took a long time.” Ambrosius, voiced by Tilda Swinton, gets a lot more screentime in Season 4. When Splinter (Rob Benedict) splits in two was achieved heavily in CG. “Erik threw out the words ‘cellular mitosis’ early on as something he wanted to use,” Fleet states. “We shot Rob Benedict on a greenscreen doing all of the different performances for the clones that pop out. It was a crazy amount of CG work with Houdini and particle and skin effects. We previs’d the sequence so we had specific actions. One clone comes out to the right and the other pulls backwards.” What tends to go unnoticed by many is Splinter’s clones setting up for a press conference being held by Firecracker (Valorie Curry). “It’s funny how no one brings up the 22-hour motion control shot that we had to do with Splinter on the stage, which was the most complicated shot!” Fleet observes. “We have this sweeping long shot that brings you into the room and follows Splinter as he carries a container to the stage and hands it off to a clone, and then you reveal five more of them interweaving each other and interacting with all of these objects. It’s like a minute-long dance. First off, you have to choreograph it. We previs’d it, but then you need to get people to do it. We hired dancers and put different colored armbands on them. The camera is like another performer, and a metronome is going, which enables you to find a pace. That took about eight hours of rehearsal. Then Rob has to watch each one of their performances and mimic it to the beat. When he is handing off a box of cables, it’s to a double who is going to have to be erased and be him on the other side. They have to be almost perfect in their timing and lineup in order to take it over in visual effects and make it work.”
    0 Комментарии 0 Поделились
  • HOW DISGUISE BUILT OUT THE VIRTUAL ENVIRONMENTS FOR A MINECRAFT MOVIE

    By TREVOR HOGG

    Images courtesy of Warner Bros. Pictures.

    Rather than a world constructed around photorealistic pixels, a video game created by Markus Persson has taken the boxier 3D voxel route, which has become its signature aesthetic, and sparked an international phenomenon that finally gets adapted into a feature with the release of A Minecraft Movie. Brought onboard to help filmmaker Jared Hess in creating the environments that the cast of Jason Momoa, Jack Black, Sebastian Hansen, Emma Myers and Danielle Brooks find themselves inhabiting was Disguise under the direction of Production VFX Supervisor Dan Lemmon.

    “s the Senior Unreal Artist within the Virtual Art Departmenton Minecraft, I experienced the full creative workflow. What stood out most was how deeply the VAD was embedded across every stage of production. We weren’t working in isolation. From the production designer and director to the VFX supervisor and DP, the VAD became a hub for collaboration.”
    —Talia Finlayson, Creative Technologist, Disguise

    Interior and exterior environments had to be created, such as the shop owned by Steve.

    “Prior to working on A Minecraft Movie, I held more technical roles, like serving as the Virtual Production LED Volume Operator on a project for Apple TV+ and Paramount Pictures,” notes Talia Finlayson, Creative Technologist for Disguise. “But as the Senior Unreal Artist within the Virtual Art Departmenton Minecraft, I experienced the full creative workflow. What stood out most was how deeply the VAD was embedded across every stage of production. We weren’t working in isolation. From the production designer and director to the VFX supervisor and DP, the VAD became a hub for collaboration.” The project provided new opportunities. “I’ve always loved the physicality of working with an LED volume, both for the immersion it provides and the way that seeing the environment helps shape an actor’s performance,” notes Laura Bell, Creative Technologist for Disguise. “But for A Minecraft Movie, we used Simulcam instead, and it was an incredible experience to live-composite an entire Minecraft world in real-time, especially with nothing on set but blue curtains.”

    Set designs originally created by the art department in Rhinoceros 3D were transformed into fully navigable 3D environments within Unreal Engine. “These scenes were far more than visualizations,” Finlayson remarks. “They were interactive tools used throughout the production pipeline. We would ingest 3D models and concept art, clean and optimize geometry using tools like Blender, Cinema 4D or Maya, then build out the world in Unreal Engine. This included applying materials, lighting and extending environments. These Unreal scenes we created were vital tools across the production and were used for a variety of purposes such as enabling the director to explore shot compositions, block scenes and experiment with camera movement in a virtual space, as well as passing along Unreal Engine scenes to the visual effects vendors so they could align their digital environments and set extensions with the approved production layouts.”

    A virtual exploration of Steve’s shop in Midport Village.

    Certain elements have to be kept in mind when constructing virtual environments. “When building virtual environments, you need to consider what can actually be built, how actors and cameras will move through the space, and what’s safe and practical on set,” Bell observes. “Outside the areas where strict accuracy is required, you want the environments to blend naturally with the original designs from the art department and support the story, creating a space that feels right for the scene, guides the audience’s eye and sets the right tone. Things like composition, lighting and small environmental details can be really fun to work on, but also serve as beautiful additions to help enrich a story.”

    “I’ve always loved the physicality of working with an LED volume, both for the immersion it provides and the way that seeing the environment helps shape an actor’s performance. But for A Minecraft Movie, we used Simulcam instead, and it was an incredible experience to live-composite an entire Minecraft world in real-time, especially with nothing on set but blue curtains.”
    —Laura Bell, Creative Technologist, Disguise

    Among the buildings that had to be created for Midport Village was Steve’sLava Chicken Shack.

    Concept art was provided that served as visual touchstones. “We received concept art provided by the amazing team of concept artists,” Finlayson states. “Not only did they send us 2D artwork, but they often shared the 3D models they used to create those visuals. These models were incredibly helpful as starting points when building out the virtual environments in Unreal Engine; they gave us a clear sense of composition and design intent. Storyboards were also a key part of the process and were constantly being updated as the project evolved. Having access to the latest versions allowed us to tailor the virtual environments to match camera angles, story beats and staging. Sometimes we would also help the storyboard artists by sending through images of the Unreal Engine worlds to help them geographically position themselves in the worlds and aid in their storyboarding.” At times, the video game assets came in handy. “Exteriors often involved large-scale landscapes and stylized architectural elements, which had to feel true to the Minecraft world,” Finlayson explains. “In some cases, we brought in geometry from the game itself to help quickly block out areas. For example, we did this for the Elytra Flight Chase sequence, which takes place through a large canyon.”

    Flexibility was critical. “A key technical challenge we faced was ensuring that the Unreal levels were built in a way that allowed for fast and flexible iteration,” Finlayson remarks. “Since our environments were constantly being reviewed by the director, production designer, DP and VFX supervisor, we needed to be able to respond quickly to feedback, sometimes live during a review session. To support this, we had to keep our scenes modular and well-organized; that meant breaking environments down into manageable components and maintaining clean naming conventions. By setting up the levels this way, we could make layout changes, swap assets or adjust lighting on the fly without breaking the scene or slowing down the process.” Production schedules influence the workflows, pipelines and techniques. “No two projects will ever feel exactly the same,” Bell notes. “For example, Pat Younisadapted his typical VR setup to allow scene reviews using a PS5 controller, which made it much more comfortable and accessible for the director. On a more technical side, because everything was cubes and voxels, my Blender workflow ended up being way heavier on the re-mesh modifier than usual, definitely not something I’ll run into again anytime soon!”

    A virtual study and final still of the cast members standing outside of the Lava Chicken Shack.

    “We received concept art provided by the amazing team of concept artists. Not only did they send us 2D artwork, but they often shared the 3D models they used to create those visuals. These models were incredibly helpful as starting points when building out the virtual environments in Unreal Engine; they gave us a clear sense of composition and design intent. Storyboards were also a key part of the process and were constantly being updated as the project evolved. Having access to the latest versions allowed us to tailor the virtual environments to match camera angles, story beats and staging.”
    —Talia Finlayson, Creative Technologist, Disguise

    The design and composition of virtual environments tended to remain consistent throughout principal photography. “The only major design change I can recall was the removal of a second story from a building in Midport Village to allow the camera crane to get a clear shot of the chicken perched above Steve’s lava chicken shack,” Finlayson remarks. “I would agree that Midport Village likely went through the most iterations,” Bell responds. “The archway, in particular, became a visual anchor across different levels. We often placed it off in the distance to help orient both ourselves and the audience and show how far the characters had traveled. I remember rebuilding the stairs leading up to the rampart five or six times, using different configurations based on the physically constructed stairs. This was because there were storyboarded sequences of the film’s characters, Henry, Steve and Garrett, being chased by piglins, and the action needed to match what could be achieved practically on set.”

    Virtually conceptualizing the layout of Midport Village.

    Complex virtual environments were constructed for the final battle and the various forest scenes throughout the movie. “What made these particularly challenging was the way physical set pieces were repurposed and repositioned to serve multiple scenes and locations within the story,” Finlayson reveals. “The same built elements had to appear in different parts of the world, so we had to carefully adjust the virtual environments to accommodate those different positions.” Bell is in agreement with her colleague. “The forest scenes were some of the more complex environments to manage. It could get tricky, particularly when the filming schedule shifted. There was one day on set where the order of shots changed unexpectedly, and because the physical sets looked so similar, I initially loaded a different perspective than planned. Fortunately, thanks to our workflow, Lindsay Georgeand I were able to quickly open the recorded sequence in Unreal Engine and swap out the correct virtual environment for the live composite without any disruption to the shoot.”

    An example of the virtual and final version of the Woodland Mansion.

    “Midport Village likely went through the most iterations. The archway, in particular, became a visual anchor across different levels. We often placed it off in the distance to help orient both ourselves and the audience and show how far the characters had traveled.”
    —Laura Bell, Creative Technologist, Disguise

    Extensive detail was given to the center of the sets where the main action unfolds. “For these areas, we received prop layouts from the prop department to ensure accurate placement and alignment with the physical builds,” Finlayson explains. “These central environments were used heavily for storyboarding, blocking and department reviews, so precision was essential. As we moved further out from the practical set, the environments became more about blocking and spatial context rather than fine detail. We worked closely with Production Designer Grant Major to get approval on these extended environments, making sure they aligned with the overall visual direction. We also used creatures and crowd stand-ins provided by the visual effects team. These gave a great sense of scale and placement during early planning stages and allowed other departments to better understand how these elements would be integrated into the scenes.”

    Cast members Sebastian Hansen, Danielle Brooks and Emma Myers stand in front of the Earth Portal Plateau environment.

    Doing a virtual scale study of the Mountainside.

    Practical requirements like camera moves, stunt choreography and crane setups had an impact on the creation of virtual environments. “Sometimes we would adjust layouts slightly to open up areas for tracking shots or rework spaces to accommodate key action beats, all while keeping the environment feeling cohesive and true to the Minecraft world,” Bell states. “Simulcam bridged the physical and virtual worlds on set, overlaying Unreal Engine environments onto live-action scenes in real-time, giving the director, DP and other department heads a fully-realized preview of shots and enabling precise, informed decisions during production. It also recorded critical production data like camera movement paths, which was handed over to the post-production team to give them the exact tracks they needed, streamlining the visual effects pipeline.”

    Piglots cause mayhem during the Wingsuit Chase.

    Virtual versions of the exterior and interior of the Safe House located in the Enchanted Woods.

    “One of the biggest challenges for me was managing constant iteration while keeping our environments clean, organized and easy to update,” Finlayson notes. “Because the virtual sets were reviewed regularly by the director and other heads of departments, feedback was often implemented live in the room. This meant the environments had to be flexible. But overall, this was an amazing project to work on, and I am so grateful for the incredible VAD team I was a part of – Heide Nichols, Pat Younis, Jake Tuckand Laura. Everyone on this team worked so collaboratively, seamlessly and in such a supportive way that I never felt like I was out of my depth.” There was another challenge that is more to do with familiarity. “Having a VAD on a film is still a relatively new process in production,” Bell states. “There were moments where other departments were still learning what we did and how to best work with us. That said, the response was overwhelmingly positive. I remember being on set at the Simulcam station and seeing how excited people were to look at the virtual environments as they walked by, often stopping for a chat and a virtual tour. Instead of seeing just a huge blue curtain, they were stoked to see something Minecraft and could get a better sense of what they were actually shooting.”
    #how #disguise #built #out #virtual
    HOW DISGUISE BUILT OUT THE VIRTUAL ENVIRONMENTS FOR A MINECRAFT MOVIE
    By TREVOR HOGG Images courtesy of Warner Bros. Pictures. Rather than a world constructed around photorealistic pixels, a video game created by Markus Persson has taken the boxier 3D voxel route, which has become its signature aesthetic, and sparked an international phenomenon that finally gets adapted into a feature with the release of A Minecraft Movie. Brought onboard to help filmmaker Jared Hess in creating the environments that the cast of Jason Momoa, Jack Black, Sebastian Hansen, Emma Myers and Danielle Brooks find themselves inhabiting was Disguise under the direction of Production VFX Supervisor Dan Lemmon. “s the Senior Unreal Artist within the Virtual Art Departmenton Minecraft, I experienced the full creative workflow. What stood out most was how deeply the VAD was embedded across every stage of production. We weren’t working in isolation. From the production designer and director to the VFX supervisor and DP, the VAD became a hub for collaboration.” —Talia Finlayson, Creative Technologist, Disguise Interior and exterior environments had to be created, such as the shop owned by Steve. “Prior to working on A Minecraft Movie, I held more technical roles, like serving as the Virtual Production LED Volume Operator on a project for Apple TV+ and Paramount Pictures,” notes Talia Finlayson, Creative Technologist for Disguise. “But as the Senior Unreal Artist within the Virtual Art Departmenton Minecraft, I experienced the full creative workflow. What stood out most was how deeply the VAD was embedded across every stage of production. We weren’t working in isolation. From the production designer and director to the VFX supervisor and DP, the VAD became a hub for collaboration.” The project provided new opportunities. “I’ve always loved the physicality of working with an LED volume, both for the immersion it provides and the way that seeing the environment helps shape an actor’s performance,” notes Laura Bell, Creative Technologist for Disguise. “But for A Minecraft Movie, we used Simulcam instead, and it was an incredible experience to live-composite an entire Minecraft world in real-time, especially with nothing on set but blue curtains.” Set designs originally created by the art department in Rhinoceros 3D were transformed into fully navigable 3D environments within Unreal Engine. “These scenes were far more than visualizations,” Finlayson remarks. “They were interactive tools used throughout the production pipeline. We would ingest 3D models and concept art, clean and optimize geometry using tools like Blender, Cinema 4D or Maya, then build out the world in Unreal Engine. This included applying materials, lighting and extending environments. These Unreal scenes we created were vital tools across the production and were used for a variety of purposes such as enabling the director to explore shot compositions, block scenes and experiment with camera movement in a virtual space, as well as passing along Unreal Engine scenes to the visual effects vendors so they could align their digital environments and set extensions with the approved production layouts.” A virtual exploration of Steve’s shop in Midport Village. Certain elements have to be kept in mind when constructing virtual environments. “When building virtual environments, you need to consider what can actually be built, how actors and cameras will move through the space, and what’s safe and practical on set,” Bell observes. “Outside the areas where strict accuracy is required, you want the environments to blend naturally with the original designs from the art department and support the story, creating a space that feels right for the scene, guides the audience’s eye and sets the right tone. Things like composition, lighting and small environmental details can be really fun to work on, but also serve as beautiful additions to help enrich a story.” “I’ve always loved the physicality of working with an LED volume, both for the immersion it provides and the way that seeing the environment helps shape an actor’s performance. But for A Minecraft Movie, we used Simulcam instead, and it was an incredible experience to live-composite an entire Minecraft world in real-time, especially with nothing on set but blue curtains.” —Laura Bell, Creative Technologist, Disguise Among the buildings that had to be created for Midport Village was Steve’sLava Chicken Shack. Concept art was provided that served as visual touchstones. “We received concept art provided by the amazing team of concept artists,” Finlayson states. “Not only did they send us 2D artwork, but they often shared the 3D models they used to create those visuals. These models were incredibly helpful as starting points when building out the virtual environments in Unreal Engine; they gave us a clear sense of composition and design intent. Storyboards were also a key part of the process and were constantly being updated as the project evolved. Having access to the latest versions allowed us to tailor the virtual environments to match camera angles, story beats and staging. Sometimes we would also help the storyboard artists by sending through images of the Unreal Engine worlds to help them geographically position themselves in the worlds and aid in their storyboarding.” At times, the video game assets came in handy. “Exteriors often involved large-scale landscapes and stylized architectural elements, which had to feel true to the Minecraft world,” Finlayson explains. “In some cases, we brought in geometry from the game itself to help quickly block out areas. For example, we did this for the Elytra Flight Chase sequence, which takes place through a large canyon.” Flexibility was critical. “A key technical challenge we faced was ensuring that the Unreal levels were built in a way that allowed for fast and flexible iteration,” Finlayson remarks. “Since our environments were constantly being reviewed by the director, production designer, DP and VFX supervisor, we needed to be able to respond quickly to feedback, sometimes live during a review session. To support this, we had to keep our scenes modular and well-organized; that meant breaking environments down into manageable components and maintaining clean naming conventions. By setting up the levels this way, we could make layout changes, swap assets or adjust lighting on the fly without breaking the scene or slowing down the process.” Production schedules influence the workflows, pipelines and techniques. “No two projects will ever feel exactly the same,” Bell notes. “For example, Pat Younisadapted his typical VR setup to allow scene reviews using a PS5 controller, which made it much more comfortable and accessible for the director. On a more technical side, because everything was cubes and voxels, my Blender workflow ended up being way heavier on the re-mesh modifier than usual, definitely not something I’ll run into again anytime soon!” A virtual study and final still of the cast members standing outside of the Lava Chicken Shack. “We received concept art provided by the amazing team of concept artists. Not only did they send us 2D artwork, but they often shared the 3D models they used to create those visuals. These models were incredibly helpful as starting points when building out the virtual environments in Unreal Engine; they gave us a clear sense of composition and design intent. Storyboards were also a key part of the process and were constantly being updated as the project evolved. Having access to the latest versions allowed us to tailor the virtual environments to match camera angles, story beats and staging.” —Talia Finlayson, Creative Technologist, Disguise The design and composition of virtual environments tended to remain consistent throughout principal photography. “The only major design change I can recall was the removal of a second story from a building in Midport Village to allow the camera crane to get a clear shot of the chicken perched above Steve’s lava chicken shack,” Finlayson remarks. “I would agree that Midport Village likely went through the most iterations,” Bell responds. “The archway, in particular, became a visual anchor across different levels. We often placed it off in the distance to help orient both ourselves and the audience and show how far the characters had traveled. I remember rebuilding the stairs leading up to the rampart five or six times, using different configurations based on the physically constructed stairs. This was because there were storyboarded sequences of the film’s characters, Henry, Steve and Garrett, being chased by piglins, and the action needed to match what could be achieved practically on set.” Virtually conceptualizing the layout of Midport Village. Complex virtual environments were constructed for the final battle and the various forest scenes throughout the movie. “What made these particularly challenging was the way physical set pieces were repurposed and repositioned to serve multiple scenes and locations within the story,” Finlayson reveals. “The same built elements had to appear in different parts of the world, so we had to carefully adjust the virtual environments to accommodate those different positions.” Bell is in agreement with her colleague. “The forest scenes were some of the more complex environments to manage. It could get tricky, particularly when the filming schedule shifted. There was one day on set where the order of shots changed unexpectedly, and because the physical sets looked so similar, I initially loaded a different perspective than planned. Fortunately, thanks to our workflow, Lindsay Georgeand I were able to quickly open the recorded sequence in Unreal Engine and swap out the correct virtual environment for the live composite without any disruption to the shoot.” An example of the virtual and final version of the Woodland Mansion. “Midport Village likely went through the most iterations. The archway, in particular, became a visual anchor across different levels. We often placed it off in the distance to help orient both ourselves and the audience and show how far the characters had traveled.” —Laura Bell, Creative Technologist, Disguise Extensive detail was given to the center of the sets where the main action unfolds. “For these areas, we received prop layouts from the prop department to ensure accurate placement and alignment with the physical builds,” Finlayson explains. “These central environments were used heavily for storyboarding, blocking and department reviews, so precision was essential. As we moved further out from the practical set, the environments became more about blocking and spatial context rather than fine detail. We worked closely with Production Designer Grant Major to get approval on these extended environments, making sure they aligned with the overall visual direction. We also used creatures and crowd stand-ins provided by the visual effects team. These gave a great sense of scale and placement during early planning stages and allowed other departments to better understand how these elements would be integrated into the scenes.” Cast members Sebastian Hansen, Danielle Brooks and Emma Myers stand in front of the Earth Portal Plateau environment. Doing a virtual scale study of the Mountainside. Practical requirements like camera moves, stunt choreography and crane setups had an impact on the creation of virtual environments. “Sometimes we would adjust layouts slightly to open up areas for tracking shots or rework spaces to accommodate key action beats, all while keeping the environment feeling cohesive and true to the Minecraft world,” Bell states. “Simulcam bridged the physical and virtual worlds on set, overlaying Unreal Engine environments onto live-action scenes in real-time, giving the director, DP and other department heads a fully-realized preview of shots and enabling precise, informed decisions during production. It also recorded critical production data like camera movement paths, which was handed over to the post-production team to give them the exact tracks they needed, streamlining the visual effects pipeline.” Piglots cause mayhem during the Wingsuit Chase. Virtual versions of the exterior and interior of the Safe House located in the Enchanted Woods. “One of the biggest challenges for me was managing constant iteration while keeping our environments clean, organized and easy to update,” Finlayson notes. “Because the virtual sets were reviewed regularly by the director and other heads of departments, feedback was often implemented live in the room. This meant the environments had to be flexible. But overall, this was an amazing project to work on, and I am so grateful for the incredible VAD team I was a part of – Heide Nichols, Pat Younis, Jake Tuckand Laura. Everyone on this team worked so collaboratively, seamlessly and in such a supportive way that I never felt like I was out of my depth.” There was another challenge that is more to do with familiarity. “Having a VAD on a film is still a relatively new process in production,” Bell states. “There were moments where other departments were still learning what we did and how to best work with us. That said, the response was overwhelmingly positive. I remember being on set at the Simulcam station and seeing how excited people were to look at the virtual environments as they walked by, often stopping for a chat and a virtual tour. Instead of seeing just a huge blue curtain, they were stoked to see something Minecraft and could get a better sense of what they were actually shooting.” #how #disguise #built #out #virtual
    WWW.VFXVOICE.COM
    HOW DISGUISE BUILT OUT THE VIRTUAL ENVIRONMENTS FOR A MINECRAFT MOVIE
    By TREVOR HOGG Images courtesy of Warner Bros. Pictures. Rather than a world constructed around photorealistic pixels, a video game created by Markus Persson has taken the boxier 3D voxel route, which has become its signature aesthetic, and sparked an international phenomenon that finally gets adapted into a feature with the release of A Minecraft Movie. Brought onboard to help filmmaker Jared Hess in creating the environments that the cast of Jason Momoa, Jack Black, Sebastian Hansen, Emma Myers and Danielle Brooks find themselves inhabiting was Disguise under the direction of Production VFX Supervisor Dan Lemmon. “[A]s the Senior Unreal Artist within the Virtual Art Department (VAD) on Minecraft, I experienced the full creative workflow. What stood out most was how deeply the VAD was embedded across every stage of production. We weren’t working in isolation. From the production designer and director to the VFX supervisor and DP, the VAD became a hub for collaboration.” —Talia Finlayson, Creative Technologist, Disguise Interior and exterior environments had to be created, such as the shop owned by Steve (Jack Black). “Prior to working on A Minecraft Movie, I held more technical roles, like serving as the Virtual Production LED Volume Operator on a project for Apple TV+ and Paramount Pictures,” notes Talia Finlayson, Creative Technologist for Disguise. “But as the Senior Unreal Artist within the Virtual Art Department (VAD) on Minecraft, I experienced the full creative workflow. What stood out most was how deeply the VAD was embedded across every stage of production. We weren’t working in isolation. From the production designer and director to the VFX supervisor and DP, the VAD became a hub for collaboration.” The project provided new opportunities. “I’ve always loved the physicality of working with an LED volume, both for the immersion it provides and the way that seeing the environment helps shape an actor’s performance,” notes Laura Bell, Creative Technologist for Disguise. “But for A Minecraft Movie, we used Simulcam instead, and it was an incredible experience to live-composite an entire Minecraft world in real-time, especially with nothing on set but blue curtains.” Set designs originally created by the art department in Rhinoceros 3D were transformed into fully navigable 3D environments within Unreal Engine. “These scenes were far more than visualizations,” Finlayson remarks. “They were interactive tools used throughout the production pipeline. We would ingest 3D models and concept art, clean and optimize geometry using tools like Blender, Cinema 4D or Maya, then build out the world in Unreal Engine. This included applying materials, lighting and extending environments. These Unreal scenes we created were vital tools across the production and were used for a variety of purposes such as enabling the director to explore shot compositions, block scenes and experiment with camera movement in a virtual space, as well as passing along Unreal Engine scenes to the visual effects vendors so they could align their digital environments and set extensions with the approved production layouts.” A virtual exploration of Steve’s shop in Midport Village. Certain elements have to be kept in mind when constructing virtual environments. “When building virtual environments, you need to consider what can actually be built, how actors and cameras will move through the space, and what’s safe and practical on set,” Bell observes. “Outside the areas where strict accuracy is required, you want the environments to blend naturally with the original designs from the art department and support the story, creating a space that feels right for the scene, guides the audience’s eye and sets the right tone. Things like composition, lighting and small environmental details can be really fun to work on, but also serve as beautiful additions to help enrich a story.” “I’ve always loved the physicality of working with an LED volume, both for the immersion it provides and the way that seeing the environment helps shape an actor’s performance. But for A Minecraft Movie, we used Simulcam instead, and it was an incredible experience to live-composite an entire Minecraft world in real-time, especially with nothing on set but blue curtains.” —Laura Bell, Creative Technologist, Disguise Among the buildings that had to be created for Midport Village was Steve’s (Jack Black) Lava Chicken Shack. Concept art was provided that served as visual touchstones. “We received concept art provided by the amazing team of concept artists,” Finlayson states. “Not only did they send us 2D artwork, but they often shared the 3D models they used to create those visuals. These models were incredibly helpful as starting points when building out the virtual environments in Unreal Engine; they gave us a clear sense of composition and design intent. Storyboards were also a key part of the process and were constantly being updated as the project evolved. Having access to the latest versions allowed us to tailor the virtual environments to match camera angles, story beats and staging. Sometimes we would also help the storyboard artists by sending through images of the Unreal Engine worlds to help them geographically position themselves in the worlds and aid in their storyboarding.” At times, the video game assets came in handy. “Exteriors often involved large-scale landscapes and stylized architectural elements, which had to feel true to the Minecraft world,” Finlayson explains. “In some cases, we brought in geometry from the game itself to help quickly block out areas. For example, we did this for the Elytra Flight Chase sequence, which takes place through a large canyon.” Flexibility was critical. “A key technical challenge we faced was ensuring that the Unreal levels were built in a way that allowed for fast and flexible iteration,” Finlayson remarks. “Since our environments were constantly being reviewed by the director, production designer, DP and VFX supervisor, we needed to be able to respond quickly to feedback, sometimes live during a review session. To support this, we had to keep our scenes modular and well-organized; that meant breaking environments down into manageable components and maintaining clean naming conventions. By setting up the levels this way, we could make layout changes, swap assets or adjust lighting on the fly without breaking the scene or slowing down the process.” Production schedules influence the workflows, pipelines and techniques. “No two projects will ever feel exactly the same,” Bell notes. “For example, Pat Younis [VAD Art Director] adapted his typical VR setup to allow scene reviews using a PS5 controller, which made it much more comfortable and accessible for the director. On a more technical side, because everything was cubes and voxels, my Blender workflow ended up being way heavier on the re-mesh modifier than usual, definitely not something I’ll run into again anytime soon!” A virtual study and final still of the cast members standing outside of the Lava Chicken Shack. “We received concept art provided by the amazing team of concept artists. Not only did they send us 2D artwork, but they often shared the 3D models they used to create those visuals. These models were incredibly helpful as starting points when building out the virtual environments in Unreal Engine; they gave us a clear sense of composition and design intent. Storyboards were also a key part of the process and were constantly being updated as the project evolved. Having access to the latest versions allowed us to tailor the virtual environments to match camera angles, story beats and staging.” —Talia Finlayson, Creative Technologist, Disguise The design and composition of virtual environments tended to remain consistent throughout principal photography. “The only major design change I can recall was the removal of a second story from a building in Midport Village to allow the camera crane to get a clear shot of the chicken perched above Steve’s lava chicken shack,” Finlayson remarks. “I would agree that Midport Village likely went through the most iterations,” Bell responds. “The archway, in particular, became a visual anchor across different levels. We often placed it off in the distance to help orient both ourselves and the audience and show how far the characters had traveled. I remember rebuilding the stairs leading up to the rampart five or six times, using different configurations based on the physically constructed stairs. This was because there were storyboarded sequences of the film’s characters, Henry, Steve and Garrett, being chased by piglins, and the action needed to match what could be achieved practically on set.” Virtually conceptualizing the layout of Midport Village. Complex virtual environments were constructed for the final battle and the various forest scenes throughout the movie. “What made these particularly challenging was the way physical set pieces were repurposed and repositioned to serve multiple scenes and locations within the story,” Finlayson reveals. “The same built elements had to appear in different parts of the world, so we had to carefully adjust the virtual environments to accommodate those different positions.” Bell is in agreement with her colleague. “The forest scenes were some of the more complex environments to manage. It could get tricky, particularly when the filming schedule shifted. There was one day on set where the order of shots changed unexpectedly, and because the physical sets looked so similar, I initially loaded a different perspective than planned. Fortunately, thanks to our workflow, Lindsay George [VP Tech] and I were able to quickly open the recorded sequence in Unreal Engine and swap out the correct virtual environment for the live composite without any disruption to the shoot.” An example of the virtual and final version of the Woodland Mansion. “Midport Village likely went through the most iterations. The archway, in particular, became a visual anchor across different levels. We often placed it off in the distance to help orient both ourselves and the audience and show how far the characters had traveled.” —Laura Bell, Creative Technologist, Disguise Extensive detail was given to the center of the sets where the main action unfolds. “For these areas, we received prop layouts from the prop department to ensure accurate placement and alignment with the physical builds,” Finlayson explains. “These central environments were used heavily for storyboarding, blocking and department reviews, so precision was essential. As we moved further out from the practical set, the environments became more about blocking and spatial context rather than fine detail. We worked closely with Production Designer Grant Major to get approval on these extended environments, making sure they aligned with the overall visual direction. We also used creatures and crowd stand-ins provided by the visual effects team. These gave a great sense of scale and placement during early planning stages and allowed other departments to better understand how these elements would be integrated into the scenes.” Cast members Sebastian Hansen, Danielle Brooks and Emma Myers stand in front of the Earth Portal Plateau environment. Doing a virtual scale study of the Mountainside. Practical requirements like camera moves, stunt choreography and crane setups had an impact on the creation of virtual environments. “Sometimes we would adjust layouts slightly to open up areas for tracking shots or rework spaces to accommodate key action beats, all while keeping the environment feeling cohesive and true to the Minecraft world,” Bell states. “Simulcam bridged the physical and virtual worlds on set, overlaying Unreal Engine environments onto live-action scenes in real-time, giving the director, DP and other department heads a fully-realized preview of shots and enabling precise, informed decisions during production. It also recorded critical production data like camera movement paths, which was handed over to the post-production team to give them the exact tracks they needed, streamlining the visual effects pipeline.” Piglots cause mayhem during the Wingsuit Chase. Virtual versions of the exterior and interior of the Safe House located in the Enchanted Woods. “One of the biggest challenges for me was managing constant iteration while keeping our environments clean, organized and easy to update,” Finlayson notes. “Because the virtual sets were reviewed regularly by the director and other heads of departments, feedback was often implemented live in the room. This meant the environments had to be flexible. But overall, this was an amazing project to work on, and I am so grateful for the incredible VAD team I was a part of – Heide Nichols [VAD Supervisor], Pat Younis, Jake Tuck [Unreal Artist] and Laura. Everyone on this team worked so collaboratively, seamlessly and in such a supportive way that I never felt like I was out of my depth.” There was another challenge that is more to do with familiarity. “Having a VAD on a film is still a relatively new process in production,” Bell states. “There were moments where other departments were still learning what we did and how to best work with us. That said, the response was overwhelmingly positive. I remember being on set at the Simulcam station and seeing how excited people were to look at the virtual environments as they walked by, often stopping for a chat and a virtual tour. Instead of seeing just a huge blue curtain, they were stoked to see something Minecraft and could get a better sense of what they were actually shooting.”
    0 Комментарии 0 Поделились
  • It’s infuriating to see so-called "artists" like Karl Simon using an iPad to paint in museums! What happened to the beauty and authenticity of traditional painting? This digital nonsense is an insult to the art world. How can you truly capture the essence of life when you’re staring at a screen? It’s a slap in the face to the masters who dedicated their lives to creating genuine art. We’re losing the tactile experience of painting—something that connects us to our surroundings and to the history of art itself. This obsession with technology is not creativity; it’s laziness! If you’re going to paint, do it the right way!

    #ArtCritique #DigitalVsTraditional #MuseumArt #Creativity #CulturalHer
    It’s infuriating to see so-called "artists" like Karl Simon using an iPad to paint in museums! What happened to the beauty and authenticity of traditional painting? This digital nonsense is an insult to the art world. How can you truly capture the essence of life when you’re staring at a screen? It’s a slap in the face to the masters who dedicated their lives to creating genuine art. We’re losing the tactile experience of painting—something that connects us to our surroundings and to the history of art itself. This obsession with technology is not creativity; it’s laziness! If you’re going to paint, do it the right way! #ArtCritique #DigitalVsTraditional #MuseumArt #Creativity #CulturalHer
    WWW.CREATIVEBLOQ.COM
    How I use an iPad to paint from life in a museum
    Concept artist Karl Simon shares his creative tips on painting with an iPad in a museum setting.
    1 Комментарии 0 Поделились
  • Ever wondered how transistors are assembled inside a CPU? It’s just like playing with Lego, but instead of building castles, you’re creating the ultimate calculator – because who doesn’t love multiplying numbers while scrolling through cat memes?

    Apparently, billions of tiny transistors in your smartphone are busy making magic happen. Meanwhile, we’re just here trying to figure out how to switch it off and on again. Ah, technology! Where transistors do all the heavy lifting while we just sit back and binge-watch our favorite shows. Talk about a partnership!

    Next time you’re on your phone, remember: behind that screen, there's a bustling city of transistors, each one wishing it could take a break and join you for a snack
    Ever wondered how transistors are assembled inside a CPU? It’s just like playing with Lego, but instead of building castles, you’re creating the ultimate calculator – because who doesn’t love multiplying numbers while scrolling through cat memes? 🐱 Apparently, billions of tiny transistors in your smartphone are busy making magic happen. Meanwhile, we’re just here trying to figure out how to switch it off and on again. Ah, technology! Where transistors do all the heavy lifting while we just sit back and binge-watch our favorite shows. Talk about a partnership! Next time you’re on your phone, remember: behind that screen, there's a bustling city of transistors, each one wishing it could take a break and join you for a snack
    How are Transistors Assembled Inside a CPU?
    Mike Radjabov presents another in-depth explainer, created in Blender. Inside your smartphone, there are billions of transistors, but have you ever wondered how they actually work and how they can be combined to perform tasks like multiplying two num
    1 Комментарии 0 Поделились
  • Hey everyone! Are you ready to take your animation skills to the next level? Today, we’re diving into a fun and satisfying loop tutorial that will transform your Blender projects! Imagine creating a flashy loading animation that not only grabs attention but also showcases your creativity!

    Using the animation curves graph, you can craft eye-catching animations in no time! Let’s unleash your imagination and make something incredible together! Remember, every great animator started with a single loop!

    Embrace the process, keep experimenting, and watch your skills soar! Happy animating!

    #BlenderAnimation #SatisfyingLoop #CreativeJourney #AnimationTutorial #BlenderTips
    🚀✨ Hey everyone! Are you ready to take your animation skills to the next level? Today, we’re diving into a fun and satisfying loop tutorial that will transform your Blender projects! 🌟 Imagine creating a flashy loading animation that not only grabs attention but also showcases your creativity! 🎨💫 Using the animation curves graph, you can craft eye-catching animations in no time! Let’s unleash your imagination and make something incredible together! Remember, every great animator started with a single loop! 💖💪 Embrace the process, keep experimenting, and watch your skills soar! Happy animating! 🎉 #BlenderAnimation #SatisfyingLoop #CreativeJourney #AnimationTutorial #BlenderTips
    Satisfying Loop Tutorial
    Let's use the animation curves graph to quickly create a flashy loading animation in Blender. Source
    1 Комментарии 0 Поделились
Расширенные страницы