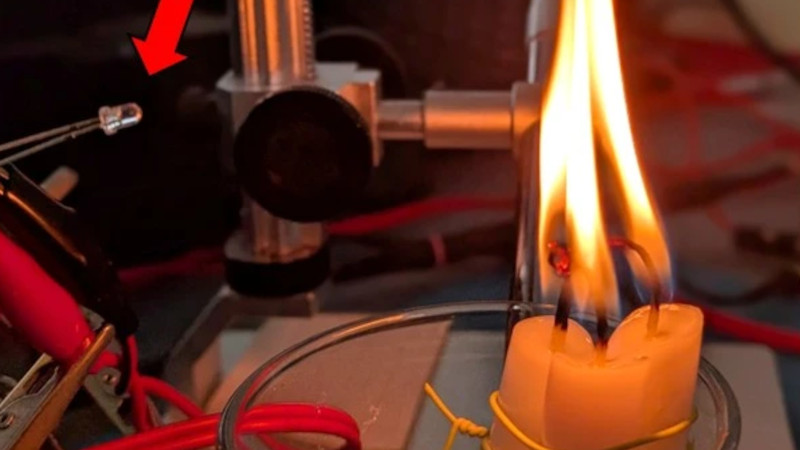
How to Make Your First ‘Ninja Slushi’ (Without Ruining It)
We may earn a commission from links on this page.Unboxing a new kitchen appliance is one of my favorite experiences—it’s a non-holiday present and I know what’s inside—how wonderful! But the instruction manual part really kills my vibe.I know tossing it aside will almost surely lead to failure, but I hate reading them anyway.
In fact, I did read the operation manual for the Ninja Slushi, and I still managed to screw up my first batch of slush.
(You can read about that experience in my review of the Ninja Slushi.) To help you avoid the shame of a ruined slush, not to mention reading the tedious instructions, I've assembled this step by step guide on operating your new Ninja Slushi, from set-up to clean-up.Notes on sugar and alcoholBefore getting started, know that what you put into the machine will directly affect your success.
Specifically, the liquid you’re using must have at least 4% sugar content.
If it doesn’t, it will become too icy, and the machine will have trouble scraping the frozen mixture out of the evaporator cylinder.
(You can’t use artificial sweeteners or sugar substitutes either, unless you want to fall down a rabbit hole of allulose and xanthan gum and brightly hued, sugar-free prepackaged slushie mixes.)Ninja provides a little chart indicating the minimum amount of sugar you need for a particular serving size.
Make a simple syrup by mixing the amount of sugar with an equal amount of water and microwaving it until warm.
Stir the mixture until the sugar dissolves.
This simple syrup can be added to your greater recipe mixture before pouring it into the Ninja Slushi (make sure to account for the water from your simple syrup in your overall calculations).
Even if you messed up and froze a cold brew mixture without any sugar by accident, you can fix it.
(Maybe I know this first hand? Maybe I don’t.) The machine will stop if it detects a problem with your sugar content during the churning process.
This is your chance to make a simple syrup with the correct amount of sugar and pour it in to the mix.
Don’t add sugar directly to the chamber mid-freeze—it may have trouble dissolving into the partially frozen drink.Alcohol has a similar stipulation—a minimum of 2.8% and a maximum of 16% alcohol must be present to make a spiked slush that will freeze properly.
Again, there's a helpful chart to guide you on your journey, but once you know these rules and abide by them, the machine will play nice.Now, let's make that slush.1.
Set up the Ninja Slushi
Credit: Allie Chanthorn Reinmann
Like dishware, bakeware, and anything else from a dusty factory, it’s a good idea to take apart the Slushi and clean the parts with soapy water before you put food in it.
That includes the drip tray, the main vessel, the condensation catch, and the auger (that spiral thingy).
The silver evaporator is not removable, so just wipe it down with a soft cloth.
Dry everything thoroughly.It’s no small appliance, so make sure you clear off a nice section of your countertop.
There are vents on the sides and back, so give those areas room to breathe too.
Put the parts back in their respective areas.
The main vessel sits into the bail handle in the back, as you pull it backward.
It won’t make a clicking sound, but it will sit there securely secure.
Once reassembled, plug in the machine.2.
Pour in the liquid mixture
Credit: Allie Chanthorn Reinmann
The fun part is almost here! Open the hatch on the top of the main clear container.
Pour the mixture in, all in one go.
Depending on how your Ninja Slushi is situated on the countertop, this might be a little hard to do gracefully.
I recommend using a pitcher or a bottle—any container with a somewhat narrow pour spout—for more precision. 3.
Power up
Credit: Allie Chanthorn Reinmann
Click the power button on the control panel.
All of the features should light up.
On the left side, you’ll see the presets.
Select the one that best matches the mixture you made: a regular soda slushie would be the “Slush” preset, an alcoholic slushie would be “Spiked Slush,” a coffee frappé would be the “Frappé” setting, and so on for milkshakes and frozen juices.
This time, I decided to make a chocolate milkshake.
Press the button you need and the right side panel should automatically light up with the number of bars that indicate the temperature.
The machine should start churning, so all you have to do is wait. Note that this is the stage where the Ninja Slushi will alert you if you did not add enough sugar or if there’s a problem with the alcohol content.
You know how to add more sugar, and more alcohol can go directly in the machine if needed—but if you added too much alcohol to start, you need to fix that by pouring in some water to dilute the mixture.
If the tank is already at the Max Fill line, dispense some mixture before adding water to dilute it. 4.
Dispense and adjust consistency
Credit: Allie Chanthorn Reinmann
Once the Slushi has finished the setting cycle, it’ll play you a little ditty to signal it’s ready, but the auger will keep spinning.
Grab a glass and hold it under the spout.
Pull the handle toward you and hold it to dispense your slushie.
The handle doesn’t have a locking mechanism while dispensing, so you have to keep pressure on it or it’ll spring shut. If you’re happy with your slushie’s consistency, hooray! If you aren’t, you can make it thicker or thinner by manually pressing the up arrow (for a thicker, colder slushie) or the down arrow (for a warmer, more liquid-y slushie).
The machine will alert you when the new temperature has been reached.5.
Clean everything thoroughlyAfter the party is over, you’ll need to clean up your Ninja Slushi.
If there is still slushie left in the container, dispense it all into a bowl or container.
You have to do this with the preset running because it’ll push the mixture down and out of the spout.
Discard it or save it to slush another day. Turn off the preset and select the rinse button.
Have a big container handy—I use a 4-quart pot as my helper of choice.
Pour hot water all the way up to the Max Fill line, then put the pot under the spout and slowly dispense all of the water.
Liquid comes out way faster than slush, so only pull the dispensing handle toward you maybe 30%.
Once all of the water is out, stop the rinse cycle by pressing the rinse button again, then press the power button to turn the machine off.
Unplug it and disassemble the same parts you washed earlier.
I hand wash them with warm soapy water, but if you have a dishwasher, the directions say you can toss all the parts in there.
Wipe down the evaporator with a warm, damp cloth.
Dry everything off before assembling the pieces again for storage, or to make your next slushie.
Source: https://lifehacker.com/food-drink/how-to-make-your-first-slush-with-the-ninja-slushi?utm_medium=RSS" style="color: #0066cc;">https://lifehacker.com/food-drink/how-to-make-your-first-slush-with-the-ninja-slushi?utm_medium=RSS
#how #make #your #first #ninja #slushi #without #ruining
How to Make Your First ‘Ninja Slushi’ (Without Ruining It)
We may earn a commission from links on this page.Unboxing a new kitchen appliance is one of my favorite experiences—it’s a non-holiday present and I know what’s inside—how wonderful! But the instruction manual part really kills my vibe.
I know tossing it aside will almost surely lead to failure, but I hate reading them anyway.
In fact, I did read the operation manual for the Ninja Slushi, and I still managed to screw up my first batch of slush.
(You can read about that experience in my review of the Ninja Slushi.) To help you avoid the shame of a ruined slush, not to mention reading the tedious instructions, I've assembled this step by step guide on operating your new Ninja Slushi, from set-up to clean-up.Notes on sugar and alcoholBefore getting started, know that what you put into the machine will directly affect your success.
Specifically, the liquid you’re using must have at least 4% sugar content.
If it doesn’t, it will become too icy, and the machine will have trouble scraping the frozen mixture out of the evaporator cylinder.
(You can’t use artificial sweeteners or sugar substitutes either, unless you want to fall down a rabbit hole of allulose and xanthan gum and brightly hued, sugar-free prepackaged slushie mixes.)Ninja provides a little chart indicating the minimum amount of sugar you need for a particular serving size.
Make a simple syrup by mixing the amount of sugar with an equal amount of water and microwaving it until warm.
Stir the mixture until the sugar dissolves.
This simple syrup can be added to your greater recipe mixture before pouring it into the Ninja Slushi (make sure to account for the water from your simple syrup in your overall calculations).
Even if you messed up and froze a cold brew mixture without any sugar by accident, you can fix it.
(Maybe I know this first hand? Maybe I don’t.) The machine will stop if it detects a problem with your sugar content during the churning process.
This is your chance to make a simple syrup with the correct amount of sugar and pour it in to the mix.
Don’t add sugar directly to the chamber mid-freeze—it may have trouble dissolving into the partially frozen drink.Alcohol has a similar stipulation—a minimum of 2.8% and a maximum of 16% alcohol must be present to make a spiked slush that will freeze properly.
Again, there's a helpful chart to guide you on your journey, but once you know these rules and abide by them, the machine will play nice.Now, let's make that slush.1.
Set up the Ninja Slushi
Credit: Allie Chanthorn Reinmann
Like dishware, bakeware, and anything else from a dusty factory, it’s a good idea to take apart the Slushi and clean the parts with soapy water before you put food in it.
That includes the drip tray, the main vessel, the condensation catch, and the auger (that spiral thingy).
The silver evaporator is not removable, so just wipe it down with a soft cloth.
Dry everything thoroughly.It’s no small appliance, so make sure you clear off a nice section of your countertop.
There are vents on the sides and back, so give those areas room to breathe too.
Put the parts back in their respective areas.
The main vessel sits into the bail handle in the back, as you pull it backward.
It won’t make a clicking sound, but it will sit there securely secure.
Once reassembled, plug in the machine.2.
Pour in the liquid mixture
Credit: Allie Chanthorn Reinmann
The fun part is almost here! Open the hatch on the top of the main clear container.
Pour the mixture in, all in one go.
Depending on how your Ninja Slushi is situated on the countertop, this might be a little hard to do gracefully.
I recommend using a pitcher or a bottle—any container with a somewhat narrow pour spout—for more precision. 3.
Power up
Credit: Allie Chanthorn Reinmann
Click the power button on the control panel.
All of the features should light up.
On the left side, you’ll see the presets.
Select the one that best matches the mixture you made: a regular soda slushie would be the “Slush” preset, an alcoholic slushie would be “Spiked Slush,” a coffee frappé would be the “Frappé” setting, and so on for milkshakes and frozen juices.
This time, I decided to make a chocolate milkshake.
Press the button you need and the right side panel should automatically light up with the number of bars that indicate the temperature.
The machine should start churning, so all you have to do is wait. Note that this is the stage where the Ninja Slushi will alert you if you did not add enough sugar or if there’s a problem with the alcohol content.
You know how to add more sugar, and more alcohol can go directly in the machine if needed—but if you added too much alcohol to start, you need to fix that by pouring in some water to dilute the mixture.
If the tank is already at the Max Fill line, dispense some mixture before adding water to dilute it. 4.
Dispense and adjust consistency
Credit: Allie Chanthorn Reinmann
Once the Slushi has finished the setting cycle, it’ll play you a little ditty to signal it’s ready, but the auger will keep spinning.
Grab a glass and hold it under the spout.
Pull the handle toward you and hold it to dispense your slushie.
The handle doesn’t have a locking mechanism while dispensing, so you have to keep pressure on it or it’ll spring shut. If you’re happy with your slushie’s consistency, hooray! If you aren’t, you can make it thicker or thinner by manually pressing the up arrow (for a thicker, colder slushie) or the down arrow (for a warmer, more liquid-y slushie).
The machine will alert you when the new temperature has been reached.5.
Clean everything thoroughlyAfter the party is over, you’ll need to clean up your Ninja Slushi.
If there is still slushie left in the container, dispense it all into a bowl or container.
You have to do this with the preset running because it’ll push the mixture down and out of the spout.
Discard it or save it to slush another day. Turn off the preset and select the rinse button.
Have a big container handy—I use a 4-quart pot as my helper of choice.
Pour hot water all the way up to the Max Fill line, then put the pot under the spout and slowly dispense all of the water.
Liquid comes out way faster than slush, so only pull the dispensing handle toward you maybe 30%.
Once all of the water is out, stop the rinse cycle by pressing the rinse button again, then press the power button to turn the machine off.
Unplug it and disassemble the same parts you washed earlier.
I hand wash them with warm soapy water, but if you have a dishwasher, the directions say you can toss all the parts in there.
Wipe down the evaporator with a warm, damp cloth.
Dry everything off before assembling the pieces again for storage, or to make your next slushie.
Source: https://lifehacker.com/food-drink/how-to-make-your-first-slush-with-the-ninja-slushi?utm_medium=RSS
#how #make #your #first #ninja #slushi #without #ruining
·62 Views