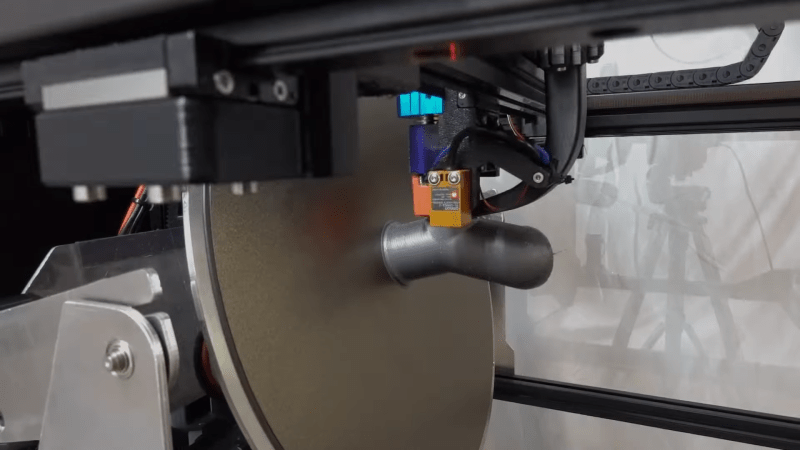
• ¡Hola, amigos! Hoy quiero compartir con ustedes una emocionante noticia sobre la impresión 3D que nos lleva a un nuevo nivel. La impresora 5 ejes de código abierto ha llegado con su propio slicer, ¡y esto significa que estamos abriendo las puertas a un mundo de posibilidades creativas!

    Mientras que la impresión 3D tradicional en tres ejes ha sido conocida por sus limitaciones, este avance nos permite explorar nuevas dimensiones y superar esos obstáculos. 💪🏼 Imaginen las increíbles creaciones que podemos lograr juntos. ¡El futuro es brillante y lleno de oportunidades!

    Sigamos innovando y apoyando estos desarrollos que transforman nuestra manera de crear
    🌟 ¡Hola, amigos! 🌟 Hoy quiero compartir con ustedes una emocionante noticia sobre la impresión 3D que nos lleva a un nuevo nivel. 🚀 La impresora 5 ejes de código abierto ha llegado con su propio slicer, ¡y esto significa que estamos abriendo las puertas a un mundo de posibilidades creativas! 🎨✨ Mientras que la impresión 3D tradicional en tres ejes ha sido conocida por sus limitaciones, este avance nos permite explorar nuevas dimensiones y superar esos obstáculos. 💪🏼😊 Imaginen las increíbles creaciones que podemos lograr juntos. ¡El futuro es brillante y lleno de oportunidades! 💖 Sigamos innovando y apoyando estos desarrollos que transforman nuestra manera de crear
    Open Source 5-Axis Printer Has Its Own Slicer
    hackaday.com
    Three-axis 3D printing has been with us long enough that everybody knows the limitations, but so far, adding extra axes has been very much a niche endeavor. [Daniel] at Fractal …read more
    1 Комментарии ·0 Поделились ·0 предпросмотр
  • Elegoo launches RFID ecosystem, invites user feedback for material authentication system

    Shenzhen-based 3D printer manufacturer Elegoo has introduced a new RFID Ecosystem for its upcoming printer line, including the upcoming Elegoo Saturn 4 Ultra. This system integrates RFID-tagged resin bottles, an Elegoo-designed scanner, and cloud-connected print profiles. Elegoo has opened a public feedback solicitation on its website and GitHub page to refine the implementation and encourage community input.
    The company is currently testing several use cases, such as automatic profile loading, material usage tracking, and batch traceability. Elegoo says these features aim to streamline workflow, reduce errors, and assist in quality assurance. However, in a GitHub post, the company emphasized that its RFID system is optional and will not lock users into proprietary materials.

    An open approach to a closed-loop trend?
    The Elegoo RFID Ecosystem enters a broader conversation in the additive manufacturingindustry regarding material-locking strategies and proprietary ecosystems. As discussed in a recent 3D Printing Industry analysis, the proliferation of closed systems has triggered renewed debate about interoperability, user autonomy, and long-term value for manufacturers and end-users alike.
    Elegoo appears to be taking a middle-ground approach: providing automation and traceability features via RFID while maintaining support for third-party materials. In the Elegoo RFID Tag Guide, developers are encouraged to create and test custom tags, with detailed instructions and example code provided to the open-source community.
    Developer-centric rollout
    The Elegoo Saturn 4 Ultra, which serves as the first testbed for the RFID system, uses a dedicated RFID reader to retrieve data from tags affixed to resin bottles. These tags store encoded information such as resin name, type, batch number, and print profile metadata. The printer’s firmware can automatically sync this information with cloud-hosted slicer settings for optimal prints.
    According to the company, future updates may include compatibility with other Elegoo printers and additional features like usage history logging, tamper detection, and resin validation for regulatory compliance.
    Color scheme guide possibly used for tag classification or UI indication in Elegoo’s RFID material system. Image via Elegoo.
    A call for collaboration
    In its official blog post, Elegoo invited users, developers, and material manufacturers to contribute feedback and propose new applications. The company has not yet announced a formal launch date for the ecosystem or its associated hardware.
    Elegoo, known for its budget-friendly resin and FDM printers, has been expanding its R&D efforts in recent years. With the RFID ecosystem, it now joins other AM firms experimenting with embedded metadata and smart materials integration to support traceability, security, and ease of use.
    Interoperability and user autonomy
    The debate about open vs closed ecosystems has increasingly intensified in additive manufacturing discussions. For example, Bambu Lab’s controversial firmware update that introduced new authentication protocols, sparking concerns about third-party compatibility and user autonomy. Subsequent coverage highlighted pushback from the open-source community, including Orca Slicer developers, who rejected integration with Bambu Connect over transparency and access concerns. These cases underscore how interoperability is not only a technical issue, but a strategic and ideological one shaping the future of the AM sector.RFID in 3D printing
    While RFID integration is more common in logistics and supply chain management, researchers and companies are beginning to explore its potential in 3D printing. Scientists at Swinburne University developed biosensing RFID tags using 3D printed hybrid liquids, enabling applications in health diagnostics and environmental sensing. Meanwhile, materials firm Supernova unveiled a new resin cartridge system embedded with RFID to improve compatibility and process control in high-viscosity 3D printing platforms. These developments suggest that RFID could play a growing role in material authentication, traceability, and automated workflow management within additive manufacturing ecosystems.Subscribe to the 3D Printing Industry newsletter to keep up with the latest 3D printing news.
    You can also follow us onLinkedIn and subscribe to the 3D Printing Industry YouTube channel to access more exclusive content. At 3DPI, our mission is to deliver high-quality journalism, technical insight, and industry intelligence to professionals across the AM ecosystem.Help us shape the future of 3D printing industry news with our2025 reader survey.
    Featured image shows Elegoo RFID system displayed on a resin bottle, designed to communicate encoded material data to the printer. Image via Elegoo.
    #elegoo #launches #rfid #ecosystem #invites
    Elegoo launches RFID ecosystem, invites user feedback for material authentication system
    Shenzhen-based 3D printer manufacturer Elegoo has introduced a new RFID Ecosystem for its upcoming printer line, including the upcoming Elegoo Saturn 4 Ultra. This system integrates RFID-tagged resin bottles, an Elegoo-designed scanner, and cloud-connected print profiles. Elegoo has opened a public feedback solicitation on its website and GitHub page to refine the implementation and encourage community input. The company is currently testing several use cases, such as automatic profile loading, material usage tracking, and batch traceability. Elegoo says these features aim to streamline workflow, reduce errors, and assist in quality assurance. However, in a GitHub post, the company emphasized that its RFID system is optional and will not lock users into proprietary materials. An open approach to a closed-loop trend? The Elegoo RFID Ecosystem enters a broader conversation in the additive manufacturingindustry regarding material-locking strategies and proprietary ecosystems. As discussed in a recent 3D Printing Industry analysis, the proliferation of closed systems has triggered renewed debate about interoperability, user autonomy, and long-term value for manufacturers and end-users alike. Elegoo appears to be taking a middle-ground approach: providing automation and traceability features via RFID while maintaining support for third-party materials. In the Elegoo RFID Tag Guide, developers are encouraged to create and test custom tags, with detailed instructions and example code provided to the open-source community. Developer-centric rollout The Elegoo Saturn 4 Ultra, which serves as the first testbed for the RFID system, uses a dedicated RFID reader to retrieve data from tags affixed to resin bottles. These tags store encoded information such as resin name, type, batch number, and print profile metadata. The printer’s firmware can automatically sync this information with cloud-hosted slicer settings for optimal prints. According to the company, future updates may include compatibility with other Elegoo printers and additional features like usage history logging, tamper detection, and resin validation for regulatory compliance. Color scheme guide possibly used for tag classification or UI indication in Elegoo’s RFID material system. Image via Elegoo. A call for collaboration In its official blog post, Elegoo invited users, developers, and material manufacturers to contribute feedback and propose new applications. The company has not yet announced a formal launch date for the ecosystem or its associated hardware. Elegoo, known for its budget-friendly resin and FDM printers, has been expanding its R&D efforts in recent years. With the RFID ecosystem, it now joins other AM firms experimenting with embedded metadata and smart materials integration to support traceability, security, and ease of use. Interoperability and user autonomy The debate about open vs closed ecosystems has increasingly intensified in additive manufacturing discussions. For example, Bambu Lab’s controversial firmware update that introduced new authentication protocols, sparking concerns about third-party compatibility and user autonomy. Subsequent coverage highlighted pushback from the open-source community, including Orca Slicer developers, who rejected integration with Bambu Connect over transparency and access concerns. These cases underscore how interoperability is not only a technical issue, but a strategic and ideological one shaping the future of the AM sector.RFID in 3D printing While RFID integration is more common in logistics and supply chain management, researchers and companies are beginning to explore its potential in 3D printing. Scientists at Swinburne University developed biosensing RFID tags using 3D printed hybrid liquids, enabling applications in health diagnostics and environmental sensing. Meanwhile, materials firm Supernova unveiled a new resin cartridge system embedded with RFID to improve compatibility and process control in high-viscosity 3D printing platforms. These developments suggest that RFID could play a growing role in material authentication, traceability, and automated workflow management within additive manufacturing ecosystems.Subscribe to the 3D Printing Industry newsletter to keep up with the latest 3D printing news. You can also follow us onLinkedIn and subscribe to the 3D Printing Industry YouTube channel to access more exclusive content. At 3DPI, our mission is to deliver high-quality journalism, technical insight, and industry intelligence to professionals across the AM ecosystem.Help us shape the future of 3D printing industry news with our2025 reader survey. Featured image shows Elegoo RFID system displayed on a resin bottle, designed to communicate encoded material data to the printer. Image via Elegoo. #elegoo #launches #rfid #ecosystem #invites
    Elegoo launches RFID ecosystem, invites user feedback for material authentication system
    3dprintingindustry.com
    Shenzhen-based 3D printer manufacturer Elegoo has introduced a new RFID Ecosystem for its upcoming printer line, including the upcoming Elegoo Saturn 4 Ultra. This system integrates RFID-tagged resin bottles, an Elegoo-designed scanner, and cloud-connected print profiles. Elegoo has opened a public feedback solicitation on its website and GitHub page to refine the implementation and encourage community input. The company is currently testing several use cases, such as automatic profile loading, material usage tracking, and batch traceability. Elegoo says these features aim to streamline workflow, reduce errors, and assist in quality assurance. However, in a GitHub post, the company emphasized that its RFID system is optional and will not lock users into proprietary materials. An open approach to a closed-loop trend? The Elegoo RFID Ecosystem enters a broader conversation in the additive manufacturing (AM) industry regarding material-locking strategies and proprietary ecosystems. As discussed in a recent 3D Printing Industry analysis, the proliferation of closed systems has triggered renewed debate about interoperability, user autonomy, and long-term value for manufacturers and end-users alike. Elegoo appears to be taking a middle-ground approach: providing automation and traceability features via RFID while maintaining support for third-party materials. In the Elegoo RFID Tag Guide, developers are encouraged to create and test custom tags, with detailed instructions and example code provided to the open-source community. Developer-centric rollout The Elegoo Saturn 4 Ultra, which serves as the first testbed for the RFID system, uses a dedicated RFID reader to retrieve data from tags affixed to resin bottles. These tags store encoded information such as resin name, type, batch number, and print profile metadata. The printer’s firmware can automatically sync this information with cloud-hosted slicer settings for optimal prints. According to the company, future updates may include compatibility with other Elegoo printers and additional features like usage history logging, tamper detection, and resin validation for regulatory compliance. Color scheme guide possibly used for tag classification or UI indication in Elegoo’s RFID material system. Image via Elegoo. A call for collaboration In its official blog post, Elegoo invited users, developers, and material manufacturers to contribute feedback and propose new applications. The company has not yet announced a formal launch date for the ecosystem or its associated hardware. Elegoo, known for its budget-friendly resin and FDM printers, has been expanding its R&D efforts in recent years. With the RFID ecosystem, it now joins other AM firms experimenting with embedded metadata and smart materials integration to support traceability, security, and ease of use. Interoperability and user autonomy The debate about open vs closed ecosystems has increasingly intensified in additive manufacturing discussions. For example, Bambu Lab’s controversial firmware update that introduced new authentication protocols, sparking concerns about third-party compatibility and user autonomy. Subsequent coverage highlighted pushback from the open-source community, including Orca Slicer developers, who rejected integration with Bambu Connect over transparency and access concerns. These cases underscore how interoperability is not only a technical issue, but a strategic and ideological one shaping the future of the AM sector.RFID in 3D printing While RFID integration is more common in logistics and supply chain management, researchers and companies are beginning to explore its potential in 3D printing. Scientists at Swinburne University developed biosensing RFID tags using 3D printed hybrid liquids, enabling applications in health diagnostics and environmental sensing. Meanwhile, materials firm Supernova unveiled a new resin cartridge system embedded with RFID to improve compatibility and process control in high-viscosity 3D printing platforms. These developments suggest that RFID could play a growing role in material authentication, traceability, and automated workflow management within additive manufacturing ecosystems.Subscribe to the 3D Printing Industry newsletter to keep up with the latest 3D printing news. You can also follow us onLinkedIn and subscribe to the 3D Printing Industry YouTube channel to access more exclusive content. At 3DPI, our mission is to deliver high-quality journalism, technical insight, and industry intelligence to professionals across the AM ecosystem.Help us shape the future of 3D printing industry news with our2025 reader survey. Featured image shows Elegoo RFID system displayed on a resin bottle, designed to communicate encoded material data to the printer. Image via Elegoo.
    0 Комментарии ·0 Поделились ·0 предпросмотр
  • SLICED: Latest news from the 3D Printing Industry

    In this edition of SLICED, the 3D Printing Industry news digest, we compile the latest developments across the additive manufacturingsector, including equipment-sharing partnerships, market expansions in Europe and Mexico, and new standards working groups.
    Today’s edition features reseller appointments, research consortium launches, large-format platform integrations, dental appliance automation, and calls for conference speakers.
    Read on for updates from AM 4 AM, Meltio, One Click Metal, Axtra3D, Nikon SLM Solutions, Formnext 2025, and more.
    Emerging partnerships from AM 4 AM, and Meltio
    Kicking off with partnerships, Luxembourg’s materials R&D firm AM 4 AM has partnered with Stockholm aluminum powder supplier Gränges Powder Metallurgy, relocating the Swedish supplier’s materials characterization park to AM 4 AM’s facility. Under the agreement, AM 4 AM will operate GPM’s particle size analyzers, thermal testers, and mechanical-testing rigs to accelerate development cycles and strengthen quality control across both companies’ product lines.
    AM 4 AM Co-founder Maxime Delmée noted that access to GPM’s instrumentation will enable faster iteration and more data-driven decision-making. Highlighting benefits, GPM Managing Director Peter Vikner explained that relocating the equipment to AM 4 AM addressed both firms’ R&D requirements while leveraging AM 4 AM’s operational capabilities.
    Moving on, Spanish wire-laser metal 3D printer manufacturer Meltio has announced partnerships with Monterrey-based service provider Alar, and academic institution  Tecnológico de Monterrey.With this move, Alar will integrate the award-winning M600 industrial wire-laser 3D printer into its production lines, while the institution has acquired a Meltio M450 for academic training and industry collaboration. 
    Additionally, the Spanish manufacturer has also announced additive manufacturing integrator Sitres Latam as its official distributor. Meltio’s wire-feed deposition process, which supports stainless steel, titanium, Inconel, and copper, offers mechanical properties on par with conventionally manufactured parts while reducing waste and emissions. “This alliance with Sitres, Alar, and Tecnológico de Monterrey is fundamental to promoting real and functional metal 3D printing solutions in Mexico,” said Alar CEO Andrea Alarcón.
    Meltio partners with Alar, SITRES, and Tecnológico de Monterrey to expand metal 3D printing capabilities in Mexico. Photo via Meltio.
    One Click Metal and Axtra3D Appoint New Resellers in Iberia
    Turning to resellers and distribution, German metal 3D printing systems developer One Click Metal has expanded into Portugal through a collaboration with Lisbon’s industrial additive manufacturing services provider 3D Ever. The agreement gives local businesses direct access to One Click Metal’s cartridge-based powder handling systems and Lab Module for rapid material changes, alongside region-specific training and post-installation support.
    Founded in 2017, 3D Ever operates a multi-technology showroom—covering covering stereolithography, selective laser sintering, fused filament fabrication, and direct metal laser sintering—and hosts open-house events and technical workshops to integrate 3D printing into customer workflows. “Portugal is a dynamic market for additive manufacturing,” said One Click Metal’s Global Sales Director Martin Heller, “and 3D Ever’s deep industry knowledge makes them the ideal partner.”
    Meanwhile, Milan-based photopolymer 3D printer innovator Axtra3D has named Spain and Portugal’s Maquinser S.A. as its professional reseller for Hi-Speed SLA systems. Maquinser will showcase the Lumia X1 platform combining Hybrid PhotoSynthesis and TruLayer technologies at three major industry events through June: the International Machine-Tool Fairin Porto, Portugal; the Subcontratación Industrial & Addit3D expo in Bilbao, Spain; and the MindTECH manufacturing technology fair in Porto.
    “Axtra3D’s Hi-Speed SLA strikes the balance between surface quality, precision, and material flexibility,” said Maquinser CEO Christian Postigo. Andreas Tulaj, SVP Europe Sales at Axtra3D, added that Maquinser’s regional presence ensures localized support, rapid deployment, and customer-specific solutions across automotive, aerospace, energy, and mold-making sectors.
    Axtra3D appoints Maquinser S.A. as official reseller for Spain and Portugal. Image via Maquinser.
    3MF Consortium and Ecosistema GO! Launch AM Research Initiatives
    On the research corner, the Microsoft-backed standards organization 3MF Consortium has formed a 6-Axis Toolpath Working Group to define open data structures for robotic and multi-axis AM workflows. The effort invites professionals using industrial robots and advanced CNC platforms to develop a 3MF extension that encodes non-planar toolpath data, enabling seamless interoperability across design, toolpath generation, and machine control software.
    Originally created to surpass STL and OBJ for complex manufacturing data, the 3MF format already supports units, materials, lattices, slice data, and metadata. This new working group will build on modules like the Beam Lattice Extension to integrate multi-axis motion paths, with open-source reference implementations available via the consortium’s GitHub repository.
    Elsewhere in Europe, Spain’s Centre for the Development of Industrial Technology-backed Ecosistema GO! Projecthas launched to map national AM capabilities and drive industrial adoption. The initiative will publish a structured “map of capabilities” covering infrastructure, specialization areas, and R&D projects, while hosting workshops in automotive, energy, and aerospace to share success stories and define adoption strategies.
    “Ecosistema GO! aligns capabilities, generates synergies, and accelerates AM’s real incorporation into Spanish industry,” said IAM3DHUB General Secretary David Adrover. Open for new members through December 2025, the consortium aims to serve as Spain’s reference network for additive manufacturing.
    The 3MF Consortium invites participants to join its newly launched 6-Axis Toolpath Working Group. Image via 3MF Consortium.
    Dental Production Boosted by DMP Flex 200 Integration at DynaFlex
    In dental applications, U.S. orthodontic manufacturer DynaFlex has upgraded its digital workflow with the DMP Flex 200 metal 3D printer from 3D Systems, supplied and installed by their official supplier Nota3D. Featuring a 500 W laser and enlarged build platform, the system has increased DynaFlex’s production speeds by up to 80% for small custom components such as fixed appliances and bands.
    Matt Malabey, DynaFlex’s Director of Operations, noted that integrated software for orientation, nesting, and support generation further streamlines workflow: “Automation tools and improved onboarding allow us to scale smarter and faster.” The Flex 200 supports LaserForm CoCr, Stainless Steel 316 L, and Ti Gr23 alloys, aligning material properties with clinical performance standards.
    Prusa Research Opens EasyPrint to All Mobile Users
    Shifting to software, Czech desktop 3D printer maker Prusa Research has launched EasyPrint, a cloud-powered slicer embedded in the official PRUSA mobile app and accessible via Printables.com. It lets users prepare and send G-code directly from smartphones and tablets, automatically detecting compatible printers and applying the correct print profiles. An interactive 3D preview allows models to be moved, rotated, scaled and batch-arranged on virtual beds, while basic settings such as copy count and object size are consolidated into a one-click workflow. EasyPrint began as an invite-only beta used to collect performance metrics and optimize scalability before opening to everyone once preliminary tests proved the service smooth, according to Ondřej Drebota, Prusa’s Head of Country Development Managers & Partnerships Manager. All G-code generation runs in the cloud, enabling even low-powered devices to handle complex workflows, and users can download prepared files for offline printing. Prusa plans to extend EasyPrint compatibility to non-Prusa printers in future updates, broadening its reach across the 3D printing community.
    Nikon SLM Solutions and DynaFlex Upgrade Metal AM Workflow
    On 3D platform news, German metal 3D printer manufacturer Nikon SLM Solutions has integrated Freiburg’s automated depowdering specialist Solukon’s SFM-AT1500-S system at its Long Beach, California AM Technology Center. Paired to German manufacturer’s NXG 600E large-format 3D printer, the SPR-Pathfinder-driven unit handles parts up to 1,500 mm tall and 2,100 kg total weight, automating powder removal for industrial-scale metal components.
    Nikon SLM Solutions’ COO Gerhard Bierleutgeb stressed the importance of closely linking printing and automated depowdering for optimal production flow. Solukon’s CTO Andreas Hartmann added that the SFM-AT1500-S was custom-engineered to meet Nikon’s requirements for high-mass, complex geometries while maintaining a compact installation footprint.
    Andreas Hartmann, CEO/CTO of Solukon, and Joshua Forster, Production Manager at Nikon SLM Solutions. Photo via Solukon.
    Formnext 2025 Announces Call for Speakers
    Looking ahead to events, Germany’s trade-fair organizer Mesago Messe Frankfurt GmbH has opened its call for speakers for the upcoming Formnext 2025, to be held November 18-21 in Frankfurt. Submissions for the Industry Stageand the Application Stageremain open through June.
    Mesago’s Vice President Christoph Stüker explained that the multistage program is central to Formnext’s mission of disseminating AM knowledge and driving new applications. Additionally, Vice President Sascha F. Wenzler noted that the speaking slots offer an ideal platform for experts to share insights, build their profiles, and forge valuable industry connections.
    Adding to that, materials supplier participation at Formnext Asia Shenzhen 2025 has jumped 68% year-on-year, with booth bookings already at 70% capacity for the 26–28 August event at Shenzhen World Exhibition & Convention Center. The expanded materials segment, now covering advanced polymers, composites and specialised alloys, will feature over 30 exhibitors in metal powders, ceramicsand polymers. 
    Louis Leung, Deputy General Manager of Guangzhou Guangya Messe Frankfurt, highlighted China’s rapid ascent as an AM leader, noting that national policy support and investment have fuelled double-digit growth in the domestic materials sector. Fringe activities include the 3D Print Farm Conference on filament supply chains and an expanded Laser & AM Forum, while related events, Formnext Asia Forum Tokyoand Formnext Frankfurt round out the global network. Exhibitor registrations remain open online.
    A panel discussion recorded live at the Industry Stage during Formnext 2024. Photo via Formnext/Mesago Messe Frankfurt GmbH.
    Take the 3DPI Reader Survey — shape the future of AM reporting in under 5 minutes.
    Ready to discover who won the 20243D Printing Industry Awards?
    Subscribe to the 3D Printing Industry newsletter to stay updated with the latest news and insights.
    Featured image shows a panel discussion recorded live at the Industry Stage during Formnext 2024. Photo via Formnext/Mesago Messe Frankfurt GmbH.

    Anyer Tenorio Lara
    Anyer Tenorio Lara is an emerging tech journalist passionate about uncovering the latest advances in technology and innovation. With a sharp eye for detail and a talent for storytelling, Anyer has quickly made a name for himself in the tech community. Anyer's articles aim to make complex subjects accessible and engaging for a broad audience. In addition to his writing, Anyer enjoys participating in industry events and discussions, eager to learn and share knowledge in the dynamic world of technology.
    #sliced #latest #news #printing #industry
    SLICED: Latest news from the 3D Printing Industry
    In this edition of SLICED, the 3D Printing Industry news digest, we compile the latest developments across the additive manufacturingsector, including equipment-sharing partnerships, market expansions in Europe and Mexico, and new standards working groups. Today’s edition features reseller appointments, research consortium launches, large-format platform integrations, dental appliance automation, and calls for conference speakers. Read on for updates from AM 4 AM, Meltio, One Click Metal, Axtra3D, Nikon SLM Solutions, Formnext 2025, and more. Emerging partnerships from AM 4 AM, and Meltio Kicking off with partnerships, Luxembourg’s materials R&D firm AM 4 AM has partnered with Stockholm aluminum powder supplier Gränges Powder Metallurgy, relocating the Swedish supplier’s materials characterization park to AM 4 AM’s facility. Under the agreement, AM 4 AM will operate GPM’s particle size analyzers, thermal testers, and mechanical-testing rigs to accelerate development cycles and strengthen quality control across both companies’ product lines. AM 4 AM Co-founder Maxime Delmée noted that access to GPM’s instrumentation will enable faster iteration and more data-driven decision-making. Highlighting benefits, GPM Managing Director Peter Vikner explained that relocating the equipment to AM 4 AM addressed both firms’ R&D requirements while leveraging AM 4 AM’s operational capabilities. Moving on, Spanish wire-laser metal 3D printer manufacturer Meltio has announced partnerships with Monterrey-based service provider Alar, and academic institution  Tecnológico de Monterrey.With this move, Alar will integrate the award-winning M600 industrial wire-laser 3D printer into its production lines, while the institution has acquired a Meltio M450 for academic training and industry collaboration.  Additionally, the Spanish manufacturer has also announced additive manufacturing integrator Sitres Latam as its official distributor. Meltio’s wire-feed deposition process, which supports stainless steel, titanium, Inconel, and copper, offers mechanical properties on par with conventionally manufactured parts while reducing waste and emissions. “This alliance with Sitres, Alar, and Tecnológico de Monterrey is fundamental to promoting real and functional metal 3D printing solutions in Mexico,” said Alar CEO Andrea Alarcón. Meltio partners with Alar, SITRES, and Tecnológico de Monterrey to expand metal 3D printing capabilities in Mexico. Photo via Meltio. One Click Metal and Axtra3D Appoint New Resellers in Iberia Turning to resellers and distribution, German metal 3D printing systems developer One Click Metal has expanded into Portugal through a collaboration with Lisbon’s industrial additive manufacturing services provider 3D Ever. The agreement gives local businesses direct access to One Click Metal’s cartridge-based powder handling systems and Lab Module for rapid material changes, alongside region-specific training and post-installation support. Founded in 2017, 3D Ever operates a multi-technology showroom—covering covering stereolithography, selective laser sintering, fused filament fabrication, and direct metal laser sintering—and hosts open-house events and technical workshops to integrate 3D printing into customer workflows. “Portugal is a dynamic market for additive manufacturing,” said One Click Metal’s Global Sales Director Martin Heller, “and 3D Ever’s deep industry knowledge makes them the ideal partner.” Meanwhile, Milan-based photopolymer 3D printer innovator Axtra3D has named Spain and Portugal’s Maquinser S.A. as its professional reseller for Hi-Speed SLA systems. Maquinser will showcase the Lumia X1 platform combining Hybrid PhotoSynthesis and TruLayer technologies at three major industry events through June: the International Machine-Tool Fairin Porto, Portugal; the Subcontratación Industrial & Addit3D expo in Bilbao, Spain; and the MindTECH manufacturing technology fair in Porto. “Axtra3D’s Hi-Speed SLA strikes the balance between surface quality, precision, and material flexibility,” said Maquinser CEO Christian Postigo. Andreas Tulaj, SVP Europe Sales at Axtra3D, added that Maquinser’s regional presence ensures localized support, rapid deployment, and customer-specific solutions across automotive, aerospace, energy, and mold-making sectors. Axtra3D appoints Maquinser S.A. as official reseller for Spain and Portugal. Image via Maquinser. 3MF Consortium and Ecosistema GO! Launch AM Research Initiatives On the research corner, the Microsoft-backed standards organization 3MF Consortium has formed a 6-Axis Toolpath Working Group to define open data structures for robotic and multi-axis AM workflows. The effort invites professionals using industrial robots and advanced CNC platforms to develop a 3MF extension that encodes non-planar toolpath data, enabling seamless interoperability across design, toolpath generation, and machine control software. Originally created to surpass STL and OBJ for complex manufacturing data, the 3MF format already supports units, materials, lattices, slice data, and metadata. This new working group will build on modules like the Beam Lattice Extension to integrate multi-axis motion paths, with open-source reference implementations available via the consortium’s GitHub repository. Elsewhere in Europe, Spain’s Centre for the Development of Industrial Technology-backed Ecosistema GO! Projecthas launched to map national AM capabilities and drive industrial adoption. The initiative will publish a structured “map of capabilities” covering infrastructure, specialization areas, and R&D projects, while hosting workshops in automotive, energy, and aerospace to share success stories and define adoption strategies. “Ecosistema GO! aligns capabilities, generates synergies, and accelerates AM’s real incorporation into Spanish industry,” said IAM3DHUB General Secretary David Adrover. Open for new members through December 2025, the consortium aims to serve as Spain’s reference network for additive manufacturing. The 3MF Consortium invites participants to join its newly launched 6-Axis Toolpath Working Group. Image via 3MF Consortium. Dental Production Boosted by DMP Flex 200 Integration at DynaFlex In dental applications, U.S. orthodontic manufacturer DynaFlex has upgraded its digital workflow with the DMP Flex 200 metal 3D printer from 3D Systems, supplied and installed by their official supplier Nota3D. Featuring a 500 W laser and enlarged build platform, the system has increased DynaFlex’s production speeds by up to 80% for small custom components such as fixed appliances and bands. Matt Malabey, DynaFlex’s Director of Operations, noted that integrated software for orientation, nesting, and support generation further streamlines workflow: “Automation tools and improved onboarding allow us to scale smarter and faster.” The Flex 200 supports LaserForm CoCr, Stainless Steel 316 L, and Ti Gr23 alloys, aligning material properties with clinical performance standards. Prusa Research Opens EasyPrint to All Mobile Users Shifting to software, Czech desktop 3D printer maker Prusa Research has launched EasyPrint, a cloud-powered slicer embedded in the official PRUSA mobile app and accessible via Printables.com. It lets users prepare and send G-code directly from smartphones and tablets, automatically detecting compatible printers and applying the correct print profiles. An interactive 3D preview allows models to be moved, rotated, scaled and batch-arranged on virtual beds, while basic settings such as copy count and object size are consolidated into a one-click workflow. EasyPrint began as an invite-only beta used to collect performance metrics and optimize scalability before opening to everyone once preliminary tests proved the service smooth, according to Ondřej Drebota, Prusa’s Head of Country Development Managers & Partnerships Manager. All G-code generation runs in the cloud, enabling even low-powered devices to handle complex workflows, and users can download prepared files for offline printing. Prusa plans to extend EasyPrint compatibility to non-Prusa printers in future updates, broadening its reach across the 3D printing community. Nikon SLM Solutions and DynaFlex Upgrade Metal AM Workflow On 3D platform news, German metal 3D printer manufacturer Nikon SLM Solutions has integrated Freiburg’s automated depowdering specialist Solukon’s SFM-AT1500-S system at its Long Beach, California AM Technology Center. Paired to German manufacturer’s NXG 600E large-format 3D printer, the SPR-Pathfinder-driven unit handles parts up to 1,500 mm tall and 2,100 kg total weight, automating powder removal for industrial-scale metal components. Nikon SLM Solutions’ COO Gerhard Bierleutgeb stressed the importance of closely linking printing and automated depowdering for optimal production flow. Solukon’s CTO Andreas Hartmann added that the SFM-AT1500-S was custom-engineered to meet Nikon’s requirements for high-mass, complex geometries while maintaining a compact installation footprint. Andreas Hartmann, CEO/CTO of Solukon, and Joshua Forster, Production Manager at Nikon SLM Solutions. Photo via Solukon. Formnext 2025 Announces Call for Speakers Looking ahead to events, Germany’s trade-fair organizer Mesago Messe Frankfurt GmbH has opened its call for speakers for the upcoming Formnext 2025, to be held November 18-21 in Frankfurt. Submissions for the Industry Stageand the Application Stageremain open through June. Mesago’s Vice President Christoph Stüker explained that the multistage program is central to Formnext’s mission of disseminating AM knowledge and driving new applications. Additionally, Vice President Sascha F. Wenzler noted that the speaking slots offer an ideal platform for experts to share insights, build their profiles, and forge valuable industry connections. Adding to that, materials supplier participation at Formnext Asia Shenzhen 2025 has jumped 68% year-on-year, with booth bookings already at 70% capacity for the 26–28 August event at Shenzhen World Exhibition & Convention Center. The expanded materials segment, now covering advanced polymers, composites and specialised alloys, will feature over 30 exhibitors in metal powders, ceramicsand polymers.  Louis Leung, Deputy General Manager of Guangzhou Guangya Messe Frankfurt, highlighted China’s rapid ascent as an AM leader, noting that national policy support and investment have fuelled double-digit growth in the domestic materials sector. Fringe activities include the 3D Print Farm Conference on filament supply chains and an expanded Laser & AM Forum, while related events, Formnext Asia Forum Tokyoand Formnext Frankfurt round out the global network. Exhibitor registrations remain open online. A panel discussion recorded live at the Industry Stage during Formnext 2024. Photo via Formnext/Mesago Messe Frankfurt GmbH. Take the 3DPI Reader Survey — shape the future of AM reporting in under 5 minutes. Ready to discover who won the 20243D Printing Industry Awards? Subscribe to the 3D Printing Industry newsletter to stay updated with the latest news and insights. Featured image shows a panel discussion recorded live at the Industry Stage during Formnext 2024. Photo via Formnext/Mesago Messe Frankfurt GmbH. Anyer Tenorio Lara Anyer Tenorio Lara is an emerging tech journalist passionate about uncovering the latest advances in technology and innovation. With a sharp eye for detail and a talent for storytelling, Anyer has quickly made a name for himself in the tech community. Anyer's articles aim to make complex subjects accessible and engaging for a broad audience. In addition to his writing, Anyer enjoys participating in industry events and discussions, eager to learn and share knowledge in the dynamic world of technology. #sliced #latest #news #printing #industry
    SLICED: Latest news from the 3D Printing Industry
    3dprintingindustry.com
    In this edition of SLICED, the 3D Printing Industry news digest, we compile the latest developments across the additive manufacturing (AM) sector, including equipment-sharing partnerships, market expansions in Europe and Mexico, and new standards working groups. Today’s edition features reseller appointments, research consortium launches, large-format platform integrations, dental appliance automation, and calls for conference speakers. Read on for updates from AM 4 AM, Meltio, One Click Metal, Axtra3D, Nikon SLM Solutions, Formnext 2025, and more. Emerging partnerships from AM 4 AM, and Meltio Kicking off with partnerships, Luxembourg’s materials R&D firm AM 4 AM has partnered with Stockholm aluminum powder supplier Gränges Powder Metallurgy (GPM), relocating the Swedish supplier’s materials characterization park to AM 4 AM’s facility. Under the agreement, AM 4 AM will operate GPM’s particle size analyzers, thermal testers, and mechanical-testing rigs to accelerate development cycles and strengthen quality control across both companies’ product lines. AM 4 AM Co-founder Maxime Delmée noted that access to GPM’s instrumentation will enable faster iteration and more data-driven decision-making. Highlighting benefits, GPM Managing Director Peter Vikner explained that relocating the equipment to AM 4 AM addressed both firms’ R&D requirements while leveraging AM 4 AM’s operational capabilities. Moving on, Spanish wire-laser metal 3D printer manufacturer Meltio has announced partnerships with Monterrey-based service provider Alar, and academic institution  Tecnológico de Monterrey.With this move, Alar will integrate the award-winning M600 industrial wire-laser 3D printer into its production lines, while the institution has acquired a Meltio M450 for academic training and industry collaboration.  Additionally, the Spanish manufacturer has also announced additive manufacturing integrator Sitres Latam as its official distributor. Meltio’s wire-feed deposition process, which supports stainless steel, titanium, Inconel, and copper, offers mechanical properties on par with conventionally manufactured parts while reducing waste and emissions. “This alliance with Sitres, Alar, and Tecnológico de Monterrey is fundamental to promoting real and functional metal 3D printing solutions in Mexico,” said Alar CEO Andrea Alarcón. Meltio partners with Alar, SITRES, and Tecnológico de Monterrey to expand metal 3D printing capabilities in Mexico. Photo via Meltio. One Click Metal and Axtra3D Appoint New Resellers in Iberia Turning to resellers and distribution, German metal 3D printing systems developer One Click Metal has expanded into Portugal through a collaboration with Lisbon’s industrial additive manufacturing services provider 3D Ever. The agreement gives local businesses direct access to One Click Metal’s cartridge-based powder handling systems and Lab Module for rapid material changes, alongside region-specific training and post-installation support. Founded in 2017, 3D Ever operates a multi-technology showroom—covering covering stereolithography (SLA), selective laser sintering (SLS), fused filament fabrication (FFF), and direct metal laser sintering (DMLS)—and hosts open-house events and technical workshops to integrate 3D printing into customer workflows. “Portugal is a dynamic market for additive manufacturing,” said One Click Metal’s Global Sales Director Martin Heller, “and 3D Ever’s deep industry knowledge makes them the ideal partner.” Meanwhile, Milan-based photopolymer 3D printer innovator Axtra3D has named Spain and Portugal’s Maquinser S.A. as its professional reseller for Hi-Speed SLA systems. Maquinser will showcase the Lumia X1 platform combining Hybrid PhotoSynthesis and TruLayer technologies at three major industry events through June: the International Machine-Tool Fair (EMAF) in Porto, Portugal; the Subcontratación Industrial & Addit3D expo in Bilbao, Spain; and the MindTECH manufacturing technology fair in Porto. “Axtra3D’s Hi-Speed SLA strikes the balance between surface quality, precision, and material flexibility,” said Maquinser CEO Christian Postigo. Andreas Tulaj, SVP Europe Sales at Axtra3D, added that Maquinser’s regional presence ensures localized support, rapid deployment, and customer-specific solutions across automotive, aerospace, energy, and mold-making sectors. Axtra3D appoints Maquinser S.A. as official reseller for Spain and Portugal. Image via Maquinser. 3MF Consortium and Ecosistema GO! Launch AM Research Initiatives On the research corner, the Microsoft-backed standards organization 3MF Consortium has formed a 6-Axis Toolpath Working Group to define open data structures for robotic and multi-axis AM workflows. The effort invites professionals using industrial robots and advanced CNC platforms to develop a 3MF extension that encodes non-planar toolpath data, enabling seamless interoperability across design, toolpath generation, and machine control software. Originally created to surpass STL and OBJ for complex manufacturing data, the 3MF format already supports units, materials, lattices, slice data, and metadata. This new working group will build on modules like the Beam Lattice Extension to integrate multi-axis motion paths, with open-source reference implementations available via the consortium’s GitHub repository. Elsewhere in Europe, Spain’s Centre for the Development of Industrial Technology (CDTI)-backed Ecosistema GO! Project (coordinated by Leitat with partners Aitiip, Idonial, Aimen, Addimat, HP, and Meltio) has launched to map national AM capabilities and drive industrial adoption. The initiative will publish a structured “map of capabilities” covering infrastructure, specialization areas, and R&D projects, while hosting workshops in automotive, energy, and aerospace to share success stories and define adoption strategies. “Ecosistema GO! aligns capabilities, generates synergies, and accelerates AM’s real incorporation into Spanish industry,” said IAM3DHUB General Secretary David Adrover. Open for new members through December 2025, the consortium aims to serve as Spain’s reference network for additive manufacturing. The 3MF Consortium invites participants to join its newly launched 6-Axis Toolpath Working Group. Image via 3MF Consortium. Dental Production Boosted by DMP Flex 200 Integration at DynaFlex In dental applications, U.S. orthodontic manufacturer DynaFlex has upgraded its digital workflow with the DMP Flex 200 metal 3D printer from 3D Systems, supplied and installed by their official supplier Nota3D. Featuring a 500 W laser and enlarged build platform, the system has increased DynaFlex’s production speeds by up to 80% for small custom components such as fixed appliances and bands. Matt Malabey, DynaFlex’s Director of Operations, noted that integrated software for orientation, nesting, and support generation further streamlines workflow: “Automation tools and improved onboarding allow us to scale smarter and faster.” The Flex 200 supports LaserForm CoCr, Stainless Steel 316 L, and Ti Gr23 alloys, aligning material properties with clinical performance standards. Prusa Research Opens EasyPrint to All Mobile Users Shifting to software, Czech desktop 3D printer maker Prusa Research has launched EasyPrint, a cloud-powered slicer embedded in the official PRUSA mobile app and accessible via Printables.com. It lets users prepare and send G-code directly from smartphones and tablets, automatically detecting compatible printers and applying the correct print profiles. An interactive 3D preview allows models to be moved, rotated, scaled and batch-arranged on virtual beds, while basic settings such as copy count and object size are consolidated into a one-click workflow. EasyPrint began as an invite-only beta used to collect performance metrics and optimize scalability before opening to everyone once preliminary tests proved the service smooth, according to Ondřej Drebota, Prusa’s Head of Country Development Managers & Partnerships Manager. All G-code generation runs in the cloud, enabling even low-powered devices to handle complex workflows, and users can download prepared files for offline printing. Prusa plans to extend EasyPrint compatibility to non-Prusa printers in future updates, broadening its reach across the 3D printing community. Nikon SLM Solutions and DynaFlex Upgrade Metal AM Workflow On 3D platform news, German metal 3D printer manufacturer Nikon SLM Solutions has integrated Freiburg’s automated depowdering specialist Solukon’s SFM-AT1500-S system at its Long Beach, California AM Technology Center. Paired to German manufacturer’s NXG 600E large-format 3D printer, the SPR-Pathfinder-driven unit handles parts up to 1,500 mm tall and 2,100 kg total weight, automating powder removal for industrial-scale metal components. Nikon SLM Solutions’ COO Gerhard Bierleutgeb stressed the importance of closely linking printing and automated depowdering for optimal production flow. Solukon’s CTO Andreas Hartmann added that the SFM-AT1500-S was custom-engineered to meet Nikon’s requirements for high-mass, complex geometries while maintaining a compact installation footprint. Andreas Hartmann, CEO/CTO of Solukon, and Joshua Forster, Production Manager at Nikon SLM Solutions. Photo via Solukon. Formnext 2025 Announces Call for Speakers Looking ahead to events, Germany’s trade-fair organizer Mesago Messe Frankfurt GmbH has opened its call for speakers for the upcoming Formnext 2025, to be held November 18-21 in Frankfurt. Submissions for the Industry Stage (covering sustainability, AI, standards, and talent) and the Application Stage (focusing on sectors like automotive, aerospace, and medical) remain open through June. Mesago’s Vice President Christoph Stüker explained that the multistage program is central to Formnext’s mission of disseminating AM knowledge and driving new applications. Additionally, Vice President Sascha F. Wenzler noted that the speaking slots offer an ideal platform for experts to share insights, build their profiles, and forge valuable industry connections. Adding to that, materials supplier participation at Formnext Asia Shenzhen 2025 has jumped 68% year-on-year, with booth bookings already at 70% capacity for the 26–28 August event at Shenzhen World Exhibition & Convention Center. The expanded materials segment, now covering advanced polymers, composites and specialised alloys, will feature over 30 exhibitors in metal powders (including Acc Material, JSJW New Material and Tiangong Technology), ceramics (Wuhan 3DCERAM, Nanoe France) and polymers (eSUN, SUNLU).  Louis Leung, Deputy General Manager of Guangzhou Guangya Messe Frankfurt, highlighted China’s rapid ascent as an AM leader, noting that national policy support and investment have fuelled double-digit growth in the domestic materials sector. Fringe activities include the 3D Print Farm Conference on filament supply chains and an expanded Laser & AM Forum, while related events, Formnext Asia Forum Tokyo (25-6 September) and Formnext Frankfurt round out the global network. Exhibitor registrations remain open online. A panel discussion recorded live at the Industry Stage during Formnext 2024. Photo via Formnext/Mesago Messe Frankfurt GmbH. Take the 3DPI Reader Survey — shape the future of AM reporting in under 5 minutes. Ready to discover who won the 20243D Printing Industry Awards? Subscribe to the 3D Printing Industry newsletter to stay updated with the latest news and insights. Featured image shows a panel discussion recorded live at the Industry Stage during Formnext 2024. Photo via Formnext/Mesago Messe Frankfurt GmbH. Anyer Tenorio Lara Anyer Tenorio Lara is an emerging tech journalist passionate about uncovering the latest advances in technology and innovation. With a sharp eye for detail and a talent for storytelling, Anyer has quickly made a name for himself in the tech community. Anyer's articles aim to make complex subjects accessible and engaging for a broad audience. In addition to his writing, Anyer enjoys participating in industry events and discussions, eager to learn and share knowledge in the dynamic world of technology.
    0 Комментарии ·0 Поделились ·0 предпросмотр
  • Excel for Microsoft 365 cheat sheet

    Windows may get all the attention, but when you want to get real work done, you turn to the applications that run on it. And if you use spreadsheets, that generally means Excel.

    Excel is, of course, part of Microsoft’s Office suite of productivity tools. Microsoft sells Office under two models: Individuals and businesses can pay for the software license up front and own it forever, or they can purchase a Microsoft 365 subscription, which means they have access to the software for only as long as they keep paying the subscription fee.

    When you purchase a perpetual version of the suite — say, Office 2021 or Office 2024 — its applications will never get new features, whereas Microsoft 365 apps are continually updated with new features. For more details, see our in-depth comparison of the two Office models.

    This cheat sheet gets you up to speed on the features that have been introduced or changed in Microsoft 365’s Excel for Windows desktop client over the past few years.We’ll periodically update this story as new features roll out.

    In this article

    Use the Ribbon

    Search to get tasks done quickly

    Explore Excel’s advanced chart types

    Collaborate in real time

    Take advantage of linked data

    Make your own custom views of a worksheet

    Create dynamic arrays and charts

    Use AutoSave to provide a safety net as you work

    Review or restore earlier versions of a spreadsheet

    Try out Microsoft 365 Copilot in Excel — but don’t expect too much

    Other new features to check out

    Use keyboard shortcuts

    Use the Ribbon

    The Ribbon interface, which puts commonly used commands in a tabbed toolbar running across the top of the application window, is alive and well in the current version of Excel. Microsoft has tweaked the Ribbon’s looks numerous times over the years, but it still works the same way it always has: just click one of the Ribbon’s tabs to see related commands on the toolbar. For example, click Insert to find buttons for inserting tables, PivotTables, charts, and more.

    Through the years, Excel’s Ribbon has gotten a variety of cosmetic changes, but it still works largely the way it always has.
    Preston Gralla / Foundry

    Just as in previous versions of Excel, if you want the Ribbon commands to go away, press Ctrl-F1 or click the name of the tab you’re currently on.To make the commands reappear, press Ctrl-F1 again or click any tab name.

    You’ve got other options for displaying the Ribbon as well. To get to them, click the Ribbon display options iconon the bottom of the Ribbon at the far right, just below the Share button. A drop-down menu appears with these four options:

    Full-screen mode: This makes Excel take up your entire screen and hides the Ribbon. To get out of full-screen mode, click the three-dot icon at the upper right of the screen.

    Show tabs only: This shows the tabs but hides the commands underneath them. It’s the same as pressing Ctrl-F1. To display the commands underneath the tabs when they’re hidden, press Ctrl-F1, click a tab, or click the Ribbon display options down arrow and select Always show Ribbon.

    Always show Ribbon: This displays the entire Ribbon, both the tabs and commands underneath them.

    Show/Hide Quick Access toolbar: This displays or hides the Quick Access toolbar, which gives you fast access to Excel commands you want to have available no matter which tab you’re on. When you enable the toolbar, it starts off empty. To populate it, click a small down arrow that appears at the right of the toolbar and from the drop-down menu that appears, choose which features to put on it. If you don’t see a command you want, click More Commands. Find the command you want on the left and click Add.

    You can have the toolbar appear either at the top of the screen, just to the right of the AutoSave button, or just underneath the Ribbon. To move it from one place to another, click a small down arrow that appears at the right of the toolbar and from the drop-down menu that appears, select either Show below the Ribbon or Show above the Ribbon. 

    Microsoft has for many years teased a simplified version of the Ribbon that hides most of the commands to reduce clutter. That simplified Ribbon is available in the Excel web app, but there’s currently no sign that it will appear in the Excel desktop app.

    There’s a useful feature in what Microsoft calls the backstage area that appears when you click the File tab on the Ribbon. If you click Open or a Copy from the menu on the left, you can see the cloud-based services you’ve connected to your Office account, such as SharePoint and OneDrive. Each location displays its associated email address underneath it. This is quite helpful if you use a cloud service with more than one account, such as if you have one OneDrive account for personal use and another one for business. You’ll be able to see at a glance which is which.

    Click the Add a service dropdown to add another cloud storage account.
    Preston Gralla / Foundry

    Search to get tasks done quickly

    Excel has never been the most user-friendly of applications, and it has so many powerful features it can be tough to keep track of them all. That’s where the handy Search feature comes in.

    To use it, click in the Search box — it’s above the Ribbon in the green title area.Then type in a task you want to do. If you want to summarize your spreadsheet data using a PivotTable, for example, type in something like summarize with pivot table. You’ll get a menu showing potential matches for the task. In this instance, the top result is a direct link to the form for summarizing with a PivotTable — select it and you’ll start your task right away, without having to go to the Ribbon’s Insert tab first.

    The search box makes it easy to perform just about any task in Excel.
    Preston Gralla / Foundry

    If you’d like more information about your task, the final items that appear in the menu let you select from related Help topics.

    Even if you consider yourself a spreadsheet jockey, it’s worth your while to try out the enhanced search function. It’s a big time-saver, and far more efficient than hunting through the Ribbon to find a command.

    Also useful is that it remembers the features you’ve previously clicked on in the box, so when you click in it, you first see a list of previous tasks you’ve searched for. That makes sure that tasks that you frequently perform are always within easy reach. And it puts tasks you rarely do within easy reach as well.

    Users of enterprise and education editions of Microsoft 365 can also use the Search box to find people in their organization, SharePoint resources, and other personalized results from within Excel.Explore Excel’s advanced chart types

    Charts are great for visualizing and presenting spreadsheet data, and for gaining insights from it. To that end, Microsoft has introduced a number of advanced chart types over the past several years, including most notably a histogram, a “waterfall” that’s effective at showing running financial totals, and a hierarchical treemap that helps you find patterns in data.

    Note that the new charts are available only if you’re working in an .xlsx document. If you use the older .xls format, you won’t find them.

    To see all the charts, put your cursor in a cell or group of cells that contains data, select Insert > Recommended Charts and click the All Charts tab. You’ll find the newer charts, mixed in with the older ones. Select any to create the chart.Excel includes several advanced chart types, including waterfall.
    Preston Gralla / Foundry

    These are the new chart types:

    Treemap. This chart type creates a hierarchical view of your data, with top-level categoriesshown as rectangles, and with subcategoriesshown as smaller rectangles grouped inside the larger ones. Thus, you can easily compare the sizes of top-level categories and subcategories in a single view. For instance, a bookstore can see at a glance that it brings in more revenue from 1st Readers, a subcategory of Children’s Books, than for the entire Non-fiction top-level category.

    srcset=" 830w, 300w, 768w, 264w, 132w, 753w, 565w, 392w" width="830" height="529" sizes="100vw, 830px">A treemap chart lets you easily compare top-level categories and subcategories in a single view.
    Preston Gralla / Foundry

    Sunburst. This chart type also displays hierarchical data, but in a multi-level pie chart. Each level of the hierarchy is represented by a circle. The innermost circle contains the top-level categories, the next circle out shows subcategories, the circle after that subsubcategories and so on.

    Sunbursts are best for showing the relationships among categories and subcategories, while treemaps are better at showing the relative sizes of categories and subcategories.

    A sunburst chart shows hierarchical data such as book categories and subcategories as a multi-level pie chart.
    Preston Gralla / Foundry

    Waterfall. This chart type is well-suited for visualizing financial statements. It displays a running total of the positive and negative contributions toward a final net value.

    A waterfall chart shows a running total of positive and negative contributions, such as revenue and expenses, toward a final net value.
    Preston Gralla / Foundry

    Histogram. This kind of chart shows frequencies within a data set. It could, for example, show the number of books sold in specific price ranges in a bookstore.

    Histograms are good for showing frequencies, such as number of books sold at various price points.
    Preston Gralla / Foundry

    Pareto. This chart, also known as a sorted histogram, contains bars as well as a line graph. Values are represented in descending order by bars. The cumulative total percentage of each bar is represented by a rising line. In the bookstore example, each bar could show a reason for a book being returned. The chart would show, at a glance, the primary reasons for returns, so a bookstore owner could focus on those issues.

    Note that the Pareto chart does not show up when you select Insert > Recommended Charts > All Charts. To use it, first select the data you want to chart, then select Insert > Insert Statistic Chart, and under Histogram, choose Pareto.

    In a Pareto chart, or sorted histogram, a rising line represents the cumulative total percentage of the items being measured. In this example, it’s easy to see that more than 80% of a bookstore’s returns are attributable to three problems.
    Preston Gralla / Foundry

    Box & Whisker. This chart, like a histogram, shows frequencies within a data set but provides for a deeper analysis than a histogram. For example, in a bookstore it could show the distribution of prices of different genres of books. In the example shown here, each “box” represents the first to third quartile of prices for books in that genre, while the “whiskers”show the upper and lower range of prices. Outliers that are priced outside the whiskers are shown as dots, the median price for each genre is shown with a horizontal line across the box, and the mean price is shown with an x.

    Box & Whisker charts can show details about data ranges such as the first to third quartile in the “boxes,” median and mean inside the boxes, upper and lower range with the “whiskers,” and outliers with dots.Preston Gralla / Foundry

    Funnel. This chart type is useful when you want to display values at multiple stages in a process. A funnel chart can show the number of sales prospects at every stage of a sales process, for example, with prospects at the top for the first stage, qualified prospects underneath it for the second stage, and so on, until you get to the final stage, closed sales. Generally, the values in funnel charts decrease with each stage, so the bars in the chart look like a funnel.

    Funnel charts let you display values at multiple stages in a process.
    Preston Gralla / Foundry

    When creating the data for a funnel chart, use one column for the stages in the process you’re charting, and a second column for the values for each stage. Once you’ve done that, to create the chart, select the data, then select Insert > Recommended Charts > All Charts > Funnel.

    Map. Map charts do exactly what you think they should: They let you compare data across different geographical regions, such as countries, regions, states, counties, or postal codes. Excel will automatically recognize the regions and create a map that visualizes the data.

    You can compare data across different locations with a map chart.
    Preston Gralla / Foundry

    To create a map chart, select the data you want to chart, then select Insert > Maps, then select the map chart. Note that in some instances, Excel might have a problem creating the map — for example, if there are multiple locations with the same name as one that you’re mapping. If that occurs, you’ll have to add one or more columns with details about the locations. If, say, you’re charting towns in the United Kingdom, you would have to include columns for the county and country each town is located in.

    Collaborate in real time

    For those who frequently collaborate with others, a welcome feature in Excel for Microsoft 365 is real-time collaboration that lets people work on spreadsheets together from anywhere in the world with an internet connection. Microsoft calls this “co-authoring.”

    Note that in order to use co-authoring, the spreadsheet must be stored in OneDrive, OneDrive for Business, or SharePoint Online, and you must be logged into your Microsoft 365 account. Also, co-authoring works in Excel only if you have AutoSave turned on. To do it, choose the On option on the AutoSave slider at the top left of the screen.

    To share a spreadsheet so you can collaborate on it with others: first open it, then click the Share button on the upper-right of the Excel screen. The “Send link” window pops up. Here you can send an email with a link where others can access the spreadsheet.

    Use the “Send link” pane to share a document and the “Link settings” pane to fine-tune its access permissions.
    Preston Gralla / Foundry

    Enter the email address of the person with whom you want to share in the text box. Enter multiple addresses, separated by commas, if you want to share the workbook with multiple people.

    One feature I found particularly useful when adding email addresses: As you type, Excel looks through your corporate or personal address book and lists the names and addresses of contacts who match the text you’ve input. Click the address you want to add. This not only saves you a bit of time but helps make sure you don’t incorrectly type in addresses.

    Next, decide whether anyone with the link can access the file, or only those whose email addresses you enter. If you see the text “Anyone with the link can edit” near the top of the pane, you can change that by clicking it, then choosing Specific people on the screen that appears. Similarly, if “Specific people” appears above the email addresses, you can change that by clicking it, then choosing Anyone with the link can edit from the screen that appears.On this second screen you can also set the document to read-only for everybody, or allow everybody to edit it. In the “Other settings” section, click the down arrow and choose either Can edit, which allows full editing, or Can view, which is read-only. If you want to give certain people editing privileges and others view-only privileges, you can send two separate invitations with different rights selected.

    On this screen you can also set an expiration date after which people won’t be able to access the file, and you can set a password so that only people who have the password can access it. When you’ve made your selections, click Apply.

    Back in the main “Send link” screen, you can send a message along with the link by typing it into the Message box. Then click Send. An email is sent to all the recipients with a link they can click to open the document.

    Your collaborators will get an email like this when you share a spreadsheet.
    Preston Gralla / FoundryThere’s another way to share a file stored in a personal OneDrive for collaboration: In the “Copy link” area at the bottom of the “Send link” pane, click Copy. When you do that, you can copy the link and send it to someone yourself via email. Note that you have the same options for setting access and editing permissions as you do if you have Excel send the link directly for you. Just click Anyone with the link can edit or Specific people below “Copy link,” and follow the instructions above.

    To begin collaborating: When your recipients receive the email and click to open the spreadsheet, they’ll open it in the web version of Excel in a browser, not in the desktop version of Excel. If you’ve granted them edit permissions, they can begin editing immediately in the browser or else click Editing > Open in Desktop App on the upper right of the screen to work in the Excel desktop client. Excel for the web is less powerful and polished than the desktop client, but it works well enough for real-time collaboration.

    As soon as any collaborators open the file, you’ll see a colored cursor that indicates their presence in the file. Each person collaborating gets a different color. Hover your cursor over a colored cell that indicates someone’s presence, and you’ll see their name. Once they begin editing the workbook, such as entering data or a formula into a cell, creating a chart, and so on, you see the changes they make in real time. Your cursor also shows up on their screen as a color, and they see the changes you make.

    You can easily see where collaborators are working in a shared worksheet.
    Preston Gralla / Foundry

    Collaboration includes the ability to make comments in a file, inside individual cells, without actually changing the contents of the cell. To do it, right-click a cell, select New Comment and type in your comment. Everyone collaborating can see that a cell has a comment in it — it’s indicated by a small colored notch appearing in the upper right of the cell. The color matches the person’s collaboration color.

    To see someone’s comment in a cell, hover your cursor over the cell or put your cursor in the cell and you’ll see the comment, the name of the person who made the comment, and a Reply box you can use to send a reply. You can also click the Comments button on the upper right of the screen to open the Comments pane, which lists every comment by every person. Click any comment to jump to the cell it’s in. You can also reply when you click a comment in the pane.

    You can make see comments that other people make, and make comments yourself.
    Preston Gralla / Foundry

    Take advantage of linked data

    Excel for Microsoft 365 has a feature that Microsoft calls “linked data types.” Essentially, they’re cells that are connected to an online sourcethat automatically updates their information — for example, a company’s current stock price. As I write this, there are nearly approximately 100 linked data types, including not just obvious data types such as stocks, geography, and currencies, but many others, including chemistry, cities, anatomy, food, yoga, and more.

    To use them, type the items you want to track into cells in a single column. For stocks, for example, you can type in a series of stock ticker symbols, company names, fund names, etc. After that, select the cells, then on the Ribbon’s Data tab, select Stocks in the Data Types section in the middle.Excel automatically converts the text in each cell into the matching data source — in our example, into the company name and stock ticker.

    Excel also adds a small icon to the left edge of each cell identifying it as a linked cell. Click any icon and a data card will pop up showing all sorts of information about the kind of information you’ve typed in.  For instance, a stock data card shows stock-related information such as current price, today’s high and low, and 52-week high and low, as well as general company information including industry and number of employees. A location card shows the location’s population, capital, GDP, and so on.

    You can build out a table using data from the data card. To do so, select the cells again, and an Insert Data button appears. Click the button, then select the information you want to appear, such as Price for the current stock price, or Population for the population of a geographic region.

    srcset=" 620w, 300w, 172w, 86w, 491w, 368w, 256w" width="620" height="606" sizes="100vw, 620px">Linked data types let you insert information, such as a company’s high and low stock prices, that is continually updated.
    Preston Gralla / Foundry

    Excel will automatically add a column to the right populated with the latest information for each item you’re tracking, and will keep it updated. You can click the Insert Data button multiple times to keep adding columns to the right for different types of data from the item’s data card.  It’s helpful to add column headers so you know what each column is showing.

    Make your own custom views of a worksheet

    Sheet Views let you make a copy of a sheet and then apply filtered or sorted views of the data to the new sheet. It’s useful when you’re working with other people on a spreadsheet, and someone wants to create a customized view without altering the original sheet. You can all create multiple custom-filtered/sorted views for a sheet. Once you’ve saved a sheet view, anyone with access to the spreadsheet can see it.

    Note: To use this feature, your spreadsheet must be stored in OneDrive.

    Sheet views work best when your data is in table format. Select the data, then go to the Ribbon toolbar and click the Insert tab. Near the left end of the Insert toolbar, click the Table button and then OK.

    To create a new sheet view, click the Ribbon’s View tab, then click the New button in the Sheet View area at the far left. The row numbers and column letters at the left and top of your spreadsheet turn black to let you know you’re in a new sheet view. In the Sheet View area of the Ribbon, it says Temporary View, the default name given to a new sheet view before you’ve saved it.

    Here’s a sheet view with data sorted from highest to lowest costs.
    Preston Gralla / Foundry

    Now apply whatever sorting and filtering you like to the data.To save this view, click the Keep button in the Sheet View area of the Ribbon. When you do that, it is saved as “View1” by default. You can click View1 and type in a more meaningful name for the view. When you click Exit on this toolbar, you return to your spreadsheet, and the row numbers and columns on the left and top of the spreadsheet are no longer black.

    To switch from one sheet view to another, click the View tab. At the left of the Ribbon toolbar, click the down arrow next to the name of the current viewto open a dropdown list of the sheet views created for the spreadsheet. Click the name of a sheet view to switch to it. Whenever you’re looking at a sheet view, the row numbers and column letters framing your spreadsheet remain black to indicate that you’re in a sheet view, not the original spreadsheet.

    Create dynamic arrays and charts

    Dynamic arrays let you write formulas that return multiple values based on your data. When data on the spreadsheet is updated, the dynamic arrays automatically update and resize themselves.

    To create a dynamic array, first create a table as outlined in the previous tip. Make sure to include a column that lists categories. Also put in at least one column to its right that lists corresponding values. Put a header at the top of each column.

    So, for example, if you’re creating a spreadsheet for a business trip budget, Column A might list expenses, such as plane tickets, meals, hotel, etc., and Column B could list each item’s cost on the same row.

    Once you’ve set up the table, use a dynamic array function on it, such as FILTER, SORT, or UNIQUE to create a dynamic array next to the table. Here’s an example of a formula for using the FILTER function:

    =FILTERThis tells Excel to show only the items that cost less than in the array.

    The FILTER function created a data array showing only the items with costs below Preston Gralla / Foundry

    Now, whenever the data in your source table changes, the dynamic array updates and resizes itself to accommodate the changes. That means the dynamic array is always up to date. So in our example, if you add new items with values under to the table, the dynamic array will enlarge itself and include those new items.

    In the same way, you can use the SORT function to sort data and the UNIQUE function to remove duplicate data.You create a dynamic chart from the dynamic array in the same way you do any other Excel chart. Select the cells from the dynamic array that you want to chart, then select the Insert tab and select the type of chart you want to add. When the source data changes in a way that affects the dynamic array that the chart is based on, both the dynamic array and the chart will be updated.

    Use AutoSave to provide a safety net as you work

    If you’re worried that you’ll lose your work on a worksheet because you don’t constantly save it, you’ll welcome the AutoSave feature. It automatically saves your files for you, so you won’t have to worry about system crashes, power outages, Excel crashes and similar problems. It only works only on documents stored in OneDrive, OneDrive for Business, or SharePoint Online. It won’t work with files saved in the older .xls format or files you save to your hard drive.

    AutoSave is a vast improvement over the previous AutoRecover feature built into Excel. AutoRecover doesn’t save your files in real time; instead, every several minutes it saves an AutoRecover file that you can try to recover after a crash. It doesn’t always work, though — for example, if you don’t properly open Excel after the crash, or if the crash doesn’t meet Microsoft’s definition of a crash. In addition, Microsoft notes, “AutoRecover is only effective for unplanned disruptions, such as a power outage or a crash. AutoRecover files are not designed to be saved when a logoff is scheduled or an orderly shutdown occurs.” And the files aren’t saved in real time, so you’ll likely lose several minutes of work even if all goes as planned.

    AutoSave is turned on by default in Excel for Microsoft 365 .xlsx workbooks stored in OneDrive, OneDrive for Business, or SharePoint Online. To turn it offfor a workbook, use the AutoSave slider on the top left of the screen. If you want AutoSave to be off for all files by default, select File > Options > and uncheck the box marked AutoSave files stored in the Cloud by default on Excel.

    Using AutoSave may require some rethinking of your workflow. Many people are used to creating new worksheets based on existing ones by opening the existing file, making changes to it, and then using As to save the new version under a different name, leaving the original file intact. Be warned that doing this with AutoSave enabled will save your changes in the original file. Instead, Microsoft suggests opening the original file and immediately selecting File > a Copyto create a new version.

    If AutoSave does save unwanted changes to a file, you can always use the Version History feature described below to roll back to an earlier version.

    Review or restore earlier versions of a spreadsheet

    There’s an extremely useful feature hiding in the title bar in Excel for Microsoft 365: You can use Version History to go back to previous versions of a file, review them, compare them side-by-side with your existing version, and copy and paste from an older file to your existing one. You can also restore an entire old version.

    To do it, click the file name at the top of the screen in an open file. A drop-down menu appears. Click Version History, and the Version History pane appears on the right side of the screen with a list of the previous versions of the file, including the time and date they were saved.Use Version History to see all previous versions of a spreadsheet, copy and paste from an older file to your existing one, or restore an entire old version.
    Preston Gralla / Foundry

    In the Version History pane, click Open version under any older version, and that version appears as a read-only version in a new window. Scroll through the version and copy any content you want, then paste it into the latest version of the file. To restore the old version, overwriting the current one, click the Restore button.

    Try out Microsoft 365 Copilot in Excel — but don’t expect too much

    For an additional subscription fee, business users of Excel can use Microsoft’s genAI add-in, Microsoft 365 Copilot. You can have Copilot suggest and create charts, create formulas, mine spreadsheets for data insights you might have missed, and more. If you have a Microsoft 365 Personal or Family subscription, many of those features are now bundled with your core subscription.

    To start using Copilot in Excel, open a spreadsheet and click the Copilot button at the right of the Ribbon’s Home tab. The Copilot panel will appear on the right, offering suggestions for actions it can perform, such as summarizing your data with a chart, adding formulas to the spreadsheet, or applying conditional formatting to the sheet. You can also chat with Copilot in the panel, asking questions about your data or how to perform an action yourself.

    Note that these suggestions are generic and won’t always make sense. For example, when you start with a blank worksheet and click the Copilot button, its suggestions include summarizing data using pivot tables or charts, even though there’s no data to chart or put into a table.

    Microsoft 365 Copilot can help you in multiple ways in Excel, including creating formulas and charts, mining spreadsheets for insights, and more.
    Preston Gralla / Foundry

    In my testing, I found that Copilot wasn’t particularly helpful. For example, when I asked it to summarize data using a PivotTable or chart, several times it responded, “Something went wrong. Please try again in a moment.” Then it said that I first needed to reformat parts of my spreadsheet by using the Transformfunction, and gave confusing advice on how I could do it — it wouldn’t do the task itself.When I asked it to suggest conditional formatting for my spreadsheet, which would highlight important data, it told me which data I should highlight but didn’t explain why the data was important. It also didn’t do the highlighting for me or tell me how to do it.

    I gave it one more try and asked it to perform an advanced analysis, which it would use Python to do. It certainly did something, although it was unclear what it was. It overwrote my original spreadsheet and added a section that claimed to show annual growth rates for revenue streams. But the data seemed to be incorrect.

    Perhaps advanced spreadsheet jockeys might be able to make sense of what Copilot is up to whenever they ask it for help. But mere mortal businesspeople may find it of no help at all.

    In my testing, I found Copilot not at all helpful, although spreadsheet jockeys may be able to make some sense of what it does.
    Preston Gralla / Foundry

    What’s more, Microsoft’s focus on Copilot in M365 has reduced the usefulness of Excel in some ways. For example, there used to be a handy feature called Smart Lookup that let you conduct targeted web searches from inside Excel. But at the beginning of 2025, Microsoft removed Smart Lookup from Excel, saying that the feature has been deprecated.

    Now the only way to search the web from inside Excel is via Copilot, which lacks some features of Smart Lookup — notably the ability to highlight words or phrases in a document and trigger an automatic web search. And M365 Copilot isn’t available to business customers unless they pay the additional subscription fee.

    Other features to check out

    Spreadsheet pros will be pleased with several other features and tools that have been added to Excel for Microsoft 365 over the past few years, from a quick data analysis tool to an advanced 3D mapping platform.

    Get an instant data analysis

    If you’re looking to analyze data in a spreadsheet, the Quick Analysis tool will help. Highlight the cells you want to analyze, then move your cursor to the lower right-hand corner of what you’ve highlighted. A small icon of a spreadsheet with a lightning bolt on it appears. Click it and you’ll get a variety of tools for performing instant analysis of your data. For example, you can use the tool to highlight the cells with a value greater than a specific number, get the numerical average for the selected cells, or create a chart on the fly.

    The Quick Analysis feature gives you a variety of tools for analyzing your data instantly.
    Preston Gralla / Foundry

    Translate text

    You can translate text from right within Excel. Highlight the cell whose text you want translated, then select Review > Translate. A Translator pane opens on the right. Excel will detect the words’ language at the top of the pane; you then select the language you want it translated to below. If Excel can’t detect the language of the text you chose or detects it incorrectly, you can override it.

    Easily find worksheets that have been shared with you

    It’s easy to forget which worksheets others have shared with you. In Excel for Microsoft 365 there’s an easy way to find them: Select File > Open > Shared with Me to see a list of them all. Note that this only works with OneDriveand SharePoint Online. You’ll also need to be signed into you Microsoft or work or school account.

    Predict the future with Forecast Sheet

    Using the Forecast Sheet function, you can generate forecasts built on historical data. If, for example, you have a worksheet showing past book sales by date, Forecast Sheet can predict future sales based on past ones.

    To use the feature, you must be working in a worksheet that has time-based historical data. Put your cursor in one of the data cells, go to the Data tab on the Ribbon and select Forecast Sheet from the Forecast group toward the right. On the screen that appears, you can select various options such as whether to create a line or bar chart and what date the forecast should end. Click the Create button, and a new worksheet will appear showing your historical and predicted data and the forecast chart.The Forecast Sheet feature can predict future results based on historical data.
    Preston Gralla / Foundry

    Manage data for analysis with Get & Transform

    This feature is not entirely new to Excel. Formerly known as Power Query, it was made available as a free add-in to Excel 2013 and worked only with the PowerPivot features in Excel Professional Plus. Microsoft’s Power BI business intelligence software offers similar functionality.

    Now called Get & Transform, it’s a business intelligence tool that lets you pull in, combine, and shape data from wide variety of local and cloud sources. These include Excel workbooks, CSV files, SQL Server and other databases, Azure, Active Directory, and many others. You can also use data from public sources including Wikipedia.

    Get & Transform helps you pull in and shape data from a wide variety of sources.
    Preston Gralla / Foundry

    You’ll find the Get & Transform tools together in a group on the Data tab in the Ribbon. For more about using these tools, see Microsoft’s “Getting Started with Get & Transform in Excel.”

    Make a 3D map

    Before Excel 2016, Power Map was a popular free 3D geospatial visualization add-in for Excel. Now it’s free, built into Excel for Microsoft 365, and has been renamed 3D Maps. With it, you can plot geographic and other information on a 3D globe or map. You’ll need to first have data suitable for mapping, and then prepare that data for 3D Maps.

    Those steps are beyond the scope of this article, but here’s advice from Microsoft about how to get and prepare data for 3D Maps. Once you have properly prepared data, open the spreadsheet and select Insert > 3D Map > Open 3D Maps. Then click Enable from the box that appears. That turns on the 3D Maps feature. For details on how to work with your data and customize your map, head to the Microsoft tutorial “Get started with 3D Maps.”

    If you don’t have data for mapping but just want to see firsthand what a 3D map is like, you can download sample data created by Microsoft. The screenshot shown here is from Microsoft’s Dallas Utilities Seasonal Electricity Consumption Simulation demo. When you’ve downloaded the workbook, open it up, select Insert > 3D Map > Open 3D Maps and click the map to launch it.

    With 3D Maps you can plot geospatial data in an interactive 3D map.
    Preston Gralla / Foundry

    Automate tasks

    If you have OneDrive for Business and use Excel with a commercial or educational Microsoft 365 license, you can automate tasks with the Automate tab. You’ll be able to create and edit scripts with the Code Editor, run automated tasks with a button click, and share the script with co-workers. See Microsoft’s “Office Scripts in Excel” documentation for details.

    Insert data from a picture into Excel

    There are times you may find data inside an image file that you’d like to get into Excel. Typically, you’ll have to input the data from it manually. There’s now a way to have Excel convert the information on the image into data for a worksheet.

    In the Get & Transform Data group on the Data tab, click the From Picture dropdown and select Picture From File to choose the image you want to grab data from, or Picture from Clipboard to take a screenshot of an image on your PC and then import the data. For more details, see Microsoft’s “Insert data from picture” support page.  

    Use keyboard shortcuts

    Here’s one last productivity tip: If you memorize a handful of keyboard shortcuts for common tasks in Excel, you can save a great deal of time over hunting for the right command to click on. See “Handy Excel keyboard shortcuts for Windows and Mac” for our favorites.

    This article was originally published in August 2019 and most recently updated in May 2025.

    More Excel tutorials:

    Excel basics: Get started with tables

    Excel basics: Get started with charts and sparklines

    How to use PivotTables and PivotCharts in Excel

    How to use slicers in Excel

    How to use Excel formulas and functions

    Howto use conditional formatting in Excel

    How to use Excel macros to save time and automate your work
    #excel #microsoft #cheat #sheet
    Excel for Microsoft 365 cheat sheet
    Windows may get all the attention, but when you want to get real work done, you turn to the applications that run on it. And if you use spreadsheets, that generally means Excel. Excel is, of course, part of Microsoft’s Office suite of productivity tools. Microsoft sells Office under two models: Individuals and businesses can pay for the software license up front and own it forever, or they can purchase a Microsoft 365 subscription, which means they have access to the software for only as long as they keep paying the subscription fee. When you purchase a perpetual version of the suite — say, Office 2021 or Office 2024 — its applications will never get new features, whereas Microsoft 365 apps are continually updated with new features. For more details, see our in-depth comparison of the two Office models. This cheat sheet gets you up to speed on the features that have been introduced or changed in Microsoft 365’s Excel for Windows desktop client over the past few years.We’ll periodically update this story as new features roll out. In this article Use the Ribbon Search to get tasks done quickly Explore Excel’s advanced chart types Collaborate in real time Take advantage of linked data Make your own custom views of a worksheet Create dynamic arrays and charts Use AutoSave to provide a safety net as you work Review or restore earlier versions of a spreadsheet Try out Microsoft 365 Copilot in Excel — but don’t expect too much Other new features to check out Use keyboard shortcuts Use the Ribbon The Ribbon interface, which puts commonly used commands in a tabbed toolbar running across the top of the application window, is alive and well in the current version of Excel. Microsoft has tweaked the Ribbon’s looks numerous times over the years, but it still works the same way it always has: just click one of the Ribbon’s tabs to see related commands on the toolbar. For example, click Insert to find buttons for inserting tables, PivotTables, charts, and more. Through the years, Excel’s Ribbon has gotten a variety of cosmetic changes, but it still works largely the way it always has. Preston Gralla / Foundry Just as in previous versions of Excel, if you want the Ribbon commands to go away, press Ctrl-F1 or click the name of the tab you’re currently on.To make the commands reappear, press Ctrl-F1 again or click any tab name. You’ve got other options for displaying the Ribbon as well. To get to them, click the Ribbon display options iconon the bottom of the Ribbon at the far right, just below the Share button. A drop-down menu appears with these four options: Full-screen mode: This makes Excel take up your entire screen and hides the Ribbon. To get out of full-screen mode, click the three-dot icon at the upper right of the screen. Show tabs only: This shows the tabs but hides the commands underneath them. It’s the same as pressing Ctrl-F1. To display the commands underneath the tabs when they’re hidden, press Ctrl-F1, click a tab, or click the Ribbon display options down arrow and select Always show Ribbon. Always show Ribbon: This displays the entire Ribbon, both the tabs and commands underneath them. Show/Hide Quick Access toolbar: This displays or hides the Quick Access toolbar, which gives you fast access to Excel commands you want to have available no matter which tab you’re on. When you enable the toolbar, it starts off empty. To populate it, click a small down arrow that appears at the right of the toolbar and from the drop-down menu that appears, choose which features to put on it. If you don’t see a command you want, click More Commands. Find the command you want on the left and click Add. You can have the toolbar appear either at the top of the screen, just to the right of the AutoSave button, or just underneath the Ribbon. To move it from one place to another, click a small down arrow that appears at the right of the toolbar and from the drop-down menu that appears, select either Show below the Ribbon or Show above the Ribbon.  Microsoft has for many years teased a simplified version of the Ribbon that hides most of the commands to reduce clutter. That simplified Ribbon is available in the Excel web app, but there’s currently no sign that it will appear in the Excel desktop app. There’s a useful feature in what Microsoft calls the backstage area that appears when you click the File tab on the Ribbon. If you click Open or a Copy from the menu on the left, you can see the cloud-based services you’ve connected to your Office account, such as SharePoint and OneDrive. Each location displays its associated email address underneath it. This is quite helpful if you use a cloud service with more than one account, such as if you have one OneDrive account for personal use and another one for business. You’ll be able to see at a glance which is which. Click the Add a service dropdown to add another cloud storage account. Preston Gralla / Foundry Search to get tasks done quickly Excel has never been the most user-friendly of applications, and it has so many powerful features it can be tough to keep track of them all. That’s where the handy Search feature comes in. To use it, click in the Search box — it’s above the Ribbon in the green title area.Then type in a task you want to do. If you want to summarize your spreadsheet data using a PivotTable, for example, type in something like summarize with pivot table. You’ll get a menu showing potential matches for the task. In this instance, the top result is a direct link to the form for summarizing with a PivotTable — select it and you’ll start your task right away, without having to go to the Ribbon’s Insert tab first. The search box makes it easy to perform just about any task in Excel. Preston Gralla / Foundry If you’d like more information about your task, the final items that appear in the menu let you select from related Help topics. Even if you consider yourself a spreadsheet jockey, it’s worth your while to try out the enhanced search function. It’s a big time-saver, and far more efficient than hunting through the Ribbon to find a command. Also useful is that it remembers the features you’ve previously clicked on in the box, so when you click in it, you first see a list of previous tasks you’ve searched for. That makes sure that tasks that you frequently perform are always within easy reach. And it puts tasks you rarely do within easy reach as well. Users of enterprise and education editions of Microsoft 365 can also use the Search box to find people in their organization, SharePoint resources, and other personalized results from within Excel.Explore Excel’s advanced chart types Charts are great for visualizing and presenting spreadsheet data, and for gaining insights from it. To that end, Microsoft has introduced a number of advanced chart types over the past several years, including most notably a histogram, a “waterfall” that’s effective at showing running financial totals, and a hierarchical treemap that helps you find patterns in data. Note that the new charts are available only if you’re working in an .xlsx document. If you use the older .xls format, you won’t find them. To see all the charts, put your cursor in a cell or group of cells that contains data, select Insert > Recommended Charts and click the All Charts tab. You’ll find the newer charts, mixed in with the older ones. Select any to create the chart.Excel includes several advanced chart types, including waterfall. Preston Gralla / Foundry These are the new chart types: Treemap. This chart type creates a hierarchical view of your data, with top-level categoriesshown as rectangles, and with subcategoriesshown as smaller rectangles grouped inside the larger ones. Thus, you can easily compare the sizes of top-level categories and subcategories in a single view. For instance, a bookstore can see at a glance that it brings in more revenue from 1st Readers, a subcategory of Children’s Books, than for the entire Non-fiction top-level category. srcset=" 830w, 300w, 768w, 264w, 132w, 753w, 565w, 392w" width="830" height="529" sizes="100vw, 830px">A treemap chart lets you easily compare top-level categories and subcategories in a single view. Preston Gralla / Foundry Sunburst. This chart type also displays hierarchical data, but in a multi-level pie chart. Each level of the hierarchy is represented by a circle. The innermost circle contains the top-level categories, the next circle out shows subcategories, the circle after that subsubcategories and so on. Sunbursts are best for showing the relationships among categories and subcategories, while treemaps are better at showing the relative sizes of categories and subcategories. A sunburst chart shows hierarchical data such as book categories and subcategories as a multi-level pie chart. Preston Gralla / Foundry Waterfall. This chart type is well-suited for visualizing financial statements. It displays a running total of the positive and negative contributions toward a final net value. A waterfall chart shows a running total of positive and negative contributions, such as revenue and expenses, toward a final net value. Preston Gralla / Foundry Histogram. This kind of chart shows frequencies within a data set. It could, for example, show the number of books sold in specific price ranges in a bookstore. Histograms are good for showing frequencies, such as number of books sold at various price points. Preston Gralla / Foundry Pareto. This chart, also known as a sorted histogram, contains bars as well as a line graph. Values are represented in descending order by bars. The cumulative total percentage of each bar is represented by a rising line. In the bookstore example, each bar could show a reason for a book being returned. The chart would show, at a glance, the primary reasons for returns, so a bookstore owner could focus on those issues. Note that the Pareto chart does not show up when you select Insert > Recommended Charts > All Charts. To use it, first select the data you want to chart, then select Insert > Insert Statistic Chart, and under Histogram, choose Pareto. In a Pareto chart, or sorted histogram, a rising line represents the cumulative total percentage of the items being measured. In this example, it’s easy to see that more than 80% of a bookstore’s returns are attributable to three problems. Preston Gralla / Foundry Box & Whisker. This chart, like a histogram, shows frequencies within a data set but provides for a deeper analysis than a histogram. For example, in a bookstore it could show the distribution of prices of different genres of books. In the example shown here, each “box” represents the first to third quartile of prices for books in that genre, while the “whiskers”show the upper and lower range of prices. Outliers that are priced outside the whiskers are shown as dots, the median price for each genre is shown with a horizontal line across the box, and the mean price is shown with an x. Box & Whisker charts can show details about data ranges such as the first to third quartile in the “boxes,” median and mean inside the boxes, upper and lower range with the “whiskers,” and outliers with dots.Preston Gralla / Foundry Funnel. This chart type is useful when you want to display values at multiple stages in a process. A funnel chart can show the number of sales prospects at every stage of a sales process, for example, with prospects at the top for the first stage, qualified prospects underneath it for the second stage, and so on, until you get to the final stage, closed sales. Generally, the values in funnel charts decrease with each stage, so the bars in the chart look like a funnel. Funnel charts let you display values at multiple stages in a process. Preston Gralla / Foundry When creating the data for a funnel chart, use one column for the stages in the process you’re charting, and a second column for the values for each stage. Once you’ve done that, to create the chart, select the data, then select Insert > Recommended Charts > All Charts > Funnel. Map. Map charts do exactly what you think they should: They let you compare data across different geographical regions, such as countries, regions, states, counties, or postal codes. Excel will automatically recognize the regions and create a map that visualizes the data. You can compare data across different locations with a map chart. Preston Gralla / Foundry To create a map chart, select the data you want to chart, then select Insert > Maps, then select the map chart. Note that in some instances, Excel might have a problem creating the map — for example, if there are multiple locations with the same name as one that you’re mapping. If that occurs, you’ll have to add one or more columns with details about the locations. If, say, you’re charting towns in the United Kingdom, you would have to include columns for the county and country each town is located in. Collaborate in real time For those who frequently collaborate with others, a welcome feature in Excel for Microsoft 365 is real-time collaboration that lets people work on spreadsheets together from anywhere in the world with an internet connection. Microsoft calls this “co-authoring.” Note that in order to use co-authoring, the spreadsheet must be stored in OneDrive, OneDrive for Business, or SharePoint Online, and you must be logged into your Microsoft 365 account. Also, co-authoring works in Excel only if you have AutoSave turned on. To do it, choose the On option on the AutoSave slider at the top left of the screen. To share a spreadsheet so you can collaborate on it with others: first open it, then click the Share button on the upper-right of the Excel screen. The “Send link” window pops up. Here you can send an email with a link where others can access the spreadsheet. Use the “Send link” pane to share a document and the “Link settings” pane to fine-tune its access permissions. Preston Gralla / Foundry Enter the email address of the person with whom you want to share in the text box. Enter multiple addresses, separated by commas, if you want to share the workbook with multiple people. One feature I found particularly useful when adding email addresses: As you type, Excel looks through your corporate or personal address book and lists the names and addresses of contacts who match the text you’ve input. Click the address you want to add. This not only saves you a bit of time but helps make sure you don’t incorrectly type in addresses. Next, decide whether anyone with the link can access the file, or only those whose email addresses you enter. If you see the text “Anyone with the link can edit” near the top of the pane, you can change that by clicking it, then choosing Specific people on the screen that appears. Similarly, if “Specific people” appears above the email addresses, you can change that by clicking it, then choosing Anyone with the link can edit from the screen that appears.On this second screen you can also set the document to read-only for everybody, or allow everybody to edit it. In the “Other settings” section, click the down arrow and choose either Can edit, which allows full editing, or Can view, which is read-only. If you want to give certain people editing privileges and others view-only privileges, you can send two separate invitations with different rights selected. On this screen you can also set an expiration date after which people won’t be able to access the file, and you can set a password so that only people who have the password can access it. When you’ve made your selections, click Apply. Back in the main “Send link” screen, you can send a message along with the link by typing it into the Message box. Then click Send. An email is sent to all the recipients with a link they can click to open the document. Your collaborators will get an email like this when you share a spreadsheet. Preston Gralla / FoundryThere’s another way to share a file stored in a personal OneDrive for collaboration: In the “Copy link” area at the bottom of the “Send link” pane, click Copy. When you do that, you can copy the link and send it to someone yourself via email. Note that you have the same options for setting access and editing permissions as you do if you have Excel send the link directly for you. Just click Anyone with the link can edit or Specific people below “Copy link,” and follow the instructions above. To begin collaborating: When your recipients receive the email and click to open the spreadsheet, they’ll open it in the web version of Excel in a browser, not in the desktop version of Excel. If you’ve granted them edit permissions, they can begin editing immediately in the browser or else click Editing > Open in Desktop App on the upper right of the screen to work in the Excel desktop client. Excel for the web is less powerful and polished than the desktop client, but it works well enough for real-time collaboration. As soon as any collaborators open the file, you’ll see a colored cursor that indicates their presence in the file. Each person collaborating gets a different color. Hover your cursor over a colored cell that indicates someone’s presence, and you’ll see their name. Once they begin editing the workbook, such as entering data or a formula into a cell, creating a chart, and so on, you see the changes they make in real time. Your cursor also shows up on their screen as a color, and they see the changes you make. You can easily see where collaborators are working in a shared worksheet. Preston Gralla / Foundry Collaboration includes the ability to make comments in a file, inside individual cells, without actually changing the contents of the cell. To do it, right-click a cell, select New Comment and type in your comment. Everyone collaborating can see that a cell has a comment in it — it’s indicated by a small colored notch appearing in the upper right of the cell. The color matches the person’s collaboration color. To see someone’s comment in a cell, hover your cursor over the cell or put your cursor in the cell and you’ll see the comment, the name of the person who made the comment, and a Reply box you can use to send a reply. You can also click the Comments button on the upper right of the screen to open the Comments pane, which lists every comment by every person. Click any comment to jump to the cell it’s in. You can also reply when you click a comment in the pane. You can make see comments that other people make, and make comments yourself. Preston Gralla / Foundry Take advantage of linked data Excel for Microsoft 365 has a feature that Microsoft calls “linked data types.” Essentially, they’re cells that are connected to an online sourcethat automatically updates their information — for example, a company’s current stock price. As I write this, there are nearly approximately 100 linked data types, including not just obvious data types such as stocks, geography, and currencies, but many others, including chemistry, cities, anatomy, food, yoga, and more. To use them, type the items you want to track into cells in a single column. For stocks, for example, you can type in a series of stock ticker symbols, company names, fund names, etc. After that, select the cells, then on the Ribbon’s Data tab, select Stocks in the Data Types section in the middle.Excel automatically converts the text in each cell into the matching data source — in our example, into the company name and stock ticker. Excel also adds a small icon to the left edge of each cell identifying it as a linked cell. Click any icon and a data card will pop up showing all sorts of information about the kind of information you’ve typed in.  For instance, a stock data card shows stock-related information such as current price, today’s high and low, and 52-week high and low, as well as general company information including industry and number of employees. A location card shows the location’s population, capital, GDP, and so on. You can build out a table using data from the data card. To do so, select the cells again, and an Insert Data button appears. Click the button, then select the information you want to appear, such as Price for the current stock price, or Population for the population of a geographic region. srcset=" 620w, 300w, 172w, 86w, 491w, 368w, 256w" width="620" height="606" sizes="100vw, 620px">Linked data types let you insert information, such as a company’s high and low stock prices, that is continually updated. Preston Gralla / Foundry Excel will automatically add a column to the right populated with the latest information for each item you’re tracking, and will keep it updated. You can click the Insert Data button multiple times to keep adding columns to the right for different types of data from the item’s data card.  It’s helpful to add column headers so you know what each column is showing. Make your own custom views of a worksheet Sheet Views let you make a copy of a sheet and then apply filtered or sorted views of the data to the new sheet. It’s useful when you’re working with other people on a spreadsheet, and someone wants to create a customized view without altering the original sheet. You can all create multiple custom-filtered/sorted views for a sheet. Once you’ve saved a sheet view, anyone with access to the spreadsheet can see it. Note: To use this feature, your spreadsheet must be stored in OneDrive. Sheet views work best when your data is in table format. Select the data, then go to the Ribbon toolbar and click the Insert tab. Near the left end of the Insert toolbar, click the Table button and then OK. To create a new sheet view, click the Ribbon’s View tab, then click the New button in the Sheet View area at the far left. The row numbers and column letters at the left and top of your spreadsheet turn black to let you know you’re in a new sheet view. In the Sheet View area of the Ribbon, it says Temporary View, the default name given to a new sheet view before you’ve saved it. Here’s a sheet view with data sorted from highest to lowest costs. Preston Gralla / Foundry Now apply whatever sorting and filtering you like to the data.To save this view, click the Keep button in the Sheet View area of the Ribbon. When you do that, it is saved as “View1” by default. You can click View1 and type in a more meaningful name for the view. When you click Exit on this toolbar, you return to your spreadsheet, and the row numbers and columns on the left and top of the spreadsheet are no longer black. To switch from one sheet view to another, click the View tab. At the left of the Ribbon toolbar, click the down arrow next to the name of the current viewto open a dropdown list of the sheet views created for the spreadsheet. Click the name of a sheet view to switch to it. Whenever you’re looking at a sheet view, the row numbers and column letters framing your spreadsheet remain black to indicate that you’re in a sheet view, not the original spreadsheet. Create dynamic arrays and charts Dynamic arrays let you write formulas that return multiple values based on your data. When data on the spreadsheet is updated, the dynamic arrays automatically update and resize themselves. To create a dynamic array, first create a table as outlined in the previous tip. Make sure to include a column that lists categories. Also put in at least one column to its right that lists corresponding values. Put a header at the top of each column. So, for example, if you’re creating a spreadsheet for a business trip budget, Column A might list expenses, such as plane tickets, meals, hotel, etc., and Column B could list each item’s cost on the same row. Once you’ve set up the table, use a dynamic array function on it, such as FILTER, SORT, or UNIQUE to create a dynamic array next to the table. Here’s an example of a formula for using the FILTER function: =FILTERThis tells Excel to show only the items that cost less than in the array. The FILTER function created a data array showing only the items with costs below Preston Gralla / Foundry Now, whenever the data in your source table changes, the dynamic array updates and resizes itself to accommodate the changes. That means the dynamic array is always up to date. So in our example, if you add new items with values under to the table, the dynamic array will enlarge itself and include those new items. In the same way, you can use the SORT function to sort data and the UNIQUE function to remove duplicate data.You create a dynamic chart from the dynamic array in the same way you do any other Excel chart. Select the cells from the dynamic array that you want to chart, then select the Insert tab and select the type of chart you want to add. When the source data changes in a way that affects the dynamic array that the chart is based on, both the dynamic array and the chart will be updated. Use AutoSave to provide a safety net as you work If you’re worried that you’ll lose your work on a worksheet because you don’t constantly save it, you’ll welcome the AutoSave feature. It automatically saves your files for you, so you won’t have to worry about system crashes, power outages, Excel crashes and similar problems. It only works only on documents stored in OneDrive, OneDrive for Business, or SharePoint Online. It won’t work with files saved in the older .xls format or files you save to your hard drive. AutoSave is a vast improvement over the previous AutoRecover feature built into Excel. AutoRecover doesn’t save your files in real time; instead, every several minutes it saves an AutoRecover file that you can try to recover after a crash. It doesn’t always work, though — for example, if you don’t properly open Excel after the crash, or if the crash doesn’t meet Microsoft’s definition of a crash. In addition, Microsoft notes, “AutoRecover is only effective for unplanned disruptions, such as a power outage or a crash. AutoRecover files are not designed to be saved when a logoff is scheduled or an orderly shutdown occurs.” And the files aren’t saved in real time, so you’ll likely lose several minutes of work even if all goes as planned. AutoSave is turned on by default in Excel for Microsoft 365 .xlsx workbooks stored in OneDrive, OneDrive for Business, or SharePoint Online. To turn it offfor a workbook, use the AutoSave slider on the top left of the screen. If you want AutoSave to be off for all files by default, select File > Options > and uncheck the box marked AutoSave files stored in the Cloud by default on Excel. Using AutoSave may require some rethinking of your workflow. Many people are used to creating new worksheets based on existing ones by opening the existing file, making changes to it, and then using As to save the new version under a different name, leaving the original file intact. Be warned that doing this with AutoSave enabled will save your changes in the original file. Instead, Microsoft suggests opening the original file and immediately selecting File > a Copyto create a new version. If AutoSave does save unwanted changes to a file, you can always use the Version History feature described below to roll back to an earlier version. Review or restore earlier versions of a spreadsheet There’s an extremely useful feature hiding in the title bar in Excel for Microsoft 365: You can use Version History to go back to previous versions of a file, review them, compare them side-by-side with your existing version, and copy and paste from an older file to your existing one. You can also restore an entire old version. To do it, click the file name at the top of the screen in an open file. A drop-down menu appears. Click Version History, and the Version History pane appears on the right side of the screen with a list of the previous versions of the file, including the time and date they were saved.Use Version History to see all previous versions of a spreadsheet, copy and paste from an older file to your existing one, or restore an entire old version. Preston Gralla / Foundry In the Version History pane, click Open version under any older version, and that version appears as a read-only version in a new window. Scroll through the version and copy any content you want, then paste it into the latest version of the file. To restore the old version, overwriting the current one, click the Restore button. Try out Microsoft 365 Copilot in Excel — but don’t expect too much For an additional subscription fee, business users of Excel can use Microsoft’s genAI add-in, Microsoft 365 Copilot. You can have Copilot suggest and create charts, create formulas, mine spreadsheets for data insights you might have missed, and more. If you have a Microsoft 365 Personal or Family subscription, many of those features are now bundled with your core subscription. To start using Copilot in Excel, open a spreadsheet and click the Copilot button at the right of the Ribbon’s Home tab. The Copilot panel will appear on the right, offering suggestions for actions it can perform, such as summarizing your data with a chart, adding formulas to the spreadsheet, or applying conditional formatting to the sheet. You can also chat with Copilot in the panel, asking questions about your data or how to perform an action yourself. Note that these suggestions are generic and won’t always make sense. For example, when you start with a blank worksheet and click the Copilot button, its suggestions include summarizing data using pivot tables or charts, even though there’s no data to chart or put into a table. Microsoft 365 Copilot can help you in multiple ways in Excel, including creating formulas and charts, mining spreadsheets for insights, and more. Preston Gralla / Foundry In my testing, I found that Copilot wasn’t particularly helpful. For example, when I asked it to summarize data using a PivotTable or chart, several times it responded, “Something went wrong. Please try again in a moment.” Then it said that I first needed to reformat parts of my spreadsheet by using the Transformfunction, and gave confusing advice on how I could do it — it wouldn’t do the task itself.When I asked it to suggest conditional formatting for my spreadsheet, which would highlight important data, it told me which data I should highlight but didn’t explain why the data was important. It also didn’t do the highlighting for me or tell me how to do it. I gave it one more try and asked it to perform an advanced analysis, which it would use Python to do. It certainly did something, although it was unclear what it was. It overwrote my original spreadsheet and added a section that claimed to show annual growth rates for revenue streams. But the data seemed to be incorrect. Perhaps advanced spreadsheet jockeys might be able to make sense of what Copilot is up to whenever they ask it for help. But mere mortal businesspeople may find it of no help at all. In my testing, I found Copilot not at all helpful, although spreadsheet jockeys may be able to make some sense of what it does. Preston Gralla / Foundry What’s more, Microsoft’s focus on Copilot in M365 has reduced the usefulness of Excel in some ways. For example, there used to be a handy feature called Smart Lookup that let you conduct targeted web searches from inside Excel. But at the beginning of 2025, Microsoft removed Smart Lookup from Excel, saying that the feature has been deprecated. Now the only way to search the web from inside Excel is via Copilot, which lacks some features of Smart Lookup — notably the ability to highlight words or phrases in a document and trigger an automatic web search. And M365 Copilot isn’t available to business customers unless they pay the additional subscription fee. Other features to check out Spreadsheet pros will be pleased with several other features and tools that have been added to Excel for Microsoft 365 over the past few years, from a quick data analysis tool to an advanced 3D mapping platform. Get an instant data analysis If you’re looking to analyze data in a spreadsheet, the Quick Analysis tool will help. Highlight the cells you want to analyze, then move your cursor to the lower right-hand corner of what you’ve highlighted. A small icon of a spreadsheet with a lightning bolt on it appears. Click it and you’ll get a variety of tools for performing instant analysis of your data. For example, you can use the tool to highlight the cells with a value greater than a specific number, get the numerical average for the selected cells, or create a chart on the fly. The Quick Analysis feature gives you a variety of tools for analyzing your data instantly. Preston Gralla / Foundry Translate text You can translate text from right within Excel. Highlight the cell whose text you want translated, then select Review > Translate. A Translator pane opens on the right. Excel will detect the words’ language at the top of the pane; you then select the language you want it translated to below. If Excel can’t detect the language of the text you chose or detects it incorrectly, you can override it. Easily find worksheets that have been shared with you It’s easy to forget which worksheets others have shared with you. In Excel for Microsoft 365 there’s an easy way to find them: Select File > Open > Shared with Me to see a list of them all. Note that this only works with OneDriveand SharePoint Online. You’ll also need to be signed into you Microsoft or work or school account. Predict the future with Forecast Sheet Using the Forecast Sheet function, you can generate forecasts built on historical data. If, for example, you have a worksheet showing past book sales by date, Forecast Sheet can predict future sales based on past ones. To use the feature, you must be working in a worksheet that has time-based historical data. Put your cursor in one of the data cells, go to the Data tab on the Ribbon and select Forecast Sheet from the Forecast group toward the right. On the screen that appears, you can select various options such as whether to create a line or bar chart and what date the forecast should end. Click the Create button, and a new worksheet will appear showing your historical and predicted data and the forecast chart.The Forecast Sheet feature can predict future results based on historical data. Preston Gralla / Foundry Manage data for analysis with Get & Transform This feature is not entirely new to Excel. Formerly known as Power Query, it was made available as a free add-in to Excel 2013 and worked only with the PowerPivot features in Excel Professional Plus. Microsoft’s Power BI business intelligence software offers similar functionality. Now called Get & Transform, it’s a business intelligence tool that lets you pull in, combine, and shape data from wide variety of local and cloud sources. These include Excel workbooks, CSV files, SQL Server and other databases, Azure, Active Directory, and many others. You can also use data from public sources including Wikipedia. Get & Transform helps you pull in and shape data from a wide variety of sources. Preston Gralla / Foundry You’ll find the Get & Transform tools together in a group on the Data tab in the Ribbon. For more about using these tools, see Microsoft’s “Getting Started with Get & Transform in Excel.” Make a 3D map Before Excel 2016, Power Map was a popular free 3D geospatial visualization add-in for Excel. Now it’s free, built into Excel for Microsoft 365, and has been renamed 3D Maps. With it, you can plot geographic and other information on a 3D globe or map. You’ll need to first have data suitable for mapping, and then prepare that data for 3D Maps. Those steps are beyond the scope of this article, but here’s advice from Microsoft about how to get and prepare data for 3D Maps. Once you have properly prepared data, open the spreadsheet and select Insert > 3D Map > Open 3D Maps. Then click Enable from the box that appears. That turns on the 3D Maps feature. For details on how to work with your data and customize your map, head to the Microsoft tutorial “Get started with 3D Maps.” If you don’t have data for mapping but just want to see firsthand what a 3D map is like, you can download sample data created by Microsoft. The screenshot shown here is from Microsoft’s Dallas Utilities Seasonal Electricity Consumption Simulation demo. When you’ve downloaded the workbook, open it up, select Insert > 3D Map > Open 3D Maps and click the map to launch it. With 3D Maps you can plot geospatial data in an interactive 3D map. Preston Gralla / Foundry Automate tasks If you have OneDrive for Business and use Excel with a commercial or educational Microsoft 365 license, you can automate tasks with the Automate tab. You’ll be able to create and edit scripts with the Code Editor, run automated tasks with a button click, and share the script with co-workers. See Microsoft’s “Office Scripts in Excel” documentation for details. Insert data from a picture into Excel There are times you may find data inside an image file that you’d like to get into Excel. Typically, you’ll have to input the data from it manually. There’s now a way to have Excel convert the information on the image into data for a worksheet. In the Get & Transform Data group on the Data tab, click the From Picture dropdown and select Picture From File to choose the image you want to grab data from, or Picture from Clipboard to take a screenshot of an image on your PC and then import the data. For more details, see Microsoft’s “Insert data from picture” support page.   Use keyboard shortcuts Here’s one last productivity tip: If you memorize a handful of keyboard shortcuts for common tasks in Excel, you can save a great deal of time over hunting for the right command to click on. See “Handy Excel keyboard shortcuts for Windows and Mac” for our favorites. This article was originally published in August 2019 and most recently updated in May 2025. More Excel tutorials: Excel basics: Get started with tables Excel basics: Get started with charts and sparklines How to use PivotTables and PivotCharts in Excel How to use slicers in Excel How to use Excel formulas and functions Howto use conditional formatting in Excel How to use Excel macros to save time and automate your work #excel #microsoft #cheat #sheet
    Excel for Microsoft 365 cheat sheet
    www.computerworld.com
    Windows may get all the attention, but when you want to get real work done, you turn to the applications that run on it. And if you use spreadsheets, that generally means Excel. Excel is, of course, part of Microsoft’s Office suite of productivity tools. Microsoft sells Office under two models: Individuals and businesses can pay for the software license up front and own it forever (what the company calls the “perpetual” version of the suite), or they can purchase a Microsoft 365 subscription, which means they have access to the software for only as long as they keep paying the subscription fee. When you purchase a perpetual version of the suite — say, Office 2021 or Office 2024 — its applications will never get new features, whereas Microsoft 365 apps are continually updated with new features. For more details, see our in-depth comparison of the two Office models. This cheat sheet gets you up to speed on the features that have been introduced or changed in Microsoft 365’s Excel for Windows desktop client over the past few years. (If you’re looking for Excel tips for the perpetual-license Office suite, see our Office 2021 and 2024 cheat sheet.) We’ll periodically update this story as new features roll out. In this article Use the Ribbon Search to get tasks done quickly Explore Excel’s advanced chart types Collaborate in real time Take advantage of linked data Make your own custom views of a worksheet Create dynamic arrays and charts Use AutoSave to provide a safety net as you work Review or restore earlier versions of a spreadsheet Try out Microsoft 365 Copilot in Excel — but don’t expect too much Other new features to check out Use keyboard shortcuts Use the Ribbon The Ribbon interface, which puts commonly used commands in a tabbed toolbar running across the top of the application window, is alive and well in the current version of Excel. Microsoft has tweaked the Ribbon’s looks numerous times over the years, but it still works the same way it always has: just click one of the Ribbon’s tabs to see related commands on the toolbar. For example, click Insert to find buttons for inserting tables, PivotTables, charts, and more. Through the years, Excel’s Ribbon has gotten a variety of cosmetic changes, but it still works largely the way it always has. Preston Gralla / Foundry Just as in previous versions of Excel, if you want the Ribbon commands to go away, press Ctrl-F1 or click the name of the tab you’re currently on. (The tabs above the Ribbon — File, Home, Insert, and so on — stay visible.) To make the commands reappear, press Ctrl-F1 again or click any tab name. You’ve got other options for displaying the Ribbon as well. To get to them, click the Ribbon display options icon (a down arrow) on the bottom of the Ribbon at the far right, just below the Share button. A drop-down menu appears with these four options: Full-screen mode: This makes Excel take up your entire screen and hides the Ribbon. To get out of full-screen mode, click the three-dot icon at the upper right of the screen. Show tabs only: This shows the tabs but hides the commands underneath them. It’s the same as pressing Ctrl-F1. To display the commands underneath the tabs when they’re hidden, press Ctrl-F1, click a tab, or click the Ribbon display options down arrow and select Always show Ribbon. Always show Ribbon: This displays the entire Ribbon, both the tabs and commands underneath them. Show/Hide Quick Access toolbar: This displays or hides the Quick Access toolbar, which gives you fast access to Excel commands you want to have available no matter which tab you’re on. When you enable the toolbar, it starts off empty. To populate it, click a small down arrow that appears at the right of the toolbar and from the drop-down menu that appears, choose which features to put on it. If you don’t see a command you want, click More Commands. Find the command you want on the left and click Add. You can have the toolbar appear either at the top of the screen, just to the right of the AutoSave button, or just underneath the Ribbon. To move it from one place to another, click a small down arrow that appears at the right of the toolbar and from the drop-down menu that appears, select either Show below the Ribbon or Show above the Ribbon.  Microsoft has for many years teased a simplified version of the Ribbon that hides most of the commands to reduce clutter. That simplified Ribbon is available in the Excel web app, but there’s currently no sign that it will appear in the Excel desktop app. There’s a useful feature in what Microsoft calls the backstage area that appears when you click the File tab on the Ribbon. If you click Open or Save a Copy from the menu on the left, you can see the cloud-based services you’ve connected to your Office account, such as SharePoint and OneDrive. Each location displays its associated email address underneath it. This is quite helpful if you use a cloud service with more than one account, such as if you have one OneDrive account for personal use and another one for business. You’ll be able to see at a glance which is which. Click the Add a service dropdown to add another cloud storage account. Preston Gralla / Foundry Search to get tasks done quickly Excel has never been the most user-friendly of applications, and it has so many powerful features it can be tough to keep track of them all. That’s where the handy Search feature comes in. To use it, click in the Search box — it’s above the Ribbon in the green title area. (Keyboard fans can instead press Alt-Q.) Then type in a task you want to do. If you want to summarize your spreadsheet data using a PivotTable, for example, type in something like summarize with pivot table. You’ll get a menu showing potential matches for the task. In this instance, the top result is a direct link to the form for summarizing with a PivotTable — select it and you’ll start your task right away, without having to go to the Ribbon’s Insert tab first. The search box makes it easy to perform just about any task in Excel. Preston Gralla / Foundry If you’d like more information about your task, the final items that appear in the menu let you select from related Help topics. Even if you consider yourself a spreadsheet jockey, it’s worth your while to try out the enhanced search function. It’s a big time-saver, and far more efficient than hunting through the Ribbon to find a command. Also useful is that it remembers the features you’ve previously clicked on in the box, so when you click in it, you first see a list of previous tasks you’ve searched for. That makes sure that tasks that you frequently perform are always within easy reach. And it puts tasks you rarely do within easy reach as well. Users of enterprise and education editions of Microsoft 365 can also use the Search box to find people in their organization, SharePoint resources, and other personalized results from within Excel. (See the Microsoft Search support page for more details about all it can do.) Explore Excel’s advanced chart types Charts are great for visualizing and presenting spreadsheet data, and for gaining insights from it. To that end, Microsoft has introduced a number of advanced chart types over the past several years, including most notably a histogram (frequently used in statistics), a “waterfall” that’s effective at showing running financial totals, and a hierarchical treemap that helps you find patterns in data. Note that the new charts are available only if you’re working in an .xlsx document. If you use the older .xls format, you won’t find them. To see all the charts, put your cursor in a cell or group of cells that contains data, select Insert > Recommended Charts and click the All Charts tab. You’ll find the newer charts, mixed in with the older ones. Select any to create the chart. (For help using charts, see our guide to charts and sparklines in Excel.) Excel includes several advanced chart types, including waterfall. Preston Gralla / Foundry These are the new chart types: Treemap. This chart type creates a hierarchical view of your data, with top-level categories (or tree branches) shown as rectangles, and with subcategories (or sub-branches) shown as smaller rectangles grouped inside the larger ones. Thus, you can easily compare the sizes of top-level categories and subcategories in a single view. For instance, a bookstore can see at a glance that it brings in more revenue from 1st Readers, a subcategory of Children’s Books, than for the entire Non-fiction top-level category. srcset="https://b2b-contenthub.com/wp-content/uploads/2025/05/excel2016_chart_treemap.jpg?quality=50&strip=all 830w, https://b2b-contenthub.com/wp-content/uploads/2025/05/excel2016_chart_treemap.jpg?resize=300%2C191&quality=50&strip=all 300w, https://b2b-contenthub.com/wp-content/uploads/2025/05/excel2016_chart_treemap.jpg?resize=768%2C489&quality=50&strip=all 768w, https://b2b-contenthub.com/wp-content/uploads/2025/05/excel2016_chart_treemap.jpg?resize=264%2C168&quality=50&strip=all 264w, https://b2b-contenthub.com/wp-content/uploads/2025/05/excel2016_chart_treemap.jpg?resize=132%2C84&quality=50&strip=all 132w, https://b2b-contenthub.com/wp-content/uploads/2025/05/excel2016_chart_treemap.jpg?resize=753%2C480&quality=50&strip=all 753w, https://b2b-contenthub.com/wp-content/uploads/2025/05/excel2016_chart_treemap.jpg?resize=565%2C360&quality=50&strip=all 565w, https://b2b-contenthub.com/wp-content/uploads/2025/05/excel2016_chart_treemap.jpg?resize=392%2C250&quality=50&strip=all 392w" width="830" height="529" sizes="(max-width: 830px) 100vw, 830px">A treemap chart lets you easily compare top-level categories and subcategories in a single view. Preston Gralla / Foundry Sunburst. This chart type also displays hierarchical data, but in a multi-level pie chart. Each level of the hierarchy is represented by a circle. The innermost circle contains the top-level categories, the next circle out shows subcategories, the circle after that subsubcategories and so on. Sunbursts are best for showing the relationships among categories and subcategories, while treemaps are better at showing the relative sizes of categories and subcategories. A sunburst chart shows hierarchical data such as book categories and subcategories as a multi-level pie chart. Preston Gralla / Foundry Waterfall. This chart type is well-suited for visualizing financial statements. It displays a running total of the positive and negative contributions toward a final net value. A waterfall chart shows a running total of positive and negative contributions, such as revenue and expenses, toward a final net value. Preston Gralla / Foundry Histogram. This kind of chart shows frequencies within a data set. It could, for example, show the number of books sold in specific price ranges in a bookstore. Histograms are good for showing frequencies, such as number of books sold at various price points. Preston Gralla / Foundry Pareto. This chart, also known as a sorted histogram, contains bars as well as a line graph. Values are represented in descending order by bars. The cumulative total percentage of each bar is represented by a rising line. In the bookstore example, each bar could show a reason for a book being returned (defective, priced incorrectly, and so on). The chart would show, at a glance, the primary reasons for returns, so a bookstore owner could focus on those issues. Note that the Pareto chart does not show up when you select Insert > Recommended Charts > All Charts. To use it, first select the data you want to chart, then select Insert > Insert Statistic Chart, and under Histogram, choose Pareto. In a Pareto chart, or sorted histogram, a rising line represents the cumulative total percentage of the items being measured. In this example, it’s easy to see that more than 80% of a bookstore’s returns are attributable to three problems. Preston Gralla / Foundry Box & Whisker. This chart, like a histogram, shows frequencies within a data set but provides for a deeper analysis than a histogram. For example, in a bookstore it could show the distribution of prices of different genres of books. In the example shown here, each “box” represents the first to third quartile of prices for books in that genre, while the “whiskers” (the lines extending up and down from the box) show the upper and lower range of prices. Outliers that are priced outside the whiskers are shown as dots, the median price for each genre is shown with a horizontal line across the box, and the mean price is shown with an x. Box & Whisker charts can show details about data ranges such as the first to third quartile in the “boxes,” median and mean inside the boxes, upper and lower range with the “whiskers,” and outliers with dots.Preston Gralla / Foundry Funnel. This chart type is useful when you want to display values at multiple stages in a process. A funnel chart can show the number of sales prospects at every stage of a sales process, for example, with prospects at the top for the first stage, qualified prospects underneath it for the second stage, and so on, until you get to the final stage, closed sales. Generally, the values in funnel charts decrease with each stage, so the bars in the chart look like a funnel. Funnel charts let you display values at multiple stages in a process. Preston Gralla / Foundry When creating the data for a funnel chart, use one column for the stages in the process you’re charting, and a second column for the values for each stage. Once you’ve done that, to create the chart, select the data, then select Insert > Recommended Charts > All Charts > Funnel. Map. Map charts do exactly what you think they should: They let you compare data across different geographical regions, such as countries, regions, states, counties, or postal codes. Excel will automatically recognize the regions and create a map that visualizes the data. You can compare data across different locations with a map chart. Preston Gralla / Foundry To create a map chart, select the data you want to chart, then select Insert > Maps, then select the map chart. Note that in some instances, Excel might have a problem creating the map — for example, if there are multiple locations with the same name as one that you’re mapping. If that occurs, you’ll have to add one or more columns with details about the locations. If, say, you’re charting towns in the United Kingdom, you would have to include columns for the county and country each town is located in. Collaborate in real time For those who frequently collaborate with others, a welcome feature in Excel for Microsoft 365 is real-time collaboration that lets people work on spreadsheets together from anywhere in the world with an internet connection. Microsoft calls this “co-authoring.” Note that in order to use co-authoring, the spreadsheet must be stored in OneDrive, OneDrive for Business, or SharePoint Online, and you must be logged into your Microsoft 365 account. Also, co-authoring works in Excel only if you have AutoSave turned on. To do it, choose the On option on the AutoSave slider at the top left of the screen. To share a spreadsheet so you can collaborate on it with others: first open it, then click the Share button on the upper-right of the Excel screen. The “Send link” window pops up. Here you can send an email with a link where others can access the spreadsheet. Use the “Send link” pane to share a document and the “Link settings” pane to fine-tune its access permissions. Preston Gralla / Foundry Enter the email address of the person with whom you want to share in the text box. Enter multiple addresses, separated by commas, if you want to share the workbook with multiple people. One feature I found particularly useful when adding email addresses: As you type, Excel looks through your corporate or personal address book and lists the names and addresses of contacts who match the text you’ve input. Click the address you want to add. This not only saves you a bit of time but helps make sure you don’t incorrectly type in addresses. Next, decide whether anyone with the link can access the file, or only those whose email addresses you enter. If you see the text “Anyone with the link can edit” near the top of the pane, you can change that by clicking it, then choosing Specific people on the screen that appears. Similarly, if “Specific people” appears above the email addresses, you can change that by clicking it, then choosing Anyone with the link can edit from the screen that appears. (If you use a business, enterprise, or education edition of Office, your IT department may have set up different sharing permissions on these two screens, such as an option to allow anyone within your organization to edit the document. You may also need to click a Link settings button — a gear icon — to access the “Link settings” pane.) On this second screen you can also set the document to read-only for everybody, or allow everybody to edit it. In the “Other settings” section, click the down arrow and choose either Can edit, which allows full editing, or Can view, which is read-only. If you want to give certain people editing privileges and others view-only privileges, you can send two separate invitations with different rights selected. On this screen you can also set an expiration date after which people won’t be able to access the file, and you can set a password so that only people who have the password can access it. When you’ve made your selections, click Apply. Back in the main “Send link” screen, you can send a message along with the link by typing it into the Message box. Then click Send. An email is sent to all the recipients with a link they can click to open the document. Your collaborators will get an email like this when you share a spreadsheet. Preston Gralla / Foundry (If you’d rather send recipients a copy of the file as an Excel file instead of a link, and thus not allow real-time collaboration, click Send a copy at the bottom of the “Send link” screen.) There’s another way to share a file stored in a personal OneDrive for collaboration: In the “Copy link” area at the bottom of the “Send link” pane, click Copy. When you do that, you can copy the link and send it to someone yourself via email. Note that you have the same options for setting access and editing permissions as you do if you have Excel send the link directly for you. Just click Anyone with the link can edit or Specific people below “Copy link,” and follow the instructions above. To begin collaborating: When your recipients receive the email and click to open the spreadsheet, they’ll open it in the web version of Excel in a browser, not in the desktop version of Excel. If you’ve granted them edit permissions, they can begin editing immediately in the browser or else click Editing > Open in Desktop App on the upper right of the screen to work in the Excel desktop client. Excel for the web is less powerful and polished than the desktop client, but it works well enough for real-time collaboration. As soon as any collaborators open the file, you’ll see a colored cursor that indicates their presence in the file. Each person collaborating gets a different color. Hover your cursor over a colored cell that indicates someone’s presence, and you’ll see their name. Once they begin editing the workbook, such as entering data or a formula into a cell, creating a chart, and so on, you see the changes they make in real time. Your cursor also shows up on their screen as a color, and they see the changes you make. You can easily see where collaborators are working in a shared worksheet. Preston Gralla / Foundry Collaboration includes the ability to make comments in a file, inside individual cells, without actually changing the contents of the cell. To do it, right-click a cell, select New Comment and type in your comment. Everyone collaborating can see that a cell has a comment in it — it’s indicated by a small colored notch appearing in the upper right of the cell. The color matches the person’s collaboration color. To see someone’s comment in a cell, hover your cursor over the cell or put your cursor in the cell and you’ll see the comment, the name of the person who made the comment, and a Reply box you can use to send a reply. You can also click the Comments button on the upper right of the screen to open the Comments pane, which lists every comment by every person. Click any comment to jump to the cell it’s in. You can also reply when you click a comment in the pane. You can make see comments that other people make, and make comments yourself. Preston Gralla / Foundry Take advantage of linked data Excel for Microsoft 365 has a feature that Microsoft calls “linked data types.” Essentially, they’re cells that are connected to an online source (Bing) that automatically updates their information — for example, a company’s current stock price. As I write this, there are nearly approximately 100 linked data types, including not just obvious data types such as stocks, geography, and currencies, but many others, including chemistry, cities, anatomy, food, yoga, and more. To use them, type the items you want to track into cells in a single column. For stocks, for example, you can type in a series of stock ticker symbols, company names, fund names, etc. After that, select the cells, then on the Ribbon’s Data tab, select Stocks in the Data Types section in the middle. (If you had typed in geographic names such as countries, states, or cities, you would instead select Geography.) Excel automatically converts the text in each cell into the matching data source — in our example, into the company name and stock ticker. Excel also adds a small icon to the left edge of each cell identifying it as a linked cell. Click any icon and a data card will pop up showing all sorts of information about the kind of information you’ve typed in.  For instance, a stock data card shows stock-related information such as current price, today’s high and low, and 52-week high and low, as well as general company information including industry and number of employees. A location card shows the location’s population, capital, GDP, and so on. You can build out a table using data from the data card. To do so, select the cells again, and an Insert Data button appears. Click the button, then select the information you want to appear, such as Price for the current stock price, or Population for the population of a geographic region. srcset="https://b2b-contenthub.com/wp-content/uploads/2025/05/excel-microsoft365-15-linked-data-2023.jpg?quality=50&strip=all 620w, https://b2b-contenthub.com/wp-content/uploads/2025/05/excel-microsoft365-15-linked-data-2023.jpg?resize=300%2C293&quality=50&strip=all 300w, https://b2b-contenthub.com/wp-content/uploads/2025/05/excel-microsoft365-15-linked-data-2023.jpg?resize=172%2C168&quality=50&strip=all 172w, https://b2b-contenthub.com/wp-content/uploads/2025/05/excel-microsoft365-15-linked-data-2023.jpg?resize=86%2C84&quality=50&strip=all 86w, https://b2b-contenthub.com/wp-content/uploads/2025/05/excel-microsoft365-15-linked-data-2023.jpg?resize=491%2C480&quality=50&strip=all 491w, https://b2b-contenthub.com/wp-content/uploads/2025/05/excel-microsoft365-15-linked-data-2023.jpg?resize=368%2C360&quality=50&strip=all 368w, https://b2b-contenthub.com/wp-content/uploads/2025/05/excel-microsoft365-15-linked-data-2023.jpg?resize=256%2C250&quality=50&strip=all 256w" width="620" height="606" sizes="(max-width: 620px) 100vw, 620px">Linked data types let you insert information, such as a company’s high and low stock prices, that is continually updated. Preston Gralla / Foundry Excel will automatically add a column to the right populated with the latest information for each item you’re tracking, and will keep it updated. You can click the Insert Data button multiple times to keep adding columns to the right for different types of data from the item’s data card.  It’s helpful to add column headers so you know what each column is showing. Make your own custom views of a worksheet Sheet Views let you make a copy of a sheet and then apply filtered or sorted views of the data to the new sheet. It’s useful when you’re working with other people on a spreadsheet, and someone wants to create a customized view without altering the original sheet. You can all create multiple custom-filtered/sorted views for a sheet. Once you’ve saved a sheet view, anyone with access to the spreadsheet can see it. Note: To use this feature, your spreadsheet must be stored in OneDrive. Sheet views work best when your data is in table format. Select the data, then go to the Ribbon toolbar and click the Insert tab. Near the left end of the Insert toolbar, click the Table button and then OK. To create a new sheet view, click the Ribbon’s View tab, then click the New button in the Sheet View area at the far left. The row numbers and column letters at the left and top of your spreadsheet turn black to let you know you’re in a new sheet view. In the Sheet View area of the Ribbon, it says Temporary View, the default name given to a new sheet view before you’ve saved it. Here’s a sheet view with data sorted from highest to lowest costs. Preston Gralla / Foundry Now apply whatever sorting and filtering you like to the data. (If you need help, see the “How to sort and filter data” section of our Excel tables guide.) To save this view, click the Keep button in the Sheet View area of the Ribbon. When you do that, it is saved as “View1” by default. You can click View1 and type in a more meaningful name for the view. When you click Exit on this toolbar, you return to your spreadsheet, and the row numbers and columns on the left and top of the spreadsheet are no longer black. To switch from one sheet view to another, click the View tab. At the left of the Ribbon toolbar, click the down arrow next to the name of the current view (it will say Default if you’re viewing the spreadsheet without a sheet view applied) to open a dropdown list of the sheet views created for the spreadsheet. Click the name of a sheet view to switch to it. Whenever you’re looking at a sheet view, the row numbers and column letters framing your spreadsheet remain black to indicate that you’re in a sheet view, not the original spreadsheet. Create dynamic arrays and charts Dynamic arrays let you write formulas that return multiple values based on your data. When data on the spreadsheet is updated, the dynamic arrays automatically update and resize themselves. To create a dynamic array, first create a table as outlined in the previous tip. Make sure to include a column that lists categories. Also put in at least one column to its right that lists corresponding values. Put a header at the top of each column. So, for example, if you’re creating a spreadsheet for a business trip budget, Column A might list expenses, such as plane tickets, meals, hotel, etc., and Column B could list each item’s cost on the same row. Once you’ve set up the table, use a dynamic array function on it, such as FILTER, SORT, or UNIQUE to create a dynamic array next to the table. Here’s an example of a formula for using the FILTER function: =FILTER(A2:B9, B2:B9 < 2000) This tells Excel to show only the items that cost less than $2,000 in the array. The FILTER function created a data array showing only the items with costs below $2,000. Preston Gralla / Foundry Now, whenever the data in your source table changes, the dynamic array updates and resizes itself to accommodate the changes. That means the dynamic array is always up to date. So in our example, if you add new items with values under $2,000 to the table, the dynamic array will enlarge itself and include those new items. In the same way, you can use the SORT function to sort data and the UNIQUE function to remove duplicate data. (Read about more ways to use the FILTER, SORT, and UNIQUE functions from Microsoft support.) You create a dynamic chart from the dynamic array in the same way you do any other Excel chart. Select the cells from the dynamic array that you want to chart, then select the Insert tab and select the type of chart you want to add. When the source data changes in a way that affects the dynamic array that the chart is based on, both the dynamic array and the chart will be updated. Use AutoSave to provide a safety net as you work If you’re worried that you’ll lose your work on a worksheet because you don’t constantly save it, you’ll welcome the AutoSave feature. It automatically saves your files for you, so you won’t have to worry about system crashes, power outages, Excel crashes and similar problems. It only works only on documents stored in OneDrive, OneDrive for Business, or SharePoint Online. It won’t work with files saved in the older .xls format or files you save to your hard drive. AutoSave is a vast improvement over the previous AutoRecover feature built into Excel. AutoRecover doesn’t save your files in real time; instead, every several minutes it saves an AutoRecover file that you can try to recover after a crash. It doesn’t always work, though — for example, if you don’t properly open Excel after the crash, or if the crash doesn’t meet Microsoft’s definition of a crash. In addition, Microsoft notes, “AutoRecover is only effective for unplanned disruptions, such as a power outage or a crash. AutoRecover files are not designed to be saved when a logoff is scheduled or an orderly shutdown occurs.” And the files aren’t saved in real time, so you’ll likely lose several minutes of work even if all goes as planned. AutoSave is turned on by default in Excel for Microsoft 365 .xlsx workbooks stored in OneDrive, OneDrive for Business, or SharePoint Online. To turn it off (or back on again) for a workbook, use the AutoSave slider on the top left of the screen. If you want AutoSave to be off for all files by default, select File > Options > Save and uncheck the box marked AutoSave files stored in the Cloud by default on Excel. Using AutoSave may require some rethinking of your workflow. Many people are used to creating new worksheets based on existing ones by opening the existing file, making changes to it, and then using Save As to save the new version under a different name, leaving the original file intact. Be warned that doing this with AutoSave enabled will save your changes in the original file. Instead, Microsoft suggests opening the original file and immediately selecting File > Save a Copy (which replaces Save As when AutoSave is enabled) to create a new version. If AutoSave does save unwanted changes to a file, you can always use the Version History feature described below to roll back to an earlier version. Review or restore earlier versions of a spreadsheet There’s an extremely useful feature hiding in the title bar in Excel for Microsoft 365: You can use Version History to go back to previous versions of a file, review them, compare them side-by-side with your existing version, and copy and paste from an older file to your existing one. You can also restore an entire old version. To do it, click the file name at the top of the screen in an open file. A drop-down menu appears. Click Version History, and the Version History pane appears on the right side of the screen with a list of the previous versions of the file, including the time and date they were saved. (Alternatively, you can select the File tab on the Ribbon, click Info from the menu on the left, and then click the Version History button.) Use Version History to see all previous versions of a spreadsheet, copy and paste from an older file to your existing one, or restore an entire old version. Preston Gralla / Foundry In the Version History pane, click Open version under any older version, and that version appears as a read-only version in a new window. Scroll through the version and copy any content you want, then paste it into the latest version of the file. To restore the old version, overwriting the current one, click the Restore button. Try out Microsoft 365 Copilot in Excel — but don’t expect too much For an additional subscription fee, business users of Excel can use Microsoft’s genAI add-in, Microsoft 365 Copilot. You can have Copilot suggest and create charts, create formulas, mine spreadsheets for data insights you might have missed, and more. If you have a Microsoft 365 Personal or Family subscription, many of those features are now bundled with your core subscription. To start using Copilot in Excel, open a spreadsheet and click the Copilot button at the right of the Ribbon’s Home tab. The Copilot panel will appear on the right, offering suggestions for actions it can perform, such as summarizing your data with a chart, adding formulas to the spreadsheet, or applying conditional formatting to the sheet. You can also chat with Copilot in the panel, asking questions about your data or how to perform an action yourself. Note that these suggestions are generic and won’t always make sense. For example, when you start with a blank worksheet and click the Copilot button, its suggestions include summarizing data using pivot tables or charts, even though there’s no data to chart or put into a table. Microsoft 365 Copilot can help you in multiple ways in Excel, including creating formulas and charts, mining spreadsheets for insights, and more. Preston Gralla / Foundry In my testing, I found that Copilot wasn’t particularly helpful. For example, when I asked it to summarize data using a PivotTable or chart, several times it responded, “Something went wrong. Please try again in a moment.” Then it said that I first needed to reformat parts of my spreadsheet by using the Transform() function, and gave confusing advice on how I could do it — it wouldn’t do the task itself. (Eventually, I gave up.) When I asked it to suggest conditional formatting for my spreadsheet, which would highlight important data, it told me which data I should highlight but didn’t explain why the data was important. It also didn’t do the highlighting for me or tell me how to do it. I gave it one more try and asked it to perform an advanced analysis, which it would use Python to do. It certainly did something, although it was unclear what it was. It overwrote my original spreadsheet and added a section that claimed to show annual growth rates for revenue streams. But the data seemed to be incorrect. Perhaps advanced spreadsheet jockeys might be able to make sense of what Copilot is up to whenever they ask it for help. But mere mortal businesspeople may find it of no help at all. In my testing, I found Copilot not at all helpful, although spreadsheet jockeys may be able to make some sense of what it does. Preston Gralla / Foundry What’s more, Microsoft’s focus on Copilot in M365 has reduced the usefulness of Excel in some ways. For example, there used to be a handy feature called Smart Lookup that let you conduct targeted web searches from inside Excel. But at the beginning of 2025, Microsoft removed Smart Lookup from Excel, saying that the feature has been deprecated. Now the only way to search the web from inside Excel is via Copilot, which lacks some features of Smart Lookup — notably the ability to highlight words or phrases in a document and trigger an automatic web search. And M365 Copilot isn’t available to business customers unless they pay the additional subscription fee. Other features to check out Spreadsheet pros will be pleased with several other features and tools that have been added to Excel for Microsoft 365 over the past few years, from a quick data analysis tool to an advanced 3D mapping platform. Get an instant data analysis If you’re looking to analyze data in a spreadsheet, the Quick Analysis tool will help. Highlight the cells you want to analyze, then move your cursor to the lower right-hand corner of what you’ve highlighted. A small icon of a spreadsheet with a lightning bolt on it appears. Click it and you’ll get a variety of tools for performing instant analysis of your data. For example, you can use the tool to highlight the cells with a value greater than a specific number, get the numerical average for the selected cells, or create a chart on the fly. The Quick Analysis feature gives you a variety of tools for analyzing your data instantly. Preston Gralla / Foundry Translate text You can translate text from right within Excel. Highlight the cell whose text you want translated, then select Review > Translate. A Translator pane opens on the right. Excel will detect the words’ language at the top of the pane; you then select the language you want it translated to below. If Excel can’t detect the language of the text you chose or detects it incorrectly, you can override it. Easily find worksheets that have been shared with you It’s easy to forget which worksheets others have shared with you. In Excel for Microsoft 365 there’s an easy way to find them: Select File > Open > Shared with Me to see a list of them all. Note that this only works with OneDrive (both Personal and Business) and SharePoint Online. You’ll also need to be signed into you Microsoft or work or school account. Predict the future with Forecast Sheet Using the Forecast Sheet function, you can generate forecasts built on historical data. If, for example, you have a worksheet showing past book sales by date, Forecast Sheet can predict future sales based on past ones. To use the feature, you must be working in a worksheet that has time-based historical data. Put your cursor in one of the data cells, go to the Data tab on the Ribbon and select Forecast Sheet from the Forecast group toward the right. On the screen that appears, you can select various options such as whether to create a line or bar chart and what date the forecast should end. Click the Create button, and a new worksheet will appear showing your historical and predicted data and the forecast chart. (Your original worksheet will be unchanged.) The Forecast Sheet feature can predict future results based on historical data. Preston Gralla / Foundry Manage data for analysis with Get & Transform This feature is not entirely new to Excel. Formerly known as Power Query, it was made available as a free add-in to Excel 2013 and worked only with the PowerPivot features in Excel Professional Plus. Microsoft’s Power BI business intelligence software offers similar functionality. Now called Get & Transform, it’s a business intelligence tool that lets you pull in, combine, and shape data from wide variety of local and cloud sources. These include Excel workbooks, CSV files, SQL Server and other databases, Azure, Active Directory, and many others. You can also use data from public sources including Wikipedia. Get & Transform helps you pull in and shape data from a wide variety of sources. Preston Gralla / Foundry You’ll find the Get & Transform tools together in a group on the Data tab in the Ribbon. For more about using these tools, see Microsoft’s “Getting Started with Get & Transform in Excel.” Make a 3D map Before Excel 2016, Power Map was a popular free 3D geospatial visualization add-in for Excel. Now it’s free, built into Excel for Microsoft 365, and has been renamed 3D Maps. With it, you can plot geographic and other information on a 3D globe or map. You’ll need to first have data suitable for mapping, and then prepare that data for 3D Maps. Those steps are beyond the scope of this article, but here’s advice from Microsoft about how to get and prepare data for 3D Maps. Once you have properly prepared data, open the spreadsheet and select Insert > 3D Map > Open 3D Maps. Then click Enable from the box that appears. That turns on the 3D Maps feature. For details on how to work with your data and customize your map, head to the Microsoft tutorial “Get started with 3D Maps.” If you don’t have data for mapping but just want to see firsthand what a 3D map is like, you can download sample data created by Microsoft. The screenshot shown here is from Microsoft’s Dallas Utilities Seasonal Electricity Consumption Simulation demo. When you’ve downloaded the workbook, open it up, select Insert > 3D Map > Open 3D Maps and click the map to launch it. With 3D Maps you can plot geospatial data in an interactive 3D map. Preston Gralla / Foundry Automate tasks If you have OneDrive for Business and use Excel with a commercial or educational Microsoft 365 license, you can automate tasks with the Automate tab. You’ll be able to create and edit scripts with the Code Editor, run automated tasks with a button click, and share the script with co-workers. See Microsoft’s “Office Scripts in Excel” documentation for details. Insert data from a picture into Excel There are times you may find data inside an image file that you’d like to get into Excel. Typically, you’ll have to input the data from it manually. There’s now a way to have Excel convert the information on the image into data for a worksheet. In the Get & Transform Data group on the Data tab, click the From Picture dropdown and select Picture From File to choose the image you want to grab data from, or Picture from Clipboard to take a screenshot of an image on your PC and then import the data. For more details, see Microsoft’s “Insert data from picture” support page.   Use keyboard shortcuts Here’s one last productivity tip: If you memorize a handful of keyboard shortcuts for common tasks in Excel, you can save a great deal of time over hunting for the right command to click on. See “Handy Excel keyboard shortcuts for Windows and Mac” for our favorites. This article was originally published in August 2019 and most recently updated in May 2025. More Excel tutorials: Excel basics: Get started with tables Excel basics: Get started with charts and sparklines How to use PivotTables and PivotCharts in Excel How to use slicers in Excel How to use Excel formulas and functions How (and why) to use conditional formatting in Excel How to use Excel macros to save time and automate your work
    0 Комментарии ·0 Поделились ·0 предпросмотр
  • Pizza Bandit Combines Gears of War and Overcooked for a Tasty Shooter Slice

    You ever wonder who the first person to put peanut butter and chocolate together was? Part of me feels like whoever it was must be loaded; I mean, you’ve combined two already great flavors into something that Reese’s would more or less build a whole brand on. And then part of me thinks it plays out like the hypothetical guy who invented the Chicken McNugget in The Wire. A pat on the back from a big shot, and then it’s back to the basement to figure out a way to make the fries taste better. I don’t know the answer; I hope it's the former. But every now and then, you come across an idea, a combination of things, that’s so good that you wonder how nobody’s ever done it before. And every time my squad and I sprinted back to our time-traveling dropship, stopping only to deal with the Time Reapers that stood in our way, I wondered how the hell nobody had ever said “Hey, what if we combined Overcooked and Gears of War?” pre-Pizza Bandit.Pizza Bandit’s setup is pretty simple. You’re Malik, a former bounty hunter with dreams of being a chef who is pulled back into the bounty game when he’s scammed out of his pizza shop and his former crew needs his help to get out of a jam. Pizza Bandit’s writing is pretty silly, but that’s part of the charm. I can’t get mad when Albert, the android that upgrades your weapons, tells me he doesn’t know how to apologize for what happened to my pizza shop because he’s just an android, or when my pilot waxes nostalgic about how he misses the fog, or when someone utters the odd nonsensical line. It’s too silly, and the whole setup is just there to, well… set up Pizza Bandit’s wackiness.PlaySee, you’re not just any bounty-hunting crew. You’re a time-traveling bounty hunting crew, and that means you’ll be going all over space and time to get the job done. Don’t ask me how any of this works. All I know is that pizza heals and bullets kill, and that the Time Reapers — nasty little buggers that seem to be invading every timeline — don’t want this pizza shop owner to make any dough. And that’s not gonna fly. Pizza Bandit’s writing is pretty silly, but that’s part of the charm.“What makes Pizza Bandit unique is that you’re not just shooting stuff. You’re also, well, kinda playing Overcooked. After squading up, my first mission saw my crewheading to the Restaurant from N owhere, a hidden outpost run by another bandit crew. Our job: fulfill the pizza orders for other bounty hunting teams, and send them off in time-traveling rocket pods. That meant putting together the right type of pizza, getting it to the oven, making sure we were getting their drink orders right, and adding some extra bullets for when things got spicy, cramming it all into a pod, and doing it on time while fighting off the Time Reapers, who really, really don’t like supporting small businesses.Pizza Bandit ScreenshotsAnd that’s where the other part of the Overcooked/Gears of War marriage comes into play. See, the Time Reapers mean business, and you’re not going to talk them out of some time reaping. That’s their whole bag. The only solution, fellow bandit, is incredible violence. I’ve played several builds of Pizza Bandit at this point, and let me tell you, your arsenal is up to the task. You start with your choice of assau lt rifle, minigun, and sniper rifle, but the fun really begins when you start unlocking your secondary weapons by completing jobs. They start simple: landmines, grenades, that sort of thing, but once you unlock the disco ball that attracts enemies and gets them dancing before it explodes? Whew, buddy. And the sentry turret? Perfection. You could slice and dice them Time Reapers with a katana, but have you ever considered using a pizza slicer as big as a man? It’ll change your life.And the Time Reapers will force you to use everything in your arsenal. You got your standard guys who will just run at you, but there are also Time Reapers that’ll crawl around on all fours, Terminator-looking ones that will leap at you, giant ones with hammers, guys who throw fireballs, the works. You gotta prioritize.Pizza Bandit is at its best when you’re with a good team, calling out orders. A good match should be shouts of “We need a pepperoni pie!” and “I’m on the Coke!” and “I’m down!” interspersed with lots and lots of gunfire. Simple choices, like when to call down your own, once-a-mission rocket pod full of pizza and supplies, and more complex ones, like where to put it, spice things up, too. And here’s the thing: so far, I’ve just talked about Restaurant from Nowhere, which is only the first level. Pizza Bandit isn’t a one-trick pony. One of my favorite levels has you taking over a sushi joint and making sure you have the right stuff on the delivery turntable for your customers. Sometimes that means running downstairs and grabbing a big ol’ tuna, taking that bad boy upstairs, and chopping him up before the Time Reapers whack you and you drop him. Other times that means frying an egg, or making a cucumber roll. You gotta stay ahead of the curve, because new customers are prioritized over old ones, and the Time Reapers aren’t gonna sit there and wait for you to plate your masterpiece.Sometimes, you’re not even cooking food at all. Another favorite level, Wizard’s Tomb, has you exploring a magically booby-trapped tomb in search of a sarcophagus. You’ll have to navigate the tomb’s traps, solve basic puzzles to reveal the way forward, and take out the arcane heart powering the whole enterprise before getting to the sarcophagus itself, which you’ll naturally transport with jetpacks before booking it back to your ship. It isn’t enough to get any given job done; you gotta get home, too. Just another day in the life of a pizza bandit.Pizza Bandit is always ludicrous, and its inspirations are obvious, but it’s never less than fun.“There are more, of course: in one, you’ll defend a cabin with Dr. Emmert Brownewhile he invents the time travel device that makes your whole business profitable. Winning it all means keeping him warm, satiating his hunger with rabbit or venison, and stopping all those nasty Time Reaperswho are trying to stop time travel from happening. You’d think that the Time Reapers would understand time paradoxes, but I guess not. Can’t reap time if there’s no time to reap, y’all. Or maybe you’ll break into an enormous safe with a laser drill, like you’re roleplaying the opening scene of Michael Mann’s Thief with a drill that’s constantly exploding. That seems safe, right? But hey, apparently there’s a magical cookbook in that vault whose recipes can alter reality, and we’re being paid to get it, exploding drill or not. A Pizza Bandit always gets the job done. And there’s always time to do your best Breaking Bad impersonation and help a couple of guys cook some “magic powder” and hide it inside some chicken. Oh, and you have to kill and cook the chickens. Only fresh, never frozen, baby. Pizza Bandit is always ludicrous, and its inspirations are obvious, but it’s never less than fun.Between missions, it’s back to Pizza Bandit, where you can acquire and upgrade your weapons, decorate Pizza Bandit itself, use the ingredients you find during missions to bake and share a pie for some stat boosts on your next run, or get some spiffy new duds for your bounty hunter. The milk carton backpack is a classic choice, if I do say so myself, but I’m still saving up for one of the cat ones. The things we do for fashion, am I right? Then it’s right back to it. A bandit’s work is never done.Sometimes, you don’t know you want something until you get it. I didn’t know I wanted Pizza Bandit until the first time I played it at PAX two years ago. It was one of those games that generated a lot of word of mouth, but it’s one of those concepts that doesn’t seem like it’ll work until you get a controller in your hands and everything makes sense. I don’t know why we’ve never gotten something like Pizza Bandit before, but once I played it, I knew I wanted more. Pizza heals, bullets kill, and Pizza Bandit rocks. If Jofsoft can stick the landing, we’re in for a tasty slice of New York pie.
    #pizza #bandit #combines #gears #war
    Pizza Bandit Combines Gears of War and Overcooked for a Tasty Shooter Slice
    You ever wonder who the first person to put peanut butter and chocolate together was? Part of me feels like whoever it was must be loaded; I mean, you’ve combined two already great flavors into something that Reese’s would more or less build a whole brand on. And then part of me thinks it plays out like the hypothetical guy who invented the Chicken McNugget in The Wire. A pat on the back from a big shot, and then it’s back to the basement to figure out a way to make the fries taste better. I don’t know the answer; I hope it's the former. But every now and then, you come across an idea, a combination of things, that’s so good that you wonder how nobody’s ever done it before. And every time my squad and I sprinted back to our time-traveling dropship, stopping only to deal with the Time Reapers that stood in our way, I wondered how the hell nobody had ever said “Hey, what if we combined Overcooked and Gears of War?” pre-Pizza Bandit.Pizza Bandit’s setup is pretty simple. You’re Malik, a former bounty hunter with dreams of being a chef who is pulled back into the bounty game when he’s scammed out of his pizza shop and his former crew needs his help to get out of a jam. Pizza Bandit’s writing is pretty silly, but that’s part of the charm. I can’t get mad when Albert, the android that upgrades your weapons, tells me he doesn’t know how to apologize for what happened to my pizza shop because he’s just an android, or when my pilot waxes nostalgic about how he misses the fog, or when someone utters the odd nonsensical line. It’s too silly, and the whole setup is just there to, well… set up Pizza Bandit’s wackiness.PlaySee, you’re not just any bounty-hunting crew. You’re a time-traveling bounty hunting crew, and that means you’ll be going all over space and time to get the job done. Don’t ask me how any of this works. All I know is that pizza heals and bullets kill, and that the Time Reapers — nasty little buggers that seem to be invading every timeline — don’t want this pizza shop owner to make any dough. And that’s not gonna fly. Pizza Bandit’s writing is pretty silly, but that’s part of the charm.“What makes Pizza Bandit unique is that you’re not just shooting stuff. You’re also, well, kinda playing Overcooked. After squading up, my first mission saw my crewheading to the Restaurant from N owhere, a hidden outpost run by another bandit crew. Our job: fulfill the pizza orders for other bounty hunting teams, and send them off in time-traveling rocket pods. That meant putting together the right type of pizza, getting it to the oven, making sure we were getting their drink orders right, and adding some extra bullets for when things got spicy, cramming it all into a pod, and doing it on time while fighting off the Time Reapers, who really, really don’t like supporting small businesses.Pizza Bandit ScreenshotsAnd that’s where the other part of the Overcooked/Gears of War marriage comes into play. See, the Time Reapers mean business, and you’re not going to talk them out of some time reaping. That’s their whole bag. The only solution, fellow bandit, is incredible violence. I’ve played several builds of Pizza Bandit at this point, and let me tell you, your arsenal is up to the task. You start with your choice of assau lt rifle, minigun, and sniper rifle, but the fun really begins when you start unlocking your secondary weapons by completing jobs. They start simple: landmines, grenades, that sort of thing, but once you unlock the disco ball that attracts enemies and gets them dancing before it explodes? Whew, buddy. And the sentry turret? Perfection. You could slice and dice them Time Reapers with a katana, but have you ever considered using a pizza slicer as big as a man? It’ll change your life.And the Time Reapers will force you to use everything in your arsenal. You got your standard guys who will just run at you, but there are also Time Reapers that’ll crawl around on all fours, Terminator-looking ones that will leap at you, giant ones with hammers, guys who throw fireballs, the works. You gotta prioritize.Pizza Bandit is at its best when you’re with a good team, calling out orders. A good match should be shouts of “We need a pepperoni pie!” and “I’m on the Coke!” and “I’m down!” interspersed with lots and lots of gunfire. Simple choices, like when to call down your own, once-a-mission rocket pod full of pizza and supplies, and more complex ones, like where to put it, spice things up, too. And here’s the thing: so far, I’ve just talked about Restaurant from Nowhere, which is only the first level. Pizza Bandit isn’t a one-trick pony. One of my favorite levels has you taking over a sushi joint and making sure you have the right stuff on the delivery turntable for your customers. Sometimes that means running downstairs and grabbing a big ol’ tuna, taking that bad boy upstairs, and chopping him up before the Time Reapers whack you and you drop him. Other times that means frying an egg, or making a cucumber roll. You gotta stay ahead of the curve, because new customers are prioritized over old ones, and the Time Reapers aren’t gonna sit there and wait for you to plate your masterpiece.Sometimes, you’re not even cooking food at all. Another favorite level, Wizard’s Tomb, has you exploring a magically booby-trapped tomb in search of a sarcophagus. You’ll have to navigate the tomb’s traps, solve basic puzzles to reveal the way forward, and take out the arcane heart powering the whole enterprise before getting to the sarcophagus itself, which you’ll naturally transport with jetpacks before booking it back to your ship. It isn’t enough to get any given job done; you gotta get home, too. Just another day in the life of a pizza bandit.Pizza Bandit is always ludicrous, and its inspirations are obvious, but it’s never less than fun.“There are more, of course: in one, you’ll defend a cabin with Dr. Emmert Brownewhile he invents the time travel device that makes your whole business profitable. Winning it all means keeping him warm, satiating his hunger with rabbit or venison, and stopping all those nasty Time Reaperswho are trying to stop time travel from happening. You’d think that the Time Reapers would understand time paradoxes, but I guess not. Can’t reap time if there’s no time to reap, y’all. Or maybe you’ll break into an enormous safe with a laser drill, like you’re roleplaying the opening scene of Michael Mann’s Thief with a drill that’s constantly exploding. That seems safe, right? But hey, apparently there’s a magical cookbook in that vault whose recipes can alter reality, and we’re being paid to get it, exploding drill or not. A Pizza Bandit always gets the job done. And there’s always time to do your best Breaking Bad impersonation and help a couple of guys cook some “magic powder” and hide it inside some chicken. Oh, and you have to kill and cook the chickens. Only fresh, never frozen, baby. Pizza Bandit is always ludicrous, and its inspirations are obvious, but it’s never less than fun.Between missions, it’s back to Pizza Bandit, where you can acquire and upgrade your weapons, decorate Pizza Bandit itself, use the ingredients you find during missions to bake and share a pie for some stat boosts on your next run, or get some spiffy new duds for your bounty hunter. The milk carton backpack is a classic choice, if I do say so myself, but I’m still saving up for one of the cat ones. The things we do for fashion, am I right? Then it’s right back to it. A bandit’s work is never done.Sometimes, you don’t know you want something until you get it. I didn’t know I wanted Pizza Bandit until the first time I played it at PAX two years ago. It was one of those games that generated a lot of word of mouth, but it’s one of those concepts that doesn’t seem like it’ll work until you get a controller in your hands and everything makes sense. I don’t know why we’ve never gotten something like Pizza Bandit before, but once I played it, I knew I wanted more. Pizza heals, bullets kill, and Pizza Bandit rocks. If Jofsoft can stick the landing, we’re in for a tasty slice of New York pie. #pizza #bandit #combines #gears #war
    Pizza Bandit Combines Gears of War and Overcooked for a Tasty Shooter Slice
    www.ign.com
    You ever wonder who the first person to put peanut butter and chocolate together was? Part of me feels like whoever it was must be loaded; I mean, you’ve combined two already great flavors into something that Reese’s would more or less build a whole brand on. And then part of me thinks it plays out like the hypothetical guy who invented the Chicken McNugget in The Wire. A pat on the back from a big shot, and then it’s back to the basement to figure out a way to make the fries taste better. I don’t know the answer; I hope it's the former. But every now and then, you come across an idea, a combination of things, that’s so good that you wonder how nobody’s ever done it before. And every time my squad and I sprinted back to our time-traveling dropship, stopping only to deal with the Time Reapers that stood in our way, I wondered how the hell nobody had ever said “Hey, what if we combined Overcooked and Gears of War?” pre-Pizza Bandit.Pizza Bandit’s setup is pretty simple. You’re Malik, a former bounty hunter with dreams of being a chef who is pulled back into the bounty game when he’s scammed out of his pizza shop and his former crew needs his help to get out of a jam. Pizza Bandit’s writing is pretty silly, but that’s part of the charm. I can’t get mad when Albert, the android that upgrades your weapons, tells me he doesn’t know how to apologize for what happened to my pizza shop because he’s just an android, or when my pilot waxes nostalgic about how he misses the fog, or when someone utters the odd nonsensical line. It’s too silly, and the whole setup is just there to, well… set up Pizza Bandit’s wackiness.PlaySee, you’re not just any bounty-hunting crew. You’re a time-traveling bounty hunting crew, and that means you’ll be going all over space and time to get the job done. Don’t ask me how any of this works. All I know is that pizza heals and bullets kill, and that the Time Reapers — nasty little buggers that seem to be invading every timeline — don’t want this pizza shop owner to make any dough. And that’s not gonna fly. Pizza Bandit’s writing is pretty silly, but that’s part of the charm.“What makes Pizza Bandit unique is that you’re not just shooting stuff. You’re also, well, kinda playing Overcooked. After squading up, my first mission saw my crew (you can play with up to three friends) heading to the Restaurant from N owhere, a hidden outpost run by another bandit crew. Our job: fulfill the pizza orders for other bounty hunting teams, and send them off in time-traveling rocket pods. That meant putting together the right type of pizza, getting it to the oven, making sure we were getting their drink orders right, and adding some extra bullets for when things got spicy, cramming it all into a pod, and doing it on time while fighting off the Time Reapers, who really, really don’t like supporting small businesses.Pizza Bandit ScreenshotsAnd that’s where the other part of the Overcooked/Gears of War marriage comes into play. See, the Time Reapers mean business, and you’re not going to talk them out of some time reaping. That’s their whole bag. The only solution, fellow bandit, is incredible violence. I’ve played several builds of Pizza Bandit at this point, and let me tell you, your arsenal is up to the task. You start with your choice of assau lt rifle, minigun, and sniper rifle, but the fun really begins when you start unlocking your secondary weapons by completing jobs. They start simple: landmines, grenades, that sort of thing, but once you unlock the disco ball that attracts enemies and gets them dancing before it explodes? Whew, buddy. And the sentry turret? Perfection. You could slice and dice them Time Reapers with a katana, but have you ever considered using a pizza slicer as big as a man? It’ll change your life.And the Time Reapers will force you to use everything in your arsenal. You got your standard guys who will just run at you, but there are also Time Reapers that’ll crawl around on all fours, Terminator-looking ones that will leap at you, giant ones with hammers, guys who throw fireballs (these can really ruin your day), the works. You gotta prioritize.Pizza Bandit is at its best when you’re with a good team, calling out orders. A good match should be shouts of “We need a pepperoni pie!” and “I’m on the Coke!” and “I’m down!” interspersed with lots and lots of gunfire. Simple choices, like when to call down your own, once-a-mission rocket pod full of pizza and supplies, and more complex ones, like where to put it (you can block off a stairway, for instance), spice things up, too. And here’s the thing: so far, I’ve just talked about Restaurant from Nowhere, which is only the first level. Pizza Bandit isn’t a one-trick pony. One of my favorite levels has you taking over a sushi joint and making sure you have the right stuff on the delivery turntable for your customers. Sometimes that means running downstairs and grabbing a big ol’ tuna, taking that bad boy upstairs, and chopping him up before the Time Reapers whack you and you drop him. Other times that means frying an egg, or making a cucumber roll. You gotta stay ahead of the curve, because new customers are prioritized over old ones, and the Time Reapers aren’t gonna sit there and wait for you to plate your masterpiece.Sometimes, you’re not even cooking food at all. Another favorite level, Wizard’s Tomb, has you exploring a magically booby-trapped tomb in search of a sarcophagus. You’ll have to navigate the tomb’s traps, solve basic puzzles to reveal the way forward, and take out the arcane heart powering the whole enterprise before getting to the sarcophagus itself, which you’ll naturally transport with jetpacks before booking it back to your ship. It isn’t enough to get any given job done; you gotta get home, too. Just another day in the life of a pizza bandit.Pizza Bandit is always ludicrous, and its inspirations are obvious, but it’s never less than fun.“There are more, of course: in one, you’ll defend a cabin with Dr. Emmert Browne (Great Scott, Jofsoft, I see what you’re doing here, and I like it!) while he invents the time travel device that makes your whole business profitable. Winning it all means keeping him warm, satiating his hunger with rabbit or venison, and stopping all those nasty Time Reapers (and Wendigos?) who are trying to stop time travel from happening. You’d think that the Time Reapers would understand time paradoxes, but I guess not. Can’t reap time if there’s no time to reap, y’all. Or maybe you’ll break into an enormous safe with a laser drill, like you’re roleplaying the opening scene of Michael Mann’s Thief with a drill that’s constantly exploding. That seems safe, right? But hey, apparently there’s a magical cookbook in that vault whose recipes can alter reality, and we’re being paid to get it, exploding drill or not. A Pizza Bandit always gets the job done. And there’s always time to do your best Breaking Bad impersonation and help a couple of guys cook some “magic powder” and hide it inside some chicken. Oh, and you have to kill and cook the chickens. Only fresh, never frozen, baby. Pizza Bandit is always ludicrous, and its inspirations are obvious, but it’s never less than fun.Between missions, it’s back to Pizza Bandit (your restaurant), where you can acquire and upgrade your weapons, decorate Pizza Bandit itself, use the ingredients you find during missions to bake and share a pie for some stat boosts on your next run, or get some spiffy new duds for your bounty hunter. The milk carton backpack is a classic choice, if I do say so myself, but I’m still saving up for one of the cat ones. The things we do for fashion, am I right? Then it’s right back to it. A bandit’s work is never done.Sometimes, you don’t know you want something until you get it. I didn’t know I wanted Pizza Bandit until the first time I played it at PAX two years ago. It was one of those games that generated a lot of word of mouth, but it’s one of those concepts that doesn’t seem like it’ll work until you get a controller in your hands and everything makes sense. I don’t know why we’ve never gotten something like Pizza Bandit before, but once I played it, I knew I wanted more. Pizza heals, bullets kill, and Pizza Bandit rocks. If Jofsoft can stick the landing, we’re in for a tasty slice of New York pie.
    0 Комментарии ·0 Поделились ·0 предпросмотр
  • What I learned from my first few months with a Bambu Lab A1 3D printer, part 1

    to 3d or not to 3d

    What I learned from my first few months with a Bambu Lab A1 3D printer, part 1

    One neophyte's first steps into the wide world of 3D printing.

    Andrew Cunningham


    May 22, 2025 7:30 am

    |

    21

    The hotend on my Bambu Lab A1 3D printer.

    Credit:

    Andrew Cunningham

    The hotend on my Bambu Lab A1 3D printer.

    Credit:

    Andrew Cunningham

    Story text

    Size

    Small
    Standard
    Large

    Width
    *

    Standard
    Wide

    Links

    Standard
    Orange

    * Subscribers only
      Learn more

    For a couple of years now, I've been trying to find an excuse to buy a decent 3D printer.
    Friends and fellow Ars staffers who had them would gush about them at every opportunity, talking about how useful they can be and how much can be printed once you get used to the idea of being able to create real, tangible objects with a little time and a few bucks' worth of plastic filament.
    But I could never quite imagine myself using one consistently enough to buy one. Then, this past Christmas, my wife forced the issue by getting me a Bambu Lab A1 as a present.
    Since then, I've been tinkering with the thing nearly daily, learning more about what I've gotten myself into and continuing to find fun and useful things to print. I've gathered a bunch of thoughts about my learning process here, not because I think I'm breaking new ground but to serve as a blueprint for anyone who has been on the fence about Getting Into 3D Printing. "Hyperfixating on new hobbies" is one of my go-to coping mechanisms during times of stress and anxiety, and 3D printing has turned out to be the perfect combination of fun, practical, and time-consuming.
    Getting to know my printer
    My wife settled on the Bambu A1 because it's a larger version of the A1 Mini, Wirecutter's main 3D printer pick at the time. Other reviews she read noted that it's beginner-friendly, easy to use, and fun to tinker with, and it has a pretty active community for answering questions, all assessments I agree with so far.
    Note that this research was done some months before Bambu earned bad headlines because of firmware updates that some users believe will lead to a more locked-down ecosystem. This is a controversy I understand—3D printers are still primarily the realm of DIYers and tinkerers, people who are especially sensitive to the closing of open ecosystems. But as a beginner, I'm already leaning mostly on the first-party tools and built-in functionality to get everything going, so I'm not really experiencing the sense of having "lost" features I was relying on, and any concerns I did have are mostly addressed by Bambu's update about its update.

    I hadn't really updated my preconceived notions of what home 3D printing was since its primordial days, something Ars has been around long enough to have covered in some depth. I was wary of getting into yet another hobby where, like building your own gaming PC, fiddling with and maintaining the equipment is part of the hobby. Bambu's printersare capable of turning out fairly high-quality prints with minimal fuss, and nothing will draw you into the hobby faster than a few successful prints.

    Basic terminology

    Extrusion-based 3D printerswork by depositing multiple thin layers of melted plastic filament on a heated bed.

    Credit:

    Andrew Cunningham

    First things first: The A1 is what’s called an “extrusion” printer, meaning that it functions by melting a long, slim thread of plasticand then depositing this plastic onto a build plate seated on top of a heated bed in tens, hundreds, or even thousands of thin layers. In the manufacturing world, this is also called “fused deposition modeling,” or FDM. This layer-based extrusion gives 3D-printed objects their distinct ridged look and feel and is also why a 3D printed piece of plastic is less detailed-looking and weaker than an injection-molded piece of plastic like a Lego brick.
    The other readily available home 3D printing technology takes liquid resin and uses UV light to harden it into a plastic structure, using a process called “stereolithography”. You can get inexpensive resin printers in the same price range as the best cheap extrusion printers, and the SLA process can create much more detailed, smooth-looking, and watertight 3D prints. Some downsides are that the print beds in these printers are smaller, resin is a bit fussier than filament, and multi-color printing isn’t possible.
    There are two main types of home extrusion printers. The Bambu A1 is a Cartesian printer, or in more evocative and colloquial terms, a "bed slinger." In these, the head of the printer can move up and down on one or two rails and from side to side on another rail. But the print bed itself has to move forward and backward to "move" the print head on the Y axis.

    More expensive home 3D printers, including higher-end Bambu models in the P- and X-series, are "CoreXY" printers, which include a third rail or set of railsthat allow the print head to travel in all three directions.
    The A1 is also an "open-bed" printer, which means that it ships without an enclosure. Closed-bed printers are more expensive, but they can maintain a more consistent temperature inside and help contain the fumes from the melted plastic. They can also reduce the amount of noise coming from your printer.
    Together, the downsides of a bed-slingerand an open-bed printermainly just mean that the A1 isn't well-suited for printing certain types of plastic and has more potential points of failure for large or delicate prints. My experience with the A1 has been mostly positive now that I know about those limitations, but the printer you buy could easily change based on what kinds of things you want to print with it.
    Setting up
    Overall, the setup process was reasonably simple, at least for someone who has been building PCs and repairing small electronics for years now. It's not quite the same as the "take it out of the box, remove all the plastic film, and plug it in" process of setting up a 2D printer, but the directions in the start guide are well-illustrated and clearly written; if you can put together prefab IKEA furniture, that's roughly the level of complexity we're talking about here. The fact that delicate electronics are involved might still make it more intimidating for the non-technical, but figuring out what goes where is fairly simple.

    The only mistake I made while setting the printer up involved the surface I initially tried to put it on. I used a spare end table, but as I discovered during the printer's calibration process, the herky-jerky movement of the bed and print head was way too much for a little table to handle. "Stable enough to put a lamp on" is not the same as "stable enough to put a constantly wobbling contraption" on—obvious in retrospect, but my being new to this is why this article exists.
    After some office rearrangement, I was able to move the printer to my sturdy L-desk full of cables and other doodads to serve as ballast. This surface was more than sturdy enough to let the printer complete its calibration process—and sturdy enough not to transfer the printer's every motion to our kid's room below, a boon for when I'm trying to print something after he has gone to bed.
    The first-party Bambu apps for sending files to the printer are Bambu Handyand Bambu Studio. Handy works OK for sending ready-made models from MakerWorldand for monitoring prints once they've started. But I'll mostly be relaying my experience with Bambu Studio, a much more fully featured app. Neither app requires sign-in, at least not yet, but the path of least resistance is to sign into your printer and apps with the same account to enable easy communication and syncing.

    Bambu Studio: A primer
    Bambu Studio is what's known in the hobby as a "slicer," software that takes existing 3D models output by common CAD programsand converts them into a set of specific movement instructions that the printer can follow. Bambu Studio allows you to do some basic modification of existing models—cloning parts, resizing them, adding supports for overhanging bits that would otherwise droop down, and a few other functions—but it's primarily there for opening files, choosing a few settings, and sending them off to the printer to become tangible objects.

    Bambu Studio isn't the most approachable application, but if you've made it this far, it shouldn't be totally beyond your comprehension. For first-time setup, you'll choose your model of printer, leave the filament settings as they are, and sign in if you want to use Bambu's cloud services. These sync printer settings and keep track of the models you save and download from MakerWorld, but a non-cloud LAN mode is available for the Bambu skeptics and privacy-conscious.
    For any newbie, pretty much all you need to do is connect your printer, open a .3MF or .STL file you've downloaded from MakerWorld or elsewhere, select your filament from the drop-down menu, click "slice plate," and then click "print." Things like the default 0.4 mm nozzle size and Bambu's included Textured PEI Build Plate are generally already factored in, though you may need to double-check these selections when you open a file for the first time.
    When you slice your build plate for the first time, the app will spit a pile of numbers back at you. There are two important ones for 3D printing neophytes to track. One is the "total filament" figure, which tells you how many grams of filament the printer will use to make your model. The second is the "total time" figure, which tells you how long the entire print will take from the first calibration steps to the end of the job.

    Selecting your filament and/or temperature presets. If you have the Automatic Material System, this is also where you'll manage multicolor printing.

    Andrew Cunningham

    Selecting your filament and/or temperature presets. If you have the Automatic Material System, this is also where you'll manage multicolor printing.

    Andrew Cunningham

    The main way to tweak print quality is to adjust the height of the layers that the A1 lays down.

    Andrew Cunningham

    The main way to tweak print quality is to adjust the height of the layers that the A1 lays down.

    Andrew Cunningham

    Adding some additional infill can add some strength to prints, though 15 percent usually gives a decent amount of strength without overusing filament.

    Andrew Cunningham

    Adding some additional infill can add some strength to prints, though 15 percent usually gives a decent amount of strength without overusing filament.

    Andrew Cunningham

    The main way to tweak print quality is to adjust the height of the layers that the A1 lays down.

    Andrew Cunningham

    Adding some additional infill can add some strength to prints, though 15 percent usually gives a decent amount of strength without overusing filament.

    Andrew Cunningham

    For some prints, scaling them up or down a bit can make them fit your needs better.

    Andrew Cunningham

    For items that are small enough, you can print a few at once using the clone function. For filaments with a gradient, this also makes the gradient effect more pronounced.

    Andrew Cunningham

    Bambu Studio estimates the amount of filament you'll use and the amount of time a print will take. Filament usually comes in 1 kg spools.

    Andrew Cunningham

    When selecting filament, people who stick to Bambu's first-party spools will have the easiest time, since optimal settings are already programmed into the app. But I've had almost zero trouble with the "generic" presets and the spools of generic Inland-branded filament I've bought from our local Micro Center, at least when sticking to PLA. But we'll dive deeper into plastics in part 2 of this series.

    I won't pretend I'm skilled enough to do a deep dive on every single setting that Bambu Studio gives you access to, but here are a few of the odds and ends I've found most useful:

    The "clone" function, accessed by right-clicking an object and clicking "clone." Useful if you'd like to fit several copies of an object on the build plate at once, especially if you're using a filament with a color gradient and you'd like to make the gradient effect more pronounced by spreading it out over a bunch of prints.
    The "arrange all objects" function, the fourth button from the left under the "prepare" tab. Did you just clone a bunch of objects? Did you delete an individual object from a model because you didn't need to print that part? Bambu Studio will arrange everything on your build plate to optimize the use of space.
    Layer height, located in the sidebar directly beneath "Process". Thicker layer heights do the opposite, slightly reducing the amount of time a model takes to print but preserving less detail.
    Infill percentage and wall loops, located in the Strength tab beneath the "Process" sidebar item. For most everyday prints, you don't need to worry about messing with these settings much; the infill percentage determines the amount of your print's interior that's plastic and the part that's empty space. The number of wall loops determines how many layers the printer uses for the outside surface of the print, with more walls using more plastic but also adding a bit of extra strength and rigidity to functional prints that need it.

    My first prints

    A humble start: My very first print was a wall bracket for the remote for my office's ceiling fan.

    Credit:

    Andrew Cunningham

    When given the opportunity to use a 3D printer, my mind went first to aggressively practical stuff—prints for organizing the odds and ends that eternally float around my office or desk.
    When we moved into our current house, only one of the bedrooms had a ceiling fan installed. I put up remote-controlled ceiling fans in all the other bedrooms myself. And all those fans, except one, came with a wall-mounted caddy to hold the remote control. The first thing I decided to print was a wall-mounted holder for that remote control.
    MakerWorld is just one of several resources for ready-made 3D-printable files, but the ease with which I found a Hampton Bay Ceiling Fan Remote Wall Mount is pretty representative of my experience so far. At this point in the life cycle of home 3D printing, if you can think about it and it's not a terrible idea, you can usually find someone out there who has made something close to what you're looking for.
    I loaded up my black roll of PLA plastic—generally the cheapest, easiest-to-buy, easiest-to-work-with kind of 3D printer filament, though not always the best for prints that need more structural integrity—into the basic roll-holder that comes with the A1, downloaded that 3MF file, opened it in Bambu Studio, sliced the file, and hit print. It felt like there should have been extra steps in there somewhere. But that's all it took to kick the printer into action.
    After a few minutes of warmup—by default, the A1 has a thorough pre-print setup process where it checks the levelness of the bed and tests the flow rate of your filament for a few minutes before it begins printing anything—the nozzle started laying plastic down on my build plate, and inside of an hour or so, I had my first 3D-printed object.

    Print No. 2 was another wall bracket, this time for my gaming PC's gamepad and headset.

    Credit:

    Andrew Cunningham

    It wears off a bit after you successfully execute a print, but I still haven't quite lost the feeling of magic of printing out a fully 3D object that comes off the plate and then just exists in space along with me and all the store-bought objects in my office.
    The remote holder was, as I'd learn, a fairly simple print made under near-ideal conditions. But it was an easy success to start off with, and that success can help embolden you and draw you in, inviting more printing and more experimentation. And the more you experiment, the more you inevitably learn.
    This time, I talked about what I learned about basic terminology and the different kinds of plastics most commonly used by home 3D printers. Next time, I'll talk about some of the pitfalls I ran into after my initial successes, what I learned about using Bambu Studio, what I've learned about fine-tuning settings to get good results, and a whole bunch of 3D-printable upgrades and mods available for the A1.

    Andrew Cunningham
    Senior Technology Reporter

    Andrew Cunningham
    Senior Technology Reporter

    Andrew is a Senior Technology Reporter at Ars Technica, with a focus on consumer tech including computer hardware and in-depth reviews of operating systems like Windows and macOS. Andrew lives in Philadelphia and co-hosts a weekly book podcast called Overdue.

    21 Comments
    #what #learned #first #few #months
    What I learned from my first few months with a Bambu Lab A1 3D printer, part 1
    to 3d or not to 3d What I learned from my first few months with a Bambu Lab A1 3D printer, part 1 One neophyte's first steps into the wide world of 3D printing. Andrew Cunningham – May 22, 2025 7:30 am | 21 The hotend on my Bambu Lab A1 3D printer. Credit: Andrew Cunningham The hotend on my Bambu Lab A1 3D printer. Credit: Andrew Cunningham Story text Size Small Standard Large Width * Standard Wide Links Standard Orange * Subscribers only   Learn more For a couple of years now, I've been trying to find an excuse to buy a decent 3D printer. Friends and fellow Ars staffers who had them would gush about them at every opportunity, talking about how useful they can be and how much can be printed once you get used to the idea of being able to create real, tangible objects with a little time and a few bucks' worth of plastic filament. But I could never quite imagine myself using one consistently enough to buy one. Then, this past Christmas, my wife forced the issue by getting me a Bambu Lab A1 as a present. Since then, I've been tinkering with the thing nearly daily, learning more about what I've gotten myself into and continuing to find fun and useful things to print. I've gathered a bunch of thoughts about my learning process here, not because I think I'm breaking new ground but to serve as a blueprint for anyone who has been on the fence about Getting Into 3D Printing. "Hyperfixating on new hobbies" is one of my go-to coping mechanisms during times of stress and anxiety, and 3D printing has turned out to be the perfect combination of fun, practical, and time-consuming. Getting to know my printer My wife settled on the Bambu A1 because it's a larger version of the A1 Mini, Wirecutter's main 3D printer pick at the time. Other reviews she read noted that it's beginner-friendly, easy to use, and fun to tinker with, and it has a pretty active community for answering questions, all assessments I agree with so far. Note that this research was done some months before Bambu earned bad headlines because of firmware updates that some users believe will lead to a more locked-down ecosystem. This is a controversy I understand—3D printers are still primarily the realm of DIYers and tinkerers, people who are especially sensitive to the closing of open ecosystems. But as a beginner, I'm already leaning mostly on the first-party tools and built-in functionality to get everything going, so I'm not really experiencing the sense of having "lost" features I was relying on, and any concerns I did have are mostly addressed by Bambu's update about its update. I hadn't really updated my preconceived notions of what home 3D printing was since its primordial days, something Ars has been around long enough to have covered in some depth. I was wary of getting into yet another hobby where, like building your own gaming PC, fiddling with and maintaining the equipment is part of the hobby. Bambu's printersare capable of turning out fairly high-quality prints with minimal fuss, and nothing will draw you into the hobby faster than a few successful prints. Basic terminology Extrusion-based 3D printerswork by depositing multiple thin layers of melted plastic filament on a heated bed. Credit: Andrew Cunningham First things first: The A1 is what’s called an “extrusion” printer, meaning that it functions by melting a long, slim thread of plasticand then depositing this plastic onto a build plate seated on top of a heated bed in tens, hundreds, or even thousands of thin layers. In the manufacturing world, this is also called “fused deposition modeling,” or FDM. This layer-based extrusion gives 3D-printed objects their distinct ridged look and feel and is also why a 3D printed piece of plastic is less detailed-looking and weaker than an injection-molded piece of plastic like a Lego brick. The other readily available home 3D printing technology takes liquid resin and uses UV light to harden it into a plastic structure, using a process called “stereolithography”. You can get inexpensive resin printers in the same price range as the best cheap extrusion printers, and the SLA process can create much more detailed, smooth-looking, and watertight 3D prints. Some downsides are that the print beds in these printers are smaller, resin is a bit fussier than filament, and multi-color printing isn’t possible. There are two main types of home extrusion printers. The Bambu A1 is a Cartesian printer, or in more evocative and colloquial terms, a "bed slinger." In these, the head of the printer can move up and down on one or two rails and from side to side on another rail. But the print bed itself has to move forward and backward to "move" the print head on the Y axis. More expensive home 3D printers, including higher-end Bambu models in the P- and X-series, are "CoreXY" printers, which include a third rail or set of railsthat allow the print head to travel in all three directions. The A1 is also an "open-bed" printer, which means that it ships without an enclosure. Closed-bed printers are more expensive, but they can maintain a more consistent temperature inside and help contain the fumes from the melted plastic. They can also reduce the amount of noise coming from your printer. Together, the downsides of a bed-slingerand an open-bed printermainly just mean that the A1 isn't well-suited for printing certain types of plastic and has more potential points of failure for large or delicate prints. My experience with the A1 has been mostly positive now that I know about those limitations, but the printer you buy could easily change based on what kinds of things you want to print with it. Setting up Overall, the setup process was reasonably simple, at least for someone who has been building PCs and repairing small electronics for years now. It's not quite the same as the "take it out of the box, remove all the plastic film, and plug it in" process of setting up a 2D printer, but the directions in the start guide are well-illustrated and clearly written; if you can put together prefab IKEA furniture, that's roughly the level of complexity we're talking about here. The fact that delicate electronics are involved might still make it more intimidating for the non-technical, but figuring out what goes where is fairly simple. The only mistake I made while setting the printer up involved the surface I initially tried to put it on. I used a spare end table, but as I discovered during the printer's calibration process, the herky-jerky movement of the bed and print head was way too much for a little table to handle. "Stable enough to put a lamp on" is not the same as "stable enough to put a constantly wobbling contraption" on—obvious in retrospect, but my being new to this is why this article exists. After some office rearrangement, I was able to move the printer to my sturdy L-desk full of cables and other doodads to serve as ballast. This surface was more than sturdy enough to let the printer complete its calibration process—and sturdy enough not to transfer the printer's every motion to our kid's room below, a boon for when I'm trying to print something after he has gone to bed. The first-party Bambu apps for sending files to the printer are Bambu Handyand Bambu Studio. Handy works OK for sending ready-made models from MakerWorldand for monitoring prints once they've started. But I'll mostly be relaying my experience with Bambu Studio, a much more fully featured app. Neither app requires sign-in, at least not yet, but the path of least resistance is to sign into your printer and apps with the same account to enable easy communication and syncing. Bambu Studio: A primer Bambu Studio is what's known in the hobby as a "slicer," software that takes existing 3D models output by common CAD programsand converts them into a set of specific movement instructions that the printer can follow. Bambu Studio allows you to do some basic modification of existing models—cloning parts, resizing them, adding supports for overhanging bits that would otherwise droop down, and a few other functions—but it's primarily there for opening files, choosing a few settings, and sending them off to the printer to become tangible objects. Bambu Studio isn't the most approachable application, but if you've made it this far, it shouldn't be totally beyond your comprehension. For first-time setup, you'll choose your model of printer, leave the filament settings as they are, and sign in if you want to use Bambu's cloud services. These sync printer settings and keep track of the models you save and download from MakerWorld, but a non-cloud LAN mode is available for the Bambu skeptics and privacy-conscious. For any newbie, pretty much all you need to do is connect your printer, open a .3MF or .STL file you've downloaded from MakerWorld or elsewhere, select your filament from the drop-down menu, click "slice plate," and then click "print." Things like the default 0.4 mm nozzle size and Bambu's included Textured PEI Build Plate are generally already factored in, though you may need to double-check these selections when you open a file for the first time. When you slice your build plate for the first time, the app will spit a pile of numbers back at you. There are two important ones for 3D printing neophytes to track. One is the "total filament" figure, which tells you how many grams of filament the printer will use to make your model. The second is the "total time" figure, which tells you how long the entire print will take from the first calibration steps to the end of the job. Selecting your filament and/or temperature presets. If you have the Automatic Material System, this is also where you'll manage multicolor printing. Andrew Cunningham Selecting your filament and/or temperature presets. If you have the Automatic Material System, this is also where you'll manage multicolor printing. Andrew Cunningham The main way to tweak print quality is to adjust the height of the layers that the A1 lays down. Andrew Cunningham The main way to tweak print quality is to adjust the height of the layers that the A1 lays down. Andrew Cunningham Adding some additional infill can add some strength to prints, though 15 percent usually gives a decent amount of strength without overusing filament. Andrew Cunningham Adding some additional infill can add some strength to prints, though 15 percent usually gives a decent amount of strength without overusing filament. Andrew Cunningham The main way to tweak print quality is to adjust the height of the layers that the A1 lays down. Andrew Cunningham Adding some additional infill can add some strength to prints, though 15 percent usually gives a decent amount of strength without overusing filament. Andrew Cunningham For some prints, scaling them up or down a bit can make them fit your needs better. Andrew Cunningham For items that are small enough, you can print a few at once using the clone function. For filaments with a gradient, this also makes the gradient effect more pronounced. Andrew Cunningham Bambu Studio estimates the amount of filament you'll use and the amount of time a print will take. Filament usually comes in 1 kg spools. Andrew Cunningham When selecting filament, people who stick to Bambu's first-party spools will have the easiest time, since optimal settings are already programmed into the app. But I've had almost zero trouble with the "generic" presets and the spools of generic Inland-branded filament I've bought from our local Micro Center, at least when sticking to PLA. But we'll dive deeper into plastics in part 2 of this series. I won't pretend I'm skilled enough to do a deep dive on every single setting that Bambu Studio gives you access to, but here are a few of the odds and ends I've found most useful: The "clone" function, accessed by right-clicking an object and clicking "clone." Useful if you'd like to fit several copies of an object on the build plate at once, especially if you're using a filament with a color gradient and you'd like to make the gradient effect more pronounced by spreading it out over a bunch of prints. The "arrange all objects" function, the fourth button from the left under the "prepare" tab. Did you just clone a bunch of objects? Did you delete an individual object from a model because you didn't need to print that part? Bambu Studio will arrange everything on your build plate to optimize the use of space. Layer height, located in the sidebar directly beneath "Process". Thicker layer heights do the opposite, slightly reducing the amount of time a model takes to print but preserving less detail. Infill percentage and wall loops, located in the Strength tab beneath the "Process" sidebar item. For most everyday prints, you don't need to worry about messing with these settings much; the infill percentage determines the amount of your print's interior that's plastic and the part that's empty space. The number of wall loops determines how many layers the printer uses for the outside surface of the print, with more walls using more plastic but also adding a bit of extra strength and rigidity to functional prints that need it. My first prints A humble start: My very first print was a wall bracket for the remote for my office's ceiling fan. Credit: Andrew Cunningham When given the opportunity to use a 3D printer, my mind went first to aggressively practical stuff—prints for organizing the odds and ends that eternally float around my office or desk. When we moved into our current house, only one of the bedrooms had a ceiling fan installed. I put up remote-controlled ceiling fans in all the other bedrooms myself. And all those fans, except one, came with a wall-mounted caddy to hold the remote control. The first thing I decided to print was a wall-mounted holder for that remote control. MakerWorld is just one of several resources for ready-made 3D-printable files, but the ease with which I found a Hampton Bay Ceiling Fan Remote Wall Mount is pretty representative of my experience so far. At this point in the life cycle of home 3D printing, if you can think about it and it's not a terrible idea, you can usually find someone out there who has made something close to what you're looking for. I loaded up my black roll of PLA plastic—generally the cheapest, easiest-to-buy, easiest-to-work-with kind of 3D printer filament, though not always the best for prints that need more structural integrity—into the basic roll-holder that comes with the A1, downloaded that 3MF file, opened it in Bambu Studio, sliced the file, and hit print. It felt like there should have been extra steps in there somewhere. But that's all it took to kick the printer into action. After a few minutes of warmup—by default, the A1 has a thorough pre-print setup process where it checks the levelness of the bed and tests the flow rate of your filament for a few minutes before it begins printing anything—the nozzle started laying plastic down on my build plate, and inside of an hour or so, I had my first 3D-printed object. Print No. 2 was another wall bracket, this time for my gaming PC's gamepad and headset. Credit: Andrew Cunningham It wears off a bit after you successfully execute a print, but I still haven't quite lost the feeling of magic of printing out a fully 3D object that comes off the plate and then just exists in space along with me and all the store-bought objects in my office. The remote holder was, as I'd learn, a fairly simple print made under near-ideal conditions. But it was an easy success to start off with, and that success can help embolden you and draw you in, inviting more printing and more experimentation. And the more you experiment, the more you inevitably learn. This time, I talked about what I learned about basic terminology and the different kinds of plastics most commonly used by home 3D printers. Next time, I'll talk about some of the pitfalls I ran into after my initial successes, what I learned about using Bambu Studio, what I've learned about fine-tuning settings to get good results, and a whole bunch of 3D-printable upgrades and mods available for the A1. Andrew Cunningham Senior Technology Reporter Andrew Cunningham Senior Technology Reporter Andrew is a Senior Technology Reporter at Ars Technica, with a focus on consumer tech including computer hardware and in-depth reviews of operating systems like Windows and macOS. Andrew lives in Philadelphia and co-hosts a weekly book podcast called Overdue. 21 Comments #what #learned #first #few #months
    What I learned from my first few months with a Bambu Lab A1 3D printer, part 1
    arstechnica.com
    to 3d or not to 3d What I learned from my first few months with a Bambu Lab A1 3D printer, part 1 One neophyte's first steps into the wide world of 3D printing. Andrew Cunningham – May 22, 2025 7:30 am | 21 The hotend on my Bambu Lab A1 3D printer. Credit: Andrew Cunningham The hotend on my Bambu Lab A1 3D printer. Credit: Andrew Cunningham Story text Size Small Standard Large Width * Standard Wide Links Standard Orange * Subscribers only   Learn more For a couple of years now, I've been trying to find an excuse to buy a decent 3D printer. Friends and fellow Ars staffers who had them would gush about them at every opportunity, talking about how useful they can be and how much can be printed once you get used to the idea of being able to create real, tangible objects with a little time and a few bucks' worth of plastic filament. But I could never quite imagine myself using one consistently enough to buy one. Then, this past Christmas, my wife forced the issue by getting me a Bambu Lab A1 as a present. Since then, I've been tinkering with the thing nearly daily, learning more about what I've gotten myself into and continuing to find fun and useful things to print. I've gathered a bunch of thoughts about my learning process here, not because I think I'm breaking new ground but to serve as a blueprint for anyone who has been on the fence about Getting Into 3D Printing. "Hyperfixating on new hobbies" is one of my go-to coping mechanisms during times of stress and anxiety, and 3D printing has turned out to be the perfect combination of fun, practical, and time-consuming. Getting to know my printer My wife settled on the Bambu A1 because it's a larger version of the A1 Mini, Wirecutter's main 3D printer pick at the time (she also noted it was "hella on sale"). Other reviews she read noted that it's beginner-friendly, easy to use, and fun to tinker with, and it has a pretty active community for answering questions, all assessments I agree with so far. Note that this research was done some months before Bambu earned bad headlines because of firmware updates that some users believe will lead to a more locked-down ecosystem. This is a controversy I understand—3D printers are still primarily the realm of DIYers and tinkerers, people who are especially sensitive to the closing of open ecosystems. But as a beginner, I'm already leaning mostly on the first-party tools and built-in functionality to get everything going, so I'm not really experiencing the sense of having "lost" features I was relying on, and any concerns I did have are mostly addressed by Bambu's update about its update. I hadn't really updated my preconceived notions of what home 3D printing was since its primordial days, something Ars has been around long enough to have covered in some depth. I was wary of getting into yet another hobby where, like building your own gaming PC, fiddling with and maintaining the equipment is part of the hobby. Bambu's printers (and those like them) are capable of turning out fairly high-quality prints with minimal fuss, and nothing will draw you into the hobby faster than a few successful prints. Basic terminology Extrusion-based 3D printers (also sometimes called "FDM," for "fused deposition modeling") work by depositing multiple thin layers of melted plastic filament on a heated bed. Credit: Andrew Cunningham First things first: The A1 is what’s called an “extrusion” printer, meaning that it functions by melting a long, slim thread of plastic (filament) and then depositing this plastic onto a build plate seated on top of a heated bed in tens, hundreds, or even thousands of thin layers. In the manufacturing world, this is also called “fused deposition modeling,” or FDM. This layer-based extrusion gives 3D-printed objects their distinct ridged look and feel and is also why a 3D printed piece of plastic is less detailed-looking and weaker than an injection-molded piece of plastic like a Lego brick. The other readily available home 3D printing technology takes liquid resin and uses UV light to harden it into a plastic structure, using a process called “stereolithography” (SLA). You can get inexpensive resin printers in the same price range as the best cheap extrusion printers, and the SLA process can create much more detailed, smooth-looking, and watertight 3D prints (it’s popular for making figurines for tabletop games). Some downsides are that the print beds in these printers are smaller, resin is a bit fussier than filament, and multi-color printing isn’t possible. There are two main types of home extrusion printers. The Bambu A1 is a Cartesian printer, or in more evocative and colloquial terms, a "bed slinger." In these, the head of the printer can move up and down on one or two rails and from side to side on another rail. But the print bed itself has to move forward and backward to "move" the print head on the Y axis. More expensive home 3D printers, including higher-end Bambu models in the P- and X-series, are "CoreXY" printers, which include a third rail or set of rails (and more Z-axis rails) that allow the print head to travel in all three directions. The A1 is also an "open-bed" printer, which means that it ships without an enclosure. Closed-bed printers are more expensive, but they can maintain a more consistent temperature inside and help contain the fumes from the melted plastic. They can also reduce the amount of noise coming from your printer. Together, the downsides of a bed-slinger (introducing more wobble for tall prints, more opportunities for parts of your print to come loose from the plate) and an open-bed printer (worse temperature, fume, and dust control) mainly just mean that the A1 isn't well-suited for printing certain types of plastic and has more potential points of failure for large or delicate prints. My experience with the A1 has been mostly positive now that I know about those limitations, but the printer you buy could easily change based on what kinds of things you want to print with it. Setting up Overall, the setup process was reasonably simple, at least for someone who has been building PCs and repairing small electronics for years now. It's not quite the same as the "take it out of the box, remove all the plastic film, and plug it in" process of setting up a 2D printer, but the directions in the start guide are well-illustrated and clearly written; if you can put together prefab IKEA furniture, that's roughly the level of complexity we're talking about here. The fact that delicate electronics are involved might still make it more intimidating for the non-technical, but figuring out what goes where is fairly simple. The only mistake I made while setting the printer up involved the surface I initially tried to put it on. I used a spare end table, but as I discovered during the printer's calibration process, the herky-jerky movement of the bed and print head was way too much for a little table to handle. "Stable enough to put a lamp on" is not the same as "stable enough to put a constantly wobbling contraption" on—obvious in retrospect, but my being new to this is why this article exists. After some office rearrangement, I was able to move the printer to my sturdy L-desk full of cables and other doodads to serve as ballast. This surface was more than sturdy enough to let the printer complete its calibration process—and sturdy enough not to transfer the printer's every motion to our kid's room below, a boon for when I'm trying to print something after he has gone to bed. The first-party Bambu apps for sending files to the printer are Bambu Handy (for iOS/Android, with no native iPad version) and Bambu Studio (for Windows, macOS, and Linux). Handy works OK for sending ready-made models from MakerWorld (a mostly community-driven but Bambu-developer repository for 3D printable files) and for monitoring prints once they've started. But I'll mostly be relaying my experience with Bambu Studio, a much more fully featured app. Neither app requires sign-in, at least not yet, but the path of least resistance is to sign into your printer and apps with the same account to enable easy communication and syncing. Bambu Studio: A primer Bambu Studio is what's known in the hobby as a "slicer," software that takes existing 3D models output by common CAD programs (Tinkercad, FreeCAD, SolidWorks, Autodesk Fusion, others) and converts them into a set of specific movement instructions that the printer can follow. Bambu Studio allows you to do some basic modification of existing models—cloning parts, resizing them, adding supports for overhanging bits that would otherwise droop down, and a few other functions—but it's primarily there for opening files, choosing a few settings, and sending them off to the printer to become tangible objects. Bambu Studio isn't the most approachable application, but if you've made it this far, it shouldn't be totally beyond your comprehension. For first-time setup, you'll choose your model of printer (all Bambu models and a healthy selection of third-party printers are officially supported), leave the filament settings as they are, and sign in if you want to use Bambu's cloud services. These sync printer settings and keep track of the models you save and download from MakerWorld, but a non-cloud LAN mode is available for the Bambu skeptics and privacy-conscious. For any newbie, pretty much all you need to do is connect your printer, open a .3MF or .STL file you've downloaded from MakerWorld or elsewhere, select your filament from the drop-down menu, click "slice plate," and then click "print." Things like the default 0.4 mm nozzle size and Bambu's included Textured PEI Build Plate are generally already factored in, though you may need to double-check these selections when you open a file for the first time. When you slice your build plate for the first time, the app will spit a pile of numbers back at you. There are two important ones for 3D printing neophytes to track. One is the "total filament" figure, which tells you how many grams of filament the printer will use to make your model (filament typically comes in 1 kg spools, and the printer generally won't track usage for you, so if you want to avoid running out in the middle of the job, you may want to keep track of what you're using). The second is the "total time" figure, which tells you how long the entire print will take from the first calibration steps to the end of the job. Selecting your filament and/or temperature presets. If you have the Automatic Material System (AMS), this is also where you'll manage multicolor printing. Andrew Cunningham Selecting your filament and/or temperature presets. If you have the Automatic Material System (AMS), this is also where you'll manage multicolor printing. Andrew Cunningham The main way to tweak print quality is to adjust the height of the layers that the A1 lays down. Andrew Cunningham The main way to tweak print quality is to adjust the height of the layers that the A1 lays down. Andrew Cunningham Adding some additional infill can add some strength to prints, though 15 percent usually gives a decent amount of strength without overusing filament. Andrew Cunningham Adding some additional infill can add some strength to prints, though 15 percent usually gives a decent amount of strength without overusing filament. Andrew Cunningham The main way to tweak print quality is to adjust the height of the layers that the A1 lays down. Andrew Cunningham Adding some additional infill can add some strength to prints, though 15 percent usually gives a decent amount of strength without overusing filament. Andrew Cunningham For some prints, scaling them up or down a bit can make them fit your needs better. Andrew Cunningham For items that are small enough, you can print a few at once using the clone function. For filaments with a gradient, this also makes the gradient effect more pronounced. Andrew Cunningham Bambu Studio estimates the amount of filament you'll use and the amount of time a print will take. Filament usually comes in 1 kg spools. Andrew Cunningham When selecting filament, people who stick to Bambu's first-party spools will have the easiest time, since optimal settings are already programmed into the app. But I've had almost zero trouble with the "generic" presets and the spools of generic Inland-branded filament I've bought from our local Micro Center, at least when sticking to PLA (polylactic acid, the most common and generally the easiest-to-print of the different kinds of filament you can buy). But we'll dive deeper into plastics in part 2 of this series. I won't pretend I'm skilled enough to do a deep dive on every single setting that Bambu Studio gives you access to, but here are a few of the odds and ends I've found most useful: The "clone" function, accessed by right-clicking an object and clicking "clone." Useful if you'd like to fit several copies of an object on the build plate at once, especially if you're using a filament with a color gradient and you'd like to make the gradient effect more pronounced by spreading it out over a bunch of prints. The "arrange all objects" function, the fourth button from the left under the "prepare" tab. Did you just clone a bunch of objects? Did you delete an individual object from a model because you didn't need to print that part? Bambu Studio will arrange everything on your build plate to optimize the use of space. Layer height, located in the sidebar directly beneath "Process" (which is directly underneath the area where you select your filament. For many functional parts, the standard 0.2 mm layer height is fine. Going with thinner layer heights adds to the printing time but can preserve more detail on prints that have a lot of it and slightly reduce the visible layer lines that give 3D-printed objects their distinct look (for better or worse). Thicker layer heights do the opposite, slightly reducing the amount of time a model takes to print but preserving less detail. Infill percentage and wall loops, located in the Strength tab beneath the "Process" sidebar item. For most everyday prints, you don't need to worry about messing with these settings much; the infill percentage determines the amount of your print's interior that's plastic and the part that's empty space (15 percent is a good happy medium most of the time between maintaining rigidity and overusing plastic). The number of wall loops determines how many layers the printer uses for the outside surface of the print, with more walls using more plastic but also adding a bit of extra strength and rigidity to functional prints that need it (think hooks, hangers, shelves and brackets, and other things that will be asked to bear some weight). My first prints A humble start: My very first print was a wall bracket for the remote for my office's ceiling fan. Credit: Andrew Cunningham When given the opportunity to use a 3D printer, my mind went first to aggressively practical stuff—prints for organizing the odds and ends that eternally float around my office or desk. When we moved into our current house, only one of the bedrooms had a ceiling fan installed. I put up remote-controlled ceiling fans in all the other bedrooms myself. And all those fans, except one, came with a wall-mounted caddy to hold the remote control. The first thing I decided to print was a wall-mounted holder for that remote control. MakerWorld is just one of several resources for ready-made 3D-printable files, but the ease with which I found a Hampton Bay Ceiling Fan Remote Wall Mount is pretty representative of my experience so far. At this point in the life cycle of home 3D printing, if you can think about it and it's not a terrible idea, you can usually find someone out there who has made something close to what you're looking for. I loaded up my black roll of PLA plastic—generally the cheapest, easiest-to-buy, easiest-to-work-with kind of 3D printer filament, though not always the best for prints that need more structural integrity—into the basic roll-holder that comes with the A1, downloaded that 3MF file, opened it in Bambu Studio, sliced the file, and hit print. It felt like there should have been extra steps in there somewhere. But that's all it took to kick the printer into action. After a few minutes of warmup—by default, the A1 has a thorough pre-print setup process where it checks the levelness of the bed and tests the flow rate of your filament for a few minutes before it begins printing anything—the nozzle started laying plastic down on my build plate, and inside of an hour or so, I had my first 3D-printed object. Print No. 2 was another wall bracket, this time for my gaming PC's gamepad and headset. Credit: Andrew Cunningham It wears off a bit after you successfully execute a print, but I still haven't quite lost the feeling of magic of printing out a fully 3D object that comes off the plate and then just exists in space along with me and all the store-bought objects in my office. The remote holder was, as I'd learn, a fairly simple print made under near-ideal conditions. But it was an easy success to start off with, and that success can help embolden you and draw you in, inviting more printing and more experimentation. And the more you experiment, the more you inevitably learn. This time, I talked about what I learned about basic terminology and the different kinds of plastics most commonly used by home 3D printers. Next time, I'll talk about some of the pitfalls I ran into after my initial successes, what I learned about using Bambu Studio, what I've learned about fine-tuning settings to get good results, and a whole bunch of 3D-printable upgrades and mods available for the A1. Andrew Cunningham Senior Technology Reporter Andrew Cunningham Senior Technology Reporter Andrew is a Senior Technology Reporter at Ars Technica, with a focus on consumer tech including computer hardware and in-depth reviews of operating systems like Windows and macOS. Andrew lives in Philadelphia and co-hosts a weekly book podcast called Overdue. 21 Comments
    0 Комментарии ·0 Поделились ·0 предпросмотр
  • Introducing PrismSlicer by Additive Appearance: Photorealistic Software for Complex Multi-Material 3D Printing

    Prague-based startup Additive Appearance, a spin-off from Charles University, has released PrismSlicer, a slicing and design-for-additive-manufacturingsoftware developed specifically for multi-material inkjet 3D printing. PrismSlicer focuses on delivering high-fidelity color accuracy, precise volumetric control, and efficient material use, addressing needs across sectors such as industrial design, healthcare, dental, model making, education, and rapid prototyping.
    To address limitations found in traditional slicing software, PrismSlicer incorporates a photorealistic rendering engine, material-aware slicing algorithms, and voxel-level volumetric authoring. These capabilities aim to reduce trial-and-error, decrease print failures, and accelerate production workflows.
    “Many users struggle to anticipate how a print will turn out, especially with complex gradients and intricate color textures, ” said Tobias Rittig, Ph.D., CTO at Additive Appearance. “We built PrismSlicer to eliminate that uncertainty. With precise previews and interactive controls, it becomes much easier to get it right on the first print.”
    PrismSlicer Software. Image via Additive Appearance.
    Key Differentiators
    Distinct from conventional surface-based slicers, PrismSlicer adopts a volumetric approach that supports native 3D gradients, material property interpolation, and adaptive color mixing. This approach enables precise spatial distribution of visual and functional features, maximizing the utilization of hardware capabilities.
    Core features include photorealistic visualization with realistic translucency effects, automated color and texture optimization through device-specific material profiles, and volumetric design tools allowing integration of pre-sliced models with 3D gradients and digital materials. The software supports widely used platforms such as Stratasys PolyJet, Quantica NovoJet, and various custom inkjet printing systems, running across Windows, macOS, and Linux operating systems.
    Printout 3. Image via Additive Appearance.
    “The early version released in collaboration with Quantica validated our core technology, ” noted Rittig. “Now, the full-featured PrismSlicer is here and it’s ready to support a much wider user base across multiple ecosystems.”
    Designed to meet the evolving needs of industries dependent on multi-material, full-color 3D printing, PrismSlicer combines speed, accuracy, and intuitive workflows—including guided steps to simplify complex processes. For users without direct access to printers, its predictive preview capability provides a cost-effective way to test designs digitally before production.
    PrismSlicer Photorealistic Preview. Image via Additive Appearance.
    In addition, PrismSlicer supports sustainability by significantly reducing the need for physical test prints, thereby cutting material waste, saving time, and lowering costs. This digital print verification aligns with broader efforts to promote environmentally responsible manufacturing.
    Offered through a subscription licensing model, PrismSlicer benefits from regular quarterly updates and feature enhancements. Future development plans include expanding support for additional printer models, refining design tools, and further improving visualization accuracy.
    Additive Appearance is also actively growing partnerships across sectors such as medical prosthetics and dentistry, commercial printing, industrial prototyping, toy and figurine production, and visual effects.
    Developments in Multi-Material 3D Printing 
    Multi-material 3D printing is a growing area throughout the additive manufacturing industry. In 2024, a team from the University of Colorado Boulder conducted a study that developed a “Pantone system for material properties.” Their findings outline how repeatable 3D printed properties can be achieved by mixing three “primary” materials – a soft elastomer, a rigid plastic, and liquid constituents.
    Custom software was used to design hundreds of digital composite material samples. The mechanical properties of the 3D printed samples were then tested, characterized, and mapped. This ultimately allowed users to find the perfect material mixture to achieve the desired properties of their 3D printed part. 
    Elsewhere, researchers from the MIT Media Lab, Harvard University’s Wyss Institute, and the Dana-Farber Cancer Institute used multi-material inkjet 3D printing to fabricate hybrid living materials.  Called the Hybrid Living Materialfabrication platform, the team created customized material recipes to combine resins and chemical signals. These signals can activate certain responses in biologically engineered microbes, offering the potential for producing 3D printed medical devices with therapeutic agents.      
    Take the 3DPIReader Survey — shape the future of AM reporting in under 5 minutes.
    Who won the 2024 3D Printing Industry Awards?
    Subscribe to the3D Printing Industry newsletter to keep up with the latest 3D printing news.
    You can also follow us on LinkedIn, and subscribe to the 3D Printing Industry Youtube channel to access more exclusive content.
    Featured image shows PrismSlicer Software. Image via Additive Appearance.
    #introducing #prismslicer #additive #appearance #photorealistic
    Introducing PrismSlicer by Additive Appearance: Photorealistic Software for Complex Multi-Material 3D Printing
    Prague-based startup Additive Appearance, a spin-off from Charles University, has released PrismSlicer, a slicing and design-for-additive-manufacturingsoftware developed specifically for multi-material inkjet 3D printing. PrismSlicer focuses on delivering high-fidelity color accuracy, precise volumetric control, and efficient material use, addressing needs across sectors such as industrial design, healthcare, dental, model making, education, and rapid prototyping. To address limitations found in traditional slicing software, PrismSlicer incorporates a photorealistic rendering engine, material-aware slicing algorithms, and voxel-level volumetric authoring. These capabilities aim to reduce trial-and-error, decrease print failures, and accelerate production workflows. “Many users struggle to anticipate how a print will turn out, especially with complex gradients and intricate color textures, ” said Tobias Rittig, Ph.D., CTO at Additive Appearance. “We built PrismSlicer to eliminate that uncertainty. With precise previews and interactive controls, it becomes much easier to get it right on the first print.” PrismSlicer Software. Image via Additive Appearance. Key Differentiators Distinct from conventional surface-based slicers, PrismSlicer adopts a volumetric approach that supports native 3D gradients, material property interpolation, and adaptive color mixing. This approach enables precise spatial distribution of visual and functional features, maximizing the utilization of hardware capabilities. Core features include photorealistic visualization with realistic translucency effects, automated color and texture optimization through device-specific material profiles, and volumetric design tools allowing integration of pre-sliced models with 3D gradients and digital materials. The software supports widely used platforms such as Stratasys PolyJet, Quantica NovoJet, and various custom inkjet printing systems, running across Windows, macOS, and Linux operating systems. Printout 3. Image via Additive Appearance. “The early version released in collaboration with Quantica validated our core technology, ” noted Rittig. “Now, the full-featured PrismSlicer is here and it’s ready to support a much wider user base across multiple ecosystems.” Designed to meet the evolving needs of industries dependent on multi-material, full-color 3D printing, PrismSlicer combines speed, accuracy, and intuitive workflows—including guided steps to simplify complex processes. For users without direct access to printers, its predictive preview capability provides a cost-effective way to test designs digitally before production. PrismSlicer Photorealistic Preview. Image via Additive Appearance. In addition, PrismSlicer supports sustainability by significantly reducing the need for physical test prints, thereby cutting material waste, saving time, and lowering costs. This digital print verification aligns with broader efforts to promote environmentally responsible manufacturing. Offered through a subscription licensing model, PrismSlicer benefits from regular quarterly updates and feature enhancements. Future development plans include expanding support for additional printer models, refining design tools, and further improving visualization accuracy. Additive Appearance is also actively growing partnerships across sectors such as medical prosthetics and dentistry, commercial printing, industrial prototyping, toy and figurine production, and visual effects. Developments in Multi-Material 3D Printing  Multi-material 3D printing is a growing area throughout the additive manufacturing industry. In 2024, a team from the University of Colorado Boulder conducted a study that developed a “Pantone system for material properties.” Their findings outline how repeatable 3D printed properties can be achieved by mixing three “primary” materials – a soft elastomer, a rigid plastic, and liquid constituents. Custom software was used to design hundreds of digital composite material samples. The mechanical properties of the 3D printed samples were then tested, characterized, and mapped. This ultimately allowed users to find the perfect material mixture to achieve the desired properties of their 3D printed part.  Elsewhere, researchers from the MIT Media Lab, Harvard University’s Wyss Institute, and the Dana-Farber Cancer Institute used multi-material inkjet 3D printing to fabricate hybrid living materials.  Called the Hybrid Living Materialfabrication platform, the team created customized material recipes to combine resins and chemical signals. These signals can activate certain responses in biologically engineered microbes, offering the potential for producing 3D printed medical devices with therapeutic agents.       Take the 3DPIReader Survey — shape the future of AM reporting in under 5 minutes. Who won the 2024 3D Printing Industry Awards? Subscribe to the3D Printing Industry newsletter to keep up with the latest 3D printing news. You can also follow us on LinkedIn, and subscribe to the 3D Printing Industry Youtube channel to access more exclusive content. Featured image shows PrismSlicer Software. Image via Additive Appearance. #introducing #prismslicer #additive #appearance #photorealistic
    Introducing PrismSlicer by Additive Appearance: Photorealistic Software for Complex Multi-Material 3D Printing
    3dprintingindustry.com
    Prague-based startup Additive Appearance, a spin-off from Charles University, has released PrismSlicer, a slicing and design-for-additive-manufacturing (DfAM) software developed specifically for multi-material inkjet 3D printing. PrismSlicer focuses on delivering high-fidelity color accuracy, precise volumetric control, and efficient material use, addressing needs across sectors such as industrial design, healthcare, dental, model making, education, and rapid prototyping. To address limitations found in traditional slicing software, PrismSlicer incorporates a photorealistic rendering engine, material-aware slicing algorithms, and voxel-level volumetric authoring. These capabilities aim to reduce trial-and-error, decrease print failures, and accelerate production workflows. “Many users struggle to anticipate how a print will turn out, especially with complex gradients and intricate color textures, ” said Tobias Rittig, Ph.D., CTO at Additive Appearance. “We built PrismSlicer to eliminate that uncertainty. With precise previews and interactive controls, it becomes much easier to get it right on the first print.” PrismSlicer Software. Image via Additive Appearance. Key Differentiators Distinct from conventional surface-based slicers, PrismSlicer adopts a volumetric approach that supports native 3D gradients, material property interpolation, and adaptive color mixing. This approach enables precise spatial distribution of visual and functional features, maximizing the utilization of hardware capabilities. Core features include photorealistic visualization with realistic translucency effects, automated color and texture optimization through device-specific material profiles, and volumetric design tools allowing integration of pre-sliced models with 3D gradients and digital materials. The software supports widely used platforms such as Stratasys PolyJet, Quantica NovoJet, and various custom inkjet printing systems, running across Windows, macOS, and Linux operating systems. Printout 3. Image via Additive Appearance. “The early version released in collaboration with Quantica validated our core technology, ” noted Rittig. “Now, the full-featured PrismSlicer is here and it’s ready to support a much wider user base across multiple ecosystems.” Designed to meet the evolving needs of industries dependent on multi-material, full-color 3D printing, PrismSlicer combines speed, accuracy, and intuitive workflows—including guided steps to simplify complex processes. For users without direct access to printers, its predictive preview capability provides a cost-effective way to test designs digitally before production. PrismSlicer Photorealistic Preview. Image via Additive Appearance. In addition, PrismSlicer supports sustainability by significantly reducing the need for physical test prints, thereby cutting material waste, saving time, and lowering costs. This digital print verification aligns with broader efforts to promote environmentally responsible manufacturing. Offered through a subscription licensing model, PrismSlicer benefits from regular quarterly updates and feature enhancements. Future development plans include expanding support for additional printer models, refining design tools, and further improving visualization accuracy. Additive Appearance is also actively growing partnerships across sectors such as medical prosthetics and dentistry, commercial printing, industrial prototyping, toy and figurine production, and visual effects. Developments in Multi-Material 3D Printing  Multi-material 3D printing is a growing area throughout the additive manufacturing industry. In 2024, a team from the University of Colorado Boulder conducted a study that developed a “Pantone system for material properties.” Their findings outline how repeatable 3D printed properties can be achieved by mixing three “primary” materials – a soft elastomer, a rigid plastic, and liquid constituents. Custom software was used to design hundreds of digital composite material samples. The mechanical properties of the 3D printed samples were then tested, characterized, and mapped. This ultimately allowed users to find the perfect material mixture to achieve the desired properties of their 3D printed part.  Elsewhere, researchers from the MIT Media Lab, Harvard University’s Wyss Institute, and the Dana-Farber Cancer Institute used multi-material inkjet 3D printing to fabricate hybrid living materials.  Called the Hybrid Living Material (HLM) fabrication platform, the team created customized material recipes to combine resins and chemical signals. These signals can activate certain responses in biologically engineered microbes, offering the potential for producing 3D printed medical devices with therapeutic agents.       Take the 3DPIReader Survey — shape the future of AM reporting in under 5 minutes. Who won the 2024 3D Printing Industry Awards? Subscribe to the3D Printing Industry newsletter to keep up with the latest 3D printing news. You can also follow us on LinkedIn, and subscribe to the 3D Printing Industry Youtube channel to access more exclusive content. Featured image shows PrismSlicer Software. Image via Additive Appearance.
    0 Комментарии ·0 Поделились ·0 предпросмотр
  • Anycubic Kobra S1 Review: Good printer, bad slicer
    Anycubic’s first Core XY color printer is great, but the software falls short.
    Source: https://www.tomshardware.com/3d-printing/anycubic-kobra-s1-review" style="color: #0066cc;">https://www.tomshardware.com/3d-printing/anycubic-kobra-s1-review
    #anycubic #kobra #review #good #printer #bad #slicer
    Anycubic Kobra S1 Review: Good printer, bad slicer
    Anycubic’s first Core XY color printer is great, but the software falls short. Source: https://www.tomshardware.com/3d-printing/anycubic-kobra-s1-review #anycubic #kobra #review #good #printer #bad #slicer
    Anycubic Kobra S1 Review: Good printer, bad slicer
    www.tomshardware.com
    Anycubic’s first Core XY color printer is great, but the software falls short.
    0 Комментарии ·0 Поделились ·0 предпросмотр
CGShares https://cgshares.com