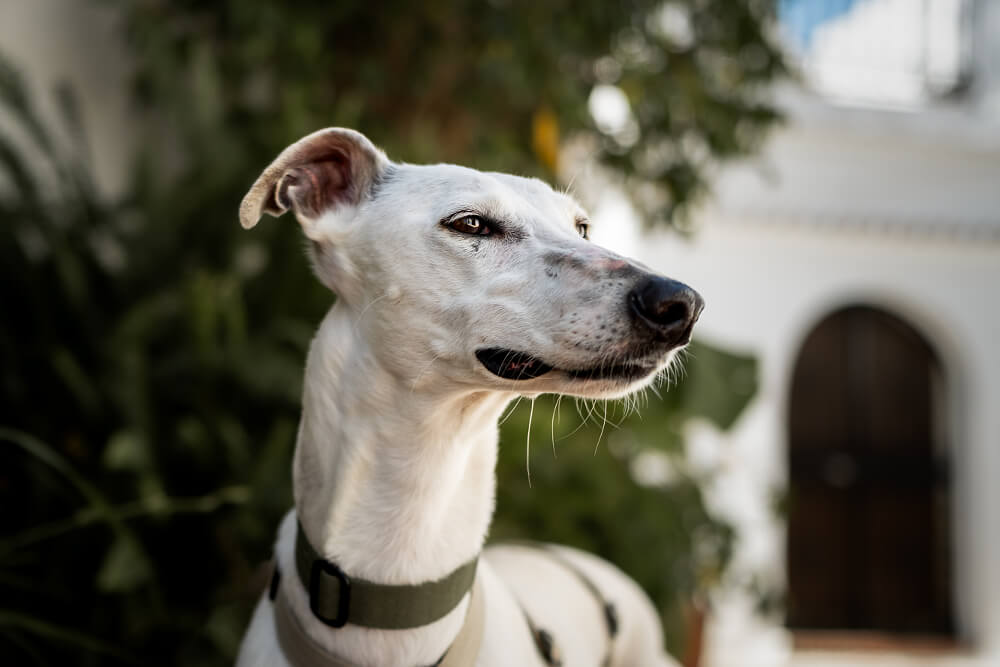
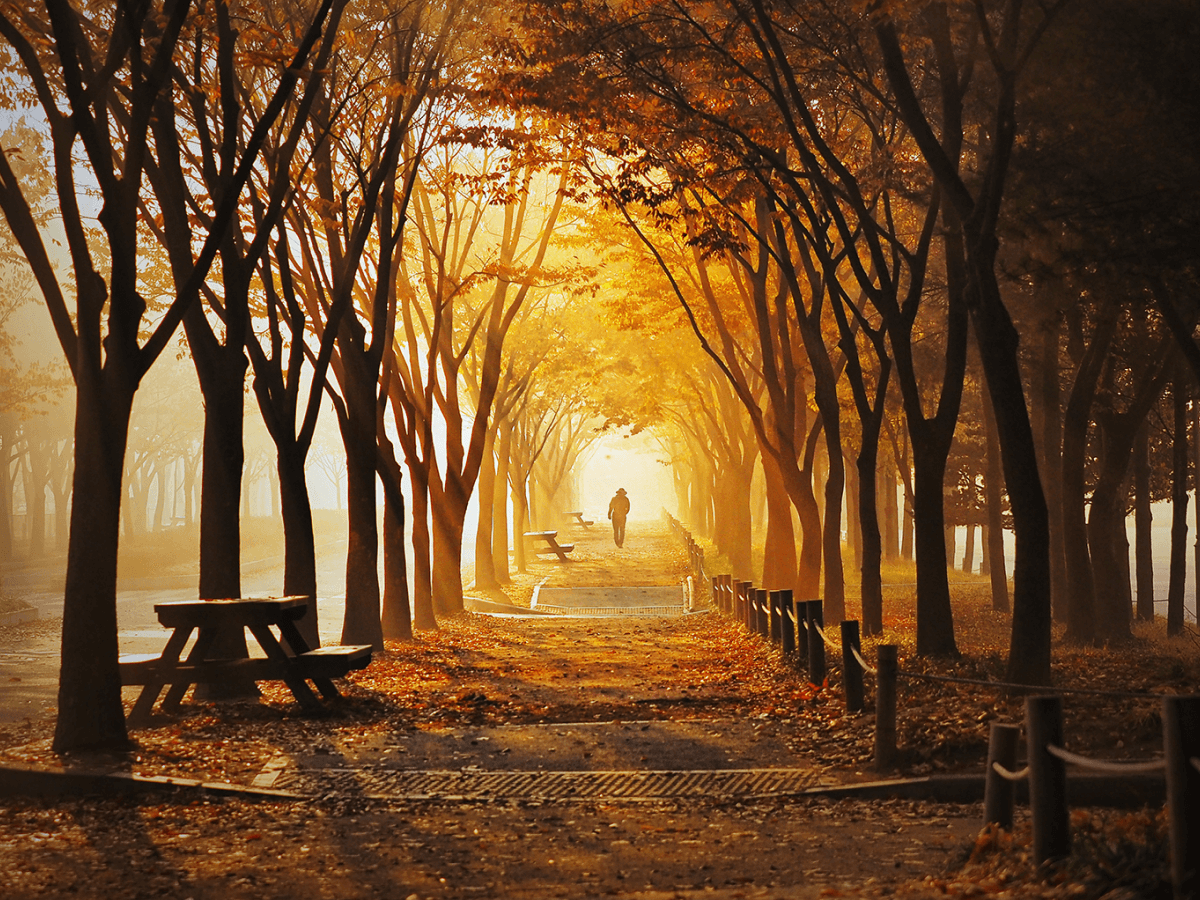
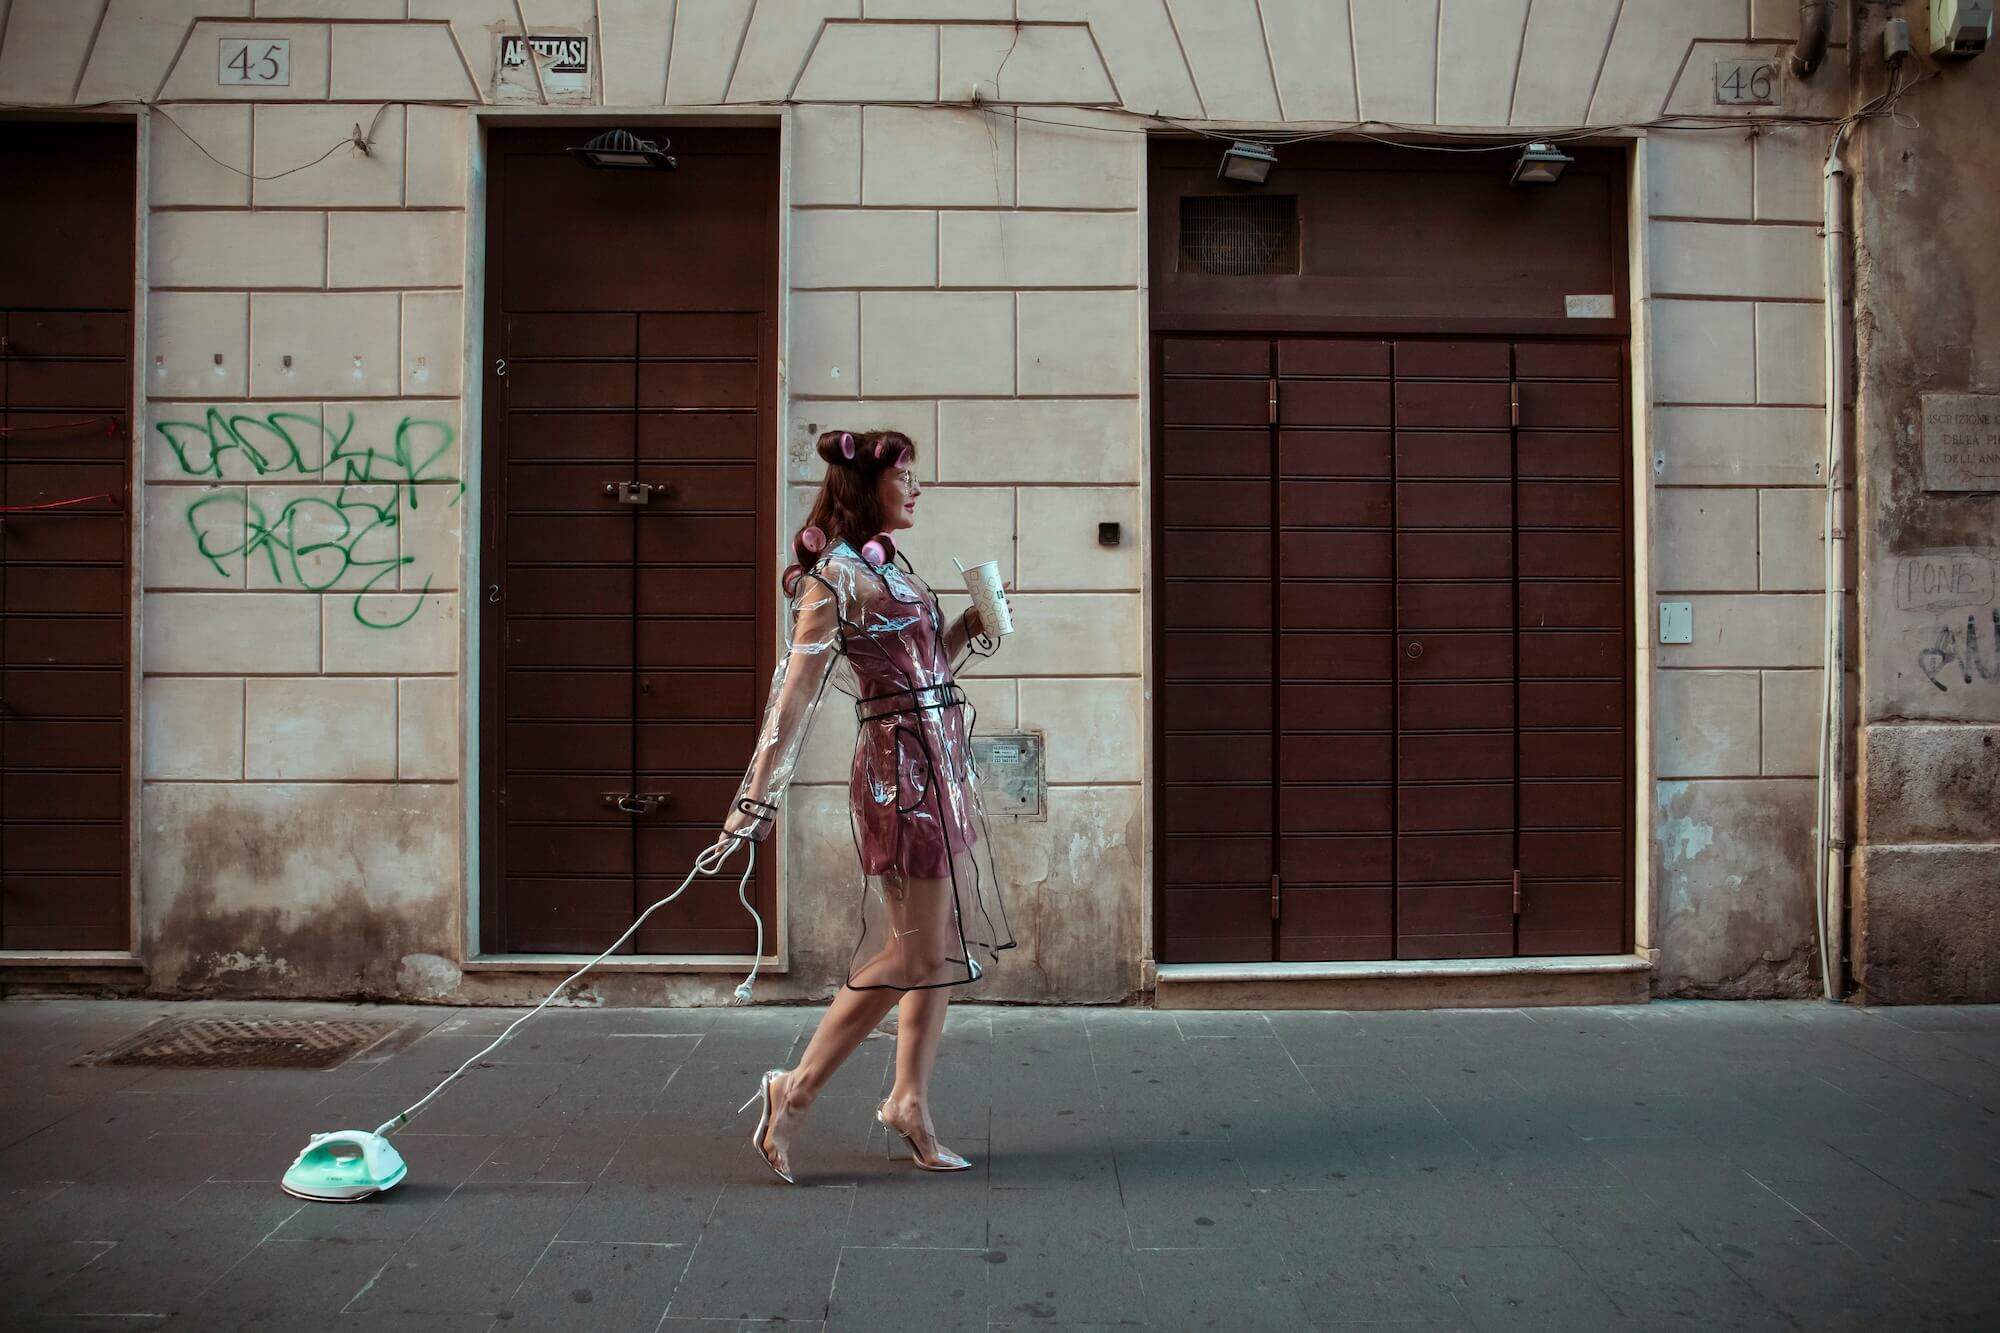
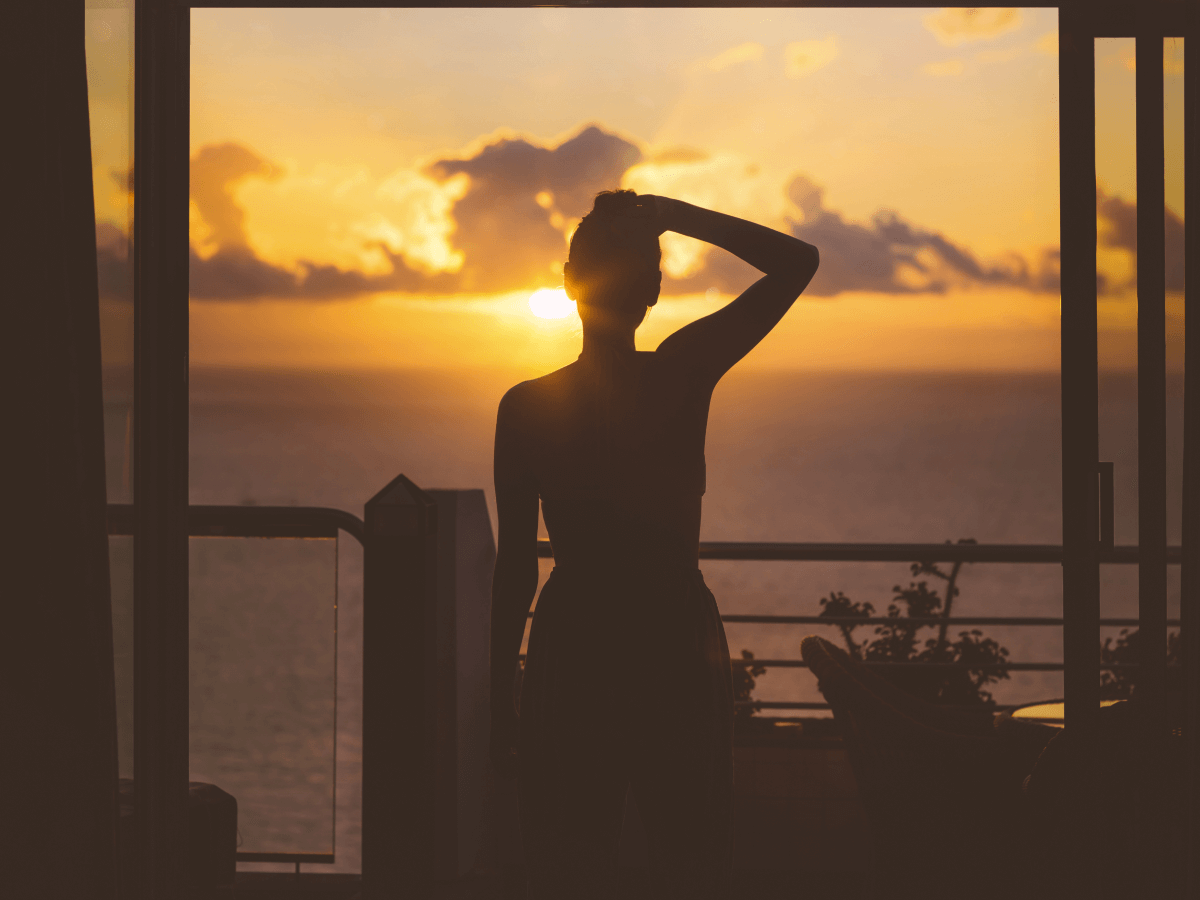
-
- EXPLORER
-
-
-
-
-
user map
A global online network where millions of photographers discover + share incredible photos
Mises à jour récentes
-
Harnessing Silhouette for Dramatic Storytelling
Silhouette photography has the unique power to convey powerful emotions and dramatic narratives by emphasizing shape and form over details and textures. By creatively harnessing silhouettes, photographers can captivate viewers’ imaginations, prompting them to fill in unseen details and engage deeply with the story. Here’s how to master silhouettes to elevate your photographic storytelling.
The Art of Silhouettes
A silhouette is created when your subject is backlit, making the subject appear completely dark against a lighter background. Silhouettes rely heavily on strong outlines, instantly recognizable shapes, and clear gestures to tell compelling stories.
Capturing the Perfect Silhouette
Ideal Conditions
Sunrise and sunset offer low-angle sunlight, providing ideal lighting conditions to create dramatic silhouettes.
Artificial light sources like urban lights, windows, and doorways offer unique creative opportunities for silhouette photography.
Camera Settings
Adjust your exposure for the brightest part of the scene, usually the background, to render your subject as a dark silhouette.
Choose a narrower apertureto maintain clear, sharp outlines, ensuring your silhouette remains distinct.
Composition Techniques for Dramatic Impact
Select subjects with strong, recognizable shapes—human figures, animals, architecture, and trees often create compelling silhouettes.
Encourage subjects to use clear gestures or dynamic poses to communicate emotion or action effectively.
Utilize negative space to emphasize silhouettes, creating visual balance and directing viewers’ attention to the subject.
Enhancing Storytelling through Silhouettes
Silhouettes simplify your scene, focusing viewers’ attention entirely on the emotional or narrative essence of your image. Obscuring details introduces an element of mystery, inviting viewers to engage actively with your photograph. Silhouettes naturally evoke emotional responses, effectively conveying solitude, contemplation, love, or drama.
Post-Processing Tips
Enhance contrast and deepen blacks to emphasize your silhouette, strengthening its dramatic presence.
Apply subtle color grading or tone adjustments to amplify mood—warmer tones evoke romance or nostalgia, while cooler tones suggest tranquility or melancholy.
Creative Applications
Silhouettes are versatile across many genres, including intimate portraits, dynamic street photography, and striking nature and wildlife imagery. Using silhouettes thoughtfully allows photographers to communicate powerful forms and actions, creating graphically strong and emotionally resonant photographs.
Silhouettes offer photographers an exceptional tool for impactful storytelling, combining simplicity with emotional intensity. By mastering essential techniques, thoughtful composition, and creative execution, you can craft compelling visual narratives that resonate deeply with your audience. Explore silhouettes in your photography, and uncover the profound storytelling power hidden within shadows.
Extended reading: Creating depth and drama with moody photography
The post Harnessing Silhouette for Dramatic Storytelling appeared first on 500px.
#harnessing #silhouette #dramatic #storytellingHarnessing Silhouette for Dramatic StorytellingSilhouette photography has the unique power to convey powerful emotions and dramatic narratives by emphasizing shape and form over details and textures. By creatively harnessing silhouettes, photographers can captivate viewers’ imaginations, prompting them to fill in unseen details and engage deeply with the story. Here’s how to master silhouettes to elevate your photographic storytelling. The Art of Silhouettes A silhouette is created when your subject is backlit, making the subject appear completely dark against a lighter background. Silhouettes rely heavily on strong outlines, instantly recognizable shapes, and clear gestures to tell compelling stories. Capturing the Perfect Silhouette Ideal Conditions Sunrise and sunset offer low-angle sunlight, providing ideal lighting conditions to create dramatic silhouettes. Artificial light sources like urban lights, windows, and doorways offer unique creative opportunities for silhouette photography. Camera Settings Adjust your exposure for the brightest part of the scene, usually the background, to render your subject as a dark silhouette. Choose a narrower apertureto maintain clear, sharp outlines, ensuring your silhouette remains distinct. Composition Techniques for Dramatic Impact Select subjects with strong, recognizable shapes—human figures, animals, architecture, and trees often create compelling silhouettes. Encourage subjects to use clear gestures or dynamic poses to communicate emotion or action effectively. Utilize negative space to emphasize silhouettes, creating visual balance and directing viewers’ attention to the subject. Enhancing Storytelling through Silhouettes Silhouettes simplify your scene, focusing viewers’ attention entirely on the emotional or narrative essence of your image. Obscuring details introduces an element of mystery, inviting viewers to engage actively with your photograph. Silhouettes naturally evoke emotional responses, effectively conveying solitude, contemplation, love, or drama. Post-Processing Tips Enhance contrast and deepen blacks to emphasize your silhouette, strengthening its dramatic presence. Apply subtle color grading or tone adjustments to amplify mood—warmer tones evoke romance or nostalgia, while cooler tones suggest tranquility or melancholy. Creative Applications Silhouettes are versatile across many genres, including intimate portraits, dynamic street photography, and striking nature and wildlife imagery. Using silhouettes thoughtfully allows photographers to communicate powerful forms and actions, creating graphically strong and emotionally resonant photographs. Silhouettes offer photographers an exceptional tool for impactful storytelling, combining simplicity with emotional intensity. By mastering essential techniques, thoughtful composition, and creative execution, you can craft compelling visual narratives that resonate deeply with your audience. Explore silhouettes in your photography, and uncover the profound storytelling power hidden within shadows. Extended reading: Creating depth and drama with moody photography The post Harnessing Silhouette for Dramatic Storytelling appeared first on 500px. #harnessing #silhouette #dramatic #storytellingISO.500PX.COMHarnessing Silhouette for Dramatic StorytellingSilhouette photography has the unique power to convey powerful emotions and dramatic narratives by emphasizing shape and form over details and textures. By creatively harnessing silhouettes, photographers can captivate viewers’ imaginations, prompting them to fill in unseen details and engage deeply with the story. Here’s how to master silhouettes to elevate your photographic storytelling. The Art of Silhouettes A silhouette is created when your subject is backlit, making the subject appear completely dark against a lighter background. Silhouettes rely heavily on strong outlines, instantly recognizable shapes, and clear gestures to tell compelling stories. Capturing the Perfect Silhouette Ideal Conditions Sunrise and sunset offer low-angle sunlight, providing ideal lighting conditions to create dramatic silhouettes. Artificial light sources like urban lights, windows, and doorways offer unique creative opportunities for silhouette photography. Camera Settings Adjust your exposure for the brightest part of the scene, usually the background, to render your subject as a dark silhouette. Choose a narrower aperture (higher f-number) to maintain clear, sharp outlines, ensuring your silhouette remains distinct. Composition Techniques for Dramatic Impact Select subjects with strong, recognizable shapes—human figures, animals, architecture, and trees often create compelling silhouettes. Encourage subjects to use clear gestures or dynamic poses to communicate emotion or action effectively. Utilize negative space to emphasize silhouettes, creating visual balance and directing viewers’ attention to the subject. Enhancing Storytelling through Silhouettes Silhouettes simplify your scene, focusing viewers’ attention entirely on the emotional or narrative essence of your image. Obscuring details introduces an element of mystery, inviting viewers to engage actively with your photograph. Silhouettes naturally evoke emotional responses, effectively conveying solitude, contemplation, love, or drama. Post-Processing Tips Enhance contrast and deepen blacks to emphasize your silhouette, strengthening its dramatic presence. Apply subtle color grading or tone adjustments to amplify mood—warmer tones evoke romance or nostalgia, while cooler tones suggest tranquility or melancholy. Creative Applications Silhouettes are versatile across many genres, including intimate portraits, dynamic street photography, and striking nature and wildlife imagery. Using silhouettes thoughtfully allows photographers to communicate powerful forms and actions, creating graphically strong and emotionally resonant photographs. Silhouettes offer photographers an exceptional tool for impactful storytelling, combining simplicity with emotional intensity. By mastering essential techniques, thoughtful composition, and creative execution, you can craft compelling visual narratives that resonate deeply with your audience. Explore silhouettes in your photography, and uncover the profound storytelling power hidden within shadows. Extended reading: Creating depth and drama with moody photography The post Harnessing Silhouette for Dramatic Storytelling appeared first on 500px.0 Commentaires 0 PartsConnectez-vous pour aimer, partager et commenter! -
Crafting Atmospheric Images with Fog and Mist
Fog and mist offer photographers an exceptional opportunity to create deeply atmospheric, moody, and mysterious imagery. By embracing these unique weather conditions, you can transform ordinary scenes into captivating visual stories filled with depth, emotion, and intrigue. Here’s how to effectively harness fog and mist to elevate your photography.
Understanding the Appeal of Fog and Mist
Fog and mist naturally diffuse light, softening contrasts and textures within a scene. This soft diffusion creates a dreamlike ambiance and adds emotional depth to photographs, often evoking feelings of tranquility, solitude, or mystery. By obscuring and revealing elements selectively, fog and mist invite viewers to engage deeply with the visual narrative, filling in unseen details with imagination.
Ideal Conditions and Timing
The most atmospheric fog and mist usually occur during early mornings or evenings, especially near bodies of water or in valleys and lowlands. Paying close attention to weather forecasts can help you predict ideal conditions. Early preparation and scouting locations ahead of time ensure you’re ready when the perfect atmospheric conditions arise.
Composition Techniques for Foggy Scenes
Creating impactful foggy compositions involves thoughtful techniques:
Layers and Depth: Use the fog’s varying densities to emphasize depth. Layering foreground, midground, and background elements adds visual complexity and interest.
Silhouettes and Shapes: Fog reduces detail, emphasizing strong shapes and silhouettes. Compose your images around distinctive shapes, trees, or structures to anchor your photograph.
Simplify the Frame: Minimalism is especially effective in foggy conditions. Embrace simplicity by isolating single elements or subjects against misty backdrops for dramatic effect.
Lighting and Exposure Considerations
Fog significantly impacts exposure and lighting conditions:
Soft Light: The diffused, gentle lighting conditions in fog and mist reduce harsh shadows, creating flattering, ethereal images.
Exposure Compensation: Fog often tricks camera meters into underexposing scenes. Consider slightly increasing your exposure compensation to accurately capture the brightness and subtle details of foggy conditions.
Creative Opportunities with Fog and Mist
Fog and mist open diverse creative possibilities:
Black-and-White Photography: Foggy conditions lend themselves exceptionally well to monochrome photography, highlighting contrasts, textures, and shapes dramatically.
Color Tones and Mood: Color images in foggy conditions can carry gentle pastel tones or cool hues, enhancing the atmospheric and emotional impact of your imagery.
Enhancing Foggy Images Through Post-Processing
Post-processing can refine foggy scenes:
Contrast and Clarity Adjustments: Fine-tune contrast and clarity subtly to maintain the softness and mood without losing important detail.
Selective Sharpening: Apply selective sharpening to key elements or subjects, ensuring they stand out within the foggy environment without diminishing the atmospheric quality.
Fog and mist provide photographers with unique conditions to craft images rich in mood, narrative, and visual intrigue. By thoughtfully considering composition, timing, lighting, and post-processing, you can harness the power of fog and mist to produce atmospheric photography that deeply resonates with viewers. Embrace these ethereal elements, and transform everyday scenes into extraordinary visual stories.
Extended reading: Alpine views: 12 breathtaking mountainscapes to celebrate the chilly season
The post Crafting Atmospheric Images with Fog and Mist appeared first on 500px.
#crafting #atmospheric #images #with #fogCrafting Atmospheric Images with Fog and MistFog and mist offer photographers an exceptional opportunity to create deeply atmospheric, moody, and mysterious imagery. By embracing these unique weather conditions, you can transform ordinary scenes into captivating visual stories filled with depth, emotion, and intrigue. Here’s how to effectively harness fog and mist to elevate your photography. Understanding the Appeal of Fog and Mist Fog and mist naturally diffuse light, softening contrasts and textures within a scene. This soft diffusion creates a dreamlike ambiance and adds emotional depth to photographs, often evoking feelings of tranquility, solitude, or mystery. By obscuring and revealing elements selectively, fog and mist invite viewers to engage deeply with the visual narrative, filling in unseen details with imagination. Ideal Conditions and Timing The most atmospheric fog and mist usually occur during early mornings or evenings, especially near bodies of water or in valleys and lowlands. Paying close attention to weather forecasts can help you predict ideal conditions. Early preparation and scouting locations ahead of time ensure you’re ready when the perfect atmospheric conditions arise. Composition Techniques for Foggy Scenes Creating impactful foggy compositions involves thoughtful techniques: Layers and Depth: Use the fog’s varying densities to emphasize depth. Layering foreground, midground, and background elements adds visual complexity and interest. Silhouettes and Shapes: Fog reduces detail, emphasizing strong shapes and silhouettes. Compose your images around distinctive shapes, trees, or structures to anchor your photograph. Simplify the Frame: Minimalism is especially effective in foggy conditions. Embrace simplicity by isolating single elements or subjects against misty backdrops for dramatic effect. Lighting and Exposure Considerations Fog significantly impacts exposure and lighting conditions: Soft Light: The diffused, gentle lighting conditions in fog and mist reduce harsh shadows, creating flattering, ethereal images. Exposure Compensation: Fog often tricks camera meters into underexposing scenes. Consider slightly increasing your exposure compensation to accurately capture the brightness and subtle details of foggy conditions. Creative Opportunities with Fog and Mist Fog and mist open diverse creative possibilities: Black-and-White Photography: Foggy conditions lend themselves exceptionally well to monochrome photography, highlighting contrasts, textures, and shapes dramatically. Color Tones and Mood: Color images in foggy conditions can carry gentle pastel tones or cool hues, enhancing the atmospheric and emotional impact of your imagery. Enhancing Foggy Images Through Post-Processing Post-processing can refine foggy scenes: Contrast and Clarity Adjustments: Fine-tune contrast and clarity subtly to maintain the softness and mood without losing important detail. Selective Sharpening: Apply selective sharpening to key elements or subjects, ensuring they stand out within the foggy environment without diminishing the atmospheric quality. Fog and mist provide photographers with unique conditions to craft images rich in mood, narrative, and visual intrigue. By thoughtfully considering composition, timing, lighting, and post-processing, you can harness the power of fog and mist to produce atmospheric photography that deeply resonates with viewers. Embrace these ethereal elements, and transform everyday scenes into extraordinary visual stories. Extended reading: Alpine views: 12 breathtaking mountainscapes to celebrate the chilly season The post Crafting Atmospheric Images with Fog and Mist appeared first on 500px. #crafting #atmospheric #images #with #fogISO.500PX.COMCrafting Atmospheric Images with Fog and MistFog and mist offer photographers an exceptional opportunity to create deeply atmospheric, moody, and mysterious imagery. By embracing these unique weather conditions, you can transform ordinary scenes into captivating visual stories filled with depth, emotion, and intrigue. Here’s how to effectively harness fog and mist to elevate your photography. Understanding the Appeal of Fog and Mist Fog and mist naturally diffuse light, softening contrasts and textures within a scene. This soft diffusion creates a dreamlike ambiance and adds emotional depth to photographs, often evoking feelings of tranquility, solitude, or mystery. By obscuring and revealing elements selectively, fog and mist invite viewers to engage deeply with the visual narrative, filling in unseen details with imagination. Ideal Conditions and Timing The most atmospheric fog and mist usually occur during early mornings or evenings, especially near bodies of water or in valleys and lowlands. Paying close attention to weather forecasts can help you predict ideal conditions. Early preparation and scouting locations ahead of time ensure you’re ready when the perfect atmospheric conditions arise. Composition Techniques for Foggy Scenes Creating impactful foggy compositions involves thoughtful techniques: Layers and Depth: Use the fog’s varying densities to emphasize depth. Layering foreground, midground, and background elements adds visual complexity and interest. Silhouettes and Shapes: Fog reduces detail, emphasizing strong shapes and silhouettes. Compose your images around distinctive shapes, trees, or structures to anchor your photograph. Simplify the Frame: Minimalism is especially effective in foggy conditions. Embrace simplicity by isolating single elements or subjects against misty backdrops for dramatic effect. Lighting and Exposure Considerations Fog significantly impacts exposure and lighting conditions: Soft Light: The diffused, gentle lighting conditions in fog and mist reduce harsh shadows, creating flattering, ethereal images. Exposure Compensation: Fog often tricks camera meters into underexposing scenes. Consider slightly increasing your exposure compensation to accurately capture the brightness and subtle details of foggy conditions. Creative Opportunities with Fog and Mist Fog and mist open diverse creative possibilities: Black-and-White Photography: Foggy conditions lend themselves exceptionally well to monochrome photography, highlighting contrasts, textures, and shapes dramatically. Color Tones and Mood: Color images in foggy conditions can carry gentle pastel tones or cool hues, enhancing the atmospheric and emotional impact of your imagery. Enhancing Foggy Images Through Post-Processing Post-processing can refine foggy scenes: Contrast and Clarity Adjustments: Fine-tune contrast and clarity subtly to maintain the softness and mood without losing important detail. Selective Sharpening: Apply selective sharpening to key elements or subjects, ensuring they stand out within the foggy environment without diminishing the atmospheric quality. Fog and mist provide photographers with unique conditions to craft images rich in mood, narrative, and visual intrigue. By thoughtfully considering composition, timing, lighting, and post-processing, you can harness the power of fog and mist to produce atmospheric photography that deeply resonates with viewers. Embrace these ethereal elements, and transform everyday scenes into extraordinary visual stories. Extended reading: Alpine views: 12 breathtaking mountainscapes to celebrate the chilly season The post Crafting Atmospheric Images with Fog and Mist appeared first on 500px. -
Creating Harmony with Analogous Color Schemes
Analogous color schemes, composed of colors adjacent to each other on the color wheel, naturally produce harmonious and visually appealing images. These palettes offer photographers a gentle yet compelling approach to color, creating soothing, cohesive photographs that effortlessly draw viewers into a serene visual experience.
Understanding Analogous Colors
Analogous colors share common undertones and naturally complement each other, creating visual comfort and unity. Common examples include:
Warm Analogous Schemes: Red, orange, and yellow hues evoke warmth, energy, and positivity.
Cool Analogous Schemes: Green, blue, and violet hues convey calmness, tranquility, and introspection.
Emotional Impact of Analogous Colors
Each analogous color palette carries unique emotional associations. Selecting colors intentionally allows photographers to reinforce specific moods:
Warm palettes promote excitement, vitality, and optimism, ideal for lifestyle or dynamic portrait photography.
Cool palettes emphasize relaxation, peace, and contemplation, perfect for landscapes, seascapes, or reflective narratives.
Techniques for Successful Analogous Compositions
Creating powerful analogous compositions requires mindful planning and execution:
Dominant and Supporting Colors: Choose a primary color to dominate your composition, using adjacent hues to provide depth and visual interest.
Balancing Tonal Values: Incorporate a variety of tones within your analogous palette—from dark to light—to maintain visual balance and ensure clear differentiation between elements.
Lighting to Enhance Color Harmony
Lighting profoundly affects the appearance and interaction of colors within analogous schemes:
Natural Light: Soft, natural daylight enhances color cohesion, bringing out subtle tonal variations and supporting visual harmony.
Studio Lighting: Controlled lighting setups enable photographers to precisely manage color intensity, highlighting specific hues to strengthen composition and mood.
Composition Tips for Analogous Schemes
Intentional composition enhances the natural beauty and harmony of analogous color photography:
Simplify Your Scene: Removing unnecessary elements ensures the analogous palette remains clear, focused, and impactful.
Layering and Depth: Thoughtfully layering colors within your composition adds depth and encourages viewer engagement, inviting exploration of visual details.
Refine Through Subtle Post-Processing
Analogous color photography often benefits from nuanced post-processing:
Adjust subtle differences in hue, saturation, and luminance to fine-tune harmony and enhance emotional resonance.
Consider gentle contrast adjustments to highlight variations without disrupting overall visual tranquility.
Analogous color schemes offer photographers a unique opportunity to create naturally harmonious and emotionally resonant images. By thoughtfully selecting your palette, carefully managing composition and lighting, and subtly refining in post-processing, you can produce photographs characterized by visual ease, depth, and emotional clarity.
Embrace the subtle power of analogous colors and elevate your photographic storytelling with visually cohesive, harmonious compositions.
Extended reading: Using Color to Strengthen Your Photographic Narratives
The post Creating Harmony with Analogous Color Schemes appeared first on 500px.
#creating #harmony #with #analogous #colorCreating Harmony with Analogous Color SchemesAnalogous color schemes, composed of colors adjacent to each other on the color wheel, naturally produce harmonious and visually appealing images. These palettes offer photographers a gentle yet compelling approach to color, creating soothing, cohesive photographs that effortlessly draw viewers into a serene visual experience. Understanding Analogous Colors Analogous colors share common undertones and naturally complement each other, creating visual comfort and unity. Common examples include: Warm Analogous Schemes: Red, orange, and yellow hues evoke warmth, energy, and positivity. Cool Analogous Schemes: Green, blue, and violet hues convey calmness, tranquility, and introspection. Emotional Impact of Analogous Colors Each analogous color palette carries unique emotional associations. Selecting colors intentionally allows photographers to reinforce specific moods: Warm palettes promote excitement, vitality, and optimism, ideal for lifestyle or dynamic portrait photography. Cool palettes emphasize relaxation, peace, and contemplation, perfect for landscapes, seascapes, or reflective narratives. Techniques for Successful Analogous Compositions Creating powerful analogous compositions requires mindful planning and execution: Dominant and Supporting Colors: Choose a primary color to dominate your composition, using adjacent hues to provide depth and visual interest. Balancing Tonal Values: Incorporate a variety of tones within your analogous palette—from dark to light—to maintain visual balance and ensure clear differentiation between elements. Lighting to Enhance Color Harmony Lighting profoundly affects the appearance and interaction of colors within analogous schemes: Natural Light: Soft, natural daylight enhances color cohesion, bringing out subtle tonal variations and supporting visual harmony. Studio Lighting: Controlled lighting setups enable photographers to precisely manage color intensity, highlighting specific hues to strengthen composition and mood. Composition Tips for Analogous Schemes Intentional composition enhances the natural beauty and harmony of analogous color photography: Simplify Your Scene: Removing unnecessary elements ensures the analogous palette remains clear, focused, and impactful. Layering and Depth: Thoughtfully layering colors within your composition adds depth and encourages viewer engagement, inviting exploration of visual details. Refine Through Subtle Post-Processing Analogous color photography often benefits from nuanced post-processing: Adjust subtle differences in hue, saturation, and luminance to fine-tune harmony and enhance emotional resonance. Consider gentle contrast adjustments to highlight variations without disrupting overall visual tranquility. Analogous color schemes offer photographers a unique opportunity to create naturally harmonious and emotionally resonant images. By thoughtfully selecting your palette, carefully managing composition and lighting, and subtly refining in post-processing, you can produce photographs characterized by visual ease, depth, and emotional clarity. Embrace the subtle power of analogous colors and elevate your photographic storytelling with visually cohesive, harmonious compositions. Extended reading: Using Color to Strengthen Your Photographic Narratives The post Creating Harmony with Analogous Color Schemes appeared first on 500px. #creating #harmony #with #analogous #colorISO.500PX.COMCreating Harmony with Analogous Color SchemesAnalogous color schemes, composed of colors adjacent to each other on the color wheel, naturally produce harmonious and visually appealing images. These palettes offer photographers a gentle yet compelling approach to color, creating soothing, cohesive photographs that effortlessly draw viewers into a serene visual experience. Understanding Analogous Colors Analogous colors share common undertones and naturally complement each other, creating visual comfort and unity. Common examples include: Warm Analogous Schemes: Red, orange, and yellow hues evoke warmth, energy, and positivity. Cool Analogous Schemes: Green, blue, and violet hues convey calmness, tranquility, and introspection. Emotional Impact of Analogous Colors Each analogous color palette carries unique emotional associations. Selecting colors intentionally allows photographers to reinforce specific moods: Warm palettes promote excitement, vitality, and optimism, ideal for lifestyle or dynamic portrait photography. Cool palettes emphasize relaxation, peace, and contemplation, perfect for landscapes, seascapes, or reflective narratives. Techniques for Successful Analogous Compositions Creating powerful analogous compositions requires mindful planning and execution: Dominant and Supporting Colors: Choose a primary color to dominate your composition, using adjacent hues to provide depth and visual interest. Balancing Tonal Values: Incorporate a variety of tones within your analogous palette—from dark to light—to maintain visual balance and ensure clear differentiation between elements. Lighting to Enhance Color Harmony Lighting profoundly affects the appearance and interaction of colors within analogous schemes: Natural Light: Soft, natural daylight enhances color cohesion, bringing out subtle tonal variations and supporting visual harmony. Studio Lighting: Controlled lighting setups enable photographers to precisely manage color intensity, highlighting specific hues to strengthen composition and mood. Composition Tips for Analogous Schemes Intentional composition enhances the natural beauty and harmony of analogous color photography: Simplify Your Scene: Removing unnecessary elements ensures the analogous palette remains clear, focused, and impactful. Layering and Depth: Thoughtfully layering colors within your composition adds depth and encourages viewer engagement, inviting exploration of visual details. Refine Through Subtle Post-Processing Analogous color photography often benefits from nuanced post-processing: Adjust subtle differences in hue, saturation, and luminance to fine-tune harmony and enhance emotional resonance. Consider gentle contrast adjustments to highlight variations without disrupting overall visual tranquility. Analogous color schemes offer photographers a unique opportunity to create naturally harmonious and emotionally resonant images. By thoughtfully selecting your palette, carefully managing composition and lighting, and subtly refining in post-processing, you can produce photographs characterized by visual ease, depth, and emotional clarity. Embrace the subtle power of analogous colors and elevate your photographic storytelling with visually cohesive, harmonious compositions. Extended reading: Using Color to Strengthen Your Photographic Narratives The post Creating Harmony with Analogous Color Schemes appeared first on 500px.0 Commentaires 0 Parts -
Less is More: The Power of Minimalist Color Photography
Minimalist color photography thrives on simplicity, clarity, and restraint, using limited color palettes and streamlined compositions to create powerful visual impact. This style strips away distractions, emphasizing the essential elements of the scene and allowing photographers to convey strong emotions and clear narratives effectively.
Embracing Simplicity
Minimalism isn’t about having fewer elements for the sake of simplicity alone; it’s about intentionality. Every aspect of your photograph—color, composition, and subject—should serve a clear purpose and contribute meaningfully to the image’s overall impact.
Limited Colors: Restricting your palette to a few colors or shades enhances visual clarity and emotional resonance.
Focused Subject: Clearly defined subjects with significant negative space help viewers immediately grasp the narrative or emotion you’re conveying.
Choosing Colors for Emotional Impact
In minimalist photography, your color choices are critical. Each hue carries emotional weight and meaning:
Monochromatic Schemes: Utilizing shades of a single color can create elegant, unified, and tranquil images.
Subtle Contrasts: Gentle contrasts in minimalist photos—such as muted pastels paired with soft neutrals—generate quiet, compelling visual interest.
Bold Accents: Introducing a single vibrant color against an otherwise neutral background can create dramatic visual tension, guiding the viewer’s eye directly to your subject.
Composition for Maximum Effect
Achieving successful minimalist photography relies heavily on thoughtful composition:
Negative Space: Extensive use of negative space emphasizes your subject, creating a serene yet compelling aesthetic.
Rule of Thirds and Symmetry: Utilize basic compositional techniques like the rule of thirds or symmetry to structure your image effectively, reinforcing clarity and visual harmony.
Minimal Details: Each detail included should significantly enhance your composition; extraneous elements dilute the minimalist impact.
The Role of Lighting in Minimalism
Lighting is essential to minimalist photography, significantly affecting mood and visual appeal:
Soft Lighting: Diffuse, gentle lighting helps maintain visual simplicity, reducing harsh contrasts and promoting a tranquil mood.
Directional Light: Controlled use of directional lighting can add subtle texture and depth, highlighting essential elements without introducing unnecessary complexity.
Refining Your Minimalist Vision
Minimalist photography challenges photographers to see beyond the surface, demanding careful planning and thoughtful execution. Cultivate the discipline to exclude unnecessary elements and focus solely on essential details. This approach allows the viewer to connect instantly with your message or emotion, leaving a lasting impression.
Minimalist color photography demonstrates the profound power of simplicity. By embracing restraint, carefully choosing your colors, mastering composition, and thoughtfully utilizing lighting, you can create visually impactful photographs that deeply resonate with your audience.
Explore minimalism in your photographic practice, and discover the strength and clarity of saying more with less.
Extended reading: Transforming ordinary scenes with vibrant colors
The post Less is More: The Power of Minimalist Color Photography appeared first on 500px.
#less #more #power #minimalist #colorLess is More: The Power of Minimalist Color PhotographyMinimalist color photography thrives on simplicity, clarity, and restraint, using limited color palettes and streamlined compositions to create powerful visual impact. This style strips away distractions, emphasizing the essential elements of the scene and allowing photographers to convey strong emotions and clear narratives effectively. Embracing Simplicity Minimalism isn’t about having fewer elements for the sake of simplicity alone; it’s about intentionality. Every aspect of your photograph—color, composition, and subject—should serve a clear purpose and contribute meaningfully to the image’s overall impact. Limited Colors: Restricting your palette to a few colors or shades enhances visual clarity and emotional resonance. Focused Subject: Clearly defined subjects with significant negative space help viewers immediately grasp the narrative or emotion you’re conveying. Choosing Colors for Emotional Impact In minimalist photography, your color choices are critical. Each hue carries emotional weight and meaning: Monochromatic Schemes: Utilizing shades of a single color can create elegant, unified, and tranquil images. Subtle Contrasts: Gentle contrasts in minimalist photos—such as muted pastels paired with soft neutrals—generate quiet, compelling visual interest. Bold Accents: Introducing a single vibrant color against an otherwise neutral background can create dramatic visual tension, guiding the viewer’s eye directly to your subject. Composition for Maximum Effect Achieving successful minimalist photography relies heavily on thoughtful composition: Negative Space: Extensive use of negative space emphasizes your subject, creating a serene yet compelling aesthetic. Rule of Thirds and Symmetry: Utilize basic compositional techniques like the rule of thirds or symmetry to structure your image effectively, reinforcing clarity and visual harmony. Minimal Details: Each detail included should significantly enhance your composition; extraneous elements dilute the minimalist impact. The Role of Lighting in Minimalism Lighting is essential to minimalist photography, significantly affecting mood and visual appeal: Soft Lighting: Diffuse, gentle lighting helps maintain visual simplicity, reducing harsh contrasts and promoting a tranquil mood. Directional Light: Controlled use of directional lighting can add subtle texture and depth, highlighting essential elements without introducing unnecessary complexity. Refining Your Minimalist Vision Minimalist photography challenges photographers to see beyond the surface, demanding careful planning and thoughtful execution. Cultivate the discipline to exclude unnecessary elements and focus solely on essential details. This approach allows the viewer to connect instantly with your message or emotion, leaving a lasting impression. Minimalist color photography demonstrates the profound power of simplicity. By embracing restraint, carefully choosing your colors, mastering composition, and thoughtfully utilizing lighting, you can create visually impactful photographs that deeply resonate with your audience. Explore minimalism in your photographic practice, and discover the strength and clarity of saying more with less. Extended reading: Transforming ordinary scenes with vibrant colors The post Less is More: The Power of Minimalist Color Photography appeared first on 500px. #less #more #power #minimalist #colorISO.500PX.COMLess is More: The Power of Minimalist Color PhotographyMinimalist color photography thrives on simplicity, clarity, and restraint, using limited color palettes and streamlined compositions to create powerful visual impact. This style strips away distractions, emphasizing the essential elements of the scene and allowing photographers to convey strong emotions and clear narratives effectively. Embracing Simplicity Minimalism isn’t about having fewer elements for the sake of simplicity alone; it’s about intentionality. Every aspect of your photograph—color, composition, and subject—should serve a clear purpose and contribute meaningfully to the image’s overall impact. Limited Colors: Restricting your palette to a few colors or shades enhances visual clarity and emotional resonance. Focused Subject: Clearly defined subjects with significant negative space help viewers immediately grasp the narrative or emotion you’re conveying. Choosing Colors for Emotional Impact In minimalist photography, your color choices are critical. Each hue carries emotional weight and meaning: Monochromatic Schemes: Utilizing shades of a single color can create elegant, unified, and tranquil images. Subtle Contrasts: Gentle contrasts in minimalist photos—such as muted pastels paired with soft neutrals—generate quiet, compelling visual interest. Bold Accents: Introducing a single vibrant color against an otherwise neutral background can create dramatic visual tension, guiding the viewer’s eye directly to your subject. Composition for Maximum Effect Achieving successful minimalist photography relies heavily on thoughtful composition: Negative Space: Extensive use of negative space emphasizes your subject, creating a serene yet compelling aesthetic. Rule of Thirds and Symmetry: Utilize basic compositional techniques like the rule of thirds or symmetry to structure your image effectively, reinforcing clarity and visual harmony. Minimal Details: Each detail included should significantly enhance your composition; extraneous elements dilute the minimalist impact. The Role of Lighting in Minimalism Lighting is essential to minimalist photography, significantly affecting mood and visual appeal: Soft Lighting: Diffuse, gentle lighting helps maintain visual simplicity, reducing harsh contrasts and promoting a tranquil mood. Directional Light: Controlled use of directional lighting can add subtle texture and depth, highlighting essential elements without introducing unnecessary complexity. Refining Your Minimalist Vision Minimalist photography challenges photographers to see beyond the surface, demanding careful planning and thoughtful execution. Cultivate the discipline to exclude unnecessary elements and focus solely on essential details. This approach allows the viewer to connect instantly with your message or emotion, leaving a lasting impression. Minimalist color photography demonstrates the profound power of simplicity. By embracing restraint, carefully choosing your colors, mastering composition, and thoughtfully utilizing lighting, you can create visually impactful photographs that deeply resonate with your audience. Explore minimalism in your photographic practice, and discover the strength and clarity of saying more with less. Extended reading: Transforming ordinary scenes with vibrant colors The post Less is More: The Power of Minimalist Color Photography appeared first on 500px.0 Commentaires 0 Parts -
Harnessing Complementary Colors for Visual Drama
Complementary colors, positioned opposite each other on the color wheel, can produce some of the most vibrant and visually compelling images in photography. By understanding and strategically using them, photographers can create striking, balanced compositions that immediately captivate viewers. Here’s how to effectively harness this to infuse your photographs with drama and visual tension.
Understanding Complementary Colors
Complementary colors—like red and green, blue and orange, or yellow and purple—create powerful visual contrasts. When placed together, these colors enhance each other’s intensity, leading to dynamic and eye-catching images.
Understanding the emotional impact of complementary colors can significantly improve your photographic storytelling:
Red and Green: evoke passion and vitality
Blue and Orange: provide depth and warmth
Yellow and Purple: suggest creativity and vibrancy
Creating Balance and Visual Tension with Complementary Colors
The key to successfully using complementary colors lies in achieving visual harmony. Allow one color to dominate the scene while using its complementary counterpart as a strategic accent. Thoughtful placement of these colors can effectively guide the viewer’s attention and create powerful visual interest without overwhelming the frame.
Utilizing Lighting to Enhance Color Contrasts
Lighting significantly influences how colors interact and appear in photographs:
Natural Lighting: During golden hour or blue hour, natural lighting emphasizes color contrasts, enhancing warmth or coolness.
Artificial Lighting: Controlled artificial lighting, such as colored gels or studio lights, can intensify color relationships and dramatize your compositions.
Composition Techniques
Effective complementary color photography involves intentional composition:
Simplify your frame by removing unnecessary distractions to help colors stand out clearly.
Use neutral or uncluttered backgrounds to make colors truly pop.
Thoughtfully integrate complementary colors within your background to further enhance your subject.
Refining Your Image in Post-Processing
Post-processing plays an important role in finalizing the visual drama of your complementary color images:
Adjust contrast, saturation, and color balance to strengthen color relationships.
Enhance the overall aesthetic appeal and cohesiveness of your composition through careful editing.
Harnessing complementary colors effectively is a dynamic skill that enables photographers to convey vivid emotions, highlight intriguing narratives, and produce unforgettable imagery. By thoughtfully balancing composition, lighting, and post-processing, you can utilize colors contrast to create powerful and visually captivating photographs that resonate deeply with viewers.
Explore the potential of complementary colors and elevate your photographic vision with bold, impactful compositions.
Extended reading: Transforming ordinary scenes with vibrant colors
The post Harnessing Complementary Colors for Visual Drama appeared first on 500px.
#harnessing #complementary #colors #visual #dramaHarnessing Complementary Colors for Visual DramaComplementary colors, positioned opposite each other on the color wheel, can produce some of the most vibrant and visually compelling images in photography. By understanding and strategically using them, photographers can create striking, balanced compositions that immediately captivate viewers. Here’s how to effectively harness this to infuse your photographs with drama and visual tension. Understanding Complementary Colors Complementary colors—like red and green, blue and orange, or yellow and purple—create powerful visual contrasts. When placed together, these colors enhance each other’s intensity, leading to dynamic and eye-catching images. Understanding the emotional impact of complementary colors can significantly improve your photographic storytelling: Red and Green: evoke passion and vitality Blue and Orange: provide depth and warmth Yellow and Purple: suggest creativity and vibrancy Creating Balance and Visual Tension with Complementary Colors The key to successfully using complementary colors lies in achieving visual harmony. Allow one color to dominate the scene while using its complementary counterpart as a strategic accent. Thoughtful placement of these colors can effectively guide the viewer’s attention and create powerful visual interest without overwhelming the frame. Utilizing Lighting to Enhance Color Contrasts Lighting significantly influences how colors interact and appear in photographs: Natural Lighting: During golden hour or blue hour, natural lighting emphasizes color contrasts, enhancing warmth or coolness. Artificial Lighting: Controlled artificial lighting, such as colored gels or studio lights, can intensify color relationships and dramatize your compositions. Composition Techniques Effective complementary color photography involves intentional composition: Simplify your frame by removing unnecessary distractions to help colors stand out clearly. Use neutral or uncluttered backgrounds to make colors truly pop. Thoughtfully integrate complementary colors within your background to further enhance your subject. Refining Your Image in Post-Processing Post-processing plays an important role in finalizing the visual drama of your complementary color images: Adjust contrast, saturation, and color balance to strengthen color relationships. Enhance the overall aesthetic appeal and cohesiveness of your composition through careful editing. Harnessing complementary colors effectively is a dynamic skill that enables photographers to convey vivid emotions, highlight intriguing narratives, and produce unforgettable imagery. By thoughtfully balancing composition, lighting, and post-processing, you can utilize colors contrast to create powerful and visually captivating photographs that resonate deeply with viewers. Explore the potential of complementary colors and elevate your photographic vision with bold, impactful compositions. Extended reading: Transforming ordinary scenes with vibrant colors The post Harnessing Complementary Colors for Visual Drama appeared first on 500px. #harnessing #complementary #colors #visual #dramaISO.500PX.COMHarnessing Complementary Colors for Visual DramaComplementary colors, positioned opposite each other on the color wheel, can produce some of the most vibrant and visually compelling images in photography. By understanding and strategically using them, photographers can create striking, balanced compositions that immediately captivate viewers. Here’s how to effectively harness this to infuse your photographs with drama and visual tension. Understanding Complementary Colors Complementary colors—like red and green, blue and orange, or yellow and purple—create powerful visual contrasts. When placed together, these colors enhance each other’s intensity, leading to dynamic and eye-catching images. Understanding the emotional impact of complementary colors can significantly improve your photographic storytelling: Red and Green: evoke passion and vitality Blue and Orange: provide depth and warmth Yellow and Purple: suggest creativity and vibrancy Creating Balance and Visual Tension with Complementary Colors The key to successfully using complementary colors lies in achieving visual harmony. Allow one color to dominate the scene while using its complementary counterpart as a strategic accent. Thoughtful placement of these colors can effectively guide the viewer’s attention and create powerful visual interest without overwhelming the frame. Utilizing Lighting to Enhance Color Contrasts Lighting significantly influences how colors interact and appear in photographs: Natural Lighting: During golden hour or blue hour, natural lighting emphasizes color contrasts, enhancing warmth or coolness. Artificial Lighting: Controlled artificial lighting, such as colored gels or studio lights, can intensify color relationships and dramatize your compositions. Composition Techniques Effective complementary color photography involves intentional composition: Simplify your frame by removing unnecessary distractions to help colors stand out clearly. Use neutral or uncluttered backgrounds to make colors truly pop. Thoughtfully integrate complementary colors within your background to further enhance your subject. Refining Your Image in Post-Processing Post-processing plays an important role in finalizing the visual drama of your complementary color images: Adjust contrast, saturation, and color balance to strengthen color relationships. Enhance the overall aesthetic appeal and cohesiveness of your composition through careful editing. Harnessing complementary colors effectively is a dynamic skill that enables photographers to convey vivid emotions, highlight intriguing narratives, and produce unforgettable imagery. By thoughtfully balancing composition, lighting, and post-processing, you can utilize colors contrast to create powerful and visually captivating photographs that resonate deeply with viewers. Explore the potential of complementary colors and elevate your photographic vision with bold, impactful compositions. Extended reading: Transforming ordinary scenes with vibrant colors The post Harnessing Complementary Colors for Visual Drama appeared first on 500px.0 Commentaires 0 Parts -
ISO.500PX.COMMastering Monochrome: The Art of Single-Color CompositionsMonochrome photography isn’t just about black and white It encompasses creating images using varying tones of a single hue. This powerful technique allows photographers to express emotion, simplify complex scenes, and direct viewer attention. Mastering monochrome photography can significantly enhance your visual storytelling, creating elegant, cohesive, and emotionally resonant images. Understanding the Essence of Monochrome Monochrome compositions are built around a single dominant color, employing different shades, tints, and tones within that hue. Whether classic black and white or contemporary color monochromes, these compositions rely on tonal variations rather than color diversity to convey depth and mood. Choosing Your Monochromatic Palette Selecting the right color for your monochromatic images is essential: Classic Black and White: Timeless and dramatic, black-and-white photography highlights form, texture, and contrast, focusing on shapes and shadows rather than color. Warm Tones: Colors like sepia, orange, or red can evoke warmth, nostalgia, and passion. These palettes excel at creating emotionally charged or historical narratives. Cool Tones: Blue, green, and violet shades offer tranquility, melancholy, or introspection, ideal for serene landscapes, portraits, or reflective storytelling. Composing Strong Monochromatic Images Effective monochrome compositions depend on thoughtful arrangement and clarity: Emphasize Shapes and Patterns: Without multiple colors to differentiate elements, rely on shapes, lines, and textures to build interest and depth. Balance Tonal Range: Use a full range of tones—from deep shadows to bright highlights—to create contrast and maintain viewer engagement. Leverage Negative Space: Negative space helps to highlight your subject and gives a minimalist, powerful visual impact to your compositions. Using Light and Shadow to Your Advantage In monochrome photography, lighting plays a crucial role: Directional Lighting: Side lighting or directional lighting accentuates textures and shapes, enhancing the three-dimensional feel of your composition. Diffuse Lighting: Soft, even lighting reduces contrast, creating gentle, harmonious compositions suitable for emotional or subtle narratives. Advanced Monochrome Techniques Take your monochrome photography to the next level: Selective Focus: Employ shallow depth of field to draw attention precisely where you want it, enhancing emotional connection through targeted clarity. Intentional Motion Blur: Introducing subtle motion blur can add a sense of movement and energy to otherwise static monochrome images. Creative Post-Processing: Experiment with contrast adjustments, tonal mapping, and dodging and burning to enhance the depth and drama of your monochrome compositions. Conveying Emotion through Simplicity Monochrome photography is powerful precisely because of its simplicity. By removing the distraction of multiple colors, photographers can focus entirely on emotional storytelling and visual clarity. When executed thoughtfully, monochrome images communicate profound narratives that resonate deeply with viewers. Embrace the art of monochrome photography to craft striking images that capture emotion, simplicity, and elegance. With deliberate composition, thoughtful color choices, and precise lighting, your monochromatic images will become powerful, timeless works of art. Extended reading: Textures and patterns in monochrome photography The post Mastering Monochrome: The Art of Single-Color Compositions appeared first on 500px.0 Commentaires 0 Parts
-
ISO.500PX.COMMaking Bold Statements with Color Blocking in PhotographyColor blocking is a powerful photographic technique that uses bold, solid colors placed strategically within an image to create visual interest, impact, and drama. By embracing simplicity and contrast, photographers can craft visually striking images that command viewer attention and evoke strong emotions. Here’s how to master color blocking and transform your photographic storytelling. Understanding the Impact of Color Blocking Color blocking involves composing photographs around large, defined areas of color, usually complementary or contrasting hues. This method draws the viewer’s eyes directly toward key elements in the image, creating a memorable and dynamic visual effect. Choosing the Right Colors Effective color blocking starts with careful color selection: Complementary Colors: Colors directly opposite each other on the color wheel—such as blue and orange, or red and green—create visually arresting contrasts and emphasize each color vividly. Analogous Colors: Colors adjacent to each other on the wheel, such as blues and greens or reds and oranges, produce a harmonious yet still impactful aesthetic. Choose colors that reinforce your intended emotional tone—warm colors (reds, oranges) can evoke passion or excitement, while cool colors (blues, greens) can suggest tranquility or introspection. Creating Effective Compositions Composition is key in color blocking. Consider these tips to enhance your images: Simplicity is Strength: Focus on simplicity by eliminating clutter and distractions. Solid backgrounds and minimalist settings amplify the strength of your color choices. Balance and Proportion: Arrange your colors and subjects thoughtfully to create visual balance. Strategic use of negative space can heighten the impact of bold colors. Contrast for Clarity: High contrast between colors helps each element stand out clearly, ensuring your photograph’s composition remains compelling and visually accessible. Utilizing Light to Enhance Color Blocking Lighting dramatically influences how colors appear: Natural Light: Natural daylight, especially during golden hour, enhances color saturation and brings warmth and vibrancy to your image. Artificial Lighting: Creative use of studio lighting or off-camera flashes can emphasize or isolate color blocks, adding depth and dramatic flair to your photos. Advanced Techniques for Exceptional Results Take your color blocking to the next level with these advanced approaches: Layering Colors: Layer foreground and background colors strategically to add depth and intrigue, inviting viewers to explore multiple layers within your composition. Color Gradients: Introduce subtle gradients or transitions between color blocks to soften the effect slightly and add complexity to your visual storytelling. The Power of Intentionality The essence of successful color blocking lies in intentionality. Every color and placement should contribute meaningfully to your composition, enhancing the story or emotion you’re conveying. Thoughtful planning and deliberate execution are essential to mastering this compelling technique. By carefully selecting your palette, simplifying your compositions, and effectively leveraging lighting, color blocking can dramatically elevate your photographic narrative. Embrace boldness and let color guide your creative vision to produce unforgettable images. Extended reading: Color clashes and bold choices in photography The post Making Bold Statements with Color Blocking in Photography appeared first on 500px.0 Commentaires 0 Parts
-
ISO.500PX.COMCapturing Meaningful Narratives with Environmental PortraitsEnvironmental portraits go beyond traditional studio shots by placing subjects within surroundings that reveal something meaningful about their lives, interests, or professions. This photographic approach deepens storytelling, creating images rich in context and character. Here’s how you can master the art of environmental portraiture to produce compelling narratives. Understanding Environmental Portraiture Unlike standard portraits, environmental portraits provide viewers with context by including significant surroundings or objects that offer insights into the subject’s world. Whether it’s an artist in their studio, a chef in their kitchen, or an athlete on their home field, these settings amplify the narrative, adding depth and authenticity to your images. Choosing the Right Environment Relevance and Authenticity Ensure the chosen environment directly relates to your subject’s identity, profession, or passion. Authenticity resonates strongly with viewers. Visual Appeal Look for locations with appealing textures, colors, and lighting opportunities. Interesting spaces naturally draw viewer attention and enhance your subject. Utilizing Light and Composition Effectively Harnessing Natural Lighting Leverage available natural light creatively. Windows, doorways, or outdoor locations can provide soft, flattering illumination that highlights your subject’s connection to their environment. Composing for Impact Employ compositional strategies like framing, leading lines, and balanced layering to guide the viewer’s eye through the environment and directly toward your subject. Capturing Authentic Interactions Encourage your subject to interact naturally with their environment. Genuine engagement with surroundings—like a musician tuning their instrument or a craftsman working on their creation—creates authentic, engaging imagery. Avoid overly posed or unnatural arrangements, focusing instead on genuine actions that reflect true personality and narrative. Extended reading: Create portraits inspired by masters Enhancing Narratives through Detail and Placement Including Narrative Details Subtle yet significant details enrich the portrait’s narrative. Items like personal tools, photographs, or meaningful objects can provide additional context and emotional layers, deepening the viewer’s connection. Strategic Subject Placement Thoughtful positioning of your subject within their environment emphasizes their connection to the space, ensuring they remain the focal point without becoming lost or overshadowed by surrounding details. Refining Your Environmental Portraits The true strength of an environmental portrait lies in its ability to communicate clearly and powerfully. Carefully enhance important details in post-processing, selectively emphasizing narrative elements without overwhelming your subject. Consider subtle color grading adjustments to amplify emotional tones—warmer hues for intimacy and nostalgia or cooler tones for reflection and professionalism. Environmental portraiture offers photographers a unique opportunity to explore storytelling through the lens. With thoughtful attention to detail, strategic composition, and genuine interactions, you can create images that resonate deeply, portraying subjects in ways that feel both authentic and compelling. Embrace the challenge, and let your creativity unfold. The post Capturing Meaningful Narratives with Environmental Portraits appeared first on 500px.0 Commentaires 0 Parts
-
ISO.500PX.COMCreative Lighting Setups to Enhance Your PortraitureElevating your portrait photography involves exploring lighting beyond conventional methods. Advanced lighting setups can infuse your portraits with greater depth, emotional resonance, and artistic flair, allowing you to tell richer visual stories. Here’s how you can push creative boundaries using sophisticated lighting techniques. Exploring the World of Creative Lighting Traditional three-point lighting has its merits, but innovative setups can help photographers uncover new expressions and moods. Creative lighting can transform portraits from simple captures into captivating visual narratives. Dramatic Portraits with Colored Gels Adding Emotional Depth Colored gels introduce a powerful visual component, dramatically altering the mood and atmosphere of your images. Experiment by matching gel colors to specific emotions or themes—cool blues and greens evoke calmness or introspection, while warm reds and oranges convey passion or intensity. Practical Gel Techniques Use gels selectively on rim lights to outline subjects and enhance depth or on background lights to create vivid backdrops that complement your subject’s character. Extended reading: How to use complementary colors to make your photos pop Combining Continuous and Flash Lighting Blending Movement and Clarity Integrating continuous lighting with flash can yield extraordinary results, providing both control and creative flexibility. Continuous lighting softly captures subtle movements, enhancing a portrait’s dynamism, while strategically placed flashes freeze critical details precisely. Adjusting your camera’s shutter speed allows you to blend ambient continuous light with the sharpness of the flash, offering artistic control over the balance of motion and clarity. Unconventional Modifiers for Unique Effects Explore unconventional lighting modifiers to achieve distinct effects: Reflective surfaces, mirrors, and metallic textures introduce intriguing highlights and reflections. Custom-made gobos—cut-outs or patterns placed in front of lights—can project shadows and textures onto your subject or background, adding layers of storytelling and visual interest. Fine-Tuning Your Advanced Lighting Setup Mastering Lighting Ratios Lighting ratios are crucial in controlling emotional intensity in portraits. By manipulating the strength and direction of lights, you can achieve diverse styles, from soft, evenly-lit scenes to dramatic, high-contrast visuals. Sculpting with Shadows Deliberately position lights to sculpt and highlight your subject’s features, using shadows purposefully to convey deeper emotions. Layered lighting—foreground and background illumination—creates depth and guides the viewer through your composition, enhancing narrative and visual interest. Bringing It All Together When experimenting with creative lighting techniques, remain intentional and thoughtful. The most impactful portraits are those where every lighting choice contributes meaningfully to the image’s emotional and narrative strength. Continually refine your approach, remain open to experimentation, and let your artistic vision guide your lighting decisions. Ultimately, the creative possibilities are endless—use them to leave a lasting impression with every portrait you create. The post Creative Lighting Setups to Enhance Your Portraiture appeared first on 500px.0 Commentaires 0 Parts
-
ISO.500PX.COMAdding Energy and Movement with Creative Motion BlurPortrait photography often emphasizes sharpness and clarity, but introducing intentional creative blur techniques can breathe dynamic life into your images. Motion blur captures energy, expresses emotion, and transforms portraits from static images into visually compelling narratives. Here’s how you can master this technique and elevate your portrait photography. Why Embrace Motion Blur? Intentional motion blur brings portraits to life by conveying movement, artistic expression, and emotional depth. It allows photographers to push beyond traditional boundaries, creating unique and memorable images that resonate with viewers. Techniques to Capture Motion Blur Mastering Shutter Speed Slow shutter speeds between 1/10 to 1/60 seconds effectively capture motion blur. A slower shutter intensifies the blur, while slightly faster speeds create subtle effects that suggest gentle movement without overwhelming your subject. Intentional Camera Movement (ICM) Moving your camera deliberately during exposure can create striking backgrounds and abstract patterns that highlight your subject. Vertical or horizontal sweeps, rotations, and subtle shakes can all yield compelling artistic results, adding energy and creativity to your portraits. Encouraging Subject Movement Invite your subjects to naturally move—walking, spinning, or dancing—to authentically capture their energy and personality. Pair their movement with slower shutter speeds to artfully blend motion and emotion into your frame. Disrupting depth of field: Creative approaches to blur and focus Enhancing Motion with Creative Flash Techniques Using flash creatively alongside motion blur can lead to extraordinary images. Rear-curtain sync, where the flash fires at the end of the exposure, freezes your subject clearly against dynamic motion trails, emphasizing both clarity and movement. Experimenting with mixed ambient and artificial lighting can further enhance the dramatic effect of your portraits. Advanced Strategies for Exceptional Results Selective Focus Combine motion blur with a shallow depth of field, drawing the viewer’s eye precisely to your subject’s most expressive features. This technique intensifies emotional connection and visual impact. Creative Color and Lighting Using colored gels or carefully chosen lighting setups can amplify the emotional atmosphere of your portraits. Colors and intentional lighting placement reinforce the narrative created by the motion blur, enhancing overall mood. Composition and Directional Blur Align the direction of your blur with your compositional intent. Horizontal blur suggests speed and directionality, while circular blur can evoke chaos or confusion. Careful alignment helps communicate the story clearly and powerfully. Refining Your Artistic Vision Integrating motion blur into portraits requires thoughtful experimentation. Embrace the unpredictability of the technique, and let your creative instincts guide your choices in lighting, color, and movement. Remember, the most compelling portraits often emerge from unexpected results. Trust your vision, explore boldly, and you’ll discover captivating ways to tell visual stories filled with energy and emotion.0 Commentaires 0 Parts
-
ISO.500PX.COM500px 2024 BEST 10 Photography Competition Winners Announced!As one of China’s most influential professional photography competitions, the BEST 10 Photography Competition, organized by the 500px Photography Community under Visual China Group—has long been committed to discovering and supporting outstanding photographic talent, establishing itself as a benchmark in China’s imaging industry. Since its inception, the contest has been held 17 times, receiving over 5.8 million submissions and attracting more than 110,000 participants. In 2024, the BEST 10 Photography Competition opened for submissions on 20 December 2024. During the 71-day submission period, it drew participation from over 21,000 photographers and received 330,000+ entries. After rigorous evaluation and professional curation by the 500px editorial team, 60 winning works were selected across three categories: Photo Series of the Year, Single Image of the Year, and Video of the Year. Today, we are thrilled to announce the winners of the BEST 10 Photography Competition. Photo Series of the Year 10 photographers were awarded in this category, including Wangkai Wei, Xun Ren, Weikai Chen, Jinyi He, Wenqi Lin, Xiaodong Zeng, Xiaotong Jia, Zi Rui Liu, Ruochen Kong, Zi Jin. (Highlights from the collection) “Little Moments” by Wenqi Lin Wenqi Lin’s Little Moments recreates post-80s childhood memories through meticulously crafted miniature scenes. Nostalgic details—an old electric fan, faded wall photos, and freshly cut watermelon—transport viewers to a pre-smartphone era of innocence. The warm lighting and rustic textures celebrate the simple joys of the past. “Little Moments” by Wenqi Lin Single Image of the Year Nature 10 winners, including Zhengjie Wu, A Little Squint, Xuanhua Li, Feng Xiong, Jiandong Hao, Bin Chen, Xuhaha, ATIME-PHOTOGRAPHY, Ruijiao Li, Egg. “Kailash and Ice” by Egg Egg’s Kailash and Ice captures Tibet’s Mount Kailash using focus-stacking techniques to juxtapose the mountain’s grandeur with the sacred landscape. The composition balances glacial permanence against swirling clouds, merging nature’s majesty with spiritual transcendence. “Kailash and Ice” by Egg Documentary 10 winners, including Lun Yu, Xiaokang Xu, Kinguv Shi, Qiang Sun, Weipeng Zheng, Yuanwai Wang, Wenpeng Lu, Ran An, 2middle, Xiangsheng Zhang. “Liangshan Yi Funeral” by Kinguv Shi Kinguv Shi’s Liangshan Yi Funeral documents a burial ceremony in Sichuan’s Yi Autonomous Prefecture. Mourners in black charva (woolen capes) march through heavy snow, their solemnity contrasted by snow-capped mountains—a poignant meditation on life and nature. “Liangshan Yi Funeral” by Kinguv Shi Urban 10 winners, including RX-105 XI, Shuhe Zhang, Mandy, Jun Shen, Leo Cai, Xuecheng Liu, Hao Liu, The Wind Rings the Bell, Sulin Yang, Yuan Li. “Cosmic Center” by Xuecheng Liu Xuecheng Liu’s Cosmic Center reimagines New York’s Times Square through an aerial panorama. Using advanced stitching techniques, the photograph transforms concentric skyscrapers into a radiant vortex, with steel-and-glass facades converging toward the frame’s center. “Cosmic Center” by Xuecheng Liu Commercial & Creative 10 winners, including Jinyang Ding, Boring Filming, Yao, Fadis Ding, Xiyuan Chen, Shuai Bian, Huizhao Li, Yanquan Lin, Tianhang Zhang, Chen Qiu. “Summer Party” by Boring Filming Summer Party employs aerial photography and digital compositing to synchronize human activity from different temporal moments within a single frame. The result is a vibrant tableau of surreal whimsy, turning an ordinary summer scene into something extraordinary. “Summer Party” by Boring Filming Video of the Year 10 winners, including: Jiyuan Wang, Ruiyu Song, Luxiang Zhu, Changsen Chi, Zukai Wang, Ziyu Wang, Wenfei Li, Fing, Yonghui Zhao, Cycle. “My Year 2024” by Cycle Cycle’s My Year 2024 is a first-person chronicle of year-round adventures—from snow-capped summits to tropical rainforests, rocket launch sites to Xinjiang’s icy wilderness. Through rapid-fire editing and immersive cinematography, the video captures the highs and lows of exploration, reflecting humanity’s ongoing dialogue with the planet. https://iso.500px.com/wp-content/uploads/2025/04/13-video.mp4 2024 BEST 10 Photography Awards Successfully Conclude This year, we witnessed countless extraordinary moments frozen in time, celebrating photography’s power to transcend borders, languages, and cultures. Explore all winning works in our gallery. Special thanks to our partners for their invaluable support. Your trust and collaboration have empowered these stunning visual stories to shine. In no particular order. Join us in 2025! Capture the planet’s beauty, push creative limits, and write photography’s next chapter. Not on 500px yet? Sign up here to explore more impactful photography. The post 500px 2024 BEST 10 Photography Competition Winners Announced! appeared first on 500px.0 Commentaires 0 Parts
-
ISO.500PX.COMCrafting Cinematic Portraits with the Brenizer MethodPortrait photography continually evolves, and creative photographers constantly seek innovative techniques to distinguish their work. One standout approach is the Brenizer Methodalso known as the bokeh panorama. This technique merges multiple images into one panoramic portrait, creating a cinematic aesthetic with an exceptionally shallow depth of field. By mastering this method, you can capture portraits that combine the expansive viewpoint of a wide-angle lens with the elegant bokeh typically associated with longer focal lengths.Understanding the Brenizer MethodThe Brenizer Method, popularized by wedding photographer Ryan Brenizer, involves capturing a scene through a series of overlapping photographs and stitching them together digitally. The result? Portraits boasting wide-angle views with pronounced subject separation, producing an impactful, cinematic effect impossible with traditional lenses.Equipment and SetupTo effectively utilize the Brenizer Method, consider the following:Lens Choice: Typically, prime lenses between 50mm to 135mm with wide apertures (f/1.4f/2.8) produce optimal results.Camera Settings: Shoot in manual mode, locking exposure, white balance, and focus to ensure consistency across all shots.Tripod Use: While handheld shooting is possible, a tripod provides stability and consistency, simplifying stitching during post-processing.Step-by-Step Shooting TechniqueFollow these steps to execute the Brenizer Method successfully:Begin by photographing your subject clearly, setting your desired aperture and focal distance.Capture surrounding shots systematically, ensuring each new image overlaps the previous one by approximately 30%.Cover the entire intended scene, expanding both vertically and horizontally.Advanced Tips for Stunning ResultsEnhance your Brenizer panoramas with these advanced strategies:Plan for Stitching: Leave additional space around your composition to facilitate cropping and adjustments during the stitching process.Manage Subject Movement: Minimize movement between shotsthis method works best with static poses to ensure seamless stitching.Consider Background Depth: Choose backgrounds that amplify depth, such as distant landscapes or architectural settings, enhancing the panoramic effect.Post-Processing and StitchingThe true magic of the Brenizer Method emerges during post-processing:Use software like Adobe Photoshops Photomerge feature or specialized programs like PTGui.After stitching, carefully refine the panoramacrop, adjust exposure, and fine-tune colors for visual consistency.Apply subtle edits to enhance depth and contrast, further emphasizing the cinematic appeal.40+ Beautiful Bokeh Images That Capture Your ImaginationCommon Mistakes to AvoidWatch out for these pitfalls:Insufficient Overlap: Not overlapping enough can create stitching gaps or misaligned elements.Inconsistent Focus and Exposure: Ensure all images maintain the same settings to avoid uneven sharpness or exposure variations.Subject Too Close to Edges: Keep your main subject central to avoid distortion or cropping issues during stitching.Final ThoughtsMastering the Brenizer Method opens doors to creative portrait possibilities, delivering visually stunning results that stand out in portfolios. By carefully planning your shots, managing your camera settings, and perfecting your stitching technique, you can consistently produce cinematic portraits that captivate viewers and elevate your artistic expression.The post Crafting Cinematic Portraits with the Brenizer Method appeared first on 500px.0 Commentaires 0 Parts
-
ISO.500PX.COMPlaying with depth of field in urban photographyDepth of field (DoF) is one of the most powerful compositional tools in photography, allowing you to control whats in focus and what fades into the background. While shallow depth of field is commonly used in portrait photography, creative manipulation of DoF in city photography can transform your images, drawing attention to key subjects while using the urban environment as a complementary backdrop. Understanding depth of field in an urban contextDepth of field refers to how much of an image appears sharp from foreground to background. A shallow depth of field isolates the subject, while a deep depth of field keeps the entire scene in focus. Cities offer a dynamic playground for experimenting with DoF because theyre filled with layersbuildings, streets, people, and objectsall interacting visually.Shallow DoF: Works well for isolating subjects in busy environments, such as a lone figure in a crowd or a single neon sign glowing against blurred city lights.Deep DoF: Allows you to showcase the vastness of a scene, perfect for capturing intricate city details or leading lines that guide the viewers eye into the distance. Techniques for manipulating depth of field in city photography1. Isolating subjects in crowded spacesUrban environments are often cluttered with distractions. Using a wide aperture (f/1.8 to f/2.8) lets you blur out the background while keeping your subject sharp. This technique is effective for street portraits, signage, or small architectural details.Position your subject close to the camera with a busy street in the background.Use a longer focal length (50mm-85mm) to compress the scene and enhance background blur.Experiment with layeringplace your subject behind semi-transparent objects like windows or reflections for added depth.2. Creating cinematic bokehBokehthe aesthetic quality of out-of-focus areascan be a striking element in urban photography, especially at night when city lights create a colorful backdrop. Shoot wide open (f/1.4 to f/2.8) with a fast prime lens to achieve smooth, dreamy bokeh.Position your subject near distant lights to create circular or hexagonal light shapes in the background.Experiment with foreground elements, like raindrops on a window or reflections in puddles, to introduce additional layers of blur.3. Using deep focus for storytellingA deep depth of field (f/8 to f/16) is ideal for scenes where you want every detail sharp, from the foreground to the background. This works well for:Urban landscapes: Capturing towering buildings and street details in a single frame.Leading lines: Roads, bridges, and railways look more dramatic when shot with a deep DoF, pulling the viewer into the scene.Reflections: Water or glass surfaces can enhance symmetry when everything in the frame is crisp and clear.4. Playing with selective focusInstead of keeping everything in sharp detail or fully blurring the background, use selective focus to highlight a particular part of your composition.Focus on a single subject while allowing the surrounding environment to remain slightly recognizable but softened.Try focusing on an unexpected elementlike a sign, a pattern in the pavement, or a pedestrians hands rather than their face.Experiment with manual focus to fine-tune what you want sharp and what should fade into the scene. Practical considerations for depth of field in the city1. Managing light and exposureUsing a wide aperture means letting in more light, which can be tricky in bright daylight. Use an ND (neutral density) filter to reduce light intake while maintaining a shallow DoF.2. Shooting at different times of dayDaylight: Use deep focus to capture layered cityscapes.Golden hour: The softer light allows for creative foreground blur.Night: Use streetlights and neon signs as glowing bokeh elements. 3. Lenses that work best for urban depth of fieldWide-angle (16mm-35mm): Best for deep focus shots with architectural elements.Standard (50mm): Versatile for both shallow and deep depth of field photography.Telephoto (85mm-135mm): Excellent for compressing backgrounds and achieving strong subject isolation.Depth of field is a powerful creative tool in urban photography, allowing you to control focus, guide the viewers eye, and bring emotion into your images. Whether youre isolating a subject with a dreamy blur or capturing an entire cityscape in pin-sharp detail, playing with depth of field can elevate your storytelling and give your urban shots a dynamic edge. Experiment with different apertures, focal lengths, and compositions, and discover how DoF can transform the way you capture the city.Not on 500px yet? Sign up here to explore more impactful photography.The post Playing with depth of field in urban photography appeared first on 500px.0 Commentaires 0 Parts
-
ISO.500PX.COMThe art of long exposure in city photographyLong exposure photography isnt just for landscapesits a powerful tool in urban photography that transforms chaotic cityscapes into mesmerizing visual stories. From light trails to motion blur, mastering long exposure techniques can add depth, movement, and emotion to your city shots. The science behind long exposure photographyLong exposure involves using slow shutter speeds to capture movement over time, turning everyday scenes into something surreal. When shooting in the city, this technique allows you to create:Light trails from moving carsBlurry pedestrian motion against still architectureSmooth reflections in rivers or fountainsStarburst or light streak effects from city lightsTo get started, youll need:A tripod to keep static elements sharpA remote shutter or timer to reduce camera shakeND filters for controlling light exposure during the day Shooting light trails for dynamic urban shotsCapturing vehicle light trails at night is one of the most popular long exposure techniques.Best settings for light trailsShutter speed: Start with 5-10 seconds for moderate traffic, increase for longer streaks.Aperture: f/8 to f/16 keeps details sharp.ISO: Keep it low (ISO 100-200) to avoid noise in dark areas.Find a location where traffic flow is steady, such as an intersection or highway overpass, and experiment with different shutter speeds to capture varied effects. Using motion blur for storytellingInstead of freezing people in motion, long exposures allow you to blur them intentionally, creating a ghostlike presence in busy streets or plazas.Position yourself near a static object (e.g., a street performer, bench, or fountain) and let people move around it.Use a shutter speed of 1-5 seconds to create controlled blurjust enough to suggest motion without losing form entirely.Experiment with panning techniques to blur the background while keeping a moving subject (like a cyclist) in focus. Refining your long exposure workflowLong exposure photography requires precision, but small adjustments can make a big difference.Use manual focus: Autofocus struggles in low light, so set your focus manually for sharper images.Shoot in RAW: This preserves details and gives you more flexibility in post-processing.Experiment with exposure time: Adjust between short and long exposures to find the perfect balance between movement and clarity. Final thoughtsMastering long exposure in city photography allows you to create images that feel dynamic and cinematic. Whether capturing glowing light trails, soft streaks of pedestrians, or perfectly still reflections, long exposure is a technique that can transform ordinary urban scenes into something extraordinary.Not on 500px yet? Sign up here to explore more impactful photography.The post The art of long exposure in city photography appeared first on 500px.0 Commentaires 0 Parts
-
ISO.500PX.COMCapturing the pulse of the city in street photographyStreet photography is all about storytelling. Unlike traditional portrait or landscape photography, it thrives on spontaneity, raw emotion, and fleeting moments. The challenge? Capturing a visually striking image while navigating the unpredictable rhythm of the city. Heres how you can refine your approach and elevate your street photography.Understanding the flow of the cityEvery city has a unique energy. Whether its the bustling streets of New York, the quiet charm of a European alleyway, or the neon-lit vibrance of Tokyo, great street photography comes from understanding and adapting to your surroundings. Observe before you shootInstead of immediately snapping photos, take time to observe. Look for patterns in movementpedestrians crossing at intervals, the way light falls on a particular street corner, or how shadows shift between buildings. Position yourself where these elements align.Blend in and anticipate momentsThe best street photographers know how to be both present and invisible. If people notice you taking photos, they may alter their behavior. Move with the crowd, avoid sudden movements, and wear neutral clothing to blend in. More importantly, anticipate the momentspot an interaction before it happens, and have your camera ready. Mastering light and shadows in street photographyUrban environments provide natural contrasts between light and shadow, allowing for powerful compositions.Golden hour vs. nighttime shootingMorning and late afternoon light create long shadows that add depth and mystery to images. Position yourself so that subjects walk through these shadows for striking silhouettes.At night, streetlights, car headlights, and neon signs become creative light sources. Use them to frame subjects or create dramatic highlights in low-light street scenes.Shooting in harsh midday lightInstead of avoiding midday light, use it to your advantage. High contrast between sunlit areas and deep shadows can create a graphic, high-impact look. Experiment with underexposing slightly to maintain detail in the highlights while letting shadows deepen naturally.Compositional techniques for stronger street shotsA well-composed street photo guides the viewers eye and tells a story without words.The power of layeringGreat street photos often have foreground, midground, and background elements that add depth. Instead of just focusing on a single subject, look for additional elements that add contextshop signs, reflections in windows, or people reacting to one another. Juxtaposition for contrastCities are full of contradictionsold vs. new, solitude vs. chaos, elegance vs. grit. Use these contrasts to create compelling compositions. A sharply dressed businessperson walking past a graffiti-covered wall, or a moment of stillness amid a crowded street, adds visual tension that keeps the viewer engaged.Framing with the environmentUse doorways, archways, or gaps between buildings to naturally frame your subject. These elements not only guide the eye, but also add a sense of place, immersing the viewer in the scene.Capturing emotion and characterStreet photography isnt just about capturing peopleits about capturing emotion, personality, and atmosphere.Expressions and gesturesA small smirk, an intense gaze, or a fleeting glance can make or break an image. Look for expressive moments, whether its a street musician deep in concentration or two strangers exchanging a silent laugh.Candid vs. engaged shotsCandid street photography focuses on capturing people as they are, unaware of the camera. But dont be afraid to interactsometimes, asking for a portrait creates a more intimate, powerful image. The key is to remain respectful and aware of cultural norms regarding photography. Post-processing for street photographyStreet photos often benefit from subtle but impactful adjustments.Convert to black and white to emphasize contrast, shape, and emotion, especially when color distracts from the core message.Adjust contrast and clarity to make subjects stand out from their surroundings.Use cropping carefullysometimes, minor adjustments can improve balance and remove distracting elements without losing the spontaneity of the shot. Street photography is about embracing unpredictability. By learning to anticipate moments, using light creatively, and composing with intention, youll develop an eye for the extraordinary in everyday life. Keep your camera ready, stay patient, and let the streets guide you to your next great shot.Not on 500px yet? Click here to learn about Licensing with 500px.The post Capturing the pulse of the city in street photography appeared first on 500px.0 Commentaires 0 Parts
-
ISO.500PX.COMMastering light and perspective in urban architectureArchitectural photography goes beyond capturing buildingsits about interpreting space, structure, and light in a way that transforms everyday cityscapes into compelling visual narratives. Whether youre shooting iconic skyscrapers or hidden urban gems, mastering perspective and lighting is essential to elevating your images from snapshots to portfolio-worthy shots.The role of light in architectural photographyLight defines the shape, texture, and mood of buildings, making it one of the most important elements in urban photography. Different times of day will dramatically affect your final image.Golden hour vs. blue hourGolden hour light (shortly after sunrise and before sunset) creates warm tones and soft shadows, which add depth and dimension to architectural shots. This is ideal for capturing buildings with intricate details, as the softer contrast helps define textures.Blue hour (just before sunrise and after sunset) introduces cooler tones, offering a balance between artificial city lights and natural twilight. Skyscrapers and modern glass buildings look particularly striking in this light. Midday sun: Harsh but usableWhile most photographers avoid the harsh light of midday, it can be useful for high-contrast black-and-white architecture photography. The strong shadows create bold geometric patterns, emphasizing lines and angles in a striking way. If shooting in color, however, you may want to use a polarizing filter to reduce glare and enhance sky contrast. Perspective and composition techniquesArchitectural photography is all about using angles and composition to create impact. The way you frame your shot can make a building look imposing, elegant, or even surreal.Choosing your perspectiveLow-angle shots make structures appear grand and dominant, emphasizing height. This is great for modern skyscrapers or historic monuments.High-angle shots can provide context, showing a building within the broader city landscape. Try shooting from rooftops, pedestrian overpasses, or even parking garages to find unique viewpoints.Corner perspectives reveal two sides of a building at once, adding dimensionality. This works particularly well with symmetrical structures. Leading lines and geometric balanceRoads, bridges, staircases, and other architectural elements naturally lead the viewers eye through a scene. Use these to create depth and movement within your frame.Symmetry can add a clean, striking effectespecially in modern architecture where repetitive patterns dominate. However, breaking symmetry intentionally by shifting your frame slightly can create a more dynamic shot. Reflections and negative space in urban photographyCity environments offer an abundance of reflective surfaceswindows, puddles, metallic sculpturesallowing for creative compositions.Look for reflections in glass buildings, which can create layered images where the city interacts with itself.Puddles after the rain make excellent natural mirrors. Shooting low to the ground can turn them into powerful visual tools for doubling a scene.Negative spacelike an open sky or an empty plazacan be used to make buildings stand out more dramatically. A lone building against a clear sky isolates the subject, making it visually striking. Post-processing for architectural photographyEven a well-shot architectural photo can benefit from subtle refinements in post-processing.Correcting lens distortion: Wide-angle lenses often distort vertical lines, making buildings appear to lean. Use software tools like Lightrooms Transform function to correct perspective distortion.Enhancing texture and contrast: A slight clarity boost can help emphasize architectural details, making stone, steel, and glass stand out more distinctly.Converting to black and white: Removing color can help accentuate geometric forms and strong contrast, especially when dealing with repetitive patterns.Architectural photography is about more than just documenting buildingsits about revealing the artistry behind urban structures. By mastering light, experimenting with angles, and looking for unique compositional elements, you can transform everyday cityscapes into stunning architectural portraits.Not on 500px yet? Sign up here to explore more impactful photography.The post Mastering light and perspective in urban architecture appeared first on 500px.0 Commentaires 0 Parts
-
ISO.500PX.COMDisrupting depth of field: Creative approaches to blur and focusDepth of field is one of the most powerful tools in a photographers arsenal, influencing how viewers interact with your images. By disrupting the traditional rules, you can create bold, unexpected compositions that captivate attention and spark curiosity. Heres how to rethink depth of field for striking, creative results.Rethinking shallow depth of fieldTraditionally, shallow depth of field is used to isolate the subject, creating a pleasing blur in the background. But what happens when you flip this approach? Instead of keeping your subject razor-sharp, try:Focusing on the foreground: Blur your subject slightly while drawing attention to a textured or colorful foreground. This technique invites the viewer to explore the frame differently and adds a layer of intrigue to your image.Soft-focused portraits: Slightly blur your subject to evoke a dreamy, ethereal quality. This approach works well for artistic portraiture and storytelling. Pushing the boundaries of deep focusDeep focus is often associated with capturing sharp details across the entire frame, but experimenting with subtle variations can create dynamic compositions:Play with layered depths: Include multiple elements at varying distances, allowing one layer to dominate while keeping others slightly blurred. For example, focus on raindrops on a window with a sharp cityscape in the background. Foreground obstructions: Place objects like branches, glass, or fabric close to the lens, creating soft, out-of-focus frames around your subject. These subtle interruptions can add depth and mood. Light and aperture as creative toolsYour lens aperture and light source are critical in disrupting depth of field. Explore unconventional uses of these elements to add a unique touch to your images.Experiment with wide apertures in unexpected scenarios: While f/1.8 is typically reserved for portraits, try using it for landscape shots. Focus on a small detaillike a single frost-covered leafwhile the rest of the scene dissolves into a soft blur. Use light to highlight depth layers: Backlit subjects combined with shallow depth of field create glowing, luminous effects, especially in misty or snowy environments. This technique adds an ethereal quality while emphasizing the separation of elements in your frame.Advanced techniques for depth of fieldTilt-shift lenses: Use a tilt-shift lens to selectively blur parts of your frame, creating surreal compositions that defy conventional depth.Freelensing: Detach your lens and tilt it manually to create artistic light leaks and blur effects. This technique requires practice but offers unpredictable and stunning results.In-camera multiple exposures: Combine sharp and blurred exposures of the same scene. For example, blend a sharply focused portrait with a blurred version to create a layered, ghostly aesthetic.Using depth disruption to tell a storyManipulating depth of field isnt just a stylistic choiceit can also enhance your storytelling. A narrow focus on a single detail can draw the viewers attention to the key message of your image, while an intentionally chaotic blur can evoke emotion and mystery. Consider how each depth choice contributes to the overall narrative you want to convey. Disrupting depth of field is an invitation to experiment and redefine traditional techniques. By creatively blurring, layering, and focusing, you can craft compositions that challenge expectations and encourage viewers to see the world through a fresh perspective. Embrace the unpredictability and let your images speak with new depth.Not on 500px yet? Sign up here to explore more impactful photography.The post Disrupting depth of field: Creative approaches to blur and focus appeared first on 500px.0 Commentaires 0 Parts
-
ISO.500PX.COMColor clashes and bold choices in photographyPhotography is a visual art form, and few techniques draw attention quite like bold color clashes. By embracing unexpected combinations, you can create images that demand attention and evoke strong emotions. This approach isnt just about adding visual excitementits about breaking norms and experimenting with how colors interact in dynamic and unexpected ways.Understanding color clashesWhat are color clashes? Color clashes occur when two or more colors that are traditionally considered to conflict are placed together in a composition. These bold combinations often bypass harmony in favor of energy, creating a sense of movement and intensity. Why do they work? Color clashes challenge the viewers expectations, making the composition more engaging. When used thoughtfully, these combinations can amplify your subject, enhance mood, and create an unforgettable image.Techniques for using color clashes effectivelySeek contrasting palettes in your environmentLook for naturally contrasting colors in urban environments, markets, or nature. For example:Urban settings: Neon signs in muted alleyways or colorful murals against industrial backdrops offer great opportunities to play with contrasts.Natural scenes: Pair vibrant flowers against deep green leaves or catch a sunset where the fiery hues meet cool, dusky blues.Use clothing and accessoriesWhen working with a human subject, think about their wardrobe as a tool for creating contrast. A red jacket against a green field or a yellow scarf on a blue-gray day can transform a composition. These pops of color can help direct attention to your subject. Experiment with layers of clashing colorsDont stop at just two colorslayer multiple clashing elements in your frame. For example, frame a yellow house against a purple sky, while including a person in a bold orange outfit. Carefully layering these contrasts can elevate the complexity and impact of your image.Harnessing light for bold colorsLighting plays a crucial role in making clashing colors pop without overwhelming the composition.Golden hour glow: The warm light of golden hour can soften the harshness of a clash, making colors more cohesive while still standing out.Overcast days: Soft, diffused light is ideal for emphasizing colors without introducing distracting highlights or shadows.Artificial light: Neon lights in urban settings can create bold, unexpected clashes when combined with muted surroundings. Experiment with their interplay in low-light conditions. Advanced tips for bold color photographyControl the viewers focusUse clashing colors to frame or highlight your subject. For instance, position a person in front of a brightly colored wall with a clashing tone, ensuring the viewers eye is drawn directly to them.Isolate your subjectUse negative space to isolate your subject within a bold color clash. For example, a lone figure wearing red against a blue sea creates an arresting image without overwhelming the viewer. Post-processing tipsEnhance the vibrancy of clashing colors in post-processing, but keep the adjustments natural. Over-editing can reduce the authenticity and make the image feel artificial.Color clashes arent just about creating a visual punchtheyre about defying expectations and pushing boundaries. By understanding how to balance and use contrasting tones, you can transform ordinary scenes into extraordinary compositions that leave a lasting impression. Whether youre exploring bold palettes in urban environments or pairing vibrant hues in nature, embracing bold choices in color will elevate your creative vision. Not on 500px yet? Sign up here to explore more impactful photography.The post Color clashes and bold choices in photography appeared first on 500px.0 Commentaires 0 Parts
-
ISO.500PX.COM500px: A Platform for Photographers, Not AIWhat is AIGC?AI-generated content (AIGC) refers to images created entirely by artificial intelligence rather than captured by a camera. These images are produced using algorithms that synthesize visuals based on existing data, often mimicking styles or subjects found in real photography.In recent years, AI tools have made it possible to generate images at scale, leading to a surge of AI content across creative platforms. While these advancements are impressive, they raise significant concernsespecially regarding copyright, Licensing, and the authenticity of creative work.AI-generated images do not qualify for copyright protection, making them unsuitable for Licensing. More importantly, they do not align with what 500px stands for.500pxs Stance on AIGCPhotography has always been the foundation of 500px. Since the beginning, we have been a platform where amateur or professional photographers can showcase their talent, tell their stories, and connect with a like-minded community.As AI-generated content gains traction in the art world, we want to be clear: 500px is, and always will be, a platform for real photography. Our community is built for those who get behind the camera to capture lifes momentsnot for AI-generated images that bypass the creative process of photography.While AI-powered tools can assist in editing and refining photos, every image on 500px must be rooted in real photography. AI-generated content is not permitted on 500px, including in Licensing, Quests, or uploaded to your Profile. Our commitment is to preserve the authenticity of the work shared here, ensuring that what you see reflects a photographers skill, creativity, and vision.When Is AI Acceptable in Photography?AI-powered tools can be useful for minor refinements, like removing small blemishes or distractions, but edits should remain subtleaffecting less than 10% of the final image. Overediting or altering core aspects of a subject, such as a models expression or natural features, undermines the authenticity that defines real photography.The rise of AI-generated imagery has sparked discussions about the value and authenticity of art. While AI can create visually striking images, it cannot replicate the depth of human experience, intention, and artistic vision.Photography is more than just capturing an imageits about emotion, perspective, and storytelling. AI, while powerful, struggles with true abstraction and the nuanced understanding of human experiences. It lacks the spontaneity, imperfection, and raw authenticity that make photography deeply meaningful.Enforcing Our Standards & Community ActionAs technology evolves, detecting AI-generated content is becoming more complex, but we remain proactive in safeguarding the integrity of 500px. We are continuously enhancing our detection methods and enforcing strict measures to prevent AI-generated content from being shared on the platform.500px has a zero-tolerance policy for AI-generated content in Licensing and Quests. Submitting AIGC to these areas will result in a permanent ban from the 500px community.We also rely on our community to help maintain these standards. If you come across AI-generated content, report it, and our team will review it to ensure 500px remains a space for real photography. To learn how to report a photo or profile, please check out our FAQ.At 500px, photography is more than just an imageits a captured moment, a true story told through the art of seeing. We remain committed to protecting our community and keeping 500px a home for real photography.The post 500px: A Platform for Photographers, Not AI appeared first on 500px.0 Commentaires 0 Parts
-
ISO.500PX.COMThe 2025 OnePlus Photography Awards Are Open! Capture, Share, and Win Big!Hey Community Friends,Were thrilled to announce that the 2025 OnePlus Photography Awards are officially open for submissions! Whether youre a professional photographer or just someone who loves capturing lifes unforgettable moments, this is your chance to shine.Grab your smartphone, unleash your creativity, and show the world what youve got!Details About the CompetitionWho Can Join?EVERYONE! Whether youre a OnePlus user or not, youre welcome to participate.OnePlus Group: Entries must be shot on a OnePlus smartphone (any model).Public Group: Any smartphone brand or model is accepted.Competition CategoriesWeve got three exciting categories for you to explore. Which one speaks to your creative soul? Movement: Breathe Each MomentCapture eternity suspended in time. Share your visual stories of speed, adventure, and travel. From the fleeting emotion of daily life, the adrenaline rush within a single second, to the beauty that flows across every motion, use your lens to capture your world.Night and Low Light: Light Up Your WorldUnveil the breathtaking magic of the night world and the sparkling atmosphere of low-light environments. Showcase your mastery of light and shadow with vibrant cityscapes, skies painted with stars, glittering firework displaysand everything in between.Faces: Portray Each MomentCapture the compelling texture of human emotion. From the joy behind every smile to the stories etched in every wrinkle, share mesmerizing portraits of your family, friends, and pets. Each image is a sentence in your life story, evoking feelings that speak to the viewer, across cultures, and across time.TimelineSubmission Deadline: June 30, 2025, 11:59 PM (UTC+8)Winner Announcement: August 19, 2025, World Photography DayAwards and Prizes Main Prize$10,000 cash prize!Exposure Opportunity Winning works will be showcased on official OnePlus Channels and 500px Channels. OnePlus Image Partner Winners will receive the prestigious titles OnePlus Photography Expert and OnePlus Photography Ambassador.OnePlus Flagship Phone All winners will receive our latest OnePlus 13 device.Rules to RememberEntries must be shot after February 7, 2023.Only basic edits (brightness, contrast, etc.) are allowedno AIGC or heavy editing.Each participant can submit up to 15 entries per category.Photos must include complete EXIF information.For more details, click here.Meet Our Judges Share Your Entries on Social MediaGot a killer shot? Tag us and let the world see your masterpiece! Share your entries on Instagram with the hashtags #OnePlusPhotoAwards and #ShotonOnePlus. If your photo catches our eye and gets featured on the official OnePlus account, youll automatically be considered a finalist!At OnePlus, we believe the OnePlus Photography Awards isnt just a competitionits a celebration of creativity, storytelling, and the art of photography. Whether youre chasing the grand prize or just want to share your unique perspective, your photos could inspire millions.So, what are you waiting for? Grab your phone, start shooting, and let your creativity shine. We cant wait to see the world through your lens!Submit NowThe post The 2025 OnePlus Photography Awards Are Open! Capture, Share, and Win Big! appeared first on 500px.0 Commentaires 0 Parts
Plus de lecture