


Figma to functional: AI-powered iteration with Animas Playground
uxdesign.cc
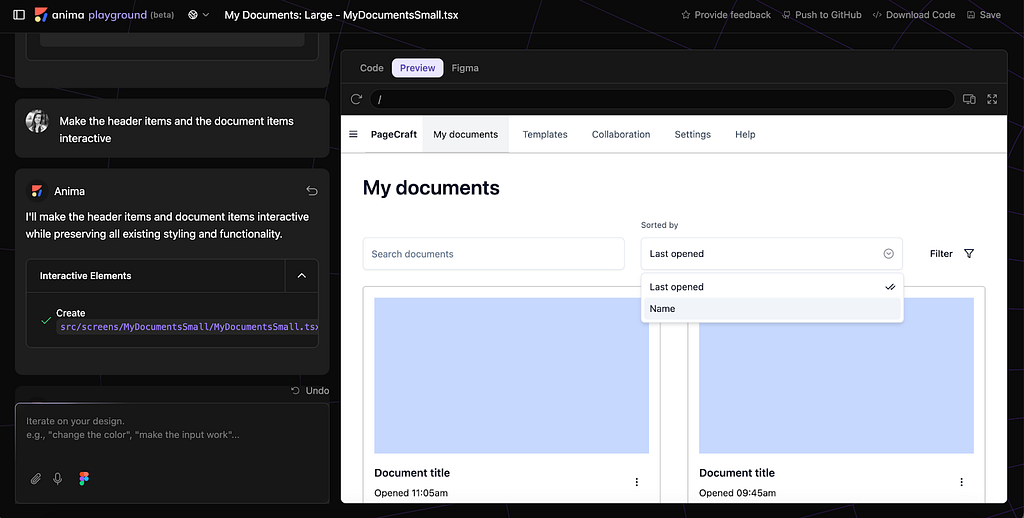
An AI-assistant that enhances your designs without taking away your creativecontrolThough I hate to say it, there are limitations to designs and prototypes created inFigma.A designer knows what the end-product should look like, but developers might have to make guesses on what is intended in small nuances the design missed (like how many milliseconds a micro-interaction should be). Or when we test designs with participants, the Figma prototype might not fully represent a live website because not all interactions are prototyped (or its justbuggy).Thats where low-code and no-code tools come intoplay.These tools give UX designers the power to interact with realistic, live previews of their working designs so they can rapidly iterate and get feedback from both stakeholders and users (all without using developer resources).There are quite a few tools with this functionality, like Lovable and Anima, but Anima has really begun to change the game of how UX designers can generate and iterate on coded design with their new Playground feature.Animas Playground feature uses an AI-assistant to make live designchangesAnima is already a staple in Figmas design workflowthey have over a million Figma plug-in users and even helped Figma create their infamous dev mode. But the new Playground feature uses an AI-assistant to make design and code changes without having to make a single update in the Figmafile.Lets check out this new feature and how designers can use an AI-assistant to power and enhance their designs without losing creative control (or feeling replaced).Designers guide to Anima PlaygroundPrep FigmadesignRun Anima plug-in inFigmaOpen and iterate in Anima PlaygroundExport codeAlternative method: Customize withAI1. Prep FigmadesignBefore you can run the Anima plug-in, your Figma designs should be at a level of detail and fidelity youre happy with before generating code for a live preview. But even if its not 100% ready, the Playground feature can help it get there (as well soonsee).Here are some quick best practices to prepare your Figma work forAnima:Name your Figma layers: Anima retains the layer names so this helps keep things tidy and clean once you move over tocodeCreate frames: Frames help Anima organize and understand relationships between elements, but dont overdo it (too many nested frames can complicate thecode)Add auto-layout: After creating frames, add auto-layout to the frames so Anima knows what position elements should be constrained to and how the frame should respond when the screen sizechangesUse components: Anima detects reused components in a design, and the Playground feature can change all components from one prompt (I used Carbon Design System for my designs, but you can also use a custom designsystem)Prep Figma designs for Anima by naming and framinglayers2. Run Anima plug-in inFigmaAfter your designs are prepped and ready, its time to run the Anima plug-in for Figma. In this step, you need to open Anima in Figma, specify the frame you want to generate code for, and select the javascript framework for yourproject.Note: I am using a Pro plan in Anima, so my plug-ins interface may look slightly different from yours if you have a different plan.How tosteps:Press +K or select Actions from the bottom toolbar in Figma (if using UI3) to open Figmaplug-insSearch and select Anima SelectRunSelect the primary frame (in the Component code inspect view) then Anima will automatically start generating codeSelect a frame in Figma for Anima to begin generating codeOnce code is generated, select the dropdown containing the javascript frameworks (on the right of the Figma frame name selected)Select React, Vue, or HTML (this determines your selection options; I chose React for mydesigns)Select a UI library (I chose Shadcn) Select Javascript or Typescript (I chose Typescript)Select Yes or No if Anima needs to generate a theme for your designs (I choseYes)The default styling for my selection is Tailwind CSS (the selection options differ depending on your previous selections)Select the UI library and javascript framework that works best for your UXproject3. Open and iterate in Anima PlaygroundAlright, now the Figma designs are prepped and set up in Anima, its time to open the designs in Anima Playground.Note: The Playground feature is available on all Anima plans (even the free plan, but with limitations).How tosteps:With the primary screen selected in the Anima plug-in, select Open in Playground (if this button is disabled, the code is still actively being generated)Anima opens in your default browser; a new chat appears in the left panel, and the code and preview in the mainviewIn the bottom-right corner, select the Figma icon in the chat feature Select Pair with Figma in the modal that appears (this is optional, but will add an additional tab in Anima so you can directly compare the Figma designs to thepreview)Note: Each time you select Open in Playground in Figma, a new file and chat is made in Animaaccessible by the panel icon button in the top-leftcornerPair Anima with Figma so you can directly compare the live preview to the FigmadesignsOnce the preview is ready in Anima, you can start making code and design changes in the left panels AI chat. You can ask the AI-assiatnt to make the tab items work or even change the header color to HEX value #EBF2FF.The initial preview Anima generated from my Figma designs contained some interaction, but not all elements were interactive yet (like the header tabs). So I asked the AI-assistant for alterations.Initial preview Anima Playground generated from my FigmadesignsI asked the AI-assistant, Make the header items and the document items interactive, and the chat immediately began to update thecodeThe AI-assistant responded with, Ill make the header items and document items interactive while preserving all existing styling and functionalityThen I asked the AI-assistant, Make the hover state for the header items and document items have a dark-grey borderThe AI-assistant responded with, Ill update the hover states to use a dark grey border for both header and documentitemsAsk for real-time design changes from the AI-assistant in Animas PlaygroundNote: If you dont like the changes, you can revert to a previous version using the undo button in the AI-chat (but this deletes the current version).Lastly, you can check to make sure the designs are responding as intended with a tablet and mobileview.If they arent responsive, the AI-assistant can make the breakpoints for youjust ask it to make the design responsive for tablet and mobile screens. If you added frames and auto-layout in Figma, this should be doable for the Playground feature.How tosteps:In the Anima Playgrounds preview section, select Switch to device mode on the right above thepreviewTo see the responsiveness, select Full screen to be taken to a new view to actively adjust the screenswidthAsk the AI-assistant for additional adjustments to the breakpoints (ifneeded)Use responsive mode in Anima Playground to ensure the design works for different screensizes4. ExportcodeOnce youre happy with the preview of the designs in Anima, its time to export and share thecode.Anima gives you three ways to dothis:Push directly to GitHub: Anima gives you the option to connect your GitHub through your settings or you can select Push to GitHub in the top-right corner of your project in Playground to specify the repository nameDownload the code: Next to the Push to GitHub button is the Download code button, which allows you to download a zip file to run elsewhereShare with collaborators: Depending on your Anima plan, you can share the project with teammates by adding them as a contributor or viewer (done in the Animaapp)Integrate your GitHub repository in the Anima Playground settings5. Alternative method: Customize withAIIf you prefer to tailor and download your designs code directly from Figma, you can use Animas Customize with AIfeature.Note: This isnt mandatory to use for Anima Playgroundjust another option to customize your designs code, but directly inFigma.In the bottom-right corner of the Animas Figma plug-in, theres a purple button that says, Add prompt with a sparkle icon. After selecting this button, you get the option to toggle on Customize with AI to use custom requests orpresets.Customize with AI feature in the Anima plug-in forFigmaThe presets allow you to select how you want the design to respond and interact (like enabling make it work) so you have a functional preview of the design. You can also add code samples and custom instructions (I.E., specifying an interaction you want a button tohave).The Customize with AI feature allows you to use AI to change and iterate the code, so you can directly download from Figma and run it elsewhere.Use the presets in Customize with AI to quickly configure codespecsThe new Playground feature in Anima is showing us a potential future of designing with AI. I can use the AI-assistant to make live updates to code (even multiple changes at the same time) if I want to explore a new color or interaction patternall without asking a developer forhelp.While using this feature, I didnt feel my role as a designer was being replaced by the AI-assistantit felt more like my collaborative partner.Not only that, it provides proactive help when needed, such as a terminal error. As a designer, I have no idea how to fix that kind of error message (I was scared), but the AI-assistant gave me a prompt to Try to fix, and I selected the prompt with no hesitation.Animas AI-assistant will prompt to fix code issues when theyoccurAnimas launch of the Playground feature gives us a new way to change our design workflow to incorporate AI. These workflow changes will accelerate design explorations, stakeholder feedback, and testing cyclesbenefitting product development and the overall user experience.Figma to functional: AI-powered iteration with Animas Playground was originally published in UX Collective on Medium, where people are continuing the conversation by highlighting and responding to this story.
0 Σχόλια
·0 Μοιράστηκε
·49 Views