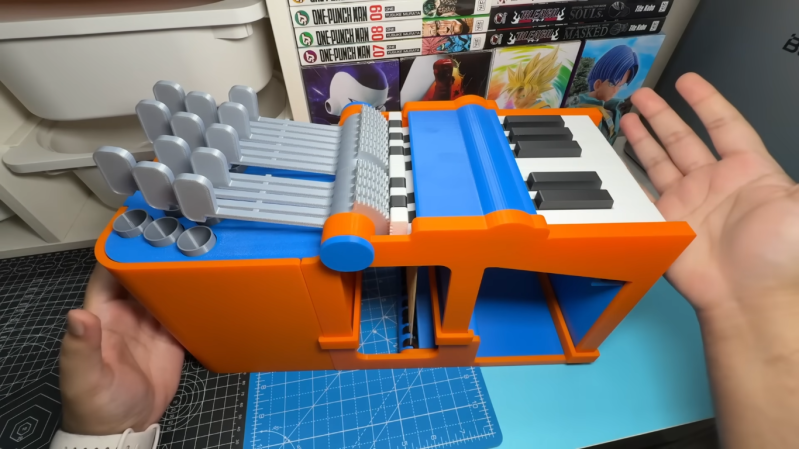
• 50 Preppy Fonts with Rich & Fancy Vibes

    In this article:See more ▼Post may contain affiliate links which give us commissions at no cost to you.Preppy fonts capture that quintessential East Coast elite vibe – think Nantucket summers, yacht clubs, and monogrammed everything. These typefaces embody the perfect balance of tradition and refinement that makes preppy design so timeless and aspirational.
    But here’s the thing: not all fonts can pull off that coveted preppy aesthetic. The best preppy fonts have a certain je ne sais quoi – they’re classic without being stuffy, elegant without being pretentious, and refined without being inaccessible.
    In this comprehensive guide, we’ll explore the most gorgeous preppy fonts that’ll have your designs looking like they belong in the pages of Town & Country magazine. So grab your pearls and let’s dive into this typographic treasure trove!
    Psst... Did you know you can get unlimited downloads of 59,000+ fonts and millions of other creative assets for just /mo? Learn more »The Preppiest Fonts That Define 2025
    Let’s start with the crème de la crème – the fonts that truly embody that preppy spirit. I’ve curated this list based on their ability to channel that classic New England charm while remaining versatile enough for modern design needs.

    Gatsby Prelude

    Gatsby Prelude is an elegant and modern Art Deco font duo. It combines sans-serif characters with decorative elements, perfect for creating sophisticated designs with a touch of vintage glamour.Burtuqol

    Burtuqol is a vintage slab serif font that exudes a retro charm. Its bold, chunky serifs and aged appearance make it ideal for projects requiring a nostalgic or timeworn aesthetic.Gafler

    Gafler is a classy vintage serif font with decorative elements. It combines elegance with a touch of old-world charm, making it perfect for high-end branding and classic design projects.Get 300+ Fonts for FREEEnter your email to download our 100% free "Font Lover's Bundle". For commercial & personal use. No royalties. No fees. No attribution. 100% free to use anywhere.

    Kagnue

    Kagnue is a modern and classy serif font. It offers a fresh take on traditional serif typefaces, blending contemporary design with timeless elegance for versatile use in various design contexts.The Blendinroom

    The Blendinroom is a retro serif typeface featuring luxurious ligatures. Its vintage-inspired design and intricate details make it ideal for creating sophisticated, old-world aesthetics in design projects.MODER BULES

    MODER BULES is a playful sans-serif font with a fun, childlike appeal. Its quirky design makes it perfect for kids-oriented projects or Halloween-themed designs, adding a touch of whimsy to typography.Nickey Vintage

    Nickey Vintage is a decorative display font with a strong vintage flair. Its bold, eye-catching characters make it ideal for headlines, logos, and designs that require a striking retro aesthetic.Ladger

    Ladger is a casual script font that exudes luxury and elegance. Its flowing lines and graceful curves make it perfect for logo designs, high-end branding, and projects requiring a touch of sophistication.Hadnich

    Hadnich is a modern script font with a brush-like quality. Its versatile design makes it suitable for various applications, from signage to branding, offering a contemporary take on handwritten typography.Belly and Park

    Belly and Park is a condensed beauty classic font family featuring both serif and sans-serif styles. Its vintage-inspired design and narrow characters make it ideal for creating elegant, space-efficient layouts.Loubag

    Loubag is a modern retro font family encompassing sans-serif, serif, and decorative styles. Its bold, fashion-forward design makes it perfect for creating eye-catching headlines and trendy branding materials.Petter And Sons

    Petter And Sons is a romantic beauty script font with decorative elements. Its elegant, flowing design makes it ideal for wedding invitations, luxury branding, and projects requiring a touch of refined beauty.Preteoria

    Preteoria is a modern cursive font with a sleek, contemporary feel. Its smooth curves and clean lines make it versatile for various design applications, from branding to digital media projects.Delauney

    Delauney is an Art Deco-inspired sans-serif font that captures the essence of the roaring twenties. Its geometric shapes and sleek lines make it perfect for creating designs with a bold, metropolitan flair.Amadi Vintage

    Amadi Vintage is a chic and beautiful serif font with a timeless appeal. Its elegant design and vintage-inspired details make it ideal for creating sophisticated, classic-looking designs and branding materials.LEDERSON

    LEDERSON is a vintage-inspired shadow font. Its weathered look and strong character make it perfect for designs requiring an authentic, aged aesthetic.Fancyou

    Fancyou is a versatile serif font with alternate characters. Its elegant design and customizable options make it suitable for a wide range of projects, from formal invitations to modern branding materials.Catterpie Font

    Catterpie is a handwritten script font that mimics natural handlettering. Its fluid, signature-like style makes it perfect for creating personal, authentic-looking designs and branding materials.Jemmy Wonder

    Jemmy Wonder is a Victorian-inspired serif font with a strong vintage character. Its ornate details and old-world charm make it ideal for creating designs with a classic, nostalgic feel.Monthey

    Monthey is a bold, elegant vintage display serif font. Its chunky characters and 70s-inspired design make it perfect for creating eye-catching headlines and retro-themed branding materials.Madville

    Madville is a classy script font with a versatile design. Its elegant curves and smooth transitions make it suitable for a wide range of projects, from formal invitations to modern branding materials.Crowk

    Crowk is a luxury serif font with a timeless, elegant appeal. Its refined design and classic proportions make it ideal for high-end branding, editorial layouts, and sophisticated design projects.Peachy Fantasy

    Peachy Fantasy is an Art Nouveau-inspired display font with decorative elements. Its vintage charm and unique character make it perfect for creating eye-catching headlines and artistic design projects.Cormier

    Cormier is a decorative sans-serif font with a strong artistic flair. Its unique design and fashion-forward aesthetic make it ideal for creating bold, attention-grabbing headlines and branding materials.Syntage

    Syntage is a decorative modern luxury font with both serif and ornamental elements. Its retro-inspired design and luxurious details make it perfect for high-end branding and sophisticated design projects.Jeniffer Selfies

    Jeniffer Selfies is a retro-inspired bold font combining sans-serif and script styles. Its playful design and vintage feel make it ideal for creating nostalgic, fun-loving designs and branding materials.The Rilman

    The Rilman is a ligature-rich rounded sans-serif font with a 90s-inspired design. Its retro charm and smooth edges make it perfect for creating playful, nostalgic designs and branding materials.Milky Croffle

    Milky Croffle is a classic beauty elegant serif font. Its refined design and timeless appeal make it ideal for creating sophisticated layouts, high-end branding, and projects requiring a touch of traditional elegance.
    What Makes a Font Feel Preppy?
    You might be wondering what exactly gives a font that unmistakable preppy vibe. After years of working with typography, I’ve identified several key characteristics that define the preppy aesthetic:
    Classic Serif Structure: Most preppy fonts are serifs, drawing inspiration from traditional typography used in prestigious publications and academic institutions. These serifs aren’t just decorative – they’re a nod to centuries of refined typographic tradition.
    Elegant Proportions: Preppy fonts tend to have well-balanced letterforms with moderate contrast between thick and thin strokes. They’re neither too delicate nor too bold – just perfectly poised, like a well-tailored blazer.
    Timeless Appeal: The best preppy fonts don’t scream “trendy.” Instead, they whisper “timeless.” They’re the typography equivalent of a strand of pearls – always appropriate, never out of style.
    Sophisticated Details: Look for subtle refinements in letterforms – graceful curves, well-crafted terminals, and thoughtful spacing. These details separate truly preppy fonts from their more pedestrian cousins.
    Heritage Inspiration: Many preppy fonts draw inspiration from historical typefaces used by Ivy League universities, prestigious publishing houses, and old-money families. This connection to tradition is what gives them their authentic preppy pedigree.
    Where to Use Preppy FontsPreppy fonts aren’t one-size-fits-all solutions, but when used appropriately, they’re absolutely magical. Here’s where they shine brightest:
    Wedding Invitations: Nothing says “elegant affair” quite like a beautifully chosen preppy serif. These fonts are perfect for formal invitations, save-the-dates, and wedding stationery that needs to feel sophisticated and timeless.
    Luxury Branding: Brands targeting affluent audiences or positioning themselves as premium often benefit from preppy typography. Think boutique hotels, high-end fashion, or artisanal goods.
    Editorial Design: Magazines, newsletters, and publications focusing on lifestyle, fashion, or culture can leverage preppy fonts to establish credibility and sophistication.
    Corporate Identity: Professional services, law firms, financial institutions, and consulting companies often choose preppy fonts to convey trustworthiness and establishment credibility.
    Academic Materials: Universities, prep schools, and educational institutions naturally gravitate toward preppy typography that reflects their traditional values and heritage.
    However, preppy fonts might not be the best choice for:
    Tech Startups: The traditional nature of preppy fonts can feel at odds with innovation and disruption. Modern sans serifs usually work better for tech companies.
    Children’s Brands: While elegant, preppy fonts might feel too formal for products targeting young children. Playful, rounded fonts are typically more appropriate.
    Casual Brands: If your brand personality is laid-back and approachable, overly formal preppy fonts might create distance between you and your audience.
    How to Choose the Perfect Preppy Font
    Selecting the right preppy font requires careful consideration of several factors. Here’s my tried-and-true process:
    Consider Your Audience: Are you designing for actual prep school alumni, or are you trying to capture that aspirational preppy aesthetic for a broader audience? Your target demographic should influence how traditional or accessible your font choice is.
    Evaluate the Context: A wedding invitation can handle more ornate details than a business card. Consider where your text will appear and how much personality the context can support.
    Test Readability: Preppy doesn’t mean hard to read. Always test your chosen font at various sizes to ensure it remains legible. Your typography should enhance communication, not hinder it.
    Think About Pairing: Will you be using this font alone or pairing it with others? Consider how your preppy serif will work alongside sans serifs for body text or script fonts for accents.
    Consider Your Medium: Some preppy fonts work beautifully in print but struggle on screens. Others are optimized for digital use but lose their charm in print. Choose accordingly.
    Pairing Preppy Fonts Like a Pro
    The magic of preppy typography often lies in thoughtful font pairing. Here are some winning combinations that never fail:
    Classic Serif + Clean Sans Serif: Pair your preppy serif headline font with a crisp, readable sans serif for body text. This creates hierarchy while maintaining sophistication.
    Traditional Serif + Script Accent: Use a refined script font sparingly for special elements like signatures or decorative text, balanced by a solid preppy serif for main content.
    Serif + Serif Variation: Sometimes pairing two serifs from the same family – perhaps a regular weight for body text and a bold condensed version for headlines – creates beautiful, cohesive designs.
    Remember, less is often more with preppy design. Stick to two or three fonts maximum, and let the inherent elegance of your chosen typefaces do the heavy lifting.
    The Psychology Behind Preppy Typography
    Understanding why preppy fonts work so well psychologically can help you use them more effectively. These typefaces tap into powerful associations:
    Trust and Reliability: The traditional nature of preppy fonts suggests stability and permanence. When people see these fonts, they subconsciously associate them with established institutions and time-tested values.
    Sophistication and Education: Preppy fonts are reminiscent of academic institutions and intellectual pursuits. They suggest refinement, education, and cultural awareness.
    Exclusivity and Status: Let’s be honest – part of the preppy aesthetic’s appeal is its association with privilege and exclusivity. These fonts can make designs feel more premium and aspirational.
    Quality and Craftsmanship: The careful attention to typographic detail in preppy fonts suggests similar attention to quality in whatever they’re representing.
    Modern Takes on Classic Preppy Style
    While preppy fonts are rooted in tradition, the best designers know how to give them contemporary flair. Here are some ways to modernize preppy typography:
    Unexpected Color Palettes: Pair traditional preppy fonts with modern colors. Think sage green and cream instead of navy and white, or soft blush tones for a fresh take.
    Generous White Space: Give your preppy fonts room to breathe with plenty of white space. This modern approach to layout keeps traditional fonts feeling fresh and uncluttered.
    Mixed Media Integration: Combine preppy typography with photography, illustrations, or graphic elements for a more contemporary feel while maintaining that sophisticated foundation.
    Strategic Contrast: Pair your refined preppy fonts with unexpected elements – maybe a bold geometric shape or modern photography – to create dynamic tension.
    Preppy Font Alternatives for Every Budget
    Not every preppy project has a premium font budget, and that’s okay! Here are some strategies for achieving that coveted preppy look without breaking the bank:
    Google Fonts Gems: Fonts like Playfair Display, Crimson Text, and Libre Baskerville offer sophisticated serif options that can work beautifully for preppy designs.
    Font Pairing Magic: Sometimes combining two free fonts thoughtfully can create a more expensive-looking result than using a single premium font poorly.
    Focus on Execution: A free font used with excellent spacing, hierarchy, and layout will always look better than an expensive font used carelessly.
    Common Preppy Font Mistakes to Avoid
    Even with the perfect preppy font, poor execution can ruin the effect. Here are the most common mistakes I see designers make:
    Overdoing the Decoration: Just because a font has elegant details doesn’t mean you need to add more flourishes. Let the typeface’s inherent sophistication speak for itself.
    Ignoring Hierarchy: Preppy design relies on clear, elegant hierarchy. Don’t make everything the same size or weight – create visual flow through thoughtful typography scaling.
    Poor Spacing: Cramped text kills the elegant feel of preppy fonts. Give your typography generous leading and appropriate margins.
    Wrong Context: Using an ultra-formal preppy font for a casual pizza restaurant’s menu will feel jarring and inappropriate. Match your font choice to your content and audience.
    The Future of Preppy Typography
    As we look ahead in 2025, preppy fonts continue to evolve while maintaining their classic appeal. We’re seeing interesting trends emerge:
    Variable Font Technology: Modern preppy fonts are increasingly available as variable fonts, allowing designers to fine-tune weight, width, and optical size for perfect customization.
    Screen Optimization: Classic preppy fonts are being redrawn and optimized for digital screens without losing their traditional charm.
    Inclusive Preppy: Designers are expanding the preppy aesthetic beyond its traditional boundaries, creating fonts that maintain sophistication while feeling more accessible and diverse.
    Sustainable Design: The timeless nature of preppy fonts aligns perfectly with sustainable design principles – these typefaces won’t look dated next year, making them environmentally responsible choices.
    Conclusion: Embracing Timeless Elegance
    Preppy fonts represent more than just letterforms – they’re a gateway to timeless elegance and sophisticated communication. Whether you’re designing wedding invitations for a Martha’s Vineyard ceremony or creating brand identity for a boutique law firm, the right preppy font can elevate your work from merely professional to genuinely distinguished.
    The beauty of preppy typography lies in its ability to feel both traditional and fresh, formal yet approachable. These fonts have stood the test of time because they tap into something fundamental about how we perceive quality, tradition, and sophistication.
    As you explore the world of preppy fonts, remember that the best typography choices support your message rather than overshadowing it. Choose fonts that enhance your content’s inherent qualities and speak to your audience’s aspirations and values.
    So whether you’re channeling that old-money aesthetic or simply want to add a touch of refined elegance to your designs, preppy fonts offer a wealth of possibilities. After all, good typography, like good manners, never goes out of style.
    #preppy #fonts #with #rich #ampamp
    50 Preppy Fonts with Rich & Fancy Vibes
    In this article:See more ▼Post may contain affiliate links which give us commissions at no cost to you.Preppy fonts capture that quintessential East Coast elite vibe – think Nantucket summers, yacht clubs, and monogrammed everything. These typefaces embody the perfect balance of tradition and refinement that makes preppy design so timeless and aspirational. But here’s the thing: not all fonts can pull off that coveted preppy aesthetic. The best preppy fonts have a certain je ne sais quoi – they’re classic without being stuffy, elegant without being pretentious, and refined without being inaccessible. In this comprehensive guide, we’ll explore the most gorgeous preppy fonts that’ll have your designs looking like they belong in the pages of Town & Country magazine. So grab your pearls and let’s dive into this typographic treasure trove! 👋 Psst... Did you know you can get unlimited downloads of 59,000+ fonts and millions of other creative assets for just /mo? Learn more »The Preppiest Fonts That Define 2025 Let’s start with the crème de la crème – the fonts that truly embody that preppy spirit. I’ve curated this list based on their ability to channel that classic New England charm while remaining versatile enough for modern design needs. Gatsby Prelude Gatsby Prelude is an elegant and modern Art Deco font duo. It combines sans-serif characters with decorative elements, perfect for creating sophisticated designs with a touch of vintage glamour.Burtuqol Burtuqol is a vintage slab serif font that exudes a retro charm. Its bold, chunky serifs and aged appearance make it ideal for projects requiring a nostalgic or timeworn aesthetic.Gafler Gafler is a classy vintage serif font with decorative elements. It combines elegance with a touch of old-world charm, making it perfect for high-end branding and classic design projects.Get 300+ Fonts for FREEEnter your email to download our 100% free "Font Lover's Bundle". For commercial & personal use. No royalties. No fees. No attribution. 100% free to use anywhere. Kagnue Kagnue is a modern and classy serif font. It offers a fresh take on traditional serif typefaces, blending contemporary design with timeless elegance for versatile use in various design contexts.The Blendinroom The Blendinroom is a retro serif typeface featuring luxurious ligatures. Its vintage-inspired design and intricate details make it ideal for creating sophisticated, old-world aesthetics in design projects.MODER BULES MODER BULES is a playful sans-serif font with a fun, childlike appeal. Its quirky design makes it perfect for kids-oriented projects or Halloween-themed designs, adding a touch of whimsy to typography.Nickey Vintage Nickey Vintage is a decorative display font with a strong vintage flair. Its bold, eye-catching characters make it ideal for headlines, logos, and designs that require a striking retro aesthetic.Ladger Ladger is a casual script font that exudes luxury and elegance. Its flowing lines and graceful curves make it perfect for logo designs, high-end branding, and projects requiring a touch of sophistication.Hadnich Hadnich is a modern script font with a brush-like quality. Its versatile design makes it suitable for various applications, from signage to branding, offering a contemporary take on handwritten typography.Belly and Park Belly and Park is a condensed beauty classic font family featuring both serif and sans-serif styles. Its vintage-inspired design and narrow characters make it ideal for creating elegant, space-efficient layouts.Loubag Loubag is a modern retro font family encompassing sans-serif, serif, and decorative styles. Its bold, fashion-forward design makes it perfect for creating eye-catching headlines and trendy branding materials.Petter And Sons Petter And Sons is a romantic beauty script font with decorative elements. Its elegant, flowing design makes it ideal for wedding invitations, luxury branding, and projects requiring a touch of refined beauty.Preteoria Preteoria is a modern cursive font with a sleek, contemporary feel. Its smooth curves and clean lines make it versatile for various design applications, from branding to digital media projects.Delauney Delauney is an Art Deco-inspired sans-serif font that captures the essence of the roaring twenties. Its geometric shapes and sleek lines make it perfect for creating designs with a bold, metropolitan flair.Amadi Vintage Amadi Vintage is a chic and beautiful serif font with a timeless appeal. Its elegant design and vintage-inspired details make it ideal for creating sophisticated, classic-looking designs and branding materials.LEDERSON LEDERSON is a vintage-inspired shadow font. Its weathered look and strong character make it perfect for designs requiring an authentic, aged aesthetic.Fancyou Fancyou is a versatile serif font with alternate characters. Its elegant design and customizable options make it suitable for a wide range of projects, from formal invitations to modern branding materials.Catterpie Font Catterpie is a handwritten script font that mimics natural handlettering. Its fluid, signature-like style makes it perfect for creating personal, authentic-looking designs and branding materials.Jemmy Wonder Jemmy Wonder is a Victorian-inspired serif font with a strong vintage character. Its ornate details and old-world charm make it ideal for creating designs with a classic, nostalgic feel.Monthey Monthey is a bold, elegant vintage display serif font. Its chunky characters and 70s-inspired design make it perfect for creating eye-catching headlines and retro-themed branding materials.Madville Madville is a classy script font with a versatile design. Its elegant curves and smooth transitions make it suitable for a wide range of projects, from formal invitations to modern branding materials.Crowk Crowk is a luxury serif font with a timeless, elegant appeal. Its refined design and classic proportions make it ideal for high-end branding, editorial layouts, and sophisticated design projects.Peachy Fantasy Peachy Fantasy is an Art Nouveau-inspired display font with decorative elements. Its vintage charm and unique character make it perfect for creating eye-catching headlines and artistic design projects.Cormier Cormier is a decorative sans-serif font with a strong artistic flair. Its unique design and fashion-forward aesthetic make it ideal for creating bold, attention-grabbing headlines and branding materials.Syntage Syntage is a decorative modern luxury font with both serif and ornamental elements. Its retro-inspired design and luxurious details make it perfect for high-end branding and sophisticated design projects.Jeniffer Selfies Jeniffer Selfies is a retro-inspired bold font combining sans-serif and script styles. Its playful design and vintage feel make it ideal for creating nostalgic, fun-loving designs and branding materials.The Rilman The Rilman is a ligature-rich rounded sans-serif font with a 90s-inspired design. Its retro charm and smooth edges make it perfect for creating playful, nostalgic designs and branding materials.Milky Croffle Milky Croffle is a classic beauty elegant serif font. Its refined design and timeless appeal make it ideal for creating sophisticated layouts, high-end branding, and projects requiring a touch of traditional elegance. What Makes a Font Feel Preppy? You might be wondering what exactly gives a font that unmistakable preppy vibe. After years of working with typography, I’ve identified several key characteristics that define the preppy aesthetic: Classic Serif Structure: Most preppy fonts are serifs, drawing inspiration from traditional typography used in prestigious publications and academic institutions. These serifs aren’t just decorative – they’re a nod to centuries of refined typographic tradition. Elegant Proportions: Preppy fonts tend to have well-balanced letterforms with moderate contrast between thick and thin strokes. They’re neither too delicate nor too bold – just perfectly poised, like a well-tailored blazer. Timeless Appeal: The best preppy fonts don’t scream “trendy.” Instead, they whisper “timeless.” They’re the typography equivalent of a strand of pearls – always appropriate, never out of style. Sophisticated Details: Look for subtle refinements in letterforms – graceful curves, well-crafted terminals, and thoughtful spacing. These details separate truly preppy fonts from their more pedestrian cousins. Heritage Inspiration: Many preppy fonts draw inspiration from historical typefaces used by Ivy League universities, prestigious publishing houses, and old-money families. This connection to tradition is what gives them their authentic preppy pedigree. Where to Use Preppy FontsPreppy fonts aren’t one-size-fits-all solutions, but when used appropriately, they’re absolutely magical. Here’s where they shine brightest: Wedding Invitations: Nothing says “elegant affair” quite like a beautifully chosen preppy serif. These fonts are perfect for formal invitations, save-the-dates, and wedding stationery that needs to feel sophisticated and timeless. Luxury Branding: Brands targeting affluent audiences or positioning themselves as premium often benefit from preppy typography. Think boutique hotels, high-end fashion, or artisanal goods. Editorial Design: Magazines, newsletters, and publications focusing on lifestyle, fashion, or culture can leverage preppy fonts to establish credibility and sophistication. Corporate Identity: Professional services, law firms, financial institutions, and consulting companies often choose preppy fonts to convey trustworthiness and establishment credibility. Academic Materials: Universities, prep schools, and educational institutions naturally gravitate toward preppy typography that reflects their traditional values and heritage. However, preppy fonts might not be the best choice for: Tech Startups: The traditional nature of preppy fonts can feel at odds with innovation and disruption. Modern sans serifs usually work better for tech companies. Children’s Brands: While elegant, preppy fonts might feel too formal for products targeting young children. Playful, rounded fonts are typically more appropriate. Casual Brands: If your brand personality is laid-back and approachable, overly formal preppy fonts might create distance between you and your audience. How to Choose the Perfect Preppy Font Selecting the right preppy font requires careful consideration of several factors. Here’s my tried-and-true process: Consider Your Audience: Are you designing for actual prep school alumni, or are you trying to capture that aspirational preppy aesthetic for a broader audience? Your target demographic should influence how traditional or accessible your font choice is. Evaluate the Context: A wedding invitation can handle more ornate details than a business card. Consider where your text will appear and how much personality the context can support. Test Readability: Preppy doesn’t mean hard to read. Always test your chosen font at various sizes to ensure it remains legible. Your typography should enhance communication, not hinder it. Think About Pairing: Will you be using this font alone or pairing it with others? Consider how your preppy serif will work alongside sans serifs for body text or script fonts for accents. Consider Your Medium: Some preppy fonts work beautifully in print but struggle on screens. Others are optimized for digital use but lose their charm in print. Choose accordingly. Pairing Preppy Fonts Like a Pro The magic of preppy typography often lies in thoughtful font pairing. Here are some winning combinations that never fail: Classic Serif + Clean Sans Serif: Pair your preppy serif headline font with a crisp, readable sans serif for body text. This creates hierarchy while maintaining sophistication. Traditional Serif + Script Accent: Use a refined script font sparingly for special elements like signatures or decorative text, balanced by a solid preppy serif for main content. Serif + Serif Variation: Sometimes pairing two serifs from the same family – perhaps a regular weight for body text and a bold condensed version for headlines – creates beautiful, cohesive designs. Remember, less is often more with preppy design. Stick to two or three fonts maximum, and let the inherent elegance of your chosen typefaces do the heavy lifting. The Psychology Behind Preppy Typography Understanding why preppy fonts work so well psychologically can help you use them more effectively. These typefaces tap into powerful associations: Trust and Reliability: The traditional nature of preppy fonts suggests stability and permanence. When people see these fonts, they subconsciously associate them with established institutions and time-tested values. Sophistication and Education: Preppy fonts are reminiscent of academic institutions and intellectual pursuits. They suggest refinement, education, and cultural awareness. Exclusivity and Status: Let’s be honest – part of the preppy aesthetic’s appeal is its association with privilege and exclusivity. These fonts can make designs feel more premium and aspirational. Quality and Craftsmanship: The careful attention to typographic detail in preppy fonts suggests similar attention to quality in whatever they’re representing. Modern Takes on Classic Preppy Style While preppy fonts are rooted in tradition, the best designers know how to give them contemporary flair. Here are some ways to modernize preppy typography: Unexpected Color Palettes: Pair traditional preppy fonts with modern colors. Think sage green and cream instead of navy and white, or soft blush tones for a fresh take. Generous White Space: Give your preppy fonts room to breathe with plenty of white space. This modern approach to layout keeps traditional fonts feeling fresh and uncluttered. Mixed Media Integration: Combine preppy typography with photography, illustrations, or graphic elements for a more contemporary feel while maintaining that sophisticated foundation. Strategic Contrast: Pair your refined preppy fonts with unexpected elements – maybe a bold geometric shape or modern photography – to create dynamic tension. Preppy Font Alternatives for Every Budget Not every preppy project has a premium font budget, and that’s okay! Here are some strategies for achieving that coveted preppy look without breaking the bank: Google Fonts Gems: Fonts like Playfair Display, Crimson Text, and Libre Baskerville offer sophisticated serif options that can work beautifully for preppy designs. Font Pairing Magic: Sometimes combining two free fonts thoughtfully can create a more expensive-looking result than using a single premium font poorly. Focus on Execution: A free font used with excellent spacing, hierarchy, and layout will always look better than an expensive font used carelessly. Common Preppy Font Mistakes to Avoid Even with the perfect preppy font, poor execution can ruin the effect. Here are the most common mistakes I see designers make: Overdoing the Decoration: Just because a font has elegant details doesn’t mean you need to add more flourishes. Let the typeface’s inherent sophistication speak for itself. Ignoring Hierarchy: Preppy design relies on clear, elegant hierarchy. Don’t make everything the same size or weight – create visual flow through thoughtful typography scaling. Poor Spacing: Cramped text kills the elegant feel of preppy fonts. Give your typography generous leading and appropriate margins. Wrong Context: Using an ultra-formal preppy font for a casual pizza restaurant’s menu will feel jarring and inappropriate. Match your font choice to your content and audience. The Future of Preppy Typography As we look ahead in 2025, preppy fonts continue to evolve while maintaining their classic appeal. We’re seeing interesting trends emerge: Variable Font Technology: Modern preppy fonts are increasingly available as variable fonts, allowing designers to fine-tune weight, width, and optical size for perfect customization. Screen Optimization: Classic preppy fonts are being redrawn and optimized for digital screens without losing their traditional charm. Inclusive Preppy: Designers are expanding the preppy aesthetic beyond its traditional boundaries, creating fonts that maintain sophistication while feeling more accessible and diverse. Sustainable Design: The timeless nature of preppy fonts aligns perfectly with sustainable design principles – these typefaces won’t look dated next year, making them environmentally responsible choices. Conclusion: Embracing Timeless Elegance Preppy fonts represent more than just letterforms – they’re a gateway to timeless elegance and sophisticated communication. Whether you’re designing wedding invitations for a Martha’s Vineyard ceremony or creating brand identity for a boutique law firm, the right preppy font can elevate your work from merely professional to genuinely distinguished. The beauty of preppy typography lies in its ability to feel both traditional and fresh, formal yet approachable. These fonts have stood the test of time because they tap into something fundamental about how we perceive quality, tradition, and sophistication. As you explore the world of preppy fonts, remember that the best typography choices support your message rather than overshadowing it. Choose fonts that enhance your content’s inherent qualities and speak to your audience’s aspirations and values. So whether you’re channeling that old-money aesthetic or simply want to add a touch of refined elegance to your designs, preppy fonts offer a wealth of possibilities. After all, good typography, like good manners, never goes out of style. #preppy #fonts #with #rich #ampamp
    DESIGNWORKLIFE.COM
    50 Preppy Fonts with Rich & Fancy Vibes
    In this article:See more ▼Post may contain affiliate links which give us commissions at no cost to you.Preppy fonts capture that quintessential East Coast elite vibe – think Nantucket summers, yacht clubs, and monogrammed everything. These typefaces embody the perfect balance of tradition and refinement that makes preppy design so timeless and aspirational. But here’s the thing: not all fonts can pull off that coveted preppy aesthetic. The best preppy fonts have a certain je ne sais quoi – they’re classic without being stuffy, elegant without being pretentious, and refined without being inaccessible. In this comprehensive guide, we’ll explore the most gorgeous preppy fonts that’ll have your designs looking like they belong in the pages of Town & Country magazine. So grab your pearls and let’s dive into this typographic treasure trove! 👋 Psst... Did you know you can get unlimited downloads of 59,000+ fonts and millions of other creative assets for just $16.95/mo? Learn more »The Preppiest Fonts That Define 2025 Let’s start with the crème de la crème – the fonts that truly embody that preppy spirit. I’ve curated this list based on their ability to channel that classic New England charm while remaining versatile enough for modern design needs. Gatsby Prelude Gatsby Prelude is an elegant and modern Art Deco font duo. It combines sans-serif characters with decorative elements, perfect for creating sophisticated designs with a touch of vintage glamour.Burtuqol Burtuqol is a vintage slab serif font that exudes a retro charm. Its bold, chunky serifs and aged appearance make it ideal for projects requiring a nostalgic or timeworn aesthetic.Gafler Gafler is a classy vintage serif font with decorative elements. It combines elegance with a touch of old-world charm, making it perfect for high-end branding and classic design projects.Get 300+ Fonts for FREEEnter your email to download our 100% free "Font Lover's Bundle". For commercial & personal use. No royalties. No fees. No attribution. 100% free to use anywhere. Kagnue Kagnue is a modern and classy serif font. It offers a fresh take on traditional serif typefaces, blending contemporary design with timeless elegance for versatile use in various design contexts.The Blendinroom The Blendinroom is a retro serif typeface featuring luxurious ligatures. Its vintage-inspired design and intricate details make it ideal for creating sophisticated, old-world aesthetics in design projects.MODER BULES MODER BULES is a playful sans-serif font with a fun, childlike appeal. Its quirky design makes it perfect for kids-oriented projects or Halloween-themed designs, adding a touch of whimsy to typography.Nickey Vintage Nickey Vintage is a decorative display font with a strong vintage flair. Its bold, eye-catching characters make it ideal for headlines, logos, and designs that require a striking retro aesthetic.Ladger Ladger is a casual script font that exudes luxury and elegance. Its flowing lines and graceful curves make it perfect for logo designs, high-end branding, and projects requiring a touch of sophistication.Hadnich Hadnich is a modern script font with a brush-like quality. Its versatile design makes it suitable for various applications, from signage to branding, offering a contemporary take on handwritten typography.Belly and Park Belly and Park is a condensed beauty classic font family featuring both serif and sans-serif styles. Its vintage-inspired design and narrow characters make it ideal for creating elegant, space-efficient layouts.Loubag Loubag is a modern retro font family encompassing sans-serif, serif, and decorative styles. Its bold, fashion-forward design makes it perfect for creating eye-catching headlines and trendy branding materials.Petter And Sons Petter And Sons is a romantic beauty script font with decorative elements. Its elegant, flowing design makes it ideal for wedding invitations, luxury branding, and projects requiring a touch of refined beauty.Preteoria Preteoria is a modern cursive font with a sleek, contemporary feel. Its smooth curves and clean lines make it versatile for various design applications, from branding to digital media projects.Delauney Delauney is an Art Deco-inspired sans-serif font that captures the essence of the roaring twenties. Its geometric shapes and sleek lines make it perfect for creating designs with a bold, metropolitan flair.Amadi Vintage Amadi Vintage is a chic and beautiful serif font with a timeless appeal. Its elegant design and vintage-inspired details make it ideal for creating sophisticated, classic-looking designs and branding materials.LEDERSON LEDERSON is a vintage-inspired shadow font. Its weathered look and strong character make it perfect for designs requiring an authentic, aged aesthetic.Fancyou Fancyou is a versatile serif font with alternate characters. Its elegant design and customizable options make it suitable for a wide range of projects, from formal invitations to modern branding materials.Catterpie Font Catterpie is a handwritten script font that mimics natural handlettering. Its fluid, signature-like style makes it perfect for creating personal, authentic-looking designs and branding materials.Jemmy Wonder Jemmy Wonder is a Victorian-inspired serif font with a strong vintage character. Its ornate details and old-world charm make it ideal for creating designs with a classic, nostalgic feel.Monthey Monthey is a bold, elegant vintage display serif font. Its chunky characters and 70s-inspired design make it perfect for creating eye-catching headlines and retro-themed branding materials.Madville Madville is a classy script font with a versatile design. Its elegant curves and smooth transitions make it suitable for a wide range of projects, from formal invitations to modern branding materials.Crowk Crowk is a luxury serif font with a timeless, elegant appeal. Its refined design and classic proportions make it ideal for high-end branding, editorial layouts, and sophisticated design projects.Peachy Fantasy Peachy Fantasy is an Art Nouveau-inspired display font with decorative elements. Its vintage charm and unique character make it perfect for creating eye-catching headlines and artistic design projects.Cormier Cormier is a decorative sans-serif font with a strong artistic flair. Its unique design and fashion-forward aesthetic make it ideal for creating bold, attention-grabbing headlines and branding materials.Syntage Syntage is a decorative modern luxury font with both serif and ornamental elements. Its retro-inspired design and luxurious details make it perfect for high-end branding and sophisticated design projects.Jeniffer Selfies Jeniffer Selfies is a retro-inspired bold font combining sans-serif and script styles. Its playful design and vintage feel make it ideal for creating nostalgic, fun-loving designs and branding materials.The Rilman The Rilman is a ligature-rich rounded sans-serif font with a 90s-inspired design. Its retro charm and smooth edges make it perfect for creating playful, nostalgic designs and branding materials.Milky Croffle Milky Croffle is a classic beauty elegant serif font. Its refined design and timeless appeal make it ideal for creating sophisticated layouts, high-end branding, and projects requiring a touch of traditional elegance. What Makes a Font Feel Preppy? You might be wondering what exactly gives a font that unmistakable preppy vibe. After years of working with typography, I’ve identified several key characteristics that define the preppy aesthetic: Classic Serif Structure: Most preppy fonts are serifs, drawing inspiration from traditional typography used in prestigious publications and academic institutions. These serifs aren’t just decorative – they’re a nod to centuries of refined typographic tradition. Elegant Proportions: Preppy fonts tend to have well-balanced letterforms with moderate contrast between thick and thin strokes. They’re neither too delicate nor too bold – just perfectly poised, like a well-tailored blazer. Timeless Appeal: The best preppy fonts don’t scream “trendy.” Instead, they whisper “timeless.” They’re the typography equivalent of a strand of pearls – always appropriate, never out of style. Sophisticated Details: Look for subtle refinements in letterforms – graceful curves, well-crafted terminals, and thoughtful spacing. These details separate truly preppy fonts from their more pedestrian cousins. Heritage Inspiration: Many preppy fonts draw inspiration from historical typefaces used by Ivy League universities, prestigious publishing houses, and old-money families. This connection to tradition is what gives them their authentic preppy pedigree. Where to Use Preppy Fonts (And Where Not To) Preppy fonts aren’t one-size-fits-all solutions, but when used appropriately, they’re absolutely magical. Here’s where they shine brightest: Wedding Invitations: Nothing says “elegant affair” quite like a beautifully chosen preppy serif. These fonts are perfect for formal invitations, save-the-dates, and wedding stationery that needs to feel sophisticated and timeless. Luxury Branding: Brands targeting affluent audiences or positioning themselves as premium often benefit from preppy typography. Think boutique hotels, high-end fashion, or artisanal goods. Editorial Design: Magazines, newsletters, and publications focusing on lifestyle, fashion, or culture can leverage preppy fonts to establish credibility and sophistication. Corporate Identity: Professional services, law firms, financial institutions, and consulting companies often choose preppy fonts to convey trustworthiness and establishment credibility. Academic Materials: Universities, prep schools, and educational institutions naturally gravitate toward preppy typography that reflects their traditional values and heritage. However, preppy fonts might not be the best choice for: Tech Startups: The traditional nature of preppy fonts can feel at odds with innovation and disruption. Modern sans serifs usually work better for tech companies. Children’s Brands: While elegant, preppy fonts might feel too formal for products targeting young children. Playful, rounded fonts are typically more appropriate. Casual Brands: If your brand personality is laid-back and approachable, overly formal preppy fonts might create distance between you and your audience. How to Choose the Perfect Preppy Font Selecting the right preppy font requires careful consideration of several factors. Here’s my tried-and-true process: Consider Your Audience: Are you designing for actual prep school alumni, or are you trying to capture that aspirational preppy aesthetic for a broader audience? Your target demographic should influence how traditional or accessible your font choice is. Evaluate the Context: A wedding invitation can handle more ornate details than a business card. Consider where your text will appear and how much personality the context can support. Test Readability: Preppy doesn’t mean hard to read. Always test your chosen font at various sizes to ensure it remains legible. Your typography should enhance communication, not hinder it. Think About Pairing: Will you be using this font alone or pairing it with others? Consider how your preppy serif will work alongside sans serifs for body text or script fonts for accents. Consider Your Medium: Some preppy fonts work beautifully in print but struggle on screens. Others are optimized for digital use but lose their charm in print. Choose accordingly. Pairing Preppy Fonts Like a Pro The magic of preppy typography often lies in thoughtful font pairing. Here are some winning combinations that never fail: Classic Serif + Clean Sans Serif: Pair your preppy serif headline font with a crisp, readable sans serif for body text. This creates hierarchy while maintaining sophistication. Traditional Serif + Script Accent: Use a refined script font sparingly for special elements like signatures or decorative text, balanced by a solid preppy serif for main content. Serif + Serif Variation: Sometimes pairing two serifs from the same family – perhaps a regular weight for body text and a bold condensed version for headlines – creates beautiful, cohesive designs. Remember, less is often more with preppy design. Stick to two or three fonts maximum, and let the inherent elegance of your chosen typefaces do the heavy lifting. The Psychology Behind Preppy Typography Understanding why preppy fonts work so well psychologically can help you use them more effectively. These typefaces tap into powerful associations: Trust and Reliability: The traditional nature of preppy fonts suggests stability and permanence. When people see these fonts, they subconsciously associate them with established institutions and time-tested values. Sophistication and Education: Preppy fonts are reminiscent of academic institutions and intellectual pursuits. They suggest refinement, education, and cultural awareness. Exclusivity and Status: Let’s be honest – part of the preppy aesthetic’s appeal is its association with privilege and exclusivity. These fonts can make designs feel more premium and aspirational. Quality and Craftsmanship: The careful attention to typographic detail in preppy fonts suggests similar attention to quality in whatever they’re representing. Modern Takes on Classic Preppy Style While preppy fonts are rooted in tradition, the best designers know how to give them contemporary flair. Here are some ways to modernize preppy typography: Unexpected Color Palettes: Pair traditional preppy fonts with modern colors. Think sage green and cream instead of navy and white, or soft blush tones for a fresh take. Generous White Space: Give your preppy fonts room to breathe with plenty of white space. This modern approach to layout keeps traditional fonts feeling fresh and uncluttered. Mixed Media Integration: Combine preppy typography with photography, illustrations, or graphic elements for a more contemporary feel while maintaining that sophisticated foundation. Strategic Contrast: Pair your refined preppy fonts with unexpected elements – maybe a bold geometric shape or modern photography – to create dynamic tension. Preppy Font Alternatives for Every Budget Not every preppy project has a premium font budget, and that’s okay! Here are some strategies for achieving that coveted preppy look without breaking the bank: Google Fonts Gems: Fonts like Playfair Display, Crimson Text, and Libre Baskerville offer sophisticated serif options that can work beautifully for preppy designs. Font Pairing Magic: Sometimes combining two free fonts thoughtfully can create a more expensive-looking result than using a single premium font poorly. Focus on Execution: A free font used with excellent spacing, hierarchy, and layout will always look better than an expensive font used carelessly. Common Preppy Font Mistakes to Avoid Even with the perfect preppy font, poor execution can ruin the effect. Here are the most common mistakes I see designers make: Overdoing the Decoration: Just because a font has elegant details doesn’t mean you need to add more flourishes. Let the typeface’s inherent sophistication speak for itself. Ignoring Hierarchy: Preppy design relies on clear, elegant hierarchy. Don’t make everything the same size or weight – create visual flow through thoughtful typography scaling. Poor Spacing: Cramped text kills the elegant feel of preppy fonts. Give your typography generous leading and appropriate margins. Wrong Context: Using an ultra-formal preppy font for a casual pizza restaurant’s menu will feel jarring and inappropriate. Match your font choice to your content and audience. The Future of Preppy Typography As we look ahead in 2025, preppy fonts continue to evolve while maintaining their classic appeal. We’re seeing interesting trends emerge: Variable Font Technology: Modern preppy fonts are increasingly available as variable fonts, allowing designers to fine-tune weight, width, and optical size for perfect customization. Screen Optimization: Classic preppy fonts are being redrawn and optimized for digital screens without losing their traditional charm. Inclusive Preppy: Designers are expanding the preppy aesthetic beyond its traditional boundaries, creating fonts that maintain sophistication while feeling more accessible and diverse. Sustainable Design: The timeless nature of preppy fonts aligns perfectly with sustainable design principles – these typefaces won’t look dated next year, making them environmentally responsible choices. Conclusion: Embracing Timeless Elegance Preppy fonts represent more than just letterforms – they’re a gateway to timeless elegance and sophisticated communication. Whether you’re designing wedding invitations for a Martha’s Vineyard ceremony or creating brand identity for a boutique law firm, the right preppy font can elevate your work from merely professional to genuinely distinguished. The beauty of preppy typography lies in its ability to feel both traditional and fresh, formal yet approachable. These fonts have stood the test of time because they tap into something fundamental about how we perceive quality, tradition, and sophistication. As you explore the world of preppy fonts, remember that the best typography choices support your message rather than overshadowing it. Choose fonts that enhance your content’s inherent qualities and speak to your audience’s aspirations and values. So whether you’re channeling that old-money aesthetic or simply want to add a touch of refined elegance to your designs, preppy fonts offer a wealth of possibilities. After all, good typography, like good manners, never goes out of style.
    Like
    Love
    Wow
    Sad
    Angry
    518
    0 Comments 0 Shares
  • The Best Hidden-Gem Etsy Shops for Fans of Farmhouse Style

    Becky Luigart-Stayner for Country LivingCountry Living editors select each product featured. If you buy from a link, we may earn a commission. Why Trust Us?Like a well-made quilt, a classic farmhouse aesthetic comes together gradually—a little bit of this, a touch of that. Each addition is purposeful and personal—and isn’t that what home is all about, really? If this type of slowed-down style speaks to you, you're probably already well aware that Etsy is a treasure trove of finds both new and old to fit your timeless farmhouse aesthetic. But with more than eight million active sellers on its marketplace, sometimes the possibilities—vintage feed sacks! primitive pie safes! galvanized grain scoops!—can quickly go from enticing to overwhelming.To better guide your search for the finest farmhouse furnishings, we’ve gathered a go-to list of editor-and designer-beloved Etsy shops which, time and again, turn out hardworking, homespun pieces of heirloom quality. From beautiful antique bureaus to hand-block-printed table linens, the character-rich wares from these sellers will help you design the farmhouse of your dreams, piece by precious piece. Related Stories For Antique AmericanaAcorn and Alice Every good old-fashioned farmhouse could use some traditional Americana to set the tone, and this Pennsylvania salvage shop offers rustic touches loaded with authentic antique allure. Aged wooden wares abound, as well as a grab bag of cotton and burlap feed sacks, perfect for framing as sets or crafting into footstool covers or throw pillows. For French Country TextilesForest and LinenThere’s nothing quite like breezy natural fabrics to make you want to throw open all the windows and let that country air in while the pie cools. Unfussy and lightweight, the hand-crafted curtains, bedding, and table linens from these Lithuanian textile experts have a classic understated quality that would be right at home in the coziest guest room or most bustling kitchen. Warm, welcoming hues range from marigold yellow to cornflower blue, but soft gingham checkers and timeless French ticking feel especially farm-fresh. Our current favorite? These cherry-striped country cafe curtains. Becky Luigart-Stayner for Country LivingVintage red torchons feel right at home in a farmhouse kitchenFor Rustic RugsOld New HouseWhether or not you’re lucky enough to have gorgeous wide-plank floors, an antique area rug or runner can work wonders for giving a room instant character and warmth. This fifth-generation family-run retailer specializes in importing heirloom hand-knotted carpets dating back to the 1800s, with a focus on traditional designs from the masters in Turkey, India, Persia, and more. Their vast variety of sizes and styles offers something for every aesthetic, with one-of-a-kind patterns ranging from distressed neutrals to chain-stitched florals to ornate arabesques. For Pillows and ProvisionsHabitation BohemeIn true farmhouse fashion, this Indiana shop has curated an enticing blend of handcrafted and vintage homewares that work effortlessly well together. A line of cozy hand-stitched linen pillow coverssits prettily alongside a mix of found objects, from patinated brass candlesticks and etched cloisonné vases to sturdy stoneware crockery and woven wicker baskets. For Elegant Everyday DishwareConvivial ProductionSimple, yet undeniably stunning, the handcrafted dinnerware from this Missouri-based ceramist is designed with durability in mind. Produced in a single, time-tested shade of ivory white glaze, these practical stoneware cups, bowls, and plates make the perfect place settings for lively farm-to-table feasts with friends and family. Beautifully balancing softness and heft, each dish is meant to feel comfortable when being held and passed, but also to look attractive when stacked upon open shelving. For English Country Antiques1100 West Co.This Illinois antiques shop is stocked with all manner of versatile vintage vessels culled from the English countryside, from massive stoneware crocks to charming little escargot pots. Their collection of neutral containers can be adapted for nearly any provincial purpose, but we especially love their assortment of old advertising—from toothpaste pots to marmalade jars and ginger beer bottles galore—for a nice little nod to the quintessential country practice of repurposing what you’ve got. Brian Woodcock/Country LivingPretty English ironstone will always have our heart.For a Cozy GlowOlde Brick LightingConstructed by hand from cord to shade, the vintage-inspired lighting produced by this Pennsylvania retailer is a tribute to the iconic quality and character of old American fixtures. Nostalgic design elements include hand-blown glassand finishes ranging from matte black to brushed nickel and antique brass. To create an authentic farmhouse ambiance, check out their gooseneck sconces, enameled red and blue barn lights, and milky white striped schoolhouse flush mounts. For Enduring ArtifactsThrough the PortholeThe weathered, artisan-made wares curated by this California husband-and-wife duo have been hand-selected from around the globe for their time-etched character. From gorgeous gray-black terracotta vases and rust-colored Turkish clay pots to patinated brass cow bells and rustic reclaimed elm stools, each item is a testament to the lasting beauty of classic materials, with storied sun-bleaching and scratches befitting the most beloved, lived-in rooms. For Winsome Wall ArtEugenia Ciotola ArtThrough graceful brushstrokes and textural swirls of paint, Maryland-based artist Eugenia Ciotola has captured the natural joy of a life that’s simple and sweet. Her pieces celebrate quiet scenes of bucolic beauty, from billowing bouquets of peonies to stoic red barns sitting in fields of wavy green. For a parlor gallery or gathering space, we gravitate toward her original oils on canvas—an impasto still life, perhaps, or a plainly frocked maiden carrying a bountiful bowl of lemons—while her stately farm animal portraitswould look lovely in a child’s nursery.For Time-Tested Storage SolutionsMaterials DivisionFunction is forefront for this farmhouse supplier operating out of New York, whose specialized selection of vintage provisions have lived out dutiful lives of purpose. Standouts include a curated offering of trusty antique tool boxes and sturdy steel-clad trunks whose rugged patina tells the story of many-a household project. Meanwhile, a hardworking mix of industrial wire and woven wood gathering baskets sits handsomely alongside heavy-duty galvanized garbage bins and antique fireplace andirons.For Pastoral PrimitivesComfort Work RoomFull of history and heritage, the old, hand-fabricated furnishings and primitive wooden tools in this unique Ukrainian antique shop are rural remnants of simpler times gone by. Quaint kitchen staples like chippy chiseled spoons, scoops, and cutting boards make an accessible entry point for the casual collector, while scuffed up dough troughs, butter churns, washboards, and barrels are highly desirable conversation pieces for any antique enthusiast who’s dedicated to authentic detail. Becky Luigart-Stayner for Country LivingAntique washboards make for on-theme wall art in a laundry roomFor Heirloom-Quality CoverletsBluegrass QuiltsNo layered farmhouse look would be complete without the homey, tactile touch of a hand-pieced quilt or two draped intentionally about the room. From harvest-hued sawtooth stars to playful patchwork pinwheels, each exquisite blanket from this Kentucky-based artisan is slow-crafted in traditional fashion from 100% cotton materials, and can even be custom stitched from scratch to match your personal color palette and decorative purpose. For a classic country aesthetic, try a log cabin, double diamond, or star patch pattern. For Hand-Crafted GiftsSelselaFeaturing a busy barnyard’s worth of plucky chickens, cuddly sheep, and happy little Holstein cows, this Illinois woodworker’s whimsical line of farm figurines and other giftable goodiesis chock-full of hand-carved charm. Crafted from 100% recycled birch and painted in loving detail, each creature has a deliberately rough-hewn look and feel worthy of any cozy and collected home. For Open-Concept CabinetryFolkhausA hallmark of many modern farmhouses, open-concept shelving has become a stylish way to show that the practical wares you use everyday are the same ones you’re proud to put on display. With their signature line of bracketed wall shelves, Shaker-style peg shelves, and raw steel kitchen rails, the team at Folkhaus has created a range of open storage solutions that beautifully balances elevated design and rustic utility. Rounding out their collection is a selection of open-shelved accent pieces like bookcases, benches, and console tables—each crafted from character-rich kiln-dried timber and finished in your choice of stain.Related StoryFor Antique Farmhouse FurnitureCottage Treasures LVThe foundation of a well-furnished farmhouse often begins with a single prized piece. Whether it’s a slant-front desk, a primitive jelly cabinet, or a punched-tin pie safe, this established New York-based dealer has a knack for sourcing vintage treasures with the personality and presence to anchor an entire space. Distressed cupboards and cabinets may be their bread and butterbut you’ll also find a robust roundup of weathered farm tables, Windsor chairs, and blanket chests—and currently, even a rare 1500s English bench. For Lively Table LinensMoontea StudioAs any devotee of slow decorating knows, sometimes it’s the little details that really bring a look home. For a spot of cheer along with your afternoon tea, we love the hand-stamped table linens from this Washington-based printmaker, which put a peppy, modern spin on farm-fresh produce. Patterned with lush illustrations of bright red tomatoes, crisp green apples, and golden sunflowers—then neatly finished with a color-coordinated hand-stitched trim—each tea towel, placemat, and napkin pays homage to the hours we spend doting over our gardens. For Traditional TransferwarePrior TimeThere’s lots to love about this Massachusetts antiques shop, which admittedly skews slightly cottagecorebut the standout, for us, is the seller’s superior selection of dinner and serving ware. In addition to a lovely lot of mottled white ironstone platters and pitchers, you’ll find a curated mix of Ridgeway and Wedgwood transferware dishes in not only classic cobalt blue, but beautiful browns, greens, and purples, too.Becky Luigart-Stayner for Country LivingPretty brown transferware could be yours with one quick "add to cart."For Folk Art for Your FloorsKinFolk ArtworkDesigned by a West Virginia watercolor and oils artist with a penchant for painting the past, these silky chenille floor mats feature an original cast of colonial characters and folksy scenes modeled after heirloom textiles from the 18th and 19th centuries. Expect lots of early American and patriotic motifs, including old-fashioned flags, Pennsylvania Dutch fraktur, equestrian vignettes, and colonial house samplers—each made to mimic a vintage hooked rug for that cozy, homespun feeling.For Historical ReproductionsSchooner Bay Co.Even in the most painstakingly appointed interior, buying antique originals isn’t always an option. And that’s where this trusted Pennsylvania-based retailer for historical reproductions comes in. Offering a colossal collection of framed art prints, decorative trays, and brass objects, these connoisseurs of the classics have decor for every old-timey aesthetic, whether it’s fox hunt prints for your cabin, Dutch landscapes for your cottage, or primitive animal portraits for your farmstead.For General Store StaplesFarmhouse EclecticsHand-plucked from New England antique shops, estate sales, and auctions, the salvaged sundries from this Massachusetts-based supplierare the type you might spy in an old country store—wooden crates emblazoned with the names of local dairies, antique apple baskets, seed displays, signs, and scales. Whether you’re setting up your farmstand or styling your entryway, you’ll have plenty of storage options and authentic accents to pick from here. Becky Luigart-Stayner for Country LivingSo many food scales, so little time.Related StoriesJackie BuddieJackie Buddie is a freelance writer with more than a decade of editorial experience covering lifestyle topics including home decor how-tos, fashion trend deep dives, seasonal gift guides, and in-depth profiles of artists and creatives around the globe. She holds a degree in journalism from the University of North Carolina at Chapel Hill and received her M.F.A. in creative writing from Boston University. Jackie is, among other things, a collector of curiosities, Catskills land caretaker, dabbling DIYer, day hiker, and mom. She lives in the hills of Bovina, New York, with her family and her sweet-as-pie rescue dog.
    #best #hiddengem #etsy #shops #fans
    The Best Hidden-Gem Etsy Shops for Fans of Farmhouse Style
    Becky Luigart-Stayner for Country LivingCountry Living editors select each product featured. If you buy from a link, we may earn a commission. Why Trust Us?Like a well-made quilt, a classic farmhouse aesthetic comes together gradually—a little bit of this, a touch of that. Each addition is purposeful and personal—and isn’t that what home is all about, really? If this type of slowed-down style speaks to you, you're probably already well aware that Etsy is a treasure trove of finds both new and old to fit your timeless farmhouse aesthetic. But with more than eight million active sellers on its marketplace, sometimes the possibilities—vintage feed sacks! primitive pie safes! galvanized grain scoops!—can quickly go from enticing to overwhelming.To better guide your search for the finest farmhouse furnishings, we’ve gathered a go-to list of editor-and designer-beloved Etsy shops which, time and again, turn out hardworking, homespun pieces of heirloom quality. From beautiful antique bureaus to hand-block-printed table linens, the character-rich wares from these sellers will help you design the farmhouse of your dreams, piece by precious piece. Related Stories For Antique AmericanaAcorn and Alice Every good old-fashioned farmhouse could use some traditional Americana to set the tone, and this Pennsylvania salvage shop offers rustic touches loaded with authentic antique allure. Aged wooden wares abound, as well as a grab bag of cotton and burlap feed sacks, perfect for framing as sets or crafting into footstool covers or throw pillows. For French Country TextilesForest and LinenThere’s nothing quite like breezy natural fabrics to make you want to throw open all the windows and let that country air in while the pie cools. Unfussy and lightweight, the hand-crafted curtains, bedding, and table linens from these Lithuanian textile experts have a classic understated quality that would be right at home in the coziest guest room or most bustling kitchen. Warm, welcoming hues range from marigold yellow to cornflower blue, but soft gingham checkers and timeless French ticking feel especially farm-fresh. Our current favorite? These cherry-striped country cafe curtains. Becky Luigart-Stayner for Country LivingVintage red torchons feel right at home in a farmhouse kitchenFor Rustic RugsOld New HouseWhether or not you’re lucky enough to have gorgeous wide-plank floors, an antique area rug or runner can work wonders for giving a room instant character and warmth. This fifth-generation family-run retailer specializes in importing heirloom hand-knotted carpets dating back to the 1800s, with a focus on traditional designs from the masters in Turkey, India, Persia, and more. Their vast variety of sizes and styles offers something for every aesthetic, with one-of-a-kind patterns ranging from distressed neutrals to chain-stitched florals to ornate arabesques. For Pillows and ProvisionsHabitation BohemeIn true farmhouse fashion, this Indiana shop has curated an enticing blend of handcrafted and vintage homewares that work effortlessly well together. A line of cozy hand-stitched linen pillow coverssits prettily alongside a mix of found objects, from patinated brass candlesticks and etched cloisonné vases to sturdy stoneware crockery and woven wicker baskets. For Elegant Everyday DishwareConvivial ProductionSimple, yet undeniably stunning, the handcrafted dinnerware from this Missouri-based ceramist is designed with durability in mind. Produced in a single, time-tested shade of ivory white glaze, these practical stoneware cups, bowls, and plates make the perfect place settings for lively farm-to-table feasts with friends and family. Beautifully balancing softness and heft, each dish is meant to feel comfortable when being held and passed, but also to look attractive when stacked upon open shelving. For English Country Antiques1100 West Co.This Illinois antiques shop is stocked with all manner of versatile vintage vessels culled from the English countryside, from massive stoneware crocks to charming little escargot pots. Their collection of neutral containers can be adapted for nearly any provincial purpose, but we especially love their assortment of old advertising—from toothpaste pots to marmalade jars and ginger beer bottles galore—for a nice little nod to the quintessential country practice of repurposing what you’ve got. Brian Woodcock/Country LivingPretty English ironstone will always have our heart.For a Cozy GlowOlde Brick LightingConstructed by hand from cord to shade, the vintage-inspired lighting produced by this Pennsylvania retailer is a tribute to the iconic quality and character of old American fixtures. Nostalgic design elements include hand-blown glassand finishes ranging from matte black to brushed nickel and antique brass. To create an authentic farmhouse ambiance, check out their gooseneck sconces, enameled red and blue barn lights, and milky white striped schoolhouse flush mounts. For Enduring ArtifactsThrough the PortholeThe weathered, artisan-made wares curated by this California husband-and-wife duo have been hand-selected from around the globe for their time-etched character. From gorgeous gray-black terracotta vases and rust-colored Turkish clay pots to patinated brass cow bells and rustic reclaimed elm stools, each item is a testament to the lasting beauty of classic materials, with storied sun-bleaching and scratches befitting the most beloved, lived-in rooms. For Winsome Wall ArtEugenia Ciotola ArtThrough graceful brushstrokes and textural swirls of paint, Maryland-based artist Eugenia Ciotola has captured the natural joy of a life that’s simple and sweet. Her pieces celebrate quiet scenes of bucolic beauty, from billowing bouquets of peonies to stoic red barns sitting in fields of wavy green. For a parlor gallery or gathering space, we gravitate toward her original oils on canvas—an impasto still life, perhaps, or a plainly frocked maiden carrying a bountiful bowl of lemons—while her stately farm animal portraitswould look lovely in a child’s nursery.For Time-Tested Storage SolutionsMaterials DivisionFunction is forefront for this farmhouse supplier operating out of New York, whose specialized selection of vintage provisions have lived out dutiful lives of purpose. Standouts include a curated offering of trusty antique tool boxes and sturdy steel-clad trunks whose rugged patina tells the story of many-a household project. Meanwhile, a hardworking mix of industrial wire and woven wood gathering baskets sits handsomely alongside heavy-duty galvanized garbage bins and antique fireplace andirons.For Pastoral PrimitivesComfort Work RoomFull of history and heritage, the old, hand-fabricated furnishings and primitive wooden tools in this unique Ukrainian antique shop are rural remnants of simpler times gone by. Quaint kitchen staples like chippy chiseled spoons, scoops, and cutting boards make an accessible entry point for the casual collector, while scuffed up dough troughs, butter churns, washboards, and barrels are highly desirable conversation pieces for any antique enthusiast who’s dedicated to authentic detail. Becky Luigart-Stayner for Country LivingAntique washboards make for on-theme wall art in a laundry roomFor Heirloom-Quality CoverletsBluegrass QuiltsNo layered farmhouse look would be complete without the homey, tactile touch of a hand-pieced quilt or two draped intentionally about the room. From harvest-hued sawtooth stars to playful patchwork pinwheels, each exquisite blanket from this Kentucky-based artisan is slow-crafted in traditional fashion from 100% cotton materials, and can even be custom stitched from scratch to match your personal color palette and decorative purpose. For a classic country aesthetic, try a log cabin, double diamond, or star patch pattern. For Hand-Crafted GiftsSelselaFeaturing a busy barnyard’s worth of plucky chickens, cuddly sheep, and happy little Holstein cows, this Illinois woodworker’s whimsical line of farm figurines and other giftable goodiesis chock-full of hand-carved charm. Crafted from 100% recycled birch and painted in loving detail, each creature has a deliberately rough-hewn look and feel worthy of any cozy and collected home. For Open-Concept CabinetryFolkhausA hallmark of many modern farmhouses, open-concept shelving has become a stylish way to show that the practical wares you use everyday are the same ones you’re proud to put on display. With their signature line of bracketed wall shelves, Shaker-style peg shelves, and raw steel kitchen rails, the team at Folkhaus has created a range of open storage solutions that beautifully balances elevated design and rustic utility. Rounding out their collection is a selection of open-shelved accent pieces like bookcases, benches, and console tables—each crafted from character-rich kiln-dried timber and finished in your choice of stain.Related StoryFor Antique Farmhouse FurnitureCottage Treasures LVThe foundation of a well-furnished farmhouse often begins with a single prized piece. Whether it’s a slant-front desk, a primitive jelly cabinet, or a punched-tin pie safe, this established New York-based dealer has a knack for sourcing vintage treasures with the personality and presence to anchor an entire space. Distressed cupboards and cabinets may be their bread and butterbut you’ll also find a robust roundup of weathered farm tables, Windsor chairs, and blanket chests—and currently, even a rare 1500s English bench. For Lively Table LinensMoontea StudioAs any devotee of slow decorating knows, sometimes it’s the little details that really bring a look home. For a spot of cheer along with your afternoon tea, we love the hand-stamped table linens from this Washington-based printmaker, which put a peppy, modern spin on farm-fresh produce. Patterned with lush illustrations of bright red tomatoes, crisp green apples, and golden sunflowers—then neatly finished with a color-coordinated hand-stitched trim—each tea towel, placemat, and napkin pays homage to the hours we spend doting over our gardens. For Traditional TransferwarePrior TimeThere’s lots to love about this Massachusetts antiques shop, which admittedly skews slightly cottagecorebut the standout, for us, is the seller’s superior selection of dinner and serving ware. In addition to a lovely lot of mottled white ironstone platters and pitchers, you’ll find a curated mix of Ridgeway and Wedgwood transferware dishes in not only classic cobalt blue, but beautiful browns, greens, and purples, too.Becky Luigart-Stayner for Country LivingPretty brown transferware could be yours with one quick "add to cart."For Folk Art for Your FloorsKinFolk ArtworkDesigned by a West Virginia watercolor and oils artist with a penchant for painting the past, these silky chenille floor mats feature an original cast of colonial characters and folksy scenes modeled after heirloom textiles from the 18th and 19th centuries. Expect lots of early American and patriotic motifs, including old-fashioned flags, Pennsylvania Dutch fraktur, equestrian vignettes, and colonial house samplers—each made to mimic a vintage hooked rug for that cozy, homespun feeling.For Historical ReproductionsSchooner Bay Co.Even in the most painstakingly appointed interior, buying antique originals isn’t always an option. And that’s where this trusted Pennsylvania-based retailer for historical reproductions comes in. Offering a colossal collection of framed art prints, decorative trays, and brass objects, these connoisseurs of the classics have decor for every old-timey aesthetic, whether it’s fox hunt prints for your cabin, Dutch landscapes for your cottage, or primitive animal portraits for your farmstead.For General Store StaplesFarmhouse EclecticsHand-plucked from New England antique shops, estate sales, and auctions, the salvaged sundries from this Massachusetts-based supplierare the type you might spy in an old country store—wooden crates emblazoned with the names of local dairies, antique apple baskets, seed displays, signs, and scales. Whether you’re setting up your farmstand or styling your entryway, you’ll have plenty of storage options and authentic accents to pick from here. Becky Luigart-Stayner for Country LivingSo many food scales, so little time.Related StoriesJackie BuddieJackie Buddie is a freelance writer with more than a decade of editorial experience covering lifestyle topics including home decor how-tos, fashion trend deep dives, seasonal gift guides, and in-depth profiles of artists and creatives around the globe. She holds a degree in journalism from the University of North Carolina at Chapel Hill and received her M.F.A. in creative writing from Boston University. Jackie is, among other things, a collector of curiosities, Catskills land caretaker, dabbling DIYer, day hiker, and mom. She lives in the hills of Bovina, New York, with her family and her sweet-as-pie rescue dog. #best #hiddengem #etsy #shops #fans
    WWW.COUNTRYLIVING.COM
    The Best Hidden-Gem Etsy Shops for Fans of Farmhouse Style
    Becky Luigart-Stayner for Country LivingCountry Living editors select each product featured. If you buy from a link, we may earn a commission. Why Trust Us?Like a well-made quilt, a classic farmhouse aesthetic comes together gradually—a little bit of this, a touch of that. Each addition is purposeful and personal—and isn’t that what home is all about, really? If this type of slowed-down style speaks to you, you're probably already well aware that Etsy is a treasure trove of finds both new and old to fit your timeless farmhouse aesthetic. But with more than eight million active sellers on its marketplace, sometimes the possibilities—vintage feed sacks! primitive pie safes! galvanized grain scoops!—can quickly go from enticing to overwhelming.To better guide your search for the finest farmhouse furnishings, we’ve gathered a go-to list of editor-and designer-beloved Etsy shops which, time and again, turn out hardworking, homespun pieces of heirloom quality. From beautiful antique bureaus to hand-block-printed table linens, the character-rich wares from these sellers will help you design the farmhouse of your dreams, piece by precious piece. Related Stories For Antique AmericanaAcorn and Alice Every good old-fashioned farmhouse could use some traditional Americana to set the tone, and this Pennsylvania salvage shop offers rustic touches loaded with authentic antique allure. Aged wooden wares abound (think vintage milk crates, orchard fruit baskets, and berry boxes), as well as a grab bag of cotton and burlap feed sacks, perfect for framing as sets or crafting into footstool covers or throw pillows. For French Country TextilesForest and LinenThere’s nothing quite like breezy natural fabrics to make you want to throw open all the windows and let that country air in while the pie cools. Unfussy and lightweight, the hand-crafted curtains, bedding, and table linens from these Lithuanian textile experts have a classic understated quality that would be right at home in the coziest guest room or most bustling kitchen. Warm, welcoming hues range from marigold yellow to cornflower blue, but soft gingham checkers and timeless French ticking feel especially farm-fresh. Our current favorite? These cherry-striped country cafe curtains. Becky Luigart-Stayner for Country LivingVintage red torchons feel right at home in a farmhouse kitchenFor Rustic RugsOld New HouseWhether or not you’re lucky enough to have gorgeous wide-plank floors, an antique area rug or runner can work wonders for giving a room instant character and warmth. This fifth-generation family-run retailer specializes in importing heirloom hand-knotted carpets dating back to the 1800s, with a focus on traditional designs from the masters in Turkey, India, Persia, and more. Their vast variety of sizes and styles offers something for every aesthetic, with one-of-a-kind patterns ranging from distressed neutrals to chain-stitched florals to ornate arabesques. For Pillows and ProvisionsHabitation BohemeIn true farmhouse fashion, this Indiana shop has curated an enticing blend of handcrafted and vintage homewares that work effortlessly well together. A line of cozy hand-stitched linen pillow covers (patterned with everything from block-printed blossoms to provincial pinstripes) sits prettily alongside a mix of found objects, from patinated brass candlesticks and etched cloisonné vases to sturdy stoneware crockery and woven wicker baskets. For Elegant Everyday DishwareConvivial ProductionSimple, yet undeniably stunning, the handcrafted dinnerware from this Missouri-based ceramist is designed with durability in mind. Produced in a single, time-tested shade of ivory white glaze, these practical stoneware cups, bowls, and plates make the perfect place settings for lively farm-to-table feasts with friends and family. Beautifully balancing softness and heft, each dish is meant to feel comfortable when being held and passed, but also to look attractive when stacked upon open shelving. For English Country Antiques1100 West Co.This Illinois antiques shop is stocked with all manner of versatile vintage vessels culled from the English countryside, from massive stoneware crocks to charming little escargot pots. Their collection of neutral containers can be adapted for nearly any provincial purpose (envision white ironstone pitchers piled high with fresh-picked hyacinths, or glass canning jars holding your harvest grains), but we especially love their assortment of old advertising—from toothpaste pots to marmalade jars and ginger beer bottles galore—for a nice little nod to the quintessential country practice of repurposing what you’ve got. Brian Woodcock/Country LivingPretty English ironstone will always have our heart.For a Cozy GlowOlde Brick LightingConstructed by hand from cord to shade, the vintage-inspired lighting produced by this Pennsylvania retailer is a tribute to the iconic quality and character of old American fixtures. Nostalgic design elements include hand-blown glass (crafted using cast-iron molds from over 80 years ago) and finishes ranging from matte black to brushed nickel and antique brass. To create an authentic farmhouse ambiance, check out their gooseneck sconces, enameled red and blue barn lights, and milky white striped schoolhouse flush mounts. For Enduring ArtifactsThrough the PortholeThe weathered, artisan-made wares curated by this California husband-and-wife duo have been hand-selected from around the globe for their time-etched character. From gorgeous gray-black terracotta vases and rust-colored Turkish clay pots to patinated brass cow bells and rustic reclaimed elm stools, each item is a testament to the lasting beauty of classic materials, with storied sun-bleaching and scratches befitting the most beloved, lived-in rooms. For Winsome Wall ArtEugenia Ciotola ArtThrough graceful brushstrokes and textural swirls of paint, Maryland-based artist Eugenia Ciotola has captured the natural joy of a life that’s simple and sweet. Her pieces celebrate quiet scenes of bucolic beauty, from billowing bouquets of peonies to stoic red barns sitting in fields of wavy green. For a parlor gallery or gathering space, we gravitate toward her original oils on canvas—an impasto still life, perhaps, or a plainly frocked maiden carrying a bountiful bowl of lemons—while her stately farm animal portraits (regal roosters! ruff collared geese!) would look lovely in a child’s nursery.For Time-Tested Storage SolutionsMaterials DivisionFunction is forefront for this farmhouse supplier operating out of New York, whose specialized selection of vintage provisions have lived out dutiful lives of purpose. Standouts include a curated offering of trusty antique tool boxes and sturdy steel-clad trunks whose rugged patina tells the story of many-a household project. Meanwhile, a hardworking mix of industrial wire and woven wood gathering baskets sits handsomely alongside heavy-duty galvanized garbage bins and antique fireplace andirons.For Pastoral PrimitivesComfort Work RoomFull of history and heritage, the old, hand-fabricated furnishings and primitive wooden tools in this unique Ukrainian antique shop are rural remnants of simpler times gone by. Quaint kitchen staples like chippy chiseled spoons, scoops, and cutting boards make an accessible entry point for the casual collector, while scuffed up dough troughs, butter churns, washboards, and barrels are highly desirable conversation pieces for any antique enthusiast who’s dedicated to authentic detail. Becky Luigart-Stayner for Country LivingAntique washboards make for on-theme wall art in a laundry roomFor Heirloom-Quality CoverletsBluegrass QuiltsNo layered farmhouse look would be complete without the homey, tactile touch of a hand-pieced quilt or two draped intentionally about the room. From harvest-hued sawtooth stars to playful patchwork pinwheels, each exquisite blanket from this Kentucky-based artisan is slow-crafted in traditional fashion from 100% cotton materials, and can even be custom stitched from scratch to match your personal color palette and decorative purpose. For a classic country aesthetic, try a log cabin, double diamond, or star patch pattern. For Hand-Crafted GiftsSelselaFeaturing a busy barnyard’s worth of plucky chickens, cuddly sheep, and happy little Holstein cows, this Illinois woodworker’s whimsical line of farm figurines and other giftable goodies (think animal wine stoppers, keychains, fridge magnets, and cake toppers) is chock-full of hand-carved charm. Crafted from 100% recycled birch and painted in loving detail, each creature has a deliberately rough-hewn look and feel worthy of any cozy and collected home. For Open-Concept CabinetryFolkhausA hallmark of many modern farmhouses, open-concept shelving has become a stylish way to show that the practical wares you use everyday are the same ones you’re proud to put on display. With their signature line of bracketed wall shelves, Shaker-style peg shelves, and raw steel kitchen rails, the team at Folkhaus has created a range of open storage solutions that beautifully balances elevated design and rustic utility. Rounding out their collection is a selection of open-shelved accent pieces like bookcases, benches, and console tables—each crafted from character-rich kiln-dried timber and finished in your choice of stain.Related StoryFor Antique Farmhouse FurnitureCottage Treasures LVThe foundation of a well-furnished farmhouse often begins with a single prized piece. Whether it’s a slant-front desk, a primitive jelly cabinet, or a punched-tin pie safe, this established New York-based dealer has a knack for sourcing vintage treasures with the personality and presence to anchor an entire space. Distressed cupboards and cabinets may be their bread and butter (just look at this two-piece pine hutch!) but you’ll also find a robust roundup of weathered farm tables, Windsor chairs, and blanket chests—and currently, even a rare 1500s English bench. For Lively Table LinensMoontea StudioAs any devotee of slow decorating knows, sometimes it’s the little details that really bring a look home. For a spot of cheer along with your afternoon tea, we love the hand-stamped table linens from this Washington-based printmaker, which put a peppy, modern spin on farm-fresh produce. Patterned with lush illustrations of bright red tomatoes, crisp green apples, and golden sunflowers—then neatly finished with a color-coordinated hand-stitched trim—each tea towel, placemat, and napkin pays homage to the hours we spend doting over our gardens. For Traditional TransferwarePrior TimeThere’s lots to love about this Massachusetts antiques shop, which admittedly skews slightly cottagecore (the pink Baccarat perfume bottles! the hobnail milk glass vases! the huge primitive bread boards!) but the standout, for us, is the seller’s superior selection of dinner and serving ware. In addition to a lovely lot of mottled white ironstone platters and pitchers, you’ll find a curated mix of Ridgeway and Wedgwood transferware dishes in not only classic cobalt blue, but beautiful browns, greens, and purples, too.Becky Luigart-Stayner for Country LivingPretty brown transferware could be yours with one quick "add to cart."For Folk Art for Your FloorsKinFolk ArtworkDesigned by a West Virginia watercolor and oils artist with a penchant for painting the past, these silky chenille floor mats feature an original cast of colonial characters and folksy scenes modeled after heirloom textiles from the 18th and 19th centuries. Expect lots of early American and patriotic motifs, including old-fashioned flags, Pennsylvania Dutch fraktur, equestrian vignettes, and colonial house samplers—each made to mimic a vintage hooked rug for that cozy, homespun feeling. (We have to admit, the folk art-inspired cow and chicken is our favorite.)For Historical ReproductionsSchooner Bay Co.Even in the most painstakingly appointed interior, buying antique originals isn’t always an option (don’t ask how many times we’ve been outbid at an estate auction). And that’s where this trusted Pennsylvania-based retailer for historical reproductions comes in. Offering a colossal collection of framed art prints, decorative trays, and brass objects (think magnifying glasses, compasses, paperweights, and letter openers), these connoisseurs of the classics have decor for every old-timey aesthetic, whether it’s fox hunt prints for your cabin, Dutch landscapes for your cottage, or primitive animal portraits for your farmstead.For General Store StaplesFarmhouse EclecticsHand-plucked from New England antique shops, estate sales, and auctions, the salvaged sundries from this Massachusetts-based supplier (who grew up in an 1850s farmhouse himself) are the type you might spy in an old country store—wooden crates emblazoned with the names of local dairies, antique apple baskets, seed displays, signs, and scales. Whether you’re setting up your farmstand or styling your entryway, you’ll have plenty of storage options and authentic accents to pick from here. Becky Luigart-Stayner for Country LivingSo many food scales, so little time.Related StoriesJackie BuddieJackie Buddie is a freelance writer with more than a decade of editorial experience covering lifestyle topics including home decor how-tos, fashion trend deep dives, seasonal gift guides, and in-depth profiles of artists and creatives around the globe. She holds a degree in journalism from the University of North Carolina at Chapel Hill and received her M.F.A. in creative writing from Boston University. Jackie is, among other things, a collector of curiosities, Catskills land caretaker, dabbling DIYer, day hiker, and mom. She lives in the hills of Bovina, New York, with her family and her sweet-as-pie rescue dog.
    Like
    Love
    Wow
    Sad
    Angry
    603
    0 Comments 0 Shares
  • Why Designers Get Stuck In The Details And How To Stop

    You’ve drawn fifty versions of the same screen — and you still hate every one of them. Begrudgingly, you pick three, show them to your product manager, and hear: “Looks cool, but the idea doesn’t work.” Sound familiar?
    In this article, I’ll unpack why designers fall into detail work at the wrong moment, examining both process pitfalls and the underlying psychological reasons, as understanding these traps is the first step to overcoming them. I’ll also share tactics I use to climb out of that trap.
    Reason #1 You’re Afraid To Show Rough Work
    We designers worship detail. We’re taught that true craft equals razor‑sharp typography, perfect grids, and pixel precision. So the minute a task arrives, we pop open Figma and start polishing long before polish is needed.
    I’ve skipped the sketch phase more times than I care to admit. I told myself it would be faster, yet I always ended up spending hours producing a tidy mock‑up when a scribbled thumbnail would have sparked a five‑minute chat with my product manager. Rough sketches felt “unprofessional,” so I hid them.
    The cost? Lost time, wasted energy — and, by the third redo, teammates were quietly wondering if I even understood the brief.
    The real problem here is the habit: we open Figma and start perfecting the UI before we’ve even solved the problem.
    So why do we hide these rough sketches? It’s not just a bad habit or plain silly. There are solid psychological reasons behind it. We often just call it perfectionism, but it’s deeper than wanting things neat. Digging into the psychologyshows there are a couple of flavors driving this:

    Socially prescribed perfectionismIt’s that nagging feeling that everyone else expects perfect work from you, which makes showing anything rough feel like walking into the lion’s den.
    Self-oriented perfectionismWhere you’re the one setting impossibly high standards for yourself, leading to brutal self-criticism if anything looks slightly off.

    Either way, the result’s the same: showing unfinished work feels wrong, and you miss out on that vital early feedback.
    Back to the design side, remember that clients rarely see architects’ first pencil sketches, but these sketches still exist; they guide structural choices before the 3D render. Treat your thumbnails the same way — artifacts meant to collapse uncertainty, not portfolio pieces. Once stakeholders see the upside, roughness becomes a badge of speed, not sloppiness. So, the key is to consciously make that shift:
    Treat early sketches as disposable tools for thinking and actively share them to get feedback faster.

    Reason #2: You Fix The Symptom, Not The Cause
    Before tackling any task, we need to understand what business outcome we’re aiming for. Product managers might come to us asking to enlarge the payment button in the shopping cart because users aren’t noticing it. The suggested solution itself isn’t necessarily bad, but before redesigning the button, we should ask, “What data suggests they aren’t noticing it?” Don’t get me wrong, I’m not saying you shouldn’t trust your product manager. On the contrary, these questions help ensure you’re on the same page and working with the same data.
    From my experience, here are several reasons why users might not be clicking that coveted button:

    Users don’t understand that this step is for payment.
    They understand it’s about payment but expect order confirmation first.
    Due to incorrect translation, users don’t understand what the button means.
    Lack of trust signals.
    Unexpected additional coststhat appear at this stage.
    Technical issues.

    Now, imagine you simply did what the manager suggested. Would you have solved the problem? Hardly.
    Moreover, the responsibility for the unresolved issue would fall on you, as the interface solution lies within the design domain. The product manager actually did their job correctly by identifying a problem: suspiciously, few users are clicking the button.
    Psychologically, taking on this bigger role isn’t easy. It means overcoming the fear of making mistakes and the discomfort of exploring unclear problems rather than just doing tasks. This shift means seeing ourselves as partners who create value — even if it means fighting a hesitation to question product managers— and understanding that using our product logic expertise proactively is crucial for modern designers.
    There’s another critical reason why we, designers, need to be a bit like product managers: the rise of AI. I deliberately used a simple example about enlarging a button, but I’m confident that in the near future, AI will easily handle routine design tasks. This worries me, but at the same time, I’m already gladly stepping into the product manager’s territory: understanding product and business metrics, formulating hypotheses, conducting research, and so on. It might sound like I’m taking work away from PMs, but believe me, they undoubtedly have enough on their plates and are usually more than happy to delegate some responsibilities to designers.
    Reason #3: You’re Solving The Wrong Problem
    Before solving anything, ask whether the problem even deserves your attention.
    During a major home‑screen redesign, our goal was to drive more users into paid services. The initial hypothesis — making service buttons bigger and brighter might help returning users — seemed reasonable enough to test. However, even when A/B testsshowed minimal impact, we continued to tweak those buttons.
    Only later did it click: the home screen isn’t the place to sell; visitors open the app to start, not to buy. We removed that promo block, and nothing broke. Contextual entry points deeper into the journey performed brilliantly. Lesson learned:
    Without the right context, any visual tweak is lipstick on a pig.

    Why did we get stuck polishing buttons instead of stopping sooner? It’s easy to get tunnel vision. Psychologically, it’s likely the good old sunk cost fallacy kicking in: we’d already invested time in the buttons, so stopping felt like wasting that effort, even though the data wasn’t promising.
    It’s just easier to keep fiddling with something familiar than to admit we need a new plan. Perhaps the simple question I should have asked myself when results stalled was: “Are we optimizing the right thing or just polishing something that fundamentally doesn’t fit the user’s primary goal here?” That alone might have saved hours.
    Reason #4: You’re Drowning In Unactionable Feedback
    We all discuss our work with colleagues. But here’s a crucial point: what kind of question do you pose to kick off that discussion? If your go-to is “What do you think?” well, that question might lead you down a rabbit hole of personal opinions rather than actionable insights. While experienced colleagues will cut through the noise, others, unsure what to evaluate, might comment on anything and everything — fonts, button colors, even when you desperately need to discuss a user flow.
    What matters here are two things:

    The question you ask,
    The context you give.

    That means clearly stating the problem, what you’ve learned, and how your idea aims to fix it.
    For instance:
    “The problem is our payment conversion rate has dropped by X%. I’ve interviewed users and found they abandon payment because they don’t understand how the total amount is calculated. My solution is to show a detailed cost breakdown. Do you think this actually solves the problem for them?”

    Here, you’ve stated the problem, shared your insight, explained your solution, and asked a direct question. It’s even better if you prepare a list of specific sub-questions. For instance: “Are all items in the cost breakdown clear?” or “Does the placement of this breakdown feel intuitive within the payment flow?”
    Another good habit is to keep your rough sketches and previous iterations handy. Some of your colleagues’ suggestions might be things you’ve already tried. It’s great if you can discuss them immediately to either revisit those ideas or definitively set them aside.
    I’m not a psychologist, but experience tells me that, psychologically, the reluctance to be this specific often stems from a fear of our solution being rejected. We tend to internalize feedback: a seemingly innocent comment like, “Have you considered other ways to organize this section?” or “Perhaps explore a different structure for this part?” can instantly morph in our minds into “You completely messed up the structure. You’re a bad designer.” Imposter syndrome, in all its glory.
    So, to wrap up this point, here are two recommendations:

    Prepare for every design discussion.A couple of focused questions will yield far more valuable input than a vague “So, what do you think?”.
    Actively work on separating feedback on your design from your self-worth.If a mistake is pointed out, acknowledge it, learn from it, and you’ll be less likely to repeat it. This is often easier said than done. For me, it took years of working with a psychotherapist. If you struggle with this, I sincerely wish you strength in overcoming it.

    Reason #5 You’re Just Tired
    Sometimes, the issue isn’t strategic at all — it’s fatigue. Fussing over icon corners can feel like a cozy bunker when your brain is fried. There’s a name for this: decision fatigue. Basically, your brain’s battery for hard thinking is low, so it hides out in the easy, comfy zone of pixel-pushing.
    A striking example comes from a New York Times article titled “Do You Suffer From Decision Fatigue?.” It described how judges deciding on release requests were far more likely to grant release early in the daycompared to late in the daysimply because their decision-making energy was depleted. Luckily, designers rarely hold someone’s freedom in their hands, but the example dramatically shows how fatigue can impact our judgment and productivity.
    What helps here:

    Swap tasks.Trade tickets with another designer; novelty resets your focus.
    Talk to another designer.If NDA permits, ask peers outside the team for a sanity check.
    Step away.Even a ten‑minute walk can do more than a double‑shot espresso.

    By the way, I came up with these ideas while walking around my office. I was lucky to work near a river, and those short walks quickly turned into a helpful habit.

    And one more trick that helps me snap out of detail mode early: if I catch myself making around 20 little tweaks — changing font weight, color, border radius — I just stop. Over time, it turned into a habit. I have a similar one with Instagram: by the third reel, my brain quietly asks, “Wait, weren’t we working?” Funny how that kind of nudge saves a ton of time.
    Four Steps I Use to Avoid Drowning In Detail
    Knowing these potential traps, here’s the practical process I use to stay on track:
    1. Define the Core Problem & Business Goal
    Before anything, dig deep: what’s the actual problem we’re solving, not just the requested task or a surface-level symptom? Ask ‘why’ repeatedly. What user pain or business need are we addressing? Then, state the clear business goal: “What metric am I moving, and do we have data to prove this is the right lever?” If retention is the goal, decide whether push reminders, gamification, or personalised content is the best route. The wrong lever, or tackling a symptom instead of the cause, dooms everything downstream.
    2. Choose the MechanicOnce the core problem and goal are clear, lock the solution principle or ‘mechanic’ first. Going with a game layer? Decide if it’s leaderboards, streaks, or badges. Write it down. Then move on. No UI yet. This keeps the focus high-level before diving into pixels.
    3. Wireframe the Flow & Get Focused Feedback
    Now open Figma. Map screens, layout, and transitions. Boxes and arrows are enough. Keep the fidelity low so the discussion stays on the flow, not colour. Crucially, when you share these early wires, ask specific questions and provide clear contextto get actionable feedback, not just vague opinions.
    4. Polish the VisualsI only let myself tweak grids, type scales, and shadows after the flow is validated. If progress stalls, or before a major polish effort, I surface the work in a design critique — again using targeted questions and clear context — instead of hiding in version 47. This ensures detailing serves the now-validated solution.
    Even for something as small as a single button, running these four checkpoints takes about ten minutes and saves hours of decorative dithering.
    Wrapping Up
    Next time you feel the pull to vanish into mock‑ups before the problem is nailed down, pause and ask what you might be avoiding. Yes, that can expose an uncomfortable truth. But pausing to ask what you might be avoiding — maybe the fuzzy core problem, or just asking for tough feedback — gives you the power to face the real issue head-on. It keeps the project focused on solving the right problem, not just perfecting a flawed solution.
    Attention to detail is a superpower when used at the right moment. Obsessing over pixels too soon, though, is a bad habit and a warning light telling us the process needs a rethink.
    #why #designers #get #stuck #details
    Why Designers Get Stuck In The Details And How To Stop
    You’ve drawn fifty versions of the same screen — and you still hate every one of them. Begrudgingly, you pick three, show them to your product manager, and hear: “Looks cool, but the idea doesn’t work.” Sound familiar? In this article, I’ll unpack why designers fall into detail work at the wrong moment, examining both process pitfalls and the underlying psychological reasons, as understanding these traps is the first step to overcoming them. I’ll also share tactics I use to climb out of that trap. Reason #1 You’re Afraid To Show Rough Work We designers worship detail. We’re taught that true craft equals razor‑sharp typography, perfect grids, and pixel precision. So the minute a task arrives, we pop open Figma and start polishing long before polish is needed. I’ve skipped the sketch phase more times than I care to admit. I told myself it would be faster, yet I always ended up spending hours producing a tidy mock‑up when a scribbled thumbnail would have sparked a five‑minute chat with my product manager. Rough sketches felt “unprofessional,” so I hid them. The cost? Lost time, wasted energy — and, by the third redo, teammates were quietly wondering if I even understood the brief. The real problem here is the habit: we open Figma and start perfecting the UI before we’ve even solved the problem. So why do we hide these rough sketches? It’s not just a bad habit or plain silly. There are solid psychological reasons behind it. We often just call it perfectionism, but it’s deeper than wanting things neat. Digging into the psychologyshows there are a couple of flavors driving this: Socially prescribed perfectionismIt’s that nagging feeling that everyone else expects perfect work from you, which makes showing anything rough feel like walking into the lion’s den. Self-oriented perfectionismWhere you’re the one setting impossibly high standards for yourself, leading to brutal self-criticism if anything looks slightly off. Either way, the result’s the same: showing unfinished work feels wrong, and you miss out on that vital early feedback. Back to the design side, remember that clients rarely see architects’ first pencil sketches, but these sketches still exist; they guide structural choices before the 3D render. Treat your thumbnails the same way — artifacts meant to collapse uncertainty, not portfolio pieces. Once stakeholders see the upside, roughness becomes a badge of speed, not sloppiness. So, the key is to consciously make that shift: Treat early sketches as disposable tools for thinking and actively share them to get feedback faster. Reason #2: You Fix The Symptom, Not The Cause Before tackling any task, we need to understand what business outcome we’re aiming for. Product managers might come to us asking to enlarge the payment button in the shopping cart because users aren’t noticing it. The suggested solution itself isn’t necessarily bad, but before redesigning the button, we should ask, “What data suggests they aren’t noticing it?” Don’t get me wrong, I’m not saying you shouldn’t trust your product manager. On the contrary, these questions help ensure you’re on the same page and working with the same data. From my experience, here are several reasons why users might not be clicking that coveted button: Users don’t understand that this step is for payment. They understand it’s about payment but expect order confirmation first. Due to incorrect translation, users don’t understand what the button means. Lack of trust signals. Unexpected additional coststhat appear at this stage. Technical issues. Now, imagine you simply did what the manager suggested. Would you have solved the problem? Hardly. Moreover, the responsibility for the unresolved issue would fall on you, as the interface solution lies within the design domain. The product manager actually did their job correctly by identifying a problem: suspiciously, few users are clicking the button. Psychologically, taking on this bigger role isn’t easy. It means overcoming the fear of making mistakes and the discomfort of exploring unclear problems rather than just doing tasks. This shift means seeing ourselves as partners who create value — even if it means fighting a hesitation to question product managers— and understanding that using our product logic expertise proactively is crucial for modern designers. There’s another critical reason why we, designers, need to be a bit like product managers: the rise of AI. I deliberately used a simple example about enlarging a button, but I’m confident that in the near future, AI will easily handle routine design tasks. This worries me, but at the same time, I’m already gladly stepping into the product manager’s territory: understanding product and business metrics, formulating hypotheses, conducting research, and so on. It might sound like I’m taking work away from PMs, but believe me, they undoubtedly have enough on their plates and are usually more than happy to delegate some responsibilities to designers. Reason #3: You’re Solving The Wrong Problem Before solving anything, ask whether the problem even deserves your attention. During a major home‑screen redesign, our goal was to drive more users into paid services. The initial hypothesis — making service buttons bigger and brighter might help returning users — seemed reasonable enough to test. However, even when A/B testsshowed minimal impact, we continued to tweak those buttons. Only later did it click: the home screen isn’t the place to sell; visitors open the app to start, not to buy. We removed that promo block, and nothing broke. Contextual entry points deeper into the journey performed brilliantly. Lesson learned: Without the right context, any visual tweak is lipstick on a pig. Why did we get stuck polishing buttons instead of stopping sooner? It’s easy to get tunnel vision. Psychologically, it’s likely the good old sunk cost fallacy kicking in: we’d already invested time in the buttons, so stopping felt like wasting that effort, even though the data wasn’t promising. It’s just easier to keep fiddling with something familiar than to admit we need a new plan. Perhaps the simple question I should have asked myself when results stalled was: “Are we optimizing the right thing or just polishing something that fundamentally doesn’t fit the user’s primary goal here?” That alone might have saved hours. Reason #4: You’re Drowning In Unactionable Feedback We all discuss our work with colleagues. But here’s a crucial point: what kind of question do you pose to kick off that discussion? If your go-to is “What do you think?” well, that question might lead you down a rabbit hole of personal opinions rather than actionable insights. While experienced colleagues will cut through the noise, others, unsure what to evaluate, might comment on anything and everything — fonts, button colors, even when you desperately need to discuss a user flow. What matters here are two things: The question you ask, The context you give. That means clearly stating the problem, what you’ve learned, and how your idea aims to fix it. For instance: “The problem is our payment conversion rate has dropped by X%. I’ve interviewed users and found they abandon payment because they don’t understand how the total amount is calculated. My solution is to show a detailed cost breakdown. Do you think this actually solves the problem for them?” Here, you’ve stated the problem, shared your insight, explained your solution, and asked a direct question. It’s even better if you prepare a list of specific sub-questions. For instance: “Are all items in the cost breakdown clear?” or “Does the placement of this breakdown feel intuitive within the payment flow?” Another good habit is to keep your rough sketches and previous iterations handy. Some of your colleagues’ suggestions might be things you’ve already tried. It’s great if you can discuss them immediately to either revisit those ideas or definitively set them aside. I’m not a psychologist, but experience tells me that, psychologically, the reluctance to be this specific often stems from a fear of our solution being rejected. We tend to internalize feedback: a seemingly innocent comment like, “Have you considered other ways to organize this section?” or “Perhaps explore a different structure for this part?” can instantly morph in our minds into “You completely messed up the structure. You’re a bad designer.” Imposter syndrome, in all its glory. So, to wrap up this point, here are two recommendations: Prepare for every design discussion.A couple of focused questions will yield far more valuable input than a vague “So, what do you think?”. Actively work on separating feedback on your design from your self-worth.If a mistake is pointed out, acknowledge it, learn from it, and you’ll be less likely to repeat it. This is often easier said than done. For me, it took years of working with a psychotherapist. If you struggle with this, I sincerely wish you strength in overcoming it. Reason #5 You’re Just Tired Sometimes, the issue isn’t strategic at all — it’s fatigue. Fussing over icon corners can feel like a cozy bunker when your brain is fried. There’s a name for this: decision fatigue. Basically, your brain’s battery for hard thinking is low, so it hides out in the easy, comfy zone of pixel-pushing. A striking example comes from a New York Times article titled “Do You Suffer From Decision Fatigue?.” It described how judges deciding on release requests were far more likely to grant release early in the daycompared to late in the daysimply because their decision-making energy was depleted. Luckily, designers rarely hold someone’s freedom in their hands, but the example dramatically shows how fatigue can impact our judgment and productivity. What helps here: Swap tasks.Trade tickets with another designer; novelty resets your focus. Talk to another designer.If NDA permits, ask peers outside the team for a sanity check. Step away.Even a ten‑minute walk can do more than a double‑shot espresso. By the way, I came up with these ideas while walking around my office. I was lucky to work near a river, and those short walks quickly turned into a helpful habit. And one more trick that helps me snap out of detail mode early: if I catch myself making around 20 little tweaks — changing font weight, color, border radius — I just stop. Over time, it turned into a habit. I have a similar one with Instagram: by the third reel, my brain quietly asks, “Wait, weren’t we working?” Funny how that kind of nudge saves a ton of time. Four Steps I Use to Avoid Drowning In Detail Knowing these potential traps, here’s the practical process I use to stay on track: 1. Define the Core Problem & Business Goal Before anything, dig deep: what’s the actual problem we’re solving, not just the requested task or a surface-level symptom? Ask ‘why’ repeatedly. What user pain or business need are we addressing? Then, state the clear business goal: “What metric am I moving, and do we have data to prove this is the right lever?” If retention is the goal, decide whether push reminders, gamification, or personalised content is the best route. The wrong lever, or tackling a symptom instead of the cause, dooms everything downstream. 2. Choose the MechanicOnce the core problem and goal are clear, lock the solution principle or ‘mechanic’ first. Going with a game layer? Decide if it’s leaderboards, streaks, or badges. Write it down. Then move on. No UI yet. This keeps the focus high-level before diving into pixels. 3. Wireframe the Flow & Get Focused Feedback Now open Figma. Map screens, layout, and transitions. Boxes and arrows are enough. Keep the fidelity low so the discussion stays on the flow, not colour. Crucially, when you share these early wires, ask specific questions and provide clear contextto get actionable feedback, not just vague opinions. 4. Polish the VisualsI only let myself tweak grids, type scales, and shadows after the flow is validated. If progress stalls, or before a major polish effort, I surface the work in a design critique — again using targeted questions and clear context — instead of hiding in version 47. This ensures detailing serves the now-validated solution. Even for something as small as a single button, running these four checkpoints takes about ten minutes and saves hours of decorative dithering. Wrapping Up Next time you feel the pull to vanish into mock‑ups before the problem is nailed down, pause and ask what you might be avoiding. Yes, that can expose an uncomfortable truth. But pausing to ask what you might be avoiding — maybe the fuzzy core problem, or just asking for tough feedback — gives you the power to face the real issue head-on. It keeps the project focused on solving the right problem, not just perfecting a flawed solution. Attention to detail is a superpower when used at the right moment. Obsessing over pixels too soon, though, is a bad habit and a warning light telling us the process needs a rethink. #why #designers #get #stuck #details
    SMASHINGMAGAZINE.COM
    Why Designers Get Stuck In The Details And How To Stop
    You’ve drawn fifty versions of the same screen — and you still hate every one of them. Begrudgingly, you pick three, show them to your product manager, and hear: “Looks cool, but the idea doesn’t work.” Sound familiar? In this article, I’ll unpack why designers fall into detail work at the wrong moment, examining both process pitfalls and the underlying psychological reasons, as understanding these traps is the first step to overcoming them. I’ll also share tactics I use to climb out of that trap. Reason #1 You’re Afraid To Show Rough Work We designers worship detail. We’re taught that true craft equals razor‑sharp typography, perfect grids, and pixel precision. So the minute a task arrives, we pop open Figma and start polishing long before polish is needed. I’ve skipped the sketch phase more times than I care to admit. I told myself it would be faster, yet I always ended up spending hours producing a tidy mock‑up when a scribbled thumbnail would have sparked a five‑minute chat with my product manager. Rough sketches felt “unprofessional,” so I hid them. The cost? Lost time, wasted energy — and, by the third redo, teammates were quietly wondering if I even understood the brief. The real problem here is the habit: we open Figma and start perfecting the UI before we’ve even solved the problem. So why do we hide these rough sketches? It’s not just a bad habit or plain silly. There are solid psychological reasons behind it. We often just call it perfectionism, but it’s deeper than wanting things neat. Digging into the psychology (like the research by Hewitt and Flett) shows there are a couple of flavors driving this: Socially prescribed perfectionismIt’s that nagging feeling that everyone else expects perfect work from you, which makes showing anything rough feel like walking into the lion’s den. Self-oriented perfectionismWhere you’re the one setting impossibly high standards for yourself, leading to brutal self-criticism if anything looks slightly off. Either way, the result’s the same: showing unfinished work feels wrong, and you miss out on that vital early feedback. Back to the design side, remember that clients rarely see architects’ first pencil sketches, but these sketches still exist; they guide structural choices before the 3D render. Treat your thumbnails the same way — artifacts meant to collapse uncertainty, not portfolio pieces. Once stakeholders see the upside, roughness becomes a badge of speed, not sloppiness. So, the key is to consciously make that shift: Treat early sketches as disposable tools for thinking and actively share them to get feedback faster. Reason #2: You Fix The Symptom, Not The Cause Before tackling any task, we need to understand what business outcome we’re aiming for. Product managers might come to us asking to enlarge the payment button in the shopping cart because users aren’t noticing it. The suggested solution itself isn’t necessarily bad, but before redesigning the button, we should ask, “What data suggests they aren’t noticing it?” Don’t get me wrong, I’m not saying you shouldn’t trust your product manager. On the contrary, these questions help ensure you’re on the same page and working with the same data. From my experience, here are several reasons why users might not be clicking that coveted button: Users don’t understand that this step is for payment. They understand it’s about payment but expect order confirmation first. Due to incorrect translation, users don’t understand what the button means. Lack of trust signals (no security icons, unclear seller information). Unexpected additional costs (hidden fees, shipping) that appear at this stage. Technical issues (inactive button, page freezing). Now, imagine you simply did what the manager suggested. Would you have solved the problem? Hardly. Moreover, the responsibility for the unresolved issue would fall on you, as the interface solution lies within the design domain. The product manager actually did their job correctly by identifying a problem: suspiciously, few users are clicking the button. Psychologically, taking on this bigger role isn’t easy. It means overcoming the fear of making mistakes and the discomfort of exploring unclear problems rather than just doing tasks. This shift means seeing ourselves as partners who create value — even if it means fighting a hesitation to question product managers (which might come from a fear of speaking up or a desire to avoid challenging authority) — and understanding that using our product logic expertise proactively is crucial for modern designers. There’s another critical reason why we, designers, need to be a bit like product managers: the rise of AI. I deliberately used a simple example about enlarging a button, but I’m confident that in the near future, AI will easily handle routine design tasks. This worries me, but at the same time, I’m already gladly stepping into the product manager’s territory: understanding product and business metrics, formulating hypotheses, conducting research, and so on. It might sound like I’m taking work away from PMs, but believe me, they undoubtedly have enough on their plates and are usually more than happy to delegate some responsibilities to designers. Reason #3: You’re Solving The Wrong Problem Before solving anything, ask whether the problem even deserves your attention. During a major home‑screen redesign, our goal was to drive more users into paid services. The initial hypothesis — making service buttons bigger and brighter might help returning users — seemed reasonable enough to test. However, even when A/B tests (a method of comparing two versions of a design to determine which performs better) showed minimal impact, we continued to tweak those buttons. Only later did it click: the home screen isn’t the place to sell; visitors open the app to start, not to buy. We removed that promo block, and nothing broke. Contextual entry points deeper into the journey performed brilliantly. Lesson learned: Without the right context, any visual tweak is lipstick on a pig. Why did we get stuck polishing buttons instead of stopping sooner? It’s easy to get tunnel vision. Psychologically, it’s likely the good old sunk cost fallacy kicking in: we’d already invested time in the buttons, so stopping felt like wasting that effort, even though the data wasn’t promising. It’s just easier to keep fiddling with something familiar than to admit we need a new plan. Perhaps the simple question I should have asked myself when results stalled was: “Are we optimizing the right thing or just polishing something that fundamentally doesn’t fit the user’s primary goal here?” That alone might have saved hours. Reason #4: You’re Drowning In Unactionable Feedback We all discuss our work with colleagues. But here’s a crucial point: what kind of question do you pose to kick off that discussion? If your go-to is “What do you think?” well, that question might lead you down a rabbit hole of personal opinions rather than actionable insights. While experienced colleagues will cut through the noise, others, unsure what to evaluate, might comment on anything and everything — fonts, button colors, even when you desperately need to discuss a user flow. What matters here are two things: The question you ask, The context you give. That means clearly stating the problem, what you’ve learned, and how your idea aims to fix it. For instance: “The problem is our payment conversion rate has dropped by X%. I’ve interviewed users and found they abandon payment because they don’t understand how the total amount is calculated. My solution is to show a detailed cost breakdown. Do you think this actually solves the problem for them?” Here, you’ve stated the problem (conversion drop), shared your insight (user confusion), explained your solution (cost breakdown), and asked a direct question. It’s even better if you prepare a list of specific sub-questions. For instance: “Are all items in the cost breakdown clear?” or “Does the placement of this breakdown feel intuitive within the payment flow?” Another good habit is to keep your rough sketches and previous iterations handy. Some of your colleagues’ suggestions might be things you’ve already tried. It’s great if you can discuss them immediately to either revisit those ideas or definitively set them aside. I’m not a psychologist, but experience tells me that, psychologically, the reluctance to be this specific often stems from a fear of our solution being rejected. We tend to internalize feedback: a seemingly innocent comment like, “Have you considered other ways to organize this section?” or “Perhaps explore a different structure for this part?” can instantly morph in our minds into “You completely messed up the structure. You’re a bad designer.” Imposter syndrome, in all its glory. So, to wrap up this point, here are two recommendations: Prepare for every design discussion.A couple of focused questions will yield far more valuable input than a vague “So, what do you think?”. Actively work on separating feedback on your design from your self-worth.If a mistake is pointed out, acknowledge it, learn from it, and you’ll be less likely to repeat it. This is often easier said than done. For me, it took years of working with a psychotherapist. If you struggle with this, I sincerely wish you strength in overcoming it. Reason #5 You’re Just Tired Sometimes, the issue isn’t strategic at all — it’s fatigue. Fussing over icon corners can feel like a cozy bunker when your brain is fried. There’s a name for this: decision fatigue. Basically, your brain’s battery for hard thinking is low, so it hides out in the easy, comfy zone of pixel-pushing. A striking example comes from a New York Times article titled “Do You Suffer From Decision Fatigue?.” It described how judges deciding on release requests were far more likely to grant release early in the day (about 70% of cases) compared to late in the day (less than 10%) simply because their decision-making energy was depleted. Luckily, designers rarely hold someone’s freedom in their hands, but the example dramatically shows how fatigue can impact our judgment and productivity. What helps here: Swap tasks.Trade tickets with another designer; novelty resets your focus. Talk to another designer.If NDA permits, ask peers outside the team for a sanity check. Step away.Even a ten‑minute walk can do more than a double‑shot espresso. By the way, I came up with these ideas while walking around my office. I was lucky to work near a river, and those short walks quickly turned into a helpful habit. And one more trick that helps me snap out of detail mode early: if I catch myself making around 20 little tweaks — changing font weight, color, border radius — I just stop. Over time, it turned into a habit. I have a similar one with Instagram: by the third reel, my brain quietly asks, “Wait, weren’t we working?” Funny how that kind of nudge saves a ton of time. Four Steps I Use to Avoid Drowning In Detail Knowing these potential traps, here’s the practical process I use to stay on track: 1. Define the Core Problem & Business Goal Before anything, dig deep: what’s the actual problem we’re solving, not just the requested task or a surface-level symptom? Ask ‘why’ repeatedly. What user pain or business need are we addressing? Then, state the clear business goal: “What metric am I moving, and do we have data to prove this is the right lever?” If retention is the goal, decide whether push reminders, gamification, or personalised content is the best route. The wrong lever, or tackling a symptom instead of the cause, dooms everything downstream. 2. Choose the Mechanic (Solution Principle) Once the core problem and goal are clear, lock the solution principle or ‘mechanic’ first. Going with a game layer? Decide if it’s leaderboards, streaks, or badges. Write it down. Then move on. No UI yet. This keeps the focus high-level before diving into pixels. 3. Wireframe the Flow & Get Focused Feedback Now open Figma. Map screens, layout, and transitions. Boxes and arrows are enough. Keep the fidelity low so the discussion stays on the flow, not colour. Crucially, when you share these early wires, ask specific questions and provide clear context (as discussed in ‘Reason #4’) to get actionable feedback, not just vague opinions. 4. Polish the Visuals (Mindfully) I only let myself tweak grids, type scales, and shadows after the flow is validated. If progress stalls, or before a major polish effort, I surface the work in a design critique — again using targeted questions and clear context — instead of hiding in version 47. This ensures detailing serves the now-validated solution. Even for something as small as a single button, running these four checkpoints takes about ten minutes and saves hours of decorative dithering. Wrapping Up Next time you feel the pull to vanish into mock‑ups before the problem is nailed down, pause and ask what you might be avoiding. Yes, that can expose an uncomfortable truth. But pausing to ask what you might be avoiding — maybe the fuzzy core problem, or just asking for tough feedback — gives you the power to face the real issue head-on. It keeps the project focused on solving the right problem, not just perfecting a flawed solution. Attention to detail is a superpower when used at the right moment. Obsessing over pixels too soon, though, is a bad habit and a warning light telling us the process needs a rethink.
    Like
    Love
    Wow
    Angry
    Sad
    596
    0 Comments 0 Shares
  • 432 Park Avenue by Rafael Viñoly Architects: Minimalism in the New York Skyline

    432 Park Avenue | © Halkin Mason Photography, Courtesy of Rafael Viñoly Architects
    Located in Midtown Manhattan, 432 Park Avenue is a prominent figure in the evolution of supertall residential towers. Completed in 2015, this 1,396-foot-high building by Rafael Viñoly Architects asserts a commanding presence over the city’s skyline. Its minimalist form and rigorous geometry have sparked considerable debate within the architectural community, marking it as a significant and controversial addition to New York City’s built environment.

    432 Park Avenue Technical Information

    Architects1-8: Rafael Viñoly Architects
    Location: Midtown Manhattan, New York City, USA
    Gross Area: 38,344 m2 | 412,637 Sq. Ft.
    Project Years: 2011 – 2015
    Photographs: © Halkin Mason Photography, Courtesy of Rafael Viñoly Architects

    It’s a building designed for the enjoyment of its occupants, not for the delight of its creator.
    – Rafael Viñoly

    432 Park Avenue Photographs

    © Halkin Mason Photography, Courtesy of Rafael Viñoly Architects

    Courtesy of Rafael Viñoly Architects

    Courtesy of Rafael Viñoly Architects

    Courtesy of Rafael Viñoly Architects

    Courtesy of Rafael Viñoly Architects
    Design Intent and Conceptual Framework
    At the heart of 432 Park Avenue’s design lies a commitment to pure geometry. The square, an elemental form, defines every aspect of the building, from its floor plate to its overall silhouette. This strict adherence to geometry speaks to Viñoly’s rationalist sensibilities and interest in stripping architecture to its fundamental components. The tower’s proportions, with its height-to-width ratio of roughly 1:15, transform this simple geometry into a monumental presence. This conceptual rigor positions the building as an object of formal clarity and a deliberate statement within the city’s varied skyline.
    The design’s minimalism extends beyond the building’s shape, reflecting Viñoly’s pursuit of a refined and disciplined expression. Eschewing decorative flourishes, the tower’s form directly responds to programmatic needs and structural imperatives. This disciplined approach underpins the project’s ambition to redefine the experience of vertical living, asserting that luxury in residential design can emerge from formal simplicity and a mastery of proportion.
    Spatial Organization and Interior Volumes
    The interior organization of 432 Park Avenue reveals an equally uncompromising commitment to clarity and openness. Each residential floor is free of interior columns, a testament to the structural ingenuity of the concrete exoskeleton. This column-free arrangement grants unobstructed floor plans and expansive panoramic views of the city, the rivers, and beyond. Floor-to-ceiling windows, measuring nearly 10 feet in height, accentuate the sense of openness and lightness within each residence.
    The tower’s slender core houses the vertical circulation and mechanical systems, ensuring the perimeter remains uninterrupted. This core placement allows for generous living spaces that maximize privacy and connection to the urban landscape. The interplay between structural precision and panoramic transparency shapes the experience of inhabiting these spaces. The result is a sequence of interiors that privilege intimacy and vastness, anchoring domestic life within an architectural expression of purity.
    Materiality, Structural Clarity, and Detailing
    Material choices in 432 Park Avenue reinforce the project’s disciplined approach. The building’s exposed concrete frame, treated as structure and façade, lends the tower a stark yet refined character. The grid of square windows, systematically repeated across the height of the building, becomes a defining feature of its visual identity. This modular repetition establishes a rhythmic order and speaks to the building’s underlying structural logic.
    High-strength concrete enables the tower’s slender profile and exceptional height while imparting a tactile materiality that resists the glassy anonymity typical of many contemporary towers. The restrained palette and attention to detail emphasize the tectonic clarity of the building’s assembly. By treating the structure itself as an architectural finish, Viñoly’s design elevates the material expression of concrete into a fundamental element of the building’s identity.
    Urban and Cultural Significance
    As one of the tallest residential buildings in the Western Hemisphere, 432 Park Avenue has significantly altered the Manhattan skyline. Its unwavering verticality and minimal ornamentation create a dialogue with the city’s diverse architectural heritage, juxtaposing a severe abstraction against a backdrop of historic and contemporary towers.
    432 Park Avenue occupies a distinctive place in the ongoing narrative of New York City’s architectural evolution. Its reductive form, structural clarity, and spatial generosity offer a compelling study of the power of minimalism at an urban scale.
    432 Park Avenue Plans

    Floor Plans | © Rafael Viñoly Architects

    Floor Plans | © Rafael Viñoly Architects

    Floor Plans | © Rafael Viñoly Architects

    Floor Plans | © Rafael Viñoly Architects
    432 Park Avenue Image Gallery

    © Rafael Viñoly Architects

    About Rafael Viñoly Architects
    Rafael Viñoly, a Uruguayan-born architect, founded Rafael Viñoly Architects in New York City in 1983. After studies in Buenos Aires and early practice in Argentina, he relocated to the U.S.. He established a global firm with offices in cities including London, Palo Alto, and Abu Dhabi. Renowned for large-scale, function-driven projects such as the Tokyo International Forum, Cleveland Museum of Art expansions, and 432 Park Avenue, the firm is praised for combining structural clarity, context-sensitive design, and institutional rigor across six continents.
    Credits and Additional Notes

    Client: Macklowe Properties and CIM Group
    Design Team: Rafael Viñoly, Deborah Berke Partners, Bentel & BentelStructural Engineer: WSP Cantor Seinuk
    Mechanical, Electrical, and Plumbing Engineers: Jaros, Baum & BollesConstruction Manager: Lendlease
    Height: 1,396 feetNumber of Floors: 96 stories
    Construction Years: 2011–2015
    #park #avenue #rafael #viñoly #architects
    432 Park Avenue by Rafael Viñoly Architects: Minimalism in the New York Skyline
    432 Park Avenue | © Halkin Mason Photography, Courtesy of Rafael Viñoly Architects Located in Midtown Manhattan, 432 Park Avenue is a prominent figure in the evolution of supertall residential towers. Completed in 2015, this 1,396-foot-high building by Rafael Viñoly Architects asserts a commanding presence over the city’s skyline. Its minimalist form and rigorous geometry have sparked considerable debate within the architectural community, marking it as a significant and controversial addition to New York City’s built environment. 432 Park Avenue Technical Information Architects1-8: Rafael Viñoly Architects Location: Midtown Manhattan, New York City, USA Gross Area: 38,344 m2 | 412,637 Sq. Ft. Project Years: 2011 – 2015 Photographs: © Halkin Mason Photography, Courtesy of Rafael Viñoly Architects It’s a building designed for the enjoyment of its occupants, not for the delight of its creator. – Rafael Viñoly 432 Park Avenue Photographs © Halkin Mason Photography, Courtesy of Rafael Viñoly Architects Courtesy of Rafael Viñoly Architects Courtesy of Rafael Viñoly Architects Courtesy of Rafael Viñoly Architects Courtesy of Rafael Viñoly Architects Design Intent and Conceptual Framework At the heart of 432 Park Avenue’s design lies a commitment to pure geometry. The square, an elemental form, defines every aspect of the building, from its floor plate to its overall silhouette. This strict adherence to geometry speaks to Viñoly’s rationalist sensibilities and interest in stripping architecture to its fundamental components. The tower’s proportions, with its height-to-width ratio of roughly 1:15, transform this simple geometry into a monumental presence. This conceptual rigor positions the building as an object of formal clarity and a deliberate statement within the city’s varied skyline. The design’s minimalism extends beyond the building’s shape, reflecting Viñoly’s pursuit of a refined and disciplined expression. Eschewing decorative flourishes, the tower’s form directly responds to programmatic needs and structural imperatives. This disciplined approach underpins the project’s ambition to redefine the experience of vertical living, asserting that luxury in residential design can emerge from formal simplicity and a mastery of proportion. Spatial Organization and Interior Volumes The interior organization of 432 Park Avenue reveals an equally uncompromising commitment to clarity and openness. Each residential floor is free of interior columns, a testament to the structural ingenuity of the concrete exoskeleton. This column-free arrangement grants unobstructed floor plans and expansive panoramic views of the city, the rivers, and beyond. Floor-to-ceiling windows, measuring nearly 10 feet in height, accentuate the sense of openness and lightness within each residence. The tower’s slender core houses the vertical circulation and mechanical systems, ensuring the perimeter remains uninterrupted. This core placement allows for generous living spaces that maximize privacy and connection to the urban landscape. The interplay between structural precision and panoramic transparency shapes the experience of inhabiting these spaces. The result is a sequence of interiors that privilege intimacy and vastness, anchoring domestic life within an architectural expression of purity. Materiality, Structural Clarity, and Detailing Material choices in 432 Park Avenue reinforce the project’s disciplined approach. The building’s exposed concrete frame, treated as structure and façade, lends the tower a stark yet refined character. The grid of square windows, systematically repeated across the height of the building, becomes a defining feature of its visual identity. This modular repetition establishes a rhythmic order and speaks to the building’s underlying structural logic. High-strength concrete enables the tower’s slender profile and exceptional height while imparting a tactile materiality that resists the glassy anonymity typical of many contemporary towers. The restrained palette and attention to detail emphasize the tectonic clarity of the building’s assembly. By treating the structure itself as an architectural finish, Viñoly’s design elevates the material expression of concrete into a fundamental element of the building’s identity. Urban and Cultural Significance As one of the tallest residential buildings in the Western Hemisphere, 432 Park Avenue has significantly altered the Manhattan skyline. Its unwavering verticality and minimal ornamentation create a dialogue with the city’s diverse architectural heritage, juxtaposing a severe abstraction against a backdrop of historic and contemporary towers. 432 Park Avenue occupies a distinctive place in the ongoing narrative of New York City’s architectural evolution. Its reductive form, structural clarity, and spatial generosity offer a compelling study of the power of minimalism at an urban scale. 432 Park Avenue Plans Floor Plans | © Rafael Viñoly Architects Floor Plans | © Rafael Viñoly Architects Floor Plans | © Rafael Viñoly Architects Floor Plans | © Rafael Viñoly Architects 432 Park Avenue Image Gallery © Rafael Viñoly Architects About Rafael Viñoly Architects Rafael Viñoly, a Uruguayan-born architect, founded Rafael Viñoly Architects in New York City in 1983. After studies in Buenos Aires and early practice in Argentina, he relocated to the U.S.. He established a global firm with offices in cities including London, Palo Alto, and Abu Dhabi. Renowned for large-scale, function-driven projects such as the Tokyo International Forum, Cleveland Museum of Art expansions, and 432 Park Avenue, the firm is praised for combining structural clarity, context-sensitive design, and institutional rigor across six continents. Credits and Additional Notes Client: Macklowe Properties and CIM Group Design Team: Rafael Viñoly, Deborah Berke Partners, Bentel & BentelStructural Engineer: WSP Cantor Seinuk Mechanical, Electrical, and Plumbing Engineers: Jaros, Baum & BollesConstruction Manager: Lendlease Height: 1,396 feetNumber of Floors: 96 stories Construction Years: 2011–2015 #park #avenue #rafael #viñoly #architects
    ARCHEYES.COM
    432 Park Avenue by Rafael Viñoly Architects: Minimalism in the New York Skyline
    432 Park Avenue | © Halkin Mason Photography, Courtesy of Rafael Viñoly Architects Located in Midtown Manhattan, 432 Park Avenue is a prominent figure in the evolution of supertall residential towers. Completed in 2015, this 1,396-foot-high building by Rafael Viñoly Architects asserts a commanding presence over the city’s skyline. Its minimalist form and rigorous geometry have sparked considerable debate within the architectural community, marking it as a significant and controversial addition to New York City’s built environment. 432 Park Avenue Technical Information Architects1-8: Rafael Viñoly Architects Location: Midtown Manhattan, New York City, USA Gross Area: 38,344 m2 | 412,637 Sq. Ft. Project Years: 2011 – 2015 Photographs: © Halkin Mason Photography, Courtesy of Rafael Viñoly Architects It’s a building designed for the enjoyment of its occupants, not for the delight of its creator. – Rafael Viñoly 432 Park Avenue Photographs © Halkin Mason Photography, Courtesy of Rafael Viñoly Architects Courtesy of Rafael Viñoly Architects Courtesy of Rafael Viñoly Architects Courtesy of Rafael Viñoly Architects Courtesy of Rafael Viñoly Architects Design Intent and Conceptual Framework At the heart of 432 Park Avenue’s design lies a commitment to pure geometry. The square, an elemental form, defines every aspect of the building, from its floor plate to its overall silhouette. This strict adherence to geometry speaks to Viñoly’s rationalist sensibilities and interest in stripping architecture to its fundamental components. The tower’s proportions, with its height-to-width ratio of roughly 1:15, transform this simple geometry into a monumental presence. This conceptual rigor positions the building as an object of formal clarity and a deliberate statement within the city’s varied skyline. The design’s minimalism extends beyond the building’s shape, reflecting Viñoly’s pursuit of a refined and disciplined expression. Eschewing decorative flourishes, the tower’s form directly responds to programmatic needs and structural imperatives. This disciplined approach underpins the project’s ambition to redefine the experience of vertical living, asserting that luxury in residential design can emerge from formal simplicity and a mastery of proportion. Spatial Organization and Interior Volumes The interior organization of 432 Park Avenue reveals an equally uncompromising commitment to clarity and openness. Each residential floor is free of interior columns, a testament to the structural ingenuity of the concrete exoskeleton. This column-free arrangement grants unobstructed floor plans and expansive panoramic views of the city, the rivers, and beyond. Floor-to-ceiling windows, measuring nearly 10 feet in height, accentuate the sense of openness and lightness within each residence. The tower’s slender core houses the vertical circulation and mechanical systems, ensuring the perimeter remains uninterrupted. This core placement allows for generous living spaces that maximize privacy and connection to the urban landscape. The interplay between structural precision and panoramic transparency shapes the experience of inhabiting these spaces. The result is a sequence of interiors that privilege intimacy and vastness, anchoring domestic life within an architectural expression of purity. Materiality, Structural Clarity, and Detailing Material choices in 432 Park Avenue reinforce the project’s disciplined approach. The building’s exposed concrete frame, treated as structure and façade, lends the tower a stark yet refined character. The grid of square windows, systematically repeated across the height of the building, becomes a defining feature of its visual identity. This modular repetition establishes a rhythmic order and speaks to the building’s underlying structural logic. High-strength concrete enables the tower’s slender profile and exceptional height while imparting a tactile materiality that resists the glassy anonymity typical of many contemporary towers. The restrained palette and attention to detail emphasize the tectonic clarity of the building’s assembly. By treating the structure itself as an architectural finish, Viñoly’s design elevates the material expression of concrete into a fundamental element of the building’s identity. Urban and Cultural Significance As one of the tallest residential buildings in the Western Hemisphere, 432 Park Avenue has significantly altered the Manhattan skyline. Its unwavering verticality and minimal ornamentation create a dialogue with the city’s diverse architectural heritage, juxtaposing a severe abstraction against a backdrop of historic and contemporary towers. 432 Park Avenue occupies a distinctive place in the ongoing narrative of New York City’s architectural evolution. Its reductive form, structural clarity, and spatial generosity offer a compelling study of the power of minimalism at an urban scale. 432 Park Avenue Plans Floor Plans | © Rafael Viñoly Architects Floor Plans | © Rafael Viñoly Architects Floor Plans | © Rafael Viñoly Architects Floor Plans | © Rafael Viñoly Architects 432 Park Avenue Image Gallery © Rafael Viñoly Architects About Rafael Viñoly Architects Rafael Viñoly, a Uruguayan-born architect (1944–2023), founded Rafael Viñoly Architects in New York City in 1983. After studies in Buenos Aires and early practice in Argentina, he relocated to the U.S.. He established a global firm with offices in cities including London, Palo Alto, and Abu Dhabi. Renowned for large-scale, function-driven projects such as the Tokyo International Forum, Cleveland Museum of Art expansions, and 432 Park Avenue, the firm is praised for combining structural clarity, context-sensitive design, and institutional rigor across six continents. Credits and Additional Notes Client: Macklowe Properties and CIM Group Design Team: Rafael Viñoly (Architect), Deborah Berke Partners (Interior Design of residential units), Bentel & Bentel (Amenity Spaces Design) Structural Engineer: WSP Cantor Seinuk Mechanical, Electrical, and Plumbing Engineers: Jaros, Baum & Bolles (JB&B) Construction Manager: Lendlease Height: 1,396 feet (425.5 meters) Number of Floors: 96 stories Construction Years: 2011–2015
    0 Comments 0 Shares
  • Hanging Art In the Bathroom Is Not As Gross As It Seems—Here's Why Designers LOVE It

    There are a few things an interior designer wouldn’t dare put in a bathroom. Carpet? Definitely not. Only overhead lighting? Design blasphemy. But there is one feature that finds its way into the bathroom all the time—rarely questioned, though maybe it should be—and that’s artwork. We get it: who doesn’t want to add a little personality to a space that otherwise is quite functional? Still, design fans are often split on the addition, especially when it comes to certain types of art. Related StoriesAn oil painting resting above a clawfoot bathtub or a framed graphic print next to a mirror infuses your bathroom with warmth and storytelling, a very necessary addition to a space that's often centered around pure function. “In a bathroom, where surfaces tend to be hard and the layout driven by function, a thoughtful piece can shift the entire ambience,” shares interior designer Linette Dai. “It brings dimension to the everyday.”According to designer Ali Milch, art can transform the entire experience from “routine to restorative.” But, is it the bathroom the bestplace to put a favorite photo or heirloom painting? With moisture in the mix and potential for it being in the “splash zone”, you need to be considerate of the art you bring in and where it’s placed. To help guide your curation, we chatted with interior designers and experts on how to integrate art into your space in a way that is both beautiful and bathroom-appropriate.Be Wary of HumidityMaybe this one is obvious, but when placing art in the bathroom, be sure to look for materials that aren’t prone to water damage. “We recommend framing art with a sealed backing and UV-protective acrylic instead of glass, which is both lighter and more resistant to moisture—an important consideration in steamy bathrooms,” Cathy Glazer, founder of Artfully Walls, shares. “Plus, acrylic is much safer than glass if dropped, especially on hard tile floors, as it won’t shatter.”Dai agrees that acrylic is the way to go when putting framed works into the bathroom, “I usually recommend acrylic glazing to avoid moisture damage. For humid environments, prints or photography mounted directly on aluminum or face-mounted under acrylic are durable and beautiful.”Make It Your Creative CanvasCourtsey of Ali MilchUnless you have a sprawling space, chances are your bathroom’s square footage is limited. Rather than viewing this as a constraint, think about it as an opportunity to get creative. “Because they’re smaller and more self-contained,invite experimentation—think unexpected pieces, playful themes, or striking colors,” shares Glazer. “Art helps turn the bathroom into a moment of surprise and style.”“It doesn’t have to feel stuffy or overly formal,” Milch adds. “In a recent Tribeca project, we installed a kitschy iMessage bubble with the text ‘I love you too’ on the wall facing the entry. It’s a lighthearted, personal touch.”While it’s fun to get whimsical with your bathroom art, Dai also suggests still approaching it with a curated eye and saving anything that is precious or too high-maintenance for the powder room. “In full baths, I tend to be more selective based on how the space is ventilated and used day-to-day,” she shares. “Powder rooms, on the other hand, offer more freedom. That’s where I love incorporating oil paintings. They bring soul and a sense of history, and can make even the smallest space feel elevated.”Keep Materials And Size In MindAnother material worth considering adding? Ceramics. “Ceramic pieces also work beautifully, especially when there’s open shelving or decorative niches to display them,” shares Milch. Be wary of larger-scale sculptures, as they could potentially be slightly disruptive to the space. “Any type of artwork can work in a bathroom depending on the spatial allowances, but the typical bathroom is suited to wall hangings versus sculptures,” says Sarah Latham of L Interiors.And don’t forget to be mindful of scale. “As for size, I always opt for larger pieces in smaller spaces, it may feel counter-intuitive, but it makes a tight space feel larger,” Anastasia Casey of The Interior Collective shares. “I look for works that complement the finishes and palette without overwhelming it.”Let It Set The ToneCourtesy of Annie SloanArtwork in the bathroom doesn’t just decorate it; it can define it. “In bathrooms, there’s often less visual competition—no bold furniture or patterned textiles—so the art naturally becomes more of a focal point,” Dai adds. “That’s why the mood it sets matters so much. I think more intentionally about subject matter—what someone will see up close, often in moments of solitude,” shares Dai. Whether it’s a serene landscape photo or storied painting, don’t underestimate what a piece of art can do for the most utilitarian room in the house. With the right materials and placement, it can hold its own—moisture and all—while adding a design moment and feels considered and unexpected.Follow House Beautiful on Instagram and TikTok.
    #hanging #art #bathroom #not #gross
    Hanging Art In the Bathroom Is Not As Gross As It Seems—Here's Why Designers LOVE It
    There are a few things an interior designer wouldn’t dare put in a bathroom. Carpet? Definitely not. Only overhead lighting? Design blasphemy. But there is one feature that finds its way into the bathroom all the time—rarely questioned, though maybe it should be—and that’s artwork. We get it: who doesn’t want to add a little personality to a space that otherwise is quite functional? Still, design fans are often split on the addition, especially when it comes to certain types of art. Related StoriesAn oil painting resting above a clawfoot bathtub or a framed graphic print next to a mirror infuses your bathroom with warmth and storytelling, a very necessary addition to a space that's often centered around pure function. “In a bathroom, where surfaces tend to be hard and the layout driven by function, a thoughtful piece can shift the entire ambience,” shares interior designer Linette Dai. “It brings dimension to the everyday.”According to designer Ali Milch, art can transform the entire experience from “routine to restorative.” But, is it the bathroom the bestplace to put a favorite photo or heirloom painting? With moisture in the mix and potential for it being in the “splash zone”, you need to be considerate of the art you bring in and where it’s placed. To help guide your curation, we chatted with interior designers and experts on how to integrate art into your space in a way that is both beautiful and bathroom-appropriate.Be Wary of HumidityMaybe this one is obvious, but when placing art in the bathroom, be sure to look for materials that aren’t prone to water damage. “We recommend framing art with a sealed backing and UV-protective acrylic instead of glass, which is both lighter and more resistant to moisture—an important consideration in steamy bathrooms,” Cathy Glazer, founder of Artfully Walls, shares. “Plus, acrylic is much safer than glass if dropped, especially on hard tile floors, as it won’t shatter.”Dai agrees that acrylic is the way to go when putting framed works into the bathroom, “I usually recommend acrylic glazing to avoid moisture damage. For humid environments, prints or photography mounted directly on aluminum or face-mounted under acrylic are durable and beautiful.”Make It Your Creative CanvasCourtsey of Ali MilchUnless you have a sprawling space, chances are your bathroom’s square footage is limited. Rather than viewing this as a constraint, think about it as an opportunity to get creative. “Because they’re smaller and more self-contained,invite experimentation—think unexpected pieces, playful themes, or striking colors,” shares Glazer. “Art helps turn the bathroom into a moment of surprise and style.”“It doesn’t have to feel stuffy or overly formal,” Milch adds. “In a recent Tribeca project, we installed a kitschy iMessage bubble with the text ‘I love you too’ on the wall facing the entry. It’s a lighthearted, personal touch.”While it’s fun to get whimsical with your bathroom art, Dai also suggests still approaching it with a curated eye and saving anything that is precious or too high-maintenance for the powder room. “In full baths, I tend to be more selective based on how the space is ventilated and used day-to-day,” she shares. “Powder rooms, on the other hand, offer more freedom. That’s where I love incorporating oil paintings. They bring soul and a sense of history, and can make even the smallest space feel elevated.”Keep Materials And Size In MindAnother material worth considering adding? Ceramics. “Ceramic pieces also work beautifully, especially when there’s open shelving or decorative niches to display them,” shares Milch. Be wary of larger-scale sculptures, as they could potentially be slightly disruptive to the space. “Any type of artwork can work in a bathroom depending on the spatial allowances, but the typical bathroom is suited to wall hangings versus sculptures,” says Sarah Latham of L Interiors.And don’t forget to be mindful of scale. “As for size, I always opt for larger pieces in smaller spaces, it may feel counter-intuitive, but it makes a tight space feel larger,” Anastasia Casey of The Interior Collective shares. “I look for works that complement the finishes and palette without overwhelming it.”Let It Set The ToneCourtesy of Annie SloanArtwork in the bathroom doesn’t just decorate it; it can define it. “In bathrooms, there’s often less visual competition—no bold furniture or patterned textiles—so the art naturally becomes more of a focal point,” Dai adds. “That’s why the mood it sets matters so much. I think more intentionally about subject matter—what someone will see up close, often in moments of solitude,” shares Dai. Whether it’s a serene landscape photo or storied painting, don’t underestimate what a piece of art can do for the most utilitarian room in the house. With the right materials and placement, it can hold its own—moisture and all—while adding a design moment and feels considered and unexpected.Follow House Beautiful on Instagram and TikTok. #hanging #art #bathroom #not #gross
    WWW.HOUSEBEAUTIFUL.COM
    Hanging Art In the Bathroom Is Not As Gross As It Seems—Here's Why Designers LOVE It
    There are a few things an interior designer wouldn’t dare put in a bathroom. Carpet? Definitely not. Only overhead lighting? Design blasphemy. But there is one feature that finds its way into the bathroom all the time—rarely questioned, though maybe it should be—and that’s artwork. We get it: who doesn’t want to add a little personality to a space that otherwise is quite functional? Still, design fans are often split on the addition, especially when it comes to certain types of art. Related StoriesAn oil painting resting above a clawfoot bathtub or a framed graphic print next to a mirror infuses your bathroom with warmth and storytelling, a very necessary addition to a space that's often centered around pure function. “In a bathroom, where surfaces tend to be hard and the layout driven by function, a thoughtful piece can shift the entire ambience,” shares interior designer Linette Dai. “It brings dimension to the everyday.”According to designer Ali Milch, art can transform the entire experience from “routine to restorative.” But, is it the bathroom the best (read: most hygienic) place to put a favorite photo or heirloom painting? With moisture in the mix and potential for it being in the “splash zone” (sorry, but it's true), you need to be considerate of the art you bring in and where it’s placed. To help guide your curation, we chatted with interior designers and experts on how to integrate art into your space in a way that is both beautiful and bathroom-appropriate.Be Wary of HumidityMaybe this one is obvious, but when placing art in the bathroom, be sure to look for materials that aren’t prone to water damage. “We recommend framing art with a sealed backing and UV-protective acrylic instead of glass, which is both lighter and more resistant to moisture—an important consideration in steamy bathrooms,” Cathy Glazer, founder of Artfully Walls, shares. “Plus, acrylic is much safer than glass if dropped, especially on hard tile floors, as it won’t shatter.”Dai agrees that acrylic is the way to go when putting framed works into the bathroom, “I usually recommend acrylic glazing to avoid moisture damage. For humid environments, prints or photography mounted directly on aluminum or face-mounted under acrylic are durable and beautiful.”Make It Your Creative CanvasCourtsey of Ali MilchUnless you have a sprawling space, chances are your bathroom’s square footage is limited. Rather than viewing this as a constraint, think about it as an opportunity to get creative. “Because they’re smaller and more self-contained, [bathrooms] invite experimentation—think unexpected pieces, playful themes, or striking colors,” shares Glazer. “Art helps turn the bathroom into a moment of surprise and style.”“It doesn’t have to feel stuffy or overly formal,” Milch adds. “In a recent Tribeca project, we installed a kitschy iMessage bubble with the text ‘I love you too’ on the wall facing the entry. It’s a lighthearted, personal touch.”While it’s fun to get whimsical with your bathroom art (pro tip: secondhand stores can be a great place for unique finds), Dai also suggests still approaching it with a curated eye and saving anything that is precious or too high-maintenance for the powder room. “In full baths, I tend to be more selective based on how the space is ventilated and used day-to-day,” she shares. “Powder rooms, on the other hand, offer more freedom. That’s where I love incorporating oil paintings. They bring soul and a sense of history, and can make even the smallest space feel elevated.”Keep Materials And Size In MindAnother material worth considering adding? Ceramics. “Ceramic pieces also work beautifully, especially when there’s open shelving or decorative niches to display them,” shares Milch. Be wary of larger-scale sculptures, as they could potentially be slightly disruptive to the space. “Any type of artwork can work in a bathroom depending on the spatial allowances, but the typical bathroom is suited to wall hangings versus sculptures,” says Sarah Latham of L Interiors.And don’t forget to be mindful of scale. “As for size, I always opt for larger pieces in smaller spaces, it may feel counter-intuitive, but it makes a tight space feel larger,” Anastasia Casey of The Interior Collective shares. “I look for works that complement the finishes and palette without overwhelming it.”Let It Set The ToneCourtesy of Annie SloanArtwork in the bathroom doesn’t just decorate it; it can define it. “In bathrooms, there’s often less visual competition—no bold furniture or patterned textiles—so the art naturally becomes more of a focal point,” Dai adds. “That’s why the mood it sets matters so much. I think more intentionally about subject matter—what someone will see up close, often in moments of solitude,” shares Dai. Whether it’s a serene landscape photo or storied painting, don’t underestimate what a piece of art can do for the most utilitarian room in the house. With the right materials and placement, it can hold its own—moisture and all—while adding a design moment and feels considered and unexpected.Follow House Beautiful on Instagram and TikTok.
    0 Comments 0 Shares
  • 48 Rustic Living Room Ideas For the Coziest Family Space

    With its comfortable, laid-back decorating vibes, no room says “come and sit awhile” or “aah, I’m home” quite like a beautifully inviting rustic and cozy living room. Whether you live in a farmhouse, cabin, cottage, a new-build in the suburbs, or even a city apartment—rustic living room ideas bring a certain homespun style that ranges from downright traditional to modern and chic.Here at Country Living, we’ve discovered that the very best classic and country rustic living room ideas begin with good ol’ tried-and-true character-rich decor. We're talking reclaimed wood, stone focal points, and a casual mix of natural textures and materials. More modern rustic living room ideas include a less-is-more approach with calming neutral color palettes and clean-lined furniture. Paint colors, fabrics, and accessories in grays, browns, and greens pulled from nature make for the just-right warmth—all simple rustic living room ideas at their finest. So relax and sink into our best country rustic living room ideas from some of our all-time favorite Country Living house tours!Here are more creative ways to make your home feel rustic and cozy:1Fill the Room With CharacterSean LitchfieldFrom floor to ceiling and wall to wall, this rustic living room packs in loads of character. Comfy leather and upholstered furniture, a vintage patterned rug, and a blue and yellow painted cupboard found on Facebook marketplace sit well together against a backdrop of rustic wood.2Source Local MaterialsLincoln BarbourIn this beautifully rustic Mississippi barn. the owners sourced local wood materials from a nearby military depot to clad the walls and ceiling, bringing maximum warmth and texture. Large windows let in loads of natural light during the day, while a chandelier and mounted sconces make for a romantic glow come nighttime.RELATED: These Wood Ceiling Ideas Bring Country Charm to Any RoomTOUR THE ENTIRE HOUSEAdvertisement - Continue Reading Below3Pick a Cozy Paint ColorAlpha Smoot for Country LivingThis cozy living room has a built-in warmth, thanks to saturated navy blue walls. Its handsomely worn floorboards, doors, mantel, and warming cabinet above the fireplace complement the dark blue beautifully. The fire and candlelight emit a magical glow.Get the Look:Wall Paint Color: Dark Navy by BehrTOUR THE ENTIRE HOUSE4Lay a Comfy RugSara Ligorria-TrampWhat's cozier than a roaring fire on a cool night? A soft, fuzzy rug in front of it! The fireplace features mantel made from a tree felled on-site and white Zellige tile. The artwork is a vintage find paired with a contemporary painting.TOUR THE ENTIRE HOUSEAdvertisement - Continue Reading Below5Embrace Log Cabin DetailsLisa FloodIn this stunning Wyoming log cabin, the family usually gathers in the wonderfully rustic great room. Its cozy factor is off the charts, thanks country decorating classics like unpainted log walls and beams, a woodburning stove, textural rugs, and a sweet swing that hangs from the ceiling. Get the Look:Swing: The Oak & Rope CompanyTOUR THE ENTIRE HOUSE6Wrap a Room in WoodMarta Xochilt PerezIn this rustic and cozy cabin, an original fieldstone fireplace creates the warmest welcome. A pair of cushy leather sofas piled with pillows blankets face off, anchoring the wood-wrapped space, and providing the perfect perches for game night. TOUR THE ENTIRE HOUSE Advertisement - Continue Reading Below7Build an Rustic Stone Accent WallMarta Xochilt Perez for Country LivingThis impressive wall of moss rock surrounds the fireplace. Chiseled stone corbels provide mantel supports. On cool nights, you can count on a roaring fire! Throughout the home, carved timbers, rough-cut stone, and walls of windows reflect a combination of the homeowners’ Scandinavian heritage and Irish roots.TOUR THE ENTIRE HOUSE8Go Big in a Small SpaceEmily FollowillThis tiny living room is packed with so much character. Designer James Farmer added decorative oomph with a large tobacco basket, an art-forward fireplace screen, and natural design elements like plants. Details like arranging the paneling on the diagonal to “point” upward enhance the vertical space. Says James, “Tall ceilings, bold plant arrangements, and large light fixtures have even more impact in a small home. Play with scale to find what feels right.” Advertisement - Continue Reading Below9Mix and Match FurnitureLincoln BarbourFor the ultimate collected-over-time vibe, forgo matching furniture. Here, a wingback chair and a spool chair look right at home in this living room. Other period-appropriate decor found in this 100-year-old home: painted paneled walls, exposed ceiling beams, and a rustic mantel wood.TOUR THE ENTIRE HOUSE 10Let There Be LightChristopher DibbleWe put this family room in the “rustic light” category. For a top-to-bottom cabin-like feel, designer Max Humphrey wrapped the space in eight-foot knotty pine planks on the ceiling and walls. A clear coat of polyurethane protects the wood while letting its natural color shine through. Colorful national park posters, globes, camp grounds signage, and a linen modern sectional create a hip yet homey living space.Advertisement - Continue Reading Below11Customize a Focal PointHomeowners Victoria and Marcus Ford’s vision of a custom wood fireplace surround included open shelves and striking floor-to-ceiling firewood nooks. “We figured go big or go home,” says Victoria. Brass sconces provide a library-like touch, and a custom frame has the TV looking picture-perfect above the mantel.Get the Look:Wall and Trim Paint: Endless Sea by Sherwin-WilliamsCeiling Paint: Oyster White by Sherwin-WilliamsTOUR THE ENTIRE SPACE12Incorporate Rustic Furniture FindsAnnie SchlechterTopped with a plaid cushion, a rustic yellow daybed nestled in the corner makes for the coziest spot to take in lake views. The 22-foot cathedral ceilings are clad in wood, warming up this lofty open-concept space designed by Amy Meier that also includes a dining area and kitchen.TOUR THE ENTIRE HOUSE Advertisement - Continue Reading Below13Paint the FloorsDane Tashima for Country LivingWhile the homeowners of this New Jersey dairy barn were able to salvage the structure’s original knotty beams, the walls and floors in the soaring 25-foot-high space needed to be replaced. Simple poplar planks painted white got the job done affordably. A new cast-iron pellet stove warms the space with a rustic, authentic look. Get the Look:Wall and Floor Paint Color: Alabaster by Sherwin-WilliamsTOUR THE ENTIRE HOUSE14Tell the BackstorySean LitchfieldWhere possible, the original Eastern Hemlock posts and beams of this 1819 Maine barn were carefully preserved when, in 1999, the structure was disassembled and then reassembled several miles down the road. Hand-split slabs of Maine graniteand brick were used to fabricate the massive woodburning fireplace. The walls and floors are lined in rough-hewn, nonuniform wood planks. The sofa table, made from an old piece of barn wood found on the farm, shows off collections of books, ceramics, and shells.Advertisement - Continue Reading Below15Use Old Materials for New BuildsBrie WilliamsIn this new build, reclaimed materials create instant patina for a warm and welcoming family room. Here’s what makes it rustic: reclaimed beams came from an 1800s mill in Massachusetts mill; log skins salvaged from old Midwest barns; North Carolina stone on the fireplace. A soft palette for the furniture and window treatments was inspired by the antique rug that covers the ottoman.TOUR THE ENTIRE HOUSE 16Balance Natural Wood with ColorNick JohnsonA pretty blue on the fireplace and in the fabrics balances the overall rustic vibe in this country house. “I wanted this room to feel rich and cozy and warm—the kind of place you’d sit by the fire to read a book,” says Erica Harrison of Detroit-based design firm Hudson and Sterling.TOUR THE ENTIRE HOUSEAdvertisement - Continue Reading Below17Make It WorkHelen NormanDespite the renovation challenges, this cozy sitting area situated just off the open kitchen works. The fireplace, which had to be rebuilt from the inside, was covered in stucco to balance all the exposed brick that was discovered underneath damaged drywall. For attic access, a ladder that was found in a barn on the property gets the job done in lieu of stairs. On the other side of the fireplace, a sturdy wooden bookshelf replaces an existing one that was crumbling.18Paint It WhiteZIO AND SONSFor the ultimate modern farmhouse vibe, start with an all-white palette, like in this home of designer Anthony D’Argenzio. This allows you to layer in character-rich architectural elements, like wide-planked wood floors and ceiling beams. A comfy sectional piled with pillows balances perfectly with hard elements, like the wood-and-iron coffee table, handmade oak stump side table, and a round iron chandelier. The hanging chair in the corner provides a wink to this serene design. RELATED: The Best Warm White Paint Colors For Every Room in Your HouseAdvertisement - Continue Reading Below19Leave Materials NaturalJames MerrellRustic meets cozy in this cabin that features walls constructed of hand-hewn logs, a stone fireplace, exposed ceiling beams, and a pair of comfy armchairs. Leaving all materials in their natural finish and unpainted contributes to the overall homespun feel.RELATED: The Best Places to Find or Buy Reclaimed Wood Near You20Choose Neutral FurnishingsSeth SmootIn this California living room, a comfortable collection of neutral furnishings complements the home’s rustic redwood walls. The solid sofa and barrel chairs that are upholstered in linen leave room for visual delights, like the wicker and fringe lamps, an antique rug, a patterned ottoman, and piles of pillows.Jennifer KopfJennifer Kopf is the Executive Editor of Country Living. She also covers antiques and collecting.Amy MitchellManaging EditorAmy Mitchell is the managing editor for VERANDA and Country Living, where she writes articles on a variety of topics—decorating and design, gardens, and holidays. Amy’s experience in the shelter magazine category spans more than 20 years, as she’s previously held positions at Coastal Living and Cottage Living. Her personal pursuits include cooking, gardening, and hunting her favorite tag sale spots for the next piece of Pyrex for her prized collection.
    #rustic #living #room #ideas #coziest
    48 Rustic Living Room Ideas For the Coziest Family Space
    With its comfortable, laid-back decorating vibes, no room says “come and sit awhile” or “aah, I’m home” quite like a beautifully inviting rustic and cozy living room. Whether you live in a farmhouse, cabin, cottage, a new-build in the suburbs, or even a city apartment—rustic living room ideas bring a certain homespun style that ranges from downright traditional to modern and chic.Here at Country Living, we’ve discovered that the very best classic and country rustic living room ideas begin with good ol’ tried-and-true character-rich decor. We're talking reclaimed wood, stone focal points, and a casual mix of natural textures and materials. More modern rustic living room ideas include a less-is-more approach with calming neutral color palettes and clean-lined furniture. Paint colors, fabrics, and accessories in grays, browns, and greens pulled from nature make for the just-right warmth—all simple rustic living room ideas at their finest. So relax and sink into our best country rustic living room ideas from some of our all-time favorite Country Living house tours!Here are more creative ways to make your home feel rustic and cozy:1Fill the Room With CharacterSean LitchfieldFrom floor to ceiling and wall to wall, this rustic living room packs in loads of character. Comfy leather and upholstered furniture, a vintage patterned rug, and a blue and yellow painted cupboard found on Facebook marketplace sit well together against a backdrop of rustic wood.2Source Local MaterialsLincoln BarbourIn this beautifully rustic Mississippi barn. the owners sourced local wood materials from a nearby military depot to clad the walls and ceiling, bringing maximum warmth and texture. Large windows let in loads of natural light during the day, while a chandelier and mounted sconces make for a romantic glow come nighttime.RELATED: These Wood Ceiling Ideas Bring Country Charm to Any RoomTOUR THE ENTIRE HOUSEAdvertisement - Continue Reading Below3Pick a Cozy Paint ColorAlpha Smoot for Country LivingThis cozy living room has a built-in warmth, thanks to saturated navy blue walls. Its handsomely worn floorboards, doors, mantel, and warming cabinet above the fireplace complement the dark blue beautifully. The fire and candlelight emit a magical glow.Get the Look:Wall Paint Color: Dark Navy by BehrTOUR THE ENTIRE HOUSE4Lay a Comfy RugSara Ligorria-TrampWhat's cozier than a roaring fire on a cool night? A soft, fuzzy rug in front of it! The fireplace features mantel made from a tree felled on-site and white Zellige tile. The artwork is a vintage find paired with a contemporary painting.TOUR THE ENTIRE HOUSEAdvertisement - Continue Reading Below5Embrace Log Cabin DetailsLisa FloodIn this stunning Wyoming log cabin, the family usually gathers in the wonderfully rustic great room. Its cozy factor is off the charts, thanks country decorating classics like unpainted log walls and beams, a woodburning stove, textural rugs, and a sweet swing that hangs from the ceiling. Get the Look:Swing: The Oak & Rope CompanyTOUR THE ENTIRE HOUSE6Wrap a Room in WoodMarta Xochilt PerezIn this rustic and cozy cabin, an original fieldstone fireplace creates the warmest welcome. A pair of cushy leather sofas piled with pillows blankets face off, anchoring the wood-wrapped space, and providing the perfect perches for game night. TOUR THE ENTIRE HOUSE Advertisement - Continue Reading Below7Build an Rustic Stone Accent WallMarta Xochilt Perez for Country LivingThis impressive wall of moss rock surrounds the fireplace. Chiseled stone corbels provide mantel supports. On cool nights, you can count on a roaring fire! Throughout the home, carved timbers, rough-cut stone, and walls of windows reflect a combination of the homeowners’ Scandinavian heritage and Irish roots.TOUR THE ENTIRE HOUSE8Go Big in a Small SpaceEmily FollowillThis tiny living room is packed with so much character. Designer James Farmer added decorative oomph with a large tobacco basket, an art-forward fireplace screen, and natural design elements like plants. Details like arranging the paneling on the diagonal to “point” upward enhance the vertical space. Says James, “Tall ceilings, bold plant arrangements, and large light fixtures have even more impact in a small home. Play with scale to find what feels right.” Advertisement - Continue Reading Below9Mix and Match FurnitureLincoln BarbourFor the ultimate collected-over-time vibe, forgo matching furniture. Here, a wingback chair and a spool chair look right at home in this living room. Other period-appropriate decor found in this 100-year-old home: painted paneled walls, exposed ceiling beams, and a rustic mantel wood.TOUR THE ENTIRE HOUSE 10Let There Be LightChristopher DibbleWe put this family room in the “rustic light” category. For a top-to-bottom cabin-like feel, designer Max Humphrey wrapped the space in eight-foot knotty pine planks on the ceiling and walls. A clear coat of polyurethane protects the wood while letting its natural color shine through. Colorful national park posters, globes, camp grounds signage, and a linen modern sectional create a hip yet homey living space.Advertisement - Continue Reading Below11Customize a Focal PointHomeowners Victoria and Marcus Ford’s vision of a custom wood fireplace surround included open shelves and striking floor-to-ceiling firewood nooks. “We figured go big or go home,” says Victoria. Brass sconces provide a library-like touch, and a custom frame has the TV looking picture-perfect above the mantel.Get the Look:Wall and Trim Paint: Endless Sea by Sherwin-WilliamsCeiling Paint: Oyster White by Sherwin-WilliamsTOUR THE ENTIRE SPACE12Incorporate Rustic Furniture FindsAnnie SchlechterTopped with a plaid cushion, a rustic yellow daybed nestled in the corner makes for the coziest spot to take in lake views. The 22-foot cathedral ceilings are clad in wood, warming up this lofty open-concept space designed by Amy Meier that also includes a dining area and kitchen.TOUR THE ENTIRE HOUSE Advertisement - Continue Reading Below13Paint the FloorsDane Tashima for Country LivingWhile the homeowners of this New Jersey dairy barn were able to salvage the structure’s original knotty beams, the walls and floors in the soaring 25-foot-high space needed to be replaced. Simple poplar planks painted white got the job done affordably. A new cast-iron pellet stove warms the space with a rustic, authentic look. Get the Look:Wall and Floor Paint Color: Alabaster by Sherwin-WilliamsTOUR THE ENTIRE HOUSE14Tell the BackstorySean LitchfieldWhere possible, the original Eastern Hemlock posts and beams of this 1819 Maine barn were carefully preserved when, in 1999, the structure was disassembled and then reassembled several miles down the road. Hand-split slabs of Maine graniteand brick were used to fabricate the massive woodburning fireplace. The walls and floors are lined in rough-hewn, nonuniform wood planks. The sofa table, made from an old piece of barn wood found on the farm, shows off collections of books, ceramics, and shells.Advertisement - Continue Reading Below15Use Old Materials for New BuildsBrie WilliamsIn this new build, reclaimed materials create instant patina for a warm and welcoming family room. Here’s what makes it rustic: reclaimed beams came from an 1800s mill in Massachusetts mill; log skins salvaged from old Midwest barns; North Carolina stone on the fireplace. A soft palette for the furniture and window treatments was inspired by the antique rug that covers the ottoman.TOUR THE ENTIRE HOUSE 16Balance Natural Wood with ColorNick JohnsonA pretty blue on the fireplace and in the fabrics balances the overall rustic vibe in this country house. “I wanted this room to feel rich and cozy and warm—the kind of place you’d sit by the fire to read a book,” says Erica Harrison of Detroit-based design firm Hudson and Sterling.TOUR THE ENTIRE HOUSEAdvertisement - Continue Reading Below17Make It WorkHelen NormanDespite the renovation challenges, this cozy sitting area situated just off the open kitchen works. The fireplace, which had to be rebuilt from the inside, was covered in stucco to balance all the exposed brick that was discovered underneath damaged drywall. For attic access, a ladder that was found in a barn on the property gets the job done in lieu of stairs. On the other side of the fireplace, a sturdy wooden bookshelf replaces an existing one that was crumbling.18Paint It WhiteZIO AND SONSFor the ultimate modern farmhouse vibe, start with an all-white palette, like in this home of designer Anthony D’Argenzio. This allows you to layer in character-rich architectural elements, like wide-planked wood floors and ceiling beams. A comfy sectional piled with pillows balances perfectly with hard elements, like the wood-and-iron coffee table, handmade oak stump side table, and a round iron chandelier. The hanging chair in the corner provides a wink to this serene design. RELATED: The Best Warm White Paint Colors For Every Room in Your HouseAdvertisement - Continue Reading Below19Leave Materials NaturalJames MerrellRustic meets cozy in this cabin that features walls constructed of hand-hewn logs, a stone fireplace, exposed ceiling beams, and a pair of comfy armchairs. Leaving all materials in their natural finish and unpainted contributes to the overall homespun feel.RELATED: The Best Places to Find or Buy Reclaimed Wood Near You20Choose Neutral FurnishingsSeth SmootIn this California living room, a comfortable collection of neutral furnishings complements the home’s rustic redwood walls. The solid sofa and barrel chairs that are upholstered in linen leave room for visual delights, like the wicker and fringe lamps, an antique rug, a patterned ottoman, and piles of pillows.Jennifer KopfJennifer Kopf is the Executive Editor of Country Living. She also covers antiques and collecting.Amy MitchellManaging EditorAmy Mitchell is the managing editor for VERANDA and Country Living, where she writes articles on a variety of topics—decorating and design, gardens, and holidays. Amy’s experience in the shelter magazine category spans more than 20 years, as she’s previously held positions at Coastal Living and Cottage Living. Her personal pursuits include cooking, gardening, and hunting her favorite tag sale spots for the next piece of Pyrex for her prized collection. #rustic #living #room #ideas #coziest
    WWW.COUNTRYLIVING.COM
    48 Rustic Living Room Ideas For the Coziest Family Space
    With its comfortable, laid-back decorating vibes, no room says “come and sit awhile” or “aah, I’m home” quite like a beautifully inviting rustic and cozy living room. Whether you live in a farmhouse, cabin, cottage, a new-build in the suburbs, or even a city apartment—rustic living room ideas bring a certain homespun style that ranges from downright traditional to modern and chic.Here at Country Living, we’ve discovered that the very best classic and country rustic living room ideas begin with good ol’ tried-and-true character-rich decor. We're talking reclaimed wood, stone focal points (there are so many rustic style living room ideas with cozy fireplaces!), and a casual mix of natural textures and materials (think wood and woven furniture, perfectly worn leather sofas, vintage wool rugs laid atop natural sisal). More modern rustic living room ideas include a less-is-more approach with calming neutral color palettes and clean-lined furniture. Paint colors, fabrics, and accessories in grays, browns, and greens pulled from nature make for the just-right warmth—all simple rustic living room ideas at their finest. So relax and sink into our best country rustic living room ideas from some of our all-time favorite Country Living house tours!Here are more creative ways to make your home feel rustic and cozy:1Fill the Room With CharacterSean LitchfieldFrom floor to ceiling and wall to wall, this rustic living room packs in loads of character. Comfy leather and upholstered furniture, a vintage patterned rug, and a blue and yellow painted cupboard found on Facebook marketplace sit well together against a backdrop of rustic wood.2Source Local MaterialsLincoln BarbourIn this beautifully rustic Mississippi barn. the owners sourced local wood materials from a nearby military depot to clad the walls and ceiling, bringing maximum warmth and texture. Large windows let in loads of natural light during the day, while a chandelier and mounted sconces make for a romantic glow come nighttime.RELATED: These Wood Ceiling Ideas Bring Country Charm to Any RoomTOUR THE ENTIRE HOUSEAdvertisement - Continue Reading Below3Pick a Cozy Paint ColorAlpha Smoot for Country LivingThis cozy living room has a built-in warmth, thanks to saturated navy blue walls (“It’s sort of a gentleman’s navy,” says homeowner Justin Reis). Its handsomely worn floorboards, doors, mantel, and warming cabinet above the fireplace complement the dark blue beautifully. The fire and candlelight emit a magical glow.Get the Look:Wall Paint Color: Dark Navy by BehrTOUR THE ENTIRE HOUSE4Lay a Comfy RugSara Ligorria-TrampWhat's cozier than a roaring fire on a cool night? A soft, fuzzy rug in front of it! The fireplace features mantel made from a tree felled on-site and white Zellige tile. The artwork is a vintage find paired with a contemporary painting.TOUR THE ENTIRE HOUSEAdvertisement - Continue Reading Below5Embrace Log Cabin DetailsLisa FloodIn this stunning Wyoming log cabin, the family usually gathers in the wonderfully rustic great room. Its cozy factor is off the charts, thanks country decorating classics like unpainted log walls and beams, a woodburning stove, textural rugs, and a sweet swing that hangs from the ceiling. Get the Look:Swing: The Oak & Rope CompanyTOUR THE ENTIRE HOUSE6Wrap a Room in WoodMarta Xochilt PerezIn this rustic and cozy cabin, an original fieldstone fireplace creates the warmest welcome. A pair of cushy leather sofas piled with pillows blankets face off, anchoring the wood-wrapped space, and providing the perfect perches for game night. TOUR THE ENTIRE HOUSE Advertisement - Continue Reading Below7Build an Rustic Stone Accent WallMarta Xochilt Perez for Country LivingThis impressive wall of moss rock surrounds the fireplace. Chiseled stone corbels provide mantel supports. On cool nights, you can count on a roaring fire! Throughout the home, carved timbers, rough-cut stone, and walls of windows reflect a combination of the homeowners’ Scandinavian heritage and Irish roots.TOUR THE ENTIRE HOUSE8Go Big in a Small SpaceEmily FollowillThis tiny living room is packed with so much character. Designer James Farmer added decorative oomph with a large tobacco basket, an art-forward fireplace screen, and natural design elements like plants. Details like arranging the paneling on the diagonal to “point” upward enhance the vertical space. Says James, “Tall ceilings, bold plant arrangements, and large light fixtures have even more impact in a small home. Play with scale to find what feels right.” Advertisement - Continue Reading Below9Mix and Match FurnitureLincoln BarbourFor the ultimate collected-over-time vibe, forgo matching furniture. Here, a wingback chair and a spool chair look right at home in this living room. Other period-appropriate decor found in this 100-year-old home: painted paneled walls, exposed ceiling beams, and a rustic mantel wood.TOUR THE ENTIRE HOUSE 10Let There Be Light (Wood)Christopher DibbleWe put this family room in the “rustic light” category. For a top-to-bottom cabin-like feel, designer Max Humphrey wrapped the space in eight-foot knotty pine planks on the ceiling and walls. A clear coat of polyurethane protects the wood while letting its natural color shine through (a stain would’ve darkened the room). Colorful national park posters, globes, camp grounds signage, and a linen modern sectional create a hip yet homey living space.Advertisement - Continue Reading Below11Customize a Focal PointHomeowners Victoria and Marcus Ford’s vision of a custom wood fireplace surround included open shelves and striking floor-to-ceiling firewood nooks (our favorite detail!). “We figured go big or go home,” says Victoria. Brass sconces provide a library-like touch, and a custom frame has the TV looking picture-perfect above the mantel.Get the Look:Wall and Trim Paint: Endless Sea by Sherwin-WilliamsCeiling Paint: Oyster White by Sherwin-WilliamsTOUR THE ENTIRE SPACE12Incorporate Rustic Furniture FindsAnnie SchlechterTopped with a plaid cushion, a rustic yellow daybed nestled in the corner makes for the coziest spot to take in lake views. The 22-foot cathedral ceilings are clad in wood, warming up this lofty open-concept space designed by Amy Meier that also includes a dining area and kitchen.TOUR THE ENTIRE HOUSE Advertisement - Continue Reading Below13Paint the FloorsDane Tashima for Country LivingWhile the homeowners of this New Jersey dairy barn were able to salvage the structure’s original knotty beams, the walls and floors in the soaring 25-foot-high space needed to be replaced. Simple poplar planks painted white got the job done affordably. A new cast-iron pellet stove warms the space with a rustic, authentic look. Get the Look:Wall and Floor Paint Color: Alabaster by Sherwin-WilliamsTOUR THE ENTIRE HOUSE14Tell the BackstorySean LitchfieldWhere possible, the original Eastern Hemlock posts and beams of this 1819 Maine barn were carefully preserved when, in 1999, the structure was disassembled and then reassembled several miles down the road. Hand-split slabs of Maine granite (some from the barn's original foundation) and brick were used to fabricate the massive woodburning fireplace. The walls and floors are lined in rough-hewn, nonuniform wood planks. The sofa table, made from an old piece of barn wood found on the farm, shows off collections of books, ceramics, and shells.Advertisement - Continue Reading Below15Use Old Materials for New BuildsBrie WilliamsIn this new build, reclaimed materials create instant patina for a warm and welcoming family room. Here’s what makes it rustic: reclaimed beams came from an 1800s mill in Massachusetts mill; log skins salvaged from old Midwest barns; North Carolina stone on the fireplace. A soft palette for the furniture and window treatments was inspired by the antique rug that covers the ottoman.TOUR THE ENTIRE HOUSE 16Balance Natural Wood with ColorNick JohnsonA pretty blue on the fireplace and in the fabrics balances the overall rustic vibe in this country house. “I wanted this room to feel rich and cozy and warm—the kind of place you’d sit by the fire to read a book,” says Erica Harrison of Detroit-based design firm Hudson and Sterling.TOUR THE ENTIRE HOUSEAdvertisement - Continue Reading Below17Make It WorkHelen NormanDespite the renovation challenges, this cozy sitting area situated just off the open kitchen works. The fireplace, which had to be rebuilt from the inside, was covered in stucco to balance all the exposed brick that was discovered underneath damaged drywall. For attic access, a ladder that was found in a barn on the property gets the job done in lieu of stairs. On the other side of the fireplace, a sturdy wooden bookshelf replaces an existing one that was crumbling.18Paint It WhiteZIO AND SONSFor the ultimate modern farmhouse vibe, start with an all-white palette, like in this home of designer Anthony D’Argenzio. This allows you to layer in character-rich architectural elements, like wide-planked wood floors and ceiling beams. A comfy sectional piled with pillows balances perfectly with hard elements, like the wood-and-iron coffee table, handmade oak stump side table, and a round iron chandelier. The hanging chair in the corner provides a wink to this serene design. RELATED: The Best Warm White Paint Colors For Every Room in Your HouseAdvertisement - Continue Reading Below19Leave Materials NaturalJames MerrellRustic meets cozy in this cabin that features walls constructed of hand-hewn logs, a stone fireplace, exposed ceiling beams, and a pair of comfy armchairs. Leaving all materials in their natural finish and unpainted contributes to the overall homespun feel.RELATED: The Best Places to Find or Buy Reclaimed Wood Near You20Choose Neutral FurnishingsSeth SmootIn this California living room, a comfortable collection of neutral furnishings complements the home’s rustic redwood walls. The solid sofa and barrel chairs that are upholstered in linen leave room for visual delights, like the wicker and fringe lamps, an antique rug, a patterned ottoman, and piles of pillows.Jennifer KopfJennifer Kopf is the Executive Editor of Country Living. She also covers antiques and collecting.Amy MitchellManaging EditorAmy Mitchell is the managing editor for VERANDA and Country Living, where she writes articles on a variety of topics—decorating and design, gardens, and holidays. Amy’s experience in the shelter magazine category spans more than 20 years, as she’s previously held positions at Coastal Living and Cottage Living. Her personal pursuits include cooking, gardening, and hunting her favorite tag sale spots for the next piece of Pyrex for her prized collection.
    0 Comments 0 Shares
  • Why Half Backsplashes Are Taking Over Kitchen Design, According to Experts

    Pictured Above: Designer Amber Lewis balances New England charm with old-world sophistication with a half Calacatta Vagli marble backsplash in the kitchen of this Martha's Vineyard home. To backsplash or not to backsplash? That is the question. Or is it? Because if anyone’s ever told you “you shouldn’t do anything halfway,” they clearly haven’t heard of the half backsplash. This twist on a design mainstay makes a compelling case for stopping short. So maybe the real question is: to backsplash or to half backsplash?Lately, we’ve seen more and more designers going for the latter. “A trend these days is to use 1/2 or 2/3 stone backsplashes with a six- to nine-inch ledge,” says designer Jennifer Gilmer. “This is typically used behind a range and adds interest as well as softening the overall look.” It’s not just aesthetic—it’s strategic functionality. “The ledge is useful for salt and pepper shakers, olive oil, and other items,” she adds. Ahead, we break down everything to know about half backsplashes and why this kitchen trend is gaining traction in the design world.Related StoriesWhat Is a Half Backsplash?Lisa PetroleMagnolia’s director of styling, Ashley Maddox, enlisted the help of designer Hilary Walker to create her midcentury-modern dream home in Waco, Texas. Complete with walnut kitchen cabinetry topped with a Topzstone countertop continued into a partial backsplash.“A half backsplash or 1/3 backsplash is when the material stops at a point on the wall determined by the design,” explains designer Isabella Patrick. This makes it distinct from a “built-out or existing element, such as upper cabinets, a ceiling, soffit, or some other inherent element of the space.” In other words, it’s intentional, not just the result of running out of tile.Courtesy of JN Interior SpacesTaking the ceiling height into consideration, JN Interior Spaces decided a half backsplash would be suitable for this sleek, modern kitchen.While traditional backsplashes typically reach the bottom of upper cabinetry or span the entire wall, partial backsplashes usually stop somewhere around four to 25 inches up, depending on the look you’re going for.And while it may sound like a design compromise, it’s actually quite the opposite.Related StoryWhy Designers Are Loving the Half-Height LookOpting for a half backsplash is a clever way to balance proportion, budget, and visual interest. “If the design does not have upper cabinets, we would opt for a half backsplash to create visual interest,” Patrick says. “A full wall of the same tile or stone could overwhelm the space and seem like an afterthought.”Shannon Dupre/DD RepsIsabella Patrick experimented with this concept in her own kitchen, mixing materials for a more layered half backsplash look.Instead, Patrick often mixes materials—like running Cambria quartzite up from the counter to a ledge, then switching to Fireclay tile above. “This is a great example of how a singular material would have overwhelmed the space but also may have felt like an afterthought,” she explains. “Mixing materials and adding in details and personal touches is what good design is.”Another bonus? It lets the rest of the kitchen sing. “In another design, we eliminated the upper cabinets in favor of a more open and airy look so that the windows were not blocked—and so you were not walking right into a side view of cabinetry,” Patrick says. “No upper cabinets also makes the kitchen feel more of a transitional space and decorative, especially since it opens right into a dining room.”krafty_photos
copyright 2021This kitchen from JN Interior Spaces proves that a partial backsplash can still make a big impact. They chose to use an iridescent, almost-patina tile in this Wyoming kitchen.For Jill Najinigier of JN Interior Spaces, the choice is just as much about form as it is function. “It's all about how the backsplash interacts with the architecture,” she explains. “Wall height, windows, the shape of the hood, upper cabinets, or open shelves—where do they start and terminate?”In one standout project, Najinigier used a luminous tile just tall enough to tuck under a tapered plaster hood, topped with a narrow stone ledge carved from the same slab as the counter. The result? “Clean lines that make a stunning statement.”Mixing materials and adding in details and personal touches is what good design is.It’s Decorative and FunctionalHeather TalbertDesigner Kate Pearce installed a statement-making marble backsplash. Bringing it only halfway up allows its beauty to be appreciated while giving the other aesthetic elements in the space room to breathe.Don’t underestimate what that ledge can do. Designer Kate Pearce swears by hers: “I love my little five-inch-deep marble shelf that allows me to style some vintage kitchenware in the space,” she says. “And I think the shelfis exactly what gives the kitchen an approachable feel—versus having a full backsplash of marble, which would have given the space a more serious vibe.”Stylish ProductionsPrioritizing visually continuity, Italian designer Federica Asack of Masseria Chic used the same leathered sandstone, a natural material that will develop a wonderful patina, for both the counters and the backsplash.Designer Federica Asack of Masseria Chic used a leathered sandstone for both her countertop and half backsplash, adding a ledge that’s just deep enough to style. “It allows for a splash-free decorating opportunity to layer artwork and favorite objects,” she says.Designer Molly Watson agrees: “The simple shelf is just deep enough for some special items to be on display,” she notes of a project where carrying the countertop stone up the wall helped keep things visually calm and scaled to the space. Related StoryThe Verdict on Half BacksplashesErin Kelly"Keeping materials simple in this kitchen was important for scale," says designer Molly Watson. "Carrying the countertop up the wall as a backsplash allowed the space to feel larger."Half backsplashes are having a major design moment, but not just because they’re practical. They’re a blank canvas for creativity. From floating ledges and mixed materials to budget-conscious decisions that don’t skimp on style, they’re a smartway to make your kitchen feel lighter, livelier, and totally considered.So, go ahead—do it halfway.Follow House Beautiful on Instagram and TikTok.
    #why #half #backsplashes #are #taking
    Why Half Backsplashes Are Taking Over Kitchen Design, According to Experts
    Pictured Above: Designer Amber Lewis balances New England charm with old-world sophistication with a half Calacatta Vagli marble backsplash in the kitchen of this Martha's Vineyard home. To backsplash or not to backsplash? That is the question. Or is it? Because if anyone’s ever told you “you shouldn’t do anything halfway,” they clearly haven’t heard of the half backsplash. This twist on a design mainstay makes a compelling case for stopping short. So maybe the real question is: to backsplash or to half backsplash?Lately, we’ve seen more and more designers going for the latter. “A trend these days is to use 1/2 or 2/3 stone backsplashes with a six- to nine-inch ledge,” says designer Jennifer Gilmer. “This is typically used behind a range and adds interest as well as softening the overall look.” It’s not just aesthetic—it’s strategic functionality. “The ledge is useful for salt and pepper shakers, olive oil, and other items,” she adds. Ahead, we break down everything to know about half backsplashes and why this kitchen trend is gaining traction in the design world.Related StoriesWhat Is a Half Backsplash?Lisa PetroleMagnolia’s director of styling, Ashley Maddox, enlisted the help of designer Hilary Walker to create her midcentury-modern dream home in Waco, Texas. Complete with walnut kitchen cabinetry topped with a Topzstone countertop continued into a partial backsplash.“A half backsplash or 1/3 backsplash is when the material stops at a point on the wall determined by the design,” explains designer Isabella Patrick. This makes it distinct from a “built-out or existing element, such as upper cabinets, a ceiling, soffit, or some other inherent element of the space.” In other words, it’s intentional, not just the result of running out of tile.Courtesy of JN Interior SpacesTaking the ceiling height into consideration, JN Interior Spaces decided a half backsplash would be suitable for this sleek, modern kitchen.While traditional backsplashes typically reach the bottom of upper cabinetry or span the entire wall, partial backsplashes usually stop somewhere around four to 25 inches up, depending on the look you’re going for.And while it may sound like a design compromise, it’s actually quite the opposite.Related StoryWhy Designers Are Loving the Half-Height LookOpting for a half backsplash is a clever way to balance proportion, budget, and visual interest. “If the design does not have upper cabinets, we would opt for a half backsplash to create visual interest,” Patrick says. “A full wall of the same tile or stone could overwhelm the space and seem like an afterthought.”Shannon Dupre/DD RepsIsabella Patrick experimented with this concept in her own kitchen, mixing materials for a more layered half backsplash look.Instead, Patrick often mixes materials—like running Cambria quartzite up from the counter to a ledge, then switching to Fireclay tile above. “This is a great example of how a singular material would have overwhelmed the space but also may have felt like an afterthought,” she explains. “Mixing materials and adding in details and personal touches is what good design is.”Another bonus? It lets the rest of the kitchen sing. “In another design, we eliminated the upper cabinets in favor of a more open and airy look so that the windows were not blocked—and so you were not walking right into a side view of cabinetry,” Patrick says. “No upper cabinets also makes the kitchen feel more of a transitional space and decorative, especially since it opens right into a dining room.”krafty_photos
copyright 2021This kitchen from JN Interior Spaces proves that a partial backsplash can still make a big impact. They chose to use an iridescent, almost-patina tile in this Wyoming kitchen.For Jill Najinigier of JN Interior Spaces, the choice is just as much about form as it is function. “It's all about how the backsplash interacts with the architecture,” she explains. “Wall height, windows, the shape of the hood, upper cabinets, or open shelves—where do they start and terminate?”In one standout project, Najinigier used a luminous tile just tall enough to tuck under a tapered plaster hood, topped with a narrow stone ledge carved from the same slab as the counter. The result? “Clean lines that make a stunning statement.”Mixing materials and adding in details and personal touches is what good design is.It’s Decorative and FunctionalHeather TalbertDesigner Kate Pearce installed a statement-making marble backsplash. Bringing it only halfway up allows its beauty to be appreciated while giving the other aesthetic elements in the space room to breathe.Don’t underestimate what that ledge can do. Designer Kate Pearce swears by hers: “I love my little five-inch-deep marble shelf that allows me to style some vintage kitchenware in the space,” she says. “And I think the shelfis exactly what gives the kitchen an approachable feel—versus having a full backsplash of marble, which would have given the space a more serious vibe.”Stylish ProductionsPrioritizing visually continuity, Italian designer Federica Asack of Masseria Chic used the same leathered sandstone, a natural material that will develop a wonderful patina, for both the counters and the backsplash.Designer Federica Asack of Masseria Chic used a leathered sandstone for both her countertop and half backsplash, adding a ledge that’s just deep enough to style. “It allows for a splash-free decorating opportunity to layer artwork and favorite objects,” she says.Designer Molly Watson agrees: “The simple shelf is just deep enough for some special items to be on display,” she notes of a project where carrying the countertop stone up the wall helped keep things visually calm and scaled to the space. Related StoryThe Verdict on Half BacksplashesErin Kelly"Keeping materials simple in this kitchen was important for scale," says designer Molly Watson. "Carrying the countertop up the wall as a backsplash allowed the space to feel larger."Half backsplashes are having a major design moment, but not just because they’re practical. They’re a blank canvas for creativity. From floating ledges and mixed materials to budget-conscious decisions that don’t skimp on style, they’re a smartway to make your kitchen feel lighter, livelier, and totally considered.So, go ahead—do it halfway.Follow House Beautiful on Instagram and TikTok. #why #half #backsplashes #are #taking
    WWW.HOUSEBEAUTIFUL.COM
    Why Half Backsplashes Are Taking Over Kitchen Design, According to Experts
    Pictured Above: Designer Amber Lewis balances New England charm with old-world sophistication with a half Calacatta Vagli marble backsplash in the kitchen of this Martha's Vineyard home. To backsplash or not to backsplash? That is the question. Or is it? Because if anyone’s ever told you “you shouldn’t do anything halfway,” they clearly haven’t heard of the half backsplash. This twist on a design mainstay makes a compelling case for stopping short. So maybe the real question is: to backsplash or to half backsplash?Lately, we’ve seen more and more designers going for the latter. “A trend these days is to use 1/2 or 2/3 stone backsplashes with a six- to nine-inch ledge,” says designer Jennifer Gilmer. “This is typically used behind a range and adds interest as well as softening the overall look.” It’s not just aesthetic—it’s strategic functionality. “The ledge is useful for salt and pepper shakers, olive oil, and other items,” she adds. Ahead, we break down everything to know about half backsplashes and why this kitchen trend is gaining traction in the design world.Related StoriesWhat Is a Half Backsplash?Lisa PetroleMagnolia’s director of styling, Ashley Maddox, enlisted the help of designer Hilary Walker to create her midcentury-modern dream home in Waco, Texas. Complete with walnut kitchen cabinetry topped with a Topzstone countertop continued into a partial backsplash.“A half backsplash or 1/3 backsplash is when the material stops at a point on the wall determined by the design,” explains designer Isabella Patrick. This makes it distinct from a “built-out or existing element, such as upper cabinets, a ceiling, soffit, or some other inherent element of the space.” In other words, it’s intentional, not just the result of running out of tile.Courtesy of JN Interior SpacesTaking the ceiling height into consideration, JN Interior Spaces decided a half backsplash would be suitable for this sleek, modern kitchen.While traditional backsplashes typically reach the bottom of upper cabinetry or span the entire wall, partial backsplashes usually stop somewhere around four to 25 inches up, depending on the look you’re going for.And while it may sound like a design compromise, it’s actually quite the opposite.Related StoryWhy Designers Are Loving the Half-Height LookOpting for a half backsplash is a clever way to balance proportion, budget, and visual interest. “If the design does not have upper cabinets, we would opt for a half backsplash to create visual interest,” Patrick says. “A full wall of the same tile or stone could overwhelm the space and seem like an afterthought.”Shannon Dupre/DD RepsIsabella Patrick experimented with this concept in her own kitchen, mixing materials for a more layered half backsplash look.Instead, Patrick often mixes materials—like running Cambria quartzite up from the counter to a ledge, then switching to Fireclay tile above. “This is a great example of how a singular material would have overwhelmed the space but also may have felt like an afterthought,” she explains. “Mixing materials and adding in details and personal touches is what good design is.”Another bonus? It lets the rest of the kitchen sing. “In another design, we eliminated the upper cabinets in favor of a more open and airy look so that the windows were not blocked—and so you were not walking right into a side view of cabinetry,” Patrick says. “No upper cabinets also makes the kitchen feel more of a transitional space and decorative, especially since it opens right into a dining room.”krafty_photos
copyright 2021This kitchen from JN Interior Spaces proves that a partial backsplash can still make a big impact. They chose to use an iridescent, almost-patina tile in this Wyoming kitchen.For Jill Najinigier of JN Interior Spaces, the choice is just as much about form as it is function. “It's all about how the backsplash interacts with the architecture,” she explains. “Wall height, windows, the shape of the hood, upper cabinets, or open shelves—where do they start and terminate?”In one standout project, Najinigier used a luminous tile just tall enough to tuck under a tapered plaster hood, topped with a narrow stone ledge carved from the same slab as the counter. The result? “Clean lines that make a stunning statement.”Mixing materials and adding in details and personal touches is what good design is.It’s Decorative and FunctionalHeather TalbertDesigner Kate Pearce installed a statement-making marble backsplash. Bringing it only halfway up allows its beauty to be appreciated while giving the other aesthetic elements in the space room to breathe.Don’t underestimate what that ledge can do. Designer Kate Pearce swears by hers: “I love my little five-inch-deep marble shelf that allows me to style some vintage kitchenware in the space,” she says. “And I think the shelf (and the pieces styled on it) is exactly what gives the kitchen an approachable feel—versus having a full backsplash of marble, which would have given the space a more serious vibe.”Stylish ProductionsPrioritizing visually continuity, Italian designer Federica Asack of Masseria Chic used the same leathered sandstone, a natural material that will develop a wonderful patina, for both the counters and the backsplash.Designer Federica Asack of Masseria Chic used a leathered sandstone for both her countertop and half backsplash, adding a ledge that’s just deep enough to style. “It allows for a splash-free decorating opportunity to layer artwork and favorite objects,” she says.Designer Molly Watson agrees: “The simple shelf is just deep enough for some special items to be on display,” she notes of a project where carrying the countertop stone up the wall helped keep things visually calm and scaled to the space. Related StoryThe Verdict on Half BacksplashesErin Kelly"Keeping materials simple in this kitchen was important for scale," says designer Molly Watson. "Carrying the countertop up the wall as a backsplash allowed the space to feel larger."Half backsplashes are having a major design moment, but not just because they’re practical. They’re a blank canvas for creativity. From floating ledges and mixed materials to budget-conscious decisions that don’t skimp on style, they’re a smart (and stylish) way to make your kitchen feel lighter, livelier, and totally considered.So, go ahead—do it halfway.Follow House Beautiful on Instagram and TikTok.
    0 Comments 0 Shares
  • How Do I Make A Small Space Look Bigger Without Renovating

    Living in a small space doesn’t mean you have to feel cramped or boxed in. With the right design tricks, you can make even the tiniest room feel open, airy, and inviting, no renovation required. Whether you’re in a compact apartment, a small home, or just trying to make the most of a single room, smart styling and layout choices can dramatically shift how the space looks and feels. From strategic lighting and paint colors to furniture swaps and clever storage solutions, there are plenty of easy, affordable ways to stretch your square footage visually. Ready to transform your space? Here are some practical, design-savvy ideas to make your home feel bigger without tearing down a single wall.

    1. Opt for Multi-Functional Furniture

    Image Source: House Beautiful

    In a small space, every piece of furniture should earn its keep. Look for multi-functional items: ottomans that open up for storage, beds with drawers underneath, or coffee tables that can extend or lift to become a desk. Not only do these pieces help reduce clutter, but they also free up floor space, making the room look more open. Bonus points for furniture that can be folded away when not in use. By choosing versatile pieces, you’re making the most of every inch without sacrificing style or comfort.

    2. Keep Pathways Clear

    Image Source: The Spruce

    One of the simplest yet most effective ways to make a small space feel bigger is to keep pathways and walkways clear. When furniture or clutter blocks natural movement through a room, it can make the space feel cramped and chaotic. Take a walk through your home and notice where you’re dodging corners or squeezing between pieces,those are areas to rethink. Opt for smaller furniture with slim profiles, or rearrange what you have to create an easy, natural flow. Open walkways help your eyes move freely through the room, making everything feel more spacious, breathable, and intentional. It’s all about giving yourself room to move,literally and visually.

    3. Use Glass and Lucite Furniture

    Image Source: The Spruce

    Transparent furniture made from glass or Lucitetakes up less visual space because you can see right through it. A glass coffee table or clear dining chairs can provide functionality without cluttering up the view. These pieces practically disappear into the background, which helps the room feel more open. They also add a touch of modern sophistication. When you need furniture but don’t want it to dominate the room, going clear is a clever design choice.

    4. Don’t Over-Clutter Your Space

    Image Source: House Beautiful

    In small spaces, clutter accumulates fast,and it visually shrinks your environment. The more items scattered around, the more cramped the room feels. Start by taking a critical look at what you own and asking: do I really need this here? Use storage bins, under-bed containers, or floating shelves to hide away what you don’t use daily. Keep surfaces like countertops, desks, and coffee tables as clear as possible. A minimal, clean setup allows the eye to rest and makes the space feel open and intentional. Remember: less stuff equals more space,both physically and mentally.

    5. Utilize Your Windows

    Image Source: House Beautiful

    Windows are like built-in art that can also dramatically affect how big or small your space feels. Don’t cover them with heavy drapes or clutter them with too many objects on the sill. Keep window treatments light and minimal,sheer curtains or roller blinds are perfect. If privacy isn’t a big concern, consider leaving them bare. Letting natural light flood in through your windows instantly opens up your space and makes it feel brighter and more expansive. You can also place mirrors or shiny surfaces near windows to reflect more light into the room and maximize their impact.

    6. Downsize Your Dining Table

    Image Source: House Beautiful

    A large dining table can dominate a small room, leaving little space to move or breathe. If you rarely entertain a big crowd, consider downsizing to a smaller round or drop-leaf table. These take up less visual and physical space and still offer enough room for daily meals. You can always keep a folding table or stackable chairs nearby for when guests do come over. Round tables are especially great for small spaces because they allow smoother traffic flow and eliminate awkward corners. Plus, a smaller table encourages intimacy during meals and helps the whole area feel more open and functional.

    7. Use Mirrors Strategically

    Image Source: The Tiny Cottage

    Mirrors can work magic in a small room. They reflect both natural and artificial light, which can instantly make a space feel larger and brighter. A large mirror on a wall opposite a window can double the amount of light in your room. Mirrored furniture or decor elements like trays and picture frames also help. Think about using mirrored closet doors or even creating a mirror gallery wall. It’s not just about brightness; mirrors also create a sense of depth, tricking the eye into seeing more space than there actually is.

    8. Install a Murphy Bed

    Image Source: House Beautiful

    A Murphy bedis a game-changer for anyone living in a tight space. It folds up into the wall or a cabinet when not in use, instantly transforming your bedroom into a living room, office, or workout area. This setup gives you the flexibility to have a multi-purpose room without sacrificing comfort. Modern Murphy beds often come with built-in shelves or desks, offering even more function without taking up extra space. If you want to reclaim your floor during the day and still get a good night’s sleep, this is one smart solution.

    9. Paint It White

    Image Source: House Beautiful

    Painting your walls white is one of the easiest and most effective tricks to make a space feel bigger. White reflects light, helping the room feel open, clean, and fresh. It creates a seamless look, making walls seem to recede and ceilings feel higher. You can still have fun with the space, layer in texture, subtle patterns, or neutral accessories to keep it from feeling sterile. White also acts as a blank canvas, letting your furniture and art stand out. Whether you’re decorating a studio apartment or a small home office, a fresh coat of white paint can work wonders.

    10. Prioritize Natural Light

    Image Source: The Spruce

    Natural light has an incredible ability to make any room feel more spacious and welcoming. To make the most of it, avoid blocking windows with bulky furniture or dark curtains. Consider using light-filtering shades or sheer curtains to let sunlight pour in while maintaining some privacy. Arrange mirrors or reflective surfaces like glossy tables and metallic decor to bounce the light around the room. Even placing furniture in a way that lets light flow freely can change how open your home feels. Natural light not only brightens your space but also boosts your mood, making it a double win.

    11. Maximize Shelving

    Image Source: House Beautiful

    When floor space is limited, vertical storage becomes your best ally. Floating shelves, wall-mounted units, or tall bookcases draw the eye upward, creating a sense of height and maximizing every inch. They’re perfect for books, plants, artwork, or even kitchen supplies if you’re short on cabinets. You can also install corner shelves to use often-overlooked spots. Keep them tidy and curated,group items by color, size, or theme for a visually pleasing look. Shelving helps reduce clutter on the floor and tabletops, keeping your home organized and visually open without requiring any extra square footage.

    12. Keep It Neutral

    Image Source: House Beautiful

    Neutral tones, like soft whites, light grays, warm beiges, and pale taupes,can make a space feel calm and cohesive. These colors reflect light well and reduce visual clutter, making your room appear larger. A neutral palette doesn’t mean boring; you can still play with textures, patterns, and accents within that color family. Add throw pillows, rugs, or wall art in layered neutrals for interest without overwhelming the space. When everything flows in similar tones, it creates continuity, which tricks the eye into seeing a more expansive area. It’s an effortless way to open up your home without lifting a hammer.

    13. Choose Benches, Not Chairs

    Image Source: House Beautiful

    When space is tight, traditional dining chairs or bulky accent seats can eat up more room than they’re worth. Benches, on the other hand, are a sleek, versatile alternative. They tuck neatly under tables when not in use, saving valuable floor space and keeping walkways open. In entryways, living rooms, or at the foot of a bed, a bench offers seating and can double as storage or display. Some come with built-in compartments or open space beneath for baskets. Plus, benches visually declutter the room with their simple, low-profile design.

    14. Use Vertical Spaces

    Image Source: The Spruce

    When you’re short on square footage, think vertical. Use tall bookshelves, wall-mounted shelves, and hanging storage to keep things off the floor. Vertical lines naturally draw the eye upward, which creates a feeling of height and openness. Consider mounting floating shelves for books, plants, or decorative items. Hooks and pegboards can add function without taking up space. Making use of your wall space not only maximizes storage but also frees up floor area, which visually enlarges the room.

    15. Add a Gallery Wall

    Image Source: House Beautiful

    It might seem counterintuitive, but adding a gallery wall can actually make a small space feel bigger,if done right. A curated display of art, photos, or prints draws the eye upward and outward, giving the illusion of a larger area. Stick to cohesive frames and colors to maintain a clean, intentional look. You can go symmetrical for a polished feel or get creative with an organic, freeform layout. Position the gallery higher on the wall to elongate the space visually. Just be sure not to overcrowd,balance is key. A thoughtful gallery wall adds personality without cluttering the room.

    Finishing Notes:

    Creating a spacious feel in a small home doesn’t require a sledgehammer or a major remodel, it just takes a bit of strategy and smart design. From downsizing your dining table to letting natural light pour in, each tip we’ve shared is an easy, budget-friendly way to visually open up your space.

    If you’re looking for even more inspiration, layout ideas, or style guides, be sure to explore Home Designing. It’s packed with expert advice, modern interior trends, and visual walkthroughs to help you transform your space, big or small, into something that truly feels like home.
    #how #make #small #space #look
    How Do I Make A Small Space Look Bigger Without Renovating
    Living in a small space doesn’t mean you have to feel cramped or boxed in. With the right design tricks, you can make even the tiniest room feel open, airy, and inviting, no renovation required. Whether you’re in a compact apartment, a small home, or just trying to make the most of a single room, smart styling and layout choices can dramatically shift how the space looks and feels. From strategic lighting and paint colors to furniture swaps and clever storage solutions, there are plenty of easy, affordable ways to stretch your square footage visually. Ready to transform your space? Here are some practical, design-savvy ideas to make your home feel bigger without tearing down a single wall. 1. Opt for Multi-Functional Furniture Image Source: House Beautiful In a small space, every piece of furniture should earn its keep. Look for multi-functional items: ottomans that open up for storage, beds with drawers underneath, or coffee tables that can extend or lift to become a desk. Not only do these pieces help reduce clutter, but they also free up floor space, making the room look more open. Bonus points for furniture that can be folded away when not in use. By choosing versatile pieces, you’re making the most of every inch without sacrificing style or comfort. 2. Keep Pathways Clear Image Source: The Spruce One of the simplest yet most effective ways to make a small space feel bigger is to keep pathways and walkways clear. When furniture or clutter blocks natural movement through a room, it can make the space feel cramped and chaotic. Take a walk through your home and notice where you’re dodging corners or squeezing between pieces,those are areas to rethink. Opt for smaller furniture with slim profiles, or rearrange what you have to create an easy, natural flow. Open walkways help your eyes move freely through the room, making everything feel more spacious, breathable, and intentional. It’s all about giving yourself room to move,literally and visually. 3. Use Glass and Lucite Furniture Image Source: The Spruce Transparent furniture made from glass or Lucitetakes up less visual space because you can see right through it. A glass coffee table or clear dining chairs can provide functionality without cluttering up the view. These pieces practically disappear into the background, which helps the room feel more open. They also add a touch of modern sophistication. When you need furniture but don’t want it to dominate the room, going clear is a clever design choice. 4. Don’t Over-Clutter Your Space Image Source: House Beautiful In small spaces, clutter accumulates fast,and it visually shrinks your environment. The more items scattered around, the more cramped the room feels. Start by taking a critical look at what you own and asking: do I really need this here? Use storage bins, under-bed containers, or floating shelves to hide away what you don’t use daily. Keep surfaces like countertops, desks, and coffee tables as clear as possible. A minimal, clean setup allows the eye to rest and makes the space feel open and intentional. Remember: less stuff equals more space,both physically and mentally. 5. Utilize Your Windows Image Source: House Beautiful Windows are like built-in art that can also dramatically affect how big or small your space feels. Don’t cover them with heavy drapes or clutter them with too many objects on the sill. Keep window treatments light and minimal,sheer curtains or roller blinds are perfect. If privacy isn’t a big concern, consider leaving them bare. Letting natural light flood in through your windows instantly opens up your space and makes it feel brighter and more expansive. You can also place mirrors or shiny surfaces near windows to reflect more light into the room and maximize their impact. 6. Downsize Your Dining Table Image Source: House Beautiful A large dining table can dominate a small room, leaving little space to move or breathe. If you rarely entertain a big crowd, consider downsizing to a smaller round or drop-leaf table. These take up less visual and physical space and still offer enough room for daily meals. You can always keep a folding table or stackable chairs nearby for when guests do come over. Round tables are especially great for small spaces because they allow smoother traffic flow and eliminate awkward corners. Plus, a smaller table encourages intimacy during meals and helps the whole area feel more open and functional. 7. Use Mirrors Strategically Image Source: The Tiny Cottage Mirrors can work magic in a small room. They reflect both natural and artificial light, which can instantly make a space feel larger and brighter. A large mirror on a wall opposite a window can double the amount of light in your room. Mirrored furniture or decor elements like trays and picture frames also help. Think about using mirrored closet doors or even creating a mirror gallery wall. It’s not just about brightness; mirrors also create a sense of depth, tricking the eye into seeing more space than there actually is. 8. Install a Murphy Bed Image Source: House Beautiful A Murphy bedis a game-changer for anyone living in a tight space. It folds up into the wall or a cabinet when not in use, instantly transforming your bedroom into a living room, office, or workout area. This setup gives you the flexibility to have a multi-purpose room without sacrificing comfort. Modern Murphy beds often come with built-in shelves or desks, offering even more function without taking up extra space. If you want to reclaim your floor during the day and still get a good night’s sleep, this is one smart solution. 9. Paint It White Image Source: House Beautiful Painting your walls white is one of the easiest and most effective tricks to make a space feel bigger. White reflects light, helping the room feel open, clean, and fresh. It creates a seamless look, making walls seem to recede and ceilings feel higher. You can still have fun with the space, layer in texture, subtle patterns, or neutral accessories to keep it from feeling sterile. White also acts as a blank canvas, letting your furniture and art stand out. Whether you’re decorating a studio apartment or a small home office, a fresh coat of white paint can work wonders. 10. Prioritize Natural Light Image Source: The Spruce Natural light has an incredible ability to make any room feel more spacious and welcoming. To make the most of it, avoid blocking windows with bulky furniture or dark curtains. Consider using light-filtering shades or sheer curtains to let sunlight pour in while maintaining some privacy. Arrange mirrors or reflective surfaces like glossy tables and metallic decor to bounce the light around the room. Even placing furniture in a way that lets light flow freely can change how open your home feels. Natural light not only brightens your space but also boosts your mood, making it a double win. 11. Maximize Shelving Image Source: House Beautiful When floor space is limited, vertical storage becomes your best ally. Floating shelves, wall-mounted units, or tall bookcases draw the eye upward, creating a sense of height and maximizing every inch. They’re perfect for books, plants, artwork, or even kitchen supplies if you’re short on cabinets. You can also install corner shelves to use often-overlooked spots. Keep them tidy and curated,group items by color, size, or theme for a visually pleasing look. Shelving helps reduce clutter on the floor and tabletops, keeping your home organized and visually open without requiring any extra square footage. 12. Keep It Neutral Image Source: House Beautiful Neutral tones, like soft whites, light grays, warm beiges, and pale taupes,can make a space feel calm and cohesive. These colors reflect light well and reduce visual clutter, making your room appear larger. A neutral palette doesn’t mean boring; you can still play with textures, patterns, and accents within that color family. Add throw pillows, rugs, or wall art in layered neutrals for interest without overwhelming the space. When everything flows in similar tones, it creates continuity, which tricks the eye into seeing a more expansive area. It’s an effortless way to open up your home without lifting a hammer. 13. Choose Benches, Not Chairs Image Source: House Beautiful When space is tight, traditional dining chairs or bulky accent seats can eat up more room than they’re worth. Benches, on the other hand, are a sleek, versatile alternative. They tuck neatly under tables when not in use, saving valuable floor space and keeping walkways open. In entryways, living rooms, or at the foot of a bed, a bench offers seating and can double as storage or display. Some come with built-in compartments or open space beneath for baskets. Plus, benches visually declutter the room with their simple, low-profile design. 14. Use Vertical Spaces Image Source: The Spruce When you’re short on square footage, think vertical. Use tall bookshelves, wall-mounted shelves, and hanging storage to keep things off the floor. Vertical lines naturally draw the eye upward, which creates a feeling of height and openness. Consider mounting floating shelves for books, plants, or decorative items. Hooks and pegboards can add function without taking up space. Making use of your wall space not only maximizes storage but also frees up floor area, which visually enlarges the room. 15. Add a Gallery Wall Image Source: House Beautiful It might seem counterintuitive, but adding a gallery wall can actually make a small space feel bigger,if done right. A curated display of art, photos, or prints draws the eye upward and outward, giving the illusion of a larger area. Stick to cohesive frames and colors to maintain a clean, intentional look. You can go symmetrical for a polished feel or get creative with an organic, freeform layout. Position the gallery higher on the wall to elongate the space visually. Just be sure not to overcrowd,balance is key. A thoughtful gallery wall adds personality without cluttering the room. Finishing Notes: Creating a spacious feel in a small home doesn’t require a sledgehammer or a major remodel, it just takes a bit of strategy and smart design. From downsizing your dining table to letting natural light pour in, each tip we’ve shared is an easy, budget-friendly way to visually open up your space. If you’re looking for even more inspiration, layout ideas, or style guides, be sure to explore Home Designing. It’s packed with expert advice, modern interior trends, and visual walkthroughs to help you transform your space, big or small, into something that truly feels like home. #how #make #small #space #look
    WWW.HOME-DESIGNING.COM
    How Do I Make A Small Space Look Bigger Without Renovating
    Living in a small space doesn’t mean you have to feel cramped or boxed in. With the right design tricks, you can make even the tiniest room feel open, airy, and inviting, no renovation required. Whether you’re in a compact apartment, a small home, or just trying to make the most of a single room, smart styling and layout choices can dramatically shift how the space looks and feels. From strategic lighting and paint colors to furniture swaps and clever storage solutions, there are plenty of easy, affordable ways to stretch your square footage visually. Ready to transform your space? Here are some practical, design-savvy ideas to make your home feel bigger without tearing down a single wall. 1. Opt for Multi-Functional Furniture Image Source: House Beautiful In a small space, every piece of furniture should earn its keep. Look for multi-functional items: ottomans that open up for storage, beds with drawers underneath, or coffee tables that can extend or lift to become a desk. Not only do these pieces help reduce clutter, but they also free up floor space, making the room look more open. Bonus points for furniture that can be folded away when not in use. By choosing versatile pieces, you’re making the most of every inch without sacrificing style or comfort. 2. Keep Pathways Clear Image Source: The Spruce One of the simplest yet most effective ways to make a small space feel bigger is to keep pathways and walkways clear. When furniture or clutter blocks natural movement through a room, it can make the space feel cramped and chaotic. Take a walk through your home and notice where you’re dodging corners or squeezing between pieces,those are areas to rethink. Opt for smaller furniture with slim profiles, or rearrange what you have to create an easy, natural flow. Open walkways help your eyes move freely through the room, making everything feel more spacious, breathable, and intentional. It’s all about giving yourself room to move,literally and visually. 3. Use Glass and Lucite Furniture Image Source: The Spruce Transparent furniture made from glass or Lucite (acrylic) takes up less visual space because you can see right through it. A glass coffee table or clear dining chairs can provide functionality without cluttering up the view. These pieces practically disappear into the background, which helps the room feel more open. They also add a touch of modern sophistication. When you need furniture but don’t want it to dominate the room, going clear is a clever design choice. 4. Don’t Over-Clutter Your Space Image Source: House Beautiful In small spaces, clutter accumulates fast,and it visually shrinks your environment. The more items scattered around, the more cramped the room feels. Start by taking a critical look at what you own and asking: do I really need this here? Use storage bins, under-bed containers, or floating shelves to hide away what you don’t use daily. Keep surfaces like countertops, desks, and coffee tables as clear as possible. A minimal, clean setup allows the eye to rest and makes the space feel open and intentional. Remember: less stuff equals more space,both physically and mentally. 5. Utilize Your Windows Image Source: House Beautiful Windows are like built-in art that can also dramatically affect how big or small your space feels. Don’t cover them with heavy drapes or clutter them with too many objects on the sill. Keep window treatments light and minimal,sheer curtains or roller blinds are perfect. If privacy isn’t a big concern, consider leaving them bare. Letting natural light flood in through your windows instantly opens up your space and makes it feel brighter and more expansive. You can also place mirrors or shiny surfaces near windows to reflect more light into the room and maximize their impact. 6. Downsize Your Dining Table Image Source: House Beautiful A large dining table can dominate a small room, leaving little space to move or breathe. If you rarely entertain a big crowd, consider downsizing to a smaller round or drop-leaf table. These take up less visual and physical space and still offer enough room for daily meals. You can always keep a folding table or stackable chairs nearby for when guests do come over. Round tables are especially great for small spaces because they allow smoother traffic flow and eliminate awkward corners. Plus, a smaller table encourages intimacy during meals and helps the whole area feel more open and functional. 7. Use Mirrors Strategically Image Source: The Tiny Cottage Mirrors can work magic in a small room. They reflect both natural and artificial light, which can instantly make a space feel larger and brighter. A large mirror on a wall opposite a window can double the amount of light in your room. Mirrored furniture or decor elements like trays and picture frames also help. Think about using mirrored closet doors or even creating a mirror gallery wall. It’s not just about brightness; mirrors also create a sense of depth, tricking the eye into seeing more space than there actually is. 8. Install a Murphy Bed Image Source: House Beautiful A Murphy bed (also known as a wall bed) is a game-changer for anyone living in a tight space. It folds up into the wall or a cabinet when not in use, instantly transforming your bedroom into a living room, office, or workout area. This setup gives you the flexibility to have a multi-purpose room without sacrificing comfort. Modern Murphy beds often come with built-in shelves or desks, offering even more function without taking up extra space. If you want to reclaim your floor during the day and still get a good night’s sleep, this is one smart solution. 9. Paint It White Image Source: House Beautiful Painting your walls white is one of the easiest and most effective tricks to make a space feel bigger. White reflects light, helping the room feel open, clean, and fresh. It creates a seamless look, making walls seem to recede and ceilings feel higher. You can still have fun with the space, layer in texture, subtle patterns, or neutral accessories to keep it from feeling sterile. White also acts as a blank canvas, letting your furniture and art stand out. Whether you’re decorating a studio apartment or a small home office, a fresh coat of white paint can work wonders. 10. Prioritize Natural Light Image Source: The Spruce Natural light has an incredible ability to make any room feel more spacious and welcoming. To make the most of it, avoid blocking windows with bulky furniture or dark curtains. Consider using light-filtering shades or sheer curtains to let sunlight pour in while maintaining some privacy. Arrange mirrors or reflective surfaces like glossy tables and metallic decor to bounce the light around the room. Even placing furniture in a way that lets light flow freely can change how open your home feels. Natural light not only brightens your space but also boosts your mood, making it a double win. 11. Maximize Shelving Image Source: House Beautiful When floor space is limited, vertical storage becomes your best ally. Floating shelves, wall-mounted units, or tall bookcases draw the eye upward, creating a sense of height and maximizing every inch. They’re perfect for books, plants, artwork, or even kitchen supplies if you’re short on cabinets. You can also install corner shelves to use often-overlooked spots. Keep them tidy and curated,group items by color, size, or theme for a visually pleasing look. Shelving helps reduce clutter on the floor and tabletops, keeping your home organized and visually open without requiring any extra square footage. 12. Keep It Neutral Image Source: House Beautiful Neutral tones, like soft whites, light grays, warm beiges, and pale taupes,can make a space feel calm and cohesive. These colors reflect light well and reduce visual clutter, making your room appear larger. A neutral palette doesn’t mean boring; you can still play with textures, patterns, and accents within that color family. Add throw pillows, rugs, or wall art in layered neutrals for interest without overwhelming the space. When everything flows in similar tones, it creates continuity, which tricks the eye into seeing a more expansive area. It’s an effortless way to open up your home without lifting a hammer. 13. Choose Benches, Not Chairs Image Source: House Beautiful When space is tight, traditional dining chairs or bulky accent seats can eat up more room than they’re worth. Benches, on the other hand, are a sleek, versatile alternative. They tuck neatly under tables when not in use, saving valuable floor space and keeping walkways open. In entryways, living rooms, or at the foot of a bed, a bench offers seating and can double as storage or display. Some come with built-in compartments or open space beneath for baskets. Plus, benches visually declutter the room with their simple, low-profile design. 14. Use Vertical Spaces Image Source: The Spruce When you’re short on square footage, think vertical. Use tall bookshelves, wall-mounted shelves, and hanging storage to keep things off the floor. Vertical lines naturally draw the eye upward, which creates a feeling of height and openness. Consider mounting floating shelves for books, plants, or decorative items. Hooks and pegboards can add function without taking up space. Making use of your wall space not only maximizes storage but also frees up floor area, which visually enlarges the room. 15. Add a Gallery Wall Image Source: House Beautiful It might seem counterintuitive, but adding a gallery wall can actually make a small space feel bigger,if done right. A curated display of art, photos, or prints draws the eye upward and outward, giving the illusion of a larger area. Stick to cohesive frames and colors to maintain a clean, intentional look. You can go symmetrical for a polished feel or get creative with an organic, freeform layout. Position the gallery higher on the wall to elongate the space visually. Just be sure not to overcrowd,balance is key. A thoughtful gallery wall adds personality without cluttering the room. Finishing Notes: Creating a spacious feel in a small home doesn’t require a sledgehammer or a major remodel, it just takes a bit of strategy and smart design. From downsizing your dining table to letting natural light pour in, each tip we’ve shared is an easy, budget-friendly way to visually open up your space. If you’re looking for even more inspiration, layout ideas, or style guides, be sure to explore Home Designing. It’s packed with expert advice, modern interior trends, and visual walkthroughs to help you transform your space, big or small, into something that truly feels like home.
    0 Comments 0 Shares
  • Muted Harmony Dining Room: Board with Shopping List

    Style: Modern Minimalist

    Color Combination: Sage green, warm wood, cream white, charcoal black

    Who is it for: For those who believe less is more, but more should still feel inviting. Perfect for dinner party hosts who want their space to whisper elegance rather than shout for attention, and where every meal feels like a thoughtful moment.

    Budget: $-$$

    Muted Harmony Dining Room – Shopping List

    Below, we present a curated list of products presented on the board:

    1. Houke Rectangular Dining Table

    2. White Boucle Dining Chairs

    3. Matte Black Candle Holders

    4. ZZ Live Indoor Tabletop Plant

    5. White Ceramic Vase

    6. Sideboard Buffets Cabinet

    7. Ceramic Vase with Grooves

    8. Abstract Canvas Wall Art 

    9. Kristen Single Pendant

    10. Maja Tufted Area Rug

    11. Wall Molding Kit

    12. Black Metal Framed Wall Mirror

    Tips and suggestions

    Colors that Work Together: This palette is like a gentle exhale: calming but never boring. The sage green acts as nature’s neutral, bringing serenity without the sterility of pure white. Warm wood tones ground the space, while strategic black accents provide just enough contrast to keep things interesting without disruption.

    Lighting Strategy: Those sage pendant lights? They’re doing double duty as both functional task lighting and sculptural art pieces. The key is hanging them at the right height – about 30-36 inches above your table surface. This creates intimate pools of light perfect for both family dinners and dinner parties.

    Furniture Foundation: The natural wood dining table is the room’s anchor – substantial enough to feel permanent but simple enough to never go out of style. When choosing dining chairs, look for pieces that blend comfort with clean lines. The built-in banquette seating maximizes space while maintaining the streamlined aesthetic.

    Storage Solutions: That fluted sideboard isn’t just beautiful – it’s incredibly practical. The vertical ridges add texture and visual interest while hiding away dining essentials. Think of it as jewellery for your dining room that happens to store your good china.

    Art and Accessories: The monochrome abstract piece proves that wall art doesn’t need color to make an impact. Black and white photography or simple line drawings work beautifully in this palette. Keep accessories minimal but meaningful—a single ceramic vase, a small plant, perhaps a beautiful bowl.

    Flooring and Textiles: Layered rugs create depth and warmth underfoot. The neutral tones ensure they’ll work as your style evolves, while the varied textures prevent the space from feeling flat. Think of rugs as the room’s foundation garments—invisible but essential.

    The Mirror Moment: That large mirror isn’t just decorative – it’s also architectural. Positioned strategically, it reflects natural light and makes the space feel larger and brighter. In a minimalist room, every piece needs to earn its place, and mirrors are multitasking champions.

    The Final Note: of restraint. This isn’t minimalism that feels cold – it’s minimalism that feels intentional and warm. Every element here serves a purpose while contributing to the overall sense of calm sophistication.
    #muted #harmony #dining #room #board
    Muted Harmony Dining Room: Board with Shopping List
    Style: Modern Minimalist Color Combination: Sage green, warm wood, cream white, charcoal black Who is it for: For those who believe less is more, but more should still feel inviting. Perfect for dinner party hosts who want their space to whisper elegance rather than shout for attention, and where every meal feels like a thoughtful moment. Budget: $-$$ Muted Harmony Dining Room – Shopping List Below, we present a curated list of products presented on the board: 1. Houke Rectangular Dining Table 2. White Boucle Dining Chairs 3. Matte Black Candle Holders 4. ZZ Live Indoor Tabletop Plant 5. White Ceramic Vase 6. Sideboard Buffets Cabinet 7. Ceramic Vase with Grooves 8. Abstract Canvas Wall Art  9. Kristen Single Pendant 10. Maja Tufted Area Rug 11. Wall Molding Kit 12. Black Metal Framed Wall Mirror Tips and suggestions Colors that Work Together: This palette is like a gentle exhale: calming but never boring. The sage green acts as nature’s neutral, bringing serenity without the sterility of pure white. Warm wood tones ground the space, while strategic black accents provide just enough contrast to keep things interesting without disruption. Lighting Strategy: Those sage pendant lights? They’re doing double duty as both functional task lighting and sculptural art pieces. The key is hanging them at the right height – about 30-36 inches above your table surface. This creates intimate pools of light perfect for both family dinners and dinner parties. Furniture Foundation: The natural wood dining table is the room’s anchor – substantial enough to feel permanent but simple enough to never go out of style. When choosing dining chairs, look for pieces that blend comfort with clean lines. The built-in banquette seating maximizes space while maintaining the streamlined aesthetic. Storage Solutions: That fluted sideboard isn’t just beautiful – it’s incredibly practical. The vertical ridges add texture and visual interest while hiding away dining essentials. Think of it as jewellery for your dining room that happens to store your good china. Art and Accessories: The monochrome abstract piece proves that wall art doesn’t need color to make an impact. Black and white photography or simple line drawings work beautifully in this palette. Keep accessories minimal but meaningful—a single ceramic vase, a small plant, perhaps a beautiful bowl. Flooring and Textiles: Layered rugs create depth and warmth underfoot. The neutral tones ensure they’ll work as your style evolves, while the varied textures prevent the space from feeling flat. Think of rugs as the room’s foundation garments—invisible but essential. The Mirror Moment: That large mirror isn’t just decorative – it’s also architectural. Positioned strategically, it reflects natural light and makes the space feel larger and brighter. In a minimalist room, every piece needs to earn its place, and mirrors are multitasking champions. The Final Note: of restraint. This isn’t minimalism that feels cold – it’s minimalism that feels intentional and warm. Every element here serves a purpose while contributing to the overall sense of calm sophistication. #muted #harmony #dining #room #board
    WWW.HOME-DESIGNING.COM
    Muted Harmony Dining Room: Board with Shopping List
    Style: Modern Minimalist Color Combination: Sage green, warm wood, cream white, charcoal black Who is it for: For those who believe less is more, but more should still feel inviting. Perfect for dinner party hosts who want their space to whisper elegance rather than shout for attention, and where every meal feels like a thoughtful moment. Budget: $-$$ Muted Harmony Dining Room – Shopping List Below, we present a curated list of products presented on the board: 1. Houke Rectangular Dining Table 2. White Boucle Dining Chairs 3. Matte Black Candle Holders 4. ZZ Live Indoor Tabletop Plant 5. White Ceramic Vase 6. Sideboard Buffets Cabinet 7. Ceramic Vase with Grooves 8. Abstract Canvas Wall Art  9. Kristen Single Pendant 10. Maja Tufted Area Rug 11. Wall Molding Kit 12. Black Metal Framed Wall Mirror Tips and suggestions Colors that Work Together: This palette is like a gentle exhale: calming but never boring. The sage green acts as nature’s neutral, bringing serenity without the sterility of pure white. Warm wood tones ground the space, while strategic black accents provide just enough contrast to keep things interesting without disruption. Lighting Strategy: Those sage pendant lights? They’re doing double duty as both functional task lighting and sculptural art pieces. The key is hanging them at the right height – about 30-36 inches above your table surface. This creates intimate pools of light perfect for both family dinners and dinner parties. Furniture Foundation: The natural wood dining table is the room’s anchor – substantial enough to feel permanent but simple enough to never go out of style. When choosing dining chairs, look for pieces that blend comfort with clean lines. The built-in banquette seating maximizes space while maintaining the streamlined aesthetic. Storage Solutions: That fluted sideboard isn’t just beautiful – it’s incredibly practical. The vertical ridges add texture and visual interest while hiding away dining essentials. Think of it as jewellery for your dining room that happens to store your good china. Art and Accessories: The monochrome abstract piece proves that wall art doesn’t need color to make an impact. Black and white photography or simple line drawings work beautifully in this palette. Keep accessories minimal but meaningful—a single ceramic vase, a small plant, perhaps a beautiful bowl. Flooring and Textiles: Layered rugs create depth and warmth underfoot. The neutral tones ensure they’ll work as your style evolves, while the varied textures prevent the space from feeling flat. Think of rugs as the room’s foundation garments—invisible but essential. The Mirror Moment: That large mirror isn’t just decorative – it’s also architectural. Positioned strategically, it reflects natural light and makes the space feel larger and brighter. In a minimalist room, every piece needs to earn its place, and mirrors are multitasking champions. The Final Note: of restraint. This isn’t minimalism that feels cold – it’s minimalism that feels intentional and warm. Every element here serves a purpose while contributing to the overall sense of calm sophistication.
    Like
    Love
    Wow
    Sad
    Angry
    631
    0 Comments 0 Shares