80.LV
How To Model & Texture An Atmospheric Bathroom Scene With Rich Props
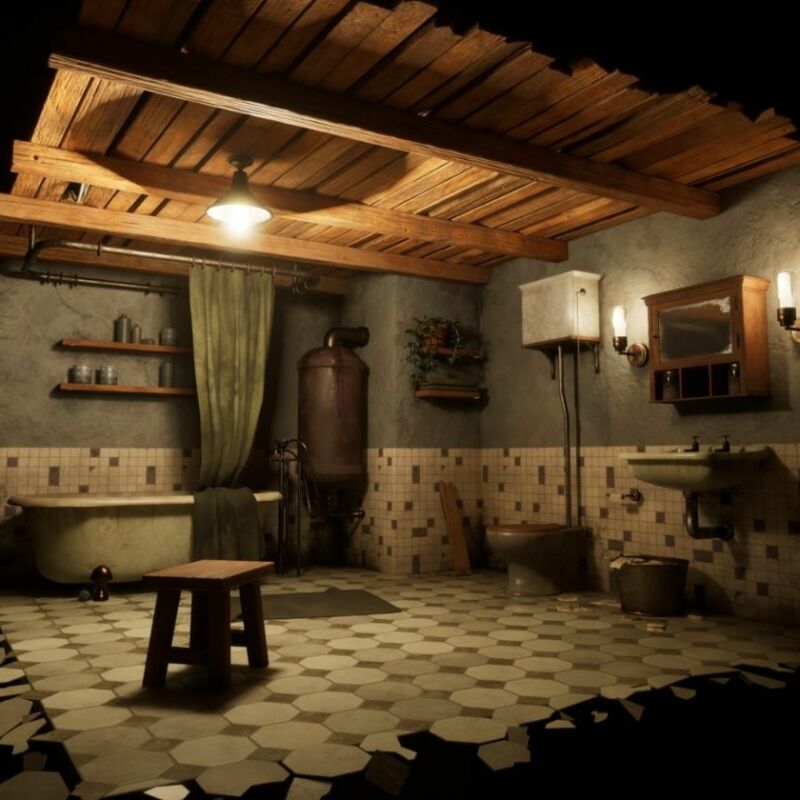
IntroductionHello! I’m Paola Villegas, a 3D Environment Artist student at PlaygroundSquad in Sweden. I am originally from Mexico City, but my dreams are bigger than my obstacles! Thanks to my family’s support, I moved to Europe to pursue my goal of becoming a Game Artist.I’ve always loved art, and grew up watching my big brother play video games, completely invested in the gameplay. In 2022, I realized I could combine both passions, so I took a Games Design and Development course in Ireland, where I learnt programming and 3D modeling. That’s when I knew programming wasn’t for me, but I loved the idea of modeling as another way of creating art. I later completed an online course at Animum Creativity Advanced School, focusing on the 3D Fundamentals in Maya. Here are some of the projects I’ve made at both Animum and a recent project I made at PlaygroundSquad:Eager to keep improving, I moved to Sweden to study Game Art at PlaygroundSquad. As I finish my first semester, I’m excited to share with you my first personal project at PSQ.About The Abandoned Bathroom Diorama ProjectThe Abandoned Bathroom Diorama project started as a personal school project, with my main goals being to strengthen my modeling and texturing skills while getting used to the game art pipeline. My inspiration came from the Bathroom Diorama by Brothers Interactive on ArtStation. I was really drawn to its eerie, almost “abandoned” atmosphere, which reminded me of the unsettling mood in Little Nightmares. That inspired me to create my own version with guidance from my mentor, Martin Henriksson.Since I was starting from scratch, I required a lot of references. Using PureRef, I gathered a collection of photos and video game scenes, picking out the most interesting elements to blend them into my own design.I made a project plan for each week to keep up with the school deadline. My weeks have to be divided into these phases: blockout, low-poly modeling, high-poly modeling and/or sculpting, retopology, UV mapping and baking, tileable materials for environments, props textures, rendering, and post production.Blockout & CompositionThe goal of this project was to create a game-ready scene in Unreal Engine 5. I started with the basic blockout directly in Unreal, which helped me to visualize the layout and composition of the scene. It allowed me to play around with asset placement and silhouettes to get a better sense of the overall distribution.Composition was definitely one of the biggest challenges. To guide the process, I studied real bathroom layouts and kept adjusting the assets until the scene felt more balanced and visually interesting.Lighting is also a big part of the scene, and that is why it is important to make a blockout of it. I played with point lights and the temperature of the light. At the same time, I placed and played with camera angles. As I had a Diorama scene, I wanted to capture the whole room in one image. Blender was my main software for modeling and cloth simulations, and ZBrush for sculpting details like the wooden planks ceiling. I used a low-poly to high-poly workflow for optimization and to prepare in advance for the baking of assets. The trick to save time is keeping the naming conventions used in Unreal, so when I modelled in Blender, I could export the same-named asset into the Content Folder of my Unreal project, and it would update into the scene automatically. RetopologyFor most of the assets, I duplicated the low-poly mesh and added more detail on top to create the high-poly version. This saved me time, since I didn’t need to spend extra work on remeshing. For the sculpted wooden planks, I did the retopology in Blender. The shape was simple enough, so I created a mesh from scratch, then added some bevels and extra geometry where needed for details. As these planks would be repeated, I only made four modular versions. Later, I instanced and rotated them around in Unreal to break the repetition while also saving time and resources.To expand my knowledge in texturing, I decided to unwrap the UVs myself. I made a plan to categorise the objects that could share the same UV space to optimise performance. Using Blender’s “average islands scale” tool, I made sure the texel density was consistent across all UVs. Then I packed each category into a single texture space. I chose to make unique textures because I wanted to have more control over the look of each prop and push my learning in texturing, as this was my goal for the project.TexturingBefore getting to the most exciting part for me, texturing, I first had to bake the assets, which consisted of importing the high-poly details onto the low-poly mesh using texture maps. I used Substance Painter for both baking and texturing, since it allows me to create unique textures for each prop. In Painter, I am not only able to paint on the base color channel, but also on roughness, height, metalness, and even ambient occlusion, which helps to enhance detail. I decided to make my textures 2k resolution, and I wanted them to look sharper.My texturing workflow starts by organising the materials needed for each asset into folders. In the sink texture example, I had one folder for each asset, and subfolders inside with the materials, like wood (for the cabinet), ceramic (for the sink), metal (for the pipes), and so on. From there, I created a base material with a base color and average roughness. This helped me to narrow down what I needed and build up details gradually using masks. I used subtle generators for dirt, tweaking the settings to add randomness to the color. Masks with grunge fill layers helped me to add the leaks. I sometimes used filters like blur or warp for the leaks to look more natural and wavy, and gradients so the dirt would build up more at the bottom of the sink. In other cases, I used anchor points for the dirt to accumulate in crevices. For example, I assigned an anchor point to the “Dirt Base” layer, then created another fill layer with a black mask and a mask builder generator. Inside that mask, I added a fill that uses the anchor point in the grayscale channel. This setup is shown in the image below:The last step in finishing my texture was adding a Levels effect to balance tones and color values across the material. I choose to keep an analogous harmony of color, spicing it up a little by adding those green olive tones on the curtain and carpet.The tiling textures were made in Substance 3D Designer so I could keep them procedural. These textures would be used for larger surfaces like the walls and the floor, and I looked at real-life references for each one. The texture I am most proud of is the wall tiles. I focused on making the wear and tear feel realistic — adding cracks, dirt, pores, roughness variations, height details for the missing tiles, corner damage, and color variation. It was my first time working in Substance 3D Designer, and with some help from YouTube, I managed to get the results I was aiming for. Every tiling texture I made started by creating the basic shape or pattern, then building up the medium to large cracks, followed by the smaller details and height. The workflow was similar to sculpting, where you begin with base forms and gradually add in the finer details. After that, I added roughness detail and brought everything together with ambient occlusion and color. Here is a showcase of the procedural wall tiles:Here are some renders of the rest of the tiling materials I used in my scene, including concrete, terracotta, and another tile variation for the floor.I wanted my diorama to look like a room that was being pulled apart. I took inspiration from other artists’ Diorama projects on ArtStation, aiming for that same kind of atmosphere. I felt it fit the “abandoned” theme I was going for. So, I put together a collage of the references that matched the vibe:I created mesh corners for the walls and modular tile pieces to scatter across the floor. Then, I set up my materials in Unreal to use vertex painting between the terracotta bricks and the concrete wall. I also added decals to the walls for cracks, dirt decals for the corners to have that “gritty” look, and a roughness decal for the floor to simulate water spills. I designed the decals in Substance 3D Painter by working on a 3D plane and painting only in the necessary channels, like using the roughness channel for the water spills. Then, I exported the textures into a Deferred Decal material in Unreal. To help with the decal creation in Unreal, I followed a step-by-step YouTube tutorial.Assemble The Final SceneMy goal for the composition was to keep the abandoned feel, which ended up being one of the most challenging parts of the project. I followed the initial blockout and kept adjusting the asset placement all around. From real-life references, I noticed that bathroom furniture is usually pushed into corners or grouped along the same wall. I wanted to follow that layout while also adding some storytelling. So, I placed the stool in the middle to break the pattern, and added the broken wood plank as a subtle narrative detail. The water spill decals helped to add variation to the floor, and the dirt decals on the walls and corners kept that “gritty” look I was going for.Throughout the project, I received some amazing feedback from teachers and classmates. Being open to critique really helped shape the final piece, even when it meant reworking things as I did. One of the biggest changes I made was the texture of the boiler. As you can see below, I ended up redoing it, even though it was towards the end of the project. I spent more time on it this time, giving it the love and detail, like water drips and rust. I felt it was worth giving it a rework, and I am a lot happier with how it turned out.LightingThis was my first time lighting up a scene, and honestly, it was such a struggle. I mostly used four-point lights around the room. I had a vision of how I wanted it to look, but translating that into reality was trickier than expected. I learnt how much of a difference light colors make. At first, I thought colder tones would work best for the “abandoned” atmosphere, but they didn’t quite click. I ended up going with warmer tones, which felt more fitting and worked better with the textures I had created.I also took inspiration from other diorama projects and realized how important camera setups are. I decided to frame the whole scene into my main shot camera and have other cameras for the close-up shots to showcase the props. I set up several cine camera actors around the scene and adjusted their lens settings, keeping the focal length around 25 for most of the shots. For my render video, I adjusted the focus distance and key-framed it in a level sequence.In the post-processing settings in Unreal, I tweaked a few effects, like softening the shadows and adding some bloom. My goal was to have a strong main shot that showed the full environment, followed by more detailed close-up shots to showcase the textures and storytelling elements.SummaryAs part of a school assignment, I completed this project in five weeks, with an extra week for polishing and posting. My biggest challenge was sticking to the schedule. Even though I had a plan laid out, I couldn’t keep up with it. I’m still learning and getting comfortable with the basics, but now I know from experience how long each stage takes me, and I can plan smarter next time.I also realized that while having creative freedom is fun, it can feel overwhelming without a solid structure or concept to work from. Even though I had a plan and references, I learned that I should’ve spent more time on composition and storytelling from the start, instead of figuring it out along the way. That way, my scene would’ve stood out more and had a stronger emotional connection with the audience.One of the hardest parts of this project was dealing with burnout and impostor syndrome. I had tough days when the to-do list felt endless, the deadline kept creeping closer, and I couldn’t see the finish line. But even then, I stayed motivated and disciplined, even if that meant staying after school hours. What kept me going was the desire to see the final result, so I had to trust myself and my skills. Looking back, I now realise every project is a learning experience, both professionally and personally. I can honestly say I’m proud of what I have achieved, and I’m really happy with the results, especially the skills I picked up, like my new love for Substance 3D Designer!This experience taught me about the game production workflow and technical skills like vertex painting and lighting, and it definitely helped me grow creatively.For any beginner artist wanting to create an environment, my advice is to start by defining the story. What happened to this place? Who lived there? What was it used for? What message are you trying to share? Asking yourself these kinds of questions will help the player connect emotionally to your scene. Here is some more personal advice: don’t be afraid to ask for help. Listen to feedback and apply what feels right for your vision. That feedback can take your project further. That said, be conscious of knowing when to stop; it’s super easy to get caught tweaking endlessly. Perfection doesn’t really exist, and honestly, you learn more from mistakes, so don’t be too hard on yourself. Be kind to yourself, take guilt-free breaks, especially when you feel stuck. It can give you a fresh perspective and spark new ideas.Lastly, I want to thank everyone who supported and guided me during this project — my amazing classmates and teachers who helped me bring out the best in me, and my lovely family and partner for always giving me all their love when I needed it the most to keep me going.And of course, I can’t be more grateful to 80 Level for giving me this opportunity to share my project breakdown.Hope you enjoyed reading this! It’s been a pleasure to share the behind-the-scenes process of my project. If you have any questions, feel free to send me a DM on my LinkedIn. I’ll be posting my future school projects on my ArtStation, so be sure to follow me there.See you soon with more projects to share!Paola Villegas, Game ArtistInterview conducted by Gloria Levine