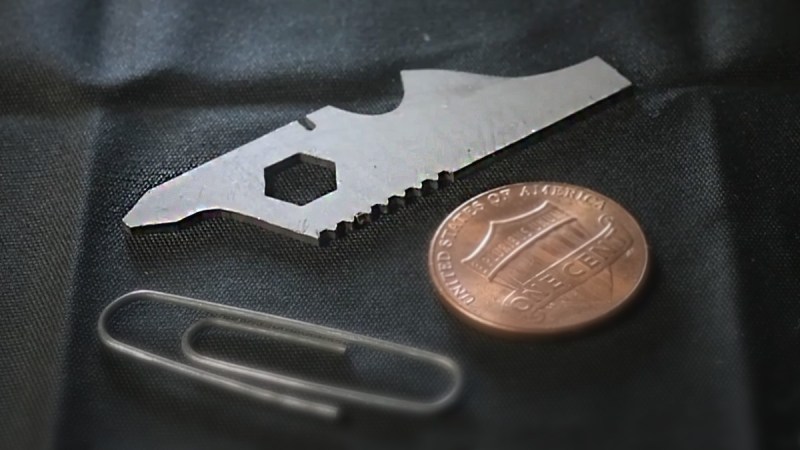
• ## Introducción

    En un mundo donde los videojuegos han dejado una marca indeleble en la cultura moderna, algunos títulos nos tocan el corazón, evocando emociones profundas y recuerdos nostálgicos. **Moonlighter 2**, con su encantadora estética y su cautivadora jugabilidad, se alza como un faro de esperanza en un océano de títulos olvidables. A medida que esta secuela evoluciona de un entorno 2D a uno 3D, se nos invita a explorar no solo los cambios visuales, sino también las profundas implicaci...
    ## Introducción En un mundo donde los videojuegos han dejado una marca indeleble en la cultura moderna, algunos títulos nos tocan el corazón, evocando emociones profundas y recuerdos nostálgicos. **Moonlighter 2**, con su encantadora estética y su cautivadora jugabilidad, se alza como un faro de esperanza en un océano de títulos olvidables. A medida que esta secuela evoluciona de un entorno 2D a uno 3D, se nos invita a explorar no solo los cambios visuales, sino también las profundas implicaci...
    Cómo Moonlighter 2 Construye Sobre su Giro Inspirado en Zelda al Pasar de 2D a 3D
    ## Introducción En un mundo donde los videojuegos han dejado una marca indeleble en la cultura moderna, algunos títulos nos tocan el corazón, evocando emociones profundas y recuerdos nostálgicos. **Moonlighter 2**, con su encantadora estética y su cautivadora jugabilidad, se alza como un faro de esperanza en un océano de títulos olvidables. A medida que esta secuela evoluciona de un entorno...
    Like
    Love
    Wow
    Angry
    Sad
    56
    1 Σχόλια 0 Μοιράστηκε
  • 8 Sage Green Color Palettes You’ve Got to Experience

    8 Sage Green Color Palettes You’ve Got to Experience

    In this article:See more ▼Post may contain affiliate links which give us commissions at no cost to you.There’s something undeniably calming about sage green that makes it one of my absolute favorite colors to work with as a designer. This muted, earthy hue has this incredible ability to ground a space while still feeling fresh and contemporary. Whether you’re working on a branding project, designing an interior space, or creating digital content, sage green offers a versatility that few colors can match.
    What I love most about sage green is how it bridges the gap between trendy and timeless. It’s not going anywhere anytime soon, and honestly, I don’t think it ever should. This sophisticated color has been quietly revolutionizing design palettes across every industry, and today I’m excited to share eight of my favorite sage green color combinations that will elevate your next project.
    Psst... Did you know you can get unlimited downloads of 59,000+ fonts and millions of other creative assets for just /mo? Learn more »The 8 Most Inspiring Sage Green Color Palettes
    1. Garden Fresh

    #D2E5C4

    #B2C69E

    #95B07B

    #79955D

    #5A743C

    Download this color palette

    735×1102
    Pinterest image

    2160×3840
    Vertical wallpaper

    900×900
    Square

    3840×2160
    4K Wallpaper

    This monochromatic sage palette is pure perfection for anyone wanting to create depth without complexity. I use this combination constantly in botanical-themed projects because it captures every shade of green you’d find in a thriving garden. The progression from light to dark creates natural hierarchy, making it incredibly functional for both print and digital work.
    2. Misty Morning

    #BDC9BB

    #ACBAA1

    #B2C1A2

    #A4B1A0

    #ADC3B7

    Download this color palette

    735×1102
    Pinterest image

    2160×3840
    Vertical wallpaper

    900×900
    Square

    3840×2160
    4K Wallpaper

    When I need something soft and ethereal, this is my go-to palette. These gentle sage tones remind me of early morning fog rolling over hills. It’s perfect for wellness brands, spa environments, or any project that needs to evoke tranquility and peace. The subtle variations create interest without ever feeling overwhelming.
    3. Harvest Moon

    #9AAB89

    #647056

    #D6C388

    #F8C565

    Download this color palette

    735×1102
    Pinterest image

    2160×3840
    Vertical wallpaper

    900×900
    Square

    3840×2160
    4K Wallpaper

    Get 300+ Fonts for FREEEnter your email to download our 100% free "Font Lover's Bundle". For commercial & personal use. No royalties. No fees. No attribution. 100% free to use anywhere.

    The combination of sage green with warm golds creates magic every single time. This palette captures that perfect autumn moment when the light hits everything just right. I love using this for brands that want to feel both grounded and optimistic – it’s earthy sophistication with a sunny disposition.
    4. Moody Botanical

    #4D5D42

    #6A894B

    #8DA67E

    #9B999A

    #C6B5DF

    Download this color palette

    735×1102
    Pinterest image

    2160×3840
    Vertical wallpaper

    900×900
    Square

    3840×2160
    4K Wallpaper

    For projects that need a bit more drama, this palette delivers beautifully. The deeper sage tones paired with that unexpected lavender create intrigue without losing the calming essence of green. I find this combination works wonderfully for upscale restaurants or luxury lifestyle brands that want to feel approachable yet refined.
    5. Countryside Charm

    #A3AC9A

    #8A9A5B

    #93A395

    #748B74

    #827D67

    Download this color palette

    735×1102
    Pinterest image

    2160×3840
    Vertical wallpaper

    900×900
    Square

    3840×2160
    4K Wallpaper

    This palette feels like a walk through the English countryside – all rolling hills and weathered stone walls. The mix of sage greens with those earthy undertones creates incredible depth. I use this combination for projects that need to feel established and trustworthy, like financial services or heritage brands.
    6. Industrial Farmhouse Zen

    #CED3D2

    #3F5054

    #6F675E

    #9CAB86

    #C8CAB5

    Download this color palette

    735×1102
    Pinterest image

    2160×3840
    Vertical wallpaper

    900×900
    Square

    3840×2160
    4K Wallpaper

    The marriage of sage green with industrial grays might seem unexpected, but it creates this incredibly sophisticated modern aesthetic. This palette is perfect for tech companies or architectural firms that want to feel innovative yet grounded. The sage adds warmth to what could otherwise be cold, sterile colors.
    7. Desert Sage

    #9AAB89

    #B2AC88

    #A06464

    #8C909C

    #C9AD99

    Download this color palette

    735×1102
    Pinterest image

    2160×3840
    Vertical wallpaper

    900×900
    Square

    3840×2160
    4K Wallpaper

    Inspired by the American Southwest, this palette combines sage with dusty terra cottas and warm beiges. There’s something so comforting about these colors together – they feel like sunset in the desert. I love using this for hospitality brands or any project that wants to evoke adventure and warmth.
    8. Forest Floor

    #B2C69E

    #ACB6A6

    #5B7553

    #745000

    #462800

    Download this color palette

    735×1102
    Pinterest image

    2160×3840
    Vertical wallpaper

    900×900
    Square

    3840×2160
    4K Wallpaper

    This rich, earthy combination takes sage green into deeper territory with those gorgeous chocolate browns. It reminds me of walking through an old-growth forest where the light filters through layers of leaves. Perfect for organic brands, outdoor companies, or any project that wants to feel authentic and connected to nature.
    Why Sage Green Is Having Its Moment
    As someone who’s been watching color trends for years, I can tell you that sage green’s popularity isn’t just a passing fad. This color speaks to our collective desire for calm in an increasingly chaotic world. It’s the visual equivalent of taking a deep breath – immediately soothing and centering.
    The rise of biophilic design has also played a huge role in sage green’s dominance. As we spend more time indoors, we’re craving those connections to nature, and sage green delivers that botanical feeling without being overly literal. It’s nature-inspired design at its most sophisticated.
    What makes sage green particularly special is its incredible adaptability. Unlike brighter greens that can feel overwhelming or dated, sage green has this chameleon-like quality that allows it to work in virtually any context. Pair it with warm woods and it feels rustic; combine it with metallics and it becomes luxurious; add some crisp whites and suddenly it’s Scandinavian minimalism.
    Mastering Sage Green in Your Design Work
    The key to working with sage green successfully is understanding its undertones. Some sage greens lean more yellow, others more blue or gray. Recognizing these subtle differences will help you create more cohesive palettes and avoid color clashes that can make your work feel off.
    I always recommend testing your sage green palettes in different lighting conditions. What looks perfect on your computer screen might feel completely different in natural light or under warm artificial lighting. This is especially crucial for interior design projects or any work that will be viewed in physical spaces.
    When building palettes around sage green, I like to think about the mood I’m trying to create. For calm, peaceful vibes, I’ll pair it with other muted tones and plenty of white space. For something more energetic, I might add unexpected pops of coral or sunny yellow. The beauty of sage green is that it’s such a diplomatic color – it plays well with almost everything.

    Sage Green Across Different Design Applications
    Branding and Logo Design In branding work, sage green communicates reliability, growth, and environmental consciousness without hitting people over the head with it. I love using it for wellness companies, sustainable brands, and professional services that want to feel approachable. The key is pairing it with typography that reinforces your brand personality – clean sans serifs for modern feels, or elegant serifs for more traditional approaches.
    Interior Spaces Sage green walls have become incredibly popular, and for good reason. The color creates an instant sense of calm while still feeling current. I particularly love using darker sage greens in dining rooms or bedrooms where you want that cozy, enveloping feeling. Lighter sages work beautifully in kitchens and bathrooms where you want freshness without the sterility of pure white.
    Digital Design For websites and apps, sage green offers a refreshing alternative to the blues and grays that dominate digital design. It’s easy on the eyes, which makes it perfect for apps focused on wellness, meditation, or any platform where users will spend extended time. Just be mindful of accessibility – always test your sage green backgrounds with various text colors to ensure proper contrast ratios.
    Product Design The natural, organic feeling of sage green makes it perfect for product packaging, especially in the beauty, food, and wellness sectors. It communicates quality and naturalness without feeling overly earthy or crunchy. I’ve seen it work beautifully on everything from skincare packaging to high-end kitchen appliances.
    The Psychology Behind Sage Green’s Appeal
    Color psychology tells us that green represents growth, harmony, and balance – all things we desperately need in our modern lives. But sage green takes these positive associations and adds sophistication. It’s green without the intensity, nature without the rawness.
    There’s also something inherently honest about sage green. It doesn’t try too hard or demand attention the way brighter colors do. This authenticity resonates with consumers who are increasingly skeptical of brands that feel forced or overly polished. Sage green whispers where other colors shout, and sometimes that’s exactly what your message needs.
    Looking Forward: Sage Green’s Staying Power
    While I can’t predict the future, I’m confident that sage green will remain relevant for years to come. It hits all the right notes for contemporary design – it’s calming without being boring, natural without being literal, and sophisticated without being pretentious.
    The color also photographs beautifully, which matters more than ever in our Instagram-driven world. Whether it’s a sage green accent wall or a product shot featuring sage packaging, this color translates perfectly to social media, helping brands create that coveted “aesthetic” that drives engagement.
    As we continue to prioritize wellness and sustainability in design, sage green offers the perfect visual shorthand for these values. It’s a color that makes people feel good, and in a world that often doesn’t, that’s incredibly powerful.
    Bringing It All Together
    These eight sage green palettes represent just the beginning of what’s possible with this incredible color. Whether you’re drawn to the monochromatic serenity of Garden Fresh or the unexpected sophistication of Industrial Zen, there’s a sage green palette that can elevate your next project.
    The secret to success with sage green is trusting its natural elegance. Don’t feel like you need to overstyling or complicate things – sage green’s beauty lies in its understated sophistication. Let it be the calm, confident foundation that allows other elements of your design to shine.
    So go ahead and embrace the sage green revolution. Your designswill thank you for it. After all, in a world full of visual noise, sometimes the most powerful statement you can make is a quiet one.

    Riley Morgan

    Riley Morgan is a globe-trotting graphic designer with a sharp eye for color, typography, and intuitive design. They are a color lover and blend creativity with culture, drawing inspiration from cities, landscapes, and stories around the world. When they’re not designing sleek visuals for clients, they’re blogging about trends, tools, and the art of making design feel like home—wherever that may be.

    8 Stunning Sunset Color PalettesThere’s something absolutely magical about watching the sun dip below the horizon, painting the sky in breathtaking hues that seem...10 Warm Color Palettes That’ll Brighten Your DayThere’s nothing quite like the embracing quality of warm colors to make a design feel inviting and alive. As someone...10 Luxurious Jewel Tone Color PalettesAs a designer who’s always searching for color combinations that exude sophistication and richness, I find myself constantly returning to...
    #sage #green #color #palettes #youve
    8 Sage Green Color Palettes You’ve Got to Experience
    8 Sage Green Color Palettes You’ve Got to Experience In this article:See more ▼Post may contain affiliate links which give us commissions at no cost to you.There’s something undeniably calming about sage green that makes it one of my absolute favorite colors to work with as a designer. This muted, earthy hue has this incredible ability to ground a space while still feeling fresh and contemporary. Whether you’re working on a branding project, designing an interior space, or creating digital content, sage green offers a versatility that few colors can match. What I love most about sage green is how it bridges the gap between trendy and timeless. It’s not going anywhere anytime soon, and honestly, I don’t think it ever should. This sophisticated color has been quietly revolutionizing design palettes across every industry, and today I’m excited to share eight of my favorite sage green color combinations that will elevate your next project. 👋 Psst... Did you know you can get unlimited downloads of 59,000+ fonts and millions of other creative assets for just /mo? Learn more »The 8 Most Inspiring Sage Green Color Palettes 1. Garden Fresh #D2E5C4 #B2C69E #95B07B #79955D #5A743C Download this color palette 735×1102 Pinterest image 2160×3840 Vertical wallpaper 900×900 Square 3840×2160 4K Wallpaper This monochromatic sage palette is pure perfection for anyone wanting to create depth without complexity. I use this combination constantly in botanical-themed projects because it captures every shade of green you’d find in a thriving garden. The progression from light to dark creates natural hierarchy, making it incredibly functional for both print and digital work. 2. Misty Morning #BDC9BB #ACBAA1 #B2C1A2 #A4B1A0 #ADC3B7 Download this color palette 735×1102 Pinterest image 2160×3840 Vertical wallpaper 900×900 Square 3840×2160 4K Wallpaper When I need something soft and ethereal, this is my go-to palette. These gentle sage tones remind me of early morning fog rolling over hills. It’s perfect for wellness brands, spa environments, or any project that needs to evoke tranquility and peace. The subtle variations create interest without ever feeling overwhelming. 3. Harvest Moon #9AAB89 #647056 #D6C388 #F8C565 Download this color palette 735×1102 Pinterest image 2160×3840 Vertical wallpaper 900×900 Square 3840×2160 4K Wallpaper Get 300+ Fonts for FREEEnter your email to download our 100% free "Font Lover's Bundle". For commercial & personal use. No royalties. No fees. No attribution. 100% free to use anywhere. The combination of sage green with warm golds creates magic every single time. This palette captures that perfect autumn moment when the light hits everything just right. I love using this for brands that want to feel both grounded and optimistic – it’s earthy sophistication with a sunny disposition. 4. Moody Botanical #4D5D42 #6A894B #8DA67E #9B999A #C6B5DF Download this color palette 735×1102 Pinterest image 2160×3840 Vertical wallpaper 900×900 Square 3840×2160 4K Wallpaper For projects that need a bit more drama, this palette delivers beautifully. The deeper sage tones paired with that unexpected lavender create intrigue without losing the calming essence of green. I find this combination works wonderfully for upscale restaurants or luxury lifestyle brands that want to feel approachable yet refined. 5. Countryside Charm #A3AC9A #8A9A5B #93A395 #748B74 #827D67 Download this color palette 735×1102 Pinterest image 2160×3840 Vertical wallpaper 900×900 Square 3840×2160 4K Wallpaper This palette feels like a walk through the English countryside – all rolling hills and weathered stone walls. The mix of sage greens with those earthy undertones creates incredible depth. I use this combination for projects that need to feel established and trustworthy, like financial services or heritage brands. 6. Industrial Farmhouse Zen #CED3D2 #3F5054 #6F675E #9CAB86 #C8CAB5 Download this color palette 735×1102 Pinterest image 2160×3840 Vertical wallpaper 900×900 Square 3840×2160 4K Wallpaper The marriage of sage green with industrial grays might seem unexpected, but it creates this incredibly sophisticated modern aesthetic. This palette is perfect for tech companies or architectural firms that want to feel innovative yet grounded. The sage adds warmth to what could otherwise be cold, sterile colors. 7. Desert Sage #9AAB89 #B2AC88 #A06464 #8C909C #C9AD99 Download this color palette 735×1102 Pinterest image 2160×3840 Vertical wallpaper 900×900 Square 3840×2160 4K Wallpaper Inspired by the American Southwest, this palette combines sage with dusty terra cottas and warm beiges. There’s something so comforting about these colors together – they feel like sunset in the desert. I love using this for hospitality brands or any project that wants to evoke adventure and warmth. 8. Forest Floor #B2C69E #ACB6A6 #5B7553 #745000 #462800 Download this color palette 735×1102 Pinterest image 2160×3840 Vertical wallpaper 900×900 Square 3840×2160 4K Wallpaper This rich, earthy combination takes sage green into deeper territory with those gorgeous chocolate browns. It reminds me of walking through an old-growth forest where the light filters through layers of leaves. Perfect for organic brands, outdoor companies, or any project that wants to feel authentic and connected to nature. Why Sage Green Is Having Its Moment As someone who’s been watching color trends for years, I can tell you that sage green’s popularity isn’t just a passing fad. This color speaks to our collective desire for calm in an increasingly chaotic world. It’s the visual equivalent of taking a deep breath – immediately soothing and centering. The rise of biophilic design has also played a huge role in sage green’s dominance. As we spend more time indoors, we’re craving those connections to nature, and sage green delivers that botanical feeling without being overly literal. It’s nature-inspired design at its most sophisticated. What makes sage green particularly special is its incredible adaptability. Unlike brighter greens that can feel overwhelming or dated, sage green has this chameleon-like quality that allows it to work in virtually any context. Pair it with warm woods and it feels rustic; combine it with metallics and it becomes luxurious; add some crisp whites and suddenly it’s Scandinavian minimalism. Mastering Sage Green in Your Design Work The key to working with sage green successfully is understanding its undertones. Some sage greens lean more yellow, others more blue or gray. Recognizing these subtle differences will help you create more cohesive palettes and avoid color clashes that can make your work feel off. I always recommend testing your sage green palettes in different lighting conditions. What looks perfect on your computer screen might feel completely different in natural light or under warm artificial lighting. This is especially crucial for interior design projects or any work that will be viewed in physical spaces. When building palettes around sage green, I like to think about the mood I’m trying to create. For calm, peaceful vibes, I’ll pair it with other muted tones and plenty of white space. For something more energetic, I might add unexpected pops of coral or sunny yellow. The beauty of sage green is that it’s such a diplomatic color – it plays well with almost everything. Sage Green Across Different Design Applications Branding and Logo Design In branding work, sage green communicates reliability, growth, and environmental consciousness without hitting people over the head with it. I love using it for wellness companies, sustainable brands, and professional services that want to feel approachable. The key is pairing it with typography that reinforces your brand personality – clean sans serifs for modern feels, or elegant serifs for more traditional approaches. Interior Spaces Sage green walls have become incredibly popular, and for good reason. The color creates an instant sense of calm while still feeling current. I particularly love using darker sage greens in dining rooms or bedrooms where you want that cozy, enveloping feeling. Lighter sages work beautifully in kitchens and bathrooms where you want freshness without the sterility of pure white. Digital Design For websites and apps, sage green offers a refreshing alternative to the blues and grays that dominate digital design. It’s easy on the eyes, which makes it perfect for apps focused on wellness, meditation, or any platform where users will spend extended time. Just be mindful of accessibility – always test your sage green backgrounds with various text colors to ensure proper contrast ratios. Product Design The natural, organic feeling of sage green makes it perfect for product packaging, especially in the beauty, food, and wellness sectors. It communicates quality and naturalness without feeling overly earthy or crunchy. I’ve seen it work beautifully on everything from skincare packaging to high-end kitchen appliances. The Psychology Behind Sage Green’s Appeal Color psychology tells us that green represents growth, harmony, and balance – all things we desperately need in our modern lives. But sage green takes these positive associations and adds sophistication. It’s green without the intensity, nature without the rawness. There’s also something inherently honest about sage green. It doesn’t try too hard or demand attention the way brighter colors do. This authenticity resonates with consumers who are increasingly skeptical of brands that feel forced or overly polished. Sage green whispers where other colors shout, and sometimes that’s exactly what your message needs. Looking Forward: Sage Green’s Staying Power While I can’t predict the future, I’m confident that sage green will remain relevant for years to come. It hits all the right notes for contemporary design – it’s calming without being boring, natural without being literal, and sophisticated without being pretentious. The color also photographs beautifully, which matters more than ever in our Instagram-driven world. Whether it’s a sage green accent wall or a product shot featuring sage packaging, this color translates perfectly to social media, helping brands create that coveted “aesthetic” that drives engagement. As we continue to prioritize wellness and sustainability in design, sage green offers the perfect visual shorthand for these values. It’s a color that makes people feel good, and in a world that often doesn’t, that’s incredibly powerful. Bringing It All Together These eight sage green palettes represent just the beginning of what’s possible with this incredible color. Whether you’re drawn to the monochromatic serenity of Garden Fresh or the unexpected sophistication of Industrial Zen, there’s a sage green palette that can elevate your next project. The secret to success with sage green is trusting its natural elegance. Don’t feel like you need to overstyling or complicate things – sage green’s beauty lies in its understated sophistication. Let it be the calm, confident foundation that allows other elements of your design to shine. So go ahead and embrace the sage green revolution. Your designswill thank you for it. After all, in a world full of visual noise, sometimes the most powerful statement you can make is a quiet one. Riley Morgan Riley Morgan is a globe-trotting graphic designer with a sharp eye for color, typography, and intuitive design. They are a color lover and blend creativity with culture, drawing inspiration from cities, landscapes, and stories around the world. When they’re not designing sleek visuals for clients, they’re blogging about trends, tools, and the art of making design feel like home—wherever that may be. 8 Stunning Sunset Color PalettesThere’s something absolutely magical about watching the sun dip below the horizon, painting the sky in breathtaking hues that seem...10 Warm Color Palettes That’ll Brighten Your DayThere’s nothing quite like the embracing quality of warm colors to make a design feel inviting and alive. As someone...10 Luxurious Jewel Tone Color PalettesAs a designer who’s always searching for color combinations that exude sophistication and richness, I find myself constantly returning to... #sage #green #color #palettes #youve
    DESIGNWORKLIFE.COM
    8 Sage Green Color Palettes You’ve Got to Experience
    8 Sage Green Color Palettes You’ve Got to Experience In this article:See more ▼Post may contain affiliate links which give us commissions at no cost to you.There’s something undeniably calming about sage green that makes it one of my absolute favorite colors to work with as a designer. This muted, earthy hue has this incredible ability to ground a space while still feeling fresh and contemporary. Whether you’re working on a branding project, designing an interior space, or creating digital content, sage green offers a versatility that few colors can match. What I love most about sage green is how it bridges the gap between trendy and timeless. It’s not going anywhere anytime soon, and honestly, I don’t think it ever should. This sophisticated color has been quietly revolutionizing design palettes across every industry, and today I’m excited to share eight of my favorite sage green color combinations that will elevate your next project. 👋 Psst... Did you know you can get unlimited downloads of 59,000+ fonts and millions of other creative assets for just $16.95/mo? Learn more »The 8 Most Inspiring Sage Green Color Palettes 1. Garden Fresh #D2E5C4 #B2C69E #95B07B #79955D #5A743C Download this color palette 735×1102 Pinterest image 2160×3840 Vertical wallpaper 900×900 Square 3840×2160 4K Wallpaper This monochromatic sage palette is pure perfection for anyone wanting to create depth without complexity. I use this combination constantly in botanical-themed projects because it captures every shade of green you’d find in a thriving garden. The progression from light to dark creates natural hierarchy, making it incredibly functional for both print and digital work. 2. Misty Morning #BDC9BB #ACBAA1 #B2C1A2 #A4B1A0 #ADC3B7 Download this color palette 735×1102 Pinterest image 2160×3840 Vertical wallpaper 900×900 Square 3840×2160 4K Wallpaper When I need something soft and ethereal, this is my go-to palette. These gentle sage tones remind me of early morning fog rolling over hills. It’s perfect for wellness brands, spa environments, or any project that needs to evoke tranquility and peace. The subtle variations create interest without ever feeling overwhelming. 3. Harvest Moon #9AAB89 #647056 #D6C388 #F8C565 Download this color palette 735×1102 Pinterest image 2160×3840 Vertical wallpaper 900×900 Square 3840×2160 4K Wallpaper Get 300+ Fonts for FREEEnter your email to download our 100% free "Font Lover's Bundle". For commercial & personal use. No royalties. No fees. No attribution. 100% free to use anywhere. The combination of sage green with warm golds creates magic every single time. This palette captures that perfect autumn moment when the light hits everything just right. I love using this for brands that want to feel both grounded and optimistic – it’s earthy sophistication with a sunny disposition. 4. Moody Botanical #4D5D42 #6A894B #8DA67E #9B999A #C6B5DF Download this color palette 735×1102 Pinterest image 2160×3840 Vertical wallpaper 900×900 Square 3840×2160 4K Wallpaper For projects that need a bit more drama, this palette delivers beautifully. The deeper sage tones paired with that unexpected lavender create intrigue without losing the calming essence of green. I find this combination works wonderfully for upscale restaurants or luxury lifestyle brands that want to feel approachable yet refined. 5. Countryside Charm #A3AC9A #8A9A5B #93A395 #748B74 #827D67 Download this color palette 735×1102 Pinterest image 2160×3840 Vertical wallpaper 900×900 Square 3840×2160 4K Wallpaper This palette feels like a walk through the English countryside – all rolling hills and weathered stone walls. The mix of sage greens with those earthy undertones creates incredible depth. I use this combination for projects that need to feel established and trustworthy, like financial services or heritage brands. 6. Industrial Farmhouse Zen #CED3D2 #3F5054 #6F675E #9CAB86 #C8CAB5 Download this color palette 735×1102 Pinterest image 2160×3840 Vertical wallpaper 900×900 Square 3840×2160 4K Wallpaper The marriage of sage green with industrial grays might seem unexpected, but it creates this incredibly sophisticated modern aesthetic. This palette is perfect for tech companies or architectural firms that want to feel innovative yet grounded. The sage adds warmth to what could otherwise be cold, sterile colors. 7. Desert Sage #9AAB89 #B2AC88 #A06464 #8C909C #C9AD99 Download this color palette 735×1102 Pinterest image 2160×3840 Vertical wallpaper 900×900 Square 3840×2160 4K Wallpaper Inspired by the American Southwest, this palette combines sage with dusty terra cottas and warm beiges. There’s something so comforting about these colors together – they feel like sunset in the desert. I love using this for hospitality brands or any project that wants to evoke adventure and warmth. 8. Forest Floor #B2C69E #ACB6A6 #5B7553 #745000 #462800 Download this color palette 735×1102 Pinterest image 2160×3840 Vertical wallpaper 900×900 Square 3840×2160 4K Wallpaper This rich, earthy combination takes sage green into deeper territory with those gorgeous chocolate browns. It reminds me of walking through an old-growth forest where the light filters through layers of leaves. Perfect for organic brands, outdoor companies, or any project that wants to feel authentic and connected to nature. Why Sage Green Is Having Its Moment As someone who’s been watching color trends for years, I can tell you that sage green’s popularity isn’t just a passing fad. This color speaks to our collective desire for calm in an increasingly chaotic world. It’s the visual equivalent of taking a deep breath – immediately soothing and centering. The rise of biophilic design has also played a huge role in sage green’s dominance. As we spend more time indoors, we’re craving those connections to nature, and sage green delivers that botanical feeling without being overly literal. It’s nature-inspired design at its most sophisticated. What makes sage green particularly special is its incredible adaptability. Unlike brighter greens that can feel overwhelming or dated, sage green has this chameleon-like quality that allows it to work in virtually any context. Pair it with warm woods and it feels rustic; combine it with metallics and it becomes luxurious; add some crisp whites and suddenly it’s Scandinavian minimalism. Mastering Sage Green in Your Design Work The key to working with sage green successfully is understanding its undertones. Some sage greens lean more yellow, others more blue or gray. Recognizing these subtle differences will help you create more cohesive palettes and avoid color clashes that can make your work feel off. I always recommend testing your sage green palettes in different lighting conditions. What looks perfect on your computer screen might feel completely different in natural light or under warm artificial lighting. This is especially crucial for interior design projects or any work that will be viewed in physical spaces. When building palettes around sage green, I like to think about the mood I’m trying to create. For calm, peaceful vibes, I’ll pair it with other muted tones and plenty of white space. For something more energetic, I might add unexpected pops of coral or sunny yellow. The beauty of sage green is that it’s such a diplomatic color – it plays well with almost everything. Sage Green Across Different Design Applications Branding and Logo Design In branding work, sage green communicates reliability, growth, and environmental consciousness without hitting people over the head with it. I love using it for wellness companies, sustainable brands, and professional services that want to feel approachable. The key is pairing it with typography that reinforces your brand personality – clean sans serifs for modern feels, or elegant serifs for more traditional approaches. Interior Spaces Sage green walls have become incredibly popular, and for good reason. The color creates an instant sense of calm while still feeling current. I particularly love using darker sage greens in dining rooms or bedrooms where you want that cozy, enveloping feeling. Lighter sages work beautifully in kitchens and bathrooms where you want freshness without the sterility of pure white. Digital Design For websites and apps, sage green offers a refreshing alternative to the blues and grays that dominate digital design. It’s easy on the eyes, which makes it perfect for apps focused on wellness, meditation, or any platform where users will spend extended time. Just be mindful of accessibility – always test your sage green backgrounds with various text colors to ensure proper contrast ratios. Product Design The natural, organic feeling of sage green makes it perfect for product packaging, especially in the beauty, food, and wellness sectors. It communicates quality and naturalness without feeling overly earthy or crunchy. I’ve seen it work beautifully on everything from skincare packaging to high-end kitchen appliances. The Psychology Behind Sage Green’s Appeal Color psychology tells us that green represents growth, harmony, and balance – all things we desperately need in our modern lives. But sage green takes these positive associations and adds sophistication. It’s green without the intensity, nature without the rawness. There’s also something inherently honest about sage green. It doesn’t try too hard or demand attention the way brighter colors do. This authenticity resonates with consumers who are increasingly skeptical of brands that feel forced or overly polished. Sage green whispers where other colors shout, and sometimes that’s exactly what your message needs. Looking Forward: Sage Green’s Staying Power While I can’t predict the future, I’m confident that sage green will remain relevant for years to come. It hits all the right notes for contemporary design – it’s calming without being boring, natural without being literal, and sophisticated without being pretentious. The color also photographs beautifully, which matters more than ever in our Instagram-driven world. Whether it’s a sage green accent wall or a product shot featuring sage packaging, this color translates perfectly to social media, helping brands create that coveted “aesthetic” that drives engagement. As we continue to prioritize wellness and sustainability in design, sage green offers the perfect visual shorthand for these values. It’s a color that makes people feel good, and in a world that often doesn’t, that’s incredibly powerful. Bringing It All Together These eight sage green palettes represent just the beginning of what’s possible with this incredible color. Whether you’re drawn to the monochromatic serenity of Garden Fresh or the unexpected sophistication of Industrial Zen, there’s a sage green palette that can elevate your next project. The secret to success with sage green is trusting its natural elegance. Don’t feel like you need to overstyling or complicate things – sage green’s beauty lies in its understated sophistication. Let it be the calm, confident foundation that allows other elements of your design to shine. So go ahead and embrace the sage green revolution. Your designs (and your stress levels) will thank you for it. After all, in a world full of visual noise, sometimes the most powerful statement you can make is a quiet one. Riley Morgan Riley Morgan is a globe-trotting graphic designer with a sharp eye for color, typography, and intuitive design. They are a color lover and blend creativity with culture, drawing inspiration from cities, landscapes, and stories around the world. When they’re not designing sleek visuals for clients, they’re blogging about trends, tools, and the art of making design feel like home—wherever that may be. 8 Stunning Sunset Color PalettesThere’s something absolutely magical about watching the sun dip below the horizon, painting the sky in breathtaking hues that seem...10 Warm Color Palettes That’ll Brighten Your DayThere’s nothing quite like the embracing quality of warm colors to make a design feel inviting and alive. As someone...10 Luxurious Jewel Tone Color PalettesAs a designer who’s always searching for color combinations that exude sophistication and richness, I find myself constantly returning to...
    0 Σχόλια 0 Μοιράστηκε
  • Znamy sie completes a coastal-inspired patisserie in Warsaw

    html PUBLIC "-//W3C//DTD HTML 4.0 Transitional//EN" ";
    Japanese architect Shigeru Ban has created the Blue Ocean Domefor the Osaka-Kansai Expo 2025, addressing the urgent issue of marine plastic pollution and raising crucial awareness about it.Named Blue Ocean Dome, the pavilion stands out with its innovative design, comprising three distinct dome types: Dome A, Dome B, and Dome C. Each dome is specifically crafted to host captivating installations and dynamic exhibitions, promising an unforgettable experience for all visitors throughout the event. Image © Taiki FukaoThe project was commissioned by the Zero Emissions Research and Initiatives , a global network of creative minds, seeking solutions to the ever increasing problems of the world.Rather than outright rejecting plastic, the pavilion inspires deep reflection on how we use and manage materials, highlighting our critical responsibility to make sustainable choices for the future.The BOD merges traditional and modern materials—like bamboo, paper, and carbon fiber reinforced plastic—to unlock new and innovative architectural possibilities.Dome A, serving as the striking entrance, is expertly crafted from laminated bamboo. This innovative design not only showcases the beauty of bamboo but also tackles the pressing issue of abandoned bamboo groves in Japan, which pose a risk to land stability due to their shallow root systems.Utilizing raw bamboo for structural purposes is often difficult; however, through advanced processing, it is transformed into thin, laminated boards that boast strength even greater than that of conventional wood. These boards have been skillfully fashioned into a remarkable 19-meter dome, drawing inspiration from traditional Japanese bamboo hats. This project brilliantly turns an environmental challenge into a sustainable architectural solution, highlighting the potential of bamboo as a valuable resource.Dome B stands as the central and largest structure of its kind, boasting a remarkable diameter of 42 meters. It is primarily constructed from Carbon Fiber Reinforced Polymer, a cutting-edge material revered for its extraordinary strength-to-weight ratio—four times stronger than steel yet only one-fifth the weight. While CFRP is predominantly seen in industries such as aerospace and automotive due to its high cost, its application in architecture is pioneering.In this project, the choice of CFRP was not just advantageous; it was essential. The primary goal was to minimize the foundation weight on the reclaimed land of the Expo site, making sustainability a top priority. To mitigate the environmental consequences of deep foundation piles, the structure had to be lighter than the soil excavated for its foundation. CFRP not only met this stringent requirement but also ensured the dome's structural integrity, showcasing a perfect marriage of innovation and environmental responsibility.Dome C, with its impressive 19-meter diameter, is crafted entirely from paper tubes that are 100% recyclable after use. Its innovative design features a three-dimensional truss structure, connected by elegant wooden spheres, evoking the beauty of molecular structures.To champion sustainability and minimize waste following the six-month Expo, the entire BOD pavilion has been meticulously designed for effortless disassembly and relocation. It is anchored by a robust steel foundation system and boasts a modular design that allows it to be conveniently packed into standard shipping containers. After the Expo concludes, this remarkable pavilion will be transported to the Maldives, where it will be transformed into a stunning resort facility, breathing new life into its design and purpose.Recently, Shigeru Ban's Paper Log House was revealed at Philip Johnson's Glass House Venue. In addition, Ban installed his Paper Partition Sheltersfor the victims of the Turkey-Syria earthquake in Mersin and Hatay provinces of Turkey.All images © Hiroyuki Hirai unless otherwise stated.> via Shigeru Ban Architects 
    #znamy #sie #completes #coastalinspired #patisserie
    Znamy sie completes a coastal-inspired patisserie in Warsaw
    html PUBLIC "-//W3C//DTD HTML 4.0 Transitional//EN" "; Japanese architect Shigeru Ban has created the Blue Ocean Domefor the Osaka-Kansai Expo 2025, addressing the urgent issue of marine plastic pollution and raising crucial awareness about it.Named Blue Ocean Dome, the pavilion stands out with its innovative design, comprising three distinct dome types: Dome A, Dome B, and Dome C. Each dome is specifically crafted to host captivating installations and dynamic exhibitions, promising an unforgettable experience for all visitors throughout the event. Image © Taiki FukaoThe project was commissioned by the Zero Emissions Research and Initiatives , a global network of creative minds, seeking solutions to the ever increasing problems of the world.Rather than outright rejecting plastic, the pavilion inspires deep reflection on how we use and manage materials, highlighting our critical responsibility to make sustainable choices for the future.The BOD merges traditional and modern materials—like bamboo, paper, and carbon fiber reinforced plastic—to unlock new and innovative architectural possibilities.Dome A, serving as the striking entrance, is expertly crafted from laminated bamboo. This innovative design not only showcases the beauty of bamboo but also tackles the pressing issue of abandoned bamboo groves in Japan, which pose a risk to land stability due to their shallow root systems.Utilizing raw bamboo for structural purposes is often difficult; however, through advanced processing, it is transformed into thin, laminated boards that boast strength even greater than that of conventional wood. These boards have been skillfully fashioned into a remarkable 19-meter dome, drawing inspiration from traditional Japanese bamboo hats. This project brilliantly turns an environmental challenge into a sustainable architectural solution, highlighting the potential of bamboo as a valuable resource.Dome B stands as the central and largest structure of its kind, boasting a remarkable diameter of 42 meters. It is primarily constructed from Carbon Fiber Reinforced Polymer, a cutting-edge material revered for its extraordinary strength-to-weight ratio—four times stronger than steel yet only one-fifth the weight. While CFRP is predominantly seen in industries such as aerospace and automotive due to its high cost, its application in architecture is pioneering.In this project, the choice of CFRP was not just advantageous; it was essential. The primary goal was to minimize the foundation weight on the reclaimed land of the Expo site, making sustainability a top priority. To mitigate the environmental consequences of deep foundation piles, the structure had to be lighter than the soil excavated for its foundation. CFRP not only met this stringent requirement but also ensured the dome's structural integrity, showcasing a perfect marriage of innovation and environmental responsibility.Dome C, with its impressive 19-meter diameter, is crafted entirely from paper tubes that are 100% recyclable after use. Its innovative design features a three-dimensional truss structure, connected by elegant wooden spheres, evoking the beauty of molecular structures.To champion sustainability and minimize waste following the six-month Expo, the entire BOD pavilion has been meticulously designed for effortless disassembly and relocation. It is anchored by a robust steel foundation system and boasts a modular design that allows it to be conveniently packed into standard shipping containers. After the Expo concludes, this remarkable pavilion will be transported to the Maldives, where it will be transformed into a stunning resort facility, breathing new life into its design and purpose.Recently, Shigeru Ban's Paper Log House was revealed at Philip Johnson's Glass House Venue. In addition, Ban installed his Paper Partition Sheltersfor the victims of the Turkey-Syria earthquake in Mersin and Hatay provinces of Turkey.All images © Hiroyuki Hirai unless otherwise stated.> via Shigeru Ban Architects  #znamy #sie #completes #coastalinspired #patisserie
    WORLDARCHITECTURE.ORG
    Znamy sie completes a coastal-inspired patisserie in Warsaw
    html PUBLIC "-//W3C//DTD HTML 4.0 Transitional//EN" "http://www.w3.org/TR/REC-html40/loose.dtd" Japanese architect Shigeru Ban has created the Blue Ocean Dome (BOD) for the Osaka-Kansai Expo 2025, addressing the urgent issue of marine plastic pollution and raising crucial awareness about it.Named Blue Ocean Dome, the pavilion stands out with its innovative design, comprising three distinct dome types: Dome A, Dome B, and Dome C. Each dome is specifically crafted to host captivating installations and dynamic exhibitions, promising an unforgettable experience for all visitors throughout the event. Image © Taiki FukaoThe project was commissioned by the Zero Emissions Research and Initiatives (ZERI), a global network of creative minds, seeking solutions to the ever increasing problems of the world.Rather than outright rejecting plastic, the pavilion inspires deep reflection on how we use and manage materials, highlighting our critical responsibility to make sustainable choices for the future.The BOD merges traditional and modern materials—like bamboo, paper, and carbon fiber reinforced plastic (CFRP)—to unlock new and innovative architectural possibilities.Dome A, serving as the striking entrance, is expertly crafted from laminated bamboo. This innovative design not only showcases the beauty of bamboo but also tackles the pressing issue of abandoned bamboo groves in Japan, which pose a risk to land stability due to their shallow root systems.Utilizing raw bamboo for structural purposes is often difficult; however, through advanced processing, it is transformed into thin, laminated boards that boast strength even greater than that of conventional wood. These boards have been skillfully fashioned into a remarkable 19-meter dome, drawing inspiration from traditional Japanese bamboo hats. This project brilliantly turns an environmental challenge into a sustainable architectural solution, highlighting the potential of bamboo as a valuable resource.Dome B stands as the central and largest structure of its kind, boasting a remarkable diameter of 42 meters. It is primarily constructed from Carbon Fiber Reinforced Polymer (CFRP), a cutting-edge material revered for its extraordinary strength-to-weight ratio—four times stronger than steel yet only one-fifth the weight. While CFRP is predominantly seen in industries such as aerospace and automotive due to its high cost, its application in architecture is pioneering.In this project, the choice of CFRP was not just advantageous; it was essential. The primary goal was to minimize the foundation weight on the reclaimed land of the Expo site, making sustainability a top priority. To mitigate the environmental consequences of deep foundation piles, the structure had to be lighter than the soil excavated for its foundation. CFRP not only met this stringent requirement but also ensured the dome's structural integrity, showcasing a perfect marriage of innovation and environmental responsibility.Dome C, with its impressive 19-meter diameter, is crafted entirely from paper tubes that are 100% recyclable after use. Its innovative design features a three-dimensional truss structure, connected by elegant wooden spheres, evoking the beauty of molecular structures.To champion sustainability and minimize waste following the six-month Expo, the entire BOD pavilion has been meticulously designed for effortless disassembly and relocation. It is anchored by a robust steel foundation system and boasts a modular design that allows it to be conveniently packed into standard shipping containers. After the Expo concludes, this remarkable pavilion will be transported to the Maldives, where it will be transformed into a stunning resort facility, breathing new life into its design and purpose.Recently, Shigeru Ban's Paper Log House was revealed at Philip Johnson's Glass House Venue. In addition, Ban installed his Paper Partition Shelters (PPS) for the victims of the Turkey-Syria earthquake in Mersin and Hatay provinces of Turkey.All images © Hiroyuki Hirai unless otherwise stated.> via Shigeru Ban Architects 
    0 Σχόλια 0 Μοιράστηκε
  • Casa Morena by Mário Martins Atelier: Architectural Dialogue with Nature

    Casa Morena | © Fernando Guerra / FG+SG
    In the coastal enclave of Lagos, Portugal, Mário Martins Atelier has crafted Casa Morena. This residence quietly asserts itself as an ode to the dialogue between architecture and its natural setting. Completed in 2024, this project demonstrates a considered response to its environment, where the interplay of light, material, and landscape defines a sense of place rather than architectural imposition.

    Casa Morena Technical Information

    Architects1-5: Mário Martins Atelier
    Location: Lagos, Portugal
    Project Years: 2024
    Photographs: © Fernando Guerra / FG+SG

    A simple house, one that wishes to be discreet and to be influenced by its location, to become a house that is pleasant with thoughtful landscaping.
    – Mário Martins Atelier

    Casa Morena Photographs

    © Fernando Guerra / FG+SG

    © Fernando Guerra / FG+SG

    © Fernando Guerra / FG+SG

    © Fernando Guerra / FG+SG

    © Fernando Guerra / FG+SG

    © Fernando Guerra / FG+SG

    © Fernando Guerra / FG+SG

    © Fernando Guerra / FG+SG

    © Fernando Guerra / FG+SG

    © Fernando Guerra / FG+SG
    A Contextual Response to Landscape and Light
    The design of Casa Morena finds its genesis in the site itself, a pine-scented plot overlooking the expanse of a bay. The pine trees, longstanding witnesses to the landscape’s evolution, provide the project’s visual anchor and spatial logic. In a move that both respects and celebrates these natural elements, Mário Martins Atelier structured the house’s reticulated plan to echo the presence of the trees, creating a composition that unfolds as a series of volumes harmonizing with the vertical rhythm of the trunks.
    The solid base of the house, built from locally sourced schist, emerges directly from the terrain. These robust walls establish a tactile continuity with the ground, their rough textures anchoring the architecture within the landscape. In contrast, the upper volumes of the house adopt a distinctly lighter expression: horizontal planes rendered in white plaster, their smooth surfaces catching and refracting the region’s luminous sun. This duality, earthbound solidity, and aerial lightness establish an architectural narrative rooted in the elemental.
    Casa Morena Experiential Flow
    Casa Morena’s spatial arrangement articulates a clear hierarchy of public and private domains. On the ground floor, the house embraces openness and transparency. An expansive entrance hall blurs the threshold inside and out, guiding inhabitants and visitors into a luminous social heart. The lounge, kitchen, and office flow seamlessly into the garden, unified by a continuous glazed façade that invites the outside in.
    This deliberate porosity extends to a covered terrace, an intermediary space that dissolves the boundary between shelter and exposure. The terrace, framed by the garden’s green canopy and the swimming pool’s long line, becomes a place of repose and contemplation. The pool itself demarcates the transition from a cultivated garden to the looser, more rugged landscape beyond, its linear form echoing the horizon’s expanse.
    Ascending to the upper floor, the architectural language shifts towards intimacy. The bedrooms, each with direct access to terraces and patios, create secluded zones that still maintain a fluid relationship with the outdoors. A discreet rooftop terrace, accessible from these private quarters, offers a hidden sanctuary where the interplay of views and light remains uninterrupted.
    Material Tectonics and Environmental Strategy
    Casa Morena’s material palette is rooted in regional specificity and tactile sensibility. Schist, extracted from the site, is not merely a structural element but a narrative thread linking the building to its geological past. Its earthy warmth and rugged surface provide a counterpoint to the luminous white of the upper volumes, an articulation of contrast that enlivens the building’s silhouette.
    White, the chromatic signature of the Algarve region, is employed with restraint and nuance. Its reflective qualities intensify the play of shadow and light, a dynamic that shifts with the passing of the day. In this interplay, architecture becomes an instrument for registering the ephemeral, and the environment itself becomes a participant in the spatial drama.
    Environmental stewardship is also woven into the project’s DNA. Discreetly integrated systems on the roof harness solar energy and manage water resources, extending the house’s commitment to a sustainable coexistence with its setting.
    Casa Morena Plans

    Basement | © Mario Martins Atelier

    Ground Level | © Mario Martins Atelier

    Upper Level | © Mario Martins Atelier

    Roof Plan | © Mario Martins Atelier

    Elevations | © Mario Martins Atelier
    Casa Morena Image Gallery

    About Mário Martins Atelier
    Mário Martins Atelier is an architectural studio based in Lagos and Lisbon, Portugal, led by Mário Martins. The practice is known for its context-sensitive approach, crafting contemporary projects seamlessly integrating with their surroundings while prioritizing regional materials and environmental considerations.
    Credits and Additional Notes

    Lead Architect: Mário Martins, arq.
    Project Team: Nuno Colaço, Sónia Fialho, Susana Jóia, Mariana Franco, Ana Graça
    Engineering: Nuno Grave Engenharia
    Landscape: HB-Hipolito Bettencourt – Arquitectura Paisagista, Lda.
    Building Contractor: Marques Antunes Engenharia Lda.
    #casa #morena #mário #martins #atelier
    Casa Morena by Mário Martins Atelier: Architectural Dialogue with Nature
    Casa Morena | © Fernando Guerra / FG+SG In the coastal enclave of Lagos, Portugal, Mário Martins Atelier has crafted Casa Morena. This residence quietly asserts itself as an ode to the dialogue between architecture and its natural setting. Completed in 2024, this project demonstrates a considered response to its environment, where the interplay of light, material, and landscape defines a sense of place rather than architectural imposition. Casa Morena Technical Information Architects1-5: Mário Martins Atelier Location: Lagos, Portugal Project Years: 2024 Photographs: © Fernando Guerra / FG+SG A simple house, one that wishes to be discreet and to be influenced by its location, to become a house that is pleasant with thoughtful landscaping. – Mário Martins Atelier Casa Morena Photographs © Fernando Guerra / FG+SG © Fernando Guerra / FG+SG © Fernando Guerra / FG+SG © Fernando Guerra / FG+SG © Fernando Guerra / FG+SG © Fernando Guerra / FG+SG © Fernando Guerra / FG+SG © Fernando Guerra / FG+SG © Fernando Guerra / FG+SG © Fernando Guerra / FG+SG A Contextual Response to Landscape and Light The design of Casa Morena finds its genesis in the site itself, a pine-scented plot overlooking the expanse of a bay. The pine trees, longstanding witnesses to the landscape’s evolution, provide the project’s visual anchor and spatial logic. In a move that both respects and celebrates these natural elements, Mário Martins Atelier structured the house’s reticulated plan to echo the presence of the trees, creating a composition that unfolds as a series of volumes harmonizing with the vertical rhythm of the trunks. The solid base of the house, built from locally sourced schist, emerges directly from the terrain. These robust walls establish a tactile continuity with the ground, their rough textures anchoring the architecture within the landscape. In contrast, the upper volumes of the house adopt a distinctly lighter expression: horizontal planes rendered in white plaster, their smooth surfaces catching and refracting the region’s luminous sun. This duality, earthbound solidity, and aerial lightness establish an architectural narrative rooted in the elemental. Casa Morena Experiential Flow Casa Morena’s spatial arrangement articulates a clear hierarchy of public and private domains. On the ground floor, the house embraces openness and transparency. An expansive entrance hall blurs the threshold inside and out, guiding inhabitants and visitors into a luminous social heart. The lounge, kitchen, and office flow seamlessly into the garden, unified by a continuous glazed façade that invites the outside in. This deliberate porosity extends to a covered terrace, an intermediary space that dissolves the boundary between shelter and exposure. The terrace, framed by the garden’s green canopy and the swimming pool’s long line, becomes a place of repose and contemplation. The pool itself demarcates the transition from a cultivated garden to the looser, more rugged landscape beyond, its linear form echoing the horizon’s expanse. Ascending to the upper floor, the architectural language shifts towards intimacy. The bedrooms, each with direct access to terraces and patios, create secluded zones that still maintain a fluid relationship with the outdoors. A discreet rooftop terrace, accessible from these private quarters, offers a hidden sanctuary where the interplay of views and light remains uninterrupted. Material Tectonics and Environmental Strategy Casa Morena’s material palette is rooted in regional specificity and tactile sensibility. Schist, extracted from the site, is not merely a structural element but a narrative thread linking the building to its geological past. Its earthy warmth and rugged surface provide a counterpoint to the luminous white of the upper volumes, an articulation of contrast that enlivens the building’s silhouette. White, the chromatic signature of the Algarve region, is employed with restraint and nuance. Its reflective qualities intensify the play of shadow and light, a dynamic that shifts with the passing of the day. In this interplay, architecture becomes an instrument for registering the ephemeral, and the environment itself becomes a participant in the spatial drama. Environmental stewardship is also woven into the project’s DNA. Discreetly integrated systems on the roof harness solar energy and manage water resources, extending the house’s commitment to a sustainable coexistence with its setting. Casa Morena Plans Basement | © Mario Martins Atelier Ground Level | © Mario Martins Atelier Upper Level | © Mario Martins Atelier Roof Plan | © Mario Martins Atelier Elevations | © Mario Martins Atelier Casa Morena Image Gallery About Mário Martins Atelier Mário Martins Atelier is an architectural studio based in Lagos and Lisbon, Portugal, led by Mário Martins. The practice is known for its context-sensitive approach, crafting contemporary projects seamlessly integrating with their surroundings while prioritizing regional materials and environmental considerations. Credits and Additional Notes Lead Architect: Mário Martins, arq. Project Team: Nuno Colaço, Sónia Fialho, Susana Jóia, Mariana Franco, Ana Graça Engineering: Nuno Grave Engenharia Landscape: HB-Hipolito Bettencourt – Arquitectura Paisagista, Lda. Building Contractor: Marques Antunes Engenharia Lda. #casa #morena #mário #martins #atelier
    ARCHEYES.COM
    Casa Morena by Mário Martins Atelier: Architectural Dialogue with Nature
    Casa Morena | © Fernando Guerra / FG+SG In the coastal enclave of Lagos, Portugal, Mário Martins Atelier has crafted Casa Morena. This residence quietly asserts itself as an ode to the dialogue between architecture and its natural setting. Completed in 2024, this project demonstrates a considered response to its environment, where the interplay of light, material, and landscape defines a sense of place rather than architectural imposition. Casa Morena Technical Information Architects1-5: Mário Martins Atelier Location: Lagos, Portugal Project Years: 2024 Photographs: © Fernando Guerra / FG+SG A simple house, one that wishes to be discreet and to be influenced by its location, to become a house that is pleasant with thoughtful landscaping. – Mário Martins Atelier Casa Morena Photographs © Fernando Guerra / FG+SG © Fernando Guerra / FG+SG © Fernando Guerra / FG+SG © Fernando Guerra / FG+SG © Fernando Guerra / FG+SG © Fernando Guerra / FG+SG © Fernando Guerra / FG+SG © Fernando Guerra / FG+SG © Fernando Guerra / FG+SG © Fernando Guerra / FG+SG A Contextual Response to Landscape and Light The design of Casa Morena finds its genesis in the site itself, a pine-scented plot overlooking the expanse of a bay. The pine trees, longstanding witnesses to the landscape’s evolution, provide the project’s visual anchor and spatial logic. In a move that both respects and celebrates these natural elements, Mário Martins Atelier structured the house’s reticulated plan to echo the presence of the trees, creating a composition that unfolds as a series of volumes harmonizing with the vertical rhythm of the trunks. The solid base of the house, built from locally sourced schist, emerges directly from the terrain. These robust walls establish a tactile continuity with the ground, their rough textures anchoring the architecture within the landscape. In contrast, the upper volumes of the house adopt a distinctly lighter expression: horizontal planes rendered in white plaster, their smooth surfaces catching and refracting the region’s luminous sun. This duality, earthbound solidity, and aerial lightness establish an architectural narrative rooted in the elemental. Casa Morena Experiential Flow Casa Morena’s spatial arrangement articulates a clear hierarchy of public and private domains. On the ground floor, the house embraces openness and transparency. An expansive entrance hall blurs the threshold inside and out, guiding inhabitants and visitors into a luminous social heart. The lounge, kitchen, and office flow seamlessly into the garden, unified by a continuous glazed façade that invites the outside in. This deliberate porosity extends to a covered terrace, an intermediary space that dissolves the boundary between shelter and exposure. The terrace, framed by the garden’s green canopy and the swimming pool’s long line, becomes a place of repose and contemplation. The pool itself demarcates the transition from a cultivated garden to the looser, more rugged landscape beyond, its linear form echoing the horizon’s expanse. Ascending to the upper floor, the architectural language shifts towards intimacy. The bedrooms, each with direct access to terraces and patios, create secluded zones that still maintain a fluid relationship with the outdoors. A discreet rooftop terrace, accessible from these private quarters, offers a hidden sanctuary where the interplay of views and light remains uninterrupted. Material Tectonics and Environmental Strategy Casa Morena’s material palette is rooted in regional specificity and tactile sensibility. Schist, extracted from the site, is not merely a structural element but a narrative thread linking the building to its geological past. Its earthy warmth and rugged surface provide a counterpoint to the luminous white of the upper volumes, an articulation of contrast that enlivens the building’s silhouette. White, the chromatic signature of the Algarve region, is employed with restraint and nuance. Its reflective qualities intensify the play of shadow and light, a dynamic that shifts with the passing of the day. In this interplay, architecture becomes an instrument for registering the ephemeral, and the environment itself becomes a participant in the spatial drama. Environmental stewardship is also woven into the project’s DNA. Discreetly integrated systems on the roof harness solar energy and manage water resources, extending the house’s commitment to a sustainable coexistence with its setting. Casa Morena Plans Basement | © Mario Martins Atelier Ground Level | © Mario Martins Atelier Upper Level | © Mario Martins Atelier Roof Plan | © Mario Martins Atelier Elevations | © Mario Martins Atelier Casa Morena Image Gallery About Mário Martins Atelier Mário Martins Atelier is an architectural studio based in Lagos and Lisbon, Portugal, led by Mário Martins. The practice is known for its context-sensitive approach, crafting contemporary projects seamlessly integrating with their surroundings while prioritizing regional materials and environmental considerations. Credits and Additional Notes Lead Architect: Mário Martins, arq. Project Team: Nuno Colaço, Sónia Fialho, Susana Jóia, Mariana Franco, Ana Graça Engineering: Nuno Grave Engenharia Landscape: HB-Hipolito Bettencourt – Arquitectura Paisagista, Lda. Building Contractor: Marques Antunes Engenharia Lda.
    0 Σχόλια 0 Μοιράστηκε
  • Hanging Art In the Bathroom Is Not As Gross As It Seems—Here's Why Designers LOVE It

    There are a few things an interior designer wouldn’t dare put in a bathroom. Carpet? Definitely not. Only overhead lighting? Design blasphemy. But there is one feature that finds its way into the bathroom all the time—rarely questioned, though maybe it should be—and that’s artwork. We get it: who doesn’t want to add a little personality to a space that otherwise is quite functional? Still, design fans are often split on the addition, especially when it comes to certain types of art. Related StoriesAn oil painting resting above a clawfoot bathtub or a framed graphic print next to a mirror infuses your bathroom with warmth and storytelling, a very necessary addition to a space that's often centered around pure function. “In a bathroom, where surfaces tend to be hard and the layout driven by function, a thoughtful piece can shift the entire ambience,” shares interior designer Linette Dai. “It brings dimension to the everyday.”According to designer Ali Milch, art can transform the entire experience from “routine to restorative.” But, is it the bathroom the bestplace to put a favorite photo or heirloom painting? With moisture in the mix and potential for it being in the “splash zone”, you need to be considerate of the art you bring in and where it’s placed. To help guide your curation, we chatted with interior designers and experts on how to integrate art into your space in a way that is both beautiful and bathroom-appropriate.Be Wary of HumidityMaybe this one is obvious, but when placing art in the bathroom, be sure to look for materials that aren’t prone to water damage. “We recommend framing art with a sealed backing and UV-protective acrylic instead of glass, which is both lighter and more resistant to moisture—an important consideration in steamy bathrooms,” Cathy Glazer, founder of Artfully Walls, shares. “Plus, acrylic is much safer than glass if dropped, especially on hard tile floors, as it won’t shatter.”Dai agrees that acrylic is the way to go when putting framed works into the bathroom, “I usually recommend acrylic glazing to avoid moisture damage. For humid environments, prints or photography mounted directly on aluminum or face-mounted under acrylic are durable and beautiful.”Make It Your Creative CanvasCourtsey of Ali MilchUnless you have a sprawling space, chances are your bathroom’s square footage is limited. Rather than viewing this as a constraint, think about it as an opportunity to get creative. “Because they’re smaller and more self-contained,invite experimentation—think unexpected pieces, playful themes, or striking colors,” shares Glazer. “Art helps turn the bathroom into a moment of surprise and style.”“It doesn’t have to feel stuffy or overly formal,” Milch adds. “In a recent Tribeca project, we installed a kitschy iMessage bubble with the text ‘I love you too’ on the wall facing the entry. It’s a lighthearted, personal touch.”While it’s fun to get whimsical with your bathroom art, Dai also suggests still approaching it with a curated eye and saving anything that is precious or too high-maintenance for the powder room. “In full baths, I tend to be more selective based on how the space is ventilated and used day-to-day,” she shares. “Powder rooms, on the other hand, offer more freedom. That’s where I love incorporating oil paintings. They bring soul and a sense of history, and can make even the smallest space feel elevated.”Keep Materials And Size In MindAnother material worth considering adding? Ceramics. “Ceramic pieces also work beautifully, especially when there’s open shelving or decorative niches to display them,” shares Milch. Be wary of larger-scale sculptures, as they could potentially be slightly disruptive to the space. “Any type of artwork can work in a bathroom depending on the spatial allowances, but the typical bathroom is suited to wall hangings versus sculptures,” says Sarah Latham of L Interiors.And don’t forget to be mindful of scale. “As for size, I always opt for larger pieces in smaller spaces, it may feel counter-intuitive, but it makes a tight space feel larger,” Anastasia Casey of The Interior Collective shares. “I look for works that complement the finishes and palette without overwhelming it.”Let It Set The ToneCourtesy of Annie SloanArtwork in the bathroom doesn’t just decorate it; it can define it. “In bathrooms, there’s often less visual competition—no bold furniture or patterned textiles—so the art naturally becomes more of a focal point,” Dai adds. “That’s why the mood it sets matters so much. I think more intentionally about subject matter—what someone will see up close, often in moments of solitude,” shares Dai. Whether it’s a serene landscape photo or storied painting, don’t underestimate what a piece of art can do for the most utilitarian room in the house. With the right materials and placement, it can hold its own—moisture and all—while adding a design moment and feels considered and unexpected.Follow House Beautiful on Instagram and TikTok.
    #hanging #art #bathroom #not #gross
    Hanging Art In the Bathroom Is Not As Gross As It Seems—Here's Why Designers LOVE It
    There are a few things an interior designer wouldn’t dare put in a bathroom. Carpet? Definitely not. Only overhead lighting? Design blasphemy. But there is one feature that finds its way into the bathroom all the time—rarely questioned, though maybe it should be—and that’s artwork. We get it: who doesn’t want to add a little personality to a space that otherwise is quite functional? Still, design fans are often split on the addition, especially when it comes to certain types of art. Related StoriesAn oil painting resting above a clawfoot bathtub or a framed graphic print next to a mirror infuses your bathroom with warmth and storytelling, a very necessary addition to a space that's often centered around pure function. “In a bathroom, where surfaces tend to be hard and the layout driven by function, a thoughtful piece can shift the entire ambience,” shares interior designer Linette Dai. “It brings dimension to the everyday.”According to designer Ali Milch, art can transform the entire experience from “routine to restorative.” But, is it the bathroom the bestplace to put a favorite photo or heirloom painting? With moisture in the mix and potential for it being in the “splash zone”, you need to be considerate of the art you bring in and where it’s placed. To help guide your curation, we chatted with interior designers and experts on how to integrate art into your space in a way that is both beautiful and bathroom-appropriate.Be Wary of HumidityMaybe this one is obvious, but when placing art in the bathroom, be sure to look for materials that aren’t prone to water damage. “We recommend framing art with a sealed backing and UV-protective acrylic instead of glass, which is both lighter and more resistant to moisture—an important consideration in steamy bathrooms,” Cathy Glazer, founder of Artfully Walls, shares. “Plus, acrylic is much safer than glass if dropped, especially on hard tile floors, as it won’t shatter.”Dai agrees that acrylic is the way to go when putting framed works into the bathroom, “I usually recommend acrylic glazing to avoid moisture damage. For humid environments, prints or photography mounted directly on aluminum or face-mounted under acrylic are durable and beautiful.”Make It Your Creative CanvasCourtsey of Ali MilchUnless you have a sprawling space, chances are your bathroom’s square footage is limited. Rather than viewing this as a constraint, think about it as an opportunity to get creative. “Because they’re smaller and more self-contained,invite experimentation—think unexpected pieces, playful themes, or striking colors,” shares Glazer. “Art helps turn the bathroom into a moment of surprise and style.”“It doesn’t have to feel stuffy or overly formal,” Milch adds. “In a recent Tribeca project, we installed a kitschy iMessage bubble with the text ‘I love you too’ on the wall facing the entry. It’s a lighthearted, personal touch.”While it’s fun to get whimsical with your bathroom art, Dai also suggests still approaching it with a curated eye and saving anything that is precious or too high-maintenance for the powder room. “In full baths, I tend to be more selective based on how the space is ventilated and used day-to-day,” she shares. “Powder rooms, on the other hand, offer more freedom. That’s where I love incorporating oil paintings. They bring soul and a sense of history, and can make even the smallest space feel elevated.”Keep Materials And Size In MindAnother material worth considering adding? Ceramics. “Ceramic pieces also work beautifully, especially when there’s open shelving or decorative niches to display them,” shares Milch. Be wary of larger-scale sculptures, as they could potentially be slightly disruptive to the space. “Any type of artwork can work in a bathroom depending on the spatial allowances, but the typical bathroom is suited to wall hangings versus sculptures,” says Sarah Latham of L Interiors.And don’t forget to be mindful of scale. “As for size, I always opt for larger pieces in smaller spaces, it may feel counter-intuitive, but it makes a tight space feel larger,” Anastasia Casey of The Interior Collective shares. “I look for works that complement the finishes and palette without overwhelming it.”Let It Set The ToneCourtesy of Annie SloanArtwork in the bathroom doesn’t just decorate it; it can define it. “In bathrooms, there’s often less visual competition—no bold furniture or patterned textiles—so the art naturally becomes more of a focal point,” Dai adds. “That’s why the mood it sets matters so much. I think more intentionally about subject matter—what someone will see up close, often in moments of solitude,” shares Dai. Whether it’s a serene landscape photo or storied painting, don’t underestimate what a piece of art can do for the most utilitarian room in the house. With the right materials and placement, it can hold its own—moisture and all—while adding a design moment and feels considered and unexpected.Follow House Beautiful on Instagram and TikTok. #hanging #art #bathroom #not #gross
    WWW.HOUSEBEAUTIFUL.COM
    Hanging Art In the Bathroom Is Not As Gross As It Seems—Here's Why Designers LOVE It
    There are a few things an interior designer wouldn’t dare put in a bathroom. Carpet? Definitely not. Only overhead lighting? Design blasphemy. But there is one feature that finds its way into the bathroom all the time—rarely questioned, though maybe it should be—and that’s artwork. We get it: who doesn’t want to add a little personality to a space that otherwise is quite functional? Still, design fans are often split on the addition, especially when it comes to certain types of art. Related StoriesAn oil painting resting above a clawfoot bathtub or a framed graphic print next to a mirror infuses your bathroom with warmth and storytelling, a very necessary addition to a space that's often centered around pure function. “In a bathroom, where surfaces tend to be hard and the layout driven by function, a thoughtful piece can shift the entire ambience,” shares interior designer Linette Dai. “It brings dimension to the everyday.”According to designer Ali Milch, art can transform the entire experience from “routine to restorative.” But, is it the bathroom the best (read: most hygienic) place to put a favorite photo or heirloom painting? With moisture in the mix and potential for it being in the “splash zone” (sorry, but it's true), you need to be considerate of the art you bring in and where it’s placed. To help guide your curation, we chatted with interior designers and experts on how to integrate art into your space in a way that is both beautiful and bathroom-appropriate.Be Wary of HumidityMaybe this one is obvious, but when placing art in the bathroom, be sure to look for materials that aren’t prone to water damage. “We recommend framing art with a sealed backing and UV-protective acrylic instead of glass, which is both lighter and more resistant to moisture—an important consideration in steamy bathrooms,” Cathy Glazer, founder of Artfully Walls, shares. “Plus, acrylic is much safer than glass if dropped, especially on hard tile floors, as it won’t shatter.”Dai agrees that acrylic is the way to go when putting framed works into the bathroom, “I usually recommend acrylic glazing to avoid moisture damage. For humid environments, prints or photography mounted directly on aluminum or face-mounted under acrylic are durable and beautiful.”Make It Your Creative CanvasCourtsey of Ali MilchUnless you have a sprawling space, chances are your bathroom’s square footage is limited. Rather than viewing this as a constraint, think about it as an opportunity to get creative. “Because they’re smaller and more self-contained, [bathrooms] invite experimentation—think unexpected pieces, playful themes, or striking colors,” shares Glazer. “Art helps turn the bathroom into a moment of surprise and style.”“It doesn’t have to feel stuffy or overly formal,” Milch adds. “In a recent Tribeca project, we installed a kitschy iMessage bubble with the text ‘I love you too’ on the wall facing the entry. It’s a lighthearted, personal touch.”While it’s fun to get whimsical with your bathroom art (pro tip: secondhand stores can be a great place for unique finds), Dai also suggests still approaching it with a curated eye and saving anything that is precious or too high-maintenance for the powder room. “In full baths, I tend to be more selective based on how the space is ventilated and used day-to-day,” she shares. “Powder rooms, on the other hand, offer more freedom. That’s where I love incorporating oil paintings. They bring soul and a sense of history, and can make even the smallest space feel elevated.”Keep Materials And Size In MindAnother material worth considering adding? Ceramics. “Ceramic pieces also work beautifully, especially when there’s open shelving or decorative niches to display them,” shares Milch. Be wary of larger-scale sculptures, as they could potentially be slightly disruptive to the space. “Any type of artwork can work in a bathroom depending on the spatial allowances, but the typical bathroom is suited to wall hangings versus sculptures,” says Sarah Latham of L Interiors.And don’t forget to be mindful of scale. “As for size, I always opt for larger pieces in smaller spaces, it may feel counter-intuitive, but it makes a tight space feel larger,” Anastasia Casey of The Interior Collective shares. “I look for works that complement the finishes and palette without overwhelming it.”Let It Set The ToneCourtesy of Annie SloanArtwork in the bathroom doesn’t just decorate it; it can define it. “In bathrooms, there’s often less visual competition—no bold furniture or patterned textiles—so the art naturally becomes more of a focal point,” Dai adds. “That’s why the mood it sets matters so much. I think more intentionally about subject matter—what someone will see up close, often in moments of solitude,” shares Dai. Whether it’s a serene landscape photo or storied painting, don’t underestimate what a piece of art can do for the most utilitarian room in the house. With the right materials and placement, it can hold its own—moisture and all—while adding a design moment and feels considered and unexpected.Follow House Beautiful on Instagram and TikTok.
    0 Σχόλια 0 Μοιράστηκε
  • Could Iran Have Been Close to Making a Nuclear Weapon? Uranium Enrichment Explained

    June 13, 20253 min readCould Iran Have Been Close to Making a Nuclear Weapon? Uranium Enrichment ExplainedWhen Israeli aircraft recently struck a uranium-enrichment complex in the nation, Iran could have been days away from achieving “breakout,” the ability to quickly turn “yellowcake” uranium into bomb-grade fuel, with its new high-speed centrifugesBy Deni Ellis Béchard edited by Dean VisserMen work inside of a uranium conversion facility just outside the city of Isfahan, Iran, on March 30, 2005. The facility in Isfahan made hexaflouride gas, which was then enriched by feeding it into centrifuges at a facility in Natanz, Iran. Getty ImagesIn the predawn darkness on Friday local time, Israeli military aircraft struck one of Iran’s uranium-enrichment complexes near the city of Natanz. The warheads aimed to do more than shatter concrete; they were meant to buy time, according to news reports. For months, Iran had seemed to be edging ever closer to “breakout,” the point at which its growing stockpile of partially enriched uranium could be converted into fuel for a nuclear bomb.But why did the strike occur now? One consideration could involve the way enrichment complexes work. Natural uranium is composed almost entirely of uranium 238, or U-238, an isotope that is relatively “heavy”. Only about 0.7 percent is uranium 235, a lighter isotope that is capable of sustaining a nuclear chain reaction. That means that in natural uranium, only seven atoms in 1,000 are the lighter, fission-ready U-235; “enrichment” simply means raising the percentage of U-235.U-235 can be used in warheads because its nucleus can easily be split. The International Atomic Energy Agency uses 25 kilograms of contained U-235 as the benchmark amount deemed sufficient for a first-generation implosion bomb. In such a weapon, the U-235 is surrounded by conventional explosives that, when detonated, compress the isotope. A separate device releases a neutron stream.Each time a neutron strikes a U-235 atom, the atom fissions; it divides and spits out, on average, two or three fresh neutrons—plus a burst of energy in the form of heat and gamma radiation. And the emitted neutrons in turn strike other U-235 nuclei, creating a self-sustaining chain reaction among the U-235 atoms that have been packed together into a critical mass. The result is a nuclear explosion. By contrast, the more common isotope, U-238, usually absorbs slow neutrons without splitting and cannot drive such a devastating chain reaction.On supporting science journalismIf you're enjoying this article, consider supporting our award-winning journalism by subscribing. By purchasing a subscription you are helping to ensure the future of impactful stories about the discoveries and ideas shaping our world today.To enrich uranium so that it contains enough U-235, the “yellowcake” uranium powder that comes out of a mine must go through a lengthy process of conversions to transform it from a solid into the gas uranium hexafluoride. First, a series of chemical processes refine the uranium and then, at high temperatures, each uranium atom is bound to six fluorine atoms. The result, uranium hexafluoride, is unusual: below 56 degrees Celsiusit is a white, waxy solid, but just above that temperature, it sublimates into a dense, invisible gas.During enrichment, this uranium hexafluoride is loaded into a centrifuge: a metal cylinder that spins at tens of thousands of revolutions per minute—faster than the blades of a jet engine. As the heavier U-238 molecules drift toward the cylinder wall, the lighter U-235 molecules remain closer to the center and are siphoned off. This new, slightly U-235-richer gas is then put into the next centrifuge. The process is repeated 10 to 20 times as ever more enriched gas is sent through a series of centrifuges.Enrichment is a slow process, but the Iranian government has been working on this for years and already holds roughly 400 kilograms of uranium enriched to 60 percent U-235. This falls short of the 90 percent required for nuclear weapons. But whereas Iran’s first-generation IR-1 centrifuges whirl at about 63,000 revolutions per minute and do relatively modest work, its newer IR-6 models, built from high-strength carbon fiber, spin faster and produce enriched uranium far more quickly.Iran has been installing thousands of these units, especially at Fordow, an underground enrichment facility built beneath 80 to 90 meters of rock. According to a report released on Monday by the Institute for Science and International Security, the new centrifuges could produce enough 90 percent U-235 uranium for a warhead “in as little as two to three days” and enough for nine nuclear weapons in three weeks—or 19 by the end of the third month.
    #could #iran #have #been #close
    Could Iran Have Been Close to Making a Nuclear Weapon? Uranium Enrichment Explained
    June 13, 20253 min readCould Iran Have Been Close to Making a Nuclear Weapon? Uranium Enrichment ExplainedWhen Israeli aircraft recently struck a uranium-enrichment complex in the nation, Iran could have been days away from achieving “breakout,” the ability to quickly turn “yellowcake” uranium into bomb-grade fuel, with its new high-speed centrifugesBy Deni Ellis Béchard edited by Dean VisserMen work inside of a uranium conversion facility just outside the city of Isfahan, Iran, on March 30, 2005. The facility in Isfahan made hexaflouride gas, which was then enriched by feeding it into centrifuges at a facility in Natanz, Iran. Getty ImagesIn the predawn darkness on Friday local time, Israeli military aircraft struck one of Iran’s uranium-enrichment complexes near the city of Natanz. The warheads aimed to do more than shatter concrete; they were meant to buy time, according to news reports. For months, Iran had seemed to be edging ever closer to “breakout,” the point at which its growing stockpile of partially enriched uranium could be converted into fuel for a nuclear bomb.But why did the strike occur now? One consideration could involve the way enrichment complexes work. Natural uranium is composed almost entirely of uranium 238, or U-238, an isotope that is relatively “heavy”. Only about 0.7 percent is uranium 235, a lighter isotope that is capable of sustaining a nuclear chain reaction. That means that in natural uranium, only seven atoms in 1,000 are the lighter, fission-ready U-235; “enrichment” simply means raising the percentage of U-235.U-235 can be used in warheads because its nucleus can easily be split. The International Atomic Energy Agency uses 25 kilograms of contained U-235 as the benchmark amount deemed sufficient for a first-generation implosion bomb. In such a weapon, the U-235 is surrounded by conventional explosives that, when detonated, compress the isotope. A separate device releases a neutron stream.Each time a neutron strikes a U-235 atom, the atom fissions; it divides and spits out, on average, two or three fresh neutrons—plus a burst of energy in the form of heat and gamma radiation. And the emitted neutrons in turn strike other U-235 nuclei, creating a self-sustaining chain reaction among the U-235 atoms that have been packed together into a critical mass. The result is a nuclear explosion. By contrast, the more common isotope, U-238, usually absorbs slow neutrons without splitting and cannot drive such a devastating chain reaction.On supporting science journalismIf you're enjoying this article, consider supporting our award-winning journalism by subscribing. By purchasing a subscription you are helping to ensure the future of impactful stories about the discoveries and ideas shaping our world today.To enrich uranium so that it contains enough U-235, the “yellowcake” uranium powder that comes out of a mine must go through a lengthy process of conversions to transform it from a solid into the gas uranium hexafluoride. First, a series of chemical processes refine the uranium and then, at high temperatures, each uranium atom is bound to six fluorine atoms. The result, uranium hexafluoride, is unusual: below 56 degrees Celsiusit is a white, waxy solid, but just above that temperature, it sublimates into a dense, invisible gas.During enrichment, this uranium hexafluoride is loaded into a centrifuge: a metal cylinder that spins at tens of thousands of revolutions per minute—faster than the blades of a jet engine. As the heavier U-238 molecules drift toward the cylinder wall, the lighter U-235 molecules remain closer to the center and are siphoned off. This new, slightly U-235-richer gas is then put into the next centrifuge. The process is repeated 10 to 20 times as ever more enriched gas is sent through a series of centrifuges.Enrichment is a slow process, but the Iranian government has been working on this for years and already holds roughly 400 kilograms of uranium enriched to 60 percent U-235. This falls short of the 90 percent required for nuclear weapons. But whereas Iran’s first-generation IR-1 centrifuges whirl at about 63,000 revolutions per minute and do relatively modest work, its newer IR-6 models, built from high-strength carbon fiber, spin faster and produce enriched uranium far more quickly.Iran has been installing thousands of these units, especially at Fordow, an underground enrichment facility built beneath 80 to 90 meters of rock. According to a report released on Monday by the Institute for Science and International Security, the new centrifuges could produce enough 90 percent U-235 uranium for a warhead “in as little as two to three days” and enough for nine nuclear weapons in three weeks—or 19 by the end of the third month. #could #iran #have #been #close
    WWW.SCIENTIFICAMERICAN.COM
    Could Iran Have Been Close to Making a Nuclear Weapon? Uranium Enrichment Explained
    June 13, 20253 min readCould Iran Have Been Close to Making a Nuclear Weapon? Uranium Enrichment ExplainedWhen Israeli aircraft recently struck a uranium-enrichment complex in the nation, Iran could have been days away from achieving “breakout,” the ability to quickly turn “yellowcake” uranium into bomb-grade fuel, with its new high-speed centrifugesBy Deni Ellis Béchard edited by Dean VisserMen work inside of a uranium conversion facility just outside the city of Isfahan, Iran, on March 30, 2005. The facility in Isfahan made hexaflouride gas, which was then enriched by feeding it into centrifuges at a facility in Natanz, Iran. Getty ImagesIn the predawn darkness on Friday local time, Israeli military aircraft struck one of Iran’s uranium-enrichment complexes near the city of Natanz. The warheads aimed to do more than shatter concrete; they were meant to buy time, according to news reports. For months, Iran had seemed to be edging ever closer to “breakout,” the point at which its growing stockpile of partially enriched uranium could be converted into fuel for a nuclear bomb. (Iran has denied that it has been pursuing nuclear weapons development.)But why did the strike occur now? One consideration could involve the way enrichment complexes work. Natural uranium is composed almost entirely of uranium 238, or U-238, an isotope that is relatively “heavy” (meaning it has more neutrons in its nucleus). Only about 0.7 percent is uranium 235 (U-235), a lighter isotope that is capable of sustaining a nuclear chain reaction. That means that in natural uranium, only seven atoms in 1,000 are the lighter, fission-ready U-235; “enrichment” simply means raising the percentage of U-235.U-235 can be used in warheads because its nucleus can easily be split. The International Atomic Energy Agency uses 25 kilograms of contained U-235 as the benchmark amount deemed sufficient for a first-generation implosion bomb. In such a weapon, the U-235 is surrounded by conventional explosives that, when detonated, compress the isotope. A separate device releases a neutron stream. (Neutrons are the neutral subatomic particle in an atom’s nucleus that adds to their mass.) Each time a neutron strikes a U-235 atom, the atom fissions; it divides and spits out, on average, two or three fresh neutrons—plus a burst of energy in the form of heat and gamma radiation. And the emitted neutrons in turn strike other U-235 nuclei, creating a self-sustaining chain reaction among the U-235 atoms that have been packed together into a critical mass. The result is a nuclear explosion. By contrast, the more common isotope, U-238, usually absorbs slow neutrons without splitting and cannot drive such a devastating chain reaction.On supporting science journalismIf you're enjoying this article, consider supporting our award-winning journalism by subscribing. By purchasing a subscription you are helping to ensure the future of impactful stories about the discoveries and ideas shaping our world today.To enrich uranium so that it contains enough U-235, the “yellowcake” uranium powder that comes out of a mine must go through a lengthy process of conversions to transform it from a solid into the gas uranium hexafluoride. First, a series of chemical processes refine the uranium and then, at high temperatures, each uranium atom is bound to six fluorine atoms. The result, uranium hexafluoride, is unusual: below 56 degrees Celsius (132.8 degrees Fahrenheit) it is a white, waxy solid, but just above that temperature, it sublimates into a dense, invisible gas.During enrichment, this uranium hexafluoride is loaded into a centrifuge: a metal cylinder that spins at tens of thousands of revolutions per minute—faster than the blades of a jet engine. As the heavier U-238 molecules drift toward the cylinder wall, the lighter U-235 molecules remain closer to the center and are siphoned off. This new, slightly U-235-richer gas is then put into the next centrifuge. The process is repeated 10 to 20 times as ever more enriched gas is sent through a series of centrifuges.Enrichment is a slow process, but the Iranian government has been working on this for years and already holds roughly 400 kilograms of uranium enriched to 60 percent U-235. This falls short of the 90 percent required for nuclear weapons. But whereas Iran’s first-generation IR-1 centrifuges whirl at about 63,000 revolutions per minute and do relatively modest work, its newer IR-6 models, built from high-strength carbon fiber, spin faster and produce enriched uranium far more quickly.Iran has been installing thousands of these units, especially at Fordow, an underground enrichment facility built beneath 80 to 90 meters of rock. According to a report released on Monday by the Institute for Science and International Security, the new centrifuges could produce enough 90 percent U-235 uranium for a warhead “in as little as two to three days” and enough for nine nuclear weapons in three weeks—or 19 by the end of the third month.
    0 Σχόλια 0 Μοιράστηκε
  • Why Half Backsplashes Are Taking Over Kitchen Design, According to Experts

    Pictured Above: Designer Amber Lewis balances New England charm with old-world sophistication with a half Calacatta Vagli marble backsplash in the kitchen of this Martha's Vineyard home. To backsplash or not to backsplash? That is the question. Or is it? Because if anyone’s ever told you “you shouldn’t do anything halfway,” they clearly haven’t heard of the half backsplash. This twist on a design mainstay makes a compelling case for stopping short. So maybe the real question is: to backsplash or to half backsplash?Lately, we’ve seen more and more designers going for the latter. “A trend these days is to use 1/2 or 2/3 stone backsplashes with a six- to nine-inch ledge,” says designer Jennifer Gilmer. “This is typically used behind a range and adds interest as well as softening the overall look.” It’s not just aesthetic—it’s strategic functionality. “The ledge is useful for salt and pepper shakers, olive oil, and other items,” she adds. Ahead, we break down everything to know about half backsplashes and why this kitchen trend is gaining traction in the design world.Related StoriesWhat Is a Half Backsplash?Lisa PetroleMagnolia’s director of styling, Ashley Maddox, enlisted the help of designer Hilary Walker to create her midcentury-modern dream home in Waco, Texas. Complete with walnut kitchen cabinetry topped with a Topzstone countertop continued into a partial backsplash.“A half backsplash or 1/3 backsplash is when the material stops at a point on the wall determined by the design,” explains designer Isabella Patrick. This makes it distinct from a “built-out or existing element, such as upper cabinets, a ceiling, soffit, or some other inherent element of the space.” In other words, it’s intentional, not just the result of running out of tile.Courtesy of JN Interior SpacesTaking the ceiling height into consideration, JN Interior Spaces decided a half backsplash would be suitable for this sleek, modern kitchen.While traditional backsplashes typically reach the bottom of upper cabinetry or span the entire wall, partial backsplashes usually stop somewhere around four to 25 inches up, depending on the look you’re going for.And while it may sound like a design compromise, it’s actually quite the opposite.Related StoryWhy Designers Are Loving the Half-Height LookOpting for a half backsplash is a clever way to balance proportion, budget, and visual interest. “If the design does not have upper cabinets, we would opt for a half backsplash to create visual interest,” Patrick says. “A full wall of the same tile or stone could overwhelm the space and seem like an afterthought.”Shannon Dupre/DD RepsIsabella Patrick experimented with this concept in her own kitchen, mixing materials for a more layered half backsplash look.Instead, Patrick often mixes materials—like running Cambria quartzite up from the counter to a ledge, then switching to Fireclay tile above. “This is a great example of how a singular material would have overwhelmed the space but also may have felt like an afterthought,” she explains. “Mixing materials and adding in details and personal touches is what good design is.”Another bonus? It lets the rest of the kitchen sing. “In another design, we eliminated the upper cabinets in favor of a more open and airy look so that the windows were not blocked—and so you were not walking right into a side view of cabinetry,” Patrick says. “No upper cabinets also makes the kitchen feel more of a transitional space and decorative, especially since it opens right into a dining room.”krafty_photos
copyright 2021This kitchen from JN Interior Spaces proves that a partial backsplash can still make a big impact. They chose to use an iridescent, almost-patina tile in this Wyoming kitchen.For Jill Najinigier of JN Interior Spaces, the choice is just as much about form as it is function. “It's all about how the backsplash interacts with the architecture,” she explains. “Wall height, windows, the shape of the hood, upper cabinets, or open shelves—where do they start and terminate?”In one standout project, Najinigier used a luminous tile just tall enough to tuck under a tapered plaster hood, topped with a narrow stone ledge carved from the same slab as the counter. The result? “Clean lines that make a stunning statement.”Mixing materials and adding in details and personal touches is what good design is.It’s Decorative and FunctionalHeather TalbertDesigner Kate Pearce installed a statement-making marble backsplash. Bringing it only halfway up allows its beauty to be appreciated while giving the other aesthetic elements in the space room to breathe.Don’t underestimate what that ledge can do. Designer Kate Pearce swears by hers: “I love my little five-inch-deep marble shelf that allows me to style some vintage kitchenware in the space,” she says. “And I think the shelfis exactly what gives the kitchen an approachable feel—versus having a full backsplash of marble, which would have given the space a more serious vibe.”Stylish ProductionsPrioritizing visually continuity, Italian designer Federica Asack of Masseria Chic used the same leathered sandstone, a natural material that will develop a wonderful patina, for both the counters and the backsplash.Designer Federica Asack of Masseria Chic used a leathered sandstone for both her countertop and half backsplash, adding a ledge that’s just deep enough to style. “It allows for a splash-free decorating opportunity to layer artwork and favorite objects,” she says.Designer Molly Watson agrees: “The simple shelf is just deep enough for some special items to be on display,” she notes of a project where carrying the countertop stone up the wall helped keep things visually calm and scaled to the space. Related StoryThe Verdict on Half BacksplashesErin Kelly"Keeping materials simple in this kitchen was important for scale," says designer Molly Watson. "Carrying the countertop up the wall as a backsplash allowed the space to feel larger."Half backsplashes are having a major design moment, but not just because they’re practical. They’re a blank canvas for creativity. From floating ledges and mixed materials to budget-conscious decisions that don’t skimp on style, they’re a smartway to make your kitchen feel lighter, livelier, and totally considered.So, go ahead—do it halfway.Follow House Beautiful on Instagram and TikTok.
    #why #half #backsplashes #are #taking
    Why Half Backsplashes Are Taking Over Kitchen Design, According to Experts
    Pictured Above: Designer Amber Lewis balances New England charm with old-world sophistication with a half Calacatta Vagli marble backsplash in the kitchen of this Martha's Vineyard home. To backsplash or not to backsplash? That is the question. Or is it? Because if anyone’s ever told you “you shouldn’t do anything halfway,” they clearly haven’t heard of the half backsplash. This twist on a design mainstay makes a compelling case for stopping short. So maybe the real question is: to backsplash or to half backsplash?Lately, we’ve seen more and more designers going for the latter. “A trend these days is to use 1/2 or 2/3 stone backsplashes with a six- to nine-inch ledge,” says designer Jennifer Gilmer. “This is typically used behind a range and adds interest as well as softening the overall look.” It’s not just aesthetic—it’s strategic functionality. “The ledge is useful for salt and pepper shakers, olive oil, and other items,” she adds. Ahead, we break down everything to know about half backsplashes and why this kitchen trend is gaining traction in the design world.Related StoriesWhat Is a Half Backsplash?Lisa PetroleMagnolia’s director of styling, Ashley Maddox, enlisted the help of designer Hilary Walker to create her midcentury-modern dream home in Waco, Texas. Complete with walnut kitchen cabinetry topped with a Topzstone countertop continued into a partial backsplash.“A half backsplash or 1/3 backsplash is when the material stops at a point on the wall determined by the design,” explains designer Isabella Patrick. This makes it distinct from a “built-out or existing element, such as upper cabinets, a ceiling, soffit, or some other inherent element of the space.” In other words, it’s intentional, not just the result of running out of tile.Courtesy of JN Interior SpacesTaking the ceiling height into consideration, JN Interior Spaces decided a half backsplash would be suitable for this sleek, modern kitchen.While traditional backsplashes typically reach the bottom of upper cabinetry or span the entire wall, partial backsplashes usually stop somewhere around four to 25 inches up, depending on the look you’re going for.And while it may sound like a design compromise, it’s actually quite the opposite.Related StoryWhy Designers Are Loving the Half-Height LookOpting for a half backsplash is a clever way to balance proportion, budget, and visual interest. “If the design does not have upper cabinets, we would opt for a half backsplash to create visual interest,” Patrick says. “A full wall of the same tile or stone could overwhelm the space and seem like an afterthought.”Shannon Dupre/DD RepsIsabella Patrick experimented with this concept in her own kitchen, mixing materials for a more layered half backsplash look.Instead, Patrick often mixes materials—like running Cambria quartzite up from the counter to a ledge, then switching to Fireclay tile above. “This is a great example of how a singular material would have overwhelmed the space but also may have felt like an afterthought,” she explains. “Mixing materials and adding in details and personal touches is what good design is.”Another bonus? It lets the rest of the kitchen sing. “In another design, we eliminated the upper cabinets in favor of a more open and airy look so that the windows were not blocked—and so you were not walking right into a side view of cabinetry,” Patrick says. “No upper cabinets also makes the kitchen feel more of a transitional space and decorative, especially since it opens right into a dining room.”krafty_photos
copyright 2021This kitchen from JN Interior Spaces proves that a partial backsplash can still make a big impact. They chose to use an iridescent, almost-patina tile in this Wyoming kitchen.For Jill Najinigier of JN Interior Spaces, the choice is just as much about form as it is function. “It's all about how the backsplash interacts with the architecture,” she explains. “Wall height, windows, the shape of the hood, upper cabinets, or open shelves—where do they start and terminate?”In one standout project, Najinigier used a luminous tile just tall enough to tuck under a tapered plaster hood, topped with a narrow stone ledge carved from the same slab as the counter. The result? “Clean lines that make a stunning statement.”Mixing materials and adding in details and personal touches is what good design is.It’s Decorative and FunctionalHeather TalbertDesigner Kate Pearce installed a statement-making marble backsplash. Bringing it only halfway up allows its beauty to be appreciated while giving the other aesthetic elements in the space room to breathe.Don’t underestimate what that ledge can do. Designer Kate Pearce swears by hers: “I love my little five-inch-deep marble shelf that allows me to style some vintage kitchenware in the space,” she says. “And I think the shelfis exactly what gives the kitchen an approachable feel—versus having a full backsplash of marble, which would have given the space a more serious vibe.”Stylish ProductionsPrioritizing visually continuity, Italian designer Federica Asack of Masseria Chic used the same leathered sandstone, a natural material that will develop a wonderful patina, for both the counters and the backsplash.Designer Federica Asack of Masseria Chic used a leathered sandstone for both her countertop and half backsplash, adding a ledge that’s just deep enough to style. “It allows for a splash-free decorating opportunity to layer artwork and favorite objects,” she says.Designer Molly Watson agrees: “The simple shelf is just deep enough for some special items to be on display,” she notes of a project where carrying the countertop stone up the wall helped keep things visually calm and scaled to the space. Related StoryThe Verdict on Half BacksplashesErin Kelly"Keeping materials simple in this kitchen was important for scale," says designer Molly Watson. "Carrying the countertop up the wall as a backsplash allowed the space to feel larger."Half backsplashes are having a major design moment, but not just because they’re practical. They’re a blank canvas for creativity. From floating ledges and mixed materials to budget-conscious decisions that don’t skimp on style, they’re a smartway to make your kitchen feel lighter, livelier, and totally considered.So, go ahead—do it halfway.Follow House Beautiful on Instagram and TikTok. #why #half #backsplashes #are #taking
    WWW.HOUSEBEAUTIFUL.COM
    Why Half Backsplashes Are Taking Over Kitchen Design, According to Experts
    Pictured Above: Designer Amber Lewis balances New England charm with old-world sophistication with a half Calacatta Vagli marble backsplash in the kitchen of this Martha's Vineyard home. To backsplash or not to backsplash? That is the question. Or is it? Because if anyone’s ever told you “you shouldn’t do anything halfway,” they clearly haven’t heard of the half backsplash. This twist on a design mainstay makes a compelling case for stopping short. So maybe the real question is: to backsplash or to half backsplash?Lately, we’ve seen more and more designers going for the latter. “A trend these days is to use 1/2 or 2/3 stone backsplashes with a six- to nine-inch ledge,” says designer Jennifer Gilmer. “This is typically used behind a range and adds interest as well as softening the overall look.” It’s not just aesthetic—it’s strategic functionality. “The ledge is useful for salt and pepper shakers, olive oil, and other items,” she adds. Ahead, we break down everything to know about half backsplashes and why this kitchen trend is gaining traction in the design world.Related StoriesWhat Is a Half Backsplash?Lisa PetroleMagnolia’s director of styling, Ashley Maddox, enlisted the help of designer Hilary Walker to create her midcentury-modern dream home in Waco, Texas. Complete with walnut kitchen cabinetry topped with a Topzstone countertop continued into a partial backsplash.“A half backsplash or 1/3 backsplash is when the material stops at a point on the wall determined by the design,” explains designer Isabella Patrick. This makes it distinct from a “built-out or existing element, such as upper cabinets, a ceiling, soffit, or some other inherent element of the space.” In other words, it’s intentional, not just the result of running out of tile.Courtesy of JN Interior SpacesTaking the ceiling height into consideration, JN Interior Spaces decided a half backsplash would be suitable for this sleek, modern kitchen.While traditional backsplashes typically reach the bottom of upper cabinetry or span the entire wall, partial backsplashes usually stop somewhere around four to 25 inches up, depending on the look you’re going for.And while it may sound like a design compromise, it’s actually quite the opposite.Related StoryWhy Designers Are Loving the Half-Height LookOpting for a half backsplash is a clever way to balance proportion, budget, and visual interest. “If the design does not have upper cabinets, we would opt for a half backsplash to create visual interest,” Patrick says. “A full wall of the same tile or stone could overwhelm the space and seem like an afterthought.”Shannon Dupre/DD RepsIsabella Patrick experimented with this concept in her own kitchen, mixing materials for a more layered half backsplash look.Instead, Patrick often mixes materials—like running Cambria quartzite up from the counter to a ledge, then switching to Fireclay tile above. “This is a great example of how a singular material would have overwhelmed the space but also may have felt like an afterthought,” she explains. “Mixing materials and adding in details and personal touches is what good design is.”Another bonus? It lets the rest of the kitchen sing. “In another design, we eliminated the upper cabinets in favor of a more open and airy look so that the windows were not blocked—and so you were not walking right into a side view of cabinetry,” Patrick says. “No upper cabinets also makes the kitchen feel more of a transitional space and decorative, especially since it opens right into a dining room.”krafty_photos
copyright 2021This kitchen from JN Interior Spaces proves that a partial backsplash can still make a big impact. They chose to use an iridescent, almost-patina tile in this Wyoming kitchen.For Jill Najinigier of JN Interior Spaces, the choice is just as much about form as it is function. “It's all about how the backsplash interacts with the architecture,” she explains. “Wall height, windows, the shape of the hood, upper cabinets, or open shelves—where do they start and terminate?”In one standout project, Najinigier used a luminous tile just tall enough to tuck under a tapered plaster hood, topped with a narrow stone ledge carved from the same slab as the counter. The result? “Clean lines that make a stunning statement.”Mixing materials and adding in details and personal touches is what good design is.It’s Decorative and FunctionalHeather TalbertDesigner Kate Pearce installed a statement-making marble backsplash. Bringing it only halfway up allows its beauty to be appreciated while giving the other aesthetic elements in the space room to breathe.Don’t underestimate what that ledge can do. Designer Kate Pearce swears by hers: “I love my little five-inch-deep marble shelf that allows me to style some vintage kitchenware in the space,” she says. “And I think the shelf (and the pieces styled on it) is exactly what gives the kitchen an approachable feel—versus having a full backsplash of marble, which would have given the space a more serious vibe.”Stylish ProductionsPrioritizing visually continuity, Italian designer Federica Asack of Masseria Chic used the same leathered sandstone, a natural material that will develop a wonderful patina, for both the counters and the backsplash.Designer Federica Asack of Masseria Chic used a leathered sandstone for both her countertop and half backsplash, adding a ledge that’s just deep enough to style. “It allows for a splash-free decorating opportunity to layer artwork and favorite objects,” she says.Designer Molly Watson agrees: “The simple shelf is just deep enough for some special items to be on display,” she notes of a project where carrying the countertop stone up the wall helped keep things visually calm and scaled to the space. Related StoryThe Verdict on Half BacksplashesErin Kelly"Keeping materials simple in this kitchen was important for scale," says designer Molly Watson. "Carrying the countertop up the wall as a backsplash allowed the space to feel larger."Half backsplashes are having a major design moment, but not just because they’re practical. They’re a blank canvas for creativity. From floating ledges and mixed materials to budget-conscious decisions that don’t skimp on style, they’re a smart (and stylish) way to make your kitchen feel lighter, livelier, and totally considered.So, go ahead—do it halfway.Follow House Beautiful on Instagram and TikTok.
    0 Σχόλια 0 Μοιράστηκε
  • Harnessing Silhouette for Dramatic Storytelling

    Silhouette photography has the unique power to convey powerful emotions and dramatic narratives by emphasizing shape and form over details and textures. By creatively harnessing silhouettes, photographers can captivate viewers’ imaginations, prompting them to fill in unseen details and engage deeply with the story. Here’s how to master silhouettes to elevate your photographic storytelling.

    The Art of Silhouettes
    A silhouette is created when your subject is backlit, making the subject appear completely dark against a lighter background. Silhouettes rely heavily on strong outlines, instantly recognizable shapes, and clear gestures to tell compelling stories.
    Capturing the Perfect Silhouette
    Ideal Conditions

    Sunrise and sunset offer low-angle sunlight, providing ideal lighting conditions to create dramatic silhouettes.
    Artificial light sources like urban lights, windows, and doorways offer unique creative opportunities for silhouette photography.

    Camera Settings

    Adjust your exposure for the brightest part of the scene, usually the background, to render your subject as a dark silhouette.
    Choose a narrower apertureto maintain clear, sharp outlines, ensuring your silhouette remains distinct.

    Composition Techniques for Dramatic Impact

    Select subjects with strong, recognizable shapes—human figures, animals, architecture, and trees often create compelling silhouettes.
    Encourage subjects to use clear gestures or dynamic poses to communicate emotion or action effectively.
    Utilize negative space to emphasize silhouettes, creating visual balance and directing viewers’ attention to the subject.

    Enhancing Storytelling through Silhouettes
    Silhouettes simplify your scene, focusing viewers’ attention entirely on the emotional or narrative essence of your image. Obscuring details introduces an element of mystery, inviting viewers to engage actively with your photograph. Silhouettes naturally evoke emotional responses, effectively conveying solitude, contemplation, love, or drama.
    Post-Processing Tips

    Enhance contrast and deepen blacks to emphasize your silhouette, strengthening its dramatic presence.
    Apply subtle color grading or tone adjustments to amplify mood—warmer tones evoke romance or nostalgia, while cooler tones suggest tranquility or melancholy.

    Creative Applications
    Silhouettes are versatile across many genres, including intimate portraits, dynamic street photography, and striking nature and wildlife imagery. Using silhouettes thoughtfully allows photographers to communicate powerful forms and actions, creating graphically strong and emotionally resonant photographs.
    Silhouettes offer photographers an exceptional tool for impactful storytelling, combining simplicity with emotional intensity. By mastering essential techniques, thoughtful composition, and creative execution, you can craft compelling visual narratives that resonate deeply with your audience. Explore silhouettes in your photography, and uncover the profound storytelling power hidden within shadows.
    Extended reading: Creating depth and drama with moody photography
    The post Harnessing Silhouette for Dramatic Storytelling appeared first on 500px.
    #harnessing #silhouette #dramatic #storytelling
    Harnessing Silhouette for Dramatic Storytelling
    Silhouette photography has the unique power to convey powerful emotions and dramatic narratives by emphasizing shape and form over details and textures. By creatively harnessing silhouettes, photographers can captivate viewers’ imaginations, prompting them to fill in unseen details and engage deeply with the story. Here’s how to master silhouettes to elevate your photographic storytelling. The Art of Silhouettes A silhouette is created when your subject is backlit, making the subject appear completely dark against a lighter background. Silhouettes rely heavily on strong outlines, instantly recognizable shapes, and clear gestures to tell compelling stories. Capturing the Perfect Silhouette Ideal Conditions Sunrise and sunset offer low-angle sunlight, providing ideal lighting conditions to create dramatic silhouettes. Artificial light sources like urban lights, windows, and doorways offer unique creative opportunities for silhouette photography. Camera Settings Adjust your exposure for the brightest part of the scene, usually the background, to render your subject as a dark silhouette. Choose a narrower apertureto maintain clear, sharp outlines, ensuring your silhouette remains distinct. Composition Techniques for Dramatic Impact Select subjects with strong, recognizable shapes—human figures, animals, architecture, and trees often create compelling silhouettes. Encourage subjects to use clear gestures or dynamic poses to communicate emotion or action effectively. Utilize negative space to emphasize silhouettes, creating visual balance and directing viewers’ attention to the subject. Enhancing Storytelling through Silhouettes Silhouettes simplify your scene, focusing viewers’ attention entirely on the emotional or narrative essence of your image. Obscuring details introduces an element of mystery, inviting viewers to engage actively with your photograph. Silhouettes naturally evoke emotional responses, effectively conveying solitude, contemplation, love, or drama. Post-Processing Tips Enhance contrast and deepen blacks to emphasize your silhouette, strengthening its dramatic presence. Apply subtle color grading or tone adjustments to amplify mood—warmer tones evoke romance or nostalgia, while cooler tones suggest tranquility or melancholy. Creative Applications Silhouettes are versatile across many genres, including intimate portraits, dynamic street photography, and striking nature and wildlife imagery. Using silhouettes thoughtfully allows photographers to communicate powerful forms and actions, creating graphically strong and emotionally resonant photographs. Silhouettes offer photographers an exceptional tool for impactful storytelling, combining simplicity with emotional intensity. By mastering essential techniques, thoughtful composition, and creative execution, you can craft compelling visual narratives that resonate deeply with your audience. Explore silhouettes in your photography, and uncover the profound storytelling power hidden within shadows. Extended reading: Creating depth and drama with moody photography The post Harnessing Silhouette for Dramatic Storytelling appeared first on 500px. #harnessing #silhouette #dramatic #storytelling
    ISO.500PX.COM
    Harnessing Silhouette for Dramatic Storytelling
    Silhouette photography has the unique power to convey powerful emotions and dramatic narratives by emphasizing shape and form over details and textures. By creatively harnessing silhouettes, photographers can captivate viewers’ imaginations, prompting them to fill in unseen details and engage deeply with the story. Here’s how to master silhouettes to elevate your photographic storytelling. The Art of Silhouettes A silhouette is created when your subject is backlit, making the subject appear completely dark against a lighter background. Silhouettes rely heavily on strong outlines, instantly recognizable shapes, and clear gestures to tell compelling stories. Capturing the Perfect Silhouette Ideal Conditions Sunrise and sunset offer low-angle sunlight, providing ideal lighting conditions to create dramatic silhouettes. Artificial light sources like urban lights, windows, and doorways offer unique creative opportunities for silhouette photography. Camera Settings Adjust your exposure for the brightest part of the scene, usually the background, to render your subject as a dark silhouette. Choose a narrower aperture (higher f-number) to maintain clear, sharp outlines, ensuring your silhouette remains distinct. Composition Techniques for Dramatic Impact Select subjects with strong, recognizable shapes—human figures, animals, architecture, and trees often create compelling silhouettes. Encourage subjects to use clear gestures or dynamic poses to communicate emotion or action effectively. Utilize negative space to emphasize silhouettes, creating visual balance and directing viewers’ attention to the subject. Enhancing Storytelling through Silhouettes Silhouettes simplify your scene, focusing viewers’ attention entirely on the emotional or narrative essence of your image. Obscuring details introduces an element of mystery, inviting viewers to engage actively with your photograph. Silhouettes naturally evoke emotional responses, effectively conveying solitude, contemplation, love, or drama. Post-Processing Tips Enhance contrast and deepen blacks to emphasize your silhouette, strengthening its dramatic presence. Apply subtle color grading or tone adjustments to amplify mood—warmer tones evoke romance or nostalgia, while cooler tones suggest tranquility or melancholy. Creative Applications Silhouettes are versatile across many genres, including intimate portraits, dynamic street photography, and striking nature and wildlife imagery. Using silhouettes thoughtfully allows photographers to communicate powerful forms and actions, creating graphically strong and emotionally resonant photographs. Silhouettes offer photographers an exceptional tool for impactful storytelling, combining simplicity with emotional intensity. By mastering essential techniques, thoughtful composition, and creative execution, you can craft compelling visual narratives that resonate deeply with your audience. Explore silhouettes in your photography, and uncover the profound storytelling power hidden within shadows. Extended reading: Creating depth and drama with moody photography The post Harnessing Silhouette for Dramatic Storytelling appeared first on 500px.
    0 Σχόλια 0 Μοιράστηκε
  • Creating The “Moving Highlight” Navigation Bar With JavaScript And CSS

    I recently came across an old jQuery tutorial demonstrating a “moving highlight” navigation bar and decided the concept was due for a modern upgrade. With this pattern, the border around the active navigation item animates directly from one element to another as the user clicks on menu items. In 2025, we have much better tools to manipulate the DOM via vanilla JavaScript. New features like the View Transition API make progressive enhancement more easily achievable and handle a lot of the animation minutiae.In this tutorial, I will demonstrate two methods of creating the “moving highlight” navigation bar using plain JavaScript and CSS. The first example uses the getBoundingClientRect method to explicitly animate the border between navigation bar items when they are clicked. The second example achieves the same functionality using the new View Transition API.
    The Initial Markup
    Let’s assume that we have a single-page application where content changes without the page being reloaded. The starting HTML and CSS are your standard navigation bar with an additional div element containing an id of #highlight. We give the first navigation item a class of .active.
    See the Pen Moving Highlight Navbar Starting Markupby Blake Lundquist.
    For this version, we will position the #highlight element around the element with the .active class to create a border. We can utilize absolute positioning and animate the element across the navigation bar to create the desired effect. We’ll hide it off-screen initially by adding left: -200px and include transition styles for all properties so that any changes in the position and size of the element will happen gradually.
    #highlight {
    z-index: 0;
    position: absolute;
    height: 100%;
    width: 100px;
    left: -200px;
    border: 2px solid green;
    box-sizing: border-box;
    transition: all 0.2s ease;
    }

    Add A Boilerplate Event Handler For Click Interactions
    We want the highlight element to animate when a user changes the .active navigation item. Let’s add a click event handler to the nav element, then filter for events caused only by elements matching our desired selector. In this case, we only want to change the .active nav item if the user clicks on a link that does not already have the .active class.
    Initially, we can call console.log to ensure the handler fires only when expected:

    const navbar = document.querySelector;

    navbar.addEventListener{
    // return if the clicked element doesn't have the correct selector
    if')) {
    return;
    }

    console.log;
    });

    Open your browser console and try clicking different items in the navigation bar. You should only see "click" being logged when you select a new item in the navigation bar.
    Now that we know our event handler is working on the correct elements let’s add code to move the .active class to the navigation item that was clicked. We can use the object passed into the event handler to find the element that initialized the event and give that element a class of .active after removing it from the previously active item.

    const navbar = document.querySelector;

    navbar.addEventListener{
    // return if the clicked element doesn't have the correct selector
    if')) {
    return;
    }

    - console.log;
    + document.querySelector.classList.remove;
    + event.target.classList.add;

    });

    Our #highlight element needs to move across the navigation bar and position itself around the active item. Let’s write a function to calculate a new position and width. Since the #highlight selector has transition styles applied, it will move gradually when its position changes.
    Using getBoundingClientRect, we can get information about the position and size of an element. We calculate the width of the active navigation item and its offset from the left boundary of the parent element. Then, we assign styles to the highlight element so that its size and position match.

    // handler for moving the highlight
    const moveHighlight ==> {
    const activeNavItem = document.querySelector;
    const highlighterElement = document.querySelector;

    const width = activeNavItem.offsetWidth;

    const itemPos = activeNavItem.getBoundingClientRect;
    const navbarPos = navbar.getBoundingClientRectconst relativePosX = itemPos.left - navbarPos.left;

    const styles = {
    left: ${relativePosX}px,
    width: ${width}px,
    };

    Object.assign;
    }

    Let’s call our new function when the click event fires:

    navbar.addEventListener{
    // return if the clicked element doesn't have the correct selector
    if')) {
    return;
    }

    document.querySelector.classList.remove;
    event.target.classList.add;

    + moveHighlight;
    });

    Finally, let’s also call the function immediately so that the border moves behind our initial active item when the page first loads:
    // handler for moving the highlight
    const moveHighlight ==> {
    // ...
    }

    // display the highlight when the page loads
    moveHighlight;

    Now, the border moves across the navigation bar when a new item is selected. Try clicking the different navigation links to animate the navigation bar.
    See the Pen Moving Highlight Navbarby Blake Lundquist.
    That only took a few lines of vanilla JavaScript and could easily be extended to account for other interactions, like mouseover events. In the next section, we will explore refactoring this feature using the View Transition API.
    Using The View Transition API
    The View Transition API provides functionality to create animated transitions between website views. Under the hood, the API creates snapshots of “before” and “after” views and then handles transitioning between them. View transitions are useful for creating animations between documents, providing the native-app-like user experience featured in frameworks like Astro. However, the API also provides handlers meant for SPA-style applications. We will use it to reduce the JavaScript needed in our implementation and more easily create fallback functionality.
    For this approach, we no longer need a separate #highlight element. Instead, we can style the .active navigation item directly using pseudo-selectors and let the View Transition API handle the animation between the before-and-after UI states when a new navigation item is clicked.
    We’ll start by getting rid of the #highlight element and its associated CSS and replacing it with styles for the nav a::after pseudo-selector:
    <nav>
    - <div id="highlight"></div>
    <a href="#" class="active">Home</a>
    <a href="#services">Services</a>
    <a href="#about">About</a>
    <a href="#contact">Contact</a>
    </nav>

    - #highlight {
    - z-index: 0;
    - position: absolute;
    - height: 100%;
    - width: 0;
    - left: 0;
    - box-sizing: border-box;
    - transition: all 0.2s ease;
    - }

    + nav a::after {
    + content: " ";
    + position: absolute;
    + left: 0;
    + top: 0;
    + width: 100%;
    + height: 100%;
    + border: none;
    + box-sizing: border-box;
    + }

    For the .active class, we include the view-transition-name property, thus unlocking the magic of the View Transition API. Once we trigger the view transition and change the location of the .active navigation item in the DOM, “before” and “after” snapshots will be taken, and the browser will animate the border across the bar. We’ll give our view transition the name of highlight, but we could theoretically give it any name.
    nav a.active::after {
    border: 2px solid green;
    view-transition-name: highlight;
    }

    Once we have a selector that contains a view-transition-name property, the only remaining step is to trigger the transition using the startViewTransition method and pass in a callback function.

    const navbar = document.querySelector;

    // Change the active nav item on click
    navbar.addEventListener{

    if')) {
    return;
    }

    document.startViewTransition=> {
    document.querySelector.classList.remove;

    event.target.classList.add;
    });
    });

    Above is a revised version of the click handler. Instead of doing all the calculations for the size and position of the moving border ourselves, the View Transition API handles all of it for us. We only need to call document.startViewTransition and pass in a callback function to change the item that has the .active class!
    Adjusting The View Transition
    At this point, when clicking on a navigation link, you’ll notice that the transition works, but some strange sizing issues are visible.This sizing inconsistency is caused by aspect ratio changes during the course of the view transition. We won’t go into detail here, but Jake Archibald has a detailed explanation you can read for more information. In short, to ensure the height of the border stays uniform throughout the transition, we need to declare an explicit height for the ::view-transition-old and ::view-transition-new pseudo-selectors representing a static snapshot of the old and new view, respectively.
    ::view-transition-old{
    height: 100%;
    }

    ::view-transition-new{
    height: 100%;
    }

    Let’s do some final refactoring to tidy up our code by moving the callback to a separate function and adding a fallback for when view transitions aren’t supported:

    const navbar = document.querySelector;

    // change the item that has the .active class applied
    const setActiveElement ==> {
    document.querySelector.classList.remove;
    elem.classList.add;
    }

    // Start view transition and pass in a callback on click
    navbar.addEventListener{
    if')) {
    return;
    }

    // Fallback for browsers that don't support View Transitions:
    if{
    setActiveElement;
    return;
    }

    document.startViewTransition=> setActiveElement);
    });

    Here’s our view transition-powered navigation bar! Observe the smooth transition when you click on the different links.
    See the Pen Moving Highlight Navbar with View Transitionby Blake Lundquist.
    Conclusion
    Animations and transitions between website UI states used to require many kilobytes of external libraries, along with verbose, confusing, and error-prone code, but vanilla JavaScript and CSS have since incorporated features to achieve native-app-like interactions without breaking the bank. We demonstrated this by implementing the “moving highlight” navigation pattern using two approaches: CSS transitions combined with the getBoundingClientRectmethod and the View Transition API.
    Resources

    getBoundingClientRectmethod documentation
    View Transition API documentation
    “View Transitions: Handling Aspect Ratio Changes” by Jake Archibald
    #creating #ampampldquomoving #highlightampamprdquo #navigation #bar
    Creating The “Moving Highlight” Navigation Bar With JavaScript And CSS
    I recently came across an old jQuery tutorial demonstrating a “moving highlight” navigation bar and decided the concept was due for a modern upgrade. With this pattern, the border around the active navigation item animates directly from one element to another as the user clicks on menu items. In 2025, we have much better tools to manipulate the DOM via vanilla JavaScript. New features like the View Transition API make progressive enhancement more easily achievable and handle a lot of the animation minutiae.In this tutorial, I will demonstrate two methods of creating the “moving highlight” navigation bar using plain JavaScript and CSS. The first example uses the getBoundingClientRect method to explicitly animate the border between navigation bar items when they are clicked. The second example achieves the same functionality using the new View Transition API. The Initial Markup Let’s assume that we have a single-page application where content changes without the page being reloaded. The starting HTML and CSS are your standard navigation bar with an additional div element containing an id of #highlight. We give the first navigation item a class of .active. See the Pen Moving Highlight Navbar Starting Markupby Blake Lundquist. For this version, we will position the #highlight element around the element with the .active class to create a border. We can utilize absolute positioning and animate the element across the navigation bar to create the desired effect. We’ll hide it off-screen initially by adding left: -200px and include transition styles for all properties so that any changes in the position and size of the element will happen gradually. #highlight { z-index: 0; position: absolute; height: 100%; width: 100px; left: -200px; border: 2px solid green; box-sizing: border-box; transition: all 0.2s ease; } Add A Boilerplate Event Handler For Click Interactions We want the highlight element to animate when a user changes the .active navigation item. Let’s add a click event handler to the nav element, then filter for events caused only by elements matching our desired selector. In this case, we only want to change the .active nav item if the user clicks on a link that does not already have the .active class. Initially, we can call console.log to ensure the handler fires only when expected: const navbar = document.querySelector; navbar.addEventListener{ // return if the clicked element doesn't have the correct selector if')) { return; } console.log; }); Open your browser console and try clicking different items in the navigation bar. You should only see "click" being logged when you select a new item in the navigation bar. Now that we know our event handler is working on the correct elements let’s add code to move the .active class to the navigation item that was clicked. We can use the object passed into the event handler to find the element that initialized the event and give that element a class of .active after removing it from the previously active item. const navbar = document.querySelector; navbar.addEventListener{ // return if the clicked element doesn't have the correct selector if')) { return; } - console.log; + document.querySelector.classList.remove; + event.target.classList.add; }); Our #highlight element needs to move across the navigation bar and position itself around the active item. Let’s write a function to calculate a new position and width. Since the #highlight selector has transition styles applied, it will move gradually when its position changes. Using getBoundingClientRect, we can get information about the position and size of an element. We calculate the width of the active navigation item and its offset from the left boundary of the parent element. Then, we assign styles to the highlight element so that its size and position match. // handler for moving the highlight const moveHighlight ==> { const activeNavItem = document.querySelector; const highlighterElement = document.querySelector; const width = activeNavItem.offsetWidth; const itemPos = activeNavItem.getBoundingClientRect; const navbarPos = navbar.getBoundingClientRectconst relativePosX = itemPos.left - navbarPos.left; const styles = { left: ${relativePosX}px, width: ${width}px, }; Object.assign; } Let’s call our new function when the click event fires: navbar.addEventListener{ // return if the clicked element doesn't have the correct selector if')) { return; } document.querySelector.classList.remove; event.target.classList.add; + moveHighlight; }); Finally, let’s also call the function immediately so that the border moves behind our initial active item when the page first loads: // handler for moving the highlight const moveHighlight ==> { // ... } // display the highlight when the page loads moveHighlight; Now, the border moves across the navigation bar when a new item is selected. Try clicking the different navigation links to animate the navigation bar. See the Pen Moving Highlight Navbarby Blake Lundquist. That only took a few lines of vanilla JavaScript and could easily be extended to account for other interactions, like mouseover events. In the next section, we will explore refactoring this feature using the View Transition API. Using The View Transition API The View Transition API provides functionality to create animated transitions between website views. Under the hood, the API creates snapshots of “before” and “after” views and then handles transitioning between them. View transitions are useful for creating animations between documents, providing the native-app-like user experience featured in frameworks like Astro. However, the API also provides handlers meant for SPA-style applications. We will use it to reduce the JavaScript needed in our implementation and more easily create fallback functionality. For this approach, we no longer need a separate #highlight element. Instead, we can style the .active navigation item directly using pseudo-selectors and let the View Transition API handle the animation between the before-and-after UI states when a new navigation item is clicked. We’ll start by getting rid of the #highlight element and its associated CSS and replacing it with styles for the nav a::after pseudo-selector: <nav> - <div id="highlight"></div> <a href="#" class="active">Home</a> <a href="#services">Services</a> <a href="#about">About</a> <a href="#contact">Contact</a> </nav> - #highlight { - z-index: 0; - position: absolute; - height: 100%; - width: 0; - left: 0; - box-sizing: border-box; - transition: all 0.2s ease; - } + nav a::after { + content: " "; + position: absolute; + left: 0; + top: 0; + width: 100%; + height: 100%; + border: none; + box-sizing: border-box; + } For the .active class, we include the view-transition-name property, thus unlocking the magic of the View Transition API. Once we trigger the view transition and change the location of the .active navigation item in the DOM, “before” and “after” snapshots will be taken, and the browser will animate the border across the bar. We’ll give our view transition the name of highlight, but we could theoretically give it any name. nav a.active::after { border: 2px solid green; view-transition-name: highlight; } Once we have a selector that contains a view-transition-name property, the only remaining step is to trigger the transition using the startViewTransition method and pass in a callback function. const navbar = document.querySelector; // Change the active nav item on click navbar.addEventListener{ if')) { return; } document.startViewTransition=> { document.querySelector.classList.remove; event.target.classList.add; }); }); Above is a revised version of the click handler. Instead of doing all the calculations for the size and position of the moving border ourselves, the View Transition API handles all of it for us. We only need to call document.startViewTransition and pass in a callback function to change the item that has the .active class! Adjusting The View Transition At this point, when clicking on a navigation link, you’ll notice that the transition works, but some strange sizing issues are visible.This sizing inconsistency is caused by aspect ratio changes during the course of the view transition. We won’t go into detail here, but Jake Archibald has a detailed explanation you can read for more information. In short, to ensure the height of the border stays uniform throughout the transition, we need to declare an explicit height for the ::view-transition-old and ::view-transition-new pseudo-selectors representing a static snapshot of the old and new view, respectively. ::view-transition-old{ height: 100%; } ::view-transition-new{ height: 100%; } Let’s do some final refactoring to tidy up our code by moving the callback to a separate function and adding a fallback for when view transitions aren’t supported: const navbar = document.querySelector; // change the item that has the .active class applied const setActiveElement ==> { document.querySelector.classList.remove; elem.classList.add; } // Start view transition and pass in a callback on click navbar.addEventListener{ if')) { return; } // Fallback for browsers that don't support View Transitions: if{ setActiveElement; return; } document.startViewTransition=> setActiveElement); }); Here’s our view transition-powered navigation bar! Observe the smooth transition when you click on the different links. See the Pen Moving Highlight Navbar with View Transitionby Blake Lundquist. Conclusion Animations and transitions between website UI states used to require many kilobytes of external libraries, along with verbose, confusing, and error-prone code, but vanilla JavaScript and CSS have since incorporated features to achieve native-app-like interactions without breaking the bank. We demonstrated this by implementing the “moving highlight” navigation pattern using two approaches: CSS transitions combined with the getBoundingClientRectmethod and the View Transition API. Resources getBoundingClientRectmethod documentation View Transition API documentation “View Transitions: Handling Aspect Ratio Changes” by Jake Archibald #creating #ampampldquomoving #highlightampamprdquo #navigation #bar
    SMASHINGMAGAZINE.COM
    Creating The “Moving Highlight” Navigation Bar With JavaScript And CSS
    I recently came across an old jQuery tutorial demonstrating a “moving highlight” navigation bar and decided the concept was due for a modern upgrade. With this pattern, the border around the active navigation item animates directly from one element to another as the user clicks on menu items. In 2025, we have much better tools to manipulate the DOM via vanilla JavaScript. New features like the View Transition API make progressive enhancement more easily achievable and handle a lot of the animation minutiae. (Large preview) In this tutorial, I will demonstrate two methods of creating the “moving highlight” navigation bar using plain JavaScript and CSS. The first example uses the getBoundingClientRect method to explicitly animate the border between navigation bar items when they are clicked. The second example achieves the same functionality using the new View Transition API. The Initial Markup Let’s assume that we have a single-page application where content changes without the page being reloaded. The starting HTML and CSS are your standard navigation bar with an additional div element containing an id of #highlight. We give the first navigation item a class of .active. See the Pen Moving Highlight Navbar Starting Markup [forked] by Blake Lundquist. For this version, we will position the #highlight element around the element with the .active class to create a border. We can utilize absolute positioning and animate the element across the navigation bar to create the desired effect. We’ll hide it off-screen initially by adding left: -200px and include transition styles for all properties so that any changes in the position and size of the element will happen gradually. #highlight { z-index: 0; position: absolute; height: 100%; width: 100px; left: -200px; border: 2px solid green; box-sizing: border-box; transition: all 0.2s ease; } Add A Boilerplate Event Handler For Click Interactions We want the highlight element to animate when a user changes the .active navigation item. Let’s add a click event handler to the nav element, then filter for events caused only by elements matching our desired selector. In this case, we only want to change the .active nav item if the user clicks on a link that does not already have the .active class. Initially, we can call console.log to ensure the handler fires only when expected: const navbar = document.querySelector('nav'); navbar.addEventListener('click', function (event) { // return if the clicked element doesn't have the correct selector if (!event.target.matches('nav a:not(active)')) { return; } console.log('click'); }); Open your browser console and try clicking different items in the navigation bar. You should only see "click" being logged when you select a new item in the navigation bar. Now that we know our event handler is working on the correct elements let’s add code to move the .active class to the navigation item that was clicked. We can use the object passed into the event handler to find the element that initialized the event and give that element a class of .active after removing it from the previously active item. const navbar = document.querySelector('nav'); navbar.addEventListener('click', function (event) { // return if the clicked element doesn't have the correct selector if (!event.target.matches('nav a:not(active)')) { return; } - console.log('click'); + document.querySelector('nav a.active').classList.remove('active'); + event.target.classList.add('active'); }); Our #highlight element needs to move across the navigation bar and position itself around the active item. Let’s write a function to calculate a new position and width. Since the #highlight selector has transition styles applied, it will move gradually when its position changes. Using getBoundingClientRect, we can get information about the position and size of an element. We calculate the width of the active navigation item and its offset from the left boundary of the parent element. Then, we assign styles to the highlight element so that its size and position match. // handler for moving the highlight const moveHighlight = () => { const activeNavItem = document.querySelector('a.active'); const highlighterElement = document.querySelector('#highlight'); const width = activeNavItem.offsetWidth; const itemPos = activeNavItem.getBoundingClientRect(); const navbarPos = navbar.getBoundingClientRect() const relativePosX = itemPos.left - navbarPos.left; const styles = { left: ${relativePosX}px, width: ${width}px, }; Object.assign(highlighterElement.style, styles); } Let’s call our new function when the click event fires: navbar.addEventListener('click', function (event) { // return if the clicked element doesn't have the correct selector if (!event.target.matches('nav a:not(active)')) { return; } document.querySelector('nav a.active').classList.remove('active'); event.target.classList.add('active'); + moveHighlight(); }); Finally, let’s also call the function immediately so that the border moves behind our initial active item when the page first loads: // handler for moving the highlight const moveHighlight = () => { // ... } // display the highlight when the page loads moveHighlight(); Now, the border moves across the navigation bar when a new item is selected. Try clicking the different navigation links to animate the navigation bar. See the Pen Moving Highlight Navbar [forked] by Blake Lundquist. That only took a few lines of vanilla JavaScript and could easily be extended to account for other interactions, like mouseover events. In the next section, we will explore refactoring this feature using the View Transition API. Using The View Transition API The View Transition API provides functionality to create animated transitions between website views. Under the hood, the API creates snapshots of “before” and “after” views and then handles transitioning between them. View transitions are useful for creating animations between documents, providing the native-app-like user experience featured in frameworks like Astro. However, the API also provides handlers meant for SPA-style applications. We will use it to reduce the JavaScript needed in our implementation and more easily create fallback functionality. For this approach, we no longer need a separate #highlight element. Instead, we can style the .active navigation item directly using pseudo-selectors and let the View Transition API handle the animation between the before-and-after UI states when a new navigation item is clicked. We’ll start by getting rid of the #highlight element and its associated CSS and replacing it with styles for the nav a::after pseudo-selector: <nav> - <div id="highlight"></div> <a href="#" class="active">Home</a> <a href="#services">Services</a> <a href="#about">About</a> <a href="#contact">Contact</a> </nav> - #highlight { - z-index: 0; - position: absolute; - height: 100%; - width: 0; - left: 0; - box-sizing: border-box; - transition: all 0.2s ease; - } + nav a::after { + content: " "; + position: absolute; + left: 0; + top: 0; + width: 100%; + height: 100%; + border: none; + box-sizing: border-box; + } For the .active class, we include the view-transition-name property, thus unlocking the magic of the View Transition API. Once we trigger the view transition and change the location of the .active navigation item in the DOM, “before” and “after” snapshots will be taken, and the browser will animate the border across the bar. We’ll give our view transition the name of highlight, but we could theoretically give it any name. nav a.active::after { border: 2px solid green; view-transition-name: highlight; } Once we have a selector that contains a view-transition-name property, the only remaining step is to trigger the transition using the startViewTransition method and pass in a callback function. const navbar = document.querySelector('nav'); // Change the active nav item on click navbar.addEventListener('click', async function (event) { if (!event.target.matches('nav a:not(.active)')) { return; } document.startViewTransition(() => { document.querySelector('nav a.active').classList.remove('active'); event.target.classList.add('active'); }); }); Above is a revised version of the click handler. Instead of doing all the calculations for the size and position of the moving border ourselves, the View Transition API handles all of it for us. We only need to call document.startViewTransition and pass in a callback function to change the item that has the .active class! Adjusting The View Transition At this point, when clicking on a navigation link, you’ll notice that the transition works, but some strange sizing issues are visible. (Large preview) This sizing inconsistency is caused by aspect ratio changes during the course of the view transition. We won’t go into detail here, but Jake Archibald has a detailed explanation you can read for more information. In short, to ensure the height of the border stays uniform throughout the transition, we need to declare an explicit height for the ::view-transition-old and ::view-transition-new pseudo-selectors representing a static snapshot of the old and new view, respectively. ::view-transition-old(highlight) { height: 100%; } ::view-transition-new(highlight) { height: 100%; } Let’s do some final refactoring to tidy up our code by moving the callback to a separate function and adding a fallback for when view transitions aren’t supported: const navbar = document.querySelector('nav'); // change the item that has the .active class applied const setActiveElement = (elem) => { document.querySelector('nav a.active').classList.remove('active'); elem.classList.add('active'); } // Start view transition and pass in a callback on click navbar.addEventListener('click', async function (event) { if (!event.target.matches('nav a:not(.active)')) { return; } // Fallback for browsers that don't support View Transitions: if (!document.startViewTransition) { setActiveElement(event.target); return; } document.startViewTransition(() => setActiveElement(event.target)); }); Here’s our view transition-powered navigation bar! Observe the smooth transition when you click on the different links. See the Pen Moving Highlight Navbar with View Transition [forked] by Blake Lundquist. Conclusion Animations and transitions between website UI states used to require many kilobytes of external libraries, along with verbose, confusing, and error-prone code, but vanilla JavaScript and CSS have since incorporated features to achieve native-app-like interactions without breaking the bank. We demonstrated this by implementing the “moving highlight” navigation pattern using two approaches: CSS transitions combined with the getBoundingClientRect() method and the View Transition API. Resources getBoundingClientRect() method documentation View Transition API documentation “View Transitions: Handling Aspect Ratio Changes” by Jake Archibald
    0 Σχόλια 0 Μοιράστηκε