• WWW.POLYGON.COM
    How to install a new SSD in your Asus ROG Ally
    Do you want to add more storage to your Asus ROG Ally or Ally X quickly, affordably, and easily? Get a microSD card, slide it in, and get back to gaming. But wheres the fun in that? If you want faster storage that doesnt cost much more than a high-capacity microSD card, we suggest upgrading its M.2 SSD.Now, taking apart your expensive piece of hardware can be intimidating, but with our step-by-step tutorial, which includes the necessary tools and components, well get you and your ROG Ally to the finish line in no time. And, in case you havent already customized your ROG Ally, weve got a number of must-have ROG Ally accessories we think youll like.Get your tools readyMost of the tools youll need for this project, like spudgers and a #0 Phillips-head screwdriver, are easy enough to get piecemeal online or at your local hardware store. But if you want a tidier solution that contains everything you need in one place for dismantling the ROG Ally (and just about any other consumer gadget in your home), you might want to consider the Essential Electronics Toolkit from iFixit. For the purposes of this tutorial, Im relying on my trusty Pro Tech Toolkit, which costs more as it contains additional pieces.Buy a new SSDAs for your replacement SSD, youve got plenty of options. But which one you should get depends on how much storage youll need, and which ROG Ally you have. If youre working with the original white ROG Ally, which features a 512 GB SSD by default, we suggest doubling the internal storage with a 1 TB SSD, or quadrupling it to 2 TB if you can afford it. One spec thats crucial to know is that the standard ROG Ally can only accommodate the 2230 size of M.2 SSDs.If you own the newer black ROG Ally X, which is equipped with a 1 TB SSD out of the box, youll probably want something with 2 TB of storage. However, because this handheld is only compatible with the larger 2280 size of M.2 SSDs, theres a wider range of options at multiple price points. Note: Some Ally X owners on Reddit report that theres adequate internal space for an M.2 SSD that has a built-in heatsink, though some owners note that not using one doesnt seem to impact performance.Before we continue on with installation instructions, weve pulled together a handful of compatible models for the ROG Ally you can choose from, followed by recommendations for the Ally X.2230-size SSDs for the ROG Ally2280-size SSDs for the ROG Ally XBegin the disassembly carefullyA general rule before opening any device is to first power it down. Not just that: Draining the battery is never a bad idea during this process. Asus recommends discharging the battery to around 25% before operating on the ROG Ally, as a charged battery is a potential fire hazard if something goes wrong.Next, remove your microSD card from the slot. Doing so will minimize the chance of accidentally breaking it (I say this because, unfortunately, it has happened to me).Lay the console face down on a table, or use any level surface thats free of debris, ideally one like the anti-static silicone pad Im using in the photos.To access the internals of the ROG Ally, youll need to use a Phillips #0 screwdriver to remove five screws. Note that a sixth screw in the bottom center of the handheld is designed to be loosened, but not removed, so dont persist.Once the screws are removed (again, save for the bottom middle one), slide a soft flat edge (like a guitar pick, prying tool, or plastic card) gently between the plastic housing to loosen the clips around the edge of the back cover. Youll know youve done this correctly when you hear them click and the back cover begins to separate from the chassis. Carefully lift the back cover away and place it somewhere safe.Disconnect the batteryBefore doing anything else, you need to disconnect the battery. The instructions are the same for both the ROG Ally and ROG Ally X, even though internally they look a bit different. To do this, simply use the flat edge of a plastic tool to carefully push the metal locking bar away from the connector thats holding the ribbon cable in place. Its important that you do not attempt to lift the bar, as this may damage it and prevent it from locking back in place.Once the locking bar has been pushed back, use a flat tool underneath the connector and gently lift the cable away from the socket. This shouldnt take much effort. Once youve disconnected the cable from the motherboard, you no longer need to worry about the battery.Remove the plastic cover shielding the SSDOnce youre presented with the internals of the ROG Ally, youll see a sheet of plastic covering the SSD. This is attached with a small bit of adhesive, letting you easily pull it off. You might want to hang on to it instead of immediately throwing it in the trash, like I did. In the ROG Ally X, the SSD itself is covered with a thermal cover that you definitely shouldnt throw away.Remove the SSDIts time for the main event. Underneath the black sheet of plastic, the original SSD that came with your device will be visible next to the fan on the left side of the Ally (in the ROG Ally X, the rectangular 2280-size SSD is located in the middle of the device, oriented horizontally underneath the battery cable and a removable thermal covering). Using a Phillips #0 screwdriver, remove the single screw that secures the SSD in the M.2 socket. The SSD should lift up a bit, and you can then gently pull the SSD out of its socket. Do not attempt to lift the SSD up as you remove it, as this has the potential to damage your handheld and/or your SSD.Set aside the old SSD, which you can reformat to use as you please.Install your new SSDAt this point, you can seat your shiny new SSD in the now-vacant socket. Match the SSDs pins with the socket, and then gently insert it without much pressure. Youll know that youve done it correctly once the small indentation on the SSDs bottom lines up with the hole for the screw you removed earlier. Screw it back in. Youre nearly finished!Reassemble your devicePutting your ROG Ally back together means doing everything you just did to disassemble it, but in reverse.To reconnect the battery, take the connector of the ribbon cable and reseat it in the socket. You can use your fingers or a soft tool to gently push it down into the socket until you hear a small click. Afterwards, use your flat edge to push the locking bar back into place over the connector.If you held on to that small plastic sheet you removed earlier, you can stick it back into place. However, if you were like me and hastily discarded it, dont worry; it wont hamper the performance of your Ally.Finally, you can reattach the back cover. Simply press the cover back into its original position until you hear the clips start snapping into place. If the back cover is still a little loose, thats OK. Once you tighten all of the screws you removed earlier, it will be secured into its original position.Perform a cloud recoveryThe final step to getting your Ally game-ready is to restore the Windows operating system. To do this, plug the Ally back in and power it on. It should boot into the BIOS menu automatically. If it doesnt, try powering on the system while holding down the power and volume-down buttons simultaneously.Once youre in the BIOS menu, use the touchscreen to navigate to the Advanced tab and select Asus Cloud Recovery. From there, you should be able to follow the prompts to download and reinstall the OS. While youll need to redownload and reinstall any games you had stored on the original SSD, youre otherwise good to go. Good luck, and have fun.
    0 التعليقات 0 المشاركات 123 مشاهدة
  • UXDESIGN.CC
    Using AI to optimize my snow shoveling
    Using AI to optimize snow shovelingAn example of how AI is changing the way I work (and live) as a productdesignerSnapshots from the AI-generated app I created. You draw the shape of your driveway and it outputs the optimum route, square footage, estimated time to walk the distance (all at a static shovel width of 2 ft). Theres a lot I would improve but I went from idea to research to app in less than anhour.Ive been challenging myself to use AI in everyday use cases so that I can get closer to the technology as a product design leader. To that end, I want to share my attempt at using the latest generation of AI tooling to build an experience that helps people shovel snow more efficientlyan often mundane and tedioustask.Some additional context aboutme:I used to be a developer in a past life but have since lost touch with most skills associated with being able to buildappsI work in tech and so Im probably at the leading edge of most of the available tooling compared to mostpeopleI have taken a app-forward approach to solving this problem and its possible there are alternative approaches using AI to do the same (like deeper research)TL;DR; I ultimately succeeded in the task and developed a small web app where I can draw the shape of my driveway and calculate the optimum shoveling route. I went from idea to research to app in less than an hour (it took me longer to write this article).Here is my approach and the tools I used to solve thisproblem.ResearchFirst things first, I needed to determine if the answer already existed. Was there research that told me the most efficient route to shoveling a driveway? To find out I went to Gemini Deep Research(GDR).Using GDR, I ran a meta-analysis across 38 different websites and papers, triggering the research with the following prompt:can you please do research on the topic of what the most efficient way to shovel a driveway? My driveway is a long rectangle and I shovel it by hand with a 2 foot wide shovel. Id like to understand how I can shovel my driveway the most efficient way, what pattern I should use to shovel the fastest and clear the area of my drive way the quickest. If there isnt enough research on snow shoveling, you can use other research that might be applicable in the areas of mathematics, geometry, and physics.Before generating the report, GDR develops a research plan, showing its proposed steps to conduct the research. Heres an example of its response to myprompt:The Gemini Deep Research plan describes the steps it will take to conduct research and lets you correct its plan of action before executing the minutes-long process.This looked good so I clicked Start Research, sat back, and sipped my coffee. In just a few minutes an exhaustive report was spit out with references clearly cited (complete with links to websites, PDFs, andimages).In my case, GDR concluded that theres little evidence of an optimal route to shovel a driveway like mine. It also gave great insights around different patterns to try, the physics of snow shoveling, and how to shovel in a healthy way to prevent injury or over exertion.GDR reports cannot be directly shared from Google, so I processed my report with Gemini NotebookML (another wonderful tool for conducting first-party research). From NotebookML I converted my findings into a podcast. Feel free to give it a listen here if youdlike.An excerpt of the Gemini Deep Research report on shoveling snow.Answering the question (and building an AI-generated app)Given that the Internets top physicists and forum writers didnt have an answer for me, I took matters into my ownhands.There are several different surfaces I need to shovel so I thought itd be neat-o for me to be able to draw the shape of those areas and have an app tell me the optimum route to clearthem.What is optimum? I defined optimum as covering a given area in the least amount of walking time necessary to saturate thespace.For creating my app I turned to v0 by Vercel, as I believe it to be at the bleeding edge of generative AI app development. With v0, you can turn text prompts into actual functioning apps with code and deployment options.An example refinement to the app. 1 of just 8 prompts it took me to create the snow shoveling estimator app.My experience was magical. It took me 8 text prompts to generate what I believe to be a pretty good MVP. Did I build the next Facebook? Absolutely not. But I went from idea, to research, to functioning tool in about anhour.Checkout my snow shoveling route estimator here: https://v0.dev/chat/driveway-snow-route-planner-UP6yTAh9Xnp?b=b_yQkw8ddGh2c its not perfect but its pretty damn cool. At this link you can see my entire chat transcript and the versions I went through to create theapp.After your prompt you can see v0 get to work, modifying the code (in this case React) and eventually pausing to generate the runtimepreview.In the app development view, the preview renders to the right of your transcript.Not an AI-generated conclusionIf I had a full 40 hour work week on this, the potential seems limitless (and its still early days for this technology). Ive been using AI on a weekly-basis now and its changing the way I approach problemsolving.I used ChatGPTs multi-modal inputs (voice and video) to help work on an old snow blower, I researched a family trip to Yellowstone (and sent the podcast to my wife), and Im using AI almost ever day in my work as a product designleader.This is one of the most exciting times to be in technology and the pace at which these innovations are happening is truly stunning.Have you been experimenting with AI? What have you been able to accomplish?Using AI to optimize my snow shoveling was originally published in UX Collective on Medium, where people are continuing the conversation by highlighting and responding to this story.
    0 التعليقات 0 المشاركات 135 مشاهدة
  • LIFEHACKER.COM
    The Vvolt Centauri II Just Became My New Favorite E-Bike
    Ive tested a ton of bikes since I started doing reviews on Lifehacker in 2023from low frills affairs like the Propella 7S to higher end e-Mountain Bikes like Canyons Spectraland while no e-bike is right for every type of rider and every taste, the Centauri II is my overall favorite. I like the Vvolt Centauri II so much that I feel the need to open with a disclaimer: I am not getting paid by Vvolt, and Lifehacker has no relationship with the company. For general urban ridingcommuting, shorter trips on paved roadsthe Centauri II is close to perfect. The weight, power, comfort, and handling is balanced for everyday riding, and its features performed better than I expected, including the belt drive with automatic transmission and mid-drive motor. Overall, The Centauri II raises the bar for commuter-style bikes.The Vvolt Centauri II at a glanceProsMid-drive motor provides smooth power transferMaintenance-free, automatic transmission belt driveMany small details that add up to a refined rideConsThere is no throttleIts range could be greaterYour friends may be overly jealousSpecsPrice: $2,999Speed: Class III 28 mphRange: 20-60 milesBattery capacity: 490 wh / 13.6 AhMotor power: 120nm torque 350w nominal / 650w maxWeight: 50 Ibs (S/M)Frame type: Step throughUnicrown mono-shock suspension fork 30 mm travelAutomatic 3-speed rear hub transmission (163% gear range)Sizes: S/M, M/L, L/XL | Fits riders from 49-64UL-2849 compliant with UL2271 Approved batteryAvailable in Forest Planet and Galactic Storm colorsThe Centauri II has both a classy look and functional design Credit: Stephen Johnson The Centauri II is a nice-looking bikeclassy instead of flashy, with an overall look that is subtle, refined, and filled with small details that fit together. It comes in two colors, Forest Planet (green) and Galactic Storm (white), and has a matte finish. The cables are managed nicely, with most hidden inside the frame, and I especially love its reflective paint details and LED headlight built into the frame. In terms of frame geometry, the Centauri II is designed to put riders in a slightly less upright position than many e-bikes. Youre not bent in half like a road biker, but youre not bolt upright like the witch in The Wizard of Oz either; its a nice middle ground between the comfort of an upright posture and the control of more forward-leaning position, and its my personal sweet spot. The Centauri II has three sized frames, so you should be able to find the right bike for you if you're between 4'9 and 6'4.The Centauri II is really fun to ride Credit: Stephen Johnson I didnt have any pre-conceived notions of this e-bike before I took my first ride, but once I put it togetherthe assembly was easy and took about 20 minutesand got it onto the mean streets of North Hollywood, the Centauri II made a statement: This bike is dedicated to providing a ride thats smooth with as little hassle as possible. It's just really fun to ride. When I started pedaling and turned on the assist, the whisper-quiet motor and auto shifting kicked in and adjusted to my pedaling power and cadence to help me reach and maintain a speed of 20 mph quickly and with little effort. Its a class 3 e-bike, so the pedal assist will take you to 28mph should you put in the work to go that fast. Overall, it was a blast to drive, and I felt nimble and fast without feeling out of control.Four small details about the Centauri II that I likedHere are some of the smaller details that I appreciated when riding the Centauri II e-bike:Front suspension fork: The Centauri II comes with a mono shock above the front wheel. While not a mountain bike suspension fork, the mono shock provides 30mm of travel, enough to quiet urban-ride chatter like potholes and uneven pavement, but not enough for a technical single-track. While its no mountain bike, I took the Centauri II off road for a few miles and found it performed well on a hard-packed fire road.Weight: The Centauri II weighs around 50 pounds. That's light for an e-bike, but more importantly, the weight is distributed in a way that made the bike feel responsive and under control.The saddle: Bike seat comfort is a personal decision, but I found the Centauri II saddle wasn't overly padded or too big. It was a comfortable place to spend some time.A bell: Theres a little analog ding ding bell included, and I found it great.The Centauri II drive train and pedal assist Credit: Stephen Johnson Good front suspension and a comfy saddle are great details, but I was especially curious about the pedal assist and drive train. The Centauri II is powered by a mid-drive motor from Ananda, and at a continuous output of 350w, its not the most powerful motor out there (top continuous output allowed for e-bikes in the US is 750w), but mid-drive means the juice flows directly to the pedals instead of a wheel, so it picks up speed quickly and smoothly with a more natural-feeling power transfer instead of the jerky torque of a motorbike. And like most e-bikes, the Centauri II has five levels of pedal assist, but unlike others, its first level is chill mode, a configuration that keeps the bike in its lowest gear and tops out the assist at 12 mph. This is useful for climbing hills and keeping a safe speed on mixed-use bike paths. It's not a huge innovation, but a small detail that set the ride apart. Credit: Stephen Johnson The Centauri II has a Gates CDX belt drive which, unlike a chain drive, doesn't need to be lubed or maintained, doesn't rust, is quiet, and basically lasts forever. Beyond the belt drive, the Centauri II features an automatic three-speed transmission that takes the whole what gear am I in? question out of your ride. Ive tested an auto-shifting bike with a chain drive (that supposedly used AI for shifting), and I wasnt overly impressed, particularly when it came to hills, but the Centauris drive was different. It uses a mechanical system that shifts up and down based on speed. The way its pedal assist interacted with the transmission gave the right amount of power to keep the pedals turning easily, even when riding uphill. While three gears probably wouldnt be enough for an analog bike, the Centauri II almost never left me feeling like I was in the wrong gear during my 150 miles of testing. To really test out a no-shifter ride, I took the Centauri II on a couple of mountain rides including a trip with 2,000-feet of climbing, and it had no trouble. Big hills take more pedaling, but unless the grade is Tour de France-level steep, theyre totally doable. Credit: Stephen Johnson-Strava The Centauri II doesn't have a throttleI consider the Centauris lack of throttle control as a con, as many people like the option of sitting back on an e-bike and letting the motor do all the work. Thats not my vibe, so the lack of throttle doesnt bother me, but your mileage may vary.In place of a throttle, the Centauri II has a boost button designed so you can start up faster and get up steeper hills, and it provides about three seconds of maximum power before it cuts off. It works as intended, but I didn't use it much, and I found the boost a little sketchy on hills where I felt a bit of lag between when the boost stopped and when the pedal assist began. It was disconcerting, particularly on steeper grade hills, as it felt like I suddenly lost power.The Centauri II battery and display Credit: Stephen Johnson The trade off for the Centauri having such a light weight is having a more limited battery life. Its 490-watt hour battery is meant for a range of between 20 and 60 miles, which seems accurate based on my riding. During one ride, I started with a full battery and took it on a hill-heavy ride including a couple miles of dirt roads. I was tired on the way home, so I kept the pedal assist high. I traveled around 26 miles and the battery was almost tapped when I got home. In other words, its not the longest-running bike, so if range is your top consideration, you could do better. The batteries are UL-2849 compliant and charge in about 5-7 hours.As for the Centauri II display, it's functional, clutter free, and easy to read in bright sunlight. Each power level is a different color for each power level, so I could read it at a glance. The input are the standard on button, headlight on," and up and down arrows to control the PAS.Overall, I highly recommend the Centauri II Credit: Stephen Johnson Just about every time I took the Centauri II out for a ride over the past few months, Ive ridden longer than intended because its so much fun to ride. If youre looking for a a general use, urban commuter bike and the price tag is doable, I recommend the Vvolt Centauri II.
    0 التعليقات 0 المشاركات 106 مشاهدة
  • WWW.ENGADGET.COM
    Nintendo's goofy alarm clock will be available to everyone in March
    Alarmo, the most important hardware announcement Nintendo's made in the last year, will soon be available to a lot more people. Nintendo says the motion-tracking alarm clock will be able to be purchased "in stores at participating retailers" in March, without the need for a Nintendo Switch Online subscription or a visit to a physical Nintendo store.Nintendo's alarm clock originally launched in October 2024. It combines beloved sound effects from The Legend of Zelda: Breath of the Wild, Super Mario Odyssey, and Pikmin 4 with motion sensors that can track your tossing and turning. This gives the Alarmo some rudimentary sleep tracking features, and morning alarms that can get louder the more you flop around, only stopping when you actually sit up.Nintendo Sound Clock: #Alarmo will be available in stores at participating retailers in March 2025, no Nintendo Switch Online membership required. Available while supplies last. pic.twitter.com/qhVo0NMKjx Nintendo of America (@NintendoAmerica) January 13, 2025 As Engadget's review found, Alarmo is pricey at $100, and not particularly great as a sleep tracker. The alarm clock can only track one person at a time, which keeps anyone who shares a bed from accessing its most charming feature. But if you're weak to Nintendo nostalgia or have a child who's already a fan, the clock is a cute way to start your morning routine.In March, retailers will only have Alarmo "while supplies last," but hopefully by then, die-hard Nintendo fans will already be saving up for their next big purchase.This article originally appeared on Engadget at https://www.engadget.com/home/smart-home/nintendos-goofy-alarm-clock-will-be-available-to-everyone-in-march-222912137.html?src=rss
    0 التعليقات 0 المشاركات 108 مشاهدة
  • WWW.TECHRADAR.COM
    NYT Strands today my hints, answers and spangram for Tuesday, January 14 (game #317)
    Looking for NYT Strands answers and hints? Here's all you need to know to solve today's game, including the spangram.
    0 التعليقات 0 المشاركات 118 مشاهدة
  • WWW.FASTCOMPANY.COM
    Britain wants to become an AI powerhouse. Heres how
    The British government pledged on Monday to rip up the red tape hindering construction of data centers that underpin artificial intelligence while promoting its pro-innovation approach to regulating the technology.Prime Minister Keir Starmer hailed the potential of AI as he outlined wide-ranging plans to harness the technology, indicating that it will be a key part of his governments efforts to turn around the economy and jump-start lackluster growth.Starmer said he wanted to Britain to become one of the great AI superpowers that can keep up with other countries like the United States and China that have led advances in the technology.Under the 50-point plan, which provided few details on investment amounts, the government plans to massively expand public computing power, including by building a new national supercomputer and setting up AI growth zones with streamlined building approval process.So if youre looking at where to build your data centers, we will speed up planning permission if you need better access to power, Starmer said.Britainscomplex building permission rulesare frequently blamed for preventing development of big projects such as data centers. After taking power in July, Starmers Labour government vowed to review decisions by local authorities to reject some projects.The government will also stick to its pro-innovation approach to regulating AI, which involves giving responsibility to existing industry regulators instead of drawing up a new set of rules like theEuropean Union has done. It will also continue to support of U.K.s AI Safety Institute, set up under Starmers Conservative predecessor Rishi Sunak to carry out research on the most cutting-edge AI models and the existential but far-off risks they pose.We will test and understand AI before we regulate it to make sure that when we do it, its proportionate and grounded in the science, Starmer said.
    0 التعليقات 0 المشاركات 95 مشاهدة
  • WWW.YANKODESIGN.COM
    POCO X7 Series Review: Everyday Performance, Pro-Level Power, and the Collectors Appeal of the Iron Man Edition
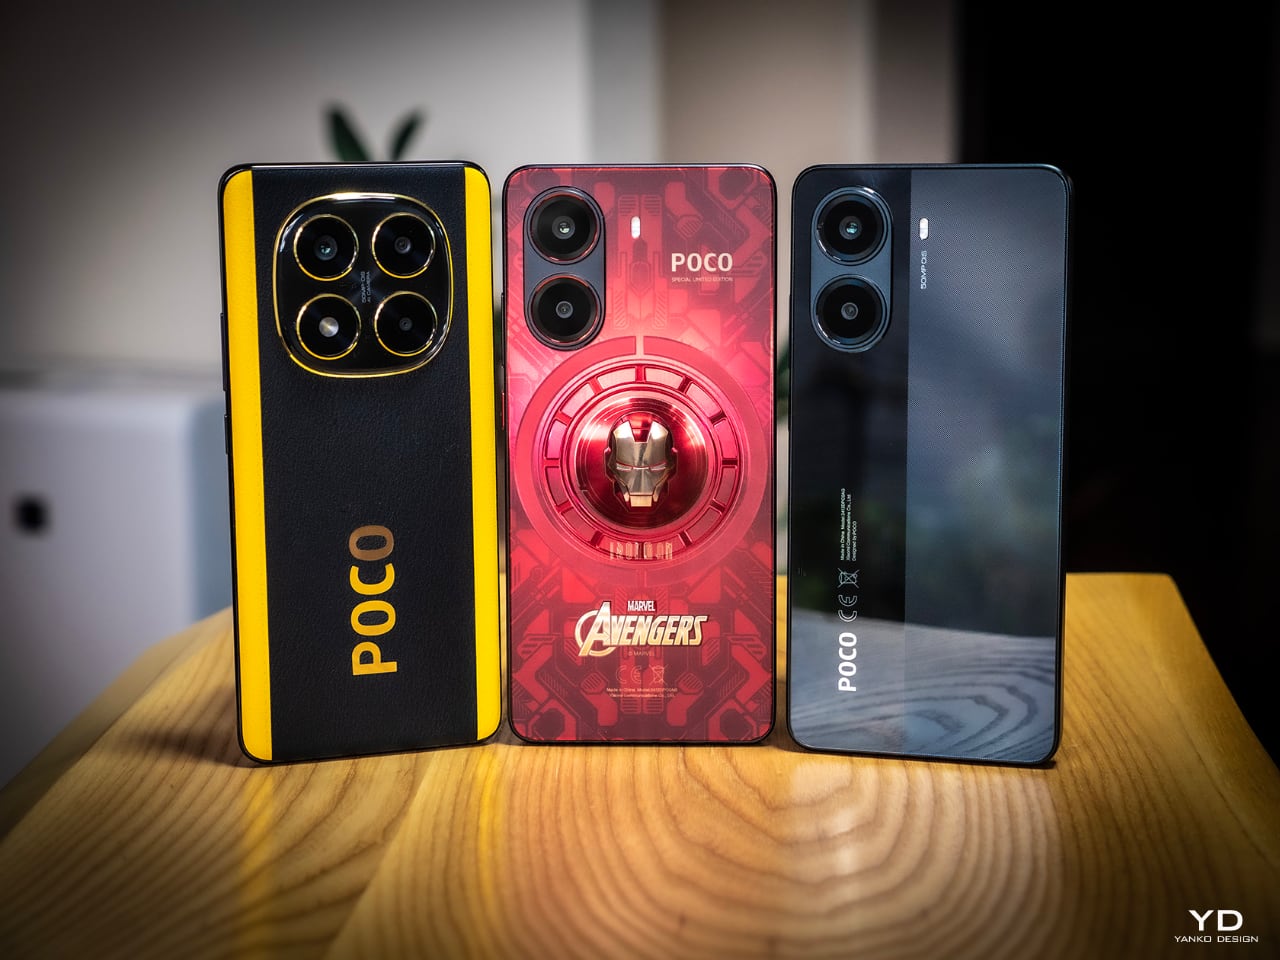
    PROS: Variety for Users: Options for everyday use, high performance, and a collectors Iron Man Edition. Striking Design: The Iron Man Editions 3D helmet and Arc Reactor cater to Marvel fans. Strong Performance: The X7 Pros Dimensity 8400-Ultra excels in gaming and multitasking. Long Battery Life: Durable batteries with reliable fast charging. Versatile Cameras: Features like Golden Portrait Mode enhance photographic quality.CONS: Camera Edge Performance: The ultra-wide lens occasionally struggles with distortion, particularly at the edges, which could impact landscape shots. Software Experience: Advanced AI features may feel less intuitive for some users. Heat Management on X7: While the X7 Pro excels with advanced cooling, the X7 can warm up slightly under heavy workloads, impacting prolonged performance.RATINGS:AESTHETICSERGONOMICSPERFORMANCESUSTAINABILITY / REPAIRABILITYVALUE FOR MONEYEDITOR'S QUOTE:Bold design meets powerful performance, with the POCO X7 series offering something for everyoneincluding the stunning Iron Man Edition for Marvel fans.Smartphones come in countless shapes, sizes, and flavors, but the POCO X7 series provides three distinct experiences under one umbrella. Youve got the POCO X7, a solid daily driver offering capable performance and a big display without pushing your budget to the brink. Then theres the POCO X7 Pro, which ramps up horsepower, battery life, and AI features for those who demand more from their mobile devices. Finally, theres the POCO X7 Pro Iron Man Edition, a collectors piece that wraps that Pro-level performance in an Iron Manthemed exterior, complete with a raised and tactile 3D version of the iconic helmet and Arc Reactor on its back panel. Its a collaboration with Marvel that puts Tony Starks signature red-and-gold palette right into your hand.Designer: POCOIn this review, Ill walk you through what each phone brings to the table, focusing on seven main areas: an introduction to the devices, an in-depth look at their designs, a discussion of ergonomics, a dive into performance, a consideration of anything they might offer for sustainability, an assessment of their value, and a final wrap-up that weighs which phone best fits different kinds of users. The POCO X7 series provides a wide range of choices depending on how much power you need, how much battery life you want, how much you care about design, and even whether you love Marvel enough to pay a premium for an Iron Manthemed phone. If youve been eyeing any phone in this lineup, youll have a clearer picture of their strengths and weaknesses by the end of this review.On a broad level, all three devices share some significant similarities: each has a 6.67-inch CrystalRes AMOLED display with up to 120Hz refresh and a high touch sampling rate, each one is IP68 water- and dust-resistant, and each phone includes a large-capacity battery paired with speedy charging. Theyre also all 5G-ready, come with solid camera setups, and feature advanced software with a range of AI-driven tools, plus all the usual connectivity youd expect (like NFC and dual SIM slots). But that doesnt mean theyre all the same. The X7 Pro is significantly more powerful than the X7, and the Iron Man Edition advances the X7 Pros design into something practically a fandom art. Lets start by looking at these differences in design since thats often the first thing people notice when picking up a phone.DesignThe POCO X7 Pro Iron Man Edition shines as a design masterpiece, combining superhero aesthetics with premium craftsmanship. Its exterior is a visual homage to Iron Mans iconic suit, featuring a deep red and metallic gold palette that immediately grabs attention. The back panel boasts a raised 3D relief of Iron Mans helmet and Arc Reactor, created with a sculptural technique for tactile and visual depth. The helmets matte finish subtly shimmers under light, while the Arc Reactors layered metallic serrations reflect light brilliantly, resembling fine jewelry. An embossed Avengers logo at the bottom adds another layer of detail, appealing to both touch and sight.Inside, the Iron Man Edition immerses users in Tony Starks world with a custom interface that mirrors his futuristic lab displays. Red app borders, dynamic animations, and tailored design elements enhance the user experience, making the phone as unique inside as it is outside. The packaging elevates the presentation further, featuring a mechanical lift structure, Iron Man suit blueprints, a faux-leather case embossed with circuitry patterns and gold highlights, and a SIM ejector tool shaped like the Arc Reactor. Every detail reinforces its connection to Marvel, making this phone a must-have for fans and collectors.From an ergonomic perspective, the raised 3D relief of the helmet and Arc Reactor provide natural grip points, ensuring the phone feels secure during use. The included vegan leather case adds a layer of comfort with its soft, textured finish, and the phones curved edges enhance usability by fitting naturally into the palm. These thoughtful touches make the Iron Man Edition not only visually captivating but also practical for everyday use.POCO X7 and X7 Pro feature a 6.67-inch CrystalRes AMOLED display with a curved edgeThe X7 and X7 Pro share a unified foundation, featuring a 6.67-inch CrystalRes AMOLED display with curved edges and IP68 protection for durability. While both models are visually distinct, they cater to different design preferences. The X7 leans into minimalism, offering Black, Green, and Silver finishes with either a lightweight plastic back or a vegan leather back for added grip and texture. This simple design focuses on practicality, with the camera module serving as the primary visual highlight, making it a great option for users who prefer understated aesthetics.The X7 Pro, on the other hand, takes a more dynamic approach. Its defining feature is the racetrack-shaped Deco design, with flowing Bzier curves around the camera module that create a sense of motion. This detail, accentuated under shifting light, brings energy to its appearance. Offered in Black, Green, or a vibrant Yellow finish, the X7 Pro appeals to those who enjoy bold, attention-grabbing designs. Together, the X7 and X7 Pro provide a balance of subtlety and flair, ensuring that users have distinct yet practical choices.ErgonomicsFans of Iron Man will appreciate how the raised 3D relief of the helmet and Arc Reactor combines striking visuals with functional design. These sculptural elements enhance the tactile experience, adding secure grip points that make the device feel natural and confident in hand. Paired with the vegan leather case, embossed with intricate circuitry and gold accents, the design delivers a premium feel thats both comfortable and distinctive.For the POCO X7 and X7 Pro, the focus shifts to practical ergonomics. The 3D Dual-Curved display is designed to rest comfortably in the hand, with rounded edges that minimize palm strain during extended use. The vegan leather back panel option adds a soft, textured finish that improves grip and reduces the chance of slips. High brightness levelsreaching 3200 nits on the X7 Proensure easy screen readability in bright environments, while TV Rheinland certifications for blue light reduction support prolonged viewing without discomfort. The POCO X7 lineup effectively balances thoughtful design and daily comfort, ensuring each device feels as good to hold as it looks.PerformancePerformance is a key factor in choosing a phone, and the POCO X7 lineup caters to various needs with well-defined capabilities across its models.Starting with the POCO X7 Pro steps up significantly in terms of raw power. At its core is the Dimensity 8400-Ultra processor, featuring an All-Big-Core setup where all eight CPU cores are performance-focused, clocking up to an impressive 3.25GHz. This ensures tasks like video editing, advanced photo retouching, and heavy multitasking are handled seamlessly. The upgraded Mali-G720 GPU enhances graphics rendering, delivering smooth performance during resource-heavy gaming or 4K video playback.Real-world gaming tests showcase the X7 Pros prowess in popular titles like Diablo Immortal, Apex Legends Mobile, and Honkai: Star Rail, where it maintained steady frame rates at high settings. Thanks to its LiquidCool Technology 4.0 and 3D IceLoop System, the phone effectively dissipates heat, ensuring consistent performance without throttling, even during extended gaming sessions. This advanced cooling system allows gamers to enjoy longer playtimes without the phone becoming uncomfortably hot, providing smooth gameplay during intense battles or detailed open-world exploration. Reliable cooling like this is critical for gamers, as it ensures consistently high frame rates and avoids frustrating slowdowns during crucial moments.The Iron Man Edition has the same internal specs as the X7 Pro and delivers identical high-end performance. This means users can enjoy top-tier speed and capability while embracing the collectible aesthetics of the Iron Man branding. Its an ideal choice for those who want a combination of powerful performance and unique design.The POCO X7, powered by the Dimensity 7300-Ultra processor, offers reliable efficiency for everyday tasks. Built on a 4nm process, it can clock up to 2.5GHz, making it sufficient for streaming, casual gaming, multitasking, and general phone usage. For users upgrading from an older POCO device, this model delivers a noticeable 12% performance boost. Additionally, the X7 includes Memory Extension 3.0, which can allocate a portion of internal storage to RAM, enabling up to 24GB of effective RAM on the 12GB version. This flexibility is especially useful when juggling multiple apps or handling large files.Ultimately, the X7 is ideal for moderate users who prioritize value and steady performance for daily activities. The X7 Pro, with its advanced processing power and cooling solutions, is tailored for gamers, multitaskers, and users who demand efficiency under pressure. The Iron Man Edition adds a unique, fandom-focused twist while retaining the Pros exceptional capabilities.POCO X7 Pro Camera PerformanceThe POCO X7 Pro enhances the X7s camera capabilities with improved sensor performance and computational photography. Its 50MP main camera, equipped with the same Sony IMX882 sensor, benefits from enhanced dynamic range and noise reduction, delivering better results in high-contrast environments. The wider aperture and advanced algorithms effectively handle highlights and shadows, ensuring balanced exposure in challenging lighting conditions. Low-light photography is awe-inspiring, with the Pro model capturing more detail and exhibiting less grain than the standard X7.The 8MP ultra-wide camera on the Pro also sees improvements in image processing, reducing distortion and maintaining a more consistent color profile across all lenses. While the X7s ultra-wide camera has the exact same resolution, its improved image processing allows for slightly better overall quality.On the front, the 20MP camera remains consistent with the X7, delivering reliable performance for selfies and group shots. Its AI-driven enhancements ensure natural-looking skin tones and vibrant details, even in suboptimal lighting conditions.POCO X7 Camera PerformanceThe POCO X7s camera system reflects versatility and adaptability, offering options catering to photographic needs. The 50MP main sensor provides good detail and clarity in various lighting conditions. Using the Sony IMX882 sensor with an f/1.5 aperture and 1.6m 4-in-1 pixel technology, the main camera excels in bright scenarios, producing sharp, vibrant shots. Optical Image Stabilization ensures low-light performance remains reliable, as it minimizes blurring and enhances image sharpness even in challenging environments.POCO has introduced a Golden Portrait Mode, designed to enhance portrait photography by delivering a professional-grade blurring effect. This feature replicates the aesthetic of high-end portrait lenses, creating a soft, natural background separation that emphasizes the subject. The 46mm effect, achieved through hardware zoom capabilities, mimics the perspective and compression typically found in traditional DSLR photography. This attention to detail delivers a sharper focus on the subject while adding depth to the image, making portraits appear more dynamic and visually striking. Capturing candid moments or curated shots, Golden Portrait Mode provides a polished, studio-like quality straight from the device.The 8MP ultra-wide camera is designed for capturing expansive scenes, like landscapes or group events. While effective, the ultra-wide lens occasionally struggles with edge distortion, a common issue in cameras at this resolution. However, the field of view is a significant advantage for most casual shots, allowing photographers to capture scenes easily.The 8MP ultra-wide camera is designed for capturing expansive scenes, like landscapes or group events. While effective, the ultra-wide lens occasionally struggles with edge distortion, a common issue in cameras at this resolution. However, the field of view is a significant advantage for most casual shots, allowing photographers to capture scenes easily.Another impressive feature is the 20MP front-facing camera, which is equipped with tools to deliver vibrant and detailed selfies. The automatic 0.8x zoom adjustment benefits group photos, ensuring all subjects are included without compromising clarity.SustainabilitySmartphone sustainability has become increasingly important, and POCO contributes to this by designing phones built to last longer. This approach reduces the frequency of replacements, which indirectly supports sustainability efforts. For instance, battery health is a common reason phones end up retired. Still, the POCO X7s battery can retain over 80% capacity after 1,600 charge cycles, and the X7 Pro can retain 90% capacity after 1,000 cycles. By staying healthier over time, these batteries should let you hold onto your phone for a longer period, thereby creating less electronic waste.Theyre also built for durability. All three have an IP68 rating against water and dust, so its less likely youll ruin your phone with an accidental splash or a bit of debris. The X7 sports Corning Gorilla Glass Victus 2, while the Pro models have Gorilla Glass 7i. The idea is that these protective measures help the phone avoid daily hazards like drops or bumps, minimizing the need for repairs or replacements. The X7s battery can perform reliably in cold conditions down to -10C, making voice calls for up to 24 hours and staying on standby for up to 66 hours in those temps. If you value longevity, you can see these features as small wins for sustainabilityno fancy packaging about carbon footprints, but a device that should last you a decent while before wearing out.Value and Wrap-UpDeciding between the POCO X7, X7 Pro, and X7 Pro Iron Man Edition hinges on your needs and priorities. The POCO X7 is a strong contender for those seeking reliable performance on a budget. Its Dimensity 7300-Ultra processor handles everyday tasks easily, and the 6.67-inch AMOLED display delivers vibrant visuals. The durable 5110mAh battery and 45W fast charging ensure you stay powered throughout the day. With its classic design and robust features, the X7 is a practical choice for users looking for value without compromise.The X7 Pro transforms the series with its cutting-edge Dimensity 8400-Ultra chipset, providing unmatched speed and exceptional efficiency. Designed for gamers and multitaskers, it delivers seamless performance for demanding applications and intensive tasks. The camera system performs well in lighting, providing good-quality photos and videos. Coupled with a 6000mAh battery and 90W HyperCharge, the X7 Pro is built for long-lasting and fast-paced use. Its racetrack-inspired design adds a bold visual appeal, making it a stylish yet high-performing choice.The Iron Man Edition redefines what a collectors device can be, blending the X7 Pros powerful hardware with unique design elements inspired by Tony Starks iconic suit. From the raised 3D relief of Iron Mans helmet and Arc Reactor to the custom Marvel-themed user interface and exclusive packaging, it offers fans a unique experience. It maintains the same impressive camera and processing performance as the Pro model, ensuring its striking aesthetic doesnt come at the cost of functionality.Across the board, the POCO X7 lineup impresses with its high-quality displays, durable builds, and reliable battery life. Whether you prioritize affordability, cutting-edge performance, or standout design, theres a model tailored to fit your lifestyle and preferences. By reflecting on your daily habits and needs, you can confidently choose the device that aligns with your goals.The post POCO X7 Series Review: Everyday Performance, Pro-Level Power, and the Collectors Appeal of the Iron Man Edition first appeared on Yanko Design.
    0 التعليقات 0 المشاركات 95 مشاهدة
  • WWW.WIRED.COM
    The Money Money Money Issue
    WIRED sent reporters far and wide to find out who controls the world's wealth. What did they find? Men. From Trump, Musk, and Putin to the CEOs, crypto schmoes, and solar bros, meet the patriarchy controlling the purse strings.
    0 التعليقات 0 المشاركات 78 مشاهدة
  • WWW.MACWORLD.COM
    How to download YouTube videos on a Mac
    MacworldIf the idea of a long car journey or bedtime without a connection to the internet leaves you trembling with fear, theres a solution. You can make a copy of those YouTube videos your kids (or you) love to watch to play back offline.There are two ways to get a copy of the video you want on your Mac, as well as plenty of third party apps that will also do this. The easiest option it to use Apples built in screen capture tools to record what is playing on your Mac. Youll have to play the whole video, and make sure you are capturing the sound, but its free. Well run though this process below.Alternatively you can pay for YouTube Premium, which will let you download videos onto your Mac (and iPhone or iPad) as well as allow you to watch ad-free. Once downloaded you will be able to play videos offline.There are also free and paid for apps that will also do this for you with a little more finesse, and we will include some of these options below too. If you see a warning that you need to install Flash to watch a video it really could be a scam, or at worse malware!Well run thought your options below and explain what you need to do to download YouTube videos on your Mac. We also discuss How to download YouTube videos to iPhone & iPad separately. PROMOTIONDownload YouTube Videos for Free EaseUS Video DownloaderEaseUS Video Downloader is a free 4K video downloader software on Mac, Windows, and Android. Simply copy and paste the video URL, and download YouTube videos, playlists, YouTube Live Video, and channels in any format like mp4, mp3, and WMV at Ultra HD definition resolution. Also, Facebook, Twitter, TikTok, and Instagram videos and livestreams are supported for download.Now 25% OFF Exclusive Code: MACWORLD25Get It Now | 25% OFFFree DownloadBefore we start, we have to point out that you should be aware of copyright issues. Firstly, you shouldnt download someone elses video and then, for example, upload it to your own YouTube channel or use it to promote your business. You should also note that downloading YouTube videos goes against YouTubes terms of service. The company specifies that You shall not download any Content unless you see a download or similar link displayed by YouTube.How to download YouTube videos on a Mac for freeIt is really easy to record a YouTube video for free with software that comes with your Mac. You dont need to download an app at all. Since Mojave arrived in 2018, macOS has had an in-built screen recording feature. You can capture what is playing on your screen along with the audio. Just note that if your Mac doesnt have an inbuilt microphone if you have a Mac mini for example you will need a separate microphone to capture audio. Note that your microphone will also pick up noise that isnt in the video, such as you typing on a keyboard, so you might want to leave the room while you record the video. FoundryHeres what to do if you want to record a YouTube video for free on your Mac:Open YouTube on your Mac. Find the video you want. Click on the option for Full Screen in the bottom right corner. Press Command + Shift + 5.Click on Record then choose Record Entire Screen. (If you didnt choose Full Screen above choose Record Selected Portion drag the crosshairs to select the space where the video is on your screen). Click Options and make sure your microphone is selected. Click Record.Now start playing the video make sure you have the volume on.Wait for the video to finish and then stop the video. To stop the screen recording click on the stop button in the menu at the top of the screen or in the box as seen in the image below.FoundryThis is the cheapest way to record from YouTube on a Mac its free! However it is necessary to wait while the whole video plays through and keep noise to a minimum and if your Mac doesnt have a microphone you wont be able to record the video, plus a short video can take up a lot of space on your Mac. So if you would prefer to avoid those complications we have alternative options for you. How to download YouTube videos on a Mac with YouTube Premium ScreenshotFoundryThere is another more official way to download YouTube videos: YouTube Premium.You can try out this method with a free trial. There is a one month trial, but it actually turned out to be two months free when we signed up. At the end of the trial period it will cost $13.99/12.99, but you can cancel this on the manage memberships page before it renews.Its really simple to download a video from YouTube if you have YouTube Premium. Find the video you want in YouTube. Below it you will see a Download icon. Click on this and it will change to read Downloading. Once Downloaded it will appear in your Downloads. Downloads remain available as long as your device has an active internet connection at least once every 30 days, if you dont connect to the internet again then you will not be able to play the video after 29 days. You can change the quality of the download. By default it will download at Standard 480p, but you can switch it to High 720p or Full HD 1080p. Obviously the better quality files will take up more room on your Mac. Best apps to download YouTube videoThere are also some solutions on offer that will download the YouTube video for you, rather than you have to record the screen of your Mac while playing the video. This might be a preferred option if you dont have the time to sit and wait for an hour of Peppa Pig to play. It should also result in much smaller file sizes. Downie Foundry$20, 14-day trial or $9.99 a month as part of SetappDownload DownieDownie from developer Charlie Monroe costs $20 and can be used to download and save video from thousands of websites.When you start up the app you can make various tweaks, to, for example, always download best quality, force MP4 format, and perform post-processing. Downie is available as a browser extension for Firefox, Safari and Chrome, but you can just drag and drop a link from a browser onto Downie in the Dock or its download window, and download the video. You can even choose the relevant subtitles. The download of a 30 minute view took seconds and the resulting video looked excellent quality and only took 77MB space on our Mac. It includes a free 14-day trial. EaseUS Video DownloaderFoundry$19.99 a month (currently $12.99), free trialDownload EaseUSEaseUSs video downloaded is simple to use. Once the app is installed you can view content on a number of popular video hosting sites, including YouTube, and we were able to download videos (although we did find a few we couldnt download). There were four download options that indicated what the file size would be. It is also possible to just download audio as an MP3. The software indicated how long the download would take and counted down the seconds remaining. We could hear the video playing in the background, but couldnt see it. Once downloaded the video was saved to our Documents folder where we could play it.The free trial lets you download two items. Parallels ToolBox$19.99/15.99 a year, 7-day trialDownload Parallels ToolboxOn the basis that going with a well-known company means you are more likely not to end up with at best bad software, at worse malware on your Mac, well look at Parallels ToolBox (read our review).Parallels (our top choice of software to run Windows on a Mac) have come up with a number of tools that can be used to simplify a number of tasks on your Mac. ToolBox is the result of their experience manning a help desk for their customers running Parallels on a Mac. So many customers phoned up asking how to do various things that Parallels thought some easy to use tools might be a good solution. And so Parallels Toolbox was born.Once you have download and installed Parallels Toolbox youll see a toolbox icon in the menu at the top of your screen. Click on that.Youll see a number of tools including Airplane Mode, Free Memory, Do Not Disturb, Make Gif, and Download Video. Click on Download Video.Toolbox will instruct you that you need to enable a Safari extension in order to download video. Click Enable.Now a Download Video box will open on your screen. Just copy and paste the URL from the YouTube video and paste it into the box, or drag and drop it in. An arrow will indicate that the video is downloading and a box will pop up with the details, e.g. Downloading Peppa Pig.mp4 and you can watch as the download happens. Ours took about 10 minutes to download 88MB but note that speed will be determined by your connection. Once the download has finished you will find the video file in your Downloads folder (which might not be immediately obvious).The file will be saved as an MPEG-4 movie. It will open and play in QuickTime on your Mac.If you are looking for an easy way to get the video from your Mac onto an iPad or iPhone one solution would be to copy the video onto iCloud so you can access it from the Files app. You can then download it from there and play it whenever you want. We have more details about saving a YouTube video to an iPhone or iPad.
    0 التعليقات 0 المشاركات 104 مشاهدة
  • APPLEINSIDER.COM
    How to stop the macOS firewall leaking system network data after a software update
    Several sources report the firewall in macOS Sequoia can sometimes leak data after an update. Here's how to test and fix it.macOS Sequoia can sometimes leak data after an update.The macOS firewall in System Settings allows you to protect your Mac and filter network traffic based on a set of rules.Several sites, including mullvad.net have reported that after macOS Sequoia updates, the firewall built into macOS may leak some data, allowing it to avoid firewall rules. Continue Reading on AppleInsider | Discuss on our Forums
    0 التعليقات 0 المشاركات 113 مشاهدة