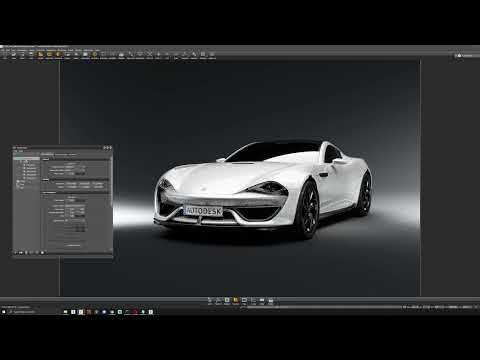
• Plastic Software has just released Plasticity 2025.2. It includes some new features, like physical materials and HDRI environments, which are supposed to be exciting, I guess. Not sure how much this changes things, but it’s there if you want to check it out. Anyway, it’s another update, and I’m not really feeling the hype.

    #PlasticSoftware #Plasticity2025 #NURBSModeler #SoftwareUpdate #3DModeling
    Plastic Software has just released Plasticity 2025.2. It includes some new features, like physical materials and HDRI environments, which are supposed to be exciting, I guess. Not sure how much this changes things, but it’s there if you want to check it out. Anyway, it’s another update, and I’m not really feeling the hype. #PlasticSoftware #Plasticity2025 #NURBSModeler #SoftwareUpdate #3DModeling
    Plastic Software releases Plasticity 2025.2
    Check out the new features in this wide-ranging update to the NURBS modeler, including new physical materials and HDRI environments.
    1 Commentarii 0 Distribuiri 0 previzualizare
  • Creating a Highly Detailed Tech-Inspired Scene with Blender

    IntroductionHello! My name is Denys. I was born and raised in Nigeria, where I'm currently based. I began my journey into 3D art in March 2022, teaching myself through online resources, starting, of course, with the iconic donut tutorial on YouTube. Since then, I've continued to grow my skills independently, and now I'm working toward a career in 3D generalism, with a particular interest in environment art.I originally got into Blender because SketchUp wasn't free, and I could not keep up with the subscriptions. While searching for alternatives, I came across Blender. That's when I realized I had installed it once years ago, but back then, the interface completely intimidated me, and I gave up on it. This time, though, I decided to stick with it – and I'm glad I did.I started out creating simple models. One of my first big projects was modeling the entire SpongeBob crew. That led to my first animation, and eventually, the first four episodes of a short animated series. As I grew more confident, I began participating in online 3D competitions, like cgandwe, where I focused on designing realistic environments. Those experiences have played a huge role in getting me to where I am today.Getting Started Before starting any scene, I always look for references. It might not be the most original approach, but it's what works best for me. One piece that inspired me was a beautiful artwork by Calder Moore. I bookmarked it as soon as I saw it back in 2023, and luckily, I finally found the time to bring it to life last month.BlockoutThe goal was to match the original camera angle and roughly model the main frame of the structures. It wasn't perfect, but modeling and placing the lower docks helped me get the perspective right. Then I moved on to modeling and positioning the major structures in the scene.I gave myself two weeks to complete this project. And as much as I enjoy modeling, I also enjoy not modeling, so I turned to asset kits and free models to help speed things up. I came across an awesome paid kit by Bigmediumsmall and instantly knew it would fit perfectly into my scene.I also downloaded a few models from Sketchfab, including a lamp, desk console, freighter controls, and a robotic arm, which I later took apart to add extra detail. Another incredibly helpful tool was the Random Flow add-on by BlenderGuppy, which made adding sci-fi elements much easier. Lastly, I pulled in some models from my older sci-fi and cyberpunk projects to round things out.Kitbashing Once I had the overall shape I was aiming for, I moved on to kitbashing to pack in as much detail as possible. There wasn't any strict method to the madness; I simply picked assets I liked, whether it was a set of pipes, vents, or even a random shape that just worked in the sci-fi context. I focused first on kitbashing the front structure, and used the Random Flow add-on to fill in areas where I didn't kitbash manually. Then I moved on to the other collections, following the same process.The freighter was the final piece of the puzzle, and I knew it was going to be a challenge. Part of me wanted to model it entirely from scratch, but the more practical side knew I could save a lot of time by sticking with my usual method. So I modeled the main shapes myself, then kitbashed the details to bring it to life. I also grabbed some crates from Sketchfab to fill out the scene.Texturing This part was easily my favorite, and there was no shortcut here. I had to meticulously create each material myself. Well, I did use PBR materials downloaded from CGAmbient as a base, but I spent a lot of time tweaking and editing them to get everything just right.Texturing has always been my favorite stage when building scenes like this. Many artists prefer external tools like Substance 3D Painter, but I've learned so much about procedural texturing, especially from RyanKingArt, that I couldn't let it go. It's such a flexible and rewarding approach, and I love pushing it as far as I can.I wanted most of the colors in the scene to be dark, but I did keep the original color of the pipes and the pillars, just to add a little bit of vibrance to the scene. I also wanted the overall texture to be very rough and grungy. One of the biggest helps in achieving this was using the Grunge Maps from Substance 3D Painter. I found a way to extract them into Blender, and it helped.A major tool during the texturing phase was Jsplacement, which I used to procedurally generate sci-fi grids and plates. This was the icing on the cake for adding intricate details. Whenever an area felt too flat, I applied bump maps with these grids and panels to bring the materials to life. For example, both the lamp pole and the entire black metal material feature these Jsplacement Maps.Lighting For this, I didn't do anything fancy. I knew the scene was in a high altitude, so I looked for HDRI with a cloudless sky, and I boosted the saturation up a little to give it that high altitude look.Post-Production The rendering phase was challenging since I was working on a low-end laptop. I couldn't render the entire scene all at once, so I broke it down by collections and rendered them as separate layers. Then, I composited the layers together in post-production. I'm not big on heavy post-work, so I kept it simple, mostly tweaking brightness and saturation on my phone. That's about it for the post-production process.Conclusion The entire project took me 10 days to complete, working at least four hours each day. Although I've expressed my love for texturing, my favorite part of this project was the detailing and kitbashing. I really enjoyed piecing all the small details together. The most challenging part was deciding which assets to use and where to place them. I had a lot of greebles to choose from, but I'm happy with the ones I selected; they felt like a perfect fit for the scene.I know kitbashing sometimes gets a negative reputation in the 3D community, but I found it incredibly relieving. Honestly, this project wouldn't have come together without it, so I fully embraced the process.I'm excited to keep making projects like this. The world of 3D art is truly an endless and vast realm, and I encourage every artist like me to keep exploring it, one project at a time.Denys Molokwu, 3D Artist
    #creating #highly #detailed #techinspired #scene
    Creating a Highly Detailed Tech-Inspired Scene with Blender
    IntroductionHello! My name is Denys. I was born and raised in Nigeria, where I'm currently based. I began my journey into 3D art in March 2022, teaching myself through online resources, starting, of course, with the iconic donut tutorial on YouTube. Since then, I've continued to grow my skills independently, and now I'm working toward a career in 3D generalism, with a particular interest in environment art.I originally got into Blender because SketchUp wasn't free, and I could not keep up with the subscriptions. While searching for alternatives, I came across Blender. That's when I realized I had installed it once years ago, but back then, the interface completely intimidated me, and I gave up on it. This time, though, I decided to stick with it – and I'm glad I did.I started out creating simple models. One of my first big projects was modeling the entire SpongeBob crew. That led to my first animation, and eventually, the first four episodes of a short animated series. As I grew more confident, I began participating in online 3D competitions, like cgandwe, where I focused on designing realistic environments. Those experiences have played a huge role in getting me to where I am today.Getting Started Before starting any scene, I always look for references. It might not be the most original approach, but it's what works best for me. One piece that inspired me was a beautiful artwork by Calder Moore. I bookmarked it as soon as I saw it back in 2023, and luckily, I finally found the time to bring it to life last month.BlockoutThe goal was to match the original camera angle and roughly model the main frame of the structures. It wasn't perfect, but modeling and placing the lower docks helped me get the perspective right. Then I moved on to modeling and positioning the major structures in the scene.I gave myself two weeks to complete this project. And as much as I enjoy modeling, I also enjoy not modeling, so I turned to asset kits and free models to help speed things up. I came across an awesome paid kit by Bigmediumsmall and instantly knew it would fit perfectly into my scene.I also downloaded a few models from Sketchfab, including a lamp, desk console, freighter controls, and a robotic arm, which I later took apart to add extra detail. Another incredibly helpful tool was the Random Flow add-on by BlenderGuppy, which made adding sci-fi elements much easier. Lastly, I pulled in some models from my older sci-fi and cyberpunk projects to round things out.Kitbashing Once I had the overall shape I was aiming for, I moved on to kitbashing to pack in as much detail as possible. There wasn't any strict method to the madness; I simply picked assets I liked, whether it was a set of pipes, vents, or even a random shape that just worked in the sci-fi context. I focused first on kitbashing the front structure, and used the Random Flow add-on to fill in areas where I didn't kitbash manually. Then I moved on to the other collections, following the same process.The freighter was the final piece of the puzzle, and I knew it was going to be a challenge. Part of me wanted to model it entirely from scratch, but the more practical side knew I could save a lot of time by sticking with my usual method. So I modeled the main shapes myself, then kitbashed the details to bring it to life. I also grabbed some crates from Sketchfab to fill out the scene.Texturing This part was easily my favorite, and there was no shortcut here. I had to meticulously create each material myself. Well, I did use PBR materials downloaded from CGAmbient as a base, but I spent a lot of time tweaking and editing them to get everything just right.Texturing has always been my favorite stage when building scenes like this. Many artists prefer external tools like Substance 3D Painter, but I've learned so much about procedural texturing, especially from RyanKingArt, that I couldn't let it go. It's such a flexible and rewarding approach, and I love pushing it as far as I can.I wanted most of the colors in the scene to be dark, but I did keep the original color of the pipes and the pillars, just to add a little bit of vibrance to the scene. I also wanted the overall texture to be very rough and grungy. One of the biggest helps in achieving this was using the Grunge Maps from Substance 3D Painter. I found a way to extract them into Blender, and it helped.A major tool during the texturing phase was Jsplacement, which I used to procedurally generate sci-fi grids and plates. This was the icing on the cake for adding intricate details. Whenever an area felt too flat, I applied bump maps with these grids and panels to bring the materials to life. For example, both the lamp pole and the entire black metal material feature these Jsplacement Maps.Lighting For this, I didn't do anything fancy. I knew the scene was in a high altitude, so I looked for HDRI with a cloudless sky, and I boosted the saturation up a little to give it that high altitude look.Post-Production The rendering phase was challenging since I was working on a low-end laptop. I couldn't render the entire scene all at once, so I broke it down by collections and rendered them as separate layers. Then, I composited the layers together in post-production. I'm not big on heavy post-work, so I kept it simple, mostly tweaking brightness and saturation on my phone. That's about it for the post-production process.Conclusion The entire project took me 10 days to complete, working at least four hours each day. Although I've expressed my love for texturing, my favorite part of this project was the detailing and kitbashing. I really enjoyed piecing all the small details together. The most challenging part was deciding which assets to use and where to place them. I had a lot of greebles to choose from, but I'm happy with the ones I selected; they felt like a perfect fit for the scene.I know kitbashing sometimes gets a negative reputation in the 3D community, but I found it incredibly relieving. Honestly, this project wouldn't have come together without it, so I fully embraced the process.I'm excited to keep making projects like this. The world of 3D art is truly an endless and vast realm, and I encourage every artist like me to keep exploring it, one project at a time.Denys Molokwu, 3D Artist #creating #highly #detailed #techinspired #scene
    80.LV
    Creating a Highly Detailed Tech-Inspired Scene with Blender
    IntroductionHello! My name is Denys. I was born and raised in Nigeria, where I'm currently based. I began my journey into 3D art in March 2022, teaching myself through online resources, starting, of course, with the iconic donut tutorial on YouTube. Since then, I've continued to grow my skills independently, and now I'm working toward a career in 3D generalism, with a particular interest in environment art.I originally got into Blender because SketchUp wasn't free, and I could not keep up with the subscriptions. While searching for alternatives, I came across Blender. That's when I realized I had installed it once years ago, but back then, the interface completely intimidated me, and I gave up on it. This time, though, I decided to stick with it – and I'm glad I did.I started out creating simple models. One of my first big projects was modeling the entire SpongeBob crew. That led to my first animation, and eventually, the first four episodes of a short animated series (though it's still incomplete). As I grew more confident, I began participating in online 3D competitions, like cgandwe, where I focused on designing realistic environments. Those experiences have played a huge role in getting me to where I am today.Getting Started Before starting any scene, I always look for references. It might not be the most original approach, but it's what works best for me. One piece that inspired me was a beautiful artwork by Calder Moore. I bookmarked it as soon as I saw it back in 2023, and luckily, I finally found the time to bring it to life last month.BlockoutThe goal was to match the original camera angle and roughly model the main frame of the structures. It wasn't perfect, but modeling and placing the lower docks helped me get the perspective right. Then I moved on to modeling and positioning the major structures in the scene.I gave myself two weeks to complete this project. And as much as I enjoy modeling, I also enjoy not modeling, so I turned to asset kits and free models to help speed things up. I came across an awesome paid kit by Bigmediumsmall and instantly knew it would fit perfectly into my scene.I also downloaded a few models from Sketchfab, including a lamp, desk console, freighter controls, and a robotic arm, which I later took apart to add extra detail. Another incredibly helpful tool was the Random Flow add-on by BlenderGuppy, which made adding sci-fi elements much easier. Lastly, I pulled in some models from my older sci-fi and cyberpunk projects to round things out.Kitbashing Once I had the overall shape I was aiming for, I moved on to kitbashing to pack in as much detail as possible. There wasn't any strict method to the madness; I simply picked assets I liked, whether it was a set of pipes, vents, or even a random shape that just worked in the sci-fi context. I focused first on kitbashing the front structure, and used the Random Flow add-on to fill in areas where I didn't kitbash manually. Then I moved on to the other collections, following the same process.The freighter was the final piece of the puzzle, and I knew it was going to be a challenge. Part of me wanted to model it entirely from scratch, but the more practical side knew I could save a lot of time by sticking with my usual method. So I modeled the main shapes myself, then kitbashed the details to bring it to life. I also grabbed some crates from Sketchfab to fill out the scene.Texturing This part was easily my favorite, and there was no shortcut here. I had to meticulously create each material myself. Well, I did use PBR materials downloaded from CGAmbient as a base, but I spent a lot of time tweaking and editing them to get everything just right.Texturing has always been my favorite stage when building scenes like this. Many artists prefer external tools like Substance 3D Painter (which I did use for some of the models), but I've learned so much about procedural texturing, especially from RyanKingArt, that I couldn't let it go. It's such a flexible and rewarding approach, and I love pushing it as far as I can.I wanted most of the colors in the scene to be dark, but I did keep the original color of the pipes and the pillars, just to add a little bit of vibrance to the scene. I also wanted the overall texture to be very rough and grungy. One of the biggest helps in achieving this was using the Grunge Maps from Substance 3D Painter. I found a way to extract them into Blender, and it helped.A major tool during the texturing phase was Jsplacement, which I used to procedurally generate sci-fi grids and plates. This was the icing on the cake for adding intricate details. Whenever an area felt too flat, I applied bump maps with these grids and panels to bring the materials to life. For example, both the lamp pole and the entire black metal material feature these Jsplacement Maps.Lighting For this, I didn't do anything fancy. I knew the scene was in a high altitude, so I looked for HDRI with a cloudless sky, and I boosted the saturation up a little to give it that high altitude look.Post-Production The rendering phase was challenging since I was working on a low-end laptop. I couldn't render the entire scene all at once, so I broke it down by collections and rendered them as separate layers. Then, I composited the layers together in post-production. I'm not big on heavy post-work, so I kept it simple, mostly tweaking brightness and saturation on my phone. That's about it for the post-production process.Conclusion The entire project took me 10 days to complete, working at least four hours each day. Although I've expressed my love for texturing, my favorite part of this project was the detailing and kitbashing. I really enjoyed piecing all the small details together. The most challenging part was deciding which assets to use and where to place them. I had a lot of greebles to choose from, but I'm happy with the ones I selected; they felt like a perfect fit for the scene.I know kitbashing sometimes gets a negative reputation in the 3D community, but I found it incredibly relieving. Honestly, this project wouldn't have come together without it, so I fully embraced the process.I'm excited to keep making projects like this. The world of 3D art is truly an endless and vast realm, and I encourage every artist like me to keep exploring it, one project at a time.Denys Molokwu, 3D Artist
    0 Commentarii 0 Distribuiri 0 previzualizare
  • Tutorial: Practical Lighting for Production

    Saturday, June 14th, 2025
    Posted by Jim Thacker
    Tutorial: Practical Lighting for Production

    html PUBLIC "-//W3C//DTD HTML 4.0 Transitional//EN" ";

    The Gnomon Workshop has released Practical Lighting for Production, a guide to VFX and cinematics workflows recorded by former Blizzard lighting lead Graham Cunningham.
    The intermediate-level workshop provides four hours of training in Maya, Arnold and Nuke.
    Discover professional workflows for lighting a CG shot to match a movie reference
    In the workshop, Cunningham sets out the complete process of lighting and compositing a shot to match a movie reference, using industry-standard software.
    He begins by setting up a basic look development light rig in Maya, importing a 3D character, assigning materials and shading components, and creating a turntable setup.
    Next, he creates a shot camera and set dresses the environment using kitbash assets.
    Cunningham also discusses strategies for lighting a character, including how to use dome lights and area lights to provide key, fill and rim lighting, and how to use HDRI maps.
    From there, he moves to rendering using Arnold, discussing render settings, depth of field, and how to create render passes.
    Cunningham then assembles the render passes in Nuke, splits out the light AOVs, and sets out how to adjust light colors and intensities.
    He also reveals how to add atmosphere, how to use cryptomattes to fine tune the results, how to add post effects, and how to apply a final color grade to match a chosen movie reference.
    As well as the tutorial videos, viewers of the workshop can download one of Cunningham’s Maya files.
    The workshop uses 3D Scan Store’s commercial Female Explorer Game Character, and KitBash3D’s Wreckage Kit, plus assets from KitBash3D’s Cargo.
    About the artist
    Graham Cunningham is a Senior Lighting, Compositing and Lookdev Artist, beginning his career as a generalist working in VFX for film and TV before moving to Blizzard Entertainment.
    At Blizzard, he contributed to cinematics for Diablo IV, Diablo Immortal, Starcraft II, Heroes of the Storm, World of Warcraft, Overwatch, and Overwatch 2, many of them as a lead lighting artist.
    Pricing and availability
    Practical Lighting for Production is available via a subscription to The Gnomon Workshop, which provides access to over 300 tutorials.
    Subscriptions cost /month or /year. Free trials are available.
    about Practical Lighting for Production on The Gnomon Workshop’s website

    Have your say on this story by following CG Channel on Facebook, Instagram and X. As well as being able to comment on stories, followers of our social media accounts can see videos we don’t post on the site itself, including making-ofs for the latest VFX movies, animations, games cinematics and motion graphics projects.
    Full disclosure: CG Channel is owned by Gnomon.

    Latest News

    DreamWorks Animation releases MoonRay 2.15
    Check out the new features in the open-source release of DreamWorks Animation's production renderer. used on movies like The Wild Robot.
    Sunday, June 15th, 2025

    Tutorial: Practical Lighting for Production
    Master professional CG lighting workflows with former Blizzard lighting lead Graham Cunningham's tutorial for The Gnomon Workshop.
    Saturday, June 14th, 2025

    Boris FX releases Mocha Pro 2025.5
    Planar tracking tool gets new AI face recognition system for automatically obscuring identities in footage. Check out its other new features.
    Friday, June 13th, 2025

    Leopoly adds voxel sculpting to Shapelab 2025
    Summer 2025 update to the VR modeling app expands the new voxel engine for blocking out 3D forms. See the other new features.
    Friday, June 13th, 2025

    iRender: the next-gen render farm for OctaneRenderOnline render farm iRender explains why its powerful, affordable GPU rendering solutions are a must for OctaneRender users.
    Wednesday, June 11th, 2025

    Master Architectural Design for Games using Blender & UE5
    Discover how to create game environments grounded in architectural principles with The Gnomon Workshop's new tutorial.
    Monday, June 9th, 2025

    More News
    Epic Games' free Live Link Face app is now available for Android
    Adobe launches Photoshop on Android and iPhone
    Sketchsoft releases Feather 1.3
    Autodesk releases 3ds Max 2026.1
    Autodesk adds AI animation tool MotionMaker to Maya 2026.1
    You can now sell MetaHumans, or use them in Unity or Godot
    Epic Games to rebrand RealityCapture as RealityScan 2.0
    Epic Games releases Unreal Engine 5.6
    Pulze releases new network render manager RenderFlow 1.0
    Xencelabs launches Pen Tablet Medium v2
    Desktop edition of sculpting app Nomad enters free beta
    Boris FX releases Silhouette 2025
    Older Posts
    #tutorial #practical #lighting #production
    Tutorial: Practical Lighting for Production
    Saturday, June 14th, 2025 Posted by Jim Thacker Tutorial: Practical Lighting for Production html PUBLIC "-//W3C//DTD HTML 4.0 Transitional//EN" "; The Gnomon Workshop has released Practical Lighting for Production, a guide to VFX and cinematics workflows recorded by former Blizzard lighting lead Graham Cunningham. The intermediate-level workshop provides four hours of training in Maya, Arnold and Nuke. Discover professional workflows for lighting a CG shot to match a movie reference In the workshop, Cunningham sets out the complete process of lighting and compositing a shot to match a movie reference, using industry-standard software. He begins by setting up a basic look development light rig in Maya, importing a 3D character, assigning materials and shading components, and creating a turntable setup. Next, he creates a shot camera and set dresses the environment using kitbash assets. Cunningham also discusses strategies for lighting a character, including how to use dome lights and area lights to provide key, fill and rim lighting, and how to use HDRI maps. From there, he moves to rendering using Arnold, discussing render settings, depth of field, and how to create render passes. Cunningham then assembles the render passes in Nuke, splits out the light AOVs, and sets out how to adjust light colors and intensities. He also reveals how to add atmosphere, how to use cryptomattes to fine tune the results, how to add post effects, and how to apply a final color grade to match a chosen movie reference. As well as the tutorial videos, viewers of the workshop can download one of Cunningham’s Maya files. The workshop uses 3D Scan Store’s commercial Female Explorer Game Character, and KitBash3D’s Wreckage Kit, plus assets from KitBash3D’s Cargo. About the artist Graham Cunningham is a Senior Lighting, Compositing and Lookdev Artist, beginning his career as a generalist working in VFX for film and TV before moving to Blizzard Entertainment. At Blizzard, he contributed to cinematics for Diablo IV, Diablo Immortal, Starcraft II, Heroes of the Storm, World of Warcraft, Overwatch, and Overwatch 2, many of them as a lead lighting artist. Pricing and availability Practical Lighting for Production is available via a subscription to The Gnomon Workshop, which provides access to over 300 tutorials. Subscriptions cost /month or /year. Free trials are available. about Practical Lighting for Production on The Gnomon Workshop’s website Have your say on this story by following CG Channel on Facebook, Instagram and X. As well as being able to comment on stories, followers of our social media accounts can see videos we don’t post on the site itself, including making-ofs for the latest VFX movies, animations, games cinematics and motion graphics projects. Full disclosure: CG Channel is owned by Gnomon. Latest News DreamWorks Animation releases MoonRay 2.15 Check out the new features in the open-source release of DreamWorks Animation's production renderer. used on movies like The Wild Robot. Sunday, June 15th, 2025 Tutorial: Practical Lighting for Production Master professional CG lighting workflows with former Blizzard lighting lead Graham Cunningham's tutorial for The Gnomon Workshop. Saturday, June 14th, 2025 Boris FX releases Mocha Pro 2025.5 Planar tracking tool gets new AI face recognition system for automatically obscuring identities in footage. Check out its other new features. Friday, June 13th, 2025 Leopoly adds voxel sculpting to Shapelab 2025 Summer 2025 update to the VR modeling app expands the new voxel engine for blocking out 3D forms. See the other new features. Friday, June 13th, 2025 iRender: the next-gen render farm for OctaneRenderOnline render farm iRender explains why its powerful, affordable GPU rendering solutions are a must for OctaneRender users. Wednesday, June 11th, 2025 Master Architectural Design for Games using Blender & UE5 Discover how to create game environments grounded in architectural principles with The Gnomon Workshop's new tutorial. Monday, June 9th, 2025 More News Epic Games' free Live Link Face app is now available for Android Adobe launches Photoshop on Android and iPhone Sketchsoft releases Feather 1.3 Autodesk releases 3ds Max 2026.1 Autodesk adds AI animation tool MotionMaker to Maya 2026.1 You can now sell MetaHumans, or use them in Unity or Godot Epic Games to rebrand RealityCapture as RealityScan 2.0 Epic Games releases Unreal Engine 5.6 Pulze releases new network render manager RenderFlow 1.0 Xencelabs launches Pen Tablet Medium v2 Desktop edition of sculpting app Nomad enters free beta Boris FX releases Silhouette 2025 Older Posts #tutorial #practical #lighting #production
    Tutorial: Practical Lighting for Production
    Saturday, June 14th, 2025 Posted by Jim Thacker Tutorial: Practical Lighting for Production html PUBLIC "-//W3C//DTD HTML 4.0 Transitional//EN" "http://www.w3.org/TR/REC-html40/loose.dtd" The Gnomon Workshop has released Practical Lighting for Production, a guide to VFX and cinematics workflows recorded by former Blizzard lighting lead Graham Cunningham. The intermediate-level workshop provides four hours of training in Maya, Arnold and Nuke. Discover professional workflows for lighting a CG shot to match a movie reference In the workshop, Cunningham sets out the complete process of lighting and compositing a shot to match a movie reference, using industry-standard software. He begins by setting up a basic look development light rig in Maya, importing a 3D character, assigning materials and shading components, and creating a turntable setup. Next, he creates a shot camera and set dresses the environment using kitbash assets. Cunningham also discusses strategies for lighting a character, including how to use dome lights and area lights to provide key, fill and rim lighting, and how to use HDRI maps. From there, he moves to rendering using Arnold, discussing render settings, depth of field, and how to create render passes. Cunningham then assembles the render passes in Nuke, splits out the light AOVs, and sets out how to adjust light colors and intensities. He also reveals how to add atmosphere, how to use cryptomattes to fine tune the results, how to add post effects, and how to apply a final color grade to match a chosen movie reference. As well as the tutorial videos, viewers of the workshop can download one of Cunningham’s Maya files. The workshop uses 3D Scan Store’s commercial Female Explorer Game Character, and KitBash3D’s Wreckage Kit, plus assets from KitBash3D’s Cargo. About the artist Graham Cunningham is a Senior Lighting, Compositing and Lookdev Artist, beginning his career as a generalist working in VFX for film and TV before moving to Blizzard Entertainment. At Blizzard, he contributed to cinematics for Diablo IV, Diablo Immortal, Starcraft II, Heroes of the Storm, World of Warcraft, Overwatch, and Overwatch 2, many of them as a lead lighting artist. Pricing and availability Practical Lighting for Production is available via a subscription to The Gnomon Workshop, which provides access to over 300 tutorials. Subscriptions cost $57/month or $519/year. Free trials are available. Read more about Practical Lighting for Production on The Gnomon Workshop’s website Have your say on this story by following CG Channel on Facebook, Instagram and X (formerly Twitter). As well as being able to comment on stories, followers of our social media accounts can see videos we don’t post on the site itself, including making-ofs for the latest VFX movies, animations, games cinematics and motion graphics projects. Full disclosure: CG Channel is owned by Gnomon. Latest News DreamWorks Animation releases MoonRay 2.15 Check out the new features in the open-source release of DreamWorks Animation's production renderer. used on movies like The Wild Robot. Sunday, June 15th, 2025 Tutorial: Practical Lighting for Production Master professional CG lighting workflows with former Blizzard lighting lead Graham Cunningham's tutorial for The Gnomon Workshop. Saturday, June 14th, 2025 Boris FX releases Mocha Pro 2025.5 Planar tracking tool gets new AI face recognition system for automatically obscuring identities in footage. Check out its other new features. Friday, June 13th, 2025 Leopoly adds voxel sculpting to Shapelab 2025 Summer 2025 update to the VR modeling app expands the new voxel engine for blocking out 3D forms. See the other new features. Friday, June 13th, 2025 iRender: the next-gen render farm for OctaneRender [Sponsored] Online render farm iRender explains why its powerful, affordable GPU rendering solutions are a must for OctaneRender users. Wednesday, June 11th, 2025 Master Architectural Design for Games using Blender & UE5 Discover how to create game environments grounded in architectural principles with The Gnomon Workshop's new tutorial. Monday, June 9th, 2025 More News Epic Games' free Live Link Face app is now available for Android Adobe launches Photoshop on Android and iPhone Sketchsoft releases Feather 1.3 Autodesk releases 3ds Max 2026.1 Autodesk adds AI animation tool MotionMaker to Maya 2026.1 You can now sell MetaHumans, or use them in Unity or Godot Epic Games to rebrand RealityCapture as RealityScan 2.0 Epic Games releases Unreal Engine 5.6 Pulze releases new network render manager RenderFlow 1.0 Xencelabs launches Pen Tablet Medium v2 Desktop edition of sculpting app Nomad enters free beta Boris FX releases Silhouette 2025 Older Posts
    0 Commentarii 0 Distribuiri 0 previzualizare
  • Cars + explosions + Animation = FUN!

    Cars + explosions + Animation = FUN! By Leo-MediaWay on June 6, 2025 Tutorials Full Blender tutorial on how to add an animated explosion into Blender using a free VDB, plus full tutorial on creating a car animation with camera, HDRI lighting, and rendering tips! Easy to follow along and links to all assets included! Have fun!
    #cars #explosions #animation #fun
    Cars + explosions + Animation = FUN!
    Cars + explosions + Animation = FUN! By Leo-MediaWay on June 6, 2025 Tutorials Full Blender tutorial on how to add an animated explosion into Blender using a free VDB, plus full tutorial on creating a car animation with camera, HDRI lighting, and rendering tips! Easy to follow along and links to all assets included! Have fun! #cars #explosions #animation #fun
    WWW.BLENDERNATION.COM
    Cars + explosions + Animation = FUN!
    Cars + explosions + Animation = FUN! By Leo-MediaWay on June 6, 2025 Tutorials Full Blender tutorial on how to add an animated explosion into Blender using a free VDB, plus full tutorial on creating a car animation with camera, HDRI lighting, and rendering tips! Easy to follow along and links to all assets included! Have fun!
    Like
    Love
    Wow
    Angry
    Sad
    321
    0 Commentarii 0 Distribuiri 0 previzualizare
  • Free HDRI pack for Blender

    Hey Blender friends, Over the past year, I’ve been studying how to create the best HDRIs possible and traveling around to capture and build a high-quality HDRI pack.I've been working in the VFX industry for the past 10 years, and this project started as a personal exploration to fully understand color management and improve my own tools.It slowly turned into a real passion project and I finally decided to create a website and upload the pack to Gumroad.I’m offering a completely free 8K version for non-commercial use.16K and 32K versions are also available for those who need ultra-high-res files for commercial work.All HDRIs are carefully shot and calibrated with a color chart to ensure physically accurate lighting and consistency across the collection.I'll continue adding more HDRIs to the pack over time. I’ve already shot over 20 additional locations that just need editing!Feedback or suggestions are more than welcome. If you end up using it in a project, feel free to share it — I’d love to see it!You can check it out here..Thanks for taking a look!
    #free #hdri #pack #blender
    Free HDRI pack for Blender
    Hey Blender friends, 👋Over the past year, I’ve been studying how to create the best HDRIs possible and traveling around to capture and build a high-quality HDRI pack.I've been working in the VFX industry for the past 10 years, and this project started as a personal exploration to fully understand color management and improve my own tools.It slowly turned into a real passion project and I finally decided to create a website and upload the pack to Gumroad.I’m offering a completely free 8K version for non-commercial use.16K and 32K versions are also available for those who need ultra-high-res files for commercial work.All HDRIs are carefully shot and calibrated with a color chart to ensure physically accurate lighting and consistency across the collection.I'll continue adding more HDRIs to the pack over time. I’ve already shot over 20 additional locations that just need editing!Feedback or suggestions are more than welcome. If you end up using it in a project, feel free to share it — I’d love to see it!You can check it out here..Thanks for taking a look! #free #hdri #pack #blender
    WWW.BLENDERNATION.COM
    Free HDRI pack for Blender
    Hey Blender friends, 👋Over the past year, I’ve been studying how to create the best HDRIs possible and traveling around to capture and build a high-quality HDRI pack.I've been working in the VFX industry for the past 10 years, and this project started as a personal exploration to fully understand color management and improve my own tools.It slowly turned into a real passion project and I finally decided to create a website and upload the pack to Gumroad.I’m offering a completely free 8K version for non-commercial use.16K and 32K versions are also available for those who need ultra-high-res files for commercial work.All HDRIs are carefully shot and calibrated with a color chart to ensure physically accurate lighting and consistency across the collection.I'll continue adding more HDRIs to the pack over time. I’ve already shot over 20 additional locations that just need editing!Feedback or suggestions are more than welcome. If you end up using it in a project, feel free to share it — I’d love to see it!You can check it out here. (Personal use versions are free; commercial use licenses are available).Thanks for taking a look!
    0 Commentarii 0 Distribuiri 0 previzualizare
CGShares https://cgshares.com