RoadCraft Explained: Your Complete Guide to Building Roads
The developers of SnowRunner have combined its vehicular physics simulator gameplay with design elements from the building simulator genre, to bring us Roadcraft, a unique game that requires you to use an array of vehicles and construction machinery to do everything from clearing debris to rebuilding roads and laying cable. Road construction is a primary aspect of gameplay, and involves multiple steps: resource collection, logistical transport, route planning, and actual road building.
While there is a very in-depth tutorial in-game that holds your hand every step of the way, there are a lot of nuances to road construction that you may not be aware of, and this RoadCraft guide has everything you need to know about those game mechanics.
Scout Vehicle Selection
The Scout is a critical vehicle for its scanning and winching capabilities, and while there are 7 to choose from, only 2 are available initially. Between these first two Scouts, the Armiger Thunder IV should be your preferred choice, due to its higher mobility and shorter wheelbase. Your eventual Scout vehicle should be the Tuz 119 “Lynx” which becomes available in the Deluge campaign for a price of nearly 25,000. The winch capability will come in handy as you clear debris to establish routes, and scan for terrain and objects.
Field Recovery Vehicles
These vehicles serve the purpose of behaving as spawn points for your other utility vehicles. This will be tremendously helpful in situations where you will require multiple pieces of equipment at a given location. Simply drive one of these to the work site such as a road construction objective, and you can simply spawn all task-related vehicles there, at the cost of Recovery Tokens. The free KHAN Lo “Strannik” Field Service Vehicle will more than suffice for this purpose, while also being equipped with a winch for manual towing.
Equipment Transporters
In the absence of fuel tokens, vehicle haulers can also be used to accomplish the task of manually delivering multiple vehicles to a work site. The Zikz 605E Heavy Equipment Transporter will be your preferred choice at a cost of 25,000, and will serve you well throughout the campaign. However, the Step 39331 “Pike” Light Equipment Transporter can function just as well, since it can use both its flatbed and its winch to haul two vehicles at a time, with maximum tonnage capability being the true limitation.
Crane Trucks
A great deal of what you will be doing in the game will involve picking stuff up off of the ground with a crane and placing it onto a flatbed for transportation. While you will be provided with two separate vehicles to accomplish this, it will be quite a tedious process especially for solo players. This is where the Mule T1 Cargo Crane Truck comes in immediately useful, at a price of 27,000. It will save you a great deal of time and effort over multiple instances in the campaign. Eventually, you will purchase better Craned vehicles, but the older ones will never use utility, as you can leave them in place at your various facilities to act as on-site loaders.
In a pinch, Crane Trucks can serve as a winch vehicle for any situation that may arise.
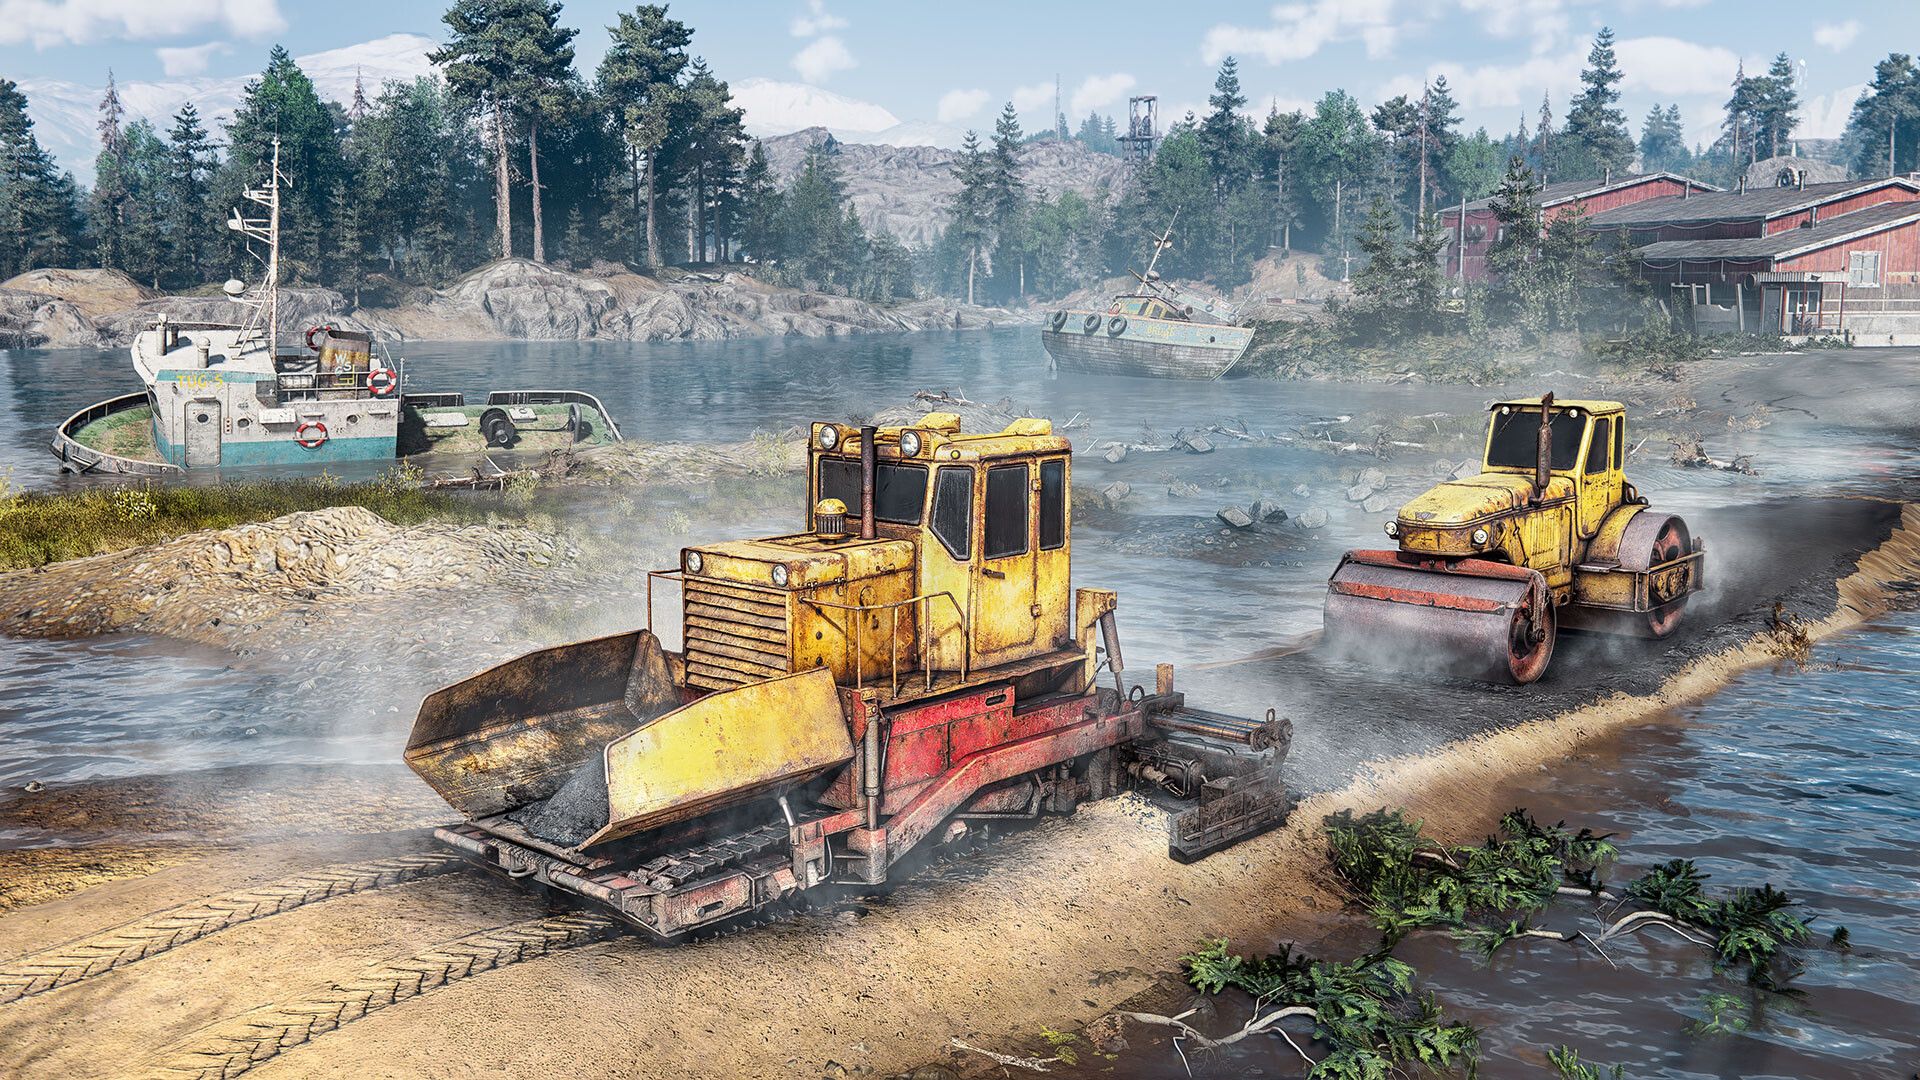
Road Construction
Your AI convoys are going to get hung up on every little obstacle along their dirt path routes, and this is where good road building comes into play. Locate a quarry source for sand, and begin filling in the route with your loaded Dump Truck.
Next, use your Dozer set to sand leveling or better yet, your Roller, to perform multiple passes in order to flatten the sand, with two passes being an absolute minimum. Be sure to proceed as slowly and carefully as you can on the second and further passes, listening carefully for audio feedback while traversing the route, which will sound different when traveling over fully flattened ground compared to slightly uneven terrain.
A recommended method is to go down the center twice, once in each direction, in order to perfect the two ends. Then travel once along each side to spread the sand evenly, followed by a single final pass down the center again.
Asphalt Paving
Strictly speaking, asphalt paving is unnecessary in the vast majority of situations, unless required by mission objectives. However, if you do elect to pave all your roads, there are some important steps to take.
The sand must be perfectly flattened, else the paving machines will frequently snag on unseen obstacles. One way to mitigate this, is to use the Paver while traveling in reverse. While this may seem odd, since the asphalt is deposited from the front and flattened by the rear, the game still allows it.
An even better option is to hoist the Paver with a mobile Crane and float it low over the planned route, and then drive the Crane along the path instead, which is significantly faster and avoids physics bugs.
Deploy the Roller next, and use the same leveling process as you do with sand: down the center once in each direction, then each side once, and one last time down the center again.
Leveling Uneven Roads
Failure to properly level the sand before laying down asphalt can lead to significantly large bumps in your roads. You can still recover from a situation like this without having to resort to using your Dozer’s Asphalt Destruction grader mode. Take your Roller out instead and perform multiple passes over the bump with it, and it will flatten out eventually.
Plotting Routes For AI Convoys
While creating routes for your transport vehicles to follow, be sure to set them along one side of the road rather than down the center. This will mitigate head-on collisions between AI traffic traveling in opposite directions, as their pathing can be quite poor. Also avoid placing an excessive number of waypoints wherever possible as this is interpreted as a direction change. While the vehicles will not get turned completely around, they can bug out and end up in an environmental hazard.
Be sure to delete the routes once you have completed the related objectives and collected all of the rewards, in order to maintain a clean infrastructure map.
That is everything you need to know about constructing proper roads in RoadCraft.
#roadcraft #explained #your #complete #guideRoadCraft Explained: Your Complete Guide to Building Roads
The developers of SnowRunner have combined its vehicular physics simulator gameplay with design elements from the building simulator genre, to bring us Roadcraft, a unique game that requires you to use an array of vehicles and construction machinery to do everything from clearing debris to rebuilding roads and laying cable. Road construction is a primary aspect of gameplay, and involves multiple steps: resource collection, logistical transport, route planning, and actual road building.
While there is a very in-depth tutorial in-game that holds your hand every step of the way, there are a lot of nuances to road construction that you may not be aware of, and this RoadCraft guide has everything you need to know about those game mechanics.
Scout Vehicle Selection
The Scout is a critical vehicle for its scanning and winching capabilities, and while there are 7 to choose from, only 2 are available initially. Between these first two Scouts, the Armiger Thunder IV should be your preferred choice, due to its higher mobility and shorter wheelbase. Your eventual Scout vehicle should be the Tuz 119 “Lynx” which becomes available in the Deluge campaign for a price of nearly 25,000. The winch capability will come in handy as you clear debris to establish routes, and scan for terrain and objects.
Field Recovery Vehicles
These vehicles serve the purpose of behaving as spawn points for your other utility vehicles. This will be tremendously helpful in situations where you will require multiple pieces of equipment at a given location. Simply drive one of these to the work site such as a road construction objective, and you can simply spawn all task-related vehicles there, at the cost of Recovery Tokens. The free KHAN Lo “Strannik” Field Service Vehicle will more than suffice for this purpose, while also being equipped with a winch for manual towing.
Equipment Transporters
In the absence of fuel tokens, vehicle haulers can also be used to accomplish the task of manually delivering multiple vehicles to a work site. The Zikz 605E Heavy Equipment Transporter will be your preferred choice at a cost of 25,000, and will serve you well throughout the campaign. However, the Step 39331 “Pike” Light Equipment Transporter can function just as well, since it can use both its flatbed and its winch to haul two vehicles at a time, with maximum tonnage capability being the true limitation.
Crane Trucks
A great deal of what you will be doing in the game will involve picking stuff up off of the ground with a crane and placing it onto a flatbed for transportation. While you will be provided with two separate vehicles to accomplish this, it will be quite a tedious process especially for solo players. This is where the Mule T1 Cargo Crane Truck comes in immediately useful, at a price of 27,000. It will save you a great deal of time and effort over multiple instances in the campaign. Eventually, you will purchase better Craned vehicles, but the older ones will never use utility, as you can leave them in place at your various facilities to act as on-site loaders.
In a pinch, Crane Trucks can serve as a winch vehicle for any situation that may arise.
Road Construction
Your AI convoys are going to get hung up on every little obstacle along their dirt path routes, and this is where good road building comes into play. Locate a quarry source for sand, and begin filling in the route with your loaded Dump Truck.
Next, use your Dozer set to sand leveling or better yet, your Roller, to perform multiple passes in order to flatten the sand, with two passes being an absolute minimum. Be sure to proceed as slowly and carefully as you can on the second and further passes, listening carefully for audio feedback while traversing the route, which will sound different when traveling over fully flattened ground compared to slightly uneven terrain.
A recommended method is to go down the center twice, once in each direction, in order to perfect the two ends. Then travel once along each side to spread the sand evenly, followed by a single final pass down the center again.
Asphalt Paving
Strictly speaking, asphalt paving is unnecessary in the vast majority of situations, unless required by mission objectives. However, if you do elect to pave all your roads, there are some important steps to take.
The sand must be perfectly flattened, else the paving machines will frequently snag on unseen obstacles. One way to mitigate this, is to use the Paver while traveling in reverse. While this may seem odd, since the asphalt is deposited from the front and flattened by the rear, the game still allows it.
An even better option is to hoist the Paver with a mobile Crane and float it low over the planned route, and then drive the Crane along the path instead, which is significantly faster and avoids physics bugs.
Deploy the Roller next, and use the same leveling process as you do with sand: down the center once in each direction, then each side once, and one last time down the center again.
Leveling Uneven Roads
Failure to properly level the sand before laying down asphalt can lead to significantly large bumps in your roads. You can still recover from a situation like this without having to resort to using your Dozer’s Asphalt Destruction grader mode. Take your Roller out instead and perform multiple passes over the bump with it, and it will flatten out eventually.
Plotting Routes For AI Convoys
While creating routes for your transport vehicles to follow, be sure to set them along one side of the road rather than down the center. This will mitigate head-on collisions between AI traffic traveling in opposite directions, as their pathing can be quite poor. Also avoid placing an excessive number of waypoints wherever possible as this is interpreted as a direction change. While the vehicles will not get turned completely around, they can bug out and end up in an environmental hazard.
Be sure to delete the routes once you have completed the related objectives and collected all of the rewards, in order to maintain a clean infrastructure map.
That is everything you need to know about constructing proper roads in RoadCraft.
#roadcraft #explained #your #complete #guide