beforesandafters.com
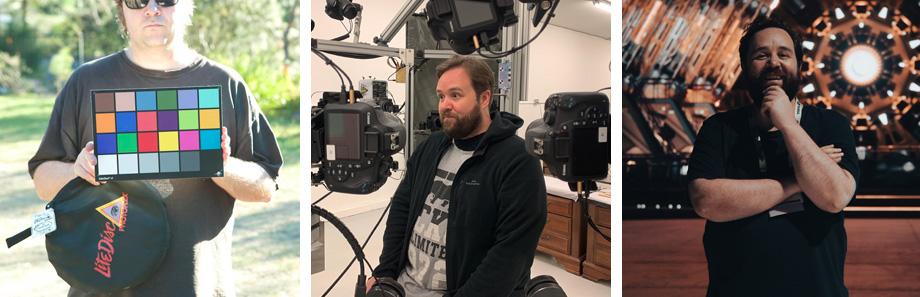
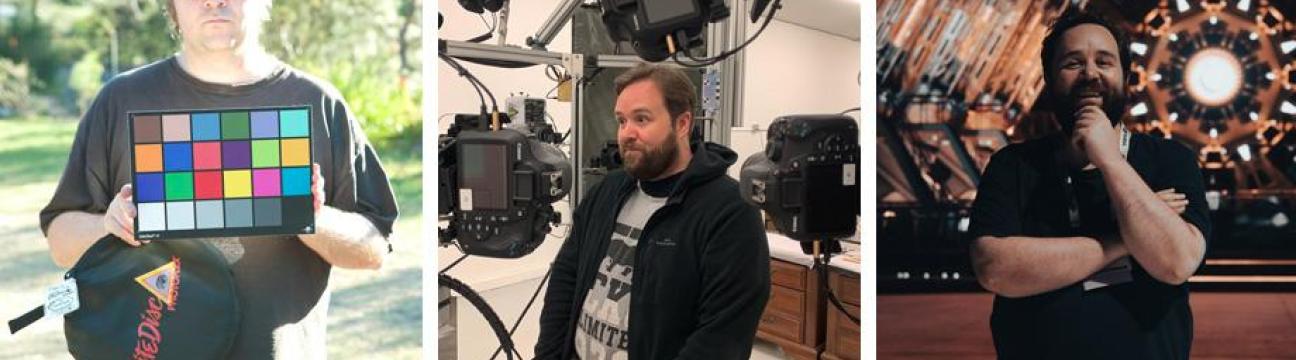
Animatronic, performer in open and closed mask, posable doll, CG, face replacements (and all of the above).In director Gerard Johnstones M3GAN 2.0, from Blumhouse Productions and Atomic Monster, the rampageous titular robot is resurrected to defeat a new military-grade robot called AMELIA. Like the first film, a number of different techniques were utilized to bring M3GAN to life, ranging from an animatronic, to the main performer with an open and closed face, a posable doll, stunt performance, and then all manner of face replacements and CG character effects (often combined in one shot).In this new installment, the stakes are raised and M3GAN appears in many shapes and formsfrom a Johnny 5-like abomination to a sleek robotic underbody, a wingsuit and even an outrageous Cyberpunk outfit destined to become a halloween favorite.Here at befores & afters, we take a look at the different filming techniques and the different M3GANs with Fin Design + Effects visual effects supervisor Rick van de Schootbrugge. Fin was responsible for around 800 visual effects in the film, including approximately 350 full-CG shots. Visual effects studio Fathom also partnered with Fin on the film to complete a range of VFX, especially for the car chase sequence.van de Schootbrugge recently shared all these details with the author in a Sydney SIGGRAPH Chapter live session.The different ways M3GAN was capturedCentral to the creation of the character was an animatronic M3GAN built by Morot FX Studio, led by make-up effects designer Adrien Morot, that could be remote controlled and puppeteered on set. The animatronic was basically a very advanced robot, advises van de Schootbrugge. Shooting as much as possible with the animatronic was always our preference because she is what M3GAN is built around as far as her looks and her robotic characteristics are concerned.Of course, the animatronic brought with it several built-in shooting limitations, in that it could not be relied upon for shots of M3GAN walking, running or doing big movements. Certainly, notes van de Schootbrugge, that was a key part of robot character. Shes quite mute in her expressions. Its all, in a sense, very Terminator-y. Its a lot of little eye movements, sassy looks, but not a lot of big reactions.Then, for bigger movements, actress Amie Donald reprised her role as M3GAN in a variety of ways. She was able to wear a M3GAN outfit, a wig and a mask. In fact, there were two types of face masks used. One was a closed mask with a M3GAN face that closely resembled the animatronic. The other was an open-faced mask. This massively increased the time that Amie could wear the mask, states van de Schootbrugge, which is a big deal on a film set, where time is always short. Plus, shes also a child actress, we get a limited amount of time with her.Fin would then augment the performance of Donald using a combination of face replacements and completely CG take-overs. In the case of the closed face mask, that provided the visual effects with more real estate to blend their CG and the live-action. For the open-faced mask, a fuller digital face replacement was necessary. Stunt performers similarly wore both types of masks and would go through the same treatment from Fin, which then also had to deal with different body proportions and heights.On set, van de Schootbrugge took advantage of capturing traditional lighting references, such as gray balls and HDRIs, but in addition also made use of practical M3GAN heads. From our experience on the first film we were looking for ways to get more accurate lighting information back to our studio in Sydney. Ideally after each take with Amie we would roll in the animatronic. That would give you the best 1-on-1, apples to apples comparison of what M3GAN is supposed to look like in that shot. Unfortunately, it became very clear that keeping the animatronic on stand-by was not an option. Not only would it be too slow to roll the animatronic in and out of frame every time, she was simply too busy being programmed and too precious an asset to get access to.Fortunately, says van de Schootbrugge, MOROT did create these poseable heads of M3GAN, same proportions, same silicone, that we could use besides our mirrored ball. Every time we had a shot with Amie, a stunt double, or where we knew we had to do a face replacement or digi-double, we would pick the right head and repeat M3GANs motion and got very accurate data that would save us many hours of work in post.Further capture methods included photogrammetry and LiDAR scanning of the animatronic, Amie and stunt double in different configurations and costume set-ups. In the film we get pretty close to the CG versions of our characters, so we had to capture every little pore and other details, explains van de Schootbrugge. M3GANs skin is made out of silicone, so that comes with all sorts of interesting properties. Theres some stickiness and flakiness to the silicone. It also scatters the light in a particular way. From a distance, it looks quite smooth, but then you get closer and closer, and you see it picks up all these little pieces of dirt and lint. It was quite important for us to try and capture as much of those imperfections as well, because otherwise, youre very quickly getting into a realm of things looking too smooth and too perfect.In some ways, however, Fin did lean into that particular look for their CG robot and for face replacements. She is a doll and by design, points out van de Schootbrugge, has an uncanny, unnatural, slightly plasticky look to her. It was a constant push and pull to have her look not quite human, but also not CG or fake and to push it too far into the other direction where you lose connection with reality.To help match the robot look for M3GAN, which originated with the animatronic, van de Schootbrugge had the puppeteers run the puppet through all its motor functions. We would look at, how far can her mouth open, or what does it look like when she says, O, or B. Wed run through a whole bunch of words, and through blinking. How far does the eye actually close when she blinks? That was about capturing information that was valuable later on.Making M3GAN danceFin then went through the process of building a M3GAN asset that could be tailored for all the different looks the character went through in the film. One was a cyberpunk look that is most prominent in a robot dance sequence at an AI/tech conference.The backstory here, recounts van de Schootbrugge, is that the first film went viral because of one of the dances in there. So, naturally, you could imagine that she would do another great dance in this film. And, M3GAN being a robot, well, they thought it would be quite fun if she did a robot dance at the AI convention.Amie Donald had rehearsed a dance to perform during principal photography, but when it was decided to lean even more into the robotic nature of the dance, the whole scene was re-thought with a professional robotic pop-and-lock dancer. This dancer, known as Barbin.ili, was then motion captured performing the new dance.Fin then ultimately rebuilt the entire sequence, dealing with reshoots shot against bluescreen, splicing in the new motion capture and animating their M3GAN asset to match. Says van de Schootbrugge: We were able to then translate Barbins mocap performance onto our 3D asset. We stayed pretty true to the mocap, but we would cut different portions of her dancing together and made some adjustments with the final framing in mind. We then also had to marry it back into shots that were filmed six months earlier where we had Amie standing on stage.Making M3GAN flyAt one point, M3GAN dons a tactical wingsuit in order to infiltrate a hidden facility where AMELIA, her rival android, is being housed and weaponized. Live-action moments and reference photography of the jump were largely captured against greenscreen, with the animatronic, Amie or a stunt performer wearing the wingsuit costume. Fin would then composite those plates into backgrounds, or utilize its CG wingsuit M3GAN.For the environments that M3GAN passes above and through, Fin leveraged Unreal Engine. Its a heavy CG sequence, details van de Schootbrugge. With just a fraction of a blockbuster budget we needed to come up with how to do this economically. If you budgeted this like a big movie, its not something that would fit in.Early on, we discussed shooting background plates by getting drone photography, but it quite quickly became apparent that that wasnt going to hold up. There was too much dynamicness to it that couldnt really be captured with a drone and get it to match the plates of M3GAN. For this scene we had done some work in Unreal Engine for our previs. The quality of Unreal has been going up every year significantly, so we actually thought that Unreal might be a really good candidate to create this type of environment that we were after.The environment included mountainous tree-covered areas. In Unreal, it was something Fin knew they could achieve with just a small team of people, and therefore within budget. Unreal has a lot of procedural tools in there and assets that we could use already. We built that environment with just two artists, shares van de Schootbrugge.The final fightEventually, M3GAN and AMELIA, played by Ivanna Sakhno, confront each other. Once again, all the tricks in the book were utilized for shooting the fight, and then used by Fin to replicate both M3GAN and AMELIA.There are stunt rig removals, set extensions, face replacements, digital doublesthe works! describes van de Schootbrugge. Were fully building AMELIA, and also M3GAN from top to bottom. I mean, for this scene M3GAN has a new groom, a damaged face, and then halfway throughout the scene, she gets her face zapped, so there was another version of M3GAN that we had to create. On top of that, we added electricity, we added sparks, glowing eyes, lots of wire removal, set extensions. To top it off we also re-created the Motherboard, a prop which caries an important story point, that the director wanted to make more impressive.For this fight, in particular, van de Schootbrugge admits he was nervous during the shoot about the wigs on the M3GAN and AMELIA characters. We were running out of shooting days. Things were happening fast and loose. There were a lot of strands and loose hairs. I was like, Oh my God, this is going to be a nightmare to comp all these faces in. But you know what? The things that youre worried about at the start are often not the ones that you actually have to worry about in post, and this was 100% one of those. It actually went really smoothly.The post Heres the many different ways the title character of M3GAN 2.0 was made, both practically and digitally appeared first on befores & afters.


 1K
1K


