What I learned from my first few months with a Bambu Lab A1 3D printer, part 1
to 3d or not to 3d
What I learned from my first few months with a Bambu Lab A1 3D printer, part 1
One neophyte's first steps into the wide world of 3D printing.
Andrew Cunningham
–
May 22, 2025 7:30 am
|
21
The hotend on my Bambu Lab A1 3D printer.
Credit:
Andrew Cunningham
The hotend on my Bambu Lab A1 3D printer.
Credit:
Andrew Cunningham
Story text
Size
Small
Standard
Large
Width
*
Standard
Wide
Links
Standard
Orange
* Subscribers only
Learn more
For a couple of years now, I've been trying to find an excuse to buy a decent 3D printer.
Friends and fellow Ars staffers who had them would gush about them at every opportunity, talking about how useful they can be and how much can be printed once you get used to the idea of being able to create real, tangible objects with a little time and a few bucks' worth of plastic filament.
But I could never quite imagine myself using one consistently enough to buy one. Then, this past Christmas, my wife forced the issue by getting me a Bambu Lab A1 as a present.
Since then, I've been tinkering with the thing nearly daily, learning more about what I've gotten myself into and continuing to find fun and useful things to print. I've gathered a bunch of thoughts about my learning process here, not because I think I'm breaking new ground but to serve as a blueprint for anyone who has been on the fence about Getting Into 3D Printing. "Hyperfixating on new hobbies" is one of my go-to coping mechanisms during times of stress and anxiety, and 3D printing has turned out to be the perfect combination of fun, practical, and time-consuming.
Getting to know my printer
My wife settled on the Bambu A1 because it's a larger version of the A1 Mini, Wirecutter's main 3D printer pick at the time. Other reviews she read noted that it's beginner-friendly, easy to use, and fun to tinker with, and it has a pretty active community for answering questions, all assessments I agree with so far.
Note that this research was done some months before Bambu earned bad headlines because of firmware updates that some users believe will lead to a more locked-down ecosystem. This is a controversy I understand—3D printers are still primarily the realm of DIYers and tinkerers, people who are especially sensitive to the closing of open ecosystems. But as a beginner, I'm already leaning mostly on the first-party tools and built-in functionality to get everything going, so I'm not really experiencing the sense of having "lost" features I was relying on, and any concerns I did have are mostly addressed by Bambu's update about its update.
I hadn't really updated my preconceived notions of what home 3D printing was since its primordial days, something Ars has been around long enough to have covered in some depth. I was wary of getting into yet another hobby where, like building your own gaming PC, fiddling with and maintaining the equipment is part of the hobby. Bambu's printersare capable of turning out fairly high-quality prints with minimal fuss, and nothing will draw you into the hobby faster than a few successful prints.
Basic terminology
Extrusion-based 3D printerswork by depositing multiple thin layers of melted plastic filament on a heated bed.
Credit:
Andrew Cunningham
First things first: The A1 is what’s called an “extrusion” printer, meaning that it functions by melting a long, slim thread of plasticand then depositing this plastic onto a build plate seated on top of a heated bed in tens, hundreds, or even thousands of thin layers. In the manufacturing world, this is also called “fused deposition modeling,” or FDM. This layer-based extrusion gives 3D-printed objects their distinct ridged look and feel and is also why a 3D printed piece of plastic is less detailed-looking and weaker than an injection-molded piece of plastic like a Lego brick.
The other readily available home 3D printing technology takes liquid resin and uses UV light to harden it into a plastic structure, using a process called “stereolithography”. You can get inexpensive resin printers in the same price range as the best cheap extrusion printers, and the SLA process can create much more detailed, smooth-looking, and watertight 3D prints. Some downsides are that the print beds in these printers are smaller, resin is a bit fussier than filament, and multi-color printing isn’t possible.
There are two main types of home extrusion printers. The Bambu A1 is a Cartesian printer, or in more evocative and colloquial terms, a "bed slinger." In these, the head of the printer can move up and down on one or two rails and from side to side on another rail. But the print bed itself has to move forward and backward to "move" the print head on the Y axis.
More expensive home 3D printers, including higher-end Bambu models in the P- and X-series, are "CoreXY" printers, which include a third rail or set of railsthat allow the print head to travel in all three directions.
The A1 is also an "open-bed" printer, which means that it ships without an enclosure. Closed-bed printers are more expensive, but they can maintain a more consistent temperature inside and help contain the fumes from the melted plastic. They can also reduce the amount of noise coming from your printer.
Together, the downsides of a bed-slingerand an open-bed printermainly just mean that the A1 isn't well-suited for printing certain types of plastic and has more potential points of failure for large or delicate prints. My experience with the A1 has been mostly positive now that I know about those limitations, but the printer you buy could easily change based on what kinds of things you want to print with it.
Setting up
Overall, the setup process was reasonably simple, at least for someone who has been building PCs and repairing small electronics for years now. It's not quite the same as the "take it out of the box, remove all the plastic film, and plug it in" process of setting up a 2D printer, but the directions in the start guide are well-illustrated and clearly written; if you can put together prefab IKEA furniture, that's roughly the level of complexity we're talking about here. The fact that delicate electronics are involved might still make it more intimidating for the non-technical, but figuring out what goes where is fairly simple.
The only mistake I made while setting the printer up involved the surface I initially tried to put it on. I used a spare end table, but as I discovered during the printer's calibration process, the herky-jerky movement of the bed and print head was way too much for a little table to handle. "Stable enough to put a lamp on" is not the same as "stable enough to put a constantly wobbling contraption" on—obvious in retrospect, but my being new to this is why this article exists.
After some office rearrangement, I was able to move the printer to my sturdy L-desk full of cables and other doodads to serve as ballast. This surface was more than sturdy enough to let the printer complete its calibration process—and sturdy enough not to transfer the printer's every motion to our kid's room below, a boon for when I'm trying to print something after he has gone to bed.
The first-party Bambu apps for sending files to the printer are Bambu Handyand Bambu Studio. Handy works OK for sending ready-made models from MakerWorldand for monitoring prints once they've started. But I'll mostly be relaying my experience with Bambu Studio, a much more fully featured app. Neither app requires sign-in, at least not yet, but the path of least resistance is to sign into your printer and apps with the same account to enable easy communication and syncing.
Bambu Studio: A primer
Bambu Studio is what's known in the hobby as a "slicer," software that takes existing 3D models output by common CAD programsand converts them into a set of specific movement instructions that the printer can follow. Bambu Studio allows you to do some basic modification of existing models—cloning parts, resizing them, adding supports for overhanging bits that would otherwise droop down, and a few other functions—but it's primarily there for opening files, choosing a few settings, and sending them off to the printer to become tangible objects.
Bambu Studio isn't the most approachable application, but if you've made it this far, it shouldn't be totally beyond your comprehension. For first-time setup, you'll choose your model of printer, leave the filament settings as they are, and sign in if you want to use Bambu's cloud services. These sync printer settings and keep track of the models you save and download from MakerWorld, but a non-cloud LAN mode is available for the Bambu skeptics and privacy-conscious.
For any newbie, pretty much all you need to do is connect your printer, open a .3MF or .STL file you've downloaded from MakerWorld or elsewhere, select your filament from the drop-down menu, click "slice plate," and then click "print." Things like the default 0.4 mm nozzle size and Bambu's included Textured PEI Build Plate are generally already factored in, though you may need to double-check these selections when you open a file for the first time.
When you slice your build plate for the first time, the app will spit a pile of numbers back at you. There are two important ones for 3D printing neophytes to track. One is the "total filament" figure, which tells you how many grams of filament the printer will use to make your model. The second is the "total time" figure, which tells you how long the entire print will take from the first calibration steps to the end of the job.
Selecting your filament and/or temperature presets. If you have the Automatic Material System, this is also where you'll manage multicolor printing.
Andrew Cunningham
Selecting your filament and/or temperature presets. If you have the Automatic Material System, this is also where you'll manage multicolor printing.
Andrew Cunningham
The main way to tweak print quality is to adjust the height of the layers that the A1 lays down.
Andrew Cunningham
The main way to tweak print quality is to adjust the height of the layers that the A1 lays down.
Andrew Cunningham
Adding some additional infill can add some strength to prints, though 15 percent usually gives a decent amount of strength without overusing filament.
Andrew Cunningham
Adding some additional infill can add some strength to prints, though 15 percent usually gives a decent amount of strength without overusing filament.
Andrew Cunningham
The main way to tweak print quality is to adjust the height of the layers that the A1 lays down.
Andrew Cunningham
Adding some additional infill can add some strength to prints, though 15 percent usually gives a decent amount of strength without overusing filament.
Andrew Cunningham
For some prints, scaling them up or down a bit can make them fit your needs better.
Andrew Cunningham
For items that are small enough, you can print a few at once using the clone function. For filaments with a gradient, this also makes the gradient effect more pronounced.
Andrew Cunningham
Bambu Studio estimates the amount of filament you'll use and the amount of time a print will take. Filament usually comes in 1 kg spools.
Andrew Cunningham
When selecting filament, people who stick to Bambu's first-party spools will have the easiest time, since optimal settings are already programmed into the app. But I've had almost zero trouble with the "generic" presets and the spools of generic Inland-branded filament I've bought from our local Micro Center, at least when sticking to PLA. But we'll dive deeper into plastics in part 2 of this series.
I won't pretend I'm skilled enough to do a deep dive on every single setting that Bambu Studio gives you access to, but here are a few of the odds and ends I've found most useful:
The "clone" function, accessed by right-clicking an object and clicking "clone." Useful if you'd like to fit several copies of an object on the build plate at once, especially if you're using a filament with a color gradient and you'd like to make the gradient effect more pronounced by spreading it out over a bunch of prints.
The "arrange all objects" function, the fourth button from the left under the "prepare" tab. Did you just clone a bunch of objects? Did you delete an individual object from a model because you didn't need to print that part? Bambu Studio will arrange everything on your build plate to optimize the use of space.
Layer height, located in the sidebar directly beneath "Process". Thicker layer heights do the opposite, slightly reducing the amount of time a model takes to print but preserving less detail.
Infill percentage and wall loops, located in the Strength tab beneath the "Process" sidebar item. For most everyday prints, you don't need to worry about messing with these settings much; the infill percentage determines the amount of your print's interior that's plastic and the part that's empty space. The number of wall loops determines how many layers the printer uses for the outside surface of the print, with more walls using more plastic but also adding a bit of extra strength and rigidity to functional prints that need it.
My first prints
A humble start: My very first print was a wall bracket for the remote for my office's ceiling fan.
Credit:
Andrew Cunningham
When given the opportunity to use a 3D printer, my mind went first to aggressively practical stuff—prints for organizing the odds and ends that eternally float around my office or desk.
When we moved into our current house, only one of the bedrooms had a ceiling fan installed. I put up remote-controlled ceiling fans in all the other bedrooms myself. And all those fans, except one, came with a wall-mounted caddy to hold the remote control. The first thing I decided to print was a wall-mounted holder for that remote control.
MakerWorld is just one of several resources for ready-made 3D-printable files, but the ease with which I found a Hampton Bay Ceiling Fan Remote Wall Mount is pretty representative of my experience so far. At this point in the life cycle of home 3D printing, if you can think about it and it's not a terrible idea, you can usually find someone out there who has made something close to what you're looking for.
I loaded up my black roll of PLA plastic—generally the cheapest, easiest-to-buy, easiest-to-work-with kind of 3D printer filament, though not always the best for prints that need more structural integrity—into the basic roll-holder that comes with the A1, downloaded that 3MF file, opened it in Bambu Studio, sliced the file, and hit print. It felt like there should have been extra steps in there somewhere. But that's all it took to kick the printer into action.
After a few minutes of warmup—by default, the A1 has a thorough pre-print setup process where it checks the levelness of the bed and tests the flow rate of your filament for a few minutes before it begins printing anything—the nozzle started laying plastic down on my build plate, and inside of an hour or so, I had my first 3D-printed object.
Print No. 2 was another wall bracket, this time for my gaming PC's gamepad and headset.
Credit:
Andrew Cunningham
It wears off a bit after you successfully execute a print, but I still haven't quite lost the feeling of magic of printing out a fully 3D object that comes off the plate and then just exists in space along with me and all the store-bought objects in my office.
The remote holder was, as I'd learn, a fairly simple print made under near-ideal conditions. But it was an easy success to start off with, and that success can help embolden you and draw you in, inviting more printing and more experimentation. And the more you experiment, the more you inevitably learn.
This time, I talked about what I learned about basic terminology and the different kinds of plastics most commonly used by home 3D printers. Next time, I'll talk about some of the pitfalls I ran into after my initial successes, what I learned about using Bambu Studio, what I've learned about fine-tuning settings to get good results, and a whole bunch of 3D-printable upgrades and mods available for the A1.
Andrew Cunningham
Senior Technology Reporter
Andrew Cunningham
Senior Technology Reporter
Andrew is a Senior Technology Reporter at Ars Technica, with a focus on consumer tech including computer hardware and in-depth reviews of operating systems like Windows and macOS. Andrew lives in Philadelphia and co-hosts a weekly book podcast called Overdue.
21 Comments
#what #learned #first #few #months
What I learned from my first few months with a Bambu Lab A1 3D printer, part 1
to 3d or not to 3d
What I learned from my first few months with a Bambu Lab A1 3D printer, part 1
One neophyte's first steps into the wide world of 3D printing.
Andrew Cunningham
–
May 22, 2025 7:30 am
|
21
The hotend on my Bambu Lab A1 3D printer.
Credit:
Andrew Cunningham
The hotend on my Bambu Lab A1 3D printer.
Credit:
Andrew Cunningham
Story text
Size
Small
Standard
Large
Width
*
Standard
Wide
Links
Standard
Orange
* Subscribers only
Learn more
For a couple of years now, I've been trying to find an excuse to buy a decent 3D printer.
Friends and fellow Ars staffers who had them would gush about them at every opportunity, talking about how useful they can be and how much can be printed once you get used to the idea of being able to create real, tangible objects with a little time and a few bucks' worth of plastic filament.
But I could never quite imagine myself using one consistently enough to buy one. Then, this past Christmas, my wife forced the issue by getting me a Bambu Lab A1 as a present.
Since then, I've been tinkering with the thing nearly daily, learning more about what I've gotten myself into and continuing to find fun and useful things to print. I've gathered a bunch of thoughts about my learning process here, not because I think I'm breaking new ground but to serve as a blueprint for anyone who has been on the fence about Getting Into 3D Printing. "Hyperfixating on new hobbies" is one of my go-to coping mechanisms during times of stress and anxiety, and 3D printing has turned out to be the perfect combination of fun, practical, and time-consuming.
Getting to know my printer
My wife settled on the Bambu A1 because it's a larger version of the A1 Mini, Wirecutter's main 3D printer pick at the time. Other reviews she read noted that it's beginner-friendly, easy to use, and fun to tinker with, and it has a pretty active community for answering questions, all assessments I agree with so far.
Note that this research was done some months before Bambu earned bad headlines because of firmware updates that some users believe will lead to a more locked-down ecosystem. This is a controversy I understand—3D printers are still primarily the realm of DIYers and tinkerers, people who are especially sensitive to the closing of open ecosystems. But as a beginner, I'm already leaning mostly on the first-party tools and built-in functionality to get everything going, so I'm not really experiencing the sense of having "lost" features I was relying on, and any concerns I did have are mostly addressed by Bambu's update about its update.
I hadn't really updated my preconceived notions of what home 3D printing was since its primordial days, something Ars has been around long enough to have covered in some depth. I was wary of getting into yet another hobby where, like building your own gaming PC, fiddling with and maintaining the equipment is part of the hobby. Bambu's printersare capable of turning out fairly high-quality prints with minimal fuss, and nothing will draw you into the hobby faster than a few successful prints.
Basic terminology
Extrusion-based 3D printerswork by depositing multiple thin layers of melted plastic filament on a heated bed.
Credit:
Andrew Cunningham
First things first: The A1 is what’s called an “extrusion” printer, meaning that it functions by melting a long, slim thread of plasticand then depositing this plastic onto a build plate seated on top of a heated bed in tens, hundreds, or even thousands of thin layers. In the manufacturing world, this is also called “fused deposition modeling,” or FDM. This layer-based extrusion gives 3D-printed objects their distinct ridged look and feel and is also why a 3D printed piece of plastic is less detailed-looking and weaker than an injection-molded piece of plastic like a Lego brick.
The other readily available home 3D printing technology takes liquid resin and uses UV light to harden it into a plastic structure, using a process called “stereolithography”. You can get inexpensive resin printers in the same price range as the best cheap extrusion printers, and the SLA process can create much more detailed, smooth-looking, and watertight 3D prints. Some downsides are that the print beds in these printers are smaller, resin is a bit fussier than filament, and multi-color printing isn’t possible.
There are two main types of home extrusion printers. The Bambu A1 is a Cartesian printer, or in more evocative and colloquial terms, a "bed slinger." In these, the head of the printer can move up and down on one or two rails and from side to side on another rail. But the print bed itself has to move forward and backward to "move" the print head on the Y axis.
More expensive home 3D printers, including higher-end Bambu models in the P- and X-series, are "CoreXY" printers, which include a third rail or set of railsthat allow the print head to travel in all three directions.
The A1 is also an "open-bed" printer, which means that it ships without an enclosure. Closed-bed printers are more expensive, but they can maintain a more consistent temperature inside and help contain the fumes from the melted plastic. They can also reduce the amount of noise coming from your printer.
Together, the downsides of a bed-slingerand an open-bed printermainly just mean that the A1 isn't well-suited for printing certain types of plastic and has more potential points of failure for large or delicate prints. My experience with the A1 has been mostly positive now that I know about those limitations, but the printer you buy could easily change based on what kinds of things you want to print with it.
Setting up
Overall, the setup process was reasonably simple, at least for someone who has been building PCs and repairing small electronics for years now. It's not quite the same as the "take it out of the box, remove all the plastic film, and plug it in" process of setting up a 2D printer, but the directions in the start guide are well-illustrated and clearly written; if you can put together prefab IKEA furniture, that's roughly the level of complexity we're talking about here. The fact that delicate electronics are involved might still make it more intimidating for the non-technical, but figuring out what goes where is fairly simple.
The only mistake I made while setting the printer up involved the surface I initially tried to put it on. I used a spare end table, but as I discovered during the printer's calibration process, the herky-jerky movement of the bed and print head was way too much for a little table to handle. "Stable enough to put a lamp on" is not the same as "stable enough to put a constantly wobbling contraption" on—obvious in retrospect, but my being new to this is why this article exists.
After some office rearrangement, I was able to move the printer to my sturdy L-desk full of cables and other doodads to serve as ballast. This surface was more than sturdy enough to let the printer complete its calibration process—and sturdy enough not to transfer the printer's every motion to our kid's room below, a boon for when I'm trying to print something after he has gone to bed.
The first-party Bambu apps for sending files to the printer are Bambu Handyand Bambu Studio. Handy works OK for sending ready-made models from MakerWorldand for monitoring prints once they've started. But I'll mostly be relaying my experience with Bambu Studio, a much more fully featured app. Neither app requires sign-in, at least not yet, but the path of least resistance is to sign into your printer and apps with the same account to enable easy communication and syncing.
Bambu Studio: A primer
Bambu Studio is what's known in the hobby as a "slicer," software that takes existing 3D models output by common CAD programsand converts them into a set of specific movement instructions that the printer can follow. Bambu Studio allows you to do some basic modification of existing models—cloning parts, resizing them, adding supports for overhanging bits that would otherwise droop down, and a few other functions—but it's primarily there for opening files, choosing a few settings, and sending them off to the printer to become tangible objects.
Bambu Studio isn't the most approachable application, but if you've made it this far, it shouldn't be totally beyond your comprehension. For first-time setup, you'll choose your model of printer, leave the filament settings as they are, and sign in if you want to use Bambu's cloud services. These sync printer settings and keep track of the models you save and download from MakerWorld, but a non-cloud LAN mode is available for the Bambu skeptics and privacy-conscious.
For any newbie, pretty much all you need to do is connect your printer, open a .3MF or .STL file you've downloaded from MakerWorld or elsewhere, select your filament from the drop-down menu, click "slice plate," and then click "print." Things like the default 0.4 mm nozzle size and Bambu's included Textured PEI Build Plate are generally already factored in, though you may need to double-check these selections when you open a file for the first time.
When you slice your build plate for the first time, the app will spit a pile of numbers back at you. There are two important ones for 3D printing neophytes to track. One is the "total filament" figure, which tells you how many grams of filament the printer will use to make your model. The second is the "total time" figure, which tells you how long the entire print will take from the first calibration steps to the end of the job.
Selecting your filament and/or temperature presets. If you have the Automatic Material System, this is also where you'll manage multicolor printing.
Andrew Cunningham
Selecting your filament and/or temperature presets. If you have the Automatic Material System, this is also where you'll manage multicolor printing.
Andrew Cunningham
The main way to tweak print quality is to adjust the height of the layers that the A1 lays down.
Andrew Cunningham
The main way to tweak print quality is to adjust the height of the layers that the A1 lays down.
Andrew Cunningham
Adding some additional infill can add some strength to prints, though 15 percent usually gives a decent amount of strength without overusing filament.
Andrew Cunningham
Adding some additional infill can add some strength to prints, though 15 percent usually gives a decent amount of strength without overusing filament.
Andrew Cunningham
The main way to tweak print quality is to adjust the height of the layers that the A1 lays down.
Andrew Cunningham
Adding some additional infill can add some strength to prints, though 15 percent usually gives a decent amount of strength without overusing filament.
Andrew Cunningham
For some prints, scaling them up or down a bit can make them fit your needs better.
Andrew Cunningham
For items that are small enough, you can print a few at once using the clone function. For filaments with a gradient, this also makes the gradient effect more pronounced.
Andrew Cunningham
Bambu Studio estimates the amount of filament you'll use and the amount of time a print will take. Filament usually comes in 1 kg spools.
Andrew Cunningham
When selecting filament, people who stick to Bambu's first-party spools will have the easiest time, since optimal settings are already programmed into the app. But I've had almost zero trouble with the "generic" presets and the spools of generic Inland-branded filament I've bought from our local Micro Center, at least when sticking to PLA. But we'll dive deeper into plastics in part 2 of this series.
I won't pretend I'm skilled enough to do a deep dive on every single setting that Bambu Studio gives you access to, but here are a few of the odds and ends I've found most useful:
The "clone" function, accessed by right-clicking an object and clicking "clone." Useful if you'd like to fit several copies of an object on the build plate at once, especially if you're using a filament with a color gradient and you'd like to make the gradient effect more pronounced by spreading it out over a bunch of prints.
The "arrange all objects" function, the fourth button from the left under the "prepare" tab. Did you just clone a bunch of objects? Did you delete an individual object from a model because you didn't need to print that part? Bambu Studio will arrange everything on your build plate to optimize the use of space.
Layer height, located in the sidebar directly beneath "Process". Thicker layer heights do the opposite, slightly reducing the amount of time a model takes to print but preserving less detail.
Infill percentage and wall loops, located in the Strength tab beneath the "Process" sidebar item. For most everyday prints, you don't need to worry about messing with these settings much; the infill percentage determines the amount of your print's interior that's plastic and the part that's empty space. The number of wall loops determines how many layers the printer uses for the outside surface of the print, with more walls using more plastic but also adding a bit of extra strength and rigidity to functional prints that need it.
My first prints
A humble start: My very first print was a wall bracket for the remote for my office's ceiling fan.
Credit:
Andrew Cunningham
When given the opportunity to use a 3D printer, my mind went first to aggressively practical stuff—prints for organizing the odds and ends that eternally float around my office or desk.
When we moved into our current house, only one of the bedrooms had a ceiling fan installed. I put up remote-controlled ceiling fans in all the other bedrooms myself. And all those fans, except one, came with a wall-mounted caddy to hold the remote control. The first thing I decided to print was a wall-mounted holder for that remote control.
MakerWorld is just one of several resources for ready-made 3D-printable files, but the ease with which I found a Hampton Bay Ceiling Fan Remote Wall Mount is pretty representative of my experience so far. At this point in the life cycle of home 3D printing, if you can think about it and it's not a terrible idea, you can usually find someone out there who has made something close to what you're looking for.
I loaded up my black roll of PLA plastic—generally the cheapest, easiest-to-buy, easiest-to-work-with kind of 3D printer filament, though not always the best for prints that need more structural integrity—into the basic roll-holder that comes with the A1, downloaded that 3MF file, opened it in Bambu Studio, sliced the file, and hit print. It felt like there should have been extra steps in there somewhere. But that's all it took to kick the printer into action.
After a few minutes of warmup—by default, the A1 has a thorough pre-print setup process where it checks the levelness of the bed and tests the flow rate of your filament for a few minutes before it begins printing anything—the nozzle started laying plastic down on my build plate, and inside of an hour or so, I had my first 3D-printed object.
Print No. 2 was another wall bracket, this time for my gaming PC's gamepad and headset.
Credit:
Andrew Cunningham
It wears off a bit after you successfully execute a print, but I still haven't quite lost the feeling of magic of printing out a fully 3D object that comes off the plate and then just exists in space along with me and all the store-bought objects in my office.
The remote holder was, as I'd learn, a fairly simple print made under near-ideal conditions. But it was an easy success to start off with, and that success can help embolden you and draw you in, inviting more printing and more experimentation. And the more you experiment, the more you inevitably learn.
This time, I talked about what I learned about basic terminology and the different kinds of plastics most commonly used by home 3D printers. Next time, I'll talk about some of the pitfalls I ran into after my initial successes, what I learned about using Bambu Studio, what I've learned about fine-tuning settings to get good results, and a whole bunch of 3D-printable upgrades and mods available for the A1.
Andrew Cunningham
Senior Technology Reporter
Andrew Cunningham
Senior Technology Reporter
Andrew is a Senior Technology Reporter at Ars Technica, with a focus on consumer tech including computer hardware and in-depth reviews of operating systems like Windows and macOS. Andrew lives in Philadelphia and co-hosts a weekly book podcast called Overdue.
21 Comments
#what #learned #first #few #months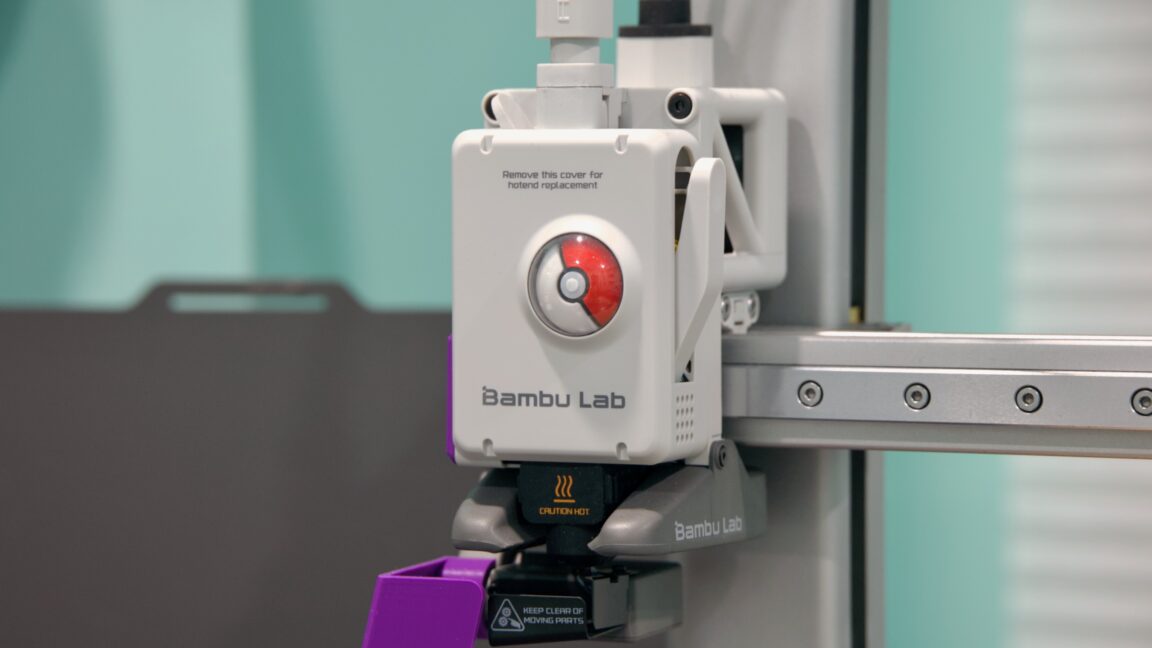
·32 Views