Daredevil – Born Again: Gong Myung Lee – Production VFX Supervisor
Interviews
Daredevil – Born Again: Gong Myung Lee – Production VFX Supervisor
By Vincent Frei - 15/05/2025
With over two decades of experience in visual effects, Gong Myung Lee started her career in 2003 and went on to work at renowned studios like Mr. X and Method Studios. She became part of the Marvel Studios team in 2022. Her credits include The Finest Hours, Deadpool 2, Triple Frontier, and The Changeling.
What is your background?
I started in VFX as a Lighting Technical Director and Compositor, which gave me a deep appreciation for how images work—light, depth, and how all the parts come together. From there, I moved into CG supervision and eventually into VFX supervision, working across features, commercials, and episodic projects.
I’ve worked both on the vendor side and in production. At facilities, I built and led teams and tackled creative challenges from inside the post pipeline. Shifting to the production side let me be involved earlier—helping shape decisions on set and ensuring VFX supports the storytelling from day one.
How did you get involved on this show?
I’d always hoped to work with Marvel on the production side, so when Jen Underdahl called me about this opportunity, I said yes immediately. I’ve been a fan of Daredevil for years—his internal conflict, his vulnerability, and the constant pull between justice and vengeance. And the fact that it was shooting entirely in New York made it even more exciting.
Daredevil: Born Again has a distinct visual style. How did you collaborate with the showrunner and directors to ensure that the VFX seamlessly fit within their creative vision?
From the start, it was clear this wasn’t going to be a typical superhero show. No lasers, no flying, no giant CG creatures. Daredevil is a street-level hero—he gets hurt, he bleeds, and he wrestles with morality and faith. The VFX had to reflect that same grounded humanity. Everything needed to feel physical, real, and restrained.
We worked closely with showrunner Dario Scardapane, directors Justin Benson and Aaron Moorhead, and Marvel creative executive Sana Amanat to define a visual language built around subtlety. The VFX weren’t there to impress—they were there to disappear into the world. We also pulled from key comic book imagery that Sana wanted to preserve—Daredevil crouched on a rooftop, his mid-air baton throws, the skyline behind him. Those became touchpoints for our design language.
Being involved from preproduction through delivery meant we could plan closely with every department—art, stunts, SFX, camera—so that VFX could step in where needed. We captured as much in camera as possible, using VFX for what couldn’t be achieved safely or practically. That ranged from invisible stitches to CG weapons, digi-doubles, and full digital builds.
Because we had multiple directors and DPs, VFX became a continuity backbone—carrying consistent design and tone across episodes. That applied to everything from the sensory visuals and BB Report graphics, to how Daredevil’s baton behaved from one fight to the next.
We also tracked the emotional and visual arc of the show. The intensity of violence escalates as the story deepens. In Episode 102, when Daredevil breaks a cop’s arm, we held back—the blood simply soaks through the sweater, staying grounded in realism. By Episode 109, when Fisk crushes Gallo’s head, the moment is fully on camera. That evolution was intentional.
To make it all sit inside the frame, we were rigorous with data acquisition. Every set was LiDAR scanned with photogrammetry, and effects-heavy scenes were supported with HDRIs, cyberscans, clean plates, and lens grids. The goal wasn’t just coverage—it was making sure our work belonged inside the photography.
Were there specific requests from the directors regarding the way VFX should enhance the realism and grittiness of the series, particularly in terms of lighting, camera movement, or fight choreography?
Absolutely. From the get-go, directors Justin Benson and Aaron Moorhead established a clear visual rulebook. Camera language was closely tied to character: Fisk’s scenes leaned into locked-off frames and symmetry, while Murdock’s were more handheld and reactive. Zooms were preferred over push-ins, and dutch angles were generally avoided. Even when VFX took over a shot—like a CG camera move—we stuck to those same principles to preserve the tone.
Our DP, Hillary Spera, shot on Alexa 35s using custom-tweaked anamorphic lenses, which created beautiful lens flares and optical distortions. We mapped those lenses and captured a full library of flare elements so that VFX could match them precisely. That look carried through to DI and helped define the show’s distinct texture.
Atmosphere—especially fog and wetdowns—was critical to the show’s look. It shaped lighting and grounded the environments. But in shots requiring CG or 2D elements, we often recreated matching FX atmosphere in post to ensure seamless interaction and integration into the plate.
Action followed the same grounded approach. Our Action Director and Supervising Stunt Coordinator, Philip Silvera, choreographed fights based on real-world combat logic, but with emotional weight built into the pacing—breath, exhaustion, impact. For digital takeovers, we started with mocap of stunt performances, then refined using video reference to match the actors’ specific movement and intention.
We didn’t shy away from gore either. The directive was clear: keep it grounded, but don’t pull punches. We referenced surgical and forensic material to guide the look of blood hits, wounds, and trauma. Practical prosthetics and squibs formed the base, with VFX adding layers—muscle tear, splatter, and dynamic blood flow—to heighten realism without drifting into stylization.
Photo credit: Giovanni Rufino
How did you choose the various vendors and split the work amongst them?
VFX is a team sport—and like any good team, you need to know your players and play to their strengths. Every facility brings something unique, and a big part of our early conversations was about assigning work based on where each vendor excels. It was about setting everyone up for success.
The best VFX comes from the artist’s eye and hand. That final 5%—the nuance and polish—is where the work really comes alive. So I looked for teams who not only had the technical chops but understood the tone of the show and cared deeply about the craft. When that alignment happens, the collaboration just works.
We planned the vendor split early, ensuring shared assets would work across facilities and that pipelines were compatible. The Third Floor handled previs, techviz, and postviz. LolaVFX supported early look development. RISE took on some of the most technically complex sequences—like the opening oner at Josie’s, digi-double transitions, and full environment builds. Folks VFX delivered rooftop environments, the finale apartment fight, and key continuity-heavy scenes. Ghost VFX handled the subway fight and Daredevil’s tunnel run, while Phosphene developed the sensory language and crafted bespoke moments like the blackout sequence and car comps. Soho VFX and Powerhouse VFX focused on fight choreography, weapon augmentation, and full-CG sequences. Cantina Creative created all in-world monitor graphics and interfaces. Anibrain, SDFX, and Base FX tackled difficult cleanups, split comps, and continuity patches. Dark Red Studios handled the BB Report design.
Scanable handled all LiDAR and cyberscans across our sets and cast—crucial for digi-double and environment work. And we also had an internal team dedicated to the more subtle sensory shots.
It was a true team effort, and the final result reflects the strength and dedication each vendor brought to the table.
Photo credit: Giovanni Rufino
The opening sequence is an incredibly complex oner action scene. Can you walk us through the planning and VFX techniques used to stitch everything together seamlessly?
This sequence was a massive effort across all departments, and for VFX, it was one of the most complex and rewarding challenges of the season. The scene begins with Daredevil and Bullseye crashing through the window of Josie’s Bar, moves into the back room, up through a stairway, and eventually emerges onto a rooftop. None of those locations existed together physically, so stitching them into one continuous action required close collaboration between stunts, camera, SFX, and VFX from day one.
Our stunt team, led by Philip Silvera, provided a detailed stuntviz that broke the choreography into stitchable beats, which became our foundation. Directors Justin Benson and Aaron Moorhead wanted the camera to feel intentional and fluid—no fast whips or chaotic edits—so every transition had to be precise. There was nowhere to hide a bad seam.
RISE led the VFX for the sequence, using a blend of techniques—2D wipes with foreground elements, bluescreen set extensions, FX smoke, and CG transitions—but the real connective tissue was in 3D. We LiDAR-scanned all key locations and rebuilt them in CG, allowing us to bridge multiple stages, extend environments, and support digi-double and FX work with accuracy. Stitching those spaces and action beats required careful spatial continuity and character animation. We used motion capture as the base for digital double work, then enhanced it with keyframed animation to preserve choreography and hit those iconic silhouettes that are signature to Daredevil and Bullseye.
The camera tilt moment—where we drop down to see Foggy on the street and then tilt back up to Daredevil and Bullseye—was a digital blend using a 2.5D street projection and a full-CG building facade. That allowed us to link two separate physical locations with one fluid camera move.
SFX, supervised by our SFX Coordinator Roy Savoy, handled all the glass breaks and practical sparks inside Josie’s, while Props took care of the breakaway items. Together, they gave us strong in-camera interaction points that VFX could build on. We layered in additional CG debris, neon signage, and more sparks to push the action further. The smoke and atmosphere—inside the bar and on the rooftop—were fully CG to allow precise interaction with digital characters, weapons, gore, and FX.
Everything—smoke, blood hits, atmosphere, digi-double transitions—had to feel cohesive and continuous. The real achievement was making the stitching and technical complexity disappear.
Given the mix of practical stunts and digital enhancements, what were the biggest challenges in maintaining continuity and realism throughout this oner?
One of the biggest challenges was maintaining character integrity—especially for Daredevil. Charlie brings such a specific physicality to the role that even under smoke or in silhouette, his movement reads clearly. Every digital double had to mirror that language—his timing, stance, and how he moves through space—so the audience never questioned the switch.
RISE used stunt mocap as the foundation for the digital doubles, then layered in character-specific adjustments to preserve that continuity. At the same time, we were building out full-CG environments to bridge shots, which meant matching textures, lighting, geometry, and camera lensing so that transitions were seamless.
Weapons were another layer. Daredevil’s baton, Bullseye’s firearms and knives—all were CG. In one sequence, Daredevil is stabbed by 17 blades, some of which he pulls out to fight back. We had to track each knife’s position, contact shadow, suit tear, and blood drip from shot to shot, which required full-body rotomation and progressive damage built into the suit asset. That also extended to the environment—any damage had to be tracked through the sequence.
Grounding the action was essential. Even when Daredevil lands from a rooftop with his grappling hook, it had to feel weighty. We added dust bursts, imperfect footfalls, and a bit of camera vibration to keep it visceral. In a sequence this seamless, every movement, every transition, every detail had to hold up. The illusion depended on total cohesion.
How did you approach the digital recreation of New York and Hell’s Kitchen to match the series’ darker, more grounded aesthetic?
New York is more than a backdrop—it’s part of Daredevil’s identity. So our approach to the digital builds had to feel authentic, responsive, and emotionally aligned with the show’s tone.
We LiDAR-scanned full city blocks, rooftops, and adjacent buildings, and captured tiled plates and HDRIs throughout the day to map real lighting conditions. This gave us a strong base to work from, while still allowing flexibility for framing and layout.
Folks VFX handled Matt’s rooftop in Episode 103, while RISE built the Josie’s rooftop and surrounding Hell’s Kitchen. Both spaces had to feel true to the city—textured and believable. Even slight changes in building height or placement could shift the tone of the scene, so we were careful to maintain a balance between realism and composition.
Atmosphere was a defining element. We added fog, steam, wetdowns, reflections, and other city-layered effects—like flickering windows and distant traffic—to give each environment weight and depth. These elements weren’t just aesthetic—they helped shape the lighting and made our digital spaces feel physically inhabited and consistent with the show’s tone.
Were there any key locations that had to be fully CG or heavily augmented with VFX? If so, what was the process of integrating them into the live-action footage?
Yes—several locations had to be fully CG or significantly augmented. Matt’s apartment rooftop in Williamsburg, the Hell’s Kitchen rooftop at Josie’s, the fire escape sequence, Hector’s subway fight, Daredevil’s tunnel run, and the sensory bank vault scene all required extensive digital builds.
We began by scanning or photographing real-world references, scouted in collaboration with our creative team, Production Designer and DP. Using LiDAR and photogrammetry, we rebuilt those environments in 3D, preserving scale and lighting using on-set HDRIs. Foreground and midground buildings were modeled in high detail, and wherever windows were visible, we added interior structure and depth to maintain a sense of life beyond the facade.
In some cases, city regulations or safety concerns limited our ability to fully scan practical locations. For sequences like the subway platform and the tunnel Daredevil runs through in Episode 106, we used partial scans and reference photography to reconstruct and extend those environments in CG—including the train asset and the tunnel’s structural continuity.
In Episode 105, the bank vault sensory sequence was shot on stage with only the real vault door present. Everything else—the spatial layout, dimensionality, and lighting—was designed in CG to reflect the show’s established visual language for Daredevil’s heightened perception.
Not exactly an environment extension, but for the “blackout” sequences in the finale, we had to heavily modify our plates to feel like a true city-wide outage. That involved blending day-for-night captures with digital relighting in comp. In Times Square, we replaced the practical LED content with FISK delivering his New Year’s Eve speech. And to build tension, we expanded Fisk’s motorcade in Red Hook using CG mocaped taskforce units and Humvees.
Whether it was a full CG build or a heavy plate modification, every element was grounded back into the photography through precise matchmove, consistent lighting cues, and environmental reference.
Marvel projects often have a mix of on-location and green-screen work. What techniques did you use to ensure a seamless blend between real and digital environments?
The key was always grounding the visual effects in something tangible. Whether we were working on a full bluescreen stage or extending a rooftop, the more real-world reference we could gather, the more seamlessly the VFX would sit in the frame.
On Daredevil: Born Again, we captured practical plates and tiled reference footage wherever possible—especially throughout New York. That gave us a photographic base to match to. From there, we built every VFX setup on solid acquisition: LiDAR scans, high-res photogrammetry, HDRIs for lighting, and texture capture from all angles.
We avoided relying entirely on CG whenever we could. Even in the most complex shots, we tried to include a practical element—whether it was a foreground prop, atmospheric haze, wet-downs or interactive lighting on set. Those physical components gave us something real to build off and helped the audience feel rooted in the scene.
For environments, 2.5D extensions were backed by real plates, and full-CG builds were constructed from real-world geometry and surface data. Even on bluescreen stages, we lit to match the look and feel of the corresponding practical scenes to preserve continuity. We also worked closely with DI to carry through the grade and environmental treatment. That final layer ensured the shot didn’t just blend technically—but emotionally felt like it belonged to the same world.
Daredevil is known for its brutal, grounded action sequences. How did VFX help enhance the stunt work while keeping it as practical as possible?
Our approach was always practical-first. If it could be done in camera—blood hits, breakaways, physical impacts—we shot it that way. Then VFX would step in to enhance what was already there and bring the moment to full fidelity.
For example, blood on faces and inside mouths was done practically using SFX makeup. But for continuity or when choreography called for additional impact, we added digital blood sprays, squibs, or drips—carefully tracked to the performance so they felt embedded, not layered on.
Our stunt team gave us strong reference across all key fight beats. We combined that with mocap when needed, especially in sequences that transitioned into digital doubles. Having that real-world base allowed us to maintain physicality and character intention throughout.
We also captured a library of flares and lens artifacts from our camera package, giving VFX the right visual language to match the look and feel of the photography—especially during close-quarters combat, where blood, smoke, and light moved dynamically through frame. It helped reinforce the tactile, in-camera aesthetic, even in fully augmented shots.
Were there any particular fight sequences that required extensive digital double work, and how did you ensure they remained indistinguishable from the real actors?
There were definitely moments where digi-doubles became essential—sometimes for safety, sometimes to maintain camera continuity, and sometimes because the physical environment couldn’t support the choreography as scripted. Sequences like Daredevil’s rooftop runs, tunnel chases, fire escape landings, grappling hook jumps, transitions within the oner, and background extensions to enhance Fisk’s task force all required digital double work at varying levels of complexity.
In every action scene, our approach was to ground the work in real-world performance. We captured motion for all key stunts and fight beats, and did detailed cyberscans of the main cast and their stunt doubles. That gave us accurate silhouettes, proportions, and suit detail—everything we needed to maintain visual continuity between live-action and CG.
While we didn’t use facial capture rigs or volume setups, Charlie Cox gave us highly expressive reference performances. His focused takes gave us insight into the intention behind each movement, which we either projected in 2.5D or matched in animation for the digi-double moments.
What really sold it was the integration. We were meticulous about matching HDRI lighting, lensing, atmosphere, and even subtle depth-of-field cues. Every digital element had to feel like it was captured on the same lens, in the same space, at the same time. That’s what kept the illusion seamless—even in full-CG moments.
Were there any memorable moments or scenes from the series that you found particularly rewarding or challenging to work on from a visual effects standpoint?
One that stands out is the rooftop environment for Matt’s apartment. It was our first major VFX presentation to the directors and creatives, and it set the tone for what our digital New York would become. It needed to feel cinematic, atmospheric, and emotionally grounded. We scanned and photographed rooftops around Williamsburg, then composited those elements into a custom layout tailored for our scenes. But even subtle changes—like shifting a building’s height or shape—could disrupt the familiarity of the skyline. It’s like adjusting features on a face: subtle, but if it’s wrong, you feel it. Getting that balance right, while still supporting our camera moves and blocking, was incredibly rewarding.
Another favorite was developing Daredevil’s sensory language, which we crafted in close collaboration with Phosphene. It evolved throughout the season, but the most ambitious moment was what we called the “Grande Sensory” shot—when Daredevil tunes into a specific sound and his world expands perceptually. We shot it using a custom three-camera rig: a spherical zoom lens in the center, flanked by wide primes. As we pushed in while zooming out—a zolly—we stitched the feeds together at the widest focal length into an approximately 230° field of view, with extra image gathering on the sides. Simultaneously, the aspect ratio expands. Once Daredevil locks onto the target sound, we “unstitch” back to the center camera and compress the aspect ratio as we zoom in for a clean finish. The transitions are subtle but emotionally impactful—designed to be felt, not noticed.
We also had the “petite sensory” moments—simpler, analog-feeling visual cues that suggest Daredevil is focusing in. These used optical lens tricks, subtle distortions, and flares—many based on practical elements we shot—so even the heightened perception moments felt grounded in the show’s visual language.
And finally, the Gallo head-crush—one of the season’s most graphic shots. The practical prosthetic was impressive, but once pressure was applied, it deformed in a way that didn’t mimic human anatomy. We scanned both the actor and prosthetic for a partial digital takeover—replacing areas with CG muscle, bone, blood, and facial details. Folks VFX handled this sequence and absolutely nailed it, especially the vascular bursts in the eyes and the blink just before the fade.
Looking back on the project, what aspects of the visual effects are you most proud of?
There’s a lot to be proud of, but what stands out most to me is the consistency of tone and craft—how the visual effects supported the grounded, emotional feel of the show without ever pulling focus. Even in sequences that were technically complex—like the rooftop builds, sensory moments, or the opening oner—we always came back to story. The VFX weren’t about spectacle. They were about precision, intention, and integration.
I’m also proud of the continuity we maintained across multiple directors and DPs. Visual effects became a steady thread—carrying design language, violence levels, atmosphere, and choreography from one episode to the next.
Most of all, I’m proud that the work feels cohesive. Whether it’s a subtle stitch or a full CG shot, it never distracts. It feels lived in—part of the world, not outside of it.
How long have you worked on this show?
I was on from November 2022 through November 2024, so a full two years. Being involved early really helped—we had time to plan things properly, make smart choices, and stay ahead instead of playing catch-up.
What’s the VFX shot count?
We delivered 1,380 final shots in the official turnover cut.
What is your next project?
We’re already shooting Season 2 of Daredevil: Born Again, which has been exciting. Coming back with the same core team means there’s already a rhythm in place—we know how to work together, and that gives us room to push things further. We’re building on what we set up in Season 1, keeping the tone grounded, but also exploring new visual ideas and storytelling challenges. It’s great to be back in this world, with a chance to evolve it in new ways.
What are the four movies that gave you the passion for cinema?
There are many, but ones that come to mind immediately are The Godfather I & II, The Shining, In the Mood for Love, and Dune: Part One & Part Two.
A big thanks for your time.
WANT TO KNOW MORE?RISE: Dedicated page about Daredevil: Born Again on RISE website.
© Vincent Frei – The Art of VFX – 2025
#daredevil #born #again #gong #myungDaredevil – Born Again: Gong Myung Lee – Production VFX Supervisor
Interviews
Daredevil – Born Again: Gong Myung Lee – Production VFX Supervisor
By Vincent Frei - 15/05/2025
With over two decades of experience in visual effects, Gong Myung Lee started her career in 2003 and went on to work at renowned studios like Mr. X and Method Studios. She became part of the Marvel Studios team in 2022. Her credits include The Finest Hours, Deadpool 2, Triple Frontier, and The Changeling.
What is your background?
I started in VFX as a Lighting Technical Director and Compositor, which gave me a deep appreciation for how images work—light, depth, and how all the parts come together. From there, I moved into CG supervision and eventually into VFX supervision, working across features, commercials, and episodic projects.
I’ve worked both on the vendor side and in production. At facilities, I built and led teams and tackled creative challenges from inside the post pipeline. Shifting to the production side let me be involved earlier—helping shape decisions on set and ensuring VFX supports the storytelling from day one.
How did you get involved on this show?
I’d always hoped to work with Marvel on the production side, so when Jen Underdahl called me about this opportunity, I said yes immediately. I’ve been a fan of Daredevil for years—his internal conflict, his vulnerability, and the constant pull between justice and vengeance. And the fact that it was shooting entirely in New York made it even more exciting.
Daredevil: Born Again has a distinct visual style. How did you collaborate with the showrunner and directors to ensure that the VFX seamlessly fit within their creative vision?
From the start, it was clear this wasn’t going to be a typical superhero show. No lasers, no flying, no giant CG creatures. Daredevil is a street-level hero—he gets hurt, he bleeds, and he wrestles with morality and faith. The VFX had to reflect that same grounded humanity. Everything needed to feel physical, real, and restrained.
We worked closely with showrunner Dario Scardapane, directors Justin Benson and Aaron Moorhead, and Marvel creative executive Sana Amanat to define a visual language built around subtlety. The VFX weren’t there to impress—they were there to disappear into the world. We also pulled from key comic book imagery that Sana wanted to preserve—Daredevil crouched on a rooftop, his mid-air baton throws, the skyline behind him. Those became touchpoints for our design language.
Being involved from preproduction through delivery meant we could plan closely with every department—art, stunts, SFX, camera—so that VFX could step in where needed. We captured as much in camera as possible, using VFX for what couldn’t be achieved safely or practically. That ranged from invisible stitches to CG weapons, digi-doubles, and full digital builds.
Because we had multiple directors and DPs, VFX became a continuity backbone—carrying consistent design and tone across episodes. That applied to everything from the sensory visuals and BB Report graphics, to how Daredevil’s baton behaved from one fight to the next.
We also tracked the emotional and visual arc of the show. The intensity of violence escalates as the story deepens. In Episode 102, when Daredevil breaks a cop’s arm, we held back—the blood simply soaks through the sweater, staying grounded in realism. By Episode 109, when Fisk crushes Gallo’s head, the moment is fully on camera. That evolution was intentional.
To make it all sit inside the frame, we were rigorous with data acquisition. Every set was LiDAR scanned with photogrammetry, and effects-heavy scenes were supported with HDRIs, cyberscans, clean plates, and lens grids. The goal wasn’t just coverage—it was making sure our work belonged inside the photography.
Were there specific requests from the directors regarding the way VFX should enhance the realism and grittiness of the series, particularly in terms of lighting, camera movement, or fight choreography?
Absolutely. From the get-go, directors Justin Benson and Aaron Moorhead established a clear visual rulebook. Camera language was closely tied to character: Fisk’s scenes leaned into locked-off frames and symmetry, while Murdock’s were more handheld and reactive. Zooms were preferred over push-ins, and dutch angles were generally avoided. Even when VFX took over a shot—like a CG camera move—we stuck to those same principles to preserve the tone.
Our DP, Hillary Spera, shot on Alexa 35s using custom-tweaked anamorphic lenses, which created beautiful lens flares and optical distortions. We mapped those lenses and captured a full library of flare elements so that VFX could match them precisely. That look carried through to DI and helped define the show’s distinct texture.
Atmosphere—especially fog and wetdowns—was critical to the show’s look. It shaped lighting and grounded the environments. But in shots requiring CG or 2D elements, we often recreated matching FX atmosphere in post to ensure seamless interaction and integration into the plate.
Action followed the same grounded approach. Our Action Director and Supervising Stunt Coordinator, Philip Silvera, choreographed fights based on real-world combat logic, but with emotional weight built into the pacing—breath, exhaustion, impact. For digital takeovers, we started with mocap of stunt performances, then refined using video reference to match the actors’ specific movement and intention.
We didn’t shy away from gore either. The directive was clear: keep it grounded, but don’t pull punches. We referenced surgical and forensic material to guide the look of blood hits, wounds, and trauma. Practical prosthetics and squibs formed the base, with VFX adding layers—muscle tear, splatter, and dynamic blood flow—to heighten realism without drifting into stylization.
Photo credit: Giovanni Rufino
How did you choose the various vendors and split the work amongst them?
VFX is a team sport—and like any good team, you need to know your players and play to their strengths. Every facility brings something unique, and a big part of our early conversations was about assigning work based on where each vendor excels. It was about setting everyone up for success.
The best VFX comes from the artist’s eye and hand. That final 5%—the nuance and polish—is where the work really comes alive. So I looked for teams who not only had the technical chops but understood the tone of the show and cared deeply about the craft. When that alignment happens, the collaboration just works.
We planned the vendor split early, ensuring shared assets would work across facilities and that pipelines were compatible. The Third Floor handled previs, techviz, and postviz. LolaVFX supported early look development. RISE took on some of the most technically complex sequences—like the opening oner at Josie’s, digi-double transitions, and full environment builds. Folks VFX delivered rooftop environments, the finale apartment fight, and key continuity-heavy scenes. Ghost VFX handled the subway fight and Daredevil’s tunnel run, while Phosphene developed the sensory language and crafted bespoke moments like the blackout sequence and car comps. Soho VFX and Powerhouse VFX focused on fight choreography, weapon augmentation, and full-CG sequences. Cantina Creative created all in-world monitor graphics and interfaces. Anibrain, SDFX, and Base FX tackled difficult cleanups, split comps, and continuity patches. Dark Red Studios handled the BB Report design.
Scanable handled all LiDAR and cyberscans across our sets and cast—crucial for digi-double and environment work. And we also had an internal team dedicated to the more subtle sensory shots.
It was a true team effort, and the final result reflects the strength and dedication each vendor brought to the table.
Photo credit: Giovanni Rufino
The opening sequence is an incredibly complex oner action scene. Can you walk us through the planning and VFX techniques used to stitch everything together seamlessly?
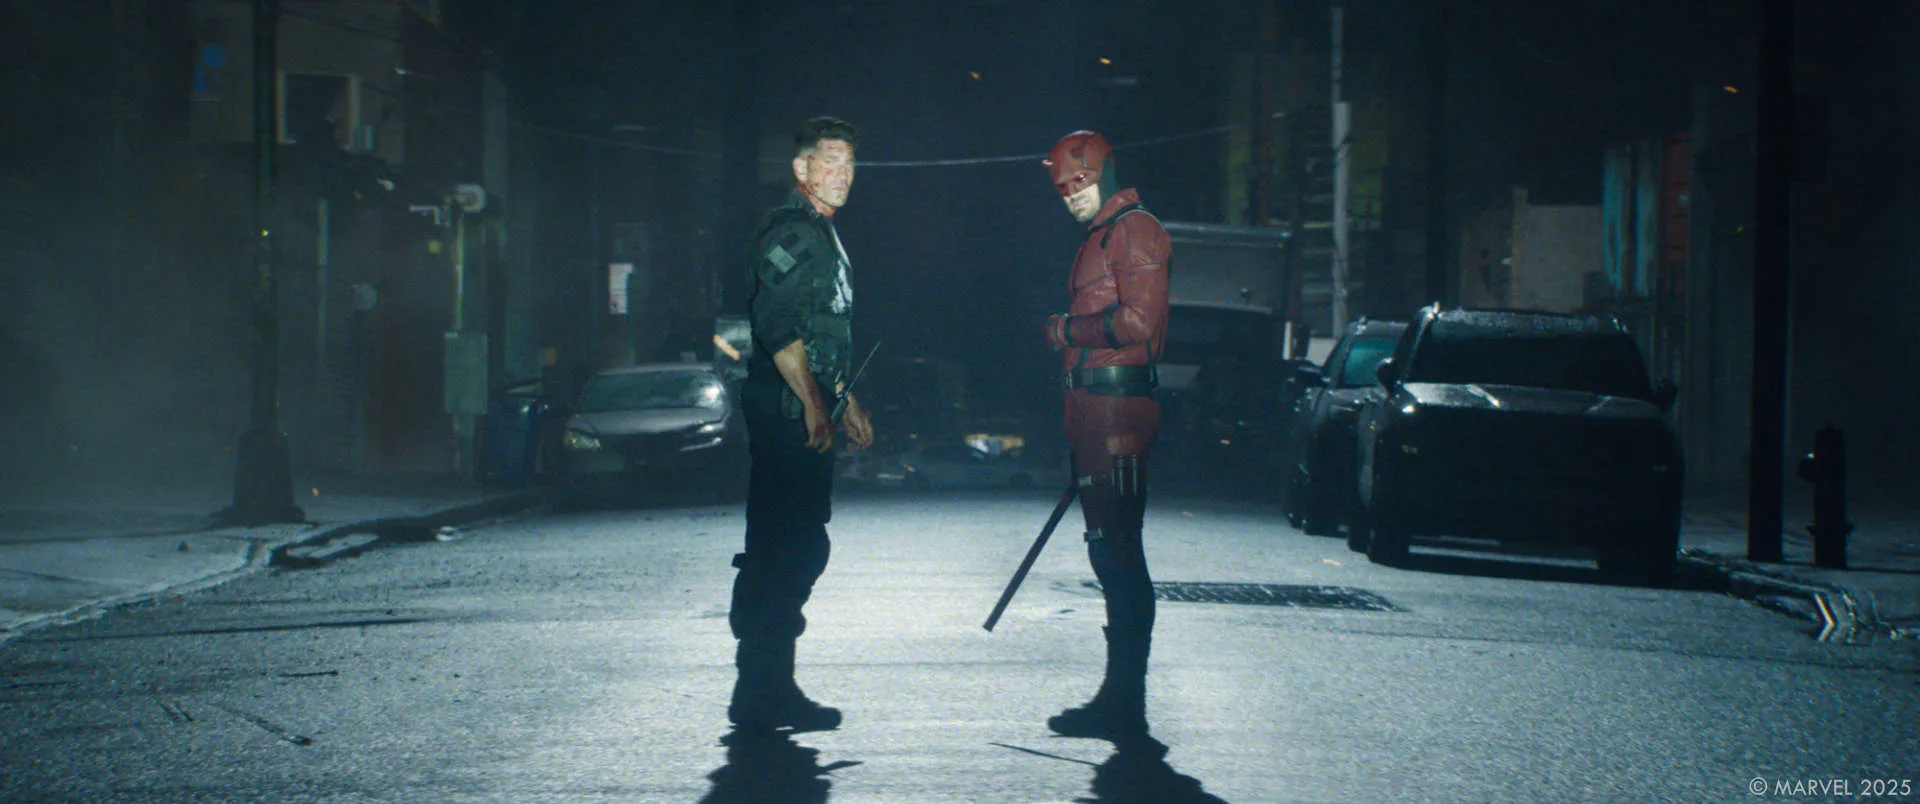
This sequence was a massive effort across all departments, and for VFX, it was one of the most complex and rewarding challenges of the season. The scene begins with Daredevil and Bullseye crashing through the window of Josie’s Bar, moves into the back room, up through a stairway, and eventually emerges onto a rooftop. None of those locations existed together physically, so stitching them into one continuous action required close collaboration between stunts, camera, SFX, and VFX from day one.
Our stunt team, led by Philip Silvera, provided a detailed stuntviz that broke the choreography into stitchable beats, which became our foundation. Directors Justin Benson and Aaron Moorhead wanted the camera to feel intentional and fluid—no fast whips or chaotic edits—so every transition had to be precise. There was nowhere to hide a bad seam.
RISE led the VFX for the sequence, using a blend of techniques—2D wipes with foreground elements, bluescreen set extensions, FX smoke, and CG transitions—but the real connective tissue was in 3D. We LiDAR-scanned all key locations and rebuilt them in CG, allowing us to bridge multiple stages, extend environments, and support digi-double and FX work with accuracy. Stitching those spaces and action beats required careful spatial continuity and character animation. We used motion capture as the base for digital double work, then enhanced it with keyframed animation to preserve choreography and hit those iconic silhouettes that are signature to Daredevil and Bullseye.
The camera tilt moment—where we drop down to see Foggy on the street and then tilt back up to Daredevil and Bullseye—was a digital blend using a 2.5D street projection and a full-CG building facade. That allowed us to link two separate physical locations with one fluid camera move.
SFX, supervised by our SFX Coordinator Roy Savoy, handled all the glass breaks and practical sparks inside Josie’s, while Props took care of the breakaway items. Together, they gave us strong in-camera interaction points that VFX could build on. We layered in additional CG debris, neon signage, and more sparks to push the action further. The smoke and atmosphere—inside the bar and on the rooftop—were fully CG to allow precise interaction with digital characters, weapons, gore, and FX.
Everything—smoke, blood hits, atmosphere, digi-double transitions—had to feel cohesive and continuous. The real achievement was making the stitching and technical complexity disappear.
Given the mix of practical stunts and digital enhancements, what were the biggest challenges in maintaining continuity and realism throughout this oner?
One of the biggest challenges was maintaining character integrity—especially for Daredevil. Charlie brings such a specific physicality to the role that even under smoke or in silhouette, his movement reads clearly. Every digital double had to mirror that language—his timing, stance, and how he moves through space—so the audience never questioned the switch.
RISE used stunt mocap as the foundation for the digital doubles, then layered in character-specific adjustments to preserve that continuity. At the same time, we were building out full-CG environments to bridge shots, which meant matching textures, lighting, geometry, and camera lensing so that transitions were seamless.
Weapons were another layer. Daredevil’s baton, Bullseye’s firearms and knives—all were CG. In one sequence, Daredevil is stabbed by 17 blades, some of which he pulls out to fight back. We had to track each knife’s position, contact shadow, suit tear, and blood drip from shot to shot, which required full-body rotomation and progressive damage built into the suit asset. That also extended to the environment—any damage had to be tracked through the sequence.
Grounding the action was essential. Even when Daredevil lands from a rooftop with his grappling hook, it had to feel weighty. We added dust bursts, imperfect footfalls, and a bit of camera vibration to keep it visceral. In a sequence this seamless, every movement, every transition, every detail had to hold up. The illusion depended on total cohesion.
How did you approach the digital recreation of New York and Hell’s Kitchen to match the series’ darker, more grounded aesthetic?
New York is more than a backdrop—it’s part of Daredevil’s identity. So our approach to the digital builds had to feel authentic, responsive, and emotionally aligned with the show’s tone.
We LiDAR-scanned full city blocks, rooftops, and adjacent buildings, and captured tiled plates and HDRIs throughout the day to map real lighting conditions. This gave us a strong base to work from, while still allowing flexibility for framing and layout.
Folks VFX handled Matt’s rooftop in Episode 103, while RISE built the Josie’s rooftop and surrounding Hell’s Kitchen. Both spaces had to feel true to the city—textured and believable. Even slight changes in building height or placement could shift the tone of the scene, so we were careful to maintain a balance between realism and composition.
Atmosphere was a defining element. We added fog, steam, wetdowns, reflections, and other city-layered effects—like flickering windows and distant traffic—to give each environment weight and depth. These elements weren’t just aesthetic—they helped shape the lighting and made our digital spaces feel physically inhabited and consistent with the show’s tone.
Were there any key locations that had to be fully CG or heavily augmented with VFX? If so, what was the process of integrating them into the live-action footage?
Yes—several locations had to be fully CG or significantly augmented. Matt’s apartment rooftop in Williamsburg, the Hell’s Kitchen rooftop at Josie’s, the fire escape sequence, Hector’s subway fight, Daredevil’s tunnel run, and the sensory bank vault scene all required extensive digital builds.
We began by scanning or photographing real-world references, scouted in collaboration with our creative team, Production Designer and DP. Using LiDAR and photogrammetry, we rebuilt those environments in 3D, preserving scale and lighting using on-set HDRIs. Foreground and midground buildings were modeled in high detail, and wherever windows were visible, we added interior structure and depth to maintain a sense of life beyond the facade.
In some cases, city regulations or safety concerns limited our ability to fully scan practical locations. For sequences like the subway platform and the tunnel Daredevil runs through in Episode 106, we used partial scans and reference photography to reconstruct and extend those environments in CG—including the train asset and the tunnel’s structural continuity.
In Episode 105, the bank vault sensory sequence was shot on stage with only the real vault door present. Everything else—the spatial layout, dimensionality, and lighting—was designed in CG to reflect the show’s established visual language for Daredevil’s heightened perception.
Not exactly an environment extension, but for the “blackout” sequences in the finale, we had to heavily modify our plates to feel like a true city-wide outage. That involved blending day-for-night captures with digital relighting in comp. In Times Square, we replaced the practical LED content with FISK delivering his New Year’s Eve speech. And to build tension, we expanded Fisk’s motorcade in Red Hook using CG mocaped taskforce units and Humvees.
Whether it was a full CG build or a heavy plate modification, every element was grounded back into the photography through precise matchmove, consistent lighting cues, and environmental reference.
Marvel projects often have a mix of on-location and green-screen work. What techniques did you use to ensure a seamless blend between real and digital environments?
The key was always grounding the visual effects in something tangible. Whether we were working on a full bluescreen stage or extending a rooftop, the more real-world reference we could gather, the more seamlessly the VFX would sit in the frame.
On Daredevil: Born Again, we captured practical plates and tiled reference footage wherever possible—especially throughout New York. That gave us a photographic base to match to. From there, we built every VFX setup on solid acquisition: LiDAR scans, high-res photogrammetry, HDRIs for lighting, and texture capture from all angles.
We avoided relying entirely on CG whenever we could. Even in the most complex shots, we tried to include a practical element—whether it was a foreground prop, atmospheric haze, wet-downs or interactive lighting on set. Those physical components gave us something real to build off and helped the audience feel rooted in the scene.
For environments, 2.5D extensions were backed by real plates, and full-CG builds were constructed from real-world geometry and surface data. Even on bluescreen stages, we lit to match the look and feel of the corresponding practical scenes to preserve continuity. We also worked closely with DI to carry through the grade and environmental treatment. That final layer ensured the shot didn’t just blend technically—but emotionally felt like it belonged to the same world.
Daredevil is known for its brutal, grounded action sequences. How did VFX help enhance the stunt work while keeping it as practical as possible?
Our approach was always practical-first. If it could be done in camera—blood hits, breakaways, physical impacts—we shot it that way. Then VFX would step in to enhance what was already there and bring the moment to full fidelity.
For example, blood on faces and inside mouths was done practically using SFX makeup. But for continuity or when choreography called for additional impact, we added digital blood sprays, squibs, or drips—carefully tracked to the performance so they felt embedded, not layered on.
Our stunt team gave us strong reference across all key fight beats. We combined that with mocap when needed, especially in sequences that transitioned into digital doubles. Having that real-world base allowed us to maintain physicality and character intention throughout.
We also captured a library of flares and lens artifacts from our camera package, giving VFX the right visual language to match the look and feel of the photography—especially during close-quarters combat, where blood, smoke, and light moved dynamically through frame. It helped reinforce the tactile, in-camera aesthetic, even in fully augmented shots.
Were there any particular fight sequences that required extensive digital double work, and how did you ensure they remained indistinguishable from the real actors?
There were definitely moments where digi-doubles became essential—sometimes for safety, sometimes to maintain camera continuity, and sometimes because the physical environment couldn’t support the choreography as scripted. Sequences like Daredevil’s rooftop runs, tunnel chases, fire escape landings, grappling hook jumps, transitions within the oner, and background extensions to enhance Fisk’s task force all required digital double work at varying levels of complexity.
In every action scene, our approach was to ground the work in real-world performance. We captured motion for all key stunts and fight beats, and did detailed cyberscans of the main cast and their stunt doubles. That gave us accurate silhouettes, proportions, and suit detail—everything we needed to maintain visual continuity between live-action and CG.
While we didn’t use facial capture rigs or volume setups, Charlie Cox gave us highly expressive reference performances. His focused takes gave us insight into the intention behind each movement, which we either projected in 2.5D or matched in animation for the digi-double moments.
What really sold it was the integration. We were meticulous about matching HDRI lighting, lensing, atmosphere, and even subtle depth-of-field cues. Every digital element had to feel like it was captured on the same lens, in the same space, at the same time. That’s what kept the illusion seamless—even in full-CG moments.
Were there any memorable moments or scenes from the series that you found particularly rewarding or challenging to work on from a visual effects standpoint?
One that stands out is the rooftop environment for Matt’s apartment. It was our first major VFX presentation to the directors and creatives, and it set the tone for what our digital New York would become. It needed to feel cinematic, atmospheric, and emotionally grounded. We scanned and photographed rooftops around Williamsburg, then composited those elements into a custom layout tailored for our scenes. But even subtle changes—like shifting a building’s height or shape—could disrupt the familiarity of the skyline. It’s like adjusting features on a face: subtle, but if it’s wrong, you feel it. Getting that balance right, while still supporting our camera moves and blocking, was incredibly rewarding.
Another favorite was developing Daredevil’s sensory language, which we crafted in close collaboration with Phosphene. It evolved throughout the season, but the most ambitious moment was what we called the “Grande Sensory” shot—when Daredevil tunes into a specific sound and his world expands perceptually. We shot it using a custom three-camera rig: a spherical zoom lens in the center, flanked by wide primes. As we pushed in while zooming out—a zolly—we stitched the feeds together at the widest focal length into an approximately 230° field of view, with extra image gathering on the sides. Simultaneously, the aspect ratio expands. Once Daredevil locks onto the target sound, we “unstitch” back to the center camera and compress the aspect ratio as we zoom in for a clean finish. The transitions are subtle but emotionally impactful—designed to be felt, not noticed.
We also had the “petite sensory” moments—simpler, analog-feeling visual cues that suggest Daredevil is focusing in. These used optical lens tricks, subtle distortions, and flares—many based on practical elements we shot—so even the heightened perception moments felt grounded in the show’s visual language.
And finally, the Gallo head-crush—one of the season’s most graphic shots. The practical prosthetic was impressive, but once pressure was applied, it deformed in a way that didn’t mimic human anatomy. We scanned both the actor and prosthetic for a partial digital takeover—replacing areas with CG muscle, bone, blood, and facial details. Folks VFX handled this sequence and absolutely nailed it, especially the vascular bursts in the eyes and the blink just before the fade.
Looking back on the project, what aspects of the visual effects are you most proud of?
There’s a lot to be proud of, but what stands out most to me is the consistency of tone and craft—how the visual effects supported the grounded, emotional feel of the show without ever pulling focus. Even in sequences that were technically complex—like the rooftop builds, sensory moments, or the opening oner—we always came back to story. The VFX weren’t about spectacle. They were about precision, intention, and integration.
I’m also proud of the continuity we maintained across multiple directors and DPs. Visual effects became a steady thread—carrying design language, violence levels, atmosphere, and choreography from one episode to the next.
Most of all, I’m proud that the work feels cohesive. Whether it’s a subtle stitch or a full CG shot, it never distracts. It feels lived in—part of the world, not outside of it.
How long have you worked on this show?
I was on from November 2022 through November 2024, so a full two years. Being involved early really helped—we had time to plan things properly, make smart choices, and stay ahead instead of playing catch-up.
What’s the VFX shot count?
We delivered 1,380 final shots in the official turnover cut.
What is your next project?
We’re already shooting Season 2 of Daredevil: Born Again, which has been exciting. Coming back with the same core team means there’s already a rhythm in place—we know how to work together, and that gives us room to push things further. We’re building on what we set up in Season 1, keeping the tone grounded, but also exploring new visual ideas and storytelling challenges. It’s great to be back in this world, with a chance to evolve it in new ways.
What are the four movies that gave you the passion for cinema?
There are many, but ones that come to mind immediately are The Godfather I & II, The Shining, In the Mood for Love, and Dune: Part One & Part Two.
A big thanks for your time.
WANT TO KNOW MORE?RISE: Dedicated page about Daredevil: Born Again on RISE website.
© Vincent Frei – The Art of VFX – 2025
#daredevil #born #again #gong #myung